1
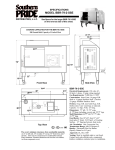
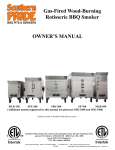
MODELS SC-100 & SC-200
OWNERS INSTRUCTION MANUAL
5003 Meadowland Pky. - MARION, ILLINOIS 62959
PHONE: 618-997-9348 FAX: 618-993-5960 SALES: 800-851-8180
www.southern-pride.com [email protected] [email protected]
SERVICE: 800-437-2679 SERVICE FAX: 618-993-0378 [email protected]
*** CONGRATULATIONS ***
In selecting SOUTHERN PRIDE, you have chosen the finest, most advanced, and fully
automatic smoker / oven available. With us, ”It’s A Matter Of Pride”.
Please read this INSTRUCTION MANUAL carefully prior to installation and operation.
Proper installation, operation, and cleaning are essential for your satisfaction and safe
operation.
KEEP THIS MANUAL FOR REFERENCE
TABLE OF CONTENTS
Page
Safety Information ......................................................................................................... 2
Oven Controls & Features ........................................................................................... 3
Operating Instructions ................................................................................................... 5
Cleaning Instructions ..................................................................................................... 6
Digital Controler Programing ........................................................................................ 7
Electrical Instructions .................................................................................................... 9
SC-100 Wiring Diagrams ............................................................................................ 10
SC-200 Wiring Diagrams ............................................................................................ 11
Installation Instructions ............................................................................................... 12
Parts List ...................................................................................................................... 13
Warranty .......................................................................................................................15
1
SAFETY INFORMATION
1. Be sure all untrained employees, who may operate this oven, are
instructed on the proper operation and safety information prior to working
with this oven.
2. Oven surfaces are HOT when oven is in operation. Proper utensils and
protective gear should be used with this appliance.
3. Oven cleaners can be HAZARDOUS. Read and follow all labeled
instructions.
4. The frame of the oven MUST be electrically grounded at all times. See
“Electrical Instructions” in this manual. FAILURE TO GROUND THIS
UNIT MAY RESULT IN AN ELECTRICAL SHOCK.
5. Do not remove the service compartment access panel unless power to the
oven is OFF.
6. Do not allow unqualified personnel to perform service work. To do so
will VOID WARRANTY and could be hazardous.
7. CAUTION: Ashes removed from ovens equipped with smoker should
be extinguished immediately with water.
8. Daily cleaning is extremely important to insure FIRE SAFETY and
FOOD SAFETY.
2
OVEN CONTROLS & FEATURES
1. Control Thermostat on Manual Models - Adjustable temperature setting (100-325o F)
with off position. Maintains the desired oven temperature by controlling the main heat element.
2. Main Power Switch on Manual Models - (red lamp) Activates the convection fan and
supplies power for the control thermostat.
3. Smoker Switch on Manual Models - (amber lamp) Activates the smoker element. The smoker
switch can activate the smoker even if the main power switch is off, allowing the operator the option
to cold smoke product.
4. Digital Roast & Hold Control - Programmable (325 degrees F) with off position. Maintains
the desired oven temperature by controlling the main heat element, convection fan and smoker
element.
5. Drip Pan - Slides out on rails located under the oven, should be emptied after each cooking.
6. Flue Damper (SC-200 Only) - Has an adjustable slide which allows the operator to regulate
the amount of smoke retained in the oven.
7. Control Panel Cover - Houses the SC-200 convection fan motor and all electrical components.
8. Food Racks - SC-200 has 5- 18” x 26” while the SC-100 has 4 - 17 x 17 3/4” nickel chrome
plated wire food racks that slide out for easy loading and unloading of product.
9. Casters - For ease of moving the oven, the front casters are locking.
10. Side Channels (SC-200 Only) - Acts as an air channel to direct air flow in the oven, and has
the slides for the food racks. Easily removable for cleaning.
11. Smoker Chip Box - Load with wood chips to smoke product. To fill or empty the box, slide
it off of the element bracket.
12. Blower Wheel & Fan Shroud (SC-200 Only) - Main element and blower wheel cover can be
removed for cleaning. Blower wheel located behind the fan shroud, circulates heat and smoke inside
the oven.
3
2.
1.
3.
7.
12.
4.
5.
6.
7.
12.
10.
8.
11.
5.
4
9.
OPERATING INSTRUCTIONS
WARNING - The element cover and both side channels must be in place
before loading or operating all of the Smoke Chef ovens!
Loading the product:
1. The SC-100-SM oven is equipped with “four”- 17” x 17 3/4” food racks for the loading of
food products. The SC-200-SM convection oven is equipped with “five”- 18” x 26” food racks
for the loading of food products.
The racks slide in and out for easy loading and unloading. Sheet pans may be used instead of the
food racks in the SC-200-SM.
Lay the product directly on the food racks. Flat items such as ribs, pork chops, half chickens, etc.
can be loaded on each shelf. Larger items, depending on size, may require the removal of every
other food rack.
2. The drip pan should be emptied and slid into place under the oven. If the drip pan is not in
place, grease will drip onto the floor under the oven.
If the product is to be smoked:
3. Slide the chip box off the element bracket, ( CAUTION: This box is HOT when the oven has
been in operation ) load wood chips in the box, close the lid and slide the box onto the element
bracket. Note: The flavor and amount of smoke generated can vary with the type and amount of
hardwood chips used.
To start cook cycle:
4. Adjust the flue damper in the SC-200-SM (attached to the outlet of the flue pipe, located on
the top right back corner of the oven). This will control the amount of smoke retained in the
oven. Closing the damper will increase the amount of smoke retained in the oven; opening it will
decrease the amount of smoke.
5. Manual Controls: Turn the main power switch on, set the control thermostat to the desired
cooking temperature, and turn the smoker switch on.
Digital Controls: See Digital Control Operations on Page 8.
When cook cycle is complete:
6. Manual Controls: If the product is to be held in the oven, turn the control thermostat down to
the desired hold temperature and turn “off” the smoker switch. The oven will hold the product
at the set temperature.
Digital Controls: Hold cycle is pre-programed. See Digital Control Operations on Page 8.
Note: Open the oven door for a few minutes to get the oven down to the hold temperature quickly.
7. Manual Controls: If holding the product is not desired, turn off the main power and the
smoker switch, remove the chip box, and extinguish the wood chips with water. Properly dispose
of the ashes. (CAUTION: This box will be HOT. Use protective gear.)
Digital Controls: Follow Manual Control procedure above.
8. Unload the food product and dispose of the grease drippings in the drip pan.
5
CLEANING INSTRUCTIONS
Oven should be cleaned daily to remove any grease or carbon deposits.
Poor cleaning habits can be both a food and fire hazard.
Mild dish detergents will remove most of the grease on all the surfaces of either oven. For areas
with build up that cannot be removed with soapy water, use conventional oven cleaners.
CAUTION: Always wear protective clothing and eyewear when using
oven cleaners. Read labeled directions and warnings.
On the SC-200-SM, the area above heating element cover on top of the inside can be cleaned by
removing the front element cover. Remove the two (2) 5/16 bolts. Let the front drop down and
then pull straight out to remove.
AFTER CLEANING, THE COVER MUST BE REINSTALLED
BEFORE OPERATING OVEN.
Clean the outside of either oven with commercial stainless steel cleaners and polishes.
NEVER use any abrasive scrub pads on the outside of the oven.
SC-200-SM with Manual Controls
6
SC-200-SM DIGITAL CONTROL OPERATING INSTRUCTIONS
To Program a menu:
The menu consists of a cook temperature, cook time, hold temperature, and CHIPS which turns
the smoker on or off for the menu.
1. Control must be in the “IDLE” mode. If the control
is “OFF” a press of any button will bring the control
back to “IDLE
2. PRESS the cook temp button, (the actual cook temperature will appear
in the display): PRESS the up/down buttons to obtain the desired cook
temperature.
3. PRESS the cook time button, (tinE 1 will appear in
the display): PRESS the up/down buttons to obtain the
desired cook time.
4. PRESS the hold temp button, (HtEnP will appear in the LED display):
PRESS the up/down buttons to obtain the desired hold temp. If a hold temp
is not desired: PRESS the down button until “OFF” is displayed in the LED.
Programming the menu is complete:
5. To start the menu, PRESS the start/stop button one time. “CHIPS” will
appear in the LED display. Two actions are possible, a touch to the up button
will start the menu with the wood chip smoker “ON” or a touch to the down
button will start the menu with the wood chip smoker “OFF”. The control
will begin the menu.
6. To pause the menu, press the start/stop button; to resume the menu, press the start,/stop again.
7. To cancel or stop a menu, press and hold the start/stop button until “IDLE” shows in the LED.
When cook cycle is complete:
8. Two actions are possible after the cook time expires. If a hold temperature
was programmed into the menu, then the control will sound an audible alarm
momentarily, and “Hold” will appear in the LED display. The length of time
the control has been in the hold mode, and the word “Hold” will be displayed
alternately in the LED display. The control will maintain the hold temperature
until the start/stop button is depressed to “END” the menu, and bring the
control to the “IDLE” mode.
If the hold temperature was programmed to “OFF” then “END” will be
displayed on the LED, and an audible alarm will sound continuously until the
start/stop button is depressed, to end the menu, and bring the control to the
“IDLE” mode.
7
13. The control should be in the “IDLE”mode. (The main heater
element, convection fan motor, and the smoker will be off).
14. If the smoker was used for the menu, remove the chip box
extinguish the wood chips with water and properly dispose of the
ashes, CAUTION! This box will be HOT use protective gear.
15. Unload the food product and properly dispose of the grease drippings in the drip pan.
16. When the control has been in the “IDLE” mode for five minutes, without a touch to any
button, it will go to “OFF”. A press of any button will bring the control back to “IDLE”
OPERATING A SC-200-SM DIGITAL CONTROL WITH MEAT PROBE
This oven is programmed to cook one of two ways.
1. Timed Cook - Cook to a set oven temperature using time to control the length of the cook cycle.
2. Internal Temperature of Product Cook - Cook with a set oven temperature until the internal
temperature of the product reaches the temperature that the meat probe is set for.
To choose to cook by time the control has to be set P-off.
1. With the control in idle press the up button, the display will read either P-on or P-off, one press
of the up button will change the setting, choose P-off.
IdlE
P
P
ON
2. There is a three second pause until the control returns
to idle and then a menu can be programmed.
O FF
IdlE
3. Use the instructions on the control panel of the
Smoke Chef to program a menu.
P
ON
To choose to cook to an internal product temperature
using the meat probe the control has to be set P-on.
1. With the control in idle press the up button, the display will read either
P-on or P-off, on press of the up button will change the setting, choose P-on.
IdlE
2. There is a three second pause until
the control returns to idle and then a
menu can be programmed.
P
OFF
P
ON
3. Make sure the meat probe is plugged into the socket inside the oven and then insert the probe
into the meat. The tip of the probe should be down into the thicker part of the meat and make
sure it isn’t against a bone.
4. Use the instructions on the control panel of the Smoke Chef to program a menu. The cook time
button will now be used to select the temperature that the meat probe will cook the product to.
8
ELECTRICAL
SC-100-SM
SC-200-SM
120 Volts AC
60 Hz
Single Phase
20 AMP wiring required
120/208 or 120/240 Volts AC
60 Hz
Single Phase
30 AMP wiring required
NOTE:
MAKE SURE THE SUPPLY POWER CORRESPONDS WITH
VOLTAGE SPECIFIED ON THE NAMEPLATE OF YOUR OVEN.
WARNING: CHASSIS MUST BE GROUNDED TO PREVENT POSSIBLE
SHOCK HAZARD.
WARRANTY IS VOID IF THE OVEN IS CONNECTED TO ANY VOLTAGE
OTHER THAN THOSE SPECIFIED ABOVE.
ELECTRICAL INSTRUCTIONS
1. The SC-100-SM is shipped with a plug and wire suitable for a 20 amp hookup.
2. The SC-200-SM is shipped with no wire and plug due to varients in 208/240
volt plugs. Your electrician must provide 10 AWG stranded four wire cable and
appropriate plug for hookup in your situation.
3. Power must be OFF during installation of the SC-200 wire and plug.
4. Electrical service is provided at the terminal block on the SC-200, located behind
the access panel which is in the lower left corner of the back of the oven.
5. After connecting the proper electrical service, test the voltage at the terminal
block with a voltmeter.
6. If power is correct, replace the access panel and power up the oven.
9
SC-100-SM Manual Wiring Diagram
10
SC-200-SM Manual
Wiring Diagram
SC-200-SM Digital
Wiring Diagram
11
INSTALLATION INSTRUCTIONS
1. Read and follow the electrical requirements on the previous page to insure proper connection
of the oven.
2. While this oven is in operation, it will emit smoke from the vent stack or from the meat door
opening if it is opened. Adequate space should be allowed for this oven under a hood to insure
that the hood will capture the smoke.
3. Venting for the SC-100-SM and the SC-200-SM must be with an exhaust ventilation system
in accordance with the National Fire Protection Association standard, NFPA 96. Local codes
may supercede this recommendation. Check local building codes prior to installation.
12
PARTS LIST
1.
1046
1046-1
1066
SC-200 - 240 VOLT MAIN HEATING ELEMENT
SC-200 - 208 VOLT MAIN HEATING ELEMENT
SC-100 - MAIN ELEMENT ( Two Required)
2.
2173
FLUE DAMPER
3.
2422S
SC-200 - SMOKE CHEF BLOWER WHEEL
4
1040SC
SC-200 - CONVECTION FAN MOTOR
5.
2417
SC-200 - 6” COOLING FAN BLADE
6.
1090E
(OPTIONAL) 100-325 DEGREE DIGITAL CONTROL
7.
1098
(OPTIONAL) S.S. THERMOCOUPLE FOR DIGITAL CONTROL
8.
1259-2
THERMOSTAT CONTROL KNOB
9.
1006
STANDARD, CONTROL THERMOSTAT
10.
9172
340 DEGREE HIGH LIMIT SWITCH
11.
0573
MAIN POWER SWITCH (Manual Control Only)
12.
0574
SMOKER SWITCH (Manual Control Only)
13.
1045
CONTACTOR, FOR MAIN ELEMENT
14.
1008
1010
SC-100 - TERMINAL BLOCK
SC-200 - TERMINAL BLOCK
15.
2116
DOOR HINGE
16.
2438
DOOR LATCH AND CATCH
17.
1049
300 WATT SMOKER ELEMENT
18.
4178
4179
4179G
SC-100 - MEAT DOOR GASKET
SC-200 - MEAT DOOR GASKET
SC-200 - NEW MEAT DOOR GASKET (Around Door Opening)
13
1040SC
CONVECTION FAN MOTOR
1
4
1091
1045
CONTACTOR
PARTS LIST
BACK
9172
FRONT
340˚ HIGH LIMIT SWITCH
DRAINPAN
2423 FOR SC-200
LOOSERACK
2417
6” COOLING FAN BLADE
1254 FOR SC-200
40 AMP MAIN ELEMENT RELAY
-
1098
1094
1092
2422S
FLUE DAMPER
3
TEMPERATURE PROBE
SOCKET
4
10 AMP SMOKER OR CONTROL RELAY
3
BLOWER WHEEL
DOOR LATCH AND CATCH
2438
2173
0573
RED-MAIN POWER SWITCH
0574
AMBER-SMOKER SWITCH
1259-2
1089
S.S. THERMOCOUPLE FOR 1006 CONTROL
1046
1006
STANDARD CONTROL THEMOSTAT
1046-1
GROUND
120 V
NEUTRAL
L2
208,240 V.
L1
240 VOLT MAIN HEATING ELEMENT
1010
TERMINAL BLOCK SC-200
RED
WHITE
BLACK
208 VOLT MAIN HEATING ELEMENT
THERMOSTAT CONTROL KNOB
9830
WOOD CHIP BOX
4179G
MEAT DOOR GASKET
14
2
S.S. THERMOCOUPLE FOR 1090 DIGITAL CONTROL
8 :8
8:∞
88
1090E
OVEN CONTROL
DOOR HINGE
2116
1
TEMPERATURE PROBE
1093
1049
300 WATT SMOKER ELEMENT
2
ONE YEAR LIMITED WARRANTY
(CONSULT FACTORY FOR DETAILS)
90 DAY LABOR WARRANTY (PRE AUTHORIZED)
Southern Pride guarantees all new equipment of its manufacture to be free of defects in material and factory
workmanship for a period of one year provided that the equipment is installed in the Continental United States,
Alaska, or Hawaii and operated according to the Owner’s Manual while located at the original address of installation,
the warranty registration card has been completed and returned to the factory within fifteen (15) days after installation
and a start-up has been preformed by an authorized service agent.
Southern Pride’s obligation under this warranty is limited to one of the following options with the option applicable
to be selected by Southern Pride at the sole discretion of Southern Pride.
1. Owner to return part, freight PREPAID. Southern Pride is to repair at own expense if defective, and ship part
back to owner freight collect.
2. Southern Pride to furnish replacement part, freight collect, without requesting return of the defective part.
3. Southern Pride to furnish replacement part, freight collect, in exchange for return of the defective part, freight
collect.
Under certain circumstances Southern Pride will reimburse owner for limited labor costs in replacing parts during a
period of not more than ninety (90) days after installation, (provided that work is prior authorized and confirmed
by Southern Pride’s Service Manager.)
Because Southern Pride does not and cannot control the owner’s installation, use and maintenance of equipment
manufactured by Southern Pride, this warranty does not cover: any equipment installed improperly; any equipment
calibrated afterstart-up and acceptance; any component disassembled in the field; damaged due to improper cleaning,
i.e. burner (hosing or “watering down” machines will cause electrical failures not covered by warranty); blown fuses,
light bulbs, gaskets,electric elements and accessory components not installed or manufactured by Southern Pride.
Shipping damage mustbe reported to the carrier and is not covered under this warranty.
Southern Pride will not be liable for damage as a result of improper installation, misuse, abuse, alteration of original
design, incorrect voltage, unauthorized service, or breakage of fragile items, Southern Pride will not be liable for
any loss or consequential damage or expense accruing directly or indirectly from the use of equipment covered by
this warranty including any production or product losses or other damages which may occur as a result of equipment
malfunction or failure. This warranty does not cover cooking performance, which is a function of food types, textures,
temperatures and other variables chosen by the owner and over which Southern Pride has no control. The effect of
corrosion, fire and normal wear on the equipment or component parts is not covered by this warranty. This warranty
does not apply to damage caused by accident or to damage caused by the negligence of the owner and the employees
of the owner or to damaged caused by lightning generated electrical current or any other Act of God whatsoever.
This warranty does not apply to any equipment bearing a serial number which has been tampered with or altered.
This warranty is exclusive and is in lieu of all other warranties, express or implied, including any implied warranty or
merchantability or fitness for particular purpose, each of which is hereby expressly disclaimed, the remedies described
above are exclusive and in no event shall Southern Pride be liable for special, consequential or incidental damages for
the breach or delay in performance of warranty.
TERMS AND CONDITIONS
For purposes of definition and interpretation, the term “Seller” as used herein refers to Southern Pride and the term
“Buyer” refers to the originator of a specific purchase order to Southern Pride.
Possession of a price list does not necessarily constitute an offer to sell by Southern Pride. Prices and specifications
are subject to change without notice. All items will be invoiced at prices in effect at time of shipment. Equipment
prices do not include federal, state, city or local taxes which may apply and all sales are subject thereto. No order,
whether written or oral, shall result in a contact, unless it is accepted and acknowledged in writing by Seller at
Seller’s office in Marion, Illinois.
Shipping weights are approximate and all prices are quoted F.O.B. Marion, Illinois. All “common carrier” shipped
equipment shall be domestic crated; all others shall be uncrated and subject to delivery charge per zone chart. Any
equipment held for shipment upon Buyer’s request beyond the delivery date specified on original purchase order
will be due and payable within terms and will result in storage charges.
Delivery estimates are figured from date written orders are received and accepted by Seller. Seller will meet Buyer’s
delivery request as nearly as possible, but does not guarantee shipment nor delivery on any particular date. Seller
reserves right to ship merchandise via any responsible carrier. Seller’s responsibility ceases upon acceptance by
carrier. Buyer is expected to examine contents of shipments and immediately report any damage to carrier authorities.
Payment terms shall be 30% deposit with order; balance prior to delivery unless otherwise agreed in writing by Seller.
Returns of any merchandise may not be made without Seller’s written approval, prior to return. Seller shall impose
a 20% restocking charge for handling of any returns. All cancellations must be in writing. Cancellations are also
subject to a 20% fee.
15
Printed 10/25/06