1
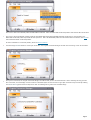
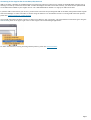
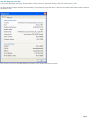
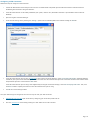
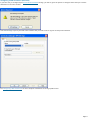
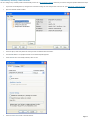
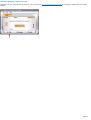
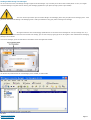
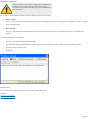
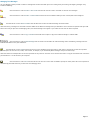
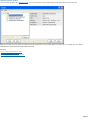
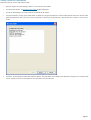
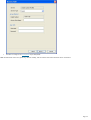
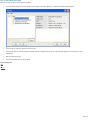
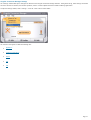
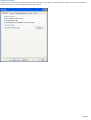
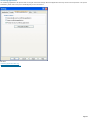
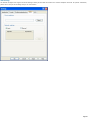
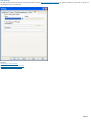
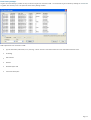
Introduction Welcome to the world of wireless connectivity and thank you for choosing Cingular as your service provider. Within this User Guide, you will find the information that you need to connect to your Email, the Internet, and even your corporate intranet using the Cingular Connection Manager software. Page 1 The Cingular Connection Manager Cingular Connection Manager simplifies access to Cingular's wireless data network. With Cingular Connection Manager, there are no confusing configuration options and no complex network jargon. We have designed this for you and hope that you enjoy your experience. Cingular Connection Manager is more than just a data connectivity tool. It also integrates with your existing VPN software, allows you to send and receive Text Messages and even provides you the ability to create custom connection profiles. Page 2 Main Window The main interface for establishing GSM (cellular, PCS) data connections is shown below. Click on an area of interest for more information. This window provides available network connection information, connected/disconnected status, and access to various controls and components of the Cingular Connection Manager software. Page 3 How to Connect to The Cingular EDGE/GPRS/UMTS Network 1. If the GSM connection window is not already displayed, select the GSM tab on the main window. The Cingular Connection Manager software will search for available GSM networks. Once an available network has been detected, you will see the Ready to Connect screen (as shown below): If the main application window is not visible, it may be minimized to appear only in the system tray. To access the Cingular Connection Manager, click on the Cingular Connection Manager icon shown in the system tray (bottom-right corner of your screen). The application window will remember its previous state and, after clicking the Cingular Connection Manager icon, you may see may appear in the "Mini-Bar" view as shown: If you have not yet inserted your EDGE/GPRS card, the Cingular Connection Manager will indicate "No Wireless Device" in the main display area as shown below: 2. Under the Connec t Using option, choose the connection profile that you would like to use to connect. Page 4 Your service comes with a default profile for EDGE/GPRS Accelerated . Note: the EDGE/GPRS Accelerated profile is also used for UMTS connections. 3. Your service comes with default network profiles for both EDGE/GPRS Accelerated and EDGE/GPRS Non-Accelerated. In most situations, the EDGE/GPRS Accelerated profile will provide the best experience. Note: the EDGE/GPRS profiles are also used for UMTS connections. Click here for more information about accelerated profiles. For more information on connection profiles, please see Network Profiles. 4. Click the orange Connec t button to create your connection. The Cingular Connection Manager will show the "Connecting" screen as seen below. 5. Once you are connected, the Cingular Connection Manager will indicate that you are connected maintain a timer measuring how long you have been connected, as well as display real-time counters of estimated bytes sent and received. A log of past connections may be found by choosing the Connec tion Log option under the Help menu. Note: Actual billing will be greater than estimated usage. Page 5 You can launch your VPN either by pressing the VPN button whenever there is a connection OR by configuring Connection Manager to automatically launch your VPN upon connection. See How to Automatically Launch a VPN Connection for more information. Page 6 Connecting to the Cingular GSM Circuit Data (CSD) Network GSM Circuit Data is available as an additional dial-up connectivity option for when you are outside of the EDGE/GPRS coverage area or wanting to use dial-up connections such as RAS. To take advantage of the GSM Circuit Data network, you must have the optional GSM Circuit Data feature added to your Cingular service. Call 1-866-CINGULAR for details or to sign up for GSM Circuit Data. If you have GSM Circuit Data on your service, you will need to activate the preconfigured GSM Circuit Data (CSD) profiles within Cingular Connection M anager in order to be able to connect using the software. For information on how to creating GSM connection profiles, please see Creating a Profile for a GSM Network. Once a GSM /CSD profile has been created, to chose Circuit Data for your connection, just toggle between connection types using the Connect Using menu in the upper right corner of the Cingular Connection M anager application. For more information on creating and using network profiles, please see Network Profiles. Page 7 The GSM Diagnostics window To view information about your laptop, wireless modem, network connection, and session activity, select Tools>Netw ork Info > GSM. The Device window will appear providing useful information on your laptop PC and wireless device. Note that your mobile number (phone number) is listed on this window as well.. Click the Netw ork tab to be provided additional information on the network and connection session. Page 8 Virtual Private Networks Virtual Private Networks (VPN’s) are end-to-end, secure, private networks that can be accessed over a public backbone network (like the Internet) without compromising their privacy. Typically, they maintain their privacy by forming secure (encrypted) "tunnels" directly to the users who access them. Cingular Connection Manager software automatically recognizes supported VPN client software and associated profiles. Once a supported client is installed, all you need to do is choose the existing VPN software and profile (or designate another VPN software to use) from the VPN settings window. Page 9 Configuring a VPN Connection Follow these steps to configure a VPN connection: 1. Consult the administrator of the VPN you wish to access. The administrator will provide you with VPN client software and instructions for establishing VPN connections using that software. 2. If the VPN client software is not already installed on your system, install it now. (Microsoft's VPN client is pre-installed on most versions of Windows). 3. Open the Cingular Connection Manager. 4. Access the VPN settings tab by selecting the Settings… option from the Tools drop down menu and then clicking the V PN tab. 5. If the VPN client software you are using is supported by the Cingular Connection Manager, select Use ex isting V PN profile. Supported software installed on your system will be automatically detected. Just select the client software that you want to use from the Client menu and then select the profile that you want to use from the Profile menu. If the VPN client software you are using is NOT supported by the Cingular Connection Manager, select Use third party V PN c lient. Then, click the Brow se button to specify the location of the client software that you are using. 6. Click OK to exit the Settings window. Once your VPN settings are configured, there are two ways to start your VPN connection. Automatically start your VPN upon connection by configuring your connection profile to do so. One click manual launch of the VPN by pressing the “VPN” button on the main interface. Page 10 Configuring a VPN Connection (alternate) If you have not yet configured your Virtual Private Network settings, you will be given the option to configure them when you click the VPN button in the main window. Click VPN Settings to specify the VPN client software that you wish to use to log into virtual private networks. See Configuring a VPN Connection for more complete information on setting up VPN access. Page 11 Automatically launching a VPN connection You can configure any network profile to automatically connect to a Virtual Private Network whenever you connect using that profile. Follow these steps: 1. If you have not already done so, configure the connection settings for the VPN you wish to connect to. (see Configuring a VPN Connection). 2. Open the Network Profiles window. 3. In the left pane, select the profile for which you want to automate VPN connection. 4. Click the Edit button. The properties sheet for the selected profile appears. 5. If the General tab is not already selected, select it now. 6. Check the A uto Launc h box in the VPN section. Page 12 7. Click OK to exit the window. 8. Repeat steps 3 through 7 for any additional profiles that you want to auto-launch your VPN connection with. Page 13 Manually Launching a VPN Connection Whenever you are connected to the Internet, you can launch a pre-configured VPN connection by clicking the VPN button in the M ain Window. Page 14 Sending and Receiving Text Messages You can send and receive Text Messages through Cingular Connection Manager very much like you can do on most wireless phones. In fact, the Cingular Connection Manager integrates with the existing Text Messaging application on your phone (if using a phone as your modem). You never need to synchronize your Connection Manager Text Messaging client with your phone's text messaging client - what you see on the Connection Manager Text Messaging client is what you would see if using your phone to manage text messages. All Cingular customers with Text Messaging capable devices can send and receive messages for a low per message cost. Or, if you plan to send and receive more than the occasion text message, you can save money by signing up for one of Cingular’s more economical text messaging packages. Ask for details. To view text messages, press the SMS button at the bottom of the main application window: You will then be presented with the Text Messaging viewer window, as shown below: See also: Receiving Text Messages Sending Text Messages Page 15 Managing Text Messages Page 16 Sending Text Messages Connection Manager can send text messages when the application is in Ready to Connect mode or when the application is actively connected to a Cingular Wireless data service such as EDGE/GPRS or GSM-Circuit Data. The Cingular Connection Manager supports sending the following types of text messages: Mobile to Mobile: In the To… field you type the mobile number of the person you are sending a message to. For example: Enter “18155551212” in the To… field of the text messaging client. Mobile to Email: In the To… field you type the Email address of the person you are sending a message to. Your message will appear as a normal email to the recipient. To send an text message, do the following: 1. Click New in the main Text Messaging Client window. 2. Type the mobile number or email address of the person you wish to send a message to in the To field. (See picture below for example) 3. Type the message you wish to send. 4. Click Send. Did Y ou Know ? For your convenience, phone numbers can be stored in the included address book. See also: Receiving Text Messages Managing Text Messages Page 17 Receiving Text Messages Others can send you text messages from their mobile phone or PC. They will need to know your mobile number. Your friends and colleagues can even send you text messages from their PC by sending an email to your 10-digit wireless number @mobile.mycingular.com. For example 4045551212 @mobile.mycingular.com. If you are using a PC card, you can usually find your mobile number by looking under Tools > Network Info > GSM (select the Device tab). When you receive an text message, the text messaging indicator icon will be displayed on Cingular Connection M anager' s main window. To see your messages, simply click on the SMS button at the bottom right of the main window. Users employing the Connection M anager with Cingular Handsets will be subject to the connection limitations listed in Using Text M essaging with tethered cellular handsets. See also: Sending Text M essages M anaging Text M essages Page 18 Managing Text Messages The Text Messaging Client provides a number of management functions that allow you to save and organize you incoming and outgoing messages. They include the following: Click this button or select Folders > New Folder from the File menu to create a new folder in which to store messages. Click this button or select Folders > Delete Folder from the File menu to delete a folder you have created (and all the messages it contains). Click this button or select Move to Folder from the Edit menu to move the selected message to another folder. Note that moving a message from the Inbox to another folder will not delete the message from your GSM device. Since the Inbox is imported from your GSM device each time you open the Text Messaging Client, the moved message will re-appear in your Inbox the next time the client is opened. Click this button or select Copy to Folder from the Edit menu to place a copy of the selected message in another folder. Click this button or select Delete Message from the Action menu to delete the selected message. Note that deleting a message from the Inbox will also delete it from your GSM device! Click this button or select Load from the File menu to return all folders (except the Inbox) to their state at the time of the last save operation (see description for the Save Icon, below). This is useful, for example, if you accidentally delete messages that you wanted to keep. Note that neither the Load operation or the Save operation has any effect on the Inbox. This is because the Inbox is a copy of information that is stored on your GSM device. It is not stored on your computer. Click this button or select Save from the File menu to save the current state of all folders (except the Inbox). Note that a Save operation is automatically performed whenever you close the Text Messaging Client. Page 19 What is a Network Profile? Network Profiles are networks for which connection information has been stored for easy, "one click" access. Cingular has created some pre-defined profiles for you. You can also manually add profiles in the network profiles window. You must have a profile for each GSM network that you wish to connect to. For more information: Creating a Profile for a GSM network The Network Profiles window Page 20 Pre-defined Cingular Profiles Cingular Connection Manager is pre-configured with network profiles for accessing the Cingular GSM networks. The pre-configured Cingular Wireless GSM profiles allows you to connect to the Cingular EDGE/GPRS network any time you are within Cingular GSM coverage. EDGE/GPRS profiles are provided for accelerated and unaccelerated connections. You can also create other network profiles that will allow you to connect seamlessly to other access points that you typically use. Note: You cannot delete a pre-defined profile, but you can edit the settings on its General properties tab. See also: How to Create a GSM Network Profile How to automatically launch a VPN connection Page 21 Network Profiles window Use this window to add or edit a Network Profile. Click on a portion of the screen shot below for more information on a particular item. Note: You can also use the Up and Dow n buttons to change the priority of a given profile within a network type. For example, you can prioritize EDGE/GPRS Non-accelerated above EDGE/GPRS Accelerated. See also: How to create a GSM Network Profile How to remove a Network Profile How to change Network Profile properties Page 22 Creating a Profile for a GSM Network Follow these steps to create a GSM Network Profile. 1. Open the Cingular Connection Manager software. You will see the main window. 2. Click the Profiles button. The Network Profile window will now be displayed. 3. Click on the GSM heading in the list of profiles on the left side of the window. 4. Click the A dd button, to bring up the window below. It displays pre-configured profiles for a number of GSM networks. Select the network whose profile you would like to add. If you want to create a profile for a network that is not listed here, select the last item in the list, Create Custom Profile. 5. Click Nex t. The second page of GSM profile properties appears. This page allows you to configure the GSM-specific settings in the network profile. Click on a portion of the screen shot below for more information on a particular item: Page 23 6. Click Nex t to configure the IP Properties of your GSM profile. Note: All information such as encryption key, network visibility, and the network name will be saved for future connections. Page 24 How to Edit a Network Profile Follow these steps to edit an existing network Profile: 1. Click the Profiles button in the main window of the Cingular Connection Manager. The Network Profiles window appears. 2. In the left pane, select the network you wish to edit. 3. Click the Edit button. A tabbed interface showing all the user-editable settings of the selected profile appears (see links below for more information). 4. Make the desired changes. 5. Click the OK button when you are finished. Profile Editing Tabs GSM IP General Page 25 How to Remove a Network Profile Follow these steps to remove a network from the Network Profiles window: 1. Open the Cingular Connection Manager. You will see the Main Window. 2. Click the Profiles button. 3. The Network Profiles window will now be displayed. 4. Select the network that you want to remove from the list in the left pane of the window. 5. Click the Remove button. 6. Click Close to exit the Network Profiles Properties window. Page 26 Cingular Connection Manager Settings The "Settings" window allows you to configure the behavior of the Cingular Connection Manager software. Among other things, these settings control how the client connects to networks, the sounds it produces, when it retrieves updates and how it handles conflicting applications. To open the settings window, select “Settings…” from the “Tools” menu as shown below: The interface that appears includes the following tabs: Application Conflicting Applications Sounds VPN GSM Page 27 Application Settings The Application tab allows you to modify various general settings of the Cingular Connection M anager software. For specific information, please click on the part of the dialog that you are interested in. Page 28 Conflicting Applications The Conflicting Applications tab specifies how the Cingular Connection Manager deals with applications that may conflict with its operation. For specific information, please click on the part of the dialog that you are interested in. See also: Conflicting Applications Warning Re-enabling Conflicting Applications Page 29 GSM Settings The GSM tab configures the Cingular Connection Manager's ability to make data connections over wireless telephone networks. For specific information, please click on the part of the dialog that you are interested in. Page 30 Sounds The Sounds Tab allows you to instruct Cingular Connection Manager to play a sound when various events occur. It also allows you to specify the sounds that the connection software plays. For specific information, please click on the part of the dialog that you are interested in. Page 31 VPN Settings The VPN tab specifies how the Cingular Connection Manager accesses Virtual Private Networks (VPNs). For specific information, please click on the part of the dialog that you are interested in. See also: Configuring a VPN Connection Automatically launching a VPN connection Manually Launching a VPN Connection Page 32 Event History Manager Cingular Connection Manager provides an easy-to-reference log of each connection made. The Connection Log can be found by choosing the Connec tion Log option from the Help menu. This opens this Event History Manager window. Fields captured for each connection include: Type of information (Information, Error, Warning). Click on the icon in this field to show even more information about this event. Technology Date and time Duration Estimated bytes used Connection description Page 33 Event Detail Double-click on any entry in the Event History Manager window brings up the Event Detail window, where you are presented with even greater detail on the given connection. This additional detail may be helpful should customer support be working with you to troubleshoot a connection. Page 34 Filtering the Connection Log For your convenience, in the bottom left corner of the Event History Manager window, the connection Log summarizes the total number of connections, duration, and bytes used for all connections in the log. Connection Manager can even filter the viewed connections by Date, Technology and Type. Just select the desired options for filtering, and click Update. Click Clear Log to erase the currently logged events. Page 35 Application Timeout The Cingular Connection Manager software is licensed on a "rolling" basis. This means that your license will expire 120 days from the last time you connected to a Cingular Wireless network. When you are within 60 and 90 days of expiring, Cingular Connections Manager will remind you with a pop-up message. To re-license the software, all you need to do is connect to one of the Cingular Wireless networks. Page 36 Additional Support If you need additional assistance beyond what is provided in this User Guide, please call Cingular Technical Support at 1-866-490-2666. Please be prepared to answer the following questions: 1. 2. 3. What is the mobile number for your wireless device (mobile phone/PC card)? This information can be found by doing the following: a. Click Tools from the main window. b. Click Netw ork Information. c. Click GSM. d. Click Devic e. What version of the Cingular Connection Manager software are you using? This information can be found by doing the following: a. Click Help from the main window. b. Click A bout Cingular Connec tion Manager. What Operating System and Service Pack are you using? This information can be found by doing the following: a. Click Help from the main window. b. Click A bout Connec tion Manager. c. Click Sy stem Info. 4. What (if any) error message are you receiving? 5. What were you doing when the error message occurred/appeared? 6. What was your location when you were experiencing the problem (physical/street address or zip code)? Page 37 Application Launch Issues A pplic ation is not visible after launc h Cingular Connection Manager is designed to launch into the display state from which it was last exited. As such, it is possible that the Client will launch directly to its minimized state, causing the user to assume that it is not actually running. Resolution Look in the system tray for the signal icon. If that icon is present, double clicking it will display the main Connection Manager user interface. In addition, a right click on the signal icon in the system tray will raise a menu. The show item in this menu will have the same effect as the double click. Conflic ts w ith A dditional W ireless EDGE/GPRS Utilities Cingular Connection Manager may conflict with other wireless utilities that are running simultaneously, leading to erratic behavior of one or both applications. At launch, Cingular Connection Manager will automatically check for a set of known conflicts. If any of these applications are present, the user will be prompted to automatically shutdown these applications whenever Cingular Connection Manager is launched. The user will also have an opportunity to ignore this warning and/or instruct the application to skip this conflict check in the future. In some instances, a user will want to allow a conflicting application to continue to operate. Cingular Connec tion Manager automatic ally shuts dow n applic ations that a user requires Cingular Connection Manager can be set to automatically shutdown conflicting applications. Cingular Connection Manager can also be set to ignore or prompt the user about the presence of these applications. Select Tools > Settings and then choose the Conflicting Applications tab to change the default behavior of Cingular Connection Manager. Cingular Connec tion Manager never shuts dow n c onflic ting applic ations Cingular Connection Manager can also be set to ignore conflicting applications. If this is not the desired behavior, the user can change the default behavior of the Connection Manager by selecting Tools > Settings and then choosing the Conflicting Applications tab. Resolution To change this settings select Tools > Settings and then choose the Conflicting Applications tab to change the default behavior of Cingular Connection Manager. A uto launc hing of Connec tion Manager at Startup The Cingular Connection Manager installation can be setup to allow the Connection Manager to automatically launch when a computer boots up or when a new user logs into the machine. This may (or may not) be the desired functionality for the end user. Resolution The user can change this behavior of Cingular Connection Manager by selecting Tools>Settings and choosing the Advanced Settings tab. Select A uto start check (or uncheck) the box to automatically launch Cingular Connection Manager. Page 38 GSM Device Issues In some circumstances, Cingular Connection Manager will not be able to detect a user’s wireless card that is installed in the system. The following is a list of possible causes of this situation: Card Is Disabled EDGE/GPRS cards, like any other network adapter, can be disabled in the operating system. Connection Manager will indicate in the primary window whether a card is disabled. Resolution Users can enable an inserted EDGE/GPRS adapter by selecting File > Enable EDGE/GPRS A dapter. Likewise, an adapter can be disabled by selecting File > Disable EDGE/GPRS A dapter. This feature is valuable to any user who needs to turn off the adapter in certain situations such as travel on an airplane or in situations where low battery consumption is critical. Wireless cards can also be enabled or disabled under the Windows Network Connections Control Panel (also called Network and Dialup connections). Card is Func tioning Erratic ally If a supported card is not functioning as expected, it is possible that the card is improperly installed. Resolution If a supported card is functioning erratically, the card installation details can be verified as follows: 1. Right-click on My Computer, on your desktop or in the start menu depending on your operating system and configuration. 2. Left click Properties and then select Devic e Manager from the Hardware tab. 3. Search for Network Adapters. 4. If you do not see Netw ork A dapters, none of these adapters have been properly installed. 5. Click on the plus (+) sign next to Netw ork A dapters. 6. If you see a yellow circle with a black exclamation point, the card has been located by the system, but it is not properly installed. 7. If you see a red X , the card is broken. 8. Either flag indicates that the card will not support a network connection. If 4, 6, or 7, above are true, the device drivers will need to be reinstalled. Check the documentation that came with your wireless device for more information. Page 39 GSM Device Connection Errors When attempting to connect to either an EDGE or GPRS network, the following errors may be reported if the connection cannot be made. CCM Error Code 631 This error is typically seen if you disconnect or cancel the EDGE/GPRS connection prior to authentication. This is a user initiated error. Resolution Click on the Cancel button and wait for the CCM to display “Ready to Connect”. Then try again. CCM Error Code 679 This error is typically reported if the CCM has lost a carrier signal from the EDGE or GPRS network. Resolution Click on the Cancel button and wait for the CCM to display “Ready to Connect”. Then try again. CCM Error Code 691 This error is typically reported if the CCM has received an Authentication Error from the EDGE/GPRS network. Resolution Click on the Cancel button and wait for the CCM to display “Ready to Connect”. Then try again. CCM Error Code 630 This error is typically reported if the CCM has detected a hardware error in the GSM Device. Resolution Click on the Cancel button and wait for the CCM to display “Ready to Connect”. If this error continues to be displayed turn your computer off then on. CCM Error Code 718, 734 or 736 These errors are typically reported if a network connection cannot be established. This may be due to poor signal strength. Resolution Click on the Cancel button and wait for the CCM to display “Ready to Connect”. Then try again. CCM Error Code 635 or 744 These errors are typically reported if an unexpected error has occurred while connected to an EDGE or GPRS network. Page 40 Resolution Click on the Cancel button and wait for the CCM to display “Ready to Connect.” Page 41 Network Scanning Issues Cingular Connec tion Manager never finds available netw ork The EDGE/GPRS Cingular Connection Manager does not report available networks. The EDGE/GPRS Connection Manager does not indicate EDGE/GPRS support. Resolution In the above conditions either the SIM does not have data capabilities or no wireless data network is available. Verify with the provider that Data capabilities are enabled for your SIM. Cingular Connec tion Manager indic ates CSD (Circ uit Sw itc hed Data) not EDGE/GPRS The Cingular Connection Manager indicates that only CSD is available when you expect EDGE/GPRS data capabilities. Verify with your provider that either circuit switched data or packet data is configured for your SIM. Verify that Data connectivity is configured for your SIM. Verify the Connection profile is set appropriately for EDGE/GPRS EDGE/GPRS Cingular Connec tion Manager say s "Ready to Connec t", but fails to c onnec t The EDGE/GPRS Cingular Connection Manager allows a connection if the EDGE/GPRS device has associated to the EDGE/GPRS network. If the GPRS signal strength is to low the client will fail to connect and display "Ready to Connect" again. Page 42 Miscellaneous Issues W hat is the version of my GSM modem driver? Select tools > Network Information > GSM > Device. How do I determine if the Cingular Connec tion Manager is c onfigured c orrec tly to c onnec t to an EDGE/GPRS netw ork ? 1. Open the Network Profiles window. 2. Select the profile whose configuration you wish to verify. 3. Click the Edit button. 4. Verify that the fields displayed are correct. Can I have the Cingular Connec tion Manager play .w av files indic ating w hen I c onnec t to or lose a netw ork c onnec tion? Yes! Select the tools>settings and then click on the Sounds Tab. From this menu you can select two options: Select a sound to play once you connect to a network Select a sound to play if you lose your network connection Page 43