1
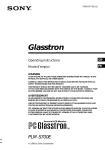
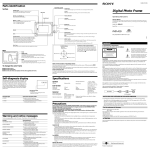
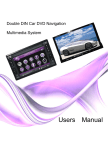
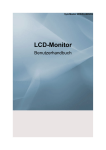
0-593-730-02 (1) Personal LCD Display Operating Instructions US WARNING YOUR FAILURE TO FOLLOW THESE OPERATING INSTRUCTIONS AND THE SUPPLIED IMPORTANT SAFEGUARDS MAY RESULT IN EYE FATIGUE, EYE DAMAGE, OR OTHER INJURY. CAREFULLY READ THESE OPERATING INSTRUCTIONS AND THE SUPPLIED IMPORTANT SAFEGUARDS, AND BECOME FAMILIAR WITH ALL SAFETY INSTRUCTIONS FOR THIS PRODUCT. THIS PRODUCT SHOULD NOT BE USED BY CHILDREN AGE 15 OR YOUNGER. IF YOU HAVE BEEN DIAGNOSED WITH EYE DISEASE OR EYE INJURY, CONSULT YOUR DOCTOR BEFORE USE AND DO NOT USE WITHOUT YOUR DOCTOR’S APPROVAL. LDI-100B/100BE © 1998 by Sony Corporation WARNING To prevent fire or shock hazard, do not expose the unit to rain or moisture. To avoid electrical shock, do not open the cabinet. Refer servicing to qualified personnel only. This symbol is intended to alert the user to the presence of uninsulated “dangerous voltage” within the product’s enclosure that may be of sufficient magnitude to constitute a risk of electric shock to persons. This symbol is intended to alert the user to the presence of important operating and maintenance (servicing) instructions in the literature accompanying the appliance. WARNING The AC power cord must be changed only at qualified service shop. The nameplate is located on the bottom of the power supply box. Use a commercially available AC plug adapter, if necessary, depending on the design of the wall outlet. CAUTION To prevent electric shock, match wide blade of plug to wide slot, fully insert. 2-US INFORMATION This equipment has been tested and found to comply with the limits for a Class B digital device, pursuant to Part 15 of the FCC Rules. These limits are designed to provide reasonable protection against harmful interference in a residential installation. This equipment generates, uses, and can radiate radio frequency energy and, if not installed and used in accordance with the instructions, may cause harmful interference to radio communications. However, there is no guarantee that interference will not occur in a particular installation. If this equipment does cause harmful interference to radio or television reception, which can be determined by turning the equipment off and on, the user is encouraged to try to correct the interference by one or more of the following measures: • Reorient or relocate the receiving antenna. • Increase the separation between the equipment and receiver. • Connect the equipment into an outlet on a circuit different from that to which the receiver is connected. • Consult the dealer or an experienced radio/TV technician for help. Declaration of Conformity Trade Name: SONY Model No.: LDI-100B/100BE Responsible Party: Sony Electronics Inc. Address: 1 Sony Drive, Park Ridge, NJ.07656 USA Telephone No.: 201-930-6970 This device complies with part 15 of the FCC Rules. Operation is subject to the following two conditions: (1) This device may not cause harmful interference, and (2) this device must accept any interference received, including interference that may cause undesired operation. You are cautioned that any changes or modifications not expressly approved in this manual could void your authority to operate this equipment. The shielded interface cable recommended in this manual must be used with this equipment in order to comply with the limits for a digital device pursuant to Subpart B of Part 15 of FCC Rules. For the customers in Canada CAUTION TO PREVENT ELECTRIC SHOCK, DO NOT USE THIS POLARIZED AC PLUG WITH AN EXTENSION CORD, RECEPTACLE OR OTHER OUTLET UNLESS THE BLADES CAN BE FULLY INSERTED TO PREVENT BLADE EXPOSURE. Pour les utilisateurs au Canada ATTENTION POUR PREVENIR LES CHOCS ELECTRIQUES, NE PAS UTILISER CETTE FICHE POLARISEE AVEC UN PROLONGATEUR, UNE PRISE DE COURANT OU UNE AUTRE SORITIE DE COURANT, SAUF SI LES LAMES PEUVENT ETRE INSEREES A FOND SANS EN LAISSER AUCUNE PARTIE A DECOUVERT. For the customers in Europe This product conforms with the following European Directives: 73/23/EEC, 93/68/EEC (Low Voltage Directive) 89/336/EEC, 92/31/EEC (EMC Directive) Precautions • One blade of the plug is wider than the other for safety purposes and will fit into the power outlet only one way. If you are unable to insert the plug fully into the outlet, contact your dealer. • You can use your Personal LCD Display in any country or area with the supplied AC power adapter within 100 V to 240 V AC, 50/60 Hz. Use a commercially available AC plug adapter [a], if necessary, depending on the design of the wall outlet [b]. AC-PLM3 [a] [b] WARNING: Using this unit at a voltage other than 120 V may require the use of a different line cord or attachment plug, or both. To reduce the risk of fire or electric shock, refer servicing to qualified service personnel. • After operating the unit with an AC power adapter, disconnect the ac power adapter from the wall outlet if the set is not to be used for an extended period of time. The POWER switch on the power supply box does not turn the ac adapter off. • The nameplate is located on the bottom exterior. • Picture/sound distortion may occur if the model LDI-100B/100BE is positioned in close proximity to any equipment emitting electromagnetic radiation. This equipment complies with EN55022 Class B for use in following areas: residential, business and light-industrial. The supplied interference cable must be used with the equipment in order to comply with the limits for a digital device pursuant to EN55022. Für die Kunden in Deutchland Diese Ausrüstung erfüllt die Europäischen EMC-Bestimmungen für die Verwendung in folgender/folgenden Umgebung(en): • Wohngegenden • Gewerbegebiete • Leichtindustriegebiete (Diese Ausrüstung erfüllt die Bestimmungen der Norm EN55022, Klasse B.) Owner’s record The model and serial numbers are located at the rear of the power supply box. Record these numbers in the spaces provided below. Refer to them whenever you call upon your Sony dealer regarding this product. Model No. Serial No. 3-US The Personal LCD Display is a brand-new concept in visual display Congratulations on your purchase of the Sony Personal LCD Display. The Personal LCD Display using current technology in small, lightweight visual displays, provides a television viewing experience similar to watching a 30inch television from a distance of approximately 4 feet in SVGA mode. (Viewing experience may differ according to individual perception.) Note on the LCD (Liquid Crystal Display) The LCD screen is made with high-precision technology. However, black points or bright points of light (red, blue, or green) may appear constantly on the LCD screen. This is not a malfunction. (Effective dots: more than 99.999%) The Personal LCD Display creates an image through two separate liquid crystal displays, in close proximity to your eyes. To insure your safe use of the Personal LCD Display, please become familiar with its basic operations, including proper fitting instructions, and be aware of any symptoms of eye fatigue or other discomfort you may experience. WARNING YOUR FAILURE TO FOLLOW THESE OPERATING INSTRUCTIONS AND THE SUPPLIED IMPORTANT SAFEGUARDS MAY RESULT IN EYE FATIGUE, EYE IMPAIRMENT, OR OTHER EYE INJURY, PROPERTY DAMAGE, OR DEATH. WARNING THIS PRODUCT SHOULD NOT BE USED BY CHILDREN AGE 15 OR YOUNGER. THE EYES OF CHILDREN ARE STILL DEVELOPING AND MAY BE ADVERSELY AFFECTED FROM USE OF THIS PRODUCT. • IBM PC/AT and VGA are registered trademarks of IBM Corporation of the U.S.A. • Microsoft, MS, MS-DOS and Windows are registered trademarks of Microsoft Corporation in the United States and other countries. • Macintosh is a trademark licensed to Apple Computer, Inc., registered in the U.S.A. and other countries. • VESA is a trademark of Video Electronics Standard Association. • All other product names mentioned herein may be the trademarks or registered trademarks of their respective companies. Furthermore, “” and “” are not mentioned in each case in this manual. 4-US Table of Contents About the Personal LCD Display ....................................... 6 Getting Started Locating the parts and controls .......................................... 8 Connecting the Personal LCD Display Connecting a PC ......................................................... 10 Connecting video equipment ...................................... 13 Connecting the power source ..................................... 15 Wearing the Personal LCD Display ................................. 16 Operations US Using the Personal LCD Display ..................................... 18 Checking the display indications ................................ 20 Viewing the surrounding environment ............................ 21 Adjusting the sound and picture Signal compatibility ................................................... 22 Adjusting the sound/picture ........................................ 23 Adjusting the RGB signal ........................................... 26 Adjusting the video signal .......................................... 27 Resetting the adjustments to the factory preset level ............................................................................ 27 Using the optional battery pack ........................................ 28 Additional Information Precautions ....................................................................... 30 Error messages ................................................................. 32 Troubleshooting ............................................................... 33 Specifications ................................................................... 35 Index ................................................................... Back cover 5-US About the Personal LCD Display Caution: The screen is always right in front of you. The Personal LCD Display is a head-mounted display. With this type of display, the screen is always in front of you even when you move your head. Because of this feature, you can concentrate on the screen more easily compared with ordinary TVs, and you have a sense of being in the action. • It is easy to adjust the Personal LCD Display to your face and eyes. You can use the display unit even while wearing glasses. The Personal LCD Display consists of the following items: Display unit The display unit is equipped with two small (left and right) LCDs. Power supply box You can supply power using the supplied AC power adapter or the optional Sony rechargeable battery pack. When using with the Personal LCD Display, connect your video equipment or PC to the connector on the power supply box. You can adjust the sound volume. You can also use the SEE- THROUGH control in order to see the surrounding environment. Personal Computer VCR 6-US Laser disc player, DVD player Camcorder Features Getting Started • A powerful, big screen experience comparable to watching a 30-inch screen from approximately 4 feet (1.2 m) away (SVGA mode). • You can connect the Personal LCD Display, which is equipped with two 1.55 million dot LCDs, to your PC to see the screen of the PC in the SVGA or VGA screen mode. • You can enjoy high quality picture when you connect a DVD player, or DV camcorder, etc. • The see-through function allows you to see the surrounding environment while wearing the Personal LCD Display. • You can use the Personal LCD Display while wearing glasses. • Solid and lightweight components made of magnesium alloy, with the display unit weighing about 5.3 oz. (120 g). 7-US Locating the parts and controls Refer to the pages indicated in parentheses ( ) for details. Display unit Strap release button (16) POWER SAVING SENSOR (inner side) (23, 25) Earphone slide button (17) Stereo earphone (17) 8-US PUSH DISPLAY jog dial (20, 24) MENU button (24) Getting Started Power supply box SCREEN switch (21) RGB connector (10 to 12, 33) SEE-THROUGH control (21) PC AUDIO jack (10 to 12) CHARGE lamp (28) POWER/POWER SAVING lamp (18, 25) POWER switch (18) PC-VIDEO switch (10 to 14, 18) S VIDEO connector (14) BATT RELEASE button (28) BRIGHT control (19) DC IN connector (15) Ventilation openings (32) VOL control (19) AUDIO/VIDEO connector (13, 14) 9-US Connecting the Personal LCD Display Connecting a PC Be sure to turn off your PC before connecting the power supply box. Notes • • • • Do not use an RGB signal cable (HD15) which is 6.5 feet (2 m) or longer. The performance may be reduced. Refer to the instruction manual supplied with your PC as well. Depending on your computer, the audio port may be indicated as LINE OUT, headphone, speaker, etc. Adjust sound volume on the computer. Connecting other IBM compatible PCs Connect the Personal LCD Display to your PC using a commercially available RGB signal (HD15) cable. When you connect the Personal LCD Display to your PC, set the PC-VIDEO switch on the power supply box to “PC.” Power supply box Set the PC-VIDEO switch to “PC.” to monitor port to audio port or PC AUDIO to monitor port to audio port Audio cable RGB signal cable : Signal flow 10-US to PC AUDIO connector RGB to RGB connector Connecting a Macintosh Powerbook to monitor port of Powerbook Getting Started Depending on the model, you may need to use a commercially available adapter to connect a commercially available RGB signal cable as shown below. When you connect the Personal LCD Display to your Powerbook, set the PC-VIDEO switch on the power supply box to “PC.” to RGB signal cable Connector should match the monitor port of your Powerbook model. VGA type connector (HD15, female) Power supply box Set the PC-VIDEO switch to “PC.” to monitor port to audio port PC AUDIO Adapter to PC AUDIO connector RGB to RGB connector Audio cable RGB signal cable : Signal flow Note on connection Set the display setting to 16-inch display mode (832 × 624) or 13-inch display mode (640 × 480). The Personal LCD Display cannot display images with the 19-inch display mode (1024 × 768) setting or more. continued 11-US Connecting the Personal LCD Display (continued) Connecting a Macintosh (desktop models) Depending on the model, you may need to use a commercially available Macintosh adapter to connect a commercially available RGB signal cable as shown below. When you connect the Personal LCD Display to your Macintosh, set the PC-VIDEO switch on the power supply box to “PC.” to monitor port of Macintosh to RGB signal cable (D-Sub 15-pin, male) to monitor port VGA type connector (HD15, female) Power supply box Set the PC-VIDEO switch to “PC.” to monitor port to audio port PC AUDIO Macintosh adapter to PC AUDIO connector RGB to RGB connector Audio cable RGB signal cable : Signal flow Notes on connection • Use a commercially available Macintosh adapter which suppors the models after the Macintosh II series. • Set the display setting to 16-inch display mode (832 × 624) or 13-inch display mode (640 × 480). The Personal LCD Display cannot display images with the 19-inch display mode (1024 × 768) setting or more. 12-US Connecting video equipment Getting Started Connect a VCR, laser disc player, DVD player, or camcorder to the power supply box using a commercially available audio/video cable as shown below. When you connect the Personal LCD Display to the video equipment, set the PC-VIDEO switch on the power supply box to “VIDEO.” Note Do not use audio, audio/video, or S-video connecting cables, which are 9.8 feet (3 m) or longer. The performance may be reduced. VCR, laser disc player, DVD player, camcorder, etc. to audio/video outputs Set the PC-VIDEO switch to “VIDEO.” Power supply box Video (yellow) Audio L (white) Audio R (red) AUDIO / VIDEO to AUDIO/VIDEO connector Audio/video cable (special miniplug phono plug) Camcorder, etc. to audio/video output Audio/video cable (special miniplug special miniplug) : Signal flow continued 13-US Connecting the Personal LCD Display (continued) If your video equipment has an S-video jack Connect the Personal LCD Display to the video equipment using a commercially available S-video cable and an audio/video cable to enjoy the highest quality pictures. In this case, you do not need to connect the video (yellow) plug. If you connect both the S-video and video plugs, the S-video signal is automatically selected. When you connect the Personal LCD Display to the video equipment, set the PCVIDEO switch on the power supply box to “VIDEO.” Set the PC-VIDEO switch to “VIDEO.” VCR, Laser disc player, DVD player, camcorder, etc. Power supply box S-video cable to S VIDEO connector to S-video output S VIDEO AUDIO / VIDEO to audio/video output to AUDIO/VIDEO connector Audio/video cable (special miniplug miniplug) special Video (yellow) Audio L (white) Audio/video cable (special miniplug plug) : Signal flow phono Audio R (red) to audio/video outputs About the AUDIO/VIDEO input jack The AUDIO/VIDEO input jack of the Personal LCD Display is a special minijack, and the signal connections are aligned as shown on the right. This alignment may differ depending on the equipment. Audio R Audio L GND Video 14-US Notes Getting Started • When you connect the Personal LCD Display to the audio output jacks (phono jacks) of your video equipment, connect the Personal LCD Display to both the right and left audio output jacks. If you connect the Personal LCD Display to just one audio output jack, you will hear sound from only one of the stereo earphones. • The audio and video signals may not be carried to the Personal LCD Display depending on the video source. In this case, contact an authorized service center. Connecting the power source Connect the AC power adapter AC-PLM3 (supplied) to the DC IN connector on the power supply box. Then, connect the AC power cord (supplied) to the AC power adapter and to a wall outlet. Do not connect the power source until all other connections are complete. to wall outlet AC power adapter AC-PLM3 (supplied) AC power cord (supplied) Power supply box to DC IN connector DC IN 8.4V Display unit 15-US Wearing the Personal LCD Display WARNING • Failure to properly fit the product each time may result in eye fatigue, eye damage, or loss of visual functions and may result in accident or injury. • This product should not be used by children age 15 or younger. The eyes of children are still developing and may be adversely affected by use of this product, and it may cause eye fatigue, eye damage, or loss of visual functions. In addition, this product may not be adjusted to fit a child’s head. If you normally wear glasses while watching TV, you can use the Personal LCD Display while wearing glasses. 1 16-US Loosen the back strap. q Press and hold the strap release buttons. w Then, loosen the back strap in the direction of the arrows. q w q w 2 Put on the Personal LCD Display. 3 Adjust the strap. Hold the front pad against your forehead and place the rear strap so it is fixed firmly around the back of your head. Adjust the strap after putting on the Personal LCD Display. Make sure the strap is snug but comfortable. 4 While holding the front pad against your forehead, adjust the angle of the display unit using the two hinges. Move the display unit close to your eyes at a slight downward angle. If you wear glasses, move the display unit as close to the lenses as possible. Adjust the stereo earphones. Pull the earphones out. To adjust the slack, reel in the earphone cord by pressing the slide button in the direction of the arrow. Front pad 5 – 10° Getting Started 5 Adjust the angle of the display unit. Earphones slide button Stereo earphones Adjusting the back strap If the strap does not fit properly in step 3, adjust the strap by changing the belt length. 17-US Using the Personal LCD Display Before you start… Be sure to follow the procedures in “Connecting the Personal LCD Display” (pages 10 to 15) and “Wearing the Personal LCD Display” (pages 16 and 17). 1 Turn on the Personal LCD Display using the POWER switch. The POWER/POWER SAVING lamp lights up green. POWER / POWER SAVING ON / OFF 2 Select the input signal using the PC-VIDEO switch. Select PC (RGB signal) or VIDEO (video signal) depending on the connected equipment. When you select PC (PC mode) PC / RGB When you select VIDEO (Video mode) PC When you connect to the S-video connector “S VIDEO” appears on the screen. 18-US VIDEO VIDEO 3 Input the signal from the connected equipment. When you connect the PC: Adjust the screen resolution. For details, see “Signal compatibility” on page 22. When you display VGA pictures (640 × 480), the picture appears about 60% of the entire screen. Notes • If no picture appears, check the default setting of your PC to output the external RGB signal from the monitor connector. • Some PCs do not output external display signal when they turn on, or switch to external display mode. Change the display mode of your PC, referring to the instruction manual supplied with your PC. 4 Operations When you connect the video equipment: Start playback on the video equipment connected to the Personal LCD Display. When you display NTSC video picture, the picture appears about 60% of the entire screen. For PAL video picture, the picture appears about 84% of the entire screen. Adjust the brightness by turning the BRIGHT control. BRIGHT BRIGHTNESS darker 5 brighter Adjust the sound volume by turning the VOL control. When you set AVLS (Auto Volume Limiter System) in the menu to on, you cannot turn up the volume beyond the defined limit (see page 23). If the audio input level is too high, the sound may be distorted. Turn the volume down using the VOL control. VOL lower louder continued 19-US Using the Personal LCD Display (continued) After you finish using the Personal LCD Display Take off the Personal LCD Display, and turn off the power. Note on the LCDs The LCD screen is made with high-precision technology. However, black points or bright points of light (red, blue, or green) may appear constantly on the LCD screen. This is not a malfunction. (Effective dots: more than 99.999%) Checking the display indications Press the PUSH DISPLAY jog dial while the picture is displayed. The display indication appears on the screen for five seconds. To turn off the indication sooner, press the jog dial again. PC / RGB 800X600 60Hz Input signal (page 18) MEGA BASS (page 25) MEGA BASS 2 AVLS 20-US AVLS (page 25) Viewing the surrounding environment While you are wearing the Personal LCD Display, you can view the surrounding environment through the screen in two ways: Viewing the surrounding environment in the area around the picture only (Screen mode) You can adjust the level of transparency of the entire screen with the LCD shutter dial. You can adjust the level of transparency of the screen area around the picture only. The picture remains intact. The picture becomes The area surrounding the picture also transparent. becomes transparent. The picture remains The area surrounding intact. the picture becomes transparent. Operations Viewing the surrounding environment by adjusting the transparency of the entire screen (See-through mode) Turn the SEE-THROUGH dial. Set the SCREEN switch to ON. SEE - THROUGH CLOSE OPEN SCREEN ON In this mode, the screen does not become transparent even if you turn the SEETHROUGH dial. Note If there is a bright light near the display unit, you may not be able to completely black out the surrounding environment by adjusting the SEETHROUGH dial. OFF Notes • When you set the SCREEN switch to ON, the edges of the picture may fade a bit, but this is not a malfunction. • If there is a bright light near the display unit, you may not be able to completely black out the surrounding environment around the picture by adjusting the SEE-THROUGH dial when you set the SCREEN switch to on. 21-US Adjusting the sound and picture Signal compatibility The signal specifications that this unit supports are as follows: PC mode (RGB signal) Display mode Macintosh 13" color 16" color IBM PC compatibles VGA text VGA graphics VESA VGA VESA SVGA Screen resolution (dot × line) Horizontal frequency (kHz) Vertical frequency (Hz) 640 × 480 832 × 624 35.0 49.7 67 75 × × × × × × × × × × 31.5 31.5 37.9 37.5 43.3 35.2 37.9 48.1 46.9 53.7 70 60 72 75 85 56 60 72 75 85 640 640 640 640 640 800 800 800 800 800 400 480 480 480 480 600 600 600 600 600 Video mode (video signal) NTSC color system Displayed in 640 × 480 area PAL color system Displayed in 762 × 572 area Notes on the PC mode • This unit does not support XGA mode (1,024 × 768) and above. If you set the vertical frequency to 60 Hz in XGA mode, the picture is displayed but the picture quality is poor due to the signal loss. Change the screen resolution on your PC to SVGA or VGA. • Though the Personal LCD Display supports the signals listed above, set the vertical frequency to 60 Hz when using with SVGA (800 × 600), or to 72 Hz or 75 Hz with VGA (640 × 480) mode. Also adjust the vertical frequency of the external display output signal of the connected computer. • When you display VGA pictures (640 × 480) or NTSC video pictures (video mode), the pictures are not displayed across the entire screen. About 60% of the screen area is utilized. For PAL video pictures (video mode), about 84% of the screen area is utilized. • Some notebook type PCs do not output the RGB signal in the adjusted screen resolution and the vertical frequency from the external monitor port until you set the PC to external display mode. 22-US Adjusting the sound/picture You can adjust the following items using the menu display. PC mode (RGB signal) Video mode (video signal) AVLS (Auto Volume Limiter System): Keeps the maximum volume down to protect your ear. You cannot turn up the volume beyond the defined limit even if you try to turn the VOL control. MEGA BASS: Creates a deep, powerful sound by emphasizing the bass sound. V CENT: Adjusts the vertical position of the picture. CONTRAST: Adjusts the picture contrast. H CENT: Adjusts the horizontal position of the picture. HUE (NTSC (VIDEO) mode only): Adjusts the hue, if the picture looks too red or green. TRACKING: Adjusts the tracking of the picture (e.g., if the picture is not displayed clearly). COLOR: Adjusts the color intensity. Operations POWER SAVE: The POWER SAVING SENSOR detects the removal of the Personal LCD Display from your head. The unit enters standby mode in a few seconds, automatically stopping the sound and picture in order to save the battery power. The sound and picture resume after a few seconds when you put on the Personal LCD Display again. SYNC: Adjusts the picture with the RGB signal synchronization (e.g., if the picture is blurred, or if red or blue shadows appear in the picture). Perform this adjustment after TRACKING adjustment is finished. Notes on power saving function • The power saving function may not work correctly in the following cases: – your hair is between your forehead and the POWER SAVING SENSOR. – the space or angle between your forehead and the POWER SAVING SENSOR is not correct. In these cases, set POWER SAVE to OFF. • When the picture disappears suddenly, do the following procedures: 1 Turn off the power sliding the POWER switch. 2 Turn on the power again. 3 Press MENU to display the menu options. 4 Set POWER SAVE to OFF. continued 23-US Adjusting the sound and picture (continued) 1 Press MENU. PC mode The menu display appears on the screen. MENU EXIT OFF AVLS : MEGA BASS : 0 POWER SAVE : OFF V CENT H CENT TRACKING SYNC PRESET SEL EXEC MENU EXIT MENU VIDEO mode * MENU EXIT OFF AVLS : MEGA BASS : 0 POWER SAVE : OFF CONTRAST HUE COLOR RESET SEL EXEC MENU EXIT * NTSC (VIDEO) mode only 2 Turn the PUSH DISPLAY jog dial to select the desired item, then press the jog dial. The setting screen of the selected item appears. PUSH DISPLAY 24-US 3 Adjust the setting using the jog dial. 4 Press MENU. For details on each item, see pages 25 to 27. To set other items, repeat steps 2 and 3. The menu display goes off. You can also turn off the menu display by selecting EXIT in the menu using the jog dial. AVLS (Auto Volume Limiter System) POWER SAVE Turn the jog dial to set to ON, then press the jog dial. Turn the jog dial to set to ON, then press the jog dial. AVLS : POWER SAVE : ON OFF ON OFF SEL SEL EXEC MEGA BASS Turn the jog dial to select the desired value, then press the jog dial. When POWER SAVE is set to ON, you can monitor the status of the Personal LCD Display by checking the POWER/POWER SAVING indicator. 2: Maximize the bass sound. 1: Boost the bass sound. 0: Normal bass sound. MEGA BASS : 2 1 0 EXEC Operations When you take off the display unit while the POWER SAVE is set to ON, the POWER SAVING SENSOR (page 8) is activated and automatically turns off the picture and sound. The picture and sound resume a few seconds after putting the display unit back on. When AVLS is on, the volume does not become louder than the level you set even if you turn the VOL control. SEL EXEC Status POWER/ Picture POWER SAVING indicator Power consumption Normal Lit in green Normal 100% Power save mode Lit in orange No picture 5% Note The power saving function of the Personal LCD Display works independently from the power management function of your PC. continued 25-US Adjusting the sound and picture (continued) Adjusting the RGB signal Note When you display the picture on both the LCD display of the notebook PC and on the Personal LCD Display, depending on the notebook PC, you may not be able to adjust the picture on the Personal LCD Display due to the mismatch of the output signal frequencies. In this case, change the display mode on your PC to the external monitor only. Then, change the screen resolution according to the list on “Signal compatibility” (page 22). V CENT TRACKING Turn the jog dial to adjust the center of the picture, then press the jog dial. Turn the jog dial until the stripes on the picture disappear, then press the jog dial. V CENT ADJ EXEC TRACKING ADJ H CENT SYNC Turn the jog dial to adjust the center of the picture, then press the jog dial. H CENT ADJ 26-US EXEC Turn the jog dial to adjust the clearance of the picture, then press the jog dial. SYNC EXEC ADJ EXEC Adjusting the video signal CONTRAST Turn the jog dial to adjust the contrast, then press the jog dial. Resetting the adjustments to the factory preset level All settings except AVLS, MEGA BASS, and POWER SAVE settings are reset to the factory preset level. Turn the jog dial to select PRESET or RESET in the menu, then press the jog dial. CONTRAST PC mode ADJ EXEC more COLOR SEL Turn the jog dial to adjust the color intensity, then press the jog dial. COLOR MENU EXIT OFF AVLS : MEGA BASS : 0 POWER SAVE : OFF CONTRAST HUE COLOR RESET SEL EXEC less EXEC MENU EXIT VIDEO mode * ADJ Operations less MENU EXIT OFF AVLS : MEGA BASS : 0 POWER SAVE : OFF V CENT H CENT TRACKING SYNC PRESET EXEC MENU EXIT * NTSC (VIDEO) mode only more HUE (NTSC (VIDEO) mode only) Note The settings are retained even when you turn off the power. Turn the jog dial to adjust the hue, then press the jog dial. HUE ADJ reddish EXEC greenish 27-US Using the optional battery pack DISPOSAL OF LITHIUM ION BATTERY. LITHIUM ION BATTERY. DISPOSE OF PROPERLY. You can return your unwanted lithium ion batteries to your nearest Sony Service Center or Factory Service Center. NOTE: In some areas the disposal of lithium ion batteries in household or business trash may be prohibited. For the Sony Service Center nearest you call 1-800-222-SONY (United States only) For the Sony Factory Service Center nearest you call 416-499-SONY (Canada only) Caution: Do not handle damaged or leaking lithium ion batteries. If you use a battery pack such as the NP-F550/F750/F950, you can use the Personal LCD Display without connecting to a wall outlet. Charging the battery pack Charge the battery pack before use. You can charge the battery pack using the power supply box. If you attach the battery pack as described below, the battery pack charges while you are not using the Personal LCD Display. 1 2 Attach the battery pack to the power supply box. Install the battery pack properly making sure it is not crooked against the power supply box. To remove the battery pack, while sliding BATT RELEASE, pull out the battery pack. Battery pack Power supply box BATT RELEASE button Connect the AC power adapter to the DC IN connector on the power supply box. Then, connect the AC power cord to the AC power adapter and to a wall outlet. Charge the battery pack on a flat place without vibration. The CHARGE lamp lights up. When the battery pack is fully charged, the CHARGE lamp goes out. Battery life and charging time are shown in the table below. CHARGE lamp to wall outlet AC power adapter to DC IN 28-US Battery pack Charging time Battery life (fully charged battery, PC mode) NP-F550 Approx. 6 hours Approx. 1 hour NP-F750 Approx. 12 hours Approx. 2 hours NP-F950 Approx. 18 hours Approx. 3 hours • The battery life and charging time may change depending on the conditions of use. • You can also use a battery pack such as the NP-500/510/710/F530/F730/F930 (not supplied) with the Personal LCD Display. • You can use an InfoLITHIUM™ battery pack with the Personal LCD Display. When using such a battery pack, the estimated remaining battery life is displayed not with the time counter, but with the indicator. • The battery life listed above is for PC mode. When you use the Personal LCD Display in video mode, the battery life is reduced to 80% of the PC mode. “InfoLITHIUM” is a trademark of Sony Corporation. Notes If the POWER/POWER SAVING lamp flashes while using the battery pack, charge the battery pack. Use the supplied AC power adapter only when charging a battery pack. Battery life may be shorter in a cold environment. This is a typical battery characteristic. You cannot charge the battery pack in power save mode. Turn off the Personal LCD Display, then it starts charging the battery pack. Operations • • • • Checking the remaining battery life When no indication or caution appears on the screen, press the jog dial. PUSH DISPLAY Remaining battery life Fully charged dead When the battery pack is weak, the following message appears on the screen. Replace the battery pack with a charged one. THE BATTERY PACK IS EMPTY. REPLACE WITH A CHARGED BATTERY. When using the AC power adapter, ” mark appears on the the “ screen. 29-US Precautions Use Installation • Operate the product only with the supplied AC power adapter. If you use a different AC power adapter, it may cause a malfunction. • To prevent internal heat build-up, do not block the ventilation openings. • Avoid operating the product at temperatures below 41˚F (5˚C). • Do not subject the product to high temperature or direct sunlight. If you do not observe the above instructions, the product may become deformed and the screens may become impossible to align. If you keep watching misaligned screens, you may develop eye fatigue. If you find the screens misaligned, have the product repaired at an authorized service center. • Do not place the product in locations where it is wet, humid, dusty, smoky, or steamy. Do not use this product near or around water. It may cause fire or electric shock. Especially, do not use the product in the bathroom. • If the product is transported directly from a cold to a warm location, or if the room temperature has changed suddenly, the picture may be blurred or show poor color. This is because moisture has condensed on the mirror or lenses inside. If this happens, let the moisture evaporate before using the product. • Do not place the product on an unstable cart, stand, table, or shelf. The product may fall, causing serious injury to a child or an adult, and serious damage to the product. • Do not allow anything to rest on or roll over the power cord, and do not place the product where the power cord is subject to wear or abuse. Unified polarity plug • Should any liquid or solid object fall into the cabinet, unplug the product and have it checked by qualified personnel before operating it further. • Always turn the product off when you do not use it. Unplug the product from the wall outlet if you are not going to use it for several days or more. To disconnect the cord, pull it out by the plug. Never pull the cord itself. • Do not overload wall outlet, extension cords, or convenience receptacles beyond their capacity, since this can result in fire or electric shock. • Do not use attachments not recommended by the manufacturer, as they may cause hazards. • Avoid using earphones at high volume. Hearing experts advise against continuous, loud, and extended play. If you experience a ringing in your ears, reduce volume or discontinue use. • Do not touch the AC power adapter or power supply box with wet hands. If you fail to observe this, it may cause electric shock. • Do not drop or give a mechanical shock to the product. 30-US Others Additional Information • Unplug the product from the wall outlet and refer servicing to qualified service personnel under the following conditions: - When the power cord or plug is damaged or frayed. - If liquid has been spilled into the product. - If the product has been exposed to rain or water. - If the product has been subject to excessive shock by being dropped, or the cabinet has been damaged. - If the product does not operate normally when following the operating instructions. Adjust only those controls that are specified in the operating instructions. Improper adjustment of other controls may result in damage and will often require extensive work by a qualified technician to restore the product to normal operation. - When the product exhibits a distinct change in performance –– this indicates a need for service. • Do not disassemble or remodel the product. It may cause fire or electric shock. Have the product checked and repaired at an authorized service center. • Do not attempt to service the product yourself since opening the cabinet may expose you to dangerous voltage or other hazards. Refer all servicing to qualified service personnel. • When replacement parts are required, be sure the service technician certifies in writing that he has used replacement parts specified by the manufacturer that have the same characteristics as the original parts. Unauthorized substitutions may result in fire, electric shock, or other hazards. • Upon completion of any service or repairs to the product, ask the service technician to perform routine safety checks (as specified by the manufacturer) to determine that the product is in safe operating condition, and to so certify. • Unplug the product from the wall outlet before cleaning. Clean the product with a dry, soft cloth, or a soft cloth slightly moistened with a mild detergent solution. Do not use any type of solvent, such as alcohol or benzine. 31-US Error messages The following error messages may appear to indicate the status of the Personal LCD Display or input signal. OUT OF SCAN RANGE The input signal does not match the supported specification. Change the screen resolution on your PC. For details of the signal compatibility, see “Signal compatibility” (page 22). NO INPUT SIGNAL The signal is not input. • Make sure that the PC-VIDEO switch is correctly set. • Make sure that the connected equipment is turned on. • Make sure that your PC is not in the power saving mode. HIGH TEMPERATURE The Personal LCD Display temperature is high. Turn off the Personal LCD Display for a while, then turn it on again. Note If you cover the ventilation openings of the power supply box, an error may occur due to a rise in temperature. In addition, it may cause a fire or malfunction of the unit. 32-US Troubleshooting Check the items listed below before contact an authorized service center. Symptom Cause Remedy The picture does not appear. Connections are incorrect. Connect the equipment correctly (pages 10 to 15). The signal is not input. Select the correct input (page 18). The Personal LCD Display enters power Put the Personal LCD Display on again to bring the forehead near to save mode. the POWER SAVING SENSOR (page 8). The picture is dark or dim. When you connect to a notebook type PC, the display mode is set to local display mode (LCD panel of your notebook PC). Change the display mode. For details, refer to the instruction manual of your PC. You are not wearing the Personal LCD Display correctly. Put on the Personal LCD Display correctly (pages 16 and 17). — Adjust the brightness with the BRIGHT control (page 19). — Adjust the RGB signal synchronization (page 26). The inside window (where the picture is Clean the display unit with a soft, dry displayed) is dirty. cloth. The picture suddenly disappears. You have set the POWER SAVE to ON Put the Personal LCD Display on while you are not wearing the Personal again to bring the forehead near to LCD Display. the POWER SAVING SENSOR (page 8). Charge the battery pack (page 28). The picture has no sound. The sound is noisy. — Adjust the volume with the VOL control (page 19). The volume does not increase. The AVLS function is on. Set AVLS in the menu to OFF (page 25). The equipment is not connected properly. Connect the equipment correctly (pages 10 to 15). The sound volume of the connected computer is inappropriate. Adjust the volume on the computer. The battery pack discharges quickly. The battery pack is not charged enough. The battery pack is completely dead. Charge the battery pack fully or use a new one (page 28). The battery pack is not charged. The battery pack is not installed properly. Install the battery pack properly (page 28). The battery pack is completely dead. Replace the battery pack with a new one (page 28). The supplied AC power adapter is not used. Use the supplied AC-PLM3 AC power adapter. Additional Information The battery pack is dead. continued 33-US Troubleshooting (continued) Symptom Cause Remedy The black, red, and green dots do not disappear. The LCD is made with highprecision technology. However, black points or bright points of light (red, blue, or green) may appear constantly on the LCD screen. This is not a malfunction. (Effective dots: more than 99.999%) — The picture color is different. The color intensity and hue* are not adjusted. Adjust COLOR and HUE* in the menu screen (page 27). The picture is out of position The external display output signal in the PC mode. of the connected computer does not match the supported input signal. Change the screen resolution and the vertical frequency on your PC to match the supported output frequency (page 22). Refer to the instruction manual of your PC. Noise appears on the picture The input signal does not match the in the PC mode. supported specifications. See “Signal compatibility” (page 22). In this case, the picture does not appear correctly. Change the screen resolution or the vertical frequency of the external display output signal on your PC to match the supported vertical frequency (pages 22 and 24). Refer to the instruction manual of your PC. The POWER switch does not function. * NTSC (VIDEO) mode only 34-US The horizontal frequency of the signal does not match the supported specifications. In this case, the flicker may appear on the right edge of the picture. Change the display mode on your PC to the external monitor only (page 24). — Disconnect the AC power cord from the wall outlet. After three minutes, reconnect the AC power cord. Specifications Power supply AC power adapter: AC-PLM3 100-240 V AC, 50/60 Hz, 16 W Output voltage 8.4 V, 1.6 A Battery pack: NP-F550/F750/F950 (not supplied) Power consumption 10 W (approx., PC mode) 12 W (approx., VIDEO mode) Operating temperature 41°F to 95°F (5°C to 35°C) Storage temperature 14°F to 140°F (–10°C to 60°C) Dimensions Display unit: Approx. 5 7/8 × 1 15/16 × 3 1/2 inches (Approx. 149 × 48 × 86 mm) (w/h/d folded) Power supply box: Approx. 2 1/4 × 1 7/8 × 6 3/8 inches (Approx. 54 × 47 × 160 mm) (w/h/d) not including projecting parts and controls Mass Display unit: Approx. 4.2 oz. (120 g) Power supply box: Approx. 9.2 oz. (260 g) Video signal NTSC color, EIA standards PAL color, CCIR standards Input PC mode RGB signal: HD15 Pin Assignment 5 4 3 2 1 10 9 8 7 6 15 14 13 12 11 Pin No. Signal 1 R (Red) 2 G (Green) 3 B (Blue) 4 – 5 GND 6 R (Red) GND 7 G (Green) GND 8 B (Blue) GND 9 – 10 GND 11 GND 12 – 13 SYNC (Horizontal) 14 SYNC (Vertical) 15 – Additional Information PC AUDIO input: Stereo minijack VIDEO mode AUDIO/VIDEO input: Special minijack Video: 1 Vp-p, 75 ohms, unbalanced, sync negative S VIDEO input: 4-pin mini DIN Y: 1 Vp-p, 75 ohms, unbalanced, sync negative C: 0.286 Vp-p, 75 ohms, unbalanced, sync negative Screen resolution Horizontal: 832 dots (max.) Vertical: 624 lines (max.) Design and specifications are subject to change without notice. 35-US Index A R AC power adapter 15, 28 Adjusting AVLS 23, 25 brightness 19 color 23, 27 contrast 23, 27 horizontal position 23, 26 hue 23, 27 mega bass 23, 25 power save 23, 25 synchronization 23, 26 tracking 23, 26 vertical position 23, 26 volume 19 Remaining battery pack life 28 Resetting 27 RGB input signal 35 B Back strap 16, 17 Battery pack 28 Brightness control 19 C Charging a battery pack 28 Connection battery pack 28 PCs 10 power 15 video equipment 13 D Display indication 20 E Error message 32 F, G, H Features 7 I, J, K, L, M, N O Input signal mode 18 P, Q Precautions 30 Sony Corporation Printed in Japan 36-US S Screen mode 21 See-through mode 21 Signal compatibility 22 Specifications 35 Stereo earphones 17 S-video 14 T, U Troubleshooting 33 V Volume control 19 W, X, Y, Z Wearing the Personal LCD Display 16, 17