1
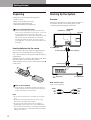
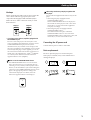
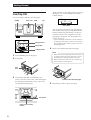
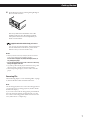
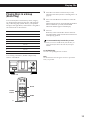
3-862-573-11 (1) Operating Instructions f CDP-CX210 1998 by Sony Corporation WARNING To prevent fire or shock hazard, do not expose the unit to rain or moisture. To avoid electrical shock, do not open the cabinet. Refer servicing to qualified personnel only. This symbol is intended to alert the user to the presence of uninsulated “dangerous voltage” within the product’s enclosure that may be of sufficient magnitude to constitute a risk of electric shock to persons. – Reorient or relocate the receiving antenna. – Increase the separation between the equipment and receiver. – Connect the equipment into an outlet on a circuit different from that to which the receiver is connected. – Consult the dealer or an experienced radio/TV technician for help. CAUTION This equipment has been tested and found to comply with the limits for a Class B digital device, pursuant to Part 15 of the FCC Rules. These limits are designed to provide reasonable protection against harmful interference in a residential installation. This equipment generates, uses, and can radiate radio frequency energy and, if not installed and used in accordance with the instructions, may cause harmful interference to radio communications. However, there is no guarantee that interference will not occur in a particular installation. If this equipment does cause harmful interference to radio or television reception, which can be determined by turning the equipment off and on, the user is encouraged to try to correct the interference by one or more of the following measures: 2 Thank you for purchasing the Sony Compact Disc Player. Before operating the unit, please read this manual thoroughly and retain it for future reference. You are cautioned that any changes or modification not expressly approved in this manual could void your authority to operate this equipment. About This Manual Owner’s Record Conventions The model and serial numbers are located at the rear of the unit. Record the serial number in the space provided below. Refer to them whenever you call upon your Sony dealer regarding this product. • Instructions in this manual describe the controls on the player. You can also use the controls on the remote if they have the same or similar names as those on the player. • The following icons are used in this manual: Model No. CDP-CX210 Serial No. _________________________ This appliance is classified as a CLASS 1 LASER product. The CLASS 1 LASER PRODUCT MARKING is located on the rear exterior. This symbol is intended to alert the user to the presence of important operating and maintenance (servicing) instructions in the literature accompanying the appliance. INFORMATION Welcome! This equipment is intended for home entertainment purposes only. The warranty shall be invalidated if used in commercial environments, such as by disc jockeys, etc., even within the Warranty Period. The instructions in this manual are for model CDP-CX210. Indicates that you can do the task using the remote. Indicates hints and tips for making the task easier. TABLE OF CONTENTS Getting Started Unpacking ............................................................................................................................ 4 Hooking Up the System ..................................................................................................... 4 Inserting CDs ....................................................................................................................... 6 Playing a CD ............................................................................................................................ 8 Playing CDs Locating a Specific Disc .................................................................................................. Specifying the Next Disc to Play ................................................................................... Locating a Specific Track or a Point in a Track ............................................................ Playing Repeatedly ........................................................................................................... Playing in Random Order (Shuffle Play) ...................................................................... Creating Your Own Program (Program Play) .............................................................. Playing Discs in a Group (Block Play) ........................................................................... 10 10 11 12 12 13 15 Additional Information Precautions ........................................................................................................................ Notes on CDs ..................................................................................................................... Troubleshooting ................................................................................................................ Specifications ..................................................................................................................... 16 16 17 17 Index .......................................................................................................................................... 18 3 Getting Started Unpacking Check that you received the following items: • Audio cord (1) • Remote commander (remote) (1) • Sony SUM-3 (NS) batteries (2) • CD booklet holders (2) and label (1) Hooking Up the System Overview This section describes how to hook up the CD player to an amplifier. Be sure to turn off the power of each component before making the connections. How to use the CD booklet holder CONTROL A1 The CD booklet holder helps you locate the disc easily. After you have inserted discs into the player, you can put the CD booklet (which comes with a CD) into the supplied holder. Put two CD booklets facing back to back into a pocket. Stick the number label on each pocket, matching the number of the disc slot where you have inserted the disc. You can put up to 200 CD booklets into the holders. Inserting batteries into the remote You can control the player using the supplied remote. Insert two size AA (R6) batteries by matching the + and – on the batteries to the diagram inside the battery compartment. Insert the negative (–) end first, then push in and down until the positive (+) end clicks into position. When using the remote, point it at the remote sensor g on the player. COMMAND MODE CD player To an AC outlet To line output (R) To line output (L) To audio input Amplifier : Signal flow To an AC outlet What cords will I need? Audio cord (1) (supplied) When to replace batteries With normal use, the batteries should last for about six months. When the remote no longer operates the player, replace all the batteries with new ones. Notes • Do not leave the remote near an extremely hot or humid place. • Do not drop any foreign object into the remote casing, particularly when replacing the batteries. • Do not expose the remote sensor to direct sunlight or lighting apparatuses. Doing so may cause a malfunction. • If you do not use the remote for an extended period of time, remove the batteries to avoid possible damage from battery leakage and corrosion. 4 White (L) Red (R) White (L) Red (R) Getting Playing Started CDs Hookups When using another Sony CD player together with this player When connecting the audio cord, be sure to match the color-coded cord to the appropriate jacks on the components: Red (right) to Red and White (left) to White. Be sure to make connections firmly to avoid hum and noise. You can make the supplied remote effective only for this player. • When using the player equipped with the COMMAND MODE selector: Set the COMMAND MODE selector of this player to CD1 and that of another player to CD2 or CD3. Then set the CD1/2/3 switch on the remote supplied for each player accordingly. • When using the player not equipped with the COMMAND MODE selector: The command mode of the player without the COMMAND MODE selector is set to CD1. Set the COMMAND MODE selector of this player to CD2, and set the CD1/2/3 switch on the remote to CD2. CD player Amplifier LINE OUT INPUT CD L L R R • If you have a Sony receiver (amplifier) equipped with the CONTROL A1 jack Be sure to connect the player to the CD IN jacks on the receiver (amplifier). When making this connection, set the COMMAND MODE of the player to CD1 (see the illustration below). If you further connect the player and the receiver (amplifier) via the CONTROL A1 jacks with the monaural (2P) mini-plug cord (not supplied), you can use the Auto Function feature between these components. For details, refer to the supplementary “S-LinkTM/CONTROLA1 Control System” instructions and the instructions supplied with the receiver (amplifier). Connecting the AC power cord Connect the AC power cord to a wall outlet. Note on placement Be sure to place the player on a horizontal place. If the player is slanted, it may cause malfunction or damage the player. When to use the COMMAND MODE selector The COMMAND MODE selector is set to CD1 at the factory for normal use. You can control this player by connecting to a Sony CD Player with the player control function, via the CONTROL A1 jacks. When making this connection, set the COMMAND MODE selectors of each player to the appropriate position according to the connected line input jacks. For details, refer to the instructions supplied with the connected player. COMMAND MODE CD 1 2 3 5 Getting Started The disc number at the loading position appears in the display.* As you turn the JOG dial, the disc number changes. Inserting CDs You can insert up to 200 discs into this player. ALL DISC S POWER Front cover OPEN JOG 1 d1 SC 2 3 4 5 6 7 8 20 CD 1 Disc number You can arrange your discs into groups and play them within a certain group using the Block Play function. When using this function, you have to insert discs into the slots assigned to one of the eight groups. For details, see “Playing Discs in a Group” on page 15. POWER * If you have already inserted discs, the disc number at the playing position appears. When you turn the JOG dial, the displayed disc number changes to the one at the loading position. Playing position Rotary table Loading position 4 Insert a disc with the label side facing right. Notes 1 Press POWER to turn on the player. 2 Press OPEN. • Make sure you have inserted the disc into each slot at a right angle to the rotary table. If the disc is not put in straight, it may damage the player or the disc. • Make sure the rotary table comes to a complete stop before inserting or removing discs. Front cover 3 Turn the JOG dial until you find the disc slot where you want to insert a disc, while checking the disc number (written beside every five slots and also indicated in the display). Disc number Disc slot at the loading position 6 With the label side facing right 5 Repeat Steps 3 and 4 to insert more discs. Getting Playing Started CDs 6 Close the front cover by pressing the right edge of the cover until it clicks. The rotary table turns and the disc slot at the loading position is set to the playing position. Always close the front cover except when you insert or remove discs. The supplied CD booklet holders help you locate a disc You can store up to 200 CD booklets. Insert booklets and stick the number label on the film of a pocket and the booklet so that you can locate the disc easily. Notes • When you insert an 8 cm (3-inch) CD, be sure to attach a Sony CSA-8 adaptor (not supplied) to the disc. Do not insert an empty 8 cm (3-inch) CD adaptor (CSA-8). It may damage the player. • Do not attach anything such as seals or sleeves to CDs. It may damage the player or the disc. • If you drop a disc into the player and the CD won‘t go into the slot correctly, consult your nearest Sony dealer. • When transporting the player, remove all discs from the player. Removing CDs After following Steps 1 to 3 of “Inserting CDs” on page 6, remove the discs. Then close the front cover. Note The disc being played does not come to the loading position if you open the front cover during playback. (The disc number flashes in the display.) If you want to remove the disc being played, press ENTER in the center of the JOG dial after opening the front cover. The disc comes to the loading position. Remove the disc after the rotary table comes to a complete stop. 7 Basic Operations Playing a CD 2 3 4 5 ENTER ENTER CONTINUE SHUFFLE PROGRAM AMS REPEAT POWER CHECK BLOCK 1 BLOCK 2 BLOCK 3 BLOCK 4 BLOCK 5 BLOCK 6 BLOCK 7 BLOCK 8 • See pages 4 – 5 for the hookup information. • Make sure you have inserted the discs correctly as indicated on page 6. • You can play all the tracks on a disc in the original order (Continuous Play). You can also play up to 200 discs consecutively. OPEN 1 2 3 You can turn on the player by pressing POWER on the remote Z 4 Turn on the amplifier and select the CD player position. Press POWER to turn on the player. Press CONTINUE to select ALL DISCS or 1 DISC Continuous Play mode. Each time you press CONTINUE, “ALL DISCS” or “1 DISC” appears in the display. When you select The player plays ALL DISCS All discs in the player consecutively in the order of disc number. Empty disc slots are skipped. 1 DISC Only one disc you have selected Turn the JOG dial until the disc number you want appears in the display to select the first disc (ALL DISCS) or the disc you want (1 DISC). ALL DISC S 1 d1 SC 8 CLEAR 2 3 4 2 0 CD 1 5 6 7 8 Basic Operations 5 When you turn off the player by pressing the POWER switch (standby mode) Display information while playing a disc While playing a disc, the display shows the current disc number, track number, playing time of the track and the next disc number. Next disc number Current disc number 1 ALL DISC S DISC TRACK 20 1 Current track number 2 3 4 MIN 5 SEC 0 28 CD 1 6 7 8 NEXT DISC 57 Playing time of the track Basic Operations The player remembers the last playing disc and the play mode (Continuous, Shuffle (see page 12) or Program (see page 13)). When you turn on the player again, therefore, the player plays the same disc in the same play mode. Note that the player does not remember this information, if you turn off the player by pressing the power switch of the amplifier or receiver while the AC power cord is connected to the switched AC outlet of the amplifier or receiver. Press ENTER to start playing. The selected disc is set to the playing position, and the player plays all the discs from the selected one (ALL DISCS) or all the tracks once (1 DISC). Adjust the volume on the amplifier. To stop playback Press p. ≠/± ENTER OPEN ENTER CONTINUE SHUFFLE PROGRAM AMS REPEAT POWER CHECK BLOCK 1 BLOCK 5 BLOCK 2 BLOCK 6 BLOCK 3 BLOCK 7 CLEAR BLOCK 4 OPEN BLOCK 8 · P p To Press Pause P Resume playing after pause P or · Go to the next disc DISC SKIP + once. Hold down the button to skip discs. Go back to the preceding disc DISC SKIP – once. Hold down the button to skip discs. Go to the next track ± Go back to the preceding track ≠ Stop playing and remove the disc OPEN and then ENTER. The disc comes to the loading position. 9 Playing CDs Locating a Specific Disc ENTER JOG Specifying the Next Disc to Play You can specify the next disc to play while playing a disc in Continuous or 1 DISC Shuffle Play mode. While playing a disc, turn the JOG dial until the disc number you want appears in the display. POWER Next disc number 1 ALL DISC S DISC TRACK 20 1 2 3 MIN 4 5 SEC 0 28 CD 1 6 7 8 NEXT DISC 38 After the current disc is played, the next disc you have specified starts playing. If you want to skip to the next disc right away, press ENTER while playing the current disc. DISC To cancel the disc you have specified Number buttons Press CONTINUE twice. ENTER Selecting a disc on the player Turn the JOG dial until the disc number you want appears in the display. Press ENTER to start play. Selecting a disc directly using the remote 1 Press DISC. 2 Press the number button of the disc. Example: To enter number 35 Press 3, then 5. To enter number 100 Press 1, then 0 twice. 3 10 Press ENTER to start play. Getting Playing Started CDs Locating a Specific Track or a Point in a Track You can quickly locate any track while playing a disc using the ≠/± (AMS: Automatic Music Sensor) buttons or number buttons on the remote. You can also locate a specific point in a track while playing a disc. To locate Press the next or succeeding tracks ± repeatedly until you find the track the current or preceding tracks ≠ repeatedly until you find the track a specific track directly Z TRACK, the number button of the track, and then ENTER. When you locate a track with a number over 10, press the 10’s digit first, then the 1’s digit. a point in a track while monitoring the sound Z ) (forward) or 0 (backward) and hold down until you find the point a point in a track quickly by observing the display Z ) (forward) or 0 (backward) and hold down until you find the point during pause. You will not hear the sound during the operation. POWER ≠/± Note If “ ” appears in the display, the disc has reached the end while you were pressing ). Press 0 or ≠ to go back. TRACK Number buttons ENTER =/+ 0/) 11 Playing CDs Playing Repeatedly You can play discs/tracks repeatedly in any play mode. REPEAT Playing in Random Order (Shuffle Play) You can have the player “shuffle” the tracks and play in random order. The player shuffles all the tracks on all discs or on the disc you specified. SHUFFLE · ENTER JOG POWER POWER Press REPEAT while playing a disc. “REPEAT” appears in the display. The player repeats the discs/tracks as follows: 1 When the disc is played in The player repeats ALL DISCS Continuous Play (page 8) All tracks on all discs Press SHUFFLE to select ALL DISCS or 1 DISC Shuffle Play mode. Each time you press SHUFFLE, “ALL DISCS” or “1 DISC” appears in the display. 1 DISC Continuous Play (page 8) All tracks on the current disc When you select The player plays ALL DISCS Shuffle Play (page 12) ALL DISCS The player does not repeat discs/tracks but keeps shuffling until you stop playback whether or not you press REPEAT. All tracks on all discs in random order. The player keeps shuffling tracks until you stop playback.* 1 DISC 1 DISC Shuffle Play (page 12) All tracks on the specific disc in random order All tracks on the current disc in random order * The player may play the same track more than once. Program Play (page 13) The same program 2 When you want to specify the disc for 1 DISC Shuffle Play, turn the JOG dial until the disc number you want appears in the display. 3 Press ENTER or ·. ALL DISCS or 1 DISC Shuffle Play starts. ” appears in the display while the player is “ “shuffling” the discs or the tracks. To cancel Repeat Play Press REPEAT repeatedly until “REPEAT” disappears from the display. Repeating the current track You can repeat only the current track. While the track you want is being played, press REPEAT repeatedly until “REPEAT 1” appears in the display. 12 To cancel Shuffle Play Press CONTINUE. You can start Shuffle Play while playing Press SHUFFLE, and Shuffle Play starts from the current track. Getting Playing Started CDs 2 You can directly select a disc for 1 DISC Shuffle Play See “Selecting a disc directly using the remote” on page 10. Turn the JOG dial until the disc number you want appears in the display. 1 DISC You can go to the next disc during 1 DISC Shuffle Play 2 3 4 TRACK 20 AL Press DISC SKIP +. 5 6 7 8 STEP 1 PROGRAM CD 1 Disc number You can specify the next disc to play during 1 DISC Shuffle Play 3 Turn the JOG dial to specify the next disc. After all the tracks on the current disc are played in random order, the next disc starts playing. If you want to skip to the next disc right away, press ENTER while playing the current disc. To program a whole disc, skip this step. Press ≠/± until the track number you want appears in the display. 1 DISC 2 3 4 TRACK 20 PROGRAM 5 6 7 8 STEP 1 1 CD 1 Note You cannot specify the next disc to play during ALL DISCS Shuffle Play. Track number 4 Press ENTER or PROGRAM. The track being programmed Creating Your Own Program (Program Play) 1 DISC 20 PROGRAM You can arrange the order of the tracks and/or discs to create your own program and the program is stored automatically. A program can contain up to 32 “steps” — one “step” may contain a track or a whole disc. You can make a program using the controls on the remote as well as the ones on the player. However, the programming procedures are different. ≠/± ENTER JOG 1 The disc being programmed 5 Creating a program on the player PROGRAM 2 TRACK 6 3 4 5 6 7 8 STEP 1 CD 1 Playing order To program other discs/tracks, do the following: To program Repeat Steps All tracks of another disc(s) 2 and 4 Other tracks on the same disc 3 and 4 Other tracks on other discs 2 to 4 Press · to start Program Play. To cancel Program Play Press CONTINUE. POWER The program remains even after Program Play ends When you press ·, you can play the same program again. · 1 CHECK CLEAR Press PROGRAM. If a program is already stored, the last step of the program appears in the display. When you want to erase the whole program, hold down CLEAR until “All Clr” appears in the display (see page 14). When you press PROGRAM during Continuous or Shuffle Play The program will be played after the current track. The program remains until you erase them If you replace discs, the programmed disc and track numbers remain. So, the player plays only the existing disc and track numbers. However, the disc and track numbers that are not found in the player or on the disc are deleted from the program, and the rest of the program is played in the programmed order. 13 Playing CDs Creating a program using the remote Checking the programmed order You can check your program before or after you start playing. PROGRAM TRACK DISC Number buttons Press CHECK. Each time you press this button, the display shows the disc and track number of each step in the programmed order. (When a whole disc is programmed as one step, “AL” appears instead of the track number.) After the last step in the program, the display shows “End” and returns to the original display. ENTER CHECK CLEAR · Press PROGRAM. 2 Press DISC. 3 Press the number button of the disc. 4 To program a whole disc, skip this step and go to Step 6. Press TRACK. 5 Press the number button of the track. 6 Press ENTER. 7 To program other discs/tracks, do the following: To You need to Erase a track or disc Press CHECK until the track or disc you want to erase appears in the display, then press CLEAR Erase the last track or disc in the program Press CLEAR. Each time you press the button, the last track or disc will be cleared. Add tracks or discs to the end of the program Follow the programming procedure Erase the whole program completely Hold down CLEAR until “All Clr” appears in the display to erase the whole program, then create a new program following the programming procedure To program Repeat Steps All tracks of another disc(s) 2, 3 and 6 Erasing the program stored in memory Other tracks on the same disc 4 to 6 1 Press PROGRAM in the stop mode. Other tracks on other discs 2 to 6 2 Hold down CLEAR until ”All Clr” appears in the display. Press · to start Program Play. To cancel Program Play Press CONTINUE. 14 You can change your program before you start playing. 1 8 Changing the programmed order Getting Playing Started CDs Playing Discs in a Group (Block Play) You can classify discs in advance by artists, category, etc. when inserting discs into the slots, and play them only within the group (called “block”) you specified. The player has eight blocks, and each slot is assigned to one of the blocks as shown below. Block number Disc slot 1 1–25 2 26–50 3 51–75 4 76–100 5 101–125 6 126–150 7 151–175 8 176–200 1 Insert discs into the slot of the block you want, referring to the table. (See also “Inserting Discs” on page 6.) 2 Press one of the BLOCK 1–8 buttons to select the block. When using the remote, press BLOCK, the number button of the block you want, then ENTER. The block number appears in the display. 3 Press ·. Block Play starts from the disc which is the most upward number within a block and located closest to the playing position. You can start Block Play from the disc you want When you want to start Block Play from the disc you want, turn the JOG dial to select the disc, then press ENTER. To cancel Block Play Press the corresponding BLOCK 1–8 button. You can enjoy Continuous, Shuffle or Repeat Play within a certain block. Note The block number does not appear if no disc is put into the block you specified. POWER BLOCK 1–8 · BLOCK Number buttons ENTER · 15 Additional Information On transportation Precautions On safety • Caution — The use of optical instruments with this product will increase eye hazard. • Should any solid object or liquid fall into the cabinet, unplug the player and have it checked by qualified personnel before operating it any further. • When transporting the player, press OPEN then remove all the discs from the player and turn the power off. If you have any questions or problems concerning your player, please consult your nearest Sony dealer. Notes on CDs On power sources • Before operating the player, check that the operating voltage of the player is identical with your local power supply. The operating voltage is indicated on the nameplate at the rear of the player. • The player is not disconnected from the AC power source (mains) as long as it is connected to the wall outlet, even if the player itself has been turned off. • If you are not going to use the player for a long time, be sure to disconnect the player from the wall outlet. To disconnect the AC power cord (mains lead), grasp the plug itself; never pull the cord. • AC power cord must be changed only at the qualified service shop. On placement • Place the player in a location with adequate ventilation to prevent heat build-up in the player. • Do not place the player on a soft surface such as a rug that might block the ventilation holes on the bottom. • Do not place the player in a location near heat sources, or in a place subject to direct sunlight, excessive dust or mechanical shock. On handling CDs • To keep the disc clean, handle the disc carefully. • Do not stick paper or tape on the disc. • Do not expose the disc to direct sunlight or heat sources such as hot air ducts, nor leave it in a car parked in direct sunlight as there can be considerable rise in temperature inside the car. • After removing a disc from the disc slot, store the disc in its case. On cleaning • Before playing, clean the disc with a cleaning cloth. Wipe the disc from the center out. On operation • If the player is brought directly from a cold to a warm location, or is placed in a very damp room, moisture may condense on the lenses inside the player. Should this occur, the player may not operate properly. In this case, leave the player turned on for about an hour until the moisture evaporates. On adjusting volume • Do not turn up the volume while listening to a portion with very low level inputs or no audio signals. If you do, the speakers may be damaged when a peak level portion is played. On cleaning • Clean the cabinet, panel and controls with a soft cloth slightly moistened with a mild detergent solution. Do not use any type of abrasive pad, scouring powder or solvent such as alcohol or benzine. 16 • Do not use solvents such as benzine, thinner, commercially available cleaners or anti-static spray intended for vinyl LPs. Playing CDs in Various Modes Additional Information Troubleshooting If you experience any of the following difficulties while using the player, use this troubleshooting guide to help you remedy the problem. Should any problem persist, consult your nearest Sony dealer. Specifications Compact disc player Laser Semiconductor laser (λ = 780 nm) Emission duration: continuous Laser output Max 44.6 µW* * This output is the value measured at a distance of 200 mm from the objective lens surface on the Optical Pick-up block with 7 mm aperture. There is no sound. /Check that the player is connected securely. /Make sure you operate the amplifier correctly. The CD does not play. /There is no CD in a slot (“–no dISC–” appears). Insert a CD. /Insert the CD with the label side facing right. /Clean the CD (see page 16). /Moisture has condensed inside the player. Press OPEN and leave the player turned on for about an hour (see page 16). The remote does not function. /Remove obstacles in the path of the remote and the player. /Point the remote at the remote sensor g on the player. /Replace all the batteries in the remote with new ones if they are weak. /Set the CD1/2/3 switch on the remote according to the position of the COMMAND MODE selector displayed in the front panel display (see page 5). The player functions incorrectly. /The microcomputer chips may be operating incorrectly. Disconnect the AC power cord, then connect it back to the wall outlet to reset the player. Frequency response 20 Hz to 20 kHz ± 0.5 dB Signal-to-noise ratio More than 100 dB Dynamic range More than 98 dB Harmonic distortion Less than 0.0045% Channel separation More than 95 dB Outputs LINE OUT Load impedance Jack type Maximum output level Phono jacks Over 10 kilohms 2V (at 50 kilohms) General Power requirements 120 V AC, 60 Hz Power consumption 13 W Dimensions (approx.) (w/h/d) When the front cover is closed 430 × 200 × 480 mm (17 × 7 7/8 × 19 in.) incl. projecting parts When the front cover is open 430 × 200 × 600 mm (17 × 7 7/8 × 23 5/8 in.) incl. projecting parts Mass (approx.) 9.0 kg (19 lbs 14 oz) Supplied accessories Audio cord (2 phono plugs – 2 phono plugs) (1) Remote commander (remote) (1) Sony SUM-3 (NS) batteries (2) CD booklet holders (2) Label (1) Design and specifications are subject to change without notice. 17 Index Additional Information Index Searching. See Locating Selecting a disc 10 Shuffle Play on all discs 12 on one disc 12 Specifying the next disc 10 A AMS 11 Automatic Music Sensor 11. T B Block Play 15 C, D Connecting 4 Continuous Play 8 E, F, G Erasing programs 14 H Handling CDs 16 Hookups overview 4 Troubleshooting 17 U, V, W, X, Y, Z Unpacking 4 Buttons BLOCK 15 BLOCK 1–8 15 CHECK 14 CLEAR 14 CONTINUE 8 DISC 10 DISC SKIP 9 ENTER 9 Number 11 OPEN 6 PROGRAM 13 REPEAT 12 SHUFFLE 12 TRACK 11 ≠/± 11 · 9 P 9 p 9 0/) 11 Switches CD1/2/3 5 POWER 6 I Inserting CDs 6 J, K JOG dial 6 L, M, N O Locating a specific point 11 a specific track 11 by monitoring 11 by observing the display 11 directly 11 discs 10 using AMS 11 P, Q Playback Block Play 15 Continuous Play 8 Program Play 13 Repeat Play 12 Shuffle Play 12 Program changing 14 checking 14 erasing 14 R Remote control 4 Repeating 12 Rotary table 6 18 Names of controls S Jacks CONTROL A1 5 LINE OUT 5 Others COMMAND MODE selector Disc slots 6 Display 9 Front cover 6 JOG dial 6, 8 Rotary table 6 g 4 5 Additional Information 19 Additional Information Sony Corporation 20 Printed in Malaysia