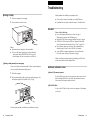
1
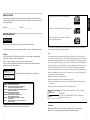
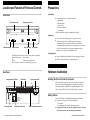
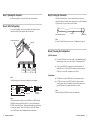
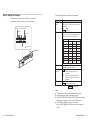
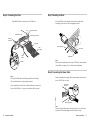
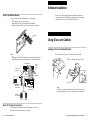
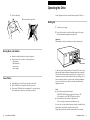
CDU948S
CD-R Drive Unit
CDU948S
CD-R Drive Unit
User’s Guide
Mode d’emploi
Bedienungsanleitung
Manual de instrucciones
Manuale d’istruzione
©1998 by Sony Corporation
Rev. 1.0
BKC: 98000668
User’s Guide
Mode d’emploi
Bedienungsanleitung
Manual de instrucciones
Manuale d’istruzione
The model and serial numbers are located on the bottom of the drive. Record these numbers
in the spaces provided below. Refer to them whenever you call upon your sales representative
regarding this product.
Model No. __________________
Serial No. ___________________
This unit uses CD-R discs with the following mark.
English
Owner’s Record
This unit uses CD-ROM discs with the following mark.
Safety Regulations
When you use this unit as a CD player, use compact
discs with the following mark.
WARNING
To prevent fire or shock hazard, do not expose the unit to rain or moisture.
To avoid electrical shock, do not open the cabinet. Refer servicing to qualified personnel only.
Caution:
As the laser beam in this CDU948S is harmful to the eyes, do not attempt to disassemble the
cabinet. Refer servicing to qualified personnel only.
The use of optical instruments with this product will increase eye hazard.
The use of controls or adjustments or performance of procedures other than those specified
herein may result in hazardous radiation.
DANGER
INVISIBLE LASER RADIATION WHEN OPEN.
AVIOD DIRECT EXPOSIRE TOP BEAM
VORSICHT
This label is located on the drive unit’s internal chassis.
UNSICHTBARE LASERSTRAHLUNG. WENN ABDECKUNG
GEOFFNET
NICHT DEMSTRAHL AUSSETZEN.
INVISIBLE LASER RADIATION WHEN OPEN.
AVOID DIRECT EXPOSURE TO BEAM.
RADIATIONS INVISIBLES DU LASER EN CAS D'OUVERTURE.
EVITER TOUTE EXPOSITION DIRECTE AU FAISCEAU.
VORSICHT UNSICHTBARE LASERSTRAHLUNG, WENN ABDECKUNG GEÖFFNET.
NICHT DEM STRAHL AUSSETZEN.
ADVARSEL USYNLIG LASERSTRÅLING VED ÅBNING.
UNDGÅ UDS/ETTELSE FOR STRÅLING.
DANGER
DANGER
ADVARSEL USYNLIG LASERSTRÅLING NÅR DEKSEL ÅPNES.
UNNGÅ EKSPONERING FOR STRÅLEN.
VARNING
OSYNLIG LASERSTRÅLING NÅR DENNA DEL AR ÖPPNAD.
STRÅLEN ÄR FARLIG.
VAROI
NÄKYMÄTÖN AVATTAESSA OLET ALTTINA LASERSÄTEILYLLE.
ÄLÄ KATSO SÄTEESEN.
This label is located on the bottom of the drive unit enclosure.
2
You are cautioned that any changes or modifications not expressly approved in this manual
could void your authority to operate this equipment.
Note:
This equipment has been tested and found to comply with the limits for a Class B digital
device, pursuant to Part 15 of the FCC Rules. These limits are designed to provide reasonable
protection against harmful interference in a residential installation. This equipment generates,
uses, and can radiate radio frequency energy and, if not installed and used in accordance with
the instructions, may cause harmful interference to radio communications. However, there is
no guarantee that interference will not occur in a particular installation. If this equipment
does cause harmful interference to radio or television reception, which can be determined by
turning the equipment off and on, the user is encouraged to try to correct the interference by
one or more of the following measures:
● Reorient or relocate the receiving antenna.
● Increase the separation between the equipment and receiver.
● Connect the equipment into an outlet on a circuit different from that to which the receiver
is connected.
● Consult the dealer or an experienced radio/TV technician for help.
CLASS 1
LASER PRODUCT
LASER KLASSE 1
PRODUKT
This CD-R drive unit is classified as a CLASS 1 LASER
PRODUCT.
The CLASS 1 LASER PRODUCT label is located at the
bottom of the enclosure.
Trademarks
Windows and Windows 95/NT are registered trademarks of Microsoft Corporation.
IBM-PC/AT is a registered trademarks of International Business Machines.
3
Contents
Introduction
Introduction
5
This manual assists you with the 4x write / 8x read CDU948S drive which
uses CD-R media storing up to 650 Mbytes of data.
Features..........................................................................................................5
System Requirements for WINDOWS 95/NT .................................................5
Location and Function of Parts and Controls
6
Front Panel / Rear Panel ................................................................................6
Precautions
7
Hardware Installation
7
Installing the Drive Unit into the Computer.....................................................7
Getting started ................................................................................................7
Step 1: Opening the Computer.......................................................................8
Step 2: SCSI Configuration ............................................................................8
Step 3: Finding the Connector........................................................................9
Step 4: Choosing the Configuration................................................................9
Step 5: Setting the Jumpers .........................................................................10
Step 6: Connecting the Drive........................................................................12
Step 7: Mounting the Drive ...........................................................................13
Step 8: Connecting the Power Cable ...........................................................13
Step 9: Installation Review ...........................................................................14
Step 10: Closing the Computer ....................................................................14
Software Installation
15
Using Discs and Caddies
15
Loading a Disc into a Standard Caddy.........................................................15
Storing Discs and Caddies ...........................................................................16
Care of Discs ................................................................................................16
Operating the Drive
Features
The drive unit has the following features:
General
● 5 1/4 inch half-height drive form factor.
● Fast SCSI bus interface embedded (Based on SCSI-2).
● 2 Mbytes of buffer memory.
● Power loading and power eject.
● Emergency eject function allows manual caddy ejection.
Supported disc formats
Reads and writes data in both CD-ROM, CD-ROM XA
(additional hard- and software) standard formats.
● Reads and writes CD-BRIDGE format, includes PHOTO-CD.
● Reads standard CD-DA (“Red Book”) encoded discs, reads and writes
CD-R discs conforming to “Orange Book Part II”.
●
Performance
Supports read and write operation at standard, double, and quadruple
speeds along with read-only at 8x speed.
● Fast access time assures high-speed reading and writing.
●
Audio
Outputs 16-bit digital audio data over SCSI interface.
● Audio CD playback via Audio Out and headphones jack.
●
Note:
Please read this manual thoroughly before attempting installation.
17
Starting Up....................................................................................................17
Ejecting a Caddy...........................................................................................18
System Requirements for WINDOWS 95/NT
●
Troubleshooting
19
Checklist .......................................................................................................19
Additional Installation Cases.........................................................................19
●
●
●
●
Specifications
4
20
●
System requirements of format software
SCSI host adapter card
20 MB or more free Hard Disc space
3.5" floppy disk drive
Mouse (Microsoft-compatible)
16 MB of RAM or more
Introduction
5
Location and Function of Parts and Controls
Precautions
Front Panel
■ Installation
Avoid placing the drive in a location subject to:
– high humidity
– high temperature
– excessive dust
– mechanical vibration
– direct sunlight.
Only horizontal drive operation recommended, not tilted.
●
Caddy insertion slot
Emergency eject hole
CD Caddy
■ Operation
●
●
Headphones jack
Volume control
Busy indicator
Eject button
Do not move drive during operation, it may cause an error.
Avoid exposing the drive to sudden temperature changes as
condensation may form on a lens inside the drive. Should the
surrounding temperature suddenly rise during operation, wait at least
1 hour before turning off power. Operation immediately after a
temperature rise may cause a malfunction as well.
■ Transportation
This indicator shows the unit’s status in various phases of operation.
● Seek, read and write:
Flashes amber
● Error:
Lights up amber and stays lit
When the power is turned on, the indicator lights up green.
Jumper block for SCSI bus
Terminators
GND
F-GND
Frame ground tab
6
●
Keep the original packing materials for future transport of the drive.
Remove caddy before moving or repackaging drive.
Hardware Installation
Rear Panel
L GND R
AUDIO OUT
●
0 1 2
Power-in connector
Installing the Drive Unit into the Computer
Before starting this section, you may wish to consult your computer’s
manual for a more detailed description of installing new hardware.
Our example assumes an IBM-PC/AT compatible computer, a SCSI
adapter card and a SCSI interface cable (50 pin flat) are supplied.
GND
INTERFACE CONNECTOR
5V±5% GND 12V±10%
DC INPUT
TEST MODE
PREVENT/ALLOW
ID SELECT
DEVICE TYPE
Audio output connector
Location and Function of Parts and Controls
SCSI bus interface connector
Getting Started
Assure a SCSI adapter is installed before installing the CD-R drive.
● Prepare the necessary parts and tools not supplied:
– a screwdriver
– Two mounting rails if computer has mounting tracks.
● Unplug and disconnect any attached computer cables for your own
safety. Restore power only after completing installation.
Precautions/Hardware Installation
7
Step 1: Opening the Computer
Step 3: Finding the Connector
Remove the computer’s cover as directed in the Owner’s Manual.
The SCSI cable should have 1 or more unused connectors on the end
opposite the adapter, as shown, find a connector not in use. We recommend
a connector at the very end of the 50 pin SCSI cable.
Step 2: SCSI Configuration
Locate the 50 pin SCSI cable in your computer. One end of the cable is
connected to the SCSI host adapter card as shown below.
SCSI host adapter connector
Pin 1 (red)
Opposite End
1
SCSI Host Adapter Card
Note:
If no free 50 pin SCSI connector exists, see “Troubleshooting”, page 19.
49
Red Edge
50
Step 4: Choosing the Configuration
■ SCSI ID selection
SCSI
Device
SCSI
Device
●
If no other SCSI devices are in the system, we recommend the default
jumper settings. In this case, go on to Step 6: “Connecting the Drive”.
●
If one or more SCSI ID’s are assigned, you must determine if the
default ID# 6 is free. If SCSI ID# 6 is assigned, you must change the
CD-R drive to a free ID# via jumpers at rear of drive.
●
If CD-R drive is on end of SCSI cable, leave terminators in place.
If CD-R drive is not on end of SCSI cable or last physical device,
carefully remove the drive termination (resistors) and assure the last
physical SCSI device is properly terminated or activated.
SCSI
Device
■ Termination
Note:
The following types of cables may be installed in your computer:
Find this
flat cable!
➧
68 Pin/
50 Pin
Width
SCSI Cable
34 Pin
Width
40 Pin
Width
IDE Cable
●
Floppy Disk
Drive Cable
Note:
Only the last physical SCSI device needs to be terminated.
Note:
There may already be internal or external SCSI devices (HDD, Scanner,
CD-ROM) connected to the SCSI cable. If so, you must determine the
SCSI ID# of each SCSI device. This information will be required for Step
5 “Setting the Jumpers”. Refer to SCSI device(s) for ID data. In some
cases a SCSI chip set may be implemented in the motherboard.
8
Hardware Installation
Hardware Installation
9
The following table shows the function of each jumper.
Step 5: Setting the Jumpers
Set jumpers on rear of drive unit according to your computer
configuration. Jumpers are factory preset as shown below.
DEVICE TYPE
Jumper
DEVICE
TYPE
PREVENT/ ALLOW
ID SELECT
0
1
2
ID SELECT
TEST MODE
Function
The setting of this jumper determines whether the
SCSI device type code in the inquiry data is WO
or CD-ROM.
ON: WORM
OFF: CD-ROM
Assign the drive unit’s ID number by setting these
jumpers to ON or OFF. Do not assign the same
number as one used for other SCSI device.
ID number
KEY
0
1
2
3
4
5
6
7
= Pin removed
Terminators
R
CTO
NNE
CO
ACE
- 10%
12V+
ND
- % G UT
5V+5 C INP
D
RF
INTE
ODE
T M ALLO
TES VENT/
PREELECT PE
ID S ICE TY
DEV
W
2
01
DR
L GN OUT
IO
AUD
D
F.GN
KEY
PREVENT/
ALLOW
TEST MODE
Jumper settings
0
1
2
OFF
OFF
OFF
ON
OFF
OFF
OFF
ON
OFF
ON
ON
OFF
OFF
OFF
ON
ON
OFF
ON
OFF
ON
ON
ON
ON
ON
Used to prevent the SCSI bus interface connector
from being plugged in upside down.
ON: Allows insert and removal of a CD caddy
with the eject button and the eject
command.
OFF: Prevents insert and removal of a CD
caddy with the eject button or an eject
command.
ON: Enables test mode.
OFF: Enables normal operation.
Factory settings
Notes:
● The upper row of pins is (without position KEY) is ground.
● Remove jumper to set OFF, install jumper to set ON.
● ID SELECT, PREVENT/ALLOW, and TEST MODE are recognized
when the power supply is turned on or the SCSI bus is reset.
● TEST MODE is used exclusively for factory testing.
Do not set TEST MODE to ON. Doing so may cause unexpected
results.
10
Hardware Installation
Hardware Installation
11
Step 6: Connecting the Drive
Step 7: Mounting the Drive
Attach flat SCSI cable to connector at rear of CD-R drive.
Pin 1
CDU948S Drive Unit
Audio Out
Connector
Insert the CD-R drive into computer front as shown, routing cables
accordingly. Secure drive to frame with appropriate screws.
Interface Connector
Power Supply Connector
TOR
NEC
ON
CE C
- 10%
12V+
ND
- % G UT
5V+5 C INP
-
D
R
2
01
DR
L GN OUT
IO
AUD
D
F.GN
+10%
CO
INT
01
L
OUT
R GND
IO
AUD
W
ODE
T M ALLO
TES VENT/
PREELECT PE
ID S ICE TY
DEV
12V
GND UT
- %
INP
5V+5 DC
TO
EC
NN
CE
FA
ER
RFA
INTE
2
E
LOW
T MOD
T/AL
TES VEN
ECT
PRE
SEL
ID ITY
PAR
ND
F.G
Red Edge
Mounting Screws
SCSI
Flat Cable
Flat Cable
Audio
Cable
2
01
DR
L GN OUT
IO
AUD
ODE
TM
TES VENT/A
PREELECT P
ID S ICE TY
DEV
Red Wire
ND
F.G
Audio Cable
Note:
Slide rails (not included) may be necessary if CD-R drive cannot cannot be
secured. Refer to computer’s User’s Guide for more information.
Step 8: Connecting the Power Cable
Notes:
The 50 pin flat SCSI cable must be firmly attached with its red edge
(Pin 1) positioned next to the power supply connector.
Locate an available power supply cable, within computer, and connect it to
the rear of CD-R drive as shown.
Power Supply
Connector
If your computer has a Sound Card, an Audio Cable may be connected to
the rear of the CD-R drive. Contact a local dealer if cable is required.
5V +- 5% GND 12V +- 10%
DC INPUT
12V
R
2
ODELLOW
TM
TES VENT/A
PREELECT
ID S ITY
PAR
+- 10%
ND
+ 5% G PUT
5V -
DC
IN
ON
CE C
RFA
INTE
TO
NEC
Power Supply Cable
Note:
The power supply cable connector is designed to fit one way, do not force
it upside down, this could damage drive and void the warranty.
12
Hardware Installation
Hardware Installation
13
Software Installation
Step 9: Installation Review
Now review the hardware installation process, assuring that:
● All connectors are properly connected.
● Each SCSI device has its own unique SCSI ID number.
● The last physical SCSI device on the bus is properly terminated.
Please refer to CD-R formatting software manual for instruction on
software installation. CD-R formatting software must first be properly
installed in order to write CD’s with the CDU948S drive.
1
49
Red Edge
50
Using Discs and Caddies
Loading a Disc into a Standard Caddy
Notes
● Red edge of 50 pin flat SCSI cable must be on pin 1 of host adapter.
● The following is a sample configuration of CDU948S installation.
CDU948S Drive
Audio Cable
(supplied)
L GND R
AUDIO OUT
F.GND
012
2 Place a disc, label up, into the caddy.
Power
Supply
Cable
INTERFACE CONNECTOR
5V±5% GND 12V±10%
TEST MODE
PREVENT/ALLOW
ID SELECT
DEVICE TYPE
DC INPUT
SCSI
Cable
(Not included)
49
50
Sound Card
(Not included)
1 Press both tabs at opposite end to shutter to open caddy lid.
Red Edge
1
2
SCSI Card
(Not included)
Note:
CD-R disc’s recording surface must be clean, please do not touch it.
Data cannot be recorded is CD’s recording surface is contaminated.
Speakers
(Not included)
Step 10: Closing the Computer
Carefully replace computer cover and reinstall screws, per Owner’s
Manual. Now hardware installation is complete.
14
Hardware Installation
Software Installation/Using Discs and Caddies
15
Operating the Drive
3 Close the lid firmly.
Assure application software is installed before using the CD-R drive.
4 Do not manually open slide.
Starting Up
1 Turn on the power supply.
2 Insert caddy into drive slot with disc label facing up. Push gently
until auto-load mechanism pulls caddy into drive.
Important:
When loading a caddy, do not attempt to overpower the auto-load.
Storing Discs and Caddies
●
●
Remove the caddy from the drive before moving drive.
Do not store the disc or caddy in a location subject to:
– high humidity
– high temperature
– excessive dust
– direct sunlight
Care of Discs
●
●
●
Only hold disc by its edge. Do not touch the record surface.
Wipe CD-ROM disc with optional CD cleaner to clean it.
Do not wipe CD-R discs before recording data. To avoid scratching
the recording surface, blow away dust using an air blower.
As the drive begins reading the Table of Contents (TOC) data, the busy
indicator lights amber and remains illuminated until read is completed.
When the busy indicator changes to green the drive is ready to receive
commands, data may be retrieved from the disc. After loading a disc, it
takes a moment for the drive to become ready while Program Memory
Area is read. From this point, follow instructions provided with the
application software.
Notes:
Drive will not permit caddy insertion if:
– PREVENT/ALLOW option in jumper block is set to OFF.
– Host computer is set to PREVENT mode via software.
● Busy indicator on drive continues to light amber if:
– Disc is not properly inserted or a malfunction occurs.
●
In such a case, eject the caddy and reinsert it properly. Should the light
remain amber, consult dealer or qualified service point.
During audio play the busy indicator remains amber, this is normal.
16
Using Discs and Caddies
Operating the Drive
17
Troubleshooting
Should problems arise installing or operating the drive:
Ejecting a Caddy
1 Turn on the computer’s power supply.
2 Press eject button on the drive unit
●
●
Please verify the steps of this manual were carefully followed.
If problem still exists, please confirm the items in “Checklist” below.
Checklist
CD Caddy
Notes:
Eject button does not function if software disabled.
● To eject a caddy when physical eject is software disabled:
– Assure jumper block’s PREVENT/ALLOW is set to ON.
– Switch computer off, then on or software reset SCSI bus.
●
Please verify the following:
● Power cable properly attached to drive, Step 8 on page 13.
When properly connected, the LED lights green.
● Both ends of SCSI cable are properly attached, check pin 1 position.
● SCSI ID# of CD-R is unique to SCSI bus. Compare all other SCSI
devices (internal and external) and see Step 2 – Step 5, pages 8-10.
● Check all other jumpers on rear of drive. We recommend factory
defaults on pages 10 and 11 with a SCSI ID# 6 (if possible).
● Assure SCSI bus is properly terminated or activated at both ends.
For details, please see Step 4, Termination, on page 9.
Should you still have problems operating or installing your CD-R drive,
please contact Hotline or local computer dealer.
■ Ejecting a caddy manually in an emergency
In the event of electrical or mechanical drive failure, a manual emergency
eject is provided to allow manual caddy removal.
1 Turn off the computer.
2 Insert a pointed object, perhaps a paper clip, into the emergency eject
hole and push (typical force required is 46 N [4.7 kg]).
Additional Installation Cases
■ No free SCSI connector present
If other SCSI devices occupy every bus connector, either remove a device
before installing CD-R drive or use a SCSI cable with more connectors.
Please contact local computer dealer for details.
■ 68 Pin SCSI Cable
If only a wide SCSI cable (68 pin) exists in the computer, a 50 pin adapter
is necessary.
at least 35 mm
After thus removing caddy, consult dealer or qualified service point.
18
Operating the Drive
Troubleshooting
19
Specifications
■ Dimension diagram
139.7
10
47.5
Incremental Write
Session at Once
Track at Once
Variable & Fixed Packet
Track Reservation
Disk at Once
1X, 2X, 4X (2X only for packet write)
1X, 2X, 4X, 8X (1X=150 kbytes/sec)
148.5
4-M3 Mounting screws
CD Caddy
■ Audio
Line out:
Headphone:
4-M3 Mounting
screws
5
Write/Read Speed:
Write:
Read:
21.9
0.7 V at 47 kΩ
0.55 V at 32 Ω
42.5
Write Methods:
41.4
146
79.25
Host interface
SCSI-2, single ended, 50 pin
Supported Read / Write formats:
CD-ROM Mode-1 & -2
CD-ROM XA (Mode-2, Form 1 & 2)
CD-Audio
Audio-combined CD-ROMs
(includes CD-EXTRA)
CD-I (Mode-2, Form 1 & 2),
CD-I Ready
CD-Bridge
Read only:
CD-R conforming to “Orange Book Part II”
203
■ General
0.8
0.8
■ Environmental conditions
Relative humidity
Climate gradient
Temperatures
Operating
Transport
(72 hours max.)
Storage
(6 month max.)
■ Drive Mass
10% to 90% (no condensation)
10°C/hour, 10% humidity/hour
42.5
5°C to 40°C (41°F to 104°F)
–40°C to 60°C (–40°F to 140°F)
Unit: mm
–30°C to 50°C (–22°F to 122°F)
1.04 kg
Important
Screws must not extend more than 4.0 mm into the side panels or the
bottom plate.
Design and specifications subject to change without notice.
20
Specifications
Specifications
22