1
Capturing Light
understanding light
Sk
y
Lig
ht
10
,
00
0
9,000
K
K
ght
dleli
Can
Aperture F/11
F/5.6
F/2.8
F/1.4
4ft
8ft
16ft
K
Light Bulb
3, 0 0
0K
00
K
Flo
od
L
K
6,000
K
0
4,
5,000
7,
00
0
K
2,000
Light
Temperature
K
0
8,00
0
00
1,
K
am
p
b
sh
Fla
Distance
2ft
Elec
tronic
Flash
b
ul
ight
Dayl
Light Temperature
Direction of Light
Time of Day
Distance of Light
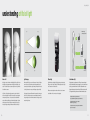
Every light source—whether the sun, a candle or camera flash—emits a color
temperature that can be measured in the Kelvin scale; named after physicist
William Thomson, 1st Baron Kelvin.
We normally see objects in everyday life lit from above, whether the sun or a
light fixture in the ceiling. Light can also come from different angles; front, side,
left, right or even below. There are also times when multiple light sources can
illuminate an object from different sides at the same time.
Consider the time of day when deciding to photograph outdoors. Distance,
direction, quality/quantity of light will change throughout the course of the
day and play an important role in how your images turn out.
It seems obvious to state, but light will be more powerful closer to the source and
weaker farther away from it. In fact, an object that is twice the distance from a
source of light will receive a quarter of the illumination. This is known as the
“Inverse Square Law” which states; “The amount of light is inversely proportional
to the square of the distance between the light source and subject”.
In general, higher temperature objects (sun, sun through clouds) are referred to as
cool, and contains more blue colors—while lower temperatures (candles and
light bulbs) are referred to as warm, which contain more red and orange colors.
Objects absorb or reflect light rays to give us color. While our human eyes can
recognize the changes in reflected color, digital cameras often “see” light
differently. We may adapt to the yellow glow from a candle light on a white piece of
paper, but your camera may see the paper as yellow. White Balance is a camera
setting, which allows you to adjust the color tone to approximate what you see.
06
Pay close attention to where the light source is coming from as this can
dramatically affect how your photograph will turn out. Further on in this guide
we will discuss how to bounce light to get a natural look by lighting from
above and adding multiple light sources to improve your image quality and
open your creative freedom.
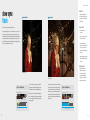
Typically, the best time of day to shoot is sunrise or sunset. Also known as “The
Golden Hours”, they provide warmer color tones and long shadows which
deliver a desirable photographic effect. “The Blue Hour” refers to dawn and
dusk, one hour before sunrise and one hour after sunset. This is the time of
day when the light is a clean, cold, blue in color and no shadows are cast.
At midday when the sun is highest, you often get dark shadows and your images
can appear flat, lacking detail, color or dimension. On a cloudy day shadows
will be diminished through diffusion, giving your photos a softer feel.
In other words, a subject that is four feet from a light source will need four times
as much light as a subject that is only two feet away. With this in mind, you
will need to compensate for the changing amount of light by adjusting your
camera’s aperture, shutter speed or add more artificial lighting.
07