1
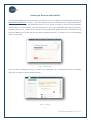
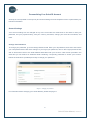
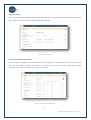
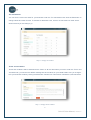
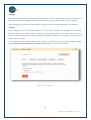
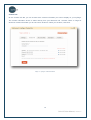
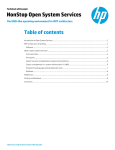
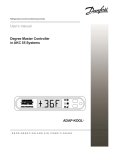
Get It Done USER MANUAL An in-depth guide to getting the most out of your business August 2012 1 SohoOS User Manual, version 5.3 Table of Contents Creating an Account with SohoOS ............................................................................................... 4 Personalizing Your SohoOS Account ........................................................................................... 5 General Settings ........................................................................................................................................ 5 Change Your Password ............................................................................................................................ 5 Payment History ....................................................................................................................................... 6 Currencies and Exchange Rates .............................................................................................................. 6 Tax Calculations ....................................................................................................................................... 7 Terms and Conditions ............................................................................................................................... 7 Purchased Items ........................................................................................................................................ 8 Docs Storage ............................................................................................................................................ 8 Sharing ........................................................................................................................................................ 9 Invite a Friend ........................................................................................................................................... 9 Importing Your Contacts ........................................................................................................................... 9 Business Info ........................................................................................................................................... 10 Change Your Email................................................................................................................................. 11 myPage ..................................................................................................................................................... 12 Settings ................................................................................................................................................... 12 Contact Info ............................................................................................................................................ 13 Me on the Web ....................................................................................................................................... 14 Description .............................................................................................................................................. 15 Portfolio ................................................................................................................................................... 15 SohoOS Business Directory ................................................................................................................... 15 Using Your SohoOS Account ...................................................................................................... 17 Navigating My Business View ................................................................................................................ 18 Navigating Selected Contact View ......................................................................................................... 20 Details ..................................................................................................................................................... 21 Notes ...................................................................................................................................................... 21 Contact Management ............................................................................................................................. 22 Clients ..................................................................................................................................................... 23 Leads ...................................................................................................................................................... 23 Personal Contacts .................................................................................................................................. 23 2 SohoOS User Manual, version 5.3 Vendors .................................................................................................................................................. 23 Business Tools ............................................................................................................................. 24 Estimates .................................................................................................................................................. 24 Invoices ..................................................................................................................................................... 25 Items .......................................................................................................................................................... 26 P.O. (Purchase Orders) ........................................................................................................................... 27 Docs .......................................................................................................................................................... 28 Soho Shop ..................................................................................................................................... 29 Introducing the Soho Shop ..................................................................................................................... 29 Soho Shop Features ................................................................................................................................ 30 The Client Machine ................................................................................................................................. 31 Super-Sized Storage .............................................................................................................................. 32 Personalized Backups ............................................................................................................................ 32 Premium Support .................................................................................................................................... 33 myPage Themes..................................................................................................................................... 34 Business Document Library .................................................................................................................... 34 White-Labeling ........................................................................................................................................ 35 Leads Widget: Get More Customers for Your Business ......................................................................... 35 Invoice Templates................................................................................................................................... 36 Time Tracker ........................................................................................................................................... 37 Currency Converter ................................................................................................................................ 39 SohoOS Support ........................................................................................................................... 40 Live Support ............................................................................................................................................. 40 Video Tutorials ......................................................................................................................................... 40 Webinars ................................................................................................................................................... 40 Walkthrough ............................................................................................................................................. 41 3 SohoOS User Manual, version 5.3 Creating an Account with SohoOS Your SohoOS experience begins with opening an account. To do so, please go to the SohoOS homepage at http://www.sohoos.com. To sign up, you can manually enter your business name, email address and a preferred password or use your Facebook account. If you choose to create an account using Facebook, SohoOS will use your Facebook email and password for your login credentials and will auto-generate a business name for you. To learn how to change your business name, please see page 10. Please note that the email address you provide will also be used for password recovery, so make sure it is a valid address that you check often. Image 1 – SohoOS sign-up Once you have completed the sign up process, you will be taken to your SohoOS account’s homepage, where you can begin to use SohoOS right away. Image 2 – Homepage 4 SohoOS User Manual, version 5.3 Personalizing Your SohoOS Account Click My Account (located on the top bar) and choose Settings from the dropdown menu to personalize your business information. General Settings Your account settings can be changed at any time. Look under the General tab to find links to reset your password, see your payment history, edit your currency and taxes, change your terms and conditions, and more. Change Your Password To change your password, go to the Change Password tab. Enter your old password, then enter and confirm your new password and click Save Changes. If you forgot your password, click on the Forgot password? link and an email will be sent to the email address associated with your account. Click the link provided in the email and you will receive an additional email containing a temporary password to access your account. Follow the instructions provided previously to change your password. Image 3 – Changing your password For information about changing your email address, please see page 11. 5 SohoOS User Manual, version 5.3 Payment History Any time you purchase additional features from the Soho Shop, they will appear under the Payment History tab. To learn more about the Soho Shop, please see page 29. Image 4 – Payment History Currencies and Exchange Rates SohoOS uses U.S. Dollars as the default currency. To change your default currency, click the Currencies tab. You can choose a currency from the list, or add a new one. Each currency comes with a default conversion rate. Click Edit next to any currency to modify it. Image 5 – Currencies and Exchange Rates 6 SohoOS User Manual, version 5.3 Tax Calculations You can set the correct tax rates for your business under the Tax Calculations tab. Click the Edit button to change names and rates of taxes. To activate or deactivate a tax, check or uncheck the box under Active. Click Save and you are ready to go. Image 6 – Changing Tax Calculation Terms and Conditions Terms and conditions will be attached as the footer on all the documents you send. Under the Terms and Conditions tab, you will see the default message we have entered on your behalf. Make sure you change it to fit your business needs by clicking the Edit button. Please note: This section is limited to 2,000 characters. Image 7 – Changing Terms & Conditions 7 SohoOS User Manual, version 5.3 Purchased Items This tab features a list of additional items that you can purchase to improve the way you do business. Click each item to learn more about it and find a direct link to the Soho Shop. Once you have purchased a feature, you can access it here. Current items available for purchase include: § Super-Sized Storage § Invoice Templates § Personalized Backups § White-Labeling § Premium Support § Leads Widget § myPage Themes § Business Document Library § The Client Machine § Time Tracker More items are added to the Soho Shop all the time, so check back frequently. To learn more about these tools and how to use them, please see page 29. Docs Storage Click the Docs Storage icon to see how much space you have available, how many MB you have used, and how many folders you have used. You can purchase additional document storage space in the Soho Shop. See page 31 for more details. Image 8 – Docs Storage 8 SohoOS User Manual, version 5.3 Sharing Use the Sharing tab to integrate SohoOS into your life—let your friends know about the platform, and automatically bring all your contacts from your email to your SohoOS account. Invite a Friend Do you know someone who might be interested in SohoOS? Send an invitation from the Invite a Friend tab. Enter your friend’s email address (separate multiple email addresses with commas) and click Invite. Image 9 – Inviting a friend Importing Your Contacts To import contacts from your email account, enter your email address and password. Then select which contacts from your email list you want to add to your SohoOS contact list. You can choose how to categorize each contact (Contact, Lead, Client or Vendor) from the dropdown menu to the right of each contact's name. For more information about contact categories, see page 22. Image 10 – Importing your contacts 9 SohoOS User Manual, version 5.3 Business Info The Business Info page includes basic information about your business that will appear on every feature in the system, including your invoices, purchase orders, and estimates, as well as on your myPage. Go to My Account and click Business Info to view and edit your settings. Image 11 – Business Info page On the Business Info page, you can change your business name and email address, and you can add information such as your business address, Taxpayer ID, and your telephone, mobile and fax numbers. You can also upload or change your business logo from this screen. You can only upload files in JPEG, GIF and PNG formats and up to 1 MB in size. Be sure to click Save when you are done. You can see how your invoices will look by clicking Preview My Invoice. 10 SohoOS User Manual, version 5.3 Change Your Email To change your email address, click the link beneath your current email address that says Change email. You will be prompted to enter and confirm your new email address, as well as your current password. When you are done, click Change Email. All of your SohoOS business documents will reflect the change, and you will use the new email address to log in to your account. Image 12 – Changing your email address 11 SohoOS User Manual, version 5.3 myPage myPage is a public listing on the SohoOS Business Directory. Click myPage under the My Account menu to add content and links to websites pertaining to your business that you want to display on your myPage. Under myPage, you will see five tabs: Settings, Contact Info, Me on the Web, Description, and Portfolio. Settings On the Settings tab, you can decide whether or not you want to publish your myPage on the SohoOS Business Directory. By publishing your myPage, you are making it public, and it will be visible to anyone inside or outside of SohoOS. By default, your myPage is already published. To unpublish it, uncheck the box next to Publish myPage. If you would like to set a custom URL for your myPage, you can edit it once your page is published. Note: you can only change the URL once, so make it count. When you are done, click Save. Image 13 – myPage—Settings 12 SohoOS User Manual, version 5.3 Contact Info On the Contact Info tab, you can choose which contact information you want to display on your myPage. The contact information shown is taken directly from your Business Info. Uncheck Show on Page for whichever contact information you do not want to be shown. When you are done, click Save. Image 14 – myPage—Contact Information 13 SohoOS User Manual, version 5.3 Me on the Web On the Me on the Web tab, you can add links to all your online profiles, such as your business website, catalogs and portfolios, Facebook, Twitter, LinkedIn, Google+ and YouTube. Just copy the URL into the appropriate section and, when you are done, click Save. Image 15 – myPage—Me on the Web 14 SohoOS User Manual, version 5.3 Description Write about your business and the things you do on the Description tab. You can change the title of your page, explain what you do in a nutshell, choose the industry you work in, and write a description of your business practices. When you are done, click Save. Image 16 – myPage—Description Portfolio This section is coming soon. Stay tuned! SohoOS Business Directory SohoOS provides each business with a page, called myPage, on the SohoOS Business Directory. The SohoOS Business Directory is designed to promote business collaboration and increase visibility. You can browse or search the Business Directory at http://www.sohoos.com/welcome/businessdirectory/. When you created an account with SohoOS, you were asked to fill in your company information. This information is represented on all your business documents (e.g. invoices, sales orders and estimates) as well as on your myPage. You can edit the information that appears on your myPage on the Business Info and myPage tabs under the My Account menu. Your myPage comes equipped with a contact form. Anyone who fills in this form will be added as a lead to your contacts. 15 SohoOS User Manual, version 5.3 The Business Directory is an excellent resource for finding small businesses, contractors and freelancers. You can search for businesses by visiting http://www.sohoos.com/welcome/businessdirectory/. Enter an industry, country, and state [if in United States] to find the small business you need. Make sure you fill out your myPage completely so people searching the SohoOS Business Directory can learn all about your business. Image 17 – SohoOS Business Directory 16 SohoOS User Manual, version 5.3 Using Your SohoOS Account After you finish setting up your Business Profile and myPage, click the SohoOS logo on the left side of the top bar go to the My Business page. This acts as the hub of your account and allows you to access the vast majority of your business tools. The very first time you see this page, you can view video tutorials by clicking on the button, which will bring up a window with numerous tutorials that explain the different features of the SohoOS platform. When you are finished watching the tutorials, click the icon on the top right to close the window. Image 18 – Initial My Business View By default, your homepage is the My Business View mode. As soon as you click the My Business bar, located on the left, you will be taken to your homepage, where you can see all the recent activities in your account. When viewing your account in My Business View mode, your contact list is found on the left side of your screen. From there you can search or select contacts, and doing so will allow you to shift between Selected Contact View and My Business View. Selected Contact View is another way of referring to the pages that you see when selecting a specific contact. My Business View is ideal for users with a high volume of customers. Online businesses with many products won't need to store detailed information about each one of their many customers. However, more serviceoriented businesses (e.g. consultants) may want to keep comprehensive records of the personal details and transaction histories of their few intimate clients. These businesses may prefer Selected Contact View. Shifting between these two viewing modes makes it simple for any type of business to get the most out of SohoOS. 17 SohoOS User Manual, version 5.3 Navigating My Business View Click to see a full overview of your account and all your activities. Image 19 – My Business View Your homepage shows your activity feed. Whenever you create an invoice, add a contact, or make any other action, it will appear under Notes & Recent Activities. Use this as an overview of your account and click any item to access it. You can write notes and reminders, and they will appear on your activities feed. Image 20 – Notes & Recent Activities 18 SohoOS User Manual, version 5.3 The toolbar on the right of your homepage screen allows you to navigate through your business tools. Click an icon to see all related items. The number attached to each icon indicates the number of related items that have been created in the applicable category. Estimates An estimate is a nonbinding document offering basic information regarding a product or service you wish to supply (also called a "sales quote"). For more information on this feature, go to Estimates under the Business Tools section on page 24. Invoices An invoice is a commercial document issued by the seller to the buyer indicating required payment. For more information on this feature, go to Invoices under the Business Tools section on page 25. Items Items are your products and services. For more information on this feature, go to Items under the Business Tools section on page 26. P.O. (Purchase Orders) When you order supplies from a vendor you must first issue a purchase order. Purchase orders are similar to invoices, except you are buying instead of selling. For more information on this feature, go to Purchase Orders under the Business Tools section on page 27. Docs View and edit all your uploaded documents from this tab. All of your documents will be organized on a list that can be sorted by document title or date modified. For more information on this feature, go to Docs under the Business Tools section on page 28. 19 SohoOS User Manual, version 5.3 Navigating Selected Contact View If you would like to view individual contacts, you can type a contact name into the search box below the My Business icon. From the Selected Contact View, you can interact directly with different contacts rather than using a broad overview of your account. This is a more detailed and specific approach to handling your business. You can swiftly switch between My Business View and back to a contact, depending on your current needs. After you click a contact’s name, you will be taken to the contact details page. The menu on the right shows a selection of options directly related to this contact. The number attached to each icon indicates the number of related items that have been created for this contact in the applicable category. Image 21 – Selected Contact View Click an icon on the menu on the right to show the full list of activities in the category that are related to the selected client. 20 SohoOS User Manual, version 5.3 Details This is essentially the profile of your contact, containing the contact information, recent activities feed and other relevant information. All changes made to each contact will show up chronologically under Recent Activities along with any item, invoice, etc. related to the contact that you create or update. Image 22 – Details page Click the Edit button on the top of the page to change the details of your contact, or click Delete to remove the contact. Notes While viewing a contact, you can click Notes to access a page where you can write records, reminders or history related to this contact. These notes will only be viewable from the specific contact’s Notes page, and will not be visible to the contact. Image 23 – Notes page 21 SohoOS User Manual, version 5.3 Contact Management Your contacts can be found on the left menu of your homepage. You can either scroll through your entire list of contacts or choose to view by type (Client, Lead, Personal Contact or Vendor) via the View by: dropdown menu, which is located below the Search Contacts box. You can also start typing a contact's name in the Search Contacts box to bring it up immediately. Once you have located the desired contact, click the name to see the contact's details. Image 24 – View by menu and search You can also create a new contact by clicking the icon on the top bar. You will be asked to choose between a Client, Lead, Personal Contact or Vendor. Each has unique functionality, as outlined in the section below. Choose the applicable option and you will be taken to the contact creation screen. Fill out the details and click Save to add the new contact to your list. Image 25 – Adding a new contact 22 SohoOS User Manual, version 5.3 Clients Clients are the contacts who purchase products or services from you. If you create an estimate or invoice for someone who isn’t on your client list, you will have the option of automatically generating a new client from within your newly created document. You can create a new client from the dropdown menu. You can also create a new client while you're creating a new estimate or invoice. Just click in the box under Contact and select + Add New Contact from the dropdown menu. In the pop-up window, click Show more details to fully fill in all information about the new client. Click Save, and you'll be returned to the estimate or invoice you were working on. Leads Leads are potential clients you might work with in the future. Leads can be added to your contacts list automatically through the Contacts form on your myPage. Once you have done business with a lead, you can edit the contact to convert the status from lead to client. You can also remove leads using the Delete option on the top right. You can create a new lead from the dropdown menu. Want to automatically generate leads? Turn to page Error! Bookmark not defined. to learn about the Client Machine. Personal Contacts Personal contacts are people whom you know, but do not necessarily do business with. You can create a new personal contact from the dropdown menu. Vendors Vendors are the contacts whom you purchase items from. If you create a purchase order for someone who isn’t on your vendors list, you will have the option of automatically generating a new vendor from the information in your newly created document. You can create a new vendor from the dropdown menu. You can also create a new vendor while you're creating a new purchase order. Just click in the box under Contact and select + Add New Contact from the dropdown menu. In the pop-up window, click Show more details to fully fill in all information about the new vendor. Click Save, and you'll be returned to the purchase order you were working on. 23 SohoOS User Manual, version 5.3 Business Tools Estimates An estimate is a document offering basic information regarding an item you wish to supply. Once accepted by your client, you can turn it into an invoice. It details the items you are about to supply as well as the costs. Make sure to update your inventory prior to starting work with estimates; it will make the whole process much easier. Start by clicking Estimates on the menu on the right side of the window. Clicking while in My Business View will show all your estimates, while clicking the link in Selected Contact View will show estimates specifically for that contact. Image 26 – Estimates in My Business View Image 27 – Estimates in Selected Contact View To create an estimate, click Estimates on the menu on the right side of the page, followed by , or click the dropdown menu from any screen on the site and then click Estimate. Fill in the contact details of the prospective client and the list of items you intend to provide. Tax calculations are based on the tax settings definable under Settings. Once you create and save an estimate, you will see action buttons that allow different activities: Send, PDF and Create Invoice. Click PDF to save a PDF version of the estimate. 24 SohoOS User Manual, version 5.3 Click Send to email your contact a link to the estimate. Your contact will have the choice to print, download, accept, reject, or make a comment. You will be notified when your contact accepts, rejects, or sends a comment. When your estimate is approved, click Crete Invoice to automatically convert it into an invoice. When an estimate is turned into an invoice, it does not disappear from the estimates list. Image 28 – Estimate Invoices An invoice is the last stage in a client’s cycle. Your client already received an initial estimate and approved it, the work was completed, and now it’s time for you to get paid. You can generate an invoice directly from an estimate, or you can generate an invoice from scratch by clicking Invoices on the menu on the right side of the page. Clicking while in My Business View will show all your invoices, while clicking in Selected Contact View will only show invoices for that specific contact. While you are in the invoice section, you can click the button to create a new invoice or you can click the dropdown menu, followed by Invoices. Image 29 – Invoice 25 SohoOS User Manual, version 5.3 If you generated your invoice from an estimate, all of the relevant data will be automatically transferred to your new invoice. If you are starting from scratch, be sure to add the relevant items and choose the applicable contact. Any item that is added to an invoice will be deducted from your inventory. Once you are done inputting the data and saving the invoice, you will see action buttons that allow different activities: Send or PDF. Click PDF to save a PDF version of the invoice. The SohoOS platform brings you fully integrated PayPal support. This means you can request payment from your clients using a PayPal interface and the money will be deposited directly into your PayPal account. All transactions are secure and do not incur extra charges other than those charged by PayPal. Click Send to email your contact a link to the invoice. If you want to request a direct payment through PayPal, check the box next to Get paid online and enter the email address associated with your PayPal account. Your contact will have the choice to print, download, pay directly, or make a comment. You will be notified when your contact makes a payment or leaves a comment. Items Items are all of your products and services. Essentially, this category covers anything you can attach a price tag to. In this section, you can manage prices, inventory and more. Start by clicking Items on the menu on the right side of the page. This option is only available while in My Business View. Image 30 – Adding a new item 26 SohoOS User Manual, version 5.3 To create a new item, click the icon on the top of the Items page, or the dropdown menu, followed by Items. Make sure you fill in all of the relevant information for each item, including assigning a vendor, setting a price, and recording the actual quantity of the items that you have in stock. You can also add a new item while making an estimate, invoice, or purchase order. Just click in the box under Product or Service and select + Add New Item from the dropdown menu. In the pop-up window, click Show more details to fully fill in all information about the item. Click Save, and you'll be returned to the estimate, invoice, or P.O. you were working on. P.O. (Purchase Orders) When you order supplies from a vendor, you must first issue a purchase order, or P.O. Start by clicking P.O. on the menu on the right side of the page. Clicking while in My Business View will show all your purchase orders, whereas clicking in Selected Contact View will only show purchase orders for that vendor. Click the icon from the P.O. screen, or click the dropdown menu and then click P.O. Be sure to enter all relevant data. The Price field indicates the price you charge clients for the item. The Cost Price field indicates the amount you pay to the vendor. Image 31 – New purchase order Once the purchase order is created, you can download it in PDF format by clicking PDF, or email it directly from within the system by clicking Send. 27 SohoOS User Manual, version 5.3 Docs View and edit all of your uploaded documents from this tab. Click Docs on the menu on the right side of the page while in My Business View to see all of your documents, organized in folders. To create a new folder, click New Folder. To add a new document to an existing folder, by click the document from any page by using the icon. You can also upload a dropdown menu and clicking Docs. Image 32 – Folders Click Browse to choose a file. Then give your new document a title, choose which folder you want to store it in, and click Save. By clicking on the title of the document you uploaded, you will have the option to Edit, Delete or Download the document. All these commands are located on the top bar. Image 33 – Uploading a document You get 20 MB of storage space for free when you sign up for SohoOS. If you want more space, you can purchase 2,000 MB of storage, plenty of room to store all of their business documents. See page 31 for more details. 28 SohoOS User Manual, version 5.3 Soho Shop Introducing the Soho Shop Enhance your SohoOS experience with these carefully selected premium features that are not available with the basic SohoOS system. Each item is custom-designed to optimize how your business operates and to give you an extra edge. Click the Upgrade button located on the top bar of any screen to access the Soho Shop. Image 34 – How to access the Soho Shop You will be taken to a page where you can read all about the premium features. Click Learn More under a specific feature to get an in-depth description. Check the box next to each of the features you want to try and click Buy Now! to get started. You can also elect to buy a bundle of all the premium features. Just click the button under the 1-month, 1-quarter, or 1-year option, according to your preference. Image 35 – The Soho Shop 29 SohoOS User Manual, version 5.3 After you click the button under the option you prefer, you will be directed to a secure page where you can fill in your billing information. Image 36 – Soho Shop billing page Simply fill in your details and click Place Order to confirm your order and gain access to your new business tools. Soho Shop Features You can access your new features any time. Just go to My Account and click Settings. Your features will be under Purchased Items on the left menu. Image 37 – Purchased Items 30 SohoOS User Manual, version 5.3 The Client Machine Let the leads chase you, rather than you chasing the leads! Our Client Machine is offered through the Soho Shop, yet it is independent of the bundles offered in the Soho Shop. You can choose how many leads you want. We offer three options: 5 leads for $49.75 per month, 10 leads for $95.75 per month, or 15 leads for $104.25 per month. In order to access this feature, click Upgrade to enter our Soho Shop, and then click the Client Machine banner on the top of the page. Select the Client Machine package that you want, and then tell us what you're selling, where your ideal clients are, and who your ideal clients are. Be sure to enter your phone number and the best time to reach you, just in case we have any additional questions. Then click Buy Now! A message will appear that says, “A SohoOS representative will contact you within 14 days.” You have a 30-day moneyback guarantee for this feature should you change your mind. Image 38 – The Client Machine 31 SohoOS User Manual, version 5.3 Once you have purchased this feature, you will receive an email notification that the Client Machine has been purchased. You can then access it by going to My Account, and then Settings. In the Settings menu, you can view the number of leads purchased. Super-Sized Storage The Docs feature (lower right-hand corner of the SohoOS web application) is much more useful and powerful: 2GB of total storage, unlimited files, and 100 folders (instead of just 20MB and 5 folders in the regular account). Now you can really keep all your business documents in one place. In order to access your stored documents, go to your homepage, click Docs, select the document you want and click Download to begin downloading the document to your computer. This feature will be automatically activated upon purchase. Personalized Backups Each week you get your entire history of aggregated data emailed to you. These data backups are in CSV format, which can be opened in any spreadsheet (e.g. Microsoft Excel or Google Spreadsheets). Use these backups to further analyze your business, pass them on to your bookkeeper/accountant, or keep them as an extra layer of security to recover information you may have mistakenly deleted. You can turn the email feature off and back on at any time. * SohoOS backs up all our users' data internally to ensure their data is always safe, of course. 32 SohoOS User Manual, version 5.3 Click Backup Settings under Personalized Backups to access this feature. Once you do so, the following message will appear: Image 39 – Backup If you do not wish to receive the weekly backup, uncheck the box and click Save. Premium Support Just click Contact Now, fill in your telephone number, and an experienced SohoOS support representative will call you (maximum one hour but typically within minutes). Image 40 – Requesting a phone call Enter your number, click Call Me! and we will call you within one hour. Please don't forget to insert all international prefixes, for example: + 1-212-555-5555 33 SohoOS User Manual, version 5.3 myPage Themes Spice up your myPage by purchasing one of our myPage Themes! You can gain access to this feature by buying a bundle or by buying the myPage Themes tool separately. In order to purchase this feature, click Upgrade to enter our Soho Shop, select myPage Themes, and then choose Buy now! By default, Google AdSense ads are displayed on all Business Directory listings. When you purchase myPage themes, the ads will be automatically removed from your myPage. Once you have purchased this feature, you can click My Account and then Settings. In the Settings menu, you can choose and preview myPage Themes. Image 41 – myPage Themes Business Document Library The ultimate business library at your fingertips: Just click Browse Library to preview and download all the business agreements, Excel templates, business letters, financial templates and additional documents that your business will ever need. Easily browse and search over 1,000 templates in dozens of categories and get just what you need, right when you need it. 34 SohoOS User Manual, version 5.3 To access the feature, click Business Documents on the Settings page. You can either type the name of the document you are seeking into the search box or choose a related category. To see a preview of the document you requested, click Preview. To download the document, click Download. You can download as many documents and templates as you want. Image 42 – Business Document Library White-Labeling The SohoOS logo will be removed from all documents and emails sent from SohoOS to your customers. This will affect even documents created in the past. For instance, if you click Send on an invoice you created before you purchase the White-Labeling (even one that you had previously sent), that invoice will now be sent without the SohoOS logo. This feature will be automatically activated upon purchase. Leads Widget: Get More Customers for Your Business Drive new leads directly into your SohoOS account from anywhere on the Web. Open the Leads Widget, choose a theme, copy the code, and embed it into your website, blog, fan page, etc. An email notification is automatically sent to you and the new lead will show up in your SohoOS contact list. 35 SohoOS User Manual, version 5.3 The Leads Widget is, in essence, a portable contact form. To start using it, simply click Leads Widget to open an easy-to-use wizard that generates the required code. Image 43 – Grabbing the Leads Widget from SohoOS Choose a theme for your contact form by clicking the desired background color. A piece of code will appear in the text box on the right. Simply copy the code (highlight it with your mouse and click Copy), go to your website or blog editor, choose the desired location and click Paste. Save it and you're done ! Contact details entered into the widget will be automatically added to the Leads section of your Contacts feature. Invoice Templates Get some attention! Your customers will sit up and take notice of the invoices you send with these invoice templates that we specially designed to make your business look good. Now you don’t need any graphic design experience to create an eye-catching invoice— just choose one of our templates. Not sure which template you like best? Changing templates is so easy, you can try them all. Colorful invoice templates are available in our Soho Shop as an individual feature or within a Soho Shop bundle. With this feature, you can choose from six different graphic designs such as Purple Rain or Strawberry Delight. In order to view an invoice design, select the desired template and create a new invoice. After you fill in the invoice details and click Save at the bottom, click the PDF button to view your completed invoice with the selected invoice template design. 36 SohoOS User Manual, version 5.3 Image 44 – Making a PDF to view invoice design Time Tracker Need to keep track of billable hours for multiple projects and clients? Time Tracker was made for you. Without having to leave the SohoOS system, you can easily create timesheets for all of your clients, convert them to invoices, and request payment from your clients. Using the intuitive interface, you can link each time entry to the relevant client, choose the service you completed, and record the hours and minutes you spent on the project. It is easy to sort your timesheets, so you can find just the ones you need when you are ready to initiate the billing phase. Time Tracker will save you time and hassle, allowing you to accurately track your projects from within the SohoOS platform. Once you purchase Time Tracker—or a bundle that includes Time Tracker—go to My Account and select Settings. Under the Time Tracker tab, you'll see a dropdown menu that allows you to calculate your time in increments of 5,6, 10, 15, 20, or 30 minutes, or 1 hour. Choose your preferred increment and click Save. Image 45 – Setting time increment preferences 37 SohoOS User Manual, version 5.3 Note: Hours will be rounded according to the setting you choose. Rounding will not show up in Time Tracker entries; hours/billing calculations are only rounded when you attach time entries to an invoice. Click the SohoOS logo on the top bar to go to your homepage. The Time Tracker icon will appear on the bottom right. To make a new timesheet, select a contact and an item/service from the dropdown menus. Enter your billable hours, and click Log It. Image 46 – Time Tracker When you're ready to bill a client, simply check the time entries you want to attach to the invoice and click Invoice It. Image 47 – Attaching time entries to an invoice 38 SohoOS User Manual, version 5.3 Currency Converter Tired of using conversion calculators? Hate having to re-check the euro-to-dollar conversion rate every time you do a transaction? Your vendor is from Ecuador but your clients are from Sweden? Not sure if Poland still uses the zloty? We have a simple and comprehensive solution for you: the Currency Converter. Simply select any currency for any invoice, estimate, or P.O., and your items’ prices are automatically converted without your worrying about it. It's easy to use and simple to understand. The Auto-Converter updates automatically every hour using Yahoo Finance. No matter where in the world you do business, you'll always be effortlessly up-to-date on conversion rates. This feature is coming soon. 39 SohoOS User Manual, version 5.3 SohoOS Support Clicking the tab will redirect you to the SohoOS support portal (http://support.sohoos.com). You can browse through our knowledge base of the most frequently asked questions, watch our video tutorials and more. SohoOS is here for you 24/7! Live Support Click the Click to Chat button to have a live chat conversation with one of our customer support representatives. We will guide you through and answer your questions in real time. Video Tutorials Are you a visual learner? For more information, be sure to watch our helpful video tutorials by clicking the icon. Webinars Are you new to SohoOS? Join our monthly webinar sessions. Watch for an invitation in your email; we'll let you know when the next one is coming up. You can watch videos of past webinars by clicking the links on the left side of the support page. 40 SohoOS User Manual, version 5.3 Walkthrough On the bottom right side of the screen when you log in, there is a fantastic feature called Walkthrough. It provides you with a step-by-step guide to using the website, including information on how to: 1. Upload logo and information 2. Create a new invoice 3. Publish a business mini-site 4. Set default currency 5. Set tax calculations 6. Request payment w/ PayPal 7. Create a new client 8. Create a new PO 9. Create a new estimate 10. Upgrade to PRO 11. Manage client history 12. Convert leads 13. Import contacts Please email your questions, requests, or suggestions to [email protected] and we will reply as soon as possible. 41 SohoOS User Manual, version 5.3 SohoOS Get It Done 42 SohoOS User Manual, version 5.3