1
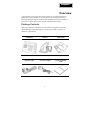
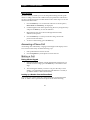
 VoIP Phone
Model SMCDSP-200
SMCDSP-205
Quick Installation Guide
Preface
COMPLIANCES
Federal Communication Commission Interference Statement This device complies with Part 15 of the FCC Rules. Operation is subject to the following two conditions: (1) This device may not cause harmful interference, and (2) this device must accept any interference received, including interference that may cause undesired operation. This equipment has been tested and found to comply with the limits for a Class B digital device, pursuant to Part 15 of the FCC Rules. These limits are designed to provide reasonable protection against harmful interference in a residential installation. This equipment generates, uses and can radiate radio frequency energy and, if not installed and used in accordance with instructions, may cause harmful interference to radio communications. However, there is no guarantee that the interference will not occur in a particular installation. If this equipment does cause harmful interference to radio or television reception, which can be determined by turning the equipment off and on, the user is encouraged to try to correct the interference by one or more of the following measures: • Reorient the receiving antenna • Increase the separation between the equipment and receiver • Connect the equipment into an outlet on a circuit different from that to which the receiver is connected • Consult the dealer or an experienced radio/TV technician for help FCC Caution: Any changes or modifications not expressly approved by the party responsible for compliance could void the userʹs authority to operate this equipment. Note: In order to maintain compliance with the limits of a Class B digital device, you are required to use a quality interface cable when connecting to this device. You may use unshielded twisted‐pair (UTP) for RJ‐45 connections ‐ Category 3 or better for 10 Mbps connections, Category 5 or better for 100 Mbps connections. i
Preface
EC Declaration of Conformity
SMC contact for these products in Europe is: SMC Networks Europe, Edificio Conata II, Calle Fructuós Gelabert 6‐8, 2o, 4a, 08970 ‐ Sant Joan Despí, Barcelona, Spain. This information technology equipment complies with the requirements of the Council Directive 89/336/EEC on the Approximation of the laws of the Member States relating to Electromagnetic Compatibility and 73/23/EEC for electrical equipment used within certain voltage limits and the Amendment Directive 93/68/EEC. For the evaluation of the compliance with these Directives, the following standards were applied. Emission • EN 55022:1998 +A1:2000 +A2:2003, Class B • EN 61000‐3‐2:2000, Class A • EN 61000‐3‐3:1995 +A1:2001 Immunity: • EN 55024:1998 +A1:2001 +A2:2003 • EN 61000‐4‐2: 1995 + A1: 1998 + A2:2000 • EN 61000‐4‐3: 2002 + A1:2002 • EN 61000‐4‐4: 1995 + A1:2000 + A2:2100 • EN 61000‐4‐5: 1995 + A1:2000 • EN 61000‐4‐6: 1996 + A1:2000 • EN 61000‐4‐8: 1993 + A1:2000 • EN 61000‐4‐11: 1994 + A1:2000 LVD: • EN 60950‐1:2001 ii
Contents
Warning: Do not plug a phone jack connector in the RJ‐45 port. This may damage this device. Les raccordeurs ne sont pas utilisé pour le systéme téléphonique! The official EC‐Declaration of Conformity can be found under the corresponding product section on the web http://www.smc.com. Copyright © 2008 by SMC Networks Inc. All rights reserved iii
Contents
Overview............................................................................................................................................1
Package Contents ..............................................................................................................................1
Connecting the Phone.......................................................................................................................3
Features...............................................................................................................................................3
Using the Phone Book .....................................................................................................................4
Creating a New Entry.......................................................................................................................4
Modifying Contact Information......................................................................................................4
Deleting a Contact.............................................................................................................................4
Speed Dial Setting .............................................................................................................................5
Phone Operation...............................................................................................................................7
Introduction .......................................................................................................................................7
Hardware Overview..................................................................................................................7
Menu Directory ........................................................................................................................10
Answering a Phone Call.................................................................................................................10
Making a Call ...................................................................................................................................10
Dialing with the Keypad.........................................................................................................10
Looking up a Number from the Phone Book ......................................................................10
Making a Call to an IP Address / SIP Server .......................................................................11
Speed Dialing a Number................................................................................................................11
Redialing a Number........................................................................................................................11
Call History ......................................................................................................................................12
Incoming Calls..........................................................................................................................12
Dialed Numbers .......................................................................................................................12
Erase Records............................................................................................................................12
Call Options .....................................................................................................................................13
Using the Speaker Phone ........................................................................................................13
Putting a Call on Hold ............................................................................................................13
Conducting a Three‐Way Conference Call ..........................................................................13
Transferring a Call ...................................................................................................................14
Forwarding a Call ....................................................................................................................14
Using the DND Function ........................................................................................................14
Call Waiting Function .............................................................................................................15
Checking Voice Messages ..............................................................................................................15
Specification....................................................................................................................................17
iv
Chapter 1
Chapter 1
Overview
Congratulations on your purchase of this VoIP (Voice over Internet Protocol) phone. This product enables you to make phone calls through the network instead of calling through a local phone line. Read this user manual carefully to learn how to operate this product and take advantage of its features. Package Contents
When unpacking the VoIP phone, ensure all the following items are present and undamaged. If anything appears to be missing or broken, contact your dealer for a replacement. VoIP Phone Handset Wall Mount Ethernet Cable AC Power Adapter Quick Installation Guide 1
Chapter 1 — Overview
Documentation CD Warranty Information Card 2
Chapter 1 — Overview
Connecting the Phone
The following illustration shows how to connect the VoIP phone to power, LAN, WAN, and the handset. PC Power outlet Hub/Switch Handset Features
This desktop VoIP phone comes equipped with the following features: •
Call blocking •
Call waiting •
Call transferring •
Call forwarding •
Redialing the last number •
Putting a call on hold •
Conducting a three‐way conference call •
Using the DND (Do Not Disturb) function •
Speakerphone •
8 speed dial memory keys •
Storing up to 140 sets of contacts •
Supporting POE (SMCDSP‐200 Only) 3
Chapter 2
Chapter 2
Using the Phone Book
The phone book feature enables you to create new entries for your contacts and edit their contact information. It also enables you to store a number from a received call or a dialed number in your phone book. Creating a New Entry
To create a new entry, do the following: 1.
Press the Menu key and then select Phone book, Add entry to add a new entry to the phone book. 2.
Type the name of the new contact. 3.
Press the Enter key to save the name. 4.
Enter the phone number of the new contact. 5.
Press the Enter key to save the number. Modifying Contact Information
To modify contact information, do the following: 1.
Press the Menu key and then select Phone Book, Search, and press the Enter key to view the phone book entries. 2.
Scroll through the phone to select an entry, and press the Enter key to display the contact information. 3.
Press the Enter key to edit the name, and press it again to save your setting. 4.
Change the phone number as required and press the Enter key to save your changes. Deleting a Contact
You can delete all contacts in the phone book one at a time or all at once. To delete a single contact, do the following: 1.
Press the Menu key and then select Phone book, Search. 4
Chapter 2 — Using the Phone Book
2.
Press the Enter key to display all contacts in the phone book. 3.
Select the contact you want to delete and press the Delete key. The selected entry is deleted. To delete all contacts in the phone book, do the following: 1.
Press the Menu key and then select Phone book. 2.
Choose Erase All and then use the up and down navigation keys to select Yes to confirm or No to cancel. Speed Dial Setting
You can use speed dialing to assign a hotkey (M1~M8) to the phone numbers that you dial most frequently. You can then press a hotkey (M1 to M8) to quickly dial a number instead of keying in the entire phone number or searching for it from the phone book. See Speed Dialing a Number on page 11. To assign speed dial hotkeys, do the following: 1.
Press the Menu key and then select Phone book and Speed Dial. 2.
Input the Phone number and press the Enter key. Then select one of the M1 ~ M8 keys to assign for speed dialing. 5
Chapter 3
Chapter 3
Phone Operation
Introduction
This chapter contains important information to help you familiarize yourself with the functions of the VoIP phone. Hardware Overview
Front View
Name Description 1 Display screen Displays calls and status information. 2 Menu Press to access the menu options or cancel your selection and go back to the previous level. 3 Voice mail indicator A red light indicator means that you have new voice messages. 4 4‐way Navigation keys Press to scroll through lists and menus on the display. 7
Chapter 3 — Phone Operation
Name Description 5 Enter key Press to enter a menu or confirm a selection. 6 Speed dial memory keys (M1 to M8) Press any of the keys to speed dial the preset contact number. MUTE Press to Mute the call. REC Press REC for recording the call. 7 Voice MSG Press to listen to voice mail messages. 8 Speaker Activates the speakerphone to allow handsfree conversations. 9 Volume control keys Press to increase or decrease the volume of the ringer tone, handset, or the volume of the current call using the speakerphone. 10 Function keys 11 Phonebook Press to access the personal phonebook directory. Redial Press to call the last number dialed. DND Press to block all incoming calls. Hold Press to put an active call on hold. Transfer Press to transfer an active call to another VoIP phone on the system. Conference Press to activate the three‐way conference call. Forward Press to forward all incoming calls to another phone on the system. Delete Press to erase the number you dialed when making a call. Alphanumerical keys Press these keys to enter phone numbers and texts. Rear View
Name Description 1 WAN port Connects to Hub/Switch. 8
Chapter 3 — Phone Operation
Name Description 2 LAN port Connects to PC. 3 DC 6V Power jack Connects to AC power adapter. 9
Chapter 3 — Phone Operation
Menu Directory
The menu directory enables you to access the product settings and set up the device according to the network conditions and your preferences. The menu is set up in a simple and easily accessible manner. Follow these steps to access the menu and the menu items. 1.
Press the Menu key to access the menu. The first two menu options, Phone book and Call history, are displayed. 2.
Scroll through the main menu options using the 4‐way navigation keys and press the Enter key to view the submenu. 3.
Repeat the previous step to browse through the menu items, submenus, and options. 4.
Press the Menu key to cancel your selection and go back to the previous level of the menu. 5.
To choose a menu setting, press the Enter key. Answering a Phone Call
An incoming call is indicated by a ringing tone and light on the display screen. You can answer the call by one of the following ways: 1.
Pick up the handset to answer the call. 2.
Press the Speaker key on the phone to answer the call. Making a Call
Dialing with the Keypad
1.
Enter the telephone number with the alphanumerical keypad. If you entered an incorrect digit, press the Delete key to erase the incorrect digit. 2.
After entering the number you want to call, press the # key to force dialing, or wait until the Auto Dial Time (The default is 5 seconds) is up and the number is dialed automatically. Looking up a Number from the Phone Book
You can call your contacts using the contact information stored in the phone book. To make a call to a person from the phone book, do the following: 10
Chapter 3 — Phone Operation
1.
Press the Menu key to display the menu. 2.
Select Phone book and press the Enter key to display the submenus. 3.
Select Search and press the Enter key to find a contact. The Search screen is displayed. 4.
Key in the first few letters of the name. Press the Enter key to search for the contact. A list of names that correspond most closely to your search criteria is displayed on the screen. 5.
Scroll through the list until you find the contact you want to call. 6.
Pick up the handset or press the Speaker key to make the call. Making a Call to an IP Address / SIP Server
When your VoIP phone is configured properly, you can make a call to a user on the same service provider. Make sure you have registered to a SIP server before making a call for the first time. 1.
You need to register in a proxy server, (with SIP server IP, Domain IP, registered name, and password) before making a call. 2.
To call a contact registered on the same service provider, press the registered number of the contact and press the # key. You can also make a call to an IP address by inputting the IP address with the keypad. (For example: 192*168*1*100) Speed Dialing a Number
You can assign a hotkey from the keypad to the most commonly dialed numbers. You can use this to dial the numbers quickly instead of keying in the complete number each time. To call a number using speed dialing, do the following: 1.
Press the hotkey (M1~M8) that has been assigned to the phone number from the numeric keypad. Redialing a Number
You can quickly redial a number that you have recently dialed using one of the following methods: 1.
Press the Redial key on the phone. The last number you called will be automatically dialed again. 11
Chapter 3 — Phone Operation
2.
Press the Menu key and select Call History, Dialed numbers. Use the up and down navigation keys to browse through the list of dialed numbers. 3.
Pick up the handset or press the Speaker key to call the selected number. Call History
The VoIP phone stores information about all calls made or received. The lists are stored from the newest to oldest entries. The oldest entries are deleted as new entries are added. Press the Menu key and then select Call History to view call information. Up to 64 calls can be saved for each of the received and dialed call logs. Incoming Calls
The Incoming Calls list consists of the most recent calls received. You can choose to save or delete a single entry from the received call logs. Select a call from the list and press the Enter key. Select one of the following options by pressing the up/ down navigation keys: •
Save: Save the number to your phone book. •
Erase: Delete the number from the call log. Dialed Numbers
The Dialed Numbers list consists of the most recent numbers dialed. You can choose to save or delete a single entry from the dialed call logs. Select a call from the list and press the Enter key. Select one of the following options by pressing the up/ down navigation keys: •
Save: Save the number to your phone book. •
Erase: Delete the number from the call log. Erase Records
You can delete any of the call logs that are not needed. To delete call logs, press the Menu key and then select Call History, Erase Records. Choose the type of call logs that you want to delete from the following options: •
All 12
Chapter 3 — Phone Operation
•
Incoming •
Dialed Then press the Enter key to confirm your selection. Call Options
While a call is in progress, a number of additional options are available. Using the Speaker Phone
For handsfree operation, you can use the built‐in speaker to talk on the phone. To use the speakerphone, do the following: While talking on the phone, press the Speaker key on the phone to enable the Speakerphone function. Press the key again to terminate the call or turn the speakerphone off. Putting a Call on Hold
You may want to put a call on hold temporarily while doing some work or attending to a second incoming or outgoing call. To put a call on hold, do one the following: •
Press the Hold key on the phone to put the call on hold. •
When you receive a second call, press the Hold key to attend to the new call, the first call is automatically put on hold. Conducting a Three-Way Conference Call
The call waiting and holding functions also help you in conducting a three‐way conference call. To start a three‐way conference call, do the following: 1.
Call the first participant of the conference call as described in Making a Call on page 10. 2.
Put the first participant on hold as described in Putting a Call on Hold on page 13. 3.
Call the second participant of the call. 4.
Press the Conference key on the phone to include all participants in the call. 5.
Hang up the phone to end your call. 13
Chapter 3 — Phone Operation
Transferring a Call
To transfer a call to another phone number, do the following: 1.
While a call is in progress, press the Transfer key on the phone. 2.
Dial the number to which you want to transfer the call and then press the Transfer key again or hang up the phone to transfer the call. Forwarding a Call
You can choose to forward the calls which you do not answer or reject to a specified number. To activate the call forwarding features, do the following: 1.
Press the Menu key and then select Phone Settings, and then Call Forward. 2.
Select from the following options: •
All forward: forward all incoming calls. •
Busy forward: to forward calls when your phone is busy. •
No answer forward: to forward calls when you do not answer the phone. •
Ring Timeout: to forward calls when the ring times out after a specific number of rings. 3.
Press the Enter key to activate the forwarding option. 4.
Key in the number to which the selected calls are to be forwarded. Press the Enter key to save your settings. 5.
You can also press the Forward key to activate the “All Forward” function. Using the DND Function
The DND (Do not Disturb) feature allows you to reject all incoming calls without ringing your phone. To activate the DND function, do the following: 1.
Press the DND key on the phone. 2.
A DND message is displayed on the screen. 3.
Press the DND key again to disable the DND function. 14
Chapter 3 — Phone Operation
You can also enable the function for a period of time. To activate the feature, do the following: 1.
Press the Menu key and then select Phone Settings, and then Do not Disturb. 2.
Select from the following options in the submenu: •
All: All incoming and outgoing calls will be blocked. This is the same as pressing the DND key. •
By Period: Enable / Disable the block setting. •
Period Time: Block calls during a specified period. (Only available when By Period function is enabled.) 3.
Press the Enter key to enter the submenu. Use the up and down navigation keys to enable/disable the call blocking function. 4.
If you wish to block calls during a specified period, enable By Period feature. 5.
Set the duration in which you want the incoming calls to be blocked. Press the Enter key to save your settings. Call Waiting Function
You can answer a call while you have another call in progress. When there is an incoming call, you will hear two continuous beeps indicating a second call. You can press the Hold key to switch between the two calls. The function needs to be activated through the web browser. Checking Voice Messages
You need to set a voice message code before using the voice mail function. After the code has been set, you can listen to your personal voice message by pressing the Voice MSG key. (ITSP or IP PBX is required for this function.) 15
Appendix
Ap pendi x
Specification
Network Protocol • SIP v1 (RFC2543), v2 (RFC3261) • IP / TCP / UDP / RTP / RTCP • IP / ICMP / ARP / RARP / SNTP • FTP / DNS / TFTP / DHCP / PPPoE Client • HTTP / NAT / DHCP server Tone • Ring Tone • Ring Back Tone • Dial Tone • Busy Tone • Programming Tone Phone Functions • Volume Adjustment • Speed Dial • Phone Book • Flash • Speaker Phone • Call History • Caller ID • Voice Message / Incoming Call Indicator Codec •
Voice Quality • VAD: Voice activity detection • CNG: Comfortable noise generator • LEC: Line echo canceller • Packet Loss Compensation • Adaptive Jitter Buffer Security • HTTP 1.1 basic /digest authentication for Web setup • MD5 for SIP authentication (RFC 2069/RFC 2617) QoS • IEEE 802.1Q VLAN • ToS field Call Function • Call Holding • Call Waiting • Call Forwarding • Caller Transferring • Call Blocking • Call Redial • Three‐way conference NAT Transversal • STUN • Outbound Proxy Configuration • Web browser • TFTP • Keypad DTMF Function • In‐band DTMF • Out‐of‐band DTMF • SIP information Firmware Upgrade • TFTP • HTTP
G.711: 64k bit/s (μ/A‐law) •
•
G.723.1: 6.3k / 5.3k bit/s G.726: 16k / 24k / 32k / 40k bit/s (ADPCM) • G.729A: 8k bit/s (CS‐ACELP) • G.729B: adds VAD & CNG to G.729 IP Assignment • Static IP • DHCP • PPPoE SIP Registration • 3 independent accounts 17
Copyright © 2008 by SMC Networks Inc. All rights reserved