1
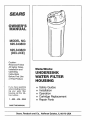
MODEL NO.
625.343800
625.343820
{DELUXE)
Caution:
Read and Follow
All Safety Rules,
Installation and
Operating
Instructions
Before First Use
of This Product.
If you have questions
when installing and using your water filter,
housing call this tollfree number...
1 -800
-426
-9345
WaterWorks
Safety Guides
Installation
Operation
Cartridge Replacement
Repair Parts
SAVE THIS MANUAL
Sears, Roebuck and Co., Hoffman Estates, IL 60179 USA
SAFETY
"_ Please
read
this
entire
installing
and
using
f'dter housing.
Be sure
carefully.
Failure
cause
personal
injury
with
department
for
follow
their
Ftlter
housLtig.
Use
home
the
COLD
to follow
or
your
local
as you
on a potable,
water
before
supply
them
property
plumbing
guides
f'dter
manual
cartridge
your
undersink
water
to follow
all guides
and
rules
Check
GUIDES / SPECIFICATIONS
could
water
You
install
the
The
the
water,
must
Your
water
filter
Water
undersink
withstand
your
house
on
Maximum Supply Water Pressure
Min_ - Max. Supply Water Temperature
Inlet - Outlet Thread Size
it safe
HOT water
(IO0°F,
unsafe
water,
or on
freezing
water
up to
water
housing
125 psi
supply
filter
and
in the
piping
housing
housing
will
water
pressure.
If
pressure
is higher
than 100 psi, install
a pressure
before
the water
filter.
filter
or make
quality.
water
from
freezing.
will break
it.
safe-to-drink,
only.
purify
of unknown
Protect
works
codes.
not
to drink.
DO NOT use
max.),
n_dcrobioiogically
damage.
public
will
reducing
valve
125 psi
40 - I00 °F
318" N PT
WARRANTY
FULL ONE YEAR WARRANTY ON UNDERSINK WATER FILTER HOUSING
( disposable filter cartridge not included)
For' one year from the date of purcllase, Sears will replace this Undersink Water Filter Housing, (except filter
cartridge, which is purchased separately), free of charge, if defective in materiai or workmanship.
WARRANTY IS AVAILABLE BY SIMPLY RETURNING THE WATER FILTER HOUSING TO THE NEAREST
SEARS STORE THROUGHOUT THE UNITED STATES°
This warranty gives you specific legal rights, and you may have other rights which vary from state to state.
Sears, Roebuck and Co., DEPT, 817 WA, Hoffman Estates, IL 60179
2
TABLE OF CONTENTS
Water Treatment Filter Cartridges ....................................
3
Planning Installation / Typical Installation Drawings / Tools and
Materials Needed ...................................................
4 - 5
Water' Filter' Housing
5- 7
Installation
Using Compression
.....................................
Fittings
........................................
5- 6
Using Soldered Copper .......................................
6
Using Threaded
7
Fittings
......................................
Installing Filter' Cartridge
.......................................
Filter Cartridge I.ife / Replacement
7
...................................
8
Repair Parts ..........................................................
WATER TREATMENT
Filter cartridges are available (not included with water
filter housing) flora Sears to remove (1) sediments, (2)
tastes and odors, (3) tastes, odors and chemical contaminants, and ('4) tastes, odors and lead.
Following is a list of filter cartridges available at the
time of dais printing. Shop your local Sears store for
the current selection
(1) Sediment
Filter Cartridge,
Sears
Stock No.
42-34360
(25 micron),
or Stock No. 42-34362
(5
micron):
Sediment
cartridges remove sand, silt, clay,
dirt, and other sediments
from water The 25 micron
cartridge
filters larger sediments
from water', and a!lows higher flows at less pressure drop, The 5 micron
cartridge filters finer' sediments
from water,
Taste and Odor Cartt-idges: Many bad tastes and/or
odors are removed from water' by an activated carbon
cartridge. It is most often useci to remove chlorine taste
and smell, usually to a single faucet such as die kitchen
cold
Note:
Small amounts
of hydrogen
sulfide
9
FILTER CARTRIDGES
Sears has several taste and odor' filter cartridges available. These are:
(2)
Sears
reduction,
and Sears
reduction
(3) Sears
reduction,
(4) Sears
reduction,
Stock
No.
42-34370:
Stock
No. 42-34372:
for' 95%
for' 99% chlorine
Stock No. 42-34375:
for 99% chlorine
plus chemical contaminants
Stock No. 42-34377:
for 99% chlorine
plus 95% lead reduction
Locate the water filter' housing on the cold water supply pipe, under the kitchen and/or bathroom sink, to
filter' the cold drinking water: Refer to the following
drawing
FILTERING WATER TO ONE FAUCET
r'l _
n kitchen sink
I
I
(noticeable
as "rotten egg" odor) may be reduced by taste and
odor filters for a short time, quicldy exhausting flae carbon media. Consult your Sears store for proper continuous treatment,
chlorine
HOT
g
COLD
HOUSING
PLANNING YOUR INSTALLATION
When planning your installation, use the drawings below and on page 5 to guide you, There are many vanables to consider' as you plan, Some of these are:
_k Installation Kit, Sears Stock No. 42-34386 - Includes
318" fittings and tubing
t,," The water filter' housing
threads are 318" NP'E
Installation Kit, Sears Stock No. 42-34387 - Includes
3f8" fittings and tubing, water' supply saddle valve,
and a separate faucet for filtered water'.
inlet and outlet internal
existing plumbing type (copper; threaded,
nominal size (114", 318" etc.)
etc.) and
-k Mounting Bracket, Seat's Stock No, 42-34388 - (included with deluxe model)
tools you have, and your plumbing skills
t.," cost of materials needed
t.* space available fbr installing the filter' housing
Make a simple sketch
and a list of plumbing
evep/d_ing you need
Be sure you have the
Sears has optiona! kits available to make installing the
water' filter housing easier' (see below and page 5)
These are:
TYPICAL
UNDERSINK
INSTALLATIONS
of your' proposed installation,
materials you will need Obtain
before starting the installation.
tools required.
/ TOOLS AND MATERIALS
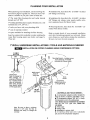
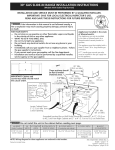
INSTALLATION ON COPPER PLUMBING USING COMPRESSION
NEEDED
FITTINGS
f
\
SINK
/ compression /
elbow
/
-!
"_
_
Mounting Bracket -includes screws
Sears Stock No., 42-_34388
j
(included with Deluxer_odel)
/
I
/
HOT
shutoff valve
filter cartridge, you
mustturnoff the waNote:
change
the t/
ter.
A To
nearby
shutoff
/
/
apply several
wraps of
nut
brass
ferrule
Teflon
tiape
compression
adaptor (use elbow
or straight fitting)
valve is convienenL /
Most sinks already/
have shutoff valves/
on the supply pipe& 1
INLET
3/8" NPT
- MATERIALS AND TOOLS NEEDED 2 compression adaptors (either straight fittings as shown, or'elbows), 3/8" NPT x comp..
ii_ 2 compression elbows, 3/8" NPT x comp.
(compression end to fit existing pipe)
Note: Sears has an installation kit available
that fits 3/8" O.D. pipe size, Stock No.
42-34386.
Teflon tape
tubing cutter
_- sandpaper or emery-cloth
_9wrenches, either nn_n_t_._.,
end n,_.._=,4ju_t=bI,=_..
jaw, size to fit compression adaptors
Note: Be sure to allow a minimum
space of 1-1t2" under the filter for
removing the sump, to change the
cartridge.
4
TYPICAL
UNDERSINK
SOLDERED
L]
TO SINK
FAUCET
iNSTALLATiONS
COPPER
(OBSERVE
/ TOOLS AND MATERIALS
INSTALLATION, WITH
FAUCET KIT, Sears Stock
INSTALLATION
FIG. 1 NOTES)
I,_
/
,#
NEEDED
318"copper
pipe, as req'd.
_
90_elbow (4)
No, 42-34387
FAUCET
(fiftered water)
adaptor
................
I
13:3
"-"
-_
i
I
/
shutoff valve
- MATERIALS
,
TO SINK
FAUCET
,,A,,
,U,_
,a_
I
Teflon tape to threads)
AND TOOLS NEEDED (see page 6)
INSTALLATION
(OBSERVE FIG_ 1 NOTES)
I:::d
1_
F:_
..../
.dElft
.....
\
,_at-
i_"
[]
1_
tt__
!'
union fitting
__
ore'
'I
3/8" etbow (3)
3/8" street
elbow
_
/
Igx:_,---
!
I
apply several
3/8" nipple (5)1
|
I
J
wraps of Teflon
tape to all
I
- MATERIALS
shutoff valve
USING
Note; Be sure to allow a
minimum
space ol t-1/2"
under the filterior removing the
sump, to change the cartridge
I
threads
AND TOOLS NEEDED -
4,
4-
(see page 7)
INSTALLATION
A.
saddM valve
3/8" NPT x sweat
(apply several wraps of
I
THREADED
I I
o.or,
Mounting Bracket - includes
screws, Sears Stock
No 42-34388 (included
with Deluxe model)
COMPRESSION
FITTINGS,
STEPS
5. Place a nut and brass female (fr'om compression elbow fittings) onto both pipe ends. Connect elbows to
the sink cold water pipe as shown below,
FIG. 1
Note: If plumbing with flexible tubing, hang or support the filter' housing in some manner: Using the
mounting bracket (included with Deluxe model) as
shown in FIG 1 and 4 is suggested.
TO SINK
COLD FAUCET
1. Apply several wraps of' Teflon tape to the threads
of both compression adaptor's
nut (,t) _t_
2. CAREFULIX, turn the compression
adaptors into
the water filter head inlet and outlet, and tighten, Do
not cross-thread
and damage the threads Do not
overtighten
and crack the head
brass ferrule (,t)
bTs
elbow (2)
3. CAUTION: Turn offthe water supply to the sink
cold pipe. Open the sink cold faucet to relieve pressure in the pipe,
'"_'
•
Note: If the sink faucet
also close the shutoff
is a single lever, mixing
valve on the hot water
ferrule
type,
side.
adaptor
.--- cold water pipe
nut
to sink
compression
FILTER
HOUSING
shutoff
4. Use a tubing cutter to remove a section of the cold
water' pipe (catch trapped water with a rag or towel) Remove al! bur,s and rough edges with the sandpaper or emery-cloth.
v"flve "_'_(
)
continued
5
INSTALLATION
6. Using females and compression nuts, cut and fasten
a length of tubing (allow some slack) from the cold
water' pipe, to the filter head inlet compression adaptor', FIG5.
STEPS
TO SINK
COLD FAUCET
.Q-
compression
elbow
7. Cutting to the length needed to allow some slack,
fasten tubing to the filter outlet side compression
adaptor; returning to the sink cold water pipe, as typically shown in FIG. 6
brass female
compression
adaptor
8. Check to be sure all fittings are tightened.
9. Before turning on the water supply, remove the
sump from the filter' head and install the filter cartridge
(see page 7).
FILTER
HOUSING
cold wmet pipe
to sink
shutoff
valve
B.
SOLDERED
COPPER
FrITINGS,
FIG. 2
MATERIALS AND TOOLS NEEDED: You will need 2
sweat adaptors, 3/8" NPI' x sweat (sweat end to fit
your' sink cold water pipe), 4 sweat 90°elbows,
copper' pipe, lead-flee
solder and flux, soldering
torch, Teflon tape, sandpaper or emery-cloth,
open
end (to fit sweat adaptor) or adjustable jaw wrench.
r
r------
I
L
CAU_£ION: Heat created
when soldering
can dam.
age the water filter housing.
Be sure to use the following procedures to protect the water' filter'
TO SINK _
COLD
FAUCET
I
type,
side.
2. Use a tubing cutter' to remove a section of the sink
cold water pipe (catch trapped water with a rag or
towel).. Use sandpaper' or emery-cloth to thoroughly
clean, and remove all bur,s and rough edges, from
both pipe ends
Note: When soldering, use lead-free
solder
only. Be sure pipe and fittings are properly
Observe caution note above,
A - _ tt
1
B
I
L t___-___J
\_
_
I
I
shutoff valve
1. CAUTION:
Turn off the water supply
to the sink
cold pipe. Open the sink cold faucet to relieve pressure in the pipe.
Note: If the sink faucet is a single lever, mixing
also close the shutoffvalve
on the hot water
_r_l
apply several
wraps of Teflon
tape, 0t pipe
jointcompound
to threads
D
[
shutoff valve
and flux
cleaned
rag around assembly A to reduce heat trans[er through
the pipe, and into the head.
5. Protect the filter housing fiorn soldering heat, as
you did above, and complete the cormections (D) to
the faucet cold water pipe
3. Refer' to FIG, 2, page 5, and to the following drawings, Make typical soldered assemblies A and B as
shown in FIG, 7 After they have cooled, apply Tef!on
tape or pipe joint compound to the pipe threads,
Then, turn them into the filter' head and tighten
6. Before turning
on the water supply,
remove the
sump from the filter head and install dae filter cartridge
(:;ce page 7)
4. Solder' the filter' housing, with assemblies A and B
installed, to the cold water shutoff valve C. Wrap a wet
6
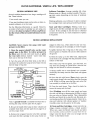
INSTALLATION STEPS (cont.)
C. THREADED
PIPE AND
FITTINGS,
a Do not turn pipe or fittings to tightly into file filter
head or you may break it
]FIG. 3
MATERIALS AND TOOLS NEEDED: For"threaded pipe
installation, you will need pipe wrenches, Teflon tape
or pipe joint compound, a union fitting and pipe nippies You may also need a pipe threading tool Connect the filter housing as typically shown in FIG 3,
page 5. Observe the following:
a Use Teflon tape or' pipe joint compound
nal threads.
D. INSTALLATION
Follow
instructions
WITH
included
FAUCET
m It is important to have some movement in tile sink
cold water pipe This will allow you to tighten tile
union fitting, witilout damaging the filter head, if pipe
lengths are not exact
a Before
on al! exter-
KIT,
with the Faucet
kit,
3. If plumbing with flexible tubing, hang or support
the filter housing in some manner', Using file mounting
bracket (included with Deluxe model) as shown in
TURN TO PAGE 8 AND FOLLOW
supply,
remove
the
4. Use tile plumbing procedures on pages 5 and 6 if
using compression
fittings Follow procedures
on
pages 6 and 7 for' sweat copper and threaded pipe
installations.. Be sure water flow is into the ffdter in,.
let side, and from the outlet side, to the faucet.
a section of the cold water pipe.
FILTER
on the water
FIG 1 and 4 is suggested If using rigid pipe, be sure
to allow a minimum of' 1-112" clearance under tile filter for sump removal when changing the filter cartridge.
PIG. 4
I. Close the cold water side shutoff valve, (Usually,
there already is a shutoff under the sink If not, close
the main water shutoff valve near the water meter or
pressure tank.)
2. Cut and remove
turning
sump from the filter head and install the filter cara'idge
(see below).
5. Before turning on the water supply, remove tile
sump from the filter' head and install the filter cartridge
(see below)
CARTRIDGE
INSTALLATION
AIL STEPS UNDER
"FRTER
CARTRIDGE
REPIACEMENT'L
i
7
FILTER CARTRIDGE
FILTER
CARTRIDGE
Several variables determine
last These include:
/ USEFUL
LIFE / REPLACEMENT
Sediment
Cartridges:
Average cartridge life, when
filtering water to 1 faucet, is about 6 months This average time varies depending on the type of' sediment
caruidge.
LIFE
how long a cartridge wilt
1. how much water' you use
Filtering sediments, you will know it's time to replace
the cartridge wizen water pressure to the faucet drops
2. how much sediment, taste and/or odor', or other unwanted substance, is in the water'
Taste and Odor Cartridges:
Filtering water to a
single faucet, the filter cartridge may last fbr 6 months
or' more If the cartridge is also for' lead or chemical
contaminant removal, it is more important to replace
it frequently.
Use the following
information
as a guide. However;
no matter' which type of cartridge you are using, you
will know it is time to replace it when you first notice the return
of the unwanted
substance
in your
water.
FILTER
CAUTION:
Never remove
pressure
in the falter.
1. Close
the
nearest
supply
pipe to
the _ter,
open
the vent valve
leak out) on the
the
shutoff
sump
valve
CARTRIDGE
with
on
the
REPLACEMENT
water
tridges fit either way, while others fit only one way,
Observe markings on the cartridge, or' on dae wrapper:
water
5. Lightly lubricate the o-ring seal, in file sump, with
silicone grease or' Vaseline_ Be sure it is fully seated in
the groove
the filter. To relieve
pressure
in
the sink cold water faucet, or press
(Deluxe
models - some water may
top of the head
6. Hold the sump up to the filter head, aligning the
center hole in the cartridge with the protrusion
on the
bottom of the head
2. Turn the sump off' of tile filter head, to the left or
clockwise.
Be careful, the sump is full of water' Do not
lose tile large o-ring seat
Note: If d_e sump will not tighten, up to the head, you
may have the cartridge in upside down Take the cartridge out and check for correct orientation
7. Being careful not to cross-thread,
turn (counterclockwise) tile sump onto the filter head and tighten
securely,
8. Open the
water supply
to fill.. While
luxe models)
TURN
SUMP
TURN
I
I
9. Close the sink faucet Then, check fbr' leaks between the sump and the head.
COUNTERCLOCKWISE
TO TIGHTEN
Note: If leaking, turn off the water' supply and open
the sink cold faucet to depressunze die filter' (or press
the vent valve on Deluxe models). Then, disassemble
the filter' and check the o-ring for cuts, flat spots, etc,
and sealing surfaces for' foreign matedal_ Clean the oring and lubricate with silicone grease or Vaseline.
Carefully press into the groove in d_e sump
SUMP._! !t.
CLOCKWISE
TO REMOVE
sink cold faucet, Then, slowly open the
shutoff valve and allow dae filter housing
it is filling, press tile filter vent valve (Deto release air in the filter:
__
%_..I
Note: A special wrench is available from Sears for mmoving the sump See the parts list on page 9.
10. Taste and Odor Cartridges:
A taste and odor cartridge contains activated carbon, a black powder
When new, open the filtered water' faucet and allow
fine, h__rmIess carben pa_ic!es to pu:ge f.,'om tb.e c_r'tridge. Close the faucet when you no longer see the
"fines" in the filtered water.
3. Be sum the inside of the sump is clean.. Cleaners are
available from Sears (.see the parts list on page 9), or
use hot, soapy water:
4. Remove the wrapper' from tile new filter cartridge
and insert the filter' cartridge in the sump Some car8
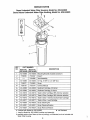
REPAI R PA RTS
Sears Undersink Water Filter Housing, Model No. 625.343800
Sears Deluxe Undersink Water Filter Housing, Model No. 625.343820
®
\
3
KEY
NO.
=
1
2
PART NUMBER
DESCRIPTION
Model No. t Model No.
625.3438001625.343820
42-3438842-34388Mounting Bracket (includes screws)
7156535
3
7160437
Head t
7164936
Vent Assembly
-_
! ....................... i ................
4
42-34385
42-34385
5
7156577
7156569
Sump
7160194
7160194
Owners Manual
4,,
42-34360
42-34360
sediment Cartridge125 micron
4*
42-34362
42-34362
Sediment Cartridge, 5 micron .................
4.
42-34370
42-34370
Taste & Odor Cartridge, 95% chlorine reduction
,6,
42-34372
42-34372
Taste & Odor Cartridge, 99% chlorine reduction
4.
42-34375
42-34375
Taste & Odor / Chemical Contaminate Cartridge
4.
42-34377
42-34377
Taste & Odor / Lead Cartridge
4,,
42-34330
42-34330
Sump Cleaning Kit
4,
42-34331
42-34331
Sump Cleaning Solution
4*
42-34334
42-34334
Sump Removal Wrench
O-ring, 3-3/8" !.Do x 3-5/8" O.D.
-k included with Model No. 625.343820
•
not illustrated
1- head for Model No., 625,343820 includes vent assembly
4. available options from Sears (at time of printing), not illustrated, and not included with
Water Filter Housing
9
10
11
WaterWorks
OWNERS
MANUAL
MODEL NO.
625.343800
625.343820 Deluxe
For the repair or replacement parts you need
Cal! 7 am - 7 pm, 7 days a week
1 - 800 - 366 - PART
(1 - 800 - 366 - 7278)
The model number of
your water filter housing
is found on the rating decal, on the filter sump.
When requesting service
or ordering parts, always
provide the following information:
4t, Product Type
4, Model Number
Part Number
Part Description
For in-home major brand repair service
Call 24 hours a day, 7 days a week
1 - 800 - 4 - REPAIR
(1 - 800 - 473 - 7247)
For the location of a
Sears Repair Service Center in your area
Ca!! 24 hours a day, 7 days a week
1 - 800 - 488 - 1222
For information on purchasing a Sears
Maintenance Agreement, or to inquire
about an existing Agreement
Call 9 am - 5 prn, Monday - Saturday
1 - 800 - 827 - 6655
Sears, Roebuck and Co., Hoffman
Estates, IL 60179 U.S.A.
7160194 (12195)