1
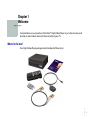
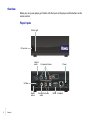
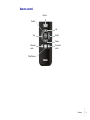
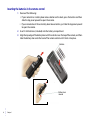
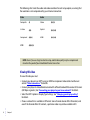
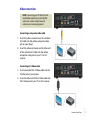
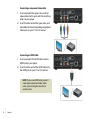
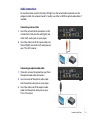
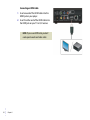
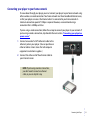
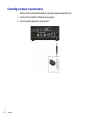
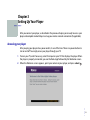
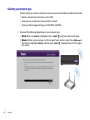
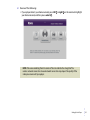
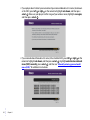
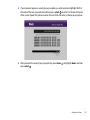
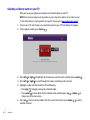
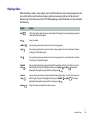
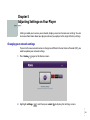
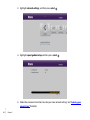
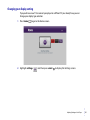
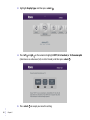
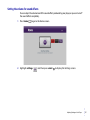
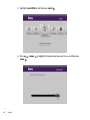
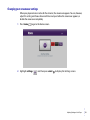
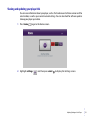
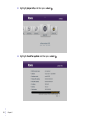
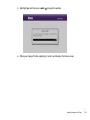
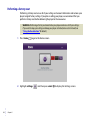
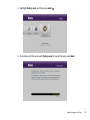
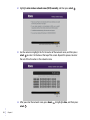
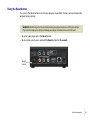
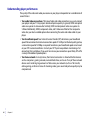
User Guide
Copyright
Copyright © 2008–2009 by Roku, Inc. All rights reserved. Roku and the Roku logo are trademarks of
Roku, Inc. Other brand and product names are trademarks or registered trademarks of their
respective holders.
ii
•
•
•
•
•
•
Contents
••••••
Chapter 1
Welcome
. . . . . . . . . . . . . . . . . . . . . . . . . . . . . . . . . . . . . . . . . . . . . . . . . . . . . . . . . . . .1
What’s in the box?
........................................................
Overview
.................................................................
Player inputs
.........................................................
Remote control
.......................................................
Inserting the batteries in the remote control
...............................
Chapter 2
Connecting Your Player
1
2
2
3
4
. . . . . . . . . . . . . . . . . . . . . . . . . . . . . . . . . . . . . . . . . . . . . .5
Connecting your player to your TV
........................................ 5
Viewing HD video
.................................................... 6
Video connections
.................................................... 7
Audio connections
................................................... 9
Connecting your player to your home network
. . . . . . . . . . . . . . . . . . . . . . . . . . . 11
Connecting your player to a power source
. . . . . . . . . . . . . . . . . . . . . . . . . . . . . . . . 12
Chapter 3
Setting Up Your Player
. . . . . . . . . . . . . . . . . . . . . . . . . . . . . . . . . . . . . . . . . . . . . 13
Accessing your player
. . . . . . . . . . . . . . . . . . . . . . . . . . . . . . . . . . . . . . . . . . . . . . . . . . . . 13
Selecting your network type
. . . . . . . . . . . . . . . . . . . . . . . . . . . . . . . . . . . . . . . . . . . . . 14
•
•
•
• iii
•
•
Chapter 4
Using Your Player
. . . . . . . . . . . . . . . . . . . . . . . . . . . . . . . . . . . . . . . . . . . . . . . . . . 19
Selecting a video to watch on your TV
. . . . . . . . . . . . . . . . . . . . . . . . . . . . . . . . . . . . 20
Playing a video
. . . . . . . . . . . . . . . . . . . . . . . . . . . . . . . . . . . . . . . . . . . . . . . . . . . . . . . . . . 21
Chapter 5
Adjusting Settings on Your Player
. . . . . . . . . . . . . . . . . . . . . . . . . . . . . . . . . . . 23
Changing your network settings
. . . . . . . . . . . . . . . . . . . . . . . . . . . . . . . . . . . . . . . . . 23
Changing your display setting
. . . . . . . . . . . . . . . . . . . . . . . . . . . . . . . . . . . . . . . . . . . . 25
Setting the volume for sound effects
. . . . . . . . . . . . . . . . . . . . . . . . . . . . . . . . . . . . . 27
Changing your screensaver settings
. . . . . . . . . . . . . . . . . . . . . . . . . . . . . . . . . . . . . . 29
Viewing and updating your player info
. . . . . . . . . . . . . . . . . . . . . . . . . . . . . . . . . . . 31
Performing a factory reset
. . . . . . . . . . . . . . . . . . . . . . . . . . . . . . . . . . . . . . . . . . . . . . . . 34
Chapter 6
Additional Information
. . . . . . . . . . . . . . . . . . . . . . . . . . . . . . . . . . . . . . . . . . . . . 37
Manually entering your network’s name (SSID)
. . . . . . . . . . . . . . . . . . . . . . . . . . . 37
Using the Reset button
. . . . . . . . . . . . . . . . . . . . . . . . . . . . . . . . . . . . . . . . . . . . . . . . . . 39
Understanding player performance
. . . . . . . . . . . . . . . . . . . . . . . . . . . . . . . . . . . . . . 40
Notices
. . . . . . . . . . . . . . . . . . . . . . . . . . . . . . . . . . . . . . . . . . . . . . . . . . . . . . . . . . . . . . . . . . . . . . . . . . . . 41
Macrovision Statement
. . . . . . . . . . . . . . . . . . . . . . . . . . . . . . . . . . . . . . . . . . . . . . . . . . 41
FCC Statement
. . . . . . . . . . . . . . . . . . . . . . . . . . . . . . . . . . . . . . . . . . . . . . . . . . . . . . . . . . 41
Roku Digital Video Player License Agreement and Warranty Statement
. . . . 42
Important Safety Instructions
. . . . . . . . . . . . . . . . . . . . . . . . . . . . . . . . . . . . . . . . . . . . 46
•
•
•
iv •
•
•
Chapter 1
Welcome
••••••
Congratulations on your purchase of the Roku™ Digital Video Player. In just a few minutes you’ll
be ready to select videos and watch them instantly on your TV.
What’s in the box?
Your Digital Video Player package should include all of these items:
•
•
•
• 1
•
•
Overview
Before you set up your player, get familiar with the inputs on the player and the buttons on the
remote control.
Player inputs
Status light
IR receiver
Optical
audio
Component video
Power
S-Video
Reset
button
2
•
•
•
•
•
•
Chapter 1
Composite Audio
video
HDMI Ethernet
Remote control
Home
Select
Up
Up
Right
Down
Reverse
scan
Forward
scan
Play/Pause
Welcome
•
•
•
• 3
•
•
Inserting the batteries in the remote control
Do one of the following:
• If your remote has a battery door release button on the back, press the button and then
slide the top panel upward to open the remote.
• If your remote doesn’t have a battery door release button, just slide the top panel upward
to open the remote.
2 Insert 2 AAA batteries (included) into the battery compartment.
3 Align the top edge of the battery door with the notches near the top of the remote, and then
slide the battery door onto the back of the remote control until it clicks into place.
1
Notches
Battery door
release
4
•
•
•
•
•
•
Chapter 1
Chapter 2
Connecting Your Player
••••••
To use your player, you need to connect it to your TV, your network, and a power source.
Connecting your player to your TV
There are several ways to connect your player to your TV. The method you choose depends on
the inputs supported by your TV and the cables you have available.
Your player includes a combination cable that has both composite video and stereo audio
connectors. If you purchased the optional cable package, you also received an optical audio
cable, a component video cable, and an HDMI cable. (S-Video cables are sold separately and can
be purchased at most stores that sell audio/video equipment.)
The type of connection you set up between your player and your TV, combined with the speed
of your Internet connection, determine the quality of your audio/video experience when you
watch videos through your player.
•
•
•
• 5
•
•
The following chart ranks the audio and video resolution for each setup option, assuming that
the resolution is not compromised by your Internet connection:
Video
Composite
S-Video
Component
HDMI
Audio
*
**
***
****
Stereo
Optical
HDMI
***
****
****
NOTE: Even if you use a high-resolution setup, audio/video quality may be compromised
based on the speed of your broadband Internet connection.
Viewing HD video
To view HD video you must:
• Connect your player to an HDTV using an HDMI or component video cable. See the next
section “Video connections” for details.
• Connect your player to a broadband network with sufficient bandwidth to receive HD streams
(4.0 Mbps or greater). See “Connecting your player to your home network” for details.
• Select the HDTV option in Display Type Settings. See “Changing your display setting”
for details.
• Choose a video that is available in HD format. Some channels do not offer HD content, and
even if the channel offers HD content, a particular video may not be available in HD.
6
•
•
•
•
•
•
Chapter 2
Video connections
NOTE: Connecting your TV directly to the
audio/video output of your Set-Top Box
will assure a more vivid picture and
enhance your viewing enjoyment.
Connecting a composite video cable
Insert the yellow connector on the standard
A/V cable into the yellow composite video
jack on your player.
2 Insert the yellow connector on the other end
of the standard A/V cable into the yellow
composite video jack on your TV or A/V
receiver.
1
Connecting an S-Video cable
Insert one end of the S-Video cable into the
S-Video jack on your player.
2 Insert the other end of the S-Video cable into
the S-Video jack on your TV or A/V receiver.
1
Connecting Your Player
•
•
•
• 7
•
•
Connecting a component video cable
Insert one end of the green, blue, and red
video cable into the jacks with the matching
colors on your player.
2 Insert the other end of the green, blue, and
red cable into the corresponding component
video jacks on your TV or A/V receiver.
1
Connecting an HDMI cable
1
Insert one end of the HDMI cable into the
HDMI jack on your player.
2
Insert the other end of the HDMI cable into
the HDMI jack on your TV or A/V receiver.
NOTE: If you use an HDMI cable, you don’t
need separate audio and video cables,
unless you’re routing the sound to an
audio receiver.
8
•
•
•
•
•
•
Chapter 2
Audio connections
For standard stereo sound (2-channels, left/right), use the red and white connectors on the
composite cable. For surround sound (5.1 audio), use either an HDMI or optical audio cable, if
available.
Connecting a stereo cable
Insert the red and white connectors on the
standard A/V cable into the red (Right) and
white (Left) audio jacks on your player.
2 Insert the other end of the stereo cable into
the red (Right) and white (Left) audio jacks on
your TV or A/V receiver.
1
Connecting an optical audio cable
1
If present, remove the protective caps from
the optical audio cable connectors.
Insert one end of the optical audio cable
into the optical audio jack on your player.
3 Insert the other end of the optical audio
cable into the optical audio jack on your
TV or A/V receiver.
2
Connecting Your Player
•
•
•
• 9
•
•
Connecting an HDMI cable
Insert one end of the HDMI cable into the
HDMI jack on your player.
2 Insert the other end of the HDMI cable into
the HDMI jack on your TV or A/V receiver.
1
NOTE: If you use an HDMI cable, you don’t
need separate audio and video cables.
•
•
•
10 •
•
•
Chapter 2
Connecting your player to your home network
To view videos through your player, you must connect your player to your home network using
either a wireless or wired connection. Your home network must have broadband Internet access,
so that your player can access the Internet when it is connected to your home network. A
minimum connection speed of 1.5Mbps is required. However, we recommend using a
connection that is 4.0Mbps or faster.
If you’re using a wired connection, follow these steps to connect your player to your network. If
you’re using a wireless connection, skip ahead to the next section, “Connecting your player to a
power source”.
Connect one end of a CAT5 ethernet cable to the
ethernet jack on your player. (You can purchase an
ethernet cables at most stores that sell computer
equipment or electronic supplies.)
2 Connect the other end of the ethernet cable to
your Internet router.
1
NOTE: If you’re using a wireless connection,
you don’t need to connect an ethernet
cable, so you can skip this step.
Connecting Your Player
•
•
•
• 11
•
•
Connecting your player to a power source
Like most home entertainment products, your player requires electricity to run.
Connect the AC adapter to the back of your player.
2 Insert the power plug into a power outlet.
1
•
•
•
12 •
•
•
Chapter 2
Chapter 3
Setting Up Your Player
••••••
After you connect your player, as described in the previous chapter, you’re ready to access your
player and complete Guided Setup to set up your wireless network connection (if applicable).
Accessing your player
After you plug your player into a power outlet, it is on all the time. There is no power button to
turn on and off. You simply access your player through your TV.
Turn on your TV, and if necessary, select the input on your TV that displays the player. When
the player is properly connected, you see the Roku logo followed by the Welcome screen.
2 When the Welcome screen appears, point your remote at your player, and press select .
1
•
•
•
• 13
•
•
Selecting your network type
If you’re setting up a wireless connection, make sure you have the following information handy:
• Wireless network name (also known as the SSID)
• Security key or passphrase (if your network is secured)
• Security method (supported types are: WEP, WPA, and WPA2)
1
•
•
•
14 •
•
•
Chapter 3
Do one of the following depending on your network type:
• Wired: Make sure wired is highlighted, press select , and you’re done with setup.
• Wireless: Make sure your player is within range of your wireless router. Press down
on
the remote to highlight wireless, and then press select . Complete the rest of the steps in
this section.
2
Do one of the following:
• If your player detects your home network, press left
your home network, and then press select .
or right
on the remote to highlight
NOTE: The waves radiating from the center of the icon indicate the strength of the
wireless network connection. A weak network connection may impact the quality of the
video you receive with your player.
Setting Up Your Player
•
•
•
• 15
•
•
• If your player doesn’t detect your network and your network broadcasts its name (also known
as the SSID), press left or right on the remote to highlight not shown, and then press
select . Make sure your player is within range of your wireless router, highlight scan again,
and then press select .
• If your network doesn’t broadcast its name (it has a hidden SSID), press left or right on the
remote to highlight not shown, and then press select . Highlight enter wireless network
name (SSID) manually, press select , and then see “Manually entering your network’s
name (SSID)” for additional instructions.
•
•
•
16 •
•
•
Chapter 3
3
If your network requires a security key or passphrase, use the remote to highlight the first
character of the key or passphrase and then press select
to enter it in the box at the top
of the screen. Repeat this process to enter the rest of the characters in the key or passphrase.
4
After you enter the security key or passphrase, press down
press select .
to highlight done, and then
Setting Up Your Player
•
•
•
• 17
•
•
•
•
•
18 •
•
•
Chapter 3
Chapter 4
Using Your Player
••••••
After you setup your player, you’re ready to select a channel. You can then use your player’s
remote to select and watch videos on your TV. You’ll be amazed at how quick and easy it is!
NOTE: Some channels require account setup the first time you access the channel. If you need help
setting up an account for a channel, go to www.roku.com/support.
•
•
•
• 19
•
•
Selecting a video to watch on your TV
After you set up your player you can browse and watch videos on your TV.
NOTE: Some channels require selecting videos on your computer in order to access them on your
TV. For information on selecting videos for a specific channel, go to www.roku.com/support.
Turn on your TV, and if necessary, select the input on your TV that displays the player.
2 On the player remote, press home
.
1
Press left or right to highlight the channel you want to watch, and then press select .
4 Press left or right to scroll through the videos available on this channel.
5 Highlight a video and then do either of the following:
• Press play
to begin viewing the selected video.
to view details for the selected video, and then press up
or down
to
• Press select
choose any of the menu items.
6 Press up
to return to the video list for the current channel, or press home
to select
another channel.
3
•
•
•
20 •
•
•
Chapter 4
Playing a video
While watching a video via your player, you have full control over your viewing experience. You
can use the buttons on the remote to pause and resume viewing and to scan forward and
backward, just like when you watch a DVD. While playing a video, the buttons on the remote do
the following:
Button
Action
play
Starts playing the video. To pause a video while it’s playing or to resume playing a paused
video, press the button again.
up
Stops the video.
select
Pauses playing the video and enters frame scanning mode.
right
Pauses playing the video and enters frame scanning mode. To scan forward one frame at
a time, press the button again.
left
Pauses playing the video and enters frame scanning mode. To scan backward one frame
at a time, press the button again.
forward
scan
Pauses playing the video and scans forward through the video. To scan faster, press the
button again. To play the highlighted scene, press select
or play
. To resume
playing from the point you paused the video, press up .
reverse
scan
Pauses playing the video and scans backward through the video. To scan faster, press the
or play
. To resume
button again. To play the highlighted scene, press select
playing from the point you paused the video, press up .
home
Stops the video and displays the Home screen.
Using Your Player
•
•
•
• 21
•
•
•
•
•
22 •
•
•
Chapter 4
Chapter 5
Adjusting Settings on Your Player
••••••
Settings enable you to access your network, display, sound, and screensaver settings. You can
also view information about your player and reset your player to the original factory settings.
Changing your network settings
If you install a new network router or change to a different Internet Service Provider (ISP), you
need to update your network settings.
1
Press home
to go to the Home screen.
2
Highlight settings
, and then press select
to display the Settings screen.
•
•
•
• 23
•
•
•
•
•
24 •
•
•
Chapter 5
3
Highlight network settings, and then press select
.
4
Highlight repeat guided setup and then press select
5
Follow the onscreen instructions to enter your new network settings. See “Selecting your
network type” for details.
.
Changing your display setting
If you purchase a new TV or connect your player to a different TV you already have, you can
change your display type selection.
1
Press home
to go to the Home screen.
2
Highlight settings
, and then press select
to display the Settings screen.
Adjusting Settings on Your Player
•
•
•
• 25
•
•
•
•
•
26 •
•
•
Chapter 5
3
Highlight display type, and then press select
4
Press left or right on the remote to highlight HDTV, 4:3 standard, or 16:9 anamorphic
(also known as widescreen, full, or stretch mode), and then press select .
5
Press select
to accept your new the setting.
.
Setting the volume for sound effects
You can adjust the volume level of the sound effects produced by your player, or you can turn off
the sound effects completely.
1
Press home
to go to the Home screen.
2
Highlight settings
, and then press select
to display the Settings screen.
Adjusting Settings on Your Player
•
•
•
• 27
•
•
•
•
•
28 •
•
•
Chapter 5
3
Highlight sound effects, and then press select
4
Press up
or down
select .
.
to highlight the volume level you want to use, and then press
Changing your screensaver settings
When your player remains inactive for five minutes, the screensaver appears. You can, however,
adjust this setting and choose how much time must pass before the screensaver appears, or
disable the screensaver completely.
1
Press home
to go to the Home screen.
2
Highlight settings
, and then press select
to display the Settings screen.
Adjusting Settings on Your Player
•
•
•
• 29
•
•
•
•
•
30 •
•
•
Chapter 5
3
Highlight screensaver, and then press select
4
Press up
or down
.
to highlight the option you want to use, and then press select
.
Viewing and updating your player info
You can view information about your player, such as the hardware and software version and the
serial number, as well as your current network settings. You can also check for software updates
to keep your player up-to-date.
1
Press home
to go to the Home screen.
2
Highlight settings
, and then press select
to display the Settings screen.
Adjusting Settings on Your Player
•
•
•
• 31
•
•
•
•
•
32 •
•
•
Chapter 5
3
Highlight player info, and then press select
.
4
Highlight check for update and then press select
.
5
Highlight yes and then press select
to begin the update.
6
When you’re player finishes updating, it restarts and displays the Home screen.
Adjusting Settings on Your Player
•
•
•
• 33
•
•
Performing a factory reset
Performing a factory reset erases all of your settings and account information and restores your
player’s original factory settings. If you plan on selling your player, we recommend that you
perform a factory reset before delivering the player to the new owner.
WARNING: Performing a factory reset deactivates your player and erases all of your settings.
If you want to keep your settings and keep your player activated, do a restart instead (see
“Using the Reset button” for details).
•
•
•
34 •
•
•
Chapter 5
1
Press home
to go to the Home screen.
2
Highlight settings
, and then press select
to display the Settings screen.
3
Highlight factory reset, and then press select
.
4
To continue with the reset, select factory reset. To cancel the reset, select back.
Adjusting Settings on Your Player
•
•
•
• 35
•
•
5
•
•
•
36 •
•
•
Chapter 5
When prompted, highlight yes to confirm that you want to reset your player, and then press
select .
Chapter 6
Additional Information
••••••
This section contains more information about select topics in this guide.
Manually entering your network’s name (SSID)
If your network is setup as a hidden network that doesn’t broadcast its name, you can enter the
name manually.
1
From the Choose Wireless Network screen in Guided Setup or the Network Settings screen,
highlight not shown and press select .
•
•
•
• 37
•
•
•
•
•
38 •
•
•
Chapter 6
2
Highlight enter wireless network name (SSID) manually, and then press select
.
3
Use the remote to highlight the first character of the network name, and then press
select
to enter it in the box at the top of the screen. Repeat this process to enter
the rest of the characters in the network name.
4
After you enter the network name, press down
select .
to highlight done, and then press
Using the Reset button
You can use the Reset button to restart your player or to perform a factory reset and restore the
original factory settings.
WARNING: Performing a factory reset deactivates your player and erases all of your settings.
If you want to keep your settings and keep your player activated, do a restart instead.
• To restart your player, press the Reset button.
• To do a factory reset, press and hold the Reset button for 15 seconds.
Reset
button
Additional Information
•
•
•
• 39
•
•
Understanding player performance
The quality of the video and audio you receive via your player is dependent on a combination of
several factors:
• Your audio/video connections. The type of audio and video connections you use to connect
your player and your TV may impact sound and picture quality. In general, HDMI and optical
audio are superior to stereo audio. Similarly, HDMI and component video are superior to
S-Video. Additionally, HDMI, component video, and S-Video are all better than composite
video. Use your best available option when connecting the audio and video cables to your
player.
• Your broadband speed. Your Internet Service Provider (ISP) determines your broadband
speed. We recommend a minimum connection speed of 1.5 Mbps. For the best quality picture,
a connection speed of 4.0 Mbps is required. Sometimes your broadband speed varies based
on your ISP’s network conditions. Contact your ISP if you have problems maintaining a fast
connection that is reliable, or if you want to increase your connection speed. Many ISPs offer
a variety of broadband speed options.
• Your home network. In many homes, the Internet connection is shared with other devices
such as computers, gaming consoles, network hard drives, and so on. If any of these network
devices are transferring large amounts of data across your network (such as a file transfer,
online gaming, or other instances of streaming video), your sound and picture quality may be
compromised.
•
•
•
40 •
•
•
Chapter 6
Notices
••••••
Macrovision Statement
This product incorporates copyright protection technology that is protected by U.S. patents and other intellectual property
rights. Use of this copyright protection technology must be authorized by Macrovision, and is intended for home and other
limited viewing uses only unless otherwise authorized by Macrovision. Reverse engineering or disassembly is prohibited.
U.S. Patent Nos. 5,583,936; 6,836,549; 5,315,448; 6,381,747; 6,501,842; and 7,050,698.
FCC Statement
This device complies with Part 15 of the FCC Rules. Operation is subject to the following two conditions: (1) this device may not
cause harmful interference, and (2) this device must accept any interference received, including interference that may cause
undesired operation.
This product has been tested and complies with the specifications for a Class B digital device, pursuant to Part 15 of the FCC Rules.
These limits are designed to provide reasonable protection against harmful interference in a residential installation. This
equipment generates, uses, and can radiate radio frequency energy and, if not installed and used according to the instructions,
may cause harmful interference to radio communications. However, there is no guarantee that interference will not occur in a
particular installation.
If this equipment does cause harmful interference to radio or television reception, which is found by turning the equipment off
and on, the user is encouraged to try to correct the interference by one or more of the following measures:
•
•
•
•
Reorient or relocate the receiving antenna
Increase the separation between the equipment or devices
Connect the equipment to an outlet other than the receiver's
Consult a dealer or an experienced radio/TV technician for assistance
Pursuant to Part 15.21 of the FCC Rules, any changes or modifications to this equipment not expressly approved by the
manufacturer may cause harmful interference and void your authority to operate this equipment.
•
•
•
• 41
•
•
Roku Digital Video Player License Agreement and Warranty Statement
IMPORTANT: READ THIS AGREEMENT CAREFULLY AND REVIEW THE FULL PRODUCT MANUAL AND SAFETY INFORMATION
AT WWW.ROKU.COM BEFORE POWERING UP YOUR ROKU PRODUCT FOR THE FIRST TIME.
THIS LICENSE AGREEMENT AND WARRANTY STATEMENT IS THE LEGAL AGREEMENT (“AGREEMENT”) BETWEEN YOU
(“YOU”) AND ROKU, INC. (“ROKU”) GOVERNING YOUR USE OF THE ROKU DIGITAL VIDEO PLAYER (“ROKU PRODUCT”), THE
SOFTWARE INSTALLED ON THE ROKU PRODUCT (“SOFTWARE”) AND RELATED DOCUMENTATION. IF YOU (1) POWER UP
YOUR ROKU PRODUCT FOR THE VERY FIRST TIME (2) OTHERWISE USE THE ROKU PRODUCT, OR (3) KEEP (AND DO NOT
RETURN) THE ROKU PRODUCT PAST THE DATE THAT IS THIRTY (30) DAYS AFTER YOUR ORIGINAL PURCHASE DATE, YOU
ARE INDICATING THAT YOU HAVE READ AND UNDERSTOOD, AND AGREE TO BE BOUND BY, THE TERMS OF THIS
AGREEMENT. IF YOU DO NOT AGREE TO THE TERMS AND CONDITIONS OF THIS AGREEMENT, YOU ARE NOT GRANTED ANY
RIGHTS WHATSOEVER IN THE SOFTWARE CONTAINED WITHIN THE ROKU PRODUCT AND YOU HAVE NO RIGHT TO USE
THE PRODUCT.
If you are not willing to be bound by these terms and conditions, you should not use the Roku Product and should immediately
return it. In that case, Roku will refund the purchase price you have paid to Roku for the Roku Product; provided that you return
the Roku Product in accordance with Roku’s return policies described herein or otherwise provided on Roku’s website at
www.roku.com. The policies and other contents of the web sites referred to in this Agreement may be changed by Roku and its
suppliers at any time at their sole discretion. See www.roku.com for details.
Third Party Notices
Some of the technology used in the Roku Product is subject to third party licenses, which require that you be given the following
notices:
THIS PRODUCT IS LICENSED UNDER THE AVC PATENT PORTFOLIO LICENSE FOR THE PERSONAL AND NONCOMMERCIAL USE OF
A CONSUMER TO (I) ENCODE VIDEO IN COMPLIANCE WITH THE AVC STANDARD (“AVC VIDEO”) AND/OR (II) DECODE AVC VIDEO
THAT WAS ENCODED BY A CONSUMER ENGAGED IN A PERSONAL AND NON-COMMERCIAL ACTIVITY AND/OR WAS OBTAINED
FROM A VIDEO PROVIDER LICENSED TO PROVIDE AVC VIDEO. NO LICENSE IS GRANTED OR SHALL BE IMPLIED FOR ANY OTHER
USE. ADDITIONAL INFORMATION MAY BE OBTAINED FROM MPEG LA, L.L.C. SEE WWW.MPEGLA.COM.
THIS PRODUCT IS LICENSED UNDER THE VC-1 PATENT PORTFOLIO LICENSE FOR THE PERSONAL AND NON-COMMERCIAL USE OF
A CONSUMER TO (I) ENCODE VIDEO IN COMPLIANCE WITH THE VC-1 STANDARD (“VC-1 VIDEO”) AND/OR (II) DECODE VC-1 VIDEO
THAT WAS ENCODED BY A CONSUMER ENGAGED IN A PERSONAL AND NON-COMMERCIAL ACTIVITY AND/OR WAS OBTAINED
FROM A VIDEO PROVIDER LICENSED TO PROVIDE VC-1 VIDEO. NO LICENSE IS GRANTED OR SHALL BE IMPLIED FOR ANY OTHER
USE. ADDITIONAL INFORMATION MAY BE OBTAINED FROM MPEG LA, L.L.C. SEE WWW.MPEGLA.COM.
See also Separately Licensed Code below.
License
Subject to the terms of this Agreement, Roku grants you a nonexclusive, nontransferable license to run the software provided
with the Roku Product and any updated versions provided by Roku (“Software”) only on and as incorporated in the Roku Product.
This is a license and not a sale. You shall not (i) copy or distribute, sublicense, lease, rent or otherwise transfer the Software to any
third party except with and incorporated in the Roku Product, and then not for value; (ii) modify, adapt, alter, translate, or create
derivative works of the Software except to the extent Roku may, in certain jurisdictions, be required by law to permit reverse
•
•
•
42 •
•
•
engineering and provided that the provisions of such law may not be waived or conditioned on prior request for information
regarding interoperability; (iii) decompile, disassemble, reverse engineer or otherwise derive source code, or attempt to derive
source code, from the Software; or (iv) have any of the foregoing done for you by a third party. The Software and all intellectual
property rights therein, are the exclusive property of Roku or its suppliers. Roku reserves the right to update the Software at any
time, at its sole discretion, including adding, changing or removing functionalities and features, including but not limited to
changing the user interface. All rights in and to the Software not expressly granted to you in this Agreement are reserved by Roku.
Separately Licensed Code
Notwithstanding the other provisions of this Agreement, certain components of the software included with the Roku Product are
subject to separate license terms, including “free” or “open source” software (“Separately Licensed Code”). Some of the Separately
Licensed Code is licensed under the terms and conditions of the “free” or “open source” license and is not subject to the License
above or the Limited Warranty below. As required by the terms of the relevant Separately Licensed Code licenses, Roku makes
the “free” and “open source” code provided under such licenses, and Roku’s modifications to such code, available on Roku’s
website, at no charge. The following Separately Licensed Code is included:
This product includes software developed by the OpenSSL Project for use in the OpenSSL Toolkit (www.openssl.org/).
Portions of the software are © 2006 The FreeType Project (www.freetype.org). All rights reserved. This software is based, in part,
on the work of the Independent JPEG Group.
This product is protected by certain intellectual property rights of Microsoft Corporation. Use or distribution of such technology
outside of this product is prohibited without a license from Microsoft or an authorized Microsoft subsidiary.
Please visit www.roku.com for detailed information on our use of third party software.
Account with a Service Provider
In order to use the Roku Product, you may be required to maintain a valid and active account in good standing with one of Roku’s
content service providers (“Service Provider”). You must adhere to the Service Provider’s terms of service with respect to your
relationship with any Service Provider that you choose to use. See www.roku.com for a list of Service Providers for the Roku
Product. Roku may add or remove Service Providers at any time, at its sole discretion.
Privacy
Our privacy policy explains our policies regarding the collection, use, and disclosure of personally identifiable and anonymous
information. Such policy may be accessed through our website at www.roku.com/privacy and may be modified by Roku at any
time for any reason. Roku collects and uses anonymous information that is not personally identifiable to you. Once you register
the Roku Product, we will also collect and use personally identifiable information that you provide as part of the registration such
as your name, address, email address, and phone information. We may also collect and use certain anonymous and personally
identifiable information, as applicable, regarding the Roku Product including, but not limited to, billing records, maintenance and
repair records, marketing information, and customer feedback. On behalf of your Service Provider, we may also collect certain
information regarding your usage of the Roku Product in connection with a video on demand service (the “Service Provider
Information”), which we will provide to your Service Provider. The Service Provider Information is only identifiable by a unique
identification number, but the Service Provider may be able to link the identification number to personally identifiable
information they have collected on their own, for example, in the case of your having an account with the Service Provider.
Notices
•
•
•
• 43
•
•
The collection, use and disclosure of the Service Provider Information is subject to the privacy policies of the Service Provider. The
Service Provider’s privacy policy is independent of Roku’s privacy policy. Before selecting a Service Provider, you should review
the Service Provider’s privacy policy by visiting its website.
Advertising and Promotional Messages
Roku and its Service Providers reserve the rights to deliver and display advertising and promotional messages to you through the
Roku Product and to include such advertising and promotional messages in or with any user interface, notices or content that is
displayed using the Roku Product.
Thirty-Day Money Back Guarantee
If you are the original purchaser and you are not completely satisfied with the Roku Product, Roku offers a 30-day money back
guarantee for the Roku Product. You may return the Roku Product for a refund of your purchase price and any sales taxes charged,
but excluding any shipping and handling charges, within thirty (30) days from the date of purchase. For returns made within the
30-day period, credit will be issued subject to receipt and inspection of the returned Roku Product. However, if you fail to return
the Roku Product within such 30-day period, you are not eligible for this offer and no credits will be issued. Please see Return and
Warranty Service Process below for return instructions.
Limited Warranty
Subject to the provisions herein, Roku warrants the Roku Product against defects in materials and workmanship under normal
use for a period of one (1) year from the date of purchase (“Warranty Period”). If Roku determines that the Roku Product is
defective, Roku will either repair the unit or replace the unit with either a new or rebuilt Roku Product, at its option, at no charge
to you. If the Warranty Period has expired or is otherwise not applicable (see Scope and Limitation on Warranty below), you are
responsible for the payment of all labor charges, parts, and materials, or you may purchase a replacement Roku Product at your
own expense. THE FOREGOING SETS FORTH ROKU’S SOLE OBLIGATION AND YOUR EXCLUSIVE REMEDY IN THE EVENT OF ANY
BREACH OF THIS LIMITED WARRANTY.
Return and Warranty Service Process
To return or obtain warranty service for a Roku Product, you must first obtain a Return Merchandise Authorization (RMA) number
from a Technical Support Representative (TSR) at Roku. A TSR may be reached by emailing [email protected] or calling our toll-free
number for customer care (1-888-600-7658 from the US). RMA numbers expire: (1) thirty days from your date of purchase in the
case of a return under Roku’s Thirty-Day Money Back Guarantee (described above) or (2) thirty days from issuance of the RMA
number in the case of a return under Roku’s Limited Warranty (described above). We may attempt to troubleshoot a warrantyrelated problem prior to issuing an RMA number. Please be prepared to provide additional information upon request. Once an
RMA number is obtained, you must ship your Roku Product, freight prepaid, together with proof of purchase and all accessories,
in either the original packaging or packaging affording an equal degree of protection, to the Roku authorized distribution facility
identified by the TSR. Failure to return any of the accessories could result in a delay and/or result in an invoice to you or credit to
Roku for the missing accessories.
Important: When emailing for an RMA number, please provide the following information with your request: (a) model number,
(b) serial number, (c) problem description, (d) software version (located in the System Configuration menu), (e) date of purchase,
(f) place of purchase (dealer or online place of purchase), (g) return shipping address (P.O. boxes are not accepted), and (h) date
of purchase.
•
•
•
44 •
•
•
Scope of and Limitation on Warranty
The warranty on the Roku Product is limited to the repair or replacement of defective units as described in Limited Warranty
above. This warranty does not cover customer training or education, installation, set up adjustments, or signal reception
problems. This warranty also does not cover any issue related to the service provided by your Service Provider, including but not
limited to service disruption, changes in service terms, changes in offerings, changes in format, or technical problems. This
warranty does not cover damage due to acts of God, accident, misuse, abuse, negligence, commercial use or modification of, or
to any part of, your Roku Product. This warranty does not cover damage due to improper operation or maintenance, connection
to improper voltage supply or attempted repair by anyone other than a facility authorized by Roku to service your Roku Product.
This warranty does not cover consumables (such as fuses and batteries). This warranty is valid only in the country of purchase
from Roku or an authorized Roku distributor or dealer.
Warranty Disclaimer
THE LIMITED WARRANTY AND REMEDIES STATED ABOVE ARE EXCLUSIVE AND IN LIEU OF ALL OTHERS, ORAL OR WRITTEN,
EXPRESS, IMPLIED OR STATUTORY. ANY AND ALL OTHER WARRANTIES, INCLUDING IMPLIED WARRANTIES OF MERCHANTABILITY,
FITNESS FOR A PARTICULAR PURPOSE, TITLE, NONINFRINGEMENT OF THIRD PARTY RIGHTS, QUIET ENJOYMENT AND ACCURACY
ARE EXPRESSLY EXCLUDED. ROKU’S WARRANTY DOES NOT APPLY TO ANY SEPARATELY LICENSED CODE. THESE WARRANTIES
ONLY APPLY TO ROKU PRODUCTS PURCHASED FROM ROKU OR AN AUTHORIZED ROKU DEALER. Some jurisdictions do not allow
limitations on how long an implied warranty lasts, so the limitations in the software and hardware warranties above may not
apply to you. These limited warranties give you specific legal rights, and you may also have other rights which vary from
jurisdiction to jurisdiction.
LIMITATION OF LIABILITY
IN NO EVENT WILL ROKU OR ITS SUPPLIERS BE LIABLE FOR ANY CONSEQUENTIAL, SPECIAL, EXEMPLARY, INCIDENTAL AND
INDIRECT DAMAGES, OR FOR LOSS OF REVENUE OR PROFITS OR DATA OR USE OR FOR THE COST OF SUBSTITUTE GOODS,
WHETHER IN CONTRACT OR TORT (INCLUDING NEGLIGENCE), ARISING OUT OF, OR IN CONNECTION WITH THE ROKU PRODUCT
OR YOUR USE THEREOF. IN NO EVENT WILL ROKU’S OR ITS SUPPLIERS’ TOTAL CUMULATIVE LIABILITY RELATING TO THE ROKU
PRODUCT EXCEED THE PURCHASE PRICE OF THE ROKU PRODUCT. Some jurisdictions do not allow the exclusion of implied
warranties or limitation of liability for certain incidental or consequential damages, so the exclusions set forth above may not
apply to you.
Miscellaneous
This Agreement is the final, complete and exclusive agreement between the parties relating to the Roku Product and supersedes
all prior or contemporaneous proposals, representations, understandings, or agreements relating thereto, whether oral or
written. No waiver or modification of the Agreement will be valid unless signed by each party. Your right to use the Software will
immediately terminate upon any breach of this Agreement. The waiver of a breach of any term hereof will in no way be construed
as a waiver of any other term or breach hereof. If any provision of this Agreement is held by a court of competent jurisdiction to
be unenforceable, the remaining provisions of this Agreement will remain in full force and effect. This Agreement shall be
governed by the laws of the State of California without giving effect to any conflict of laws or principles that may provide the
application of the law of another jurisdiction. Any action or proceeding arising from or relating to this Agreement may be brought
in a federal court in the Northern District of California or in state court in Santa Clara County, California, and each party irrevocably
submits to the jurisdiction and venue of any such court in any such action or proceeding. The United Nations Convention on
Notices
•
•
•
• 45
•
•
Contracts for the International Sale of Goods shall not apply to this Agreement. Should you have any question about this
Agreement, or if you desire to contact Roku, please contact us by mail at Roku Inc., 12980 Saratoga Ave., Suite D, Saratoga, CA
95070.
Copyright © 2008-2009 by Roku, Inc. All rights reserved. Roku and the Roku logo are trademarks of Roku, Inc. Other brand and
product names are trademarks or registered trademarks of their respective holders.
Important Safety Instructions
1
2
3
4
5
6
7
8
9
10
11
12
•
•
•
46 •
•
•
Read Instructions. All the safety and operating instructions should be read before the product is operated.
Retain Instructions. The safety and operating instructions should be retained for future reference.
Heed Warnings. All warnings on the product and in the operating instructions should be adhered to.
Follow Instructions. All operating and use instructions should be followed.
Cleaning. Unplug this product from the wall outlet before cleaning. Do not use liquid cleaners or aerosol cleaners. Use a
damp cloth for cleaning.
Water and Moisture. To reduce the risk of fire or electric shock, do not expose this appliance to rain or moisture. Apparatus
shall not be exposed to dripping or splashing and no objects filled with liquids, such as vases, shall be placed on the
apparatus. Do not use this product near water for example, near a bathtub, wash bowl, kitchen sink or laundry tub; in a wet
basement; or near a swimming pool; and the like.
Accessories. Do not place this product on an unstable cart, stand, tripod, bracket or table. The product may fall, causing
serious injury to a child or adult and serious damage to the product. Use only with a cart, stand, tripod, bracket or table
recommended by the manufacturer, or sold with the product. A product and cart combination should be moved with care.
Quick stops, excessive force and uneven surfaces may cause the product and cart combination to overturn.
Power Sources. This product should be operated only from the type of power source indicated on the marking label. If
you are not sure of the type of power supply to your home, consult your product dealer or local power company.
Grounding or Polarization. This product may be equipped with a polarized alternating current line plug (a plug having
one blade wider than the other). This plug will fit into the power outlet only one way. This is a safety feature. If you are
unable to insert the plug fully into the outlet, try reversing the plug. If the plug should still fail to fit, contact your electrician
to replace your obsolete outlet. Do not defeat the safety purpose of the polarized plug.
Power Cord Protection. Power-supply cords should be routed so that they are not likely to be walked on or pinched by
items placed upon or against them, paying particular attention to cords at plugs, convenience receptacles and the point
where they exit from the product.
Overloading. Do not overload wall outlets, extension cords or integral convenience receptacles as this can result in a risk
of fire or electric shock.
Object and Liquid Entry. Never push objects of any kind into this product through openings as they may touch
dangerous voltage points or short-out parts that could result in a fire or electric shock. Never spill liquid of any kind on the
product.
13 Servicing. Do not attempt to service this product yourself as opening or removing covers may expose you to dangerous
voltage or other hazards. Refer all servicing to qualified service personnel.
14 Damage Requiring Service. Unplug this product from the wall outlet and refer servicing to qualified service personnel
15
under the following conditions:
• When the power-supply cord or plug is damaged,
• If liquid has been spilled or objects have fallen into the product,
• If the product has been exposed to rain or water,
• If the product does not operate normally by following the operating instructions. Adjust only those controls that are covered
by the operating instructions as an improper adjustment of other controls may result in damage and will often require
extensive work by a qualified technician to restore the product to its normal operation,
• If the product has been dropped or damaged in any way, and
• When the product exhibits a distinct change in performance, this indicates a need for service.
Heat. The product should be situated away from heat sources such as radiators, heat registers, stoves or other products
(including amplifiers) that produce heat.
Notices
•
•
•
• 47
•
•