1
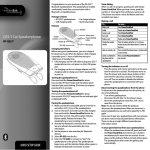
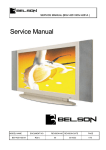
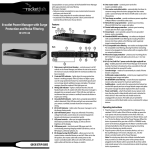
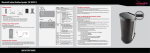
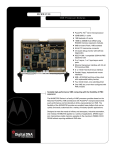
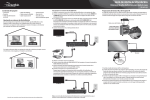
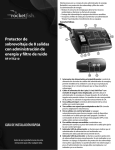
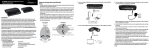
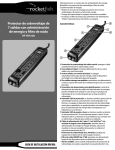
3 Controls
To...
Do this...
To...
Mute the microphone
Double-press send/end.
Increase the volume Swipe upward (toward the ear) on the
touch pad. You will hear a different
“beep” for each level change in volume.
Unmute the microphone Double-press send/end.
Do this...
To...
Do this...
Decrease the volume Swipe downward (away from the ear)
on the outside of the headset.
4 Maintaining
LEDs
Green
Green (fast flashing)
Red (flashing)
Note: This headset may also be used with a mobile phone. For pairing and
operating instructions, go to www.rocketfishproducts.com and search for
the Quick Setup Guide for model RF-EX7.
Know the facts
Recharge time: About two hours
Talk time: Up to eight hours
Standby time: Up to 300 hours
Power On
Pairing State
Low Battery
To...
Do this...
Enable or disable the indicator
Press the power button and send/end together.
Check the battery level (method 1) Turn the headset on, then press and release the power button.
Green = Between 1/2 and full charge;
Green then red = Between 1 hour talk time remaining and 1/2 charge;
Red = Less than 1 hour talk time remaining.
Check the battery level (method 2) Turn the headset on. If the indicator flashes red and green, or if it beeps every 5 minutes,
the battery level is low.
Erase paired device information
Turn the headset off, then press and hold the power button and send/end together for about
two seconds.
Reset
Connect the charger to reset the headset, then user can power on headset after remove the charger.
FCC Part 15
This device complies with Part 15 of the FCC Rules. Operation is subject to the
following two conditions: (1) this device may not cause harmful interference, and (2)
this device must accept any interference received, including interference that may
cause undesired operation.
FCC ID: EMJTRFEX7
You are cautioned that changes or modifications not expressly approved by the part
responsible for compliance could void the user’s authority to operate the equipment.
Canada IC-RSS210 statement
IC: 4251A-HRFEX7
Operation is subject to the following two conditions: (1) this device may not cause
interference, and (2) this device must accept any interference, including interference
that may cause undesired operation of the device.
© 2010 BBY Solutions, Inc., All Rights Reserved Distributed by Best Buy Purchasing,
LLC 7601 Penn Avenue South, Richfield, MN USA 55423-3645
ENGLISH 10-0829
RF-EX7
RF-GPS31126
WITH PURE SPEECH®
Hear and be heard like never before
QUICK SETUP GUIDE
Send/end button
What’s in the box:
1 Power & Pair
LED light
Rocketfish RF-GPS31126 Bluetooth headset (1)
Charger (1)
USB charging cable (1)
Round earbuds (4)
Ear loop (1)
Fitted earbuds
Quick Setup Guide (1)
(medium size is pre-attached) (3)
Volume
touch pad
1 Lift the charging port cover, then connect the charger.
When the indicator changes from red to green, you can
disconnect the charger.
2 Turn off your PS3 using the rear MAIN POWER switch, leave it off
for about 10 seconds, then turn it back on. Press the front power
button. Find the Settings menu then press the (×) button on the
controller. Highlight the Register Bluetooth® Device icon, then
press (×). Highlight the Manage Bluetooth Devices icon, then
press (×). Select Yes to register a new device (if this is the first
time registering a Bluetooth device), then highlight Start
Scanning and press (×).
LED light
Charger
Bottom view
Headset
Ear bud
Charging port
with cover
Fitted earbuds
Round earbuds
Ear loop
3 Press and hold the headset’s power button for three seconds to turn
it on. It automatically enters pairing mode when you turn it on for
the first time. While in pairing mode, the headset’s LED flashes
green, and the PS3 finds and recognizes all Bluetooth devices
within its range. Your headset is recognized as RF-GPS31126.
4 When prompted for a pass key, enter “0000” (four zeros), then
highlight OK and press (×). The “Register completed” message
appears. You will then be taken to a new screen stating Register
completed. Press (O), highlight Audio Device Settings, then
press (×). Within Input Device, highlight RF-GPS31126, press
(×), then set your headset. Then set your microphone input
levels to the desired settings (we suggest level 3). The headset is
now connected.
To turn off the headset, press and hold the power button for
about two seconds.
What is PureSpeech®?
On/Off
(reverse side)
PureSpeech is a state-of-the-art noise cancelation and signal processing technology created by SRS Labs and CSR. Your RF-GPS31126
headset incorporates PureSpeech so that you can hear your calls in amazing clarity, but also so you can be heard clearly by your callers.
PureSpeech is always activated on the RF-GPS31126 so you will hear and be heard like never before.
2 Get the perfect fit
Use one of the fitted earbuds for the most convenient and
comfortable fit, or use a round earbud in combination with
the ear loop.
To use a rounded earbud:
1 Remove the fitted earbud that’s
already attached, then press the
round earbud onto the headset.
2 Attach the ear loop for a secure fit.
To use a fitted earbud:
1 Attach the appropriate size of fitted earbud
onto the headset. The medium fitted
earbud is already attached.
2 Insert the headset vertically in your ear
(shown in Step 2).
3 Rotate the headset up towards your mouth.
The flexible portion of the earbud should fit
securely towards the back of your outer ear.
You may need to guide it to a comfortable
position with your finger.