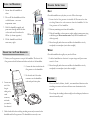
1
WARNINGS AND CAUTIONS
R ES M ED
Warnings:
•
The humidifier is for single-person use only.
•
Do not allow water from the humidifier to spill through the air
tubing into the flow generator as this could result in electrical
shock hazard and may damage the unit. To prevent this:
-
do not overfill the humidifier
-
disconnect the air tubing from the flow generator when not
in use
-
do not fill the humidifier while it is attached to the flow
generator
-
only use the humidifier when it is sitting underneath the
flow generator.
•
If water does enter the flow generator, switch off the power and
disconnect the flow generator. Return it to your equipment
supplier for inspection.
•
Always use the outlet connector - it is designed to help prevent
water from entering the air tubing that leads to your mask.
RESMED P ASSOVER HUMIDIFIER
H OW
•
Do not use a mixture of vinegar and disinfectant to clean the
humidifier.
Manufactured by ResMed Ltd 97 Waterloo Road North Ryde 2113 Australia Tel: +61 (2) 9886 5000 or 1 800 658
189 Fax: +61 (2) 9878 0120 Distributed by • ResMed Ltd 97 Waterloo Road North Ryde 2113 Australia Tel: +61
(2) 9886 5000 or 1 800 658 189 Fax: +61 (2) 9878 0120 • ResMed (UK) Limited 65 Milton Park Abingdon
Oxfordshire OX14 4RX UK Tel: +44 (1235) 862 997 Fax: +44 (1235) 831 336 • ResMed GmbH & Co KG
Rudolfstrasse 10 D-41068 Moenchengladbach Germany Tel: +49 (0) 2161-3521-0 Fax: +49 (0) 2161-3521-1499 •
ResMed SA Parc de la Bandonnière 2, rue Maurice Audibert 69800 Saint Priest France Tel: +33 (0) 437 251 251 Fax:
+33 (0) 437 251 260 • ResMed Singapore Pte Ltd 57 Ubi Avenue 1 #07-09 Ubi Centre Singapore 408936 Tel: +65
6284 7177 Fax: +65 6284 7787
Internet: http://www.resmed.com
AutoSCAN ™, AutoSet®, AutoSet T ™, AutoView™, Bubble Mask®, Bubble Cushion®, HumidAire™,
IPAP MAX™, Mirage ®, ResCap ®, SCAN™ , SmartStart ®, SULLIVAN®, VPAP ®, and VPAP MAX™ are
trademarks of ResMed Ltd.
© 2003 ResMed. Reorder No: 18805/9 03 09
WORKS
The ResMed Passover Humidifier is a water filled
container which fits underneath your flow generator. Air
from the flow generator passes over the water before being
delivered to you through your mask in the usual way. The
air picks up moisture from the water which makes it more
comfortable to breathe.
Your humidifier kit contains:
U SER GUIDE
Do not use bleach, chlorine-, alcohol-, or aromatic-based
solutions to clean the humidifier. These solutions may damage or
otherwise reduce the life of the product.
R ES M ED P ASSOVER H UMIDIFIER
The ResMed Passover Humidifier relieves the symptoms of
a dry nose and throat which some people experience during
Continuous and Variable Positive Airway Pressure (CPAP
and VPAP) treatment. It is for use with ResMed CPAP and
VPAP systems.
Cautions:
•
THE
Short length of
flexible air tubing
Outlet
connector
Humidifier
F ILLING
THE
H UMIDIFIER
C LEANING I NSTRUCTIONS
1 Ensure that the humidifier is
clean.
D AILY
2 Do not fill the humidifier with hot
or chilled water - use room
temperature water.
1
Ensure that the flow generator is switched off. Disconnect the short
air tubing. Remove the outlet connector from the humidifier. Lift the
flow generator off the humidifier.
2
Drain any remaining water from the humidifier.
3
Wash the humidifier, outlet connector, and air tubing in warm water, using
a mild detergent. Do not use hot water. Partly fill the humidifier and
shake vigorously.
4
Rinse thoroughly with clean water and allow the humidifier to air dry
completely in a warm place (not in direct sunlight).
Clean the humidifier every day after you use it. Follow these steps:
3 Hold the humidifier upright and
pour water through either the inlet
or the outlet until it reaches the
fill line (as shown opposite).
Fill line
4 Fill the humidifier with fresh
water every night.
C ONNECTING
1
THE
Position your flow generator on top of the humidifier. The front of the
flow generator should sit between the inlet and outlet of the humidifier.
1.
4
5
F LOW G ENERATOR
Connect one
end of the
long air
tubing to the
outlet
connector,
and attach
your mask to
the other end.
2
Connect the short air tube from the
flow generator to the humidifier.
3
Fit the wide end of the outlet
connector onto the humidifier
outlet and push it into place.
3.
2.
4.
Check that both the short and long air tubing are securely connected to the
humidifier and the flow generator. The humidifier is now ready to use.
W EEKLY
Clean the humidifier thoroughly every week as follows:
1
Soak the humidifier in a solution of one part vinegar and 3 parts warm
water for 1 hour.
2
Rinse thoroughly with clean water and allow the humidifier to air dry
completely in a warm place (not in direct sunlight).
C AUTION :
Do not use bleach, chlorine-, alcohol-, or aromatic-based solutions on the
air tubing or connector as these could cause some deterioration in the
materials.
Do not hang the air tubing in direct sunlight as the tubing may harden over
time and eventually crack.