1
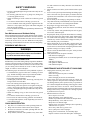
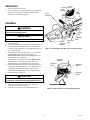
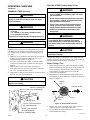
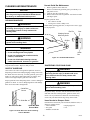
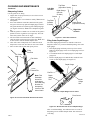
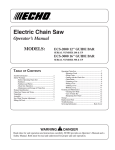
®
ELECTRIC CHAIN SAW
OWNER’S MANUAL
®
®
MODEL 100271-01
TYPE
230V~
50Hz
1450W
1995
EL-4
IMPORTANT
Read and understand this manual before assembling or operating this chain saw.
Improper use of saw can cause severe injury. Keep this manual for future reference.
CONTENTS
SECTION
PAGE
Symbol Information ............................................................ 2
Safety Warnings ................................................................. 3
Before Operating Chain Saw ....................................... 3
Kickback ...................................................................... 3
Pushback and Pull-in ................................................... 4
Chain Saw Operation .................................................. 4
Maintenance and Storage of Chain Saw ..................... 4
Product Identification ......................................................... 5
Chain Saw Names and Terms ............................................. 5
Unpacking ........................................................................... 6
Assembly ............................................................................ 6
Saw Chain Tension Adjustment ......................................... 7
Filling Oil Tank .................................................................. 7
Operating Chain Saw .......................................................... 8
Extension Cords .......................................................... 8
Oiling Chain ................................................................ 8
SECTION
PAGE
Cutting With the Chain Saw ........................................ 8
Chain Brake ................................................................. 8
Trimming a Tree .......................................................... 9
Felling a Tree .............................................................. 9
Limbing a Tree ............................................................ 10
Bucking a Log ............................................................. 11
Cleaning and Maintenance ................................................. 12
Cleaning Saw Body ..................................................... 12
Care of Guide Bar ....................................................... 12
Sharpening Your Saw Chain ....................................... 12
Recycling ........................................................................... 14
Storage ............................................................................... 14
Replacement Parts .............................................................. 14
Troubleshooting .................................................................. 15
Warranty Information ......................................... Back Cover
INFORMATION
SYMBOLS
Read Instruction Manual
Do Not Expose to Rain or Use in Wet Conditions
Remove Plug Immediately if Cable is Damaged or
Cut
Hold Chain Saw with Both Hands
Beware of Kickback
Hearing and Eye Protection Must Be Worn
!
Safety Information Warnings Appears Throughout
This Manual
Pay close attention to them. Below are definitions for the
safety information listed throughout this manual.
WARNING ICON
G 001
WARNING indicates a hazard which can cause severe
personal injury, death, or substantial property damage if
you ignore warning.
CAUTION indicates a hazard which will or can cause
minor personal injury or property damage if you ignore
warning.
2
100273
!
WARNING ICON
G 001
Kickback Safety Devices On This Saw
SAFETY WARNINGS
This saw has a low-kickback chain and reduced-kickback guide
bar. Both items reduce the chance of kickback. Kickback can still
occur with this saw. Do not let tip of guide bar touch anything
when chain is moving.
Read and understand all Safety Warnings on pages
3 and 4. Improper use of this chain saw can cause
severe injury or death from fire, electrical shock,
body contact with moving chain, or falling wood.
This saw has a chain brake. When kickback occurs, the front
hand guard is moved forward by the back of operator’s left hand.
This stops the saw chain quickly, reducing the chance of serious
injury.
BEFORE OPERATING CHAIN SAW
1. Read and understand this owner’s manual before operating
chain saw.
2. Use chain saw for cutting wood only. Do not use for cutting
any non-wood items.
3. Only well-instructed adults should operate chain saw. Never
allow children to operate chain saw. First-time user should
obtain informed, practical instruction in addition to reading
this manual. Practice cutting logs on a saw horse or cradle.
4. Use only electrical voltage noted on model plate of chain saw.
5. Use only extension cords marked for outdoor use. See page
8 for extension cord requirements.
6. Do not operate chain saw
• while under the influence of alcohol, medication, or drugs
• in rain or in damp or wet areas
• where highly flammable liquids or gases are present
• if saw is damaged, adjusted wrong, or not fully assembled
• if trigger does not turn saw on and off. Chain must stop
moving when you release trigger. Have faulty switch
replaced by authorized service person.
• while tired or in a hurry
• while in tree or on a ladder unless trained to do so
7. Wear snug-fitting clothes when operating chain saw. Do not
wear loose clothing or jewelry. They can get caught in
moving saw chain.
8. Wear the following safety gear when operating chain saw:
• heavy-duty gloves (wear rubber gloves if working oudtoors)
• steel-toed safety footwear with non-skid soles
• eye protection such as safety glasses, goggles, or face screen
• safety hard hat
• ear mufflers or ear plugs
• hair covering to contain long hair
• face or dust mask (if working in dusty areas)
9. Before cutting, always provide the following:
• clear work area
• secure footing
• planned retreat path from falling tree
10.Inspect tree before cutting down. Make sure there are no dead
limbs or branches that may fall on you.
11.The typical A-weighted noise levels at full load while cutting
wood when tested in accordance to ISO 7182 are:
Sound Pressure Level 95 DB(A)
Sound Power Level 100 DB(A)
12.The typical hand-arm vibration at full load while cutting
wood when tested in accordance to ISO/DIS 7205 is 23.8
M/S2.
Never hold the chain saw by the front hand guard.
Cause Of Kickback
Kickback may occur when nose or tip of guide bar touches an
object while chain is moving. If chain cutter catches on object, a
sudden reverse action will result. The guide bar will kick up and
back towards operator.
Direction
90°
Quadrant
Figure 1 - Kickback Hazard Example. Do Not Let Nose of
Guide Bar Touch Object While Chain is Moving
Kickback may also occur when wood pinches chain at guide bar
nose. A sudden reverse action will also result.
The following steps will reduce the risk of kickback:
• Use both hands to grip saw while saw is running. Use firm
grip. Thumbs and fingers must wrap around saw handles.
• Keep all safety items in place on saw. Make sure they work
properly.
• Do not overreach or cut above shoulder height.
• Keep solid footing and balance.
• Stand slightly to left side of saw. This keeps your body from
being in direct line with chain.
• Do not let guide bar nose touch anything when chain is
moving (see Figure 1).
KICKBACK
! WARNING
WARNING ICON
G 001
Avoid Kickback. Kickback can cause you to lose
control of chain saw. Kickback can cause severe
injury or death.
100273
Do Not Let
Guide Bar Nose
Touch Here
3
3
Continued
SAFETY WARNINGS
5.
Continued
• Never try cutting through two logs at same time. Only cut one
log at a time.
• Do not bury guide bar nose or try plunge cut (boring into
wood using guide bar nose).
• Watch for shifting of wood or other forces that may pinch
chain.
• Use extreme caution when re-entering a previous cut.
• Use low-kickback chain and guide bar supplied with this
chain saw. Only replace these parts with chains and guide
bars listed in this manual.
• Never use dull or loose chain. Keep chain sharp and tensioned
correctly.
6.
7.
8.
9.
10.
11.
Saw Maintenance and Kickback Safety
12.
13.
14.
Follow maintenance instructions in this manual. Proper cleaning
of saw and chain and guide bar maintenance can reduce chances
of kickback. Inspect and maintain saw after each use. This will
increase the service life of your saw. Note: Even with proper
sharpening, risk of kickback can increase with each sharpening.
15.
PUSHBACK AND PULL-IN
WARNING
16.
Avoid pushback and pull-in. These hazards can
cause you to lose control of chain saw. Pushback
or pull-in can cause severe injury.
17.
Cause Of Pushback and Pull-In
Pushback may occur while cutting with top of guide bar. Pushback
will force saw back towards you. Pull-in may occur while cutting
with bottom of guide bar. Pull-in will force saw in towards wood
you are cutting. These hazards can occur if chain is pinched,
caught, or contacts a non-wood object.
MAINTENANCE AND STORAGE OF CHAIN SAW
1.
The following steps will reduce the risk of pushback or pull-in:
• Use both hands to grip saw while saw is running. Use firm
grip. Thumbs and fingers must wrap around saw handles.
• Do not overreach or cut above shoulder height.
• Keep solid footing and balance.
• Stand slightly to left side of saw. This keeps your body from
being in direct line with chain.
• Have saw running at full speed before starting a cut.
• When cutting, make sure spike of saw is against wood (pullin only). See Product Identification, page 5, to locate spike.
• Never try cutting through two logs at same time. Only cut one
log at a time.
• Watch for shifting of log or other forces that may pinch
chain.
• Use extreme caution when re-entering a previous cut.
• Do not twist saw when removing guide bar from undercut.
• Use wedges made of plastic, wood, or light alloy (never steel or
iron) to hold cut open.
2.
3.
CHAIN SAW OPERATION
1.
2.
3.
4.
saw and extension cord. Only chain saw user should be in
work area.
Do not cut down a tree unless you are trained or have expert
help.
If two or more persons perform bucking and felling operations at the same time, provide plenty of distance between
operations. Provide distance of at least twice the height of
tree being felled.
Secure wood you are cutting by using clamps or chocks.
Grip chain saw firmly with both hands. Never operate chain
saw with one hand. Never use hand guard as handle.
Keep finger off trigger until ready to make cut.
Before starting chain saw, make sure chain is not touching
anything.
Avoid body contact with grounded objects such as pipes,
wire fences, and metal posts.
Keep all parts of body away from chain when saw is running.
Do not force chain saw while cutting. Apply light pressure.
Cut small brush and saplings with extreme care. Slender
material may catch in chain and be whipped toward you.
This could also pull you off balance.
When cutting limb or tree trunk that is under tension, use
extreme caution. Be alert for wood springing back. When
wood tension is released, limb could spring back and strike
operator causing severe injury or death.
Do not activate the chain brake to stop saw. Always release
trigger to stop saw.
Carry chain saw from one place to another
• with chain saw unplugged
• by holding front handle (never use front hand guard as
handle)
• with finger off trigger
• with guide bar and chain to rear
• with scabbard in place
Stay alert. Use common sense while operating chain saw.
Keep work area clean. Cluttered areas invite injuries.
Be aware of extension cord while operating chain saw. Be
careful not to trip over cord.
Keep children, animals, and bystanders away from chain
4
Unplug chain saw from power source
• when not in use
• before moving from one place to another
• before servicing
• before changing accessories or attachments
Inspect chain saw before and after each use. Check saw
closely if guard or other part has been damaged. Check for
any damage that may affect operator safety or operation of
saw. Check for alignment or binding of moving parts. Check
that switch turns motor on and off. Check chain brake.
Check for broken or damaged parts. Do not use chain saw if
damage affects safety or operation. Have damage repaired
by authorized service person.
Maintain chain saw with care.
• Never expose saw to rain.
• Keep chain sharp, clean, and lubricated.
• Follow steps outlined in this manual to sharpen chain.
• Keep handles dry, clean, and free of oil.
• Keep all screws and nuts tight.
• Inspect power cord often. If damaged, have repaired by
authorized service person.
• Never carry chain saw by power cord.
• Never yank power cord to unplug it.
• Keep power cord from heat, oil, and sharp edges.
• Inspect extension cords often and replace if damaged.
100273
4.
5.
Front Hand Guard Shield between front handle and guide bar.
Protects left hand while using saw. When kickback occurs, the
front hand guard is moved forward by the back of operator’s left
hand. This stops the saw chain quickly, reducing the chance of
serious injury.
Front Handle Located at front of saw body.
Guide Bar Metal bar that extends from saw body. The guide bar
supports and guides chain.
Guide Bar Nose Tip or end of guide bar.
Kickback Quick backward and upward motion of guide bar.
Kickback may occur when tip of guide bar touches an object while
chain is moving. The guide bar will kick up and back towards
operator.
Limbing Process of cutting limb(s) from a felled tree.
Low-Kickback Chain Chain that reduces chance of kickback
as required by ANSI B175.1.
Normal Cutting Position Stance used while making bucking
and felling cuts.
Notching Cut Notch cut in tree that directs fall of tree.
Oiler Control System for oiling guide bar and chain.
Power Head Chain saw without chain and guide bar. Also
known as saw body.
Pushback (Kickback, Pinch) Rapid pushback of chain saw.
Pushback may occur if chain along top of guide bar is pinched,
caught, or contacts a foreign object.
Rear Handle Handle located at rear of saw body.
Reduced Kickback Guide Bar Guide bar that reduces chance
of kickback.
Replacement Chain Chain that complies with ANSI B175.1
when used with a specific saw. It may not meet ANSI requirements when used with other saws.
Saw Chain (Chain) Loop of chain having cutting teeth for
cutting wood. The motor drives chain. The guide bar supports
chain.
Spiked Bumper (Spike) Pointed teeth at front of saw body
beside guide bar. Keep spiked bumper in contact with wood when
felling or bucking. It helps maintain position of saw while cutting.
Sprocket Toothed wheel that drives chain.
Switch Device that completes or interrupts electrical circuit
to motor of saw.
Switch Linkage This device connects switch to trigger. It
moves switch when you squeeze trigger.
Switch Lockout Device that reduces accidental starting of saw.
Trigger Device that turns saw on and off. Squeezing trigger
turns saw on. Releasing trigger turns saw off.
Trimming (Pruning) Process of cutting limb(s) from a living
tree.
Undercut An upward cut from underside of log or limb. This is
done while in normal cutting position and cutting with top of
guide bar.
When servicing, use only identical replacement parts.
Always store chain saw
• in a high or locked place, out of children’s reach
• in a dry place
• in a carrying case or with scabbard over guide bar
Keep this manual for reference. It is your guide to safe and proper
operation of this chain saw.
PRODUCT IDENTIFICATION
Front Hand
Guard
Saw
Chain
Rear
Handle
Guide Bar
Nose
Guide Bar
Spike
Rear Hand
Guard
Power Cord
Scabbard
Oil Level Sight Hole
(located on saw body,
hidden by front handle)
Oil Cap
Switch
Lockout
Front
Handle
Motor
Housing
Trigger
Figure 2 - Electric Chain Saw
CHAIN SAW NAMES AND TERMS
Bucking Process of cutting a felled tree or log into lengths.
Felling Process of cutting down a tree.
Felling Cut Final cut when felling a tree. Make this cut on
opposite side of tree from notching cut.
100273
5
5
UNPACKING
1.
2.
Towards
Guide
Bar Nose
Remove all items from carton.
Check all items for any shipping damage. If you find any
damage or if any parts are missing, promptly inform
dealer where you bought chain saw.
Cutting
Edge
Saw
Chain
Drive
Sprocket
Guide Bar
Bolts
ASSEMBLY
! WARNING
WARNING ICON
G 001
Cutting edges on chain are sharp. Use protective
gloves when handling chain.
Guide
Bar
IMPORTANT
Do not clamp chain saw in vise during assembly.
1.
2.
3.
4.
5.
6.
Sprocket
Support
Lay chain out flat.
Remove guide bar nuts from guide bar bolts (see Figure 3).
Turn adjusting screw counterclockwise (see Figure 4).
Continue to turn adjusting screw until adjusting block is to
rear of adjusting plate.
Install guide bar onto saw body. Place rear of guide bar
between adjusting plate and sprocket support.
IMPORTANT: Make sure to insert adjusting block into
oval adjusting hole on guide bar.
Attach guide bar nuts to guide bar bolts. IMPORTANT:
Tighten guide bar nuts finger tight only. Make sure
adjusting block is in oval adjusting hole on guide bar.
Place chain around drive sprocket, then along top groove
of guide bar and around guide bar nose. Note: Make sure
cutting edges of chain are facing the right direction.
Position chain so cutting edges on top of guide bar face
guide bar nose (see Figure 3).
Figure 3 - Assembling Guide Bar, Chain, and Hand Guard
Sprocket
Support
Adjusting
Block
Adjusting
Plate
Adjusting
Screw
! CAUTION
WARNING ICON
Guide Bar
Nuts
Adjusting
Hole
G 001
Do not place chain on saw backwards. If chain is
backwards, saw will vibrate badly and will not cut.
7.
8.
Adjust saw chain tension. Follow steps under Saw
Chain Tension Adjustment, page 7.
If saw has 2-piece side cover, attach sprocket cover.
Figure 4 - Part Locations for Assembling Guide Bar
6
100273
SAW CHAIN TENSION
ADJUSTMENT
!
WARNING ICON
G 001
WARNING
Unplug chain saw from power source before
adjusting saw chain tension.
! WARNING
WARNING ICON
G 001
Cutting edges on chain are sharp. Use protective
gloves when handling chain.
! WARNING
WARNING ICON
G 001
Maintain proper chain tension always. A loose
chain will increase the risk of kickback. A loose
chain may jump out of guide bar groove. This
may injure operator and damage chain. A loose
chain will cause chain, guide bar, and sprocket
to wear rapidly.
Figure 5 - Turning Adjusting Screw
Note: For pre assembled models, the saw chain tension is
properly set at factory. A new chain will stretch. Check new
chain after first few minutes of operation. Allow chain to cool
down. Follow steps below to readjust saw chain tension.
Guide Bar
Nuts
1. Before adjusting chain, make sure guide bar nuts are only
finger tight (see Figure 3, page 6). Also make sure adjusting block is in oval adjusting hole on guide bar (see Figure
3 and 4, page 6).
2. Turn adjusting screw clockwise until all slack is out of
chain (see Figure 5).
Note: There should be no gap between side links of chain
and bottom of guide bar (see Figure 6).
3. Wearing protective gloves, move chain around guide bar.
Chain should move freely. If chain does not move freely,
loosen chain by turning adjusting screw counterclockwise.
4. After chain tension is correct, tighten guide bar nuts firmly.
If not, guide bar will move and loosen chain tension. This
will increase the risk of kickback. This can also damage
saw. Note: A new chain will stretch. Check new chain
after first few minutes of operation. Allow chain to cool
down. Readjust chain tension.
Guide Bar
Guide Bar
Gap
Correct
Tension
Incorrect Tension
Figure 6 - Saw Chain Adjustment
FILLING OIL TANK
1. Remove oil cap.
2. Fill oil tank with SAE #30 motor oil. Note: For temperatures below -1°C, use SAE #10 oil. For temperatures above
24°C, use SAE #40 oil.
3. Replace oil cap at once. Tighten oil cap firmly for good
seal. This will avoid oil seepage from tank.
4. Wipe off excess oil.
Note: It is normal for oil to seep when saw is not in use.
Empty oil tank after each use to prevent seepage.
7
100273
7
4. Make sure your footing is firm. Keep feet apart. Divide
your weight evenly on both feet. Stand slightly to left side
of saw. This keeps your body from being in direct line
with chain.
5. When ready to make a cut, press in switch lockout with
right thumb and squeeze trigger (see Figure 9). This will
turn saw on. Releasing trigger will turn saw off. Make sure
saw is running at full speed before starting a cut.
OPERATING CHAIN SAW
! WARNING
WARNING ICON
G 001
Read and understand this owner’s manual
before operating this saw. Make certain you read
and understand all Safety Warnings. Improper
use of this chain saw can cause severe injury or
death from fire, electrical shock, or body contact
with moving chain, or falling wood.
Front Hand
Guard
Switch
Lockout
EXTENSION CORDS
Use proper extension cord with this chain saw. Use a HO7RN
extension cord no less than 1.5 mm2 at distances up to 30
meters. Use a ground fault circuit interrupter as part of the
power supply system.
Use an extension cord heavy enough to carry the current your
saw will draw. An undersized cord will cause a voltage drop at
the saw, loss of power, and overheating.
Trigger
Figure 9 - Front Hand Guard, Switch Lockout,
and Trigger Location
Keep cord away from cutting area. Make sure cord does not
catch on branches or logs during cutting. Inspect cords often.
Replace damaged cords.
6. When starting a cut, place moving chain against wood.
Hold saw firmly in place to avoid possible bouncing or
skating (sideways movement) of saw.
7. Guide saw using light pressure. Do not force saw. The
motor will overload and can burn out.
8. Remove saw from a cut with saw running at full speed.
Stop saw by releasing trigger. Do not use the chain brake.
Make sure chain has stopped before setting saw down.
9. Practice until you can maintain a steady, even cutting rate.
The extension cord may come undone from the power cord
during use. To avoid this, make a knot with the two cords as
shown in Figure 7 below.
Extension
Cord
Chain Saw
Power Cord
CHAIN BRAKE
The chain brake quickly stops the saw chain. Kickback causes
the back of operator’s left hand to contact front hand guard (see
Figure 10). When front hand guard moves forward, the saw chain
stops. This reduces the chance of serious injury during kickback.
When the chain brake activates, release trigger at once.
Figure 7 - Tying Extension Cord and Power Cord in Knot
OILING CHAIN
Always check oil level before using saw. To oil chain, press oil
cap. Oil will feed onto guide bar and chain. Press oil cap at
least once before each cut. Check oil level often by looking at
oil sight level hole. Oil sight level hole is on left side of saw,
between front handle and front hand guard.
OP
ST
Figure 10 - The chain brake quickly stopping the saw chain
To reset chain brake, release trigger and move front hand
guard back into position. You must release trigger first. If not,
the saw will start when you reset the front hand guard.
Figure 8 - Pressing Oil Cap to Oil Chain
CUTTING WITH THE CHAIN SAW
CAUTION: Do not use the chain brake to stop and start
your saw. Quick repeated stops may cause overheating
of the chain brake. Damage to the chain brake will
occur.
1. Connect saw to extension cord. Connect extension cord to
power supply.
2. Make sure section of log to be cut is not laying on ground.
This will keep chain from touching ground as it cuts through
log. Touching ground with moving chain will dull chain.
3. Use both hands to grip saw. Always use left hand to grip
front handle and right hand to grip rear handle. Use firm
grip. Thumbs and fingers must wrap around saw handles
(see Figure 9).
Note: Test chain brake before each use. Firmly grip saw with
both hands. With saw running, move front hand guard forward
with back of left hand. Keep both hands on the handles. Saw
chain should stop. If chain brake does not work, have saw
repaired by authorized service person.
8
100273
FELLING A TREE (Cutting Down a Tree)
OPERATING CHAIN SAW
Continued
!
TRIMMING A TREE (Pruning)
!
WARNING ICON
G 001
WARNING ICON
WARNING
Avoid kickback. Kickback can result in severe
injury or death. See Kickback, page 3 to avoid
risk of kickback.
! WARNING
WARNING ICON
G 001
Do not operate chain saw while
• in a tree
• on a ladder or any other unstable surface
• in any awkward position
You may lose control of saw causing severe injury.
!
WARNING ICON
G 001
G 001
G 001
When felling a tree, be aware of your
surroundings. Do not endanger any person,
strike utility lines, or cause property damage. If
tree strikes utility lines, contact utility company
at once.
WARNING
! CAUTION
Trimming a tree is the process of cutting limbs from a living
tree. Make sure your footing is firm. Keep feet apart. Divide
your weight evenly on both feet. Follow directions below to
trim a tree.
1. Make first cut 15 centimeters from tree trunk on underside
of limb. Use top of guide bar to make this cut. Cut 1/3
through diameter of limb (see Figure 11).
2. Move five to ten centimeters farther out on limb. Make
second cut from above limb. Continue cut until you cut
limb off.
3. Make third cut as close to tree trunk as possible on
underside of limb stub. Use top of guide bar to make this
cut. Cut 1/3 through diameter of stub.
4. Make fourth cut directly above third cut. Cut down to meet
third cut. This will remove limb stub.
!
WARNING
! WARNING
WARNING ICON
Do not cut limbs higher than your shoulders.
WARNING ICON
G 001
• Avoid kickback. Kickback can result in severe
injury or death. See Kickback, page 3 to avoid
risk of kickback.
• Do not fell a tree without ample skill or expert help.
• Keep children, animals, and bystanders away
from area when felling a tree.
• If two or more persons perform bucking and
felling operations at the same time, provide
ample distance between operations. Provide
distance of at least twice the height of tree
being felled.
WARNING ICON
G 001
Seek professional help if facing conditions
beyond your ability.
Felling is the process of cutting down a tree. Make sure your
footing is firm. Keep feet apart. Divide your weight evenly on
both feet. Follow directions below to fell a tree.
Before Felling a Tree
1. Before felling, inspect tree. Make sure there are no dead
limbs or branches that may fall on you. Study natural lean
of tree, location of larger branches, and wind direction.
This will help you judge which way tree will fall.
2. Clear work area around tree.
3. Plan and clear a retreat path before felling. Make retreat
path opposite to planned direction of fall of tree and at 45°
angle (see Figure 12).
CAUTION
Seek professional help if facing conditions
beyond your ability.
Retreat
Path
Direction of Fall
2nd Cut - Pruning Cut
4th Cut - Final (to avoid pinching)
Stub Cut
45°
15
cm
Retreat
Path
5 to 10 cm
1st Cut - Pruning Undercut
(to avoid splintering)
Figure 12 - Retreat Path From Tree
4. Remove dirt, stones, loose bark, nails, staples, and wire
from tree where you will make felling cuts.
5. Stay on uphill side when felling tree. Tree could roll or
slide downhill after falling.
3rd Cut - Stub Undercut
(to avoid splintering)
Figure 11 - Cutting A Limb
100273
Tree
9
Continued
9
4. When tree begins to fall, quickly
• remove saw from felling cut
• release trigger to turn saw off
• put saw down
• exit area using retreat path
OPERATING CHAIN SAW
Continued
Felling Procedure
Felling Notch
A properly placed felling notch will determine direction tree
will fall. Place felling notch on side of tree in direction you
want tree to fall (see Figure 13). Follow directions below to
create a felling notch.
1. Make lower notch cut as close to ground as possible. Hold
saw so guide bar is horizontal. Cut 1/3 the diameter of tree
trunk (see Figure 13). Note: Always make this horizontal
lower notch cut first. If you make this cut second, tree can
pinch chain or guide bar.
2. Start upper notch cut the same distance above first cut as
first cut is deep.
Example: If lower notch cut is 20 centimeters deep, start
upper notch cut 20 centimeters above it. Cut downward at
45° angle. The upper notch cut should meet end of lower
notch cut (see Figure 13).
3. Remove tree trunk wedge created by notching cuts.
!
WARNING ICON
! WARNING
WARNING ICON
G 001
!
!
Do not cut all the way through tree. Leave about
five centimeters of tree diameter uncut directly
behind felling notch (see Figure 13). This uncut
portion acts as a hinge. The hinge helps keep
tree from twisting and falling in wrong direction.
WARNING ICON
G 001
CAUTION
Limbing is removing branches from a fallen tree. Make sure
your footing is firm. Keep feet apart. Divide your weight
evenly on both feet. Do not remove larger limbs under tree that
support log off ground. Remove each limb with one cut (see
Figure 14). Clear cut limbs from work area often. This will
help maintain a safe work area.
Hinge
5 cm
WARNING
Seek professional help if facing conditions
beyond your ability.
Direction of Fall
5 cm
G 001
When cutting limb that is under tension, use
extreme caution. Be alert for wood springing
back. When wood tension is released, limb could
spring back and strike operator causing severe
injury or death.
WARNING
3rd Cut Felling Cut
G 001
Avoid kickback. Kickback can result in severe
injury or death. See Kickback, page 3 to avoid
risk of kickback.
Felling Cut
1. Make felling cut five centimeters higher than lower notch
cut and on opposite side of tree (see Figure 13). Keep
felling cut parallel to lower notch cut.
2. Cut towards notch.
!
WARNING
LIMBING A TREE
WARNING ICON
WARNING ICON
G 001
Be alert for falling overhead limbs. Watch your
footing while exiting area.
Make sure you start your cut where limb will not pinch saw
during cutting. To avoid pinching, start cut on freely hanging
limbs from above limb. Start cut on limbs under tension from
under limb. If pinch occurs, turn saw off, lift limb, and remove
saw.
2nd Cut Upper
Notch Cut
1st Cut Lower
Notch Cut
Figure 13 - Felling A Tree
3. As felling cut nears hinge, tree should begin to fall. Note: If
needed, drive wedges into felling cut to control direction of
fall. If tree settles back and pinches chain, drive wedges into
felling cut to remove saw. Only use wedges made of wood,
plastic, or aluminum. Never use wedge made of steel. This
could cause kickback and damage to chain.
Figure 14 - Limbing A Tree
10
100273
OPERATING CHAIN SAW
Log Supported On One End
Continued
1. Make first cut on underside of log (see Figure 16). Use top
of guide bar to make this cut. Cut 1/3 through diameter of
log. This cut will keep section from splintering when cut.
2. Make second cut directly above first cut. Cut down to meet
first cut. This cut will keep log from pinching guide bar
and chain.
BUCKING A LOG
! WARNING
WARNING ICON
G 001
Avoid kickback. Kickback can result in severe
injury or death. See Kickback, page 3 to avoid
risk of kickback.
!
WARNING ICON
G 001
2nd Cut
WARNING
• If on slope, make sure log will not roll down
hill. Secure log by using wooden stakes. Drive
wooden stakes into ground on downhill side
of log. Stand on uphill side of log while
cutting. Log may roll after cutting.
• Never try cutting through two logs at same
time. This could increase the risk of kickback.
• While cutting log, never hold log with your
hand, leg, or foot.
• While cutting log, never allow another person
to hold log.
• Turn off and unplug saw before moving from
one place to another.
1st Cut
Figure 16 - Bucking Log When Log Is Supported
On One End
! CAUTION
WARNING ICON
Log Supported On Both Ends
G 001
1. Make first cut from above log (see Figure 17). Cut 1/3
through diameter of log. This cut will keep section from
splintering when cut.
2. Make second cut on underside of log, directly under first
cut. Use top of guide bar to make this cut. Cut up to meet
first cut. This will keep log from pinching guide bar and
chain.
Seek professional help if facing conditions
beyond your ability.
Bucking a log is cutting a log into sections. Make sure your
footing is firm. Keep feet apart. Divide your weight evenly on
both feet. Stand slightly to left of saw. This keeps your body
from being in direct line with chain. When possible, raise log
or section off ground. Do this by using limbs, logs, chocks, etc.
When cutting through log, maintain control by reducing
cutting pressure near end of cut. Do not relax your grip on
chain saw handles. Do not let moving chain touch ground.
Ground will dull moving chain. After cutting through log,
release trigger to turn saw off before moving saw.
1st Cut
Follow directions below to buck a log.
Entire Length Of Log On Ground
1. Cut log from top (see Figure 15).
2nd Cut
Figure 17 - Bucking Log When Log Is Supported
On Both Ends
11
Figure 15 - Bucking Log With Entire Length On Ground
100273
11
Normal Guide Bar Maintenance
CLEANING AND MAINTENANCE
1. Remove guide bar from chain saw.
2. Remove sawdust from guide bar groove periodically. Use
putty knife or wire.
3. Clean oil slots after each day of use.
4. Remove burrs from sides of guide bar. Use flat file to make
side edges square.
NOTICE
Below are instructions for servicing your chain
saw. Any servicing not mentioned below should
be done by an authorized service person.
Replace guide bar when
• bar is bent or cracked
• inside groove of bar is badly worn
Note: When replacing guide bar, see Replacement Parts, page
14 for proper bar.
CLEANING SAW BODY
!
WARNING ICON
G 001
WARNING
Unplug chain saw from power source before
servicing. Severe injury or death could occur
from electrical shock or body contact with
moving chain.
Flat File
Burr
Cleaning Groove
With Putty Knife
!
WARNING ICON
G 001
WARNING
Oil Slot
Cutting edges on chain are sharp. Use protective
gloves when handling chain.
WARNING
When cleaning saw body,
Guide
Bar
• do not submerge saw in any liquids
• do not use products that contain ammonia,
chlorine, or abrasives
Figure 19 - Guide Bar Maintenance
• do not use chlorinated cleaning solvents,
carbon tetrachloride, kerosene, or gasoline
Keep saw body clean. Use a soft cloth dampened with a mild
soap and water mixture. Wipe saw body to clean.
SHARPENING YOUR SAW CHAIN
!
CARE OF GUIDE BAR
Uneven bar wear causes most guide bar problems. Incorrect
sharpening of chain cutter and depth gauge settings often cause
this. When bar wears unevenly, it widens guide bar groove (see
Figure 18). This causes chain clatter and rivet popping. Saw
will not cut straight. Replace guide bar if this occurs.
WARNING ICON
G 001
WARNING
Unplug chain saw from power source before
servicing. Severe injury or death could occur
from electrical shock or body contact with
moving chain.
Inspect guide bar before sharpening chain. A worn or damaged
guide bar is unsafe. A worn or damaged guide bar will damage
chain. It will also make cutting harder.
! WARNING
WARNING ICON
G 001
Cutting edges on chain are sharp. Use protective
gloves when handling chain.
Guide Bar
Groove
Keep chain sharp. Your saw will cut faster and more safely. A
dull chain will cause undue sprocket, guide bar, chain, and
motor wear. If you must force chain into wood and cutting
creates only sawdust with few large chips, chain is dull.
Items Needed to Sharpen Chain
Guide Bar
Normal Guide Bar
Purchase these items from your local dealer, hardware store, or
chain saw supplies outlet.
• 4 mm round file
• Depth gauge tool
• File guide
• Vise
• Medium sized flat file
Guide Bar With
Uneven Wear
Figure 18 - Guide Bar Cross Section Showing
Uneven Bar Wear
12
100273
CLEANING AND MAINTENANCE
Left Side
of Chain
Continued
Groove
Top Plate
(right side of chain)
Depth Gauge
(left side
of chain)
Groove
Sharpening Cutters
Use file guide for 30° filing.
1. Adjust chain for proper tension (see Saw Chain Tension
Adjustment, page 7).
2. Clamp guide bar in vise to hold saw steady. Note: Do not
clamp chain.
3. Press four millimeter round file (attached to file guide)
into groove between top plate and depth gauge on chain.
File guide should rest on both top plate and depth gauge
(see Figures 20 and 21). Note: File at midpoint of guide
bar.
4. Hold file guide level. Make sure 30° mark on file guide is
parallel to center of guide bar (see Figure 20). This will
insure that you file cutters at 30° angle.
5. File from inside towards outside of cutter until sharp.
Only file in this one direction (see Figure 20). Note: Two
or three strokes with file should sharpen cutter.
6. After each cutter if sharpened, move chain forward to
sharpen next cutter. File all cutters on one side of chain.
7. Move to other side of chain and repeat process.
Top Plate
(left side
of chain)
Depth Gauge
(right side of chain)
Right Side
of Chain
Figure 21 - Chain Part Locations
Filing Cutter Depth Gauges
The cutter depth gauge clearance is reduced as cutters are
sharpened. After every second or third sharpening, reset cutter
depth gauges.
1. Place depth gauge tool firmly across top of two cutters.
Make sure depth gauge enters slot in depth gauge tool (see
Figure 22).
2. Use medium flat file. File depth gauge level with depth
gauge tool.
3. Remove depth gauge tool. With flat file, round off front
corner of cutter depth gauge (see Figure 23).
Filing
Direction
30° Guide
Mark
File Guide
FILE
Depth Gauge
HOLDER
4 mm
Round File
Flat File
Note: This
illustration
shows file
guide placement and filing
direction for
sharpening
cutters on left
side of chain.
Depth
Gauge
Tool
Depth
Gauge
Slot
Figure 22 - Depth Gauge Tool On Chain
Front Corner
Figure 20 - File and File Guide Placement On Chain
Figure 23 - Round Off ECSp005
Front Corner Of Depth Gauge
After several hand filings, have authorized service center or
sharpening service machine sharpen chain. This will insure
even filing.
100273
13
13
Continued
CLEANING AND MAINTENANCE
Continued
Replacing Saw Chain
Replace chain when cutters are too worn to sharpen or when
chain breaks. Only use replacement chain noted in this manual.
Always include new drive sprocket when replacing chain. This
will maintain proper driving of chain. Note: For proper chain
and drive sprocket, see Replacement Parts, below.
RECYCLING
In the event it is not practical to repair your chain saw, be sure
to follow local and country codes for recycling plastic and
metallic materials when disposing of the unit.
STORAGE
If storing saw for more than 30 days, follow steps below.
1. Drain oil tank.
2. Remove and clean guide bar and chain. Clean guide bar
and chain by soaking in petroleum based solvent or mild
soap and water mixture.
3. Dry guide bar and chain.
4. Place chain in container filled with oil. This will prevent
rust.
5. Wipe a thin coating of oil over surface of guide bar.
6. Wipe off outside of saw body. Do this with soft cloth
dampened with a mild soap and water mixture.
7. Store chain saw
• in a high or locked place, out of children’s reach
• in a dry place
• in a carrying case or with scabbard over guide bar
REPLACEMENT PARTS
! WARNING
WARNING ICON
G 001
Use only replacement parts described in this
manual. Use of other parts could damage saw or
injure operator.
Purchase these parts from your local dealer.
Part Number
Description
097570-01
Guide bar, 350 mm
091374S
Chain, 350 mm
075752
Drive sprocket
14
100273
TROUBLESHOOTING
! WARNING
WARNING ICON
G 001
Unplug chain saw from power source before servicing. Severe injury
or death could occur from electrical shock or body contact with
moving chain.
OBSERVED FAULT
POSSIBLE CAUSE
REMEDY
Saw runs, but does not cut.
Chain assembled backwards on guide
bar.
See Assembly, page 6.
Saw does not cut unless heavily forced.
Cutting produces only sawdust with few
large chips.
Chain is dull.
See Sharpening Your Saw Chain,
page 12.
Saw runs slow. Saw stalls easily.
Low power supply voltage.
Extension cord wire size too
small. See Extension Cords, page 8.
Motor of saw does not run when you
squeeze trigger.
Switch lockout not pressed in to release
trigger.
Press in switch lockout before squeezing trigger.
Chain brake activated.
Release trigger and move front hand
guard back towards rear of saw.
Extension cord connections
loose.
Check cord connections.
Open line fuse or circuit
breaker.
Check line fuse or circuit
breaker.
Bad motor brushes.
Contact authorized service person.
Open wiring circuit on saw.
Contact authorized service person.
Gear train failure.
Contact authorized service person.
Clogged oil slot in guide bar.
Remove guide bar and clean oil slot.
Oil is too thick.
Use correct weight of oil. See Filling
Oil Tank, page 7.
Chain is loose.
Tighten chain. See Saw
Chain Tension Adjustment, page 7.
Guide bar and chain not assembled
right.
See Assembly, page 6.
Saw smokes.
Saw damaged. Do not use saw.
Contact authorized service person.
Saw leaks oil.
Oil cap is not secure.
Tighten oil cap.
Note: Empty oil tank
when not in use.
Chain brake does not stop saw chain.
Brake failure.
Contact authorized service person.
Motor of saw runs, but chain does not
move.
Chain does not get oil.
Chain comes off guide bar.
15
100273
15
WARRANTY INFORMATION
KEEP THIS WARRANTY
Model ___________________________________
Serial No. ________________________________
Date Purchased ___________________________
Always specify model and serial numbers when writing the factory.
We reserve the right to amend these specifications at any time without notice. The only warranty applicable is our
standard written warranty. We make no other warranty, expressed or implied.
LIMITED WARRANTY
ELECTRIC CHAIN SAW
This product is warranted to be free from defects in materials and workmanship for six (6) months from the date
of first purchase when operated and maintained in accordance with instructions. This warranty is extended only
to the original retail purchaser.
This warranty covers only the cost of parts required to restore this to proper operating condition. Transportation
and incidental costs associated with warranty repairs are not reimbursable under this warranty.
Warranty service is available only through authorized dealers or service centres.
This warranty does not cover commercial or rental usage nor defects resulting from misuse, accidents, lack of
proper maintenance, bar, chain.
The warrantor assumes no responsibility for indirect, incidental or consequential damages.
THIS EXPRESS WARRANTY IS GIVEN IN LIEU OF ANY OTHER WARRANTY EITHER EXPRESSED
OR IMPLIED, INCLUDING WARRANTIES OR MERCHANTABILITY AND FITNESS FOR A PARTICULAR PURPOSE.
100273-01
REV. E
5/95