1
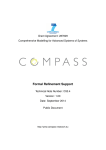
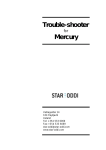
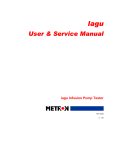
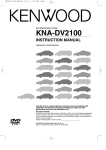
Television
User’s Guide
Changing Entertainment. Again.
Please read this manual before
operating this product for the
first time.
TOCOM 15775710
Model: CR20310
Important Information
WARNING
To reduce the risk of fire or
electric shock, do not expose
this TV to rain or moisture.
WARNING
RISK OF ELECTRIC SHOCK
DO NOT OPEN
To reduce the risk of electric shock, do not remove
cover (or back). No user serviceable parts inside.
Refer servicing to qualified service personnel.
This symbol indicates
"dangerous voltage" inside
the product that presents a
risk of electric shock or
personal injury.
This symbol indicates
important instructions
accompanying the product.
Caution: To prevent electric shock, insert plug firmly
into outlet.
Power Consumption:
~
110-220V
50/60 Hz A.C.
70 W (for model CR20310)
If fixed (non-moving) images are left on the screen for long periods,
they may be permanently imprinted on the picture tube. Such
images include network logos, phone numbers, and video games.
This damage is not covered by your warranty. Extended viewing of
channels displaying these images should be avoided.
Table of Contents
Chapter 1: Setup and Connections
Things to Consider Before You Connect ......................................................................... 4
Protect Against Power Surges ................................................................................... 4
Protect Components from Overheating ................................................................... 4
Position Cables Properly to Avoid Audio Interference ............................................ 4
Important Stand and Base Safety Information ........................................................ 4
Use Indirect Light ....................................................................................................... 4
Choose Your Connection .................................................................................................. 5
Cables Needed to Connect Components to Your TV ............................................... 5
Connection: TV Only .................................................................................................. 6
Connection: TV + VCR ................................................................................................ 6
Connection: TV + VCR + Satellite Receiver ............................................................... 7
The Front of Your TV ........................................................................................................ 8
Turn on the TV .................................................................................................................. 9
Automatic Tuning ............................................................................................................. 9
The Buttons on the Remote Control ............................................................................. 10
Chapter 2: Menus and Features
The Point and Select Method ........................................................................................ 12
TV Main Menu ................................................................................................................ 12
The Picture Menu ............................................................................................................ 12
Sound Menu .................................................................................................................... 13
Channel Menu ................................................................................................................. 14
Tuning Menu ................................................................................................................... 14
Setup Menu ..................................................................................................................... 15
Using Closed Captioning .......................................................................................... 16
Channel Marker .............................................................................................................. 16
Chapter 3: Other Information
Troubleshooting .............................................................................................................. 18
Care and Cleaning .......................................................................................................... 20
Index ................................................................................................................................ 21
Table of Contents
1
This page left blank intentionally
Chapter 1
Connections & Setup
Chapter Overview:
•
Things to Consider Before You Connect
•
Choose Your Connection
•
The Front of Your TV
•
Put Batteries in the Remote
•
How to Use the Remote Control to Complete the
Setup
•
Buttons on the Remote Control
NOTE: Illustrations are for representation only. Your product and onscreen displays might differ.
Changing Entertainment. Again.
3
Connections & Setup
Things to Consider Before You Connect
Protect Against Power Surges
•
Connect all components before you plug any of their power cords into the wall outlet.
•
Turn off the TV and/or component before you connect or disconnect any cables.
•
Make sure all antennas and cables are properly grounded. Refer to the Important
Safeguards sheet packed with your TV.
Protect Components from Overheating
•
Don’t block ventilation holes on any of the components. Arrange the components so that
air can circulate freely.
•
Don’t stack components.
•
When you place components in a stand, make sure you allow adequate ventilation.
•
If you connect an audio receiver or amplifier, place it on the top shelf so the heated air
from it won’t flow around other components.
Position Cables Properly to Avoid Audio Interference
•
Insert each cable firmly into the designated jack.
•
If you place components above the TV, route all cables down the side of the back of the
TV instead of straight down the middle of the back of the TV.
•
If your antenna uses 300-ohm twin lead cables, do not coil the cables. Also, keep the twin
lead cables away from audio/video cables.
Important Stand and Base Safety Information
Choose the location for your TV carefully. Place the TV on a stand or base that is of adequate
size and strength to prevent the TV from being accidentally tipped over, pushed off, or pulled
off. This could cause personal injury and/or damage the TV.
Use Indirect Light
Don’t place the TV where sunlight or room lighting will be directed toward the screen. Use soft
or indirect lighting.
4
Chapter 1
Connections & Setup
Choose Your Connection
There are several ways to connect your TV. Please use the following chart to determine which
connection is best for you. Proceed to the appropriate page and connect your TV.
Components
Cables
Needed
Connection
Title
Go to...
1 Coaxial
TV Only
page 6
2 Coaxial
Audio/Video
TV + VCR
page 6
4 Coaxial
Audio/Video
TV + VCR +
Satellite Receiver
page 7
TV
TV
TV
VCR
VCR
lite
tel
a
S
Cables Needed to Connect Components to Your TV
You will need the following types of cables for the connections represented in this book.
Notes: Audio/Video cables (A/V cables for short) are usually sold as a bundled set, but the
connection pictures in this book show each cable separately for better visibility. Use the White
and Red cables for audio connections and the Yellow cable for video connections.
Coaxial cable
Chapter 1
Audio/Video cables
5
Connections & Setup
TV (back panel)
INPUTS
ANTENNA
VIDEO
75 OHMS
L
AUDIO
R
TV
1
From Cable, Cable Box or Antenna
Connection: TV Only
1. Connect the TV to your cable or antenna
Connect the coaxial cable from your cable or antenna to the ANTENNA jack on the back of your TV.
Go to page 9
TV (back panel)
INPUTS
ANTENNA
75 OHMS
VIDEO
L
AUDIO
R
TV
1C
VCR
1B
VIDEO
AUDIO
IN FROM ANT
OUT
VCR
R
L
R
L
IN
Connection: TV + VCR
1A
CH3
CH4
OUT TO TV
2
From Cable,
Cable Box,
or Antenna
1. Connect your TV to your VCR
A. Connect a coaxial cable to the ANTENNA jack on your TV and to the Output Jack on your VCR
(sometimes labeled OUT TO TV).
B. Connect the white and red audio cables to the AUDIO IN jacks on the back of the TV and to
the corresponding audio output jacks on the VCR.
C. Connect the video cable (yellow) to the VIDEO IN jack on the back of the TV and to the Video
Output Jack on the VCR.
2. Connect cable or antenna to your VCR
Connect the coaxial cable from your cable outlet, cable box, or antenna to the Input Jack on your
VCR (sometimes labeled IN FROM ANTENNA or IN FROM ANT).
Go to page 9
6
Chapter 1
Connections & Setup
SATELLITE RECEIVER
From Cable or Antenna
2A
CH3
CH4
OUT
OUT TO TV
lite
l
e
Sat
VIDEO
VCR
R
L
SATELLITE
IN
3A
1B
2B
Satellite
Signal
VIDEO
AUDIO
1A
OUT
VCR
R
L
R
L
IN FROM ANT
CH3
CH4
OUT TO TV
IN
3B
TV
(back panel)
INPUTS
ANTENNA
75 OHMS
VIDEO
L
AUDIO
R
TV
Connection: TV + VCR + Satellite Receiver
1. Connect your Satellite Receiver to your TV
A. Connect the white and red audio cables to the AUDIO IN jacks on the back of the TV and to the
audio output jacks on the satellite receiver.
B. Connect the video cable (yellow) to the VIDEO IN jack on the back of the TV and to the Video
Output Jack on the satellite receiver.
2. Connect coaxial cables to the Satellite Receiver
A. Connect the coaxial cable from your cable outlet, cable box, or antenna to the Input Jack on your
satellite receiver (sometimes labeled IN FROM ANT).
B. Connect the coaxial cable from your satellite dish antenna to the Input Jack on your satellite
receiver (sometimes labeled SATELLITE IN).
3. Connect the Satellite Receiver to the VCR and to the TV
A. Connect a coaxial cable to the Output Jack (sometimes labeled OUT TO TV) on the satellite
receiver and to the Input Jack on the VCR (sometimes labeled IN FROM ANT).
B. Connect a coaxial cable to the Output Jack on the VCR (sometimes labeled OUT TO TV) and to
the CABLE/ANTENNA jack on the TV.
Go to page 9
Chapter 1
7
Connections & Setup
The Front of Your TV
Front Panel
If you cannot locate your remote you can use the buttons of your TV to operate many of the
TV’s features.
MENU Brings up the Main menu. When in the menu system, it selects highlighted items. Also
returns you to the previous menu.
CH – Scans down through the current channel list. When you’re using the TV’s menu system, it
acts like a down arrow.
CH + Scans up through the channel list. When you’re using the TV’s menu system, it acts like
an up arrow.
VOL – Decreases the volume. When you’re using the TV’s menu system, it acts like a left
arrow.
VOL + Increases the volume. When you’re using the TV’s menu system, it acts like a right
arrow.
POWER Turns the TV on and off.
Front Panel Jacks
You can access the component you connected by pressing the INPUT button on your remote to
select AV2.
VIDEO (in) Allows you to connect a component such as a VCR, camcorder or Internet access
device.
AUDIO L and R (in) Receives audio signals from another component such as a VCR,
camcorder or Internet access device.
8
Chapter 1
Connections & Setup
Plug in the TV
Plug the end of the power cord into the wall outlet. Make sure to insert the plug
completely into the outlet.
Put Batteries in the Remote
1.
Remove the battery compartment cover on the remote.
2.
Insert new batteries. Match the polarities (+ and -) on the batteries with the
diagram on the remote.
3.
Put the battery compartment cover back on the remote.
How to Use the Remote Control to
Complete Setting Up the TV
The technical term is “Navigation” – how you move through the on-screen
menus. The theory is the same throughout the menu screens: highlight your
choice and select it.
CHAN
VOL
VOL
CHAN
MENU
To highlight a menu item, use the CHAN ^/v buttons to move up or down. Use
the VOL +/- buttons to select an item or change its setting.
Press MENU to select an item.
Note: Highlighted means that the menu item stands out from other
menu items on the list (appears darker, brighter, or a different color).
Use the CHAN ^/v and VOL +/buttons along with the MENU
button to move through the menu
system.
Turn on the TV
Press the POWER button on the remote control or on the TV itself.
Automatic Tuning
The first time you turn on your TV the screen shown on the left appears.
TO RUN AUTOMATIC
TUNING NOW
PLUG THE ANTENNA
NO
YES
Your TV can search for all channels that are viewable through your antenna or
cable-TV system. This is sometimes called “automatic tuning.” Follow the steps
below to start automatic tuning.
1.
Make sure you have either an off-air antenna or another component
connected to the ANTENNA jack on the back of your TV.
2.
Press VOL+ begin the automatic tuning.
Your TV automatically cycles through all channel numbers and places the
active channels into channel memory. When your TV is finished, it tunes to
the lowest channel in its channel memory.
3.
Press CHAN ^ or CHAN v to access the channels in the channel list. The
channels can also be accessed using the number buttons on the remote.
Note: If you change your location or cable company, you will need to
Memorize Channels again.
Chapter 1
9
Connections & Setup
The Buttons on the Remote Control
DISPLAY
POWER
Brings up available channel information.
Turns the TV on and off.
POWER
DISPLAY
MUTE
Turns off the TV’s sound. Press again to restore the sound.
PREV CH Returns you to the previous channel.
PREV CH
MUTE
VOL - or VOL + Decreases or increases the TV’s volume. Also used as left and
right arrows in the menu system.
CHAN
VOL
VOL
CHAN
CLEAR
RESET
MENU
1
2
3
4
5
6
7
8
9
CHAN ^ or CHAN v Scans up or down through the current channel list. Press
once to change channels; press and hold to continue changing channels. Also
used as up and down arrows in the menu system.
CLEAR Removes any menu or display from the screen and returns you to TV
viewing. Also cancels the SKIP timer.
MENU Brings up the Main menu. When in the menu system, selects
highlighted items or returns you to the previous menu.
RESET
0
INPUT
SKIP
Returns all picture quality controls to their original settings.
(0-9) Number Buttons Enters channel numbers and time settings directly
though the remote control. To enter a three-digit channel, press and hold the
first digit, then add the second two.
INPUT
Press to toggle through available input sources (AV1, AV2, etc.).
SKIP (Commercial Skip) Press once before changing channels. The TV will
wait 30 seconds before returning you to the original channel. Press again to add
more time. Press CLEAR to cancel the SKIP timer.
10
Chapter 1
Chapter 2
Menus and Features
Chapter Overview:
•
Point and Select Method
•
Main Menu
•
Picture Menu
•
Sound Menu
•
Channel Menu
•
Tuning Menu
•
Setup Menu
•
Channel Marker
NOTE: Illustrations are for representation only. Your product and on-screen
displays might differ.
Changing Entertainment. Again.
11
11
Menus and Features
The Point and Select Method
You only need to know one rule to use the on-screen menus and control
panels: point and select.
CHAN
1.
Point to a menu item using the CHAN ^/v buttons to move up or down.
CHAN
2.
Select a menu item by pressing the VOL+ button.
MENU
Selecting an item tells the TV’s menu system to go ahead and make the change
or go to a place you have indicated.
VOL
VOL
Use the CHAN ^/v and
VOL + buttons to
move through the
menu system.
MAIN MENU
Picture
Sound
Channel
Tuning
Setup
Tip
TV Main Menu
The Main menu is your gateway to controlling the TV. It lets you adjust the TV's
picture, sound and channel settings, as well as setup the TV to your match your
preferences.
To select a menu item:
1.
Press MENU to bring up the TV's Main menu.
2.
Point to a menu item using the CHAN buttons on the remote. Select that
item by pressing VOL+ on the remote.
3.
To exit any menu screen, press MENU twice, or press CLEAR once.
Feel free to explore the menu system.
If you’re ever unsure where you are in
the menu system, or you’re just plain
tired of exploring, press CLEAR to
remove the menus from the screen
and start over again.
PICTURE
Brightness
Contrast
Colour
Sharpness
Magic
|||||||........
|||............
|||||||........
|||||||........
Original
The Picture Menu
The Picture Quality menu contains five slider controls that adjust the TV's
picture. Use the CH ^/v to select an item, and use the VOL +/- adjust the
controls.
Brightness Adjusts the brightness of the picture.
Contrast Adjusts the difference between light and dark areas of the picture.
Colour Adjusts the richness of the color.
Sharpness Adjusts the crispness of edges in the picture.
Magic Toggles between four preset picture settings:
Personal Sets the picture quality to the settings you’ve defined.
Original Returns the picture settings to their factory presets.
– Brightness Sets the picture to a darker overall level.
+ Brightness Sets the picture to a brighter overall level.
12
Chapter 2
Menus and Features
SOUND
AVL
Effects
Speaker
Mode
Bass
Treble
Balance
On
Spatial
On
Stereo
||||||......
||||||......
.....|.....
Sound Menu
AVL (Auto volume) Reduces the annoying blasts in volume during commercial
breaks, and also amplifies softer sounds in program material. Eliminates the
need to constantly adjust volume control.
Effects Use the VOL + and – buttons to toggle through the following sound
settings:
Surround Electronically expands a stereo signal to create a more
“involving” sound.
Stereo Splits the incoming stereo audio signal into left and right channels.
Most TV programs and recorded materials have stereo audio.
Spatial Electronically “widens” sound from stereo broadcasts, stereo VCRs,
digital satellite systems, DVD players, and LaserDisc players for a fuller,
more spacious sound.
Speaker Use the VOL + and – buttons to toggle between On (which turns on
your TV’s internal speakers) and Off (which turns off your TV’s internal
speakers).
Mode Use the VOL + and – buttons to toggle between the following options:
Mono Plays the sound in mono only. Use this setting when receiving
broadcasts with weak stereo signals.
Stereo Splits the incoming stereo audio signal into left and right channels.
Most TV programs and recorded materials have stereo audio.
SAP (Secondary Audio Program) Plays the program’s audio in a second
language, if one is available. SAP audio is broadcast in mono. SAP is also
used to broadcast a program’s audio with descriptions of the video for the
visually impaired.
Bass Use the VOL + and – buttons to adjust the TV’s bass.
Treble Use the VOL + and – buttons to adjust the TV’s treble.
Balance Use the VOL + and – buttons to adjust the TV’s balance.
Chapter 2
13
Menus and Features
Channel Menu
CHANNEL
Channel Nr
Skip
Lock
Channel Name
Fine Tuning
8
On
....
....|....
Channel Nr Use the VOL + and – buttons to scroll up and down through the
channels available via your antenna. You can enter the channel number directly
using the number buttons.
Skip Use the VOL + and – buttons to indicate whether you want to skip the
channel number indicated when you scan through the channels.
On Skips the selected channel.
Off Includes the selected channel in your channel list.
CHANNEL LOCK
Password
....
Channel Nr
8
Lock
On
New Password . . . .
Panel Lock
Off
Lock Use the VOL+ button to access the following items in the Lock menu:
Password To access the lock menu, use the number buttons on the
remote to enter your password. The first time you use this feature, enter the
default password, “7685.” After that you can use either your own password
once you’ve set it, or the factory password.
Channel Nr Use the VOL + and – buttons to scroll up and down through
the channels available via your antenna. You can enter the channel number
directly using the number buttons.
Lock Use the VOL + and – buttons to toggle between ON and OFF.
On Locks the channel selected.
Off Leaves the current channel unlocked.
New Password Use the number buttons on your remote to set a new
password.
Panel Lock Locks and unlocks the front panel. Use the VOL + and –
buttons to turn the front panel lock on and off. When the front panel is
locked you must us the remote to control the TV.
Channel Name Press the VOL + to name the current channel. Use the CHAN
^/v buttons to enter a four-character label for the channel. Press VOL + to go to
the next character. Press VOL – to go back to the previous character. Once
you’ve entered all four characters, press VOL + to confirm the name. The TV
can store up to 40 labels in memory.
Fine Tuning Use VOL + and VOL – to adjust the fine tuning of the selected
channel.
Tuning Menu
TUNING
Colour System
Reception
Autostore
Auto
Cable
Colour System Use the VOL + or VOL – buttons to select the broadcast
standard used in your area.
Auto Automatically detects the broadcast standard used in your area.
PAL-N Sets your TV to receive broadcasts in the PAL-N standard.
PAL-M Sets your TV to receive broadcasts in the PAL-M standard.
NTSC Sets your TV to receive broadcasts in the NTSC standard.
14
Chapter 2
Menus and Features
Reception Use the VOL + or VOL – buttons to select the type of input signal
you connected to the antenna jack on the back of your TV.
Auto Automatically detects the type of input signal you’re using (cable or
antenna).
Antenna Choose this option if you have an off-air antenna connected to
the antenna jack on the back of your TV.
Cable Choose this option if you have a cable feed connected to the
antenna jack on the back of your TV.
Autostore Press VOL + to start the Autostore channel search, which places all
active channels into memory.
Setup Menu
SETUP
Closed Caption
Language
Screen Saver
Demo
Clock
. On Screen
Alarm
. Time
. Channel
CC1
English
On
16:29
On
Off
00:00
5
Closed Caption Lets you choose which captioning mode is used for
displaying captioning information. Use VOL + and VOL – to select from the
following nine choices:
Off No closed captioning is displayed.
CC1 Displays the primary captioning information in the primary language.
CC2, CC3, CC4 Displays the secondary captioning information.
Text 1-4 Displays captioning information in text mode.
Note: The Text modes cover nearly half of the picture on the screen
to display the closed-captioned text. Most broadcasters use the CC
mode, which displays a few lines of captions at a time.
Language Use VOL + and VOL – to select your preferred language for the
menus: English or Spanish.
Screen Saver Your TV has a built-in screen saver that appears when there is
no signal present in order to prolong the life of your TV. Use VOL + and VOL –
to toggle between On and Off.
Demo Starts a demonstration of the TV’s main features. Press VOL + to start the
demonstration.
Clock Lets you set the clock. Use the number buttons on the remote to enter
the current time.
On Screen Displays the time in the channel banner everytime you change
channels. Use VOL + and VOL – to toggle between On and Off.
Alarm Turns the TV on automatically at a set time on a set channel. Use the
VOL+ and VOL – buttons to toggle between On and Off.
Time Use the number buttons on the remote to enter the time you want
the TV to turn on automatically.
Channel Use the number buttons or VOL + and VOL – to select the
channel to which you want the TV to tune when it turns on automatically.
Note: The TV turns off automatically if it remains inactive for five
minutes immediately after being turned on by the alarm.
Chapter 2
15
Menus and Features
Using Closed Captioning
Tip
If you don’t know which Closed-Caption mode
to use, select CC1. CC1 is probably the mode
that is used in your area. CC2, CC3, and CC4
are reserved for foreign languages, but are
rarely used at this time.
Many programs are encoded with closed-captioning information, which lets you
display the audio portion of a program as text on the TV screen.
Closed captioning is not available on all channels at all times. Only specific
programs encoded with closed-captioning information are applicable.
Turning off Closed-Caption
1.
Select Setup from the Main menu. Closed Caption is highlighted in the Setup
menu.
2.
Use the VOL + or VOL – to cycle through the choices until you reach Off.
3.
Press MENU twice (or CLEAR once) to exit the menu system.
Channel Marker
WRTV
06
08:59
The Channel Marker comes up when you first turn on the TV, change channels,
or press the DISPLAY button.
08:59
WRTV
06
16
Displays the current time.
Displays the label assigned to the current channel.
Displays the current channel.
Chapter 2
Chapter 3
Other Information
Chapter Overview:
•
Troubleshooting
•
Care and Cleaning
•
Index
Changing Entertainment. Again.
17
17
Other Information
Troubleshooting
Most problems you encounter with your TV you can correct by consulting the Troubleshooting list that follows.
TV Problems
TV won’t tur
n on
•
Press the POWER button.
•
Make sure the TV is plugged in.
•
Check the wall receptacle (or extension cord) to make sure it is “live” by plugging in something else.
•
Something might be wrong with your remote control. Press the POWER button on the front of the TV. If the TV turns on, check the
remote control solutions on the next page.
•
Make sure the remote is pointed directly at the remote sensor on the TV’s front panel.
•
The front panel buttons may be locked (disabled). Use the remote control to unlock the front panel controls by selecting Lock in the
Channel menu, then selecting Panel Lock and choosing OFF.
Front panel buttons don’t work
•
The front panel buttons may be locked (disabled). Use the remote control to unlock the front panel controls by selecting Lock in the
Channel menu, then selecting Panel Lock and choosing OFF.
•
Unplug the TV for 15 minutes and then plug it back in. Turn the TV on and try again.
TV turns off while playing
•
If the TV remains inactive for five minutes after being turned on by the Alarm function, it will automatically turn off.
•
Electronic protection circuit may have been activated because of a power surge. Wait 30 seconds and then turn the TV on again. If
this happens frequently, the voltage in your house may be abnormally high or low.
TV turns on unexpectedly
•
The Alarm function may have been activated. Go to p. 15 for instructions.
Blank screen
•
Make sure the component connected to the TV is turned on.
•
Try another channel.
No sound, pictur
e okay
•
Maybe sound is muted. Press the volume up button to restore sound.
Can’t select certain channel
•
Channel may be locked out in the Channel Lock menu.
•
Channel may not be in the channel memory. Try using the number buttons on the remote.
•
If using a VCR, make sure the TV/VCR button on the VCR is in the correct mode (press the TV/VCR button on your VCR).
18
Chapter 3
Other Information
Troubleshooting
No picture, no sound but TV is on
•
Maybe the cable/antenna setting is set to the wrong position. Select Tuning from the Main menu, highlight the Reception option, and
use the VOL + and VOL – buttons to choose the correct signal type. Go to pages 16 for detailed instructions.
•
The channel might be inactive — change channels.
•
If you’re watching your VCR and it’s connected with coaxial cable to the ANTENNA jack, tune the TV to channel 3 or 4 (whichever
channel is selected on the 3/4 switch on the back of your VCR). Also check to make sure the TV/VCR button on the VCR is in the
correct mode (press the TV/VCR button on your VCR).
Sound okay, pictur
e poor
•
Check antenna connections. Make sure all of the cables are firmly connected to the jacks.
•
Try adjusting sharpness function to improve weak signals. Go to page 21 for more instructions.
Black box appears on the scr
een
•
Closed-captioning might be on. Check the Closed-Caption item in the Setup menu. Go to page 16 for more instructions.
Color distorted in one or mor
e areas of the scr
een
•
Try unplugging the set for at least 15 minutes. Plug the set back in (make sure to insert the plug firmly into the socket) and press
POWER on the remote or on the TV itself. For best results, position the TV before you plug it back in.
The Remote Control Doesn’t Work
•
Something might be between the remote and the remote sensor on the component. Make sure there is a clear path.
•
Maybe the remote isn’t aimed directly at the TV.
•
Maybe batteries in remote are weak, dead or installed incorrectly. Put new batteries in the remote.
•
You might need to drain the remote’s microprocessor: remove batteries and press the number 1 button for at least 60 seconds.
Release the 1 button, replace the batteries, and (if necessary) program the remote again.
Chapter 3
19
Other Information
Care and Cleaning
CAUTION: Turn OFF your TV before cleaning.
You can clean the TV as required, using a soft lint-free cloth. Be sure to occasionally dust the ventilation slots in the cabinet
to help assure adequate ventilation.
The TV’s screen may be cleaned with a soft, lint-free cloth as well. Take care not to scratch or mar the screen. If
necessary, you may use a cloth dampened with warm water.
Never use strong cleaning agents, such as ammonia-based cleaners, or abrasive powder. These types of cleaners
will damage the TV.
While cleaning do not spray liquid directly on the screen, or allow liquid to run down the screen and inside the TV. Also,
avoid placing drinks or vases with water on top of the TV. This could increase the risk of fire or shock hazard or damage to
the TV.
Caution: If fixed (non-moving) images are left on the screen for long periods, they may be permanently imprinted on the
picture tube. Such images include network logos, phone numbers, and video games. This damage is not covered by your
warranty. Extended viewing of channels displaying these images should be avoided.
20
Chapter 3
Other Information
Index
A
E
N
Advanced connections 7
Audio
menu 14
Entering channel numbers 10
Number buttons 10
F
P
B
Fixed images 20
Front panel
buttons 8
jacks 8
Point and select 12
PREV CH button 10
Pr evious channel 10
Basic
connections 6
Batteries for the remote 9
I
C
CABLE/ANTENNA jack 6, 7
Cables
audio/video 5
coaxial 5
CHAN 10
Channel indicator 16
Channel list 9, 10
Channel numbers 10
CLEAR 10
Coaxial cable 5
Connections
multiple 7
TV + VCR 6
TV only 6
Curr ent channel list 10
Chapter 3
R
INPUT 10
Input sources 10
Remote, batteries 9
Remote buttons 10
RESET 10
L
S
Labels 16
Satellite receiver, connecting 7
M
T
Main menu 10
Memory 14
MENU 10
MUTE 10
Time display 16
Troubleshooting 18
TV, connecting 6
V
VCR, connecting 6
VIDEO IN jack 6, 7
21
Please do not send any products to the Indianapolis address listed in this manual or on the carton. This will only
add delays in service for your product.
Thomson multimedia Inc.
10330 North Meridian Street
Indianapolis, IN 46290
©2001 Thomson multimedia Inc.
Trademark(s)® Registered
Marca(s) Registrada(s)
Printed in Manaus, Brazil
TOCOM 15775710