1
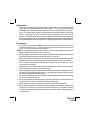
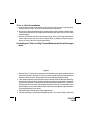
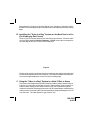
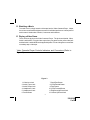
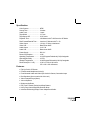
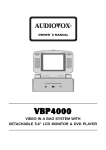
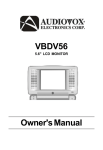
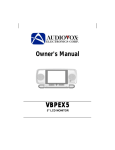
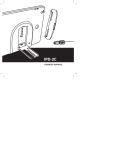
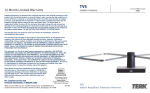
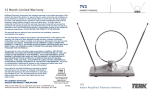
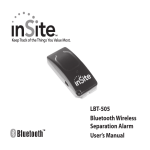
OWNER'S MANUAL
VBP2000
VIDEO IN A BAG SYSTEM WITH 5" LCD
MONITOR AND VIDEO CASSETTE PLAYER
128-6168
1 of 8
Introduction
Thank you for purchasing the "Video in a Bag" System with a 5" Liquid Crystal Display
(LCD) Monitor and Video Cassette Player Combination. The Video System utilizes the
latest state of the art electronics and is designed for use in vehicles, hotels, offices or your
home. The "Video in a Bag" System is constructed to provide years of reliable, trouble-free
service. Please read the entire instruction manual supplied with this product prior to
operation. The documentation will assist you in installing the system properly to obtain the
best equipment performance. All manuals should be stored for later use in the front pouch
of the Video Bag that is designed to hold the LCD Monitor and the Video Cassette Player.
Precautions
1. The "Video in a Bag" System MUST be powered from switched "Accessory " power (i.e.
not directly from the battery). Power should be applied to the unit when the ignition
key is in the Run and/or Accessory positions.
NOTE:To prevent battery discharge, disconnect the "Video in a Bag" System jack from the
cigarette lighter socket when the unit is not in use.
2. Always keep the unit fastened to the front piece inside the bag using the two velcro straps
around the bracket on both sides of the unit when it is in the bag.
3. Ensure that both the LCD Monitor, the Video Cassette Player and the Video Bag are
installed in accordance with the instructions and illustrations provided in this manual.
4. The “S” hooks and all straps must be fastened correctly to secure the unit in the vehicle
in the event of an accident.
5. Operate the "Video in a Bag" System with the Video Bag open to ensure proper ventilation
of the LCD Monitor and the Video Cassette Player.
6. Use only the approved power adapter supplied with the Video System. Always disconnect
the jack from the cigarette lighter socket or wall outlet before disconnecting the power
connector from the Video Cassette Player.
7. Do not plug or unplug the unit with wet hands. Always unplug the unit if you are not going
to use it for a long period of time.
8. Do not use chemicals such as paint thinner, solvents, ammonia or any harsh cleaners on
any part of the unit. Remove dust and stains with a damp cloth.
9. Do not attempt to remove the panel of the monitor to avoid electrical hazards.
10. Always remove the tape from the Video Cassette Player after use or when the Video System
is left in a hot or cold car for a period of time without being used. The inside of a parked
car with closed windows will heat up or cool down dramatically, which could damage tapes
if left in the VCP.
1
128-6168
2 of 8
INSTALLATION INSTRUCTIONS
Prior to Vehicle Installation
1. Unzip the lower storage compartment of the Video Bag and remove the cigarette lighter
adapter and four straps. Zip up the Video Bag storage compartment.
2. Remove the LCD Monitor and the Video Cassette Player from the Video Bag. Slide the power
connector through the slot in the bag and attach it to the power plug on the rear of the Video
Cassette Player.
3. Slide the LCD Monitor and the Video Cassette Player into the Video Bag and attach the
Velcro straps to each side of the Video Cassette Player by sliding the strap through the
bracket on each side of the Video Cassette Player.
A. Installing the "Video in a Bag" System Between the Driver/Passenger
Seats
Figure1
1. Refer to Figure 1. Take one of the straps and connect the latch to the upper metal ring on the left
side of the Video Bag. Attach the "S" hook to the same ring after looping the strap around the
headrest of the driver's seat. Repeat this process for the right side (Passenger Seat).
2. Take another strap and connect the latch to lower metal ring on the left side of the Video Bag.
Attach the "S" hook to the same ring after looping the strap around the front seat rail. Repeat this
process for the right side. In some vehicles, it may be necessary to attach the "S" connector to
the rail directly, as it may not be long enough to reach back to the ring. Also, depending on the
desired angle, you may need to attach the latch to either the front or the rear ring on the bottom
of the bag, depending on your vehicle.
3. Adjust the straps so that the Video Bag is tightly secured.
4. Uncover and unzip the Video Bag on the left and right side. The " Video in a Bag " System will2
2
128-6168
3 of 8
lean against the front piece of the Video Bag by up to 15 degrees. Adjust the zippers
so that the unit is at the proper angle to allow the screen to be adjusted for the best viewing
angle.
B. Installing the "Video in a Bag" System on the Back Seat in a Car
(For Viewing by One Person)
Refer to Figure 2. Before attaching the Video Bag to the seat belt, follow the cable
hook-up listed in Prior to Vehicle Installation. Do NOT remove the four straps from
the Video Bag as they are not used in this installation.
Figure 2
Place the bag carefully with its back facing up on the back seat and feed the safety belt
into the short strap sewn on the front of the bag. Then adjust and tighten the safety belt.
Uncover the bag and adjust the screen for a proper viewing angle.
C. Using the "Video in a Bag" System in a Hotel, Office or Home
Uncover the Video Bag and remove the LCD Monitor and the Video Cassette Player or
if desired, you may leave it in the bag. Place the "Video in a Bag" System carefully on
a table or other resting surface with the bottom of the Video System facing down.
Unzip the lower portion of the bag and remove the AC-DC power adapter. Attach the plug
to the connector on the rear of the Video Cassette Player and plug the adapter into a 110
Vac wall outlet. The Video System is now ready for use.
3
128-6168
4 of 8
D. Watching a Movie
To watch a movie, simply insert the video tape into the Video Cassette Player. Adjust
the volume control and the brightness control for individual preference. A description of
each button is listed under Controls, Connectors and Indicators.
E. Playing a Video Game
There are three jacks on the Video Cassette Player. The jacks are labeled: Video,
Audio L and Audio R. Plug the video output from your game into the yellow video jack
and the Audio L and Audio R into the applicable jacks. Prior to video game or camcorder
use always stop video tape.
Video Cassette Player Controls Indicators and Connectors (Refer to
Figure 3)
Figure 3
1. Video Input Jack
2. Audio L Input Jack
3. Audio R Input Jack
4. Headphone 1 Jack
5. Headphone 2 Jack
6. Power Button
7. Stop/Eject Button
8. (Fast) Rewind Button
9. Play Button
10. (Fast) Forward Button
11. Brightness Up/Down Knob
12. Volume Up/Down Knob
4
128-6168
5 of 8
F. Wired Headphones
Optional wired headphones may be used with the "Video In a Bag" System. There
are two headphone jacks, #1 and #2 located on the front panel of the Video Cassette
Player, one on each side. If you plug in the headset to jack #2, both internal
speakers will be turned off. Using jack #1 will leave the two internal Video Cassette
Player speakers on.
Video Cassette Player Rear Panel (Refer to Figure 4)
Figure 4
3
3
Figure 5
5
128-6168
6 of 8
Color System: .......................... NTSC
Screen Size: ............................ 5 Inches
Audio Track: ............................ 1 track
Tape Width: ............................. 12.7 mm
Tape Speed: SP ...................... 33.35 mm/s
Playback Time: ........................ 180 Minutes with T-180 Set to the SP Mode
Fast/Forward/Rewind Time: ...... Less than 7 Minutes with T-1 20
Video Output: .......................... 1.0 Vp/p, 75 Ohm, unbalanced
Video S/N: ............................... Better than 40 dB
Audio Output: .......................... 2 x 0.5 W
Audio S/N: ............................... Better than 40 dB
Power Supply: ......................... DC 12 V
Power Consumption: ................ 18 W
Operating Temperature: ........... 41-104 Degrees Fahrenheit (5-40) Centigrade
Operating Humidity: ................. 10-75%
Storage Temperature: .............. 4-140 Degrees Fahrenheit (-20-60) Centigrade
Dimensions(W x H x D): .......... 10.82 x 13.58 x 4.92 inches
275 x 345 x 125 millimeters
OPERATING INSTRUCTIONS
Specification:
Features:
w Flip-Up 5 Inch LCD Screen
w Front Mounted Headphone Jacks (2)
w Front Mounted Audio and Video Input Jacks for Games, Camcorder Input
w Dual Speakers (One on each side of the unit)
w Video Cassette Player (Mono)
w Volume Up Down
w Brightness Up Down
w Play, Fast Forward, Rewind, and Stop Buttons
w Heavy Duty Canvas Bag With Shoulder Strap
w Includes all Mounting Straps, Power Adapter and Cable.
6
6
128-6168
7 of 8
OPERATING INSTRUCTIONS
90 DAY LIMITED WARRANTY
AUDIOVOX CORPORATION (the Company) warrants to the original retail purchaser of this
product that should this product or any part thereof, under normal use and conditions, be
proven defective in material or workmanship within 90 days from the date of original
purchase, such defect(s) will be repaired or replaced with new or reconditioned product (at
the Company's option) without charge for parts and repair labor.
To obtain repair or replacement within the terms of this Warranty, the product is to be delivered
with proof of warranty coverage (e.g. dated bill of sale), specification of defect(s),
transportation prepaid, to the warranty center at the address shown below.
This Warranty does not extend to the elimination of car static or motor noise, to correction
of antenna problems, to costs incurred for installation, removal, or reinstallation of the
product, or damage to tapes, compact discs, speakers, accessories, or vehicle electrical
systems.
This Warranty does not apply to any product or part thereof which, in the opinion of the
Company, has suffered or been damaged through alteration, improper installation, mishandling, misuse, neglect, accident, or by removal or defacement of the factory serial number/
bar code label(s). THE EXTENT OF THE COMPANY'S LIABILITY UNDER THIS WARRANTY
IS LIMITED TO THE REPAIR OR REPLACEMENT PROVIDED ABOVE AND, IN NO EVENT,
SHALL THE COMPANY'S LIABILITY EXCEED THE PURCHASE PRICE PAID BY PURCHASER FOR THE PRODUCT.
This Warranty is in lieu of all other express warranties or liabilities. ANY IMPLIED
WARRANTIES, INCLUDING ANY IMPLIED WARRANTY OF MERCHANTABILITY, SHALL BE
LIMITED TO THE DURATION OF THIS WRITTEN WARRANTY. ANY ACTION FOR BREACH
OF ANY WARRANTY HEREUNDER INCLUDING ANY IMPLIED WARRANTY OF MERCHANTABILITY MUST BE BROUGHT WITHIN A PERIOD OF 30 MONTHS FROM DATE OF
ORIGINAL PURCHASE. IN NO CASE SHALL THE COMPANY BE LIABLE FOR ANY
CONSEQUENTIAL OR INCIDENTAL DAMAGES FOR BREACH OF THIS OR ANY OTHER
WARRANTY, EXPRESS OR IMPLIED, WHATSOEVER. No person or representative is
authorized to assume for the Company any liability other than expressed herein in connection
with the sale of this product.
Some states do not allow limitations on how long an implied warranty lasts or the exclusion
or limitation of incidental or consequential damage so the above limitations or exclusions
may not apply to you. This Warranty gives you specific legal rights and you may also have
other rights which vary from state to state.
U.S.A.: AUDIOVOX CORPORATION, 150 MARCUS BLVD., HAUPPAUGE, NEW YORK 11788 l 1-800-645-4994
CANADA:
CALL 1-800-645-4994 FOR LOCATION OF WARRANTY STATION SERVING YOUR AREA
Form No. 128-5047A
7© 2000 Audiovox Corp., 150 Marcus Blvd., Hauppauge, N.Y. 11788
128-6168
128-6168
8 of 8