1
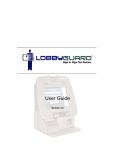
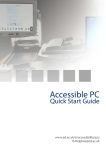
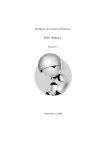
Contact us There are a number of ways you can contact PhoneWatch, we are always ready to help you with any questions you might have. See our contact details below. Customer Support: 1850 753 753 FAQs For any questions you may have please visit our website: phonewatch.ie Floors 3 - 5 Block 1 Irish Life Centre Lower Abbey Street Dublin 1 Pet Features ures y Services 24-hour24-hour Technical Support Monitoring Services InteriorEmergency and Exterior Inspection 24-hour Technical Support 24-hour Emergency Fire Monitoring Services Emergency Services Key Service Panic Response 24-hour Monitoring Break-in Service PSA Number: 00621 PhoneWatch Home Safety System 24-hour Emergency Break-inTechnical Service Fire Support Services Exterior tion Emergency Fire Services User Manual - Domonial Emergency Services WirelessBreak-in 24-hour Key Service Service App for smartphone Unlimited System Components Monitoring Maintenance Visits Pet Features PW0002 atures ervice xterior on Key Service 24-hour Technical Support Break-in Service Emergency Services 24-hour Monitoring Your PhoneWatch Alarm Thank you for choosing the PhoneWatch Home Safety system. We hope you enjoy the benefits of using the PhoneWatch system for many years to come and that it will keep you, your loved ones and your home safe and secure. This user manual will help in your everyday use of the alarm system. Please take time to read through it, as it gives you important information and some good tips on using the system. If the alarm is activated If the alarm is activated, the Alarm Receiving Centre will phone your home or your mobile to check you are ok. If they make contact, they will ask you for your verification word to verify you are the genuine user of the alarm system. If nobody answers or if we are given an incorrect verification word, we will call keyholders and the emergency services, if required. 2 If your alarm system has motion sensors with cameras fitted, images are transmitted to the Alarm Receiving Centre immediately, where they are verified and the appropriate action is taken. Procedure for transmitted images Images which have been transmitted will be treated as follows: • The images are used by the PhoneWatch Alarm Receiving Centre to determine appropriate action. • The images are processed by authorised expert staff at our Alarm Receiving Centre. • A ll images received remain accessible for up to 21 days. On the 22nd day, images are routinely deleted. • The images cannot be passed on to any third party, other than the Gardaí. • H andling of the images is in accordance with requirements set out by the authorities. Contents Description of the alarm system Page 4 How to use the keypad and keytag Page 5 How to use the remote control How the sensors work Page 10 Page 12 PhoneWatch Alarm AppPage 14 Maintenance and recommendations Page 18 3 Description of the Home Safety System How to use the keypad and keytag The control unit is the brain of the Home Safety System, it is fitted separately from the keypad and is hidden from potential view and damage. The control unit collects data that is sent by the sensors, it registers arming and disarming and communicates with the PhoneWatch Alarm Receiving Centre. The keypad is equipped with a keytag reader allowing users to arm/disarm the alarm system using either a valid code or keytag. It also has an internal siren. The keypad can have up to 9 users configured. To add, remove or configure users, please contact PhoneWatch. Properties RADIO ALARM TRANSMISSION •Narrow band FM, 868 MHZ • Built-in alarm transmitter •Unique identification for every component in the system, interference from neighbouring systems is not possible • Transmission is monitored using periodical testing • Reports interference ELECTRICS •220v - 240v ac with battery back-up •Built-in surge protection KEYTAG READER SIREN ARM/DISARM AREA FUNCTIONS • 3 settings: Away and Home and Off • Up to 24 sensors • Alert functions • Control unit and sensors are tamper-proof •Monitoring of power supply LOUD SPEAKER PANIC BUTTONS SYSTEM FAULT (Light2) SYSTEM ARMED (Light1) TAMPER ALERT (Light4) ALARM ACTIVATED (Light3) ARMING BUTTON FOR WHOLE SYSTEM (AWAY) ARMING BUTTON FOR PART OF SYSTEM (HOME) KEYTAG 4 5 Arming your system using your user code or keytag If there is a fault when arming the system Press an arming button on the keypad and enter the user code, or swipe a registered keytag over the number 8. • The keypad emits a fault tone (rapid succession of beeps) after the acknowledgement tone. If the system detects a fault on arming, it will allow you to proceed to arm the alarm system. 4 figure user code or keytag ---------------------- Arms the entire system (Away) 4 figure user code or keytag ---------------------- Arms part of system (Home) • Arming can be done by either using the keypad and your user code or using your keytag. • The keypad will emit code acknowledgement tones, followed by delay tones for exit. If the keypad indicates there is a contact sensor fault, it could mean one of your windows/doors (which are fitted with a sensor) are open, the system must be disarmed and then all windows/doors checked. • Arming is completed automatically at the end of the arming period for exit (depending on the system configuration). NOTE: • Always ensure that arming is followed by the code acknowledgement tones. • A rming is not reversed by continuing to hold the keytag in front of the keypad. You must remove the keytag from the keypad for a moment and then swipe again. • After arming, swiping your keytag a second time during the arming sequence will disararm your system. Please ensure you close all interior and exterior doors and windows before setting your alarm • Check that all doors and windows equipped with door contacts are closed. • Begin arming the alarm again. If the fault tones continue contact our Customer Support department. Reset the system after an activation If one of the lights on the control unit, 1, 2, 3 or 4, is blinking slowly, this means that your alarm has been activated (see page 9 for more details about the lights). If there is an alarm activation in the memory, the system cannot be armed until it has been reset. In order to reset the system, all you need to do is disarm it by using a valid user code or a keytag. If there is more than one alarm activation in the memory, repeat this for every one until lights 1, 2, 3 and 4 have all stopped blinking slowly. If the blinking persists, there may be a fault. In this instance, please contact Customer Support. Protection against use of the wrong user code If you enter the wrong user code 5 times in succession or use non-registered keytags 5 times in succession, the keypad is locked for 5 minutes and a sound alarm is triggered. Disarming your system using your user code or keytag How to disarm the system: • Enter a valid user code or use your keytag. • The keypad gives a disarmed tone and green light goes out. Note: The installation engineer will have programmed an entry delay so you have time to disarm the system on entry. NOTE: • Always turn the system off when you enter your home. • Always ensure that disarming is followed by the disarmed tone. • The status is not reversed by continuing to hold the keytag in front of the keypad. • You must remove the keytag from the keypad for a moment and then swipe again. • Even if the siren is turned off, this does not stop the transmission of the alarm signal to PhoneWatch. 6 7 Indicator lights Light 1 “SYSTEM ARMED” ALIGHT: The entire system is armed (Away) BLINKING SLOWLY: Part of the system is armed (Home) OFF: System is disarmed Light 2 “SYSTEM FAULT” ALIGHT: There is a fault in the system (batteries, power, gsm). If this light stays on contact PhoneWatch BLINKING SLOWLY: Fault is registered in system memory needs to be reset OFF: No Fault Light 3 “ALARM ACTIVATED” ALIGHT: The alarm has been activated. This includes opening a door contact and being in sight of a motion sensor BLINKING SLOWLY: There is an alarm activation registered in the memory OFF: No alarm activation Keypad tones Each time you set your alarm panel you will hear a series of beeps prior to the arming tone. Arming - On arming one beep per second Arming on the away function: the beeps continue until the outer door is closed Arming on the home function: the beeps continue for 30 seconds until the system is armed Disarming - Long, continuous beep The duration of this beep is about 2.5 seconds. This confirms that the system has been properly disarmed Entry delay - On entry one beep per second This entry delay continues for 20 seconds after you have opened the outer door. You must disarm the system within this time. Please note: The entry beeps won’t start beeping immediately on entering. The time allowed to get to the panel to disarm will commence immediately. Fault - 7 rapid beeps followed by 7 more This indicates a fault in the system Alert - 4 beeps in the event of alarm activation sent via keypad Confirms the transmission of an alarm activation to PhoneWatch Light 4 “SENSOR/PANEL TAMPER WARNING” ALIGHT: There is an issue with a sensor/panel BLINKING SLOWLY: There is a fault registered in the system memory, needs to be reset OFF: No sensor warning 8 9 Using the remote control (with 3 indicator lights) Checking the status of your system The remote control can be used to arm or disarm the alarm system, or to activate an audible or silent alarm. The remote control is an optional extra. • To check the status of your system, hold down the control button Arming all or part of the system Panic alarm Note that when using this remote control, arming occurs immediately i.e. there is no delay. Only arm the system when you are outside the area to be secured. You can activate a panic alarm at any time, even if the system is not armed: Arming all or part of the system: • Depending on how it is configured, the siren on the keypad may be activated. • Press the Away button for full arm or the Home button for part arm. for 2 seconds. • A ll three lights, light several times in succession, then the light on the remote that indicates armed or disarmed stays lit for 3 seconds. • Hold down the buttons and at the same time for 3 seconds. • An alarm signal is sent to PhoneWatch. • The associated light blinks while communicating with the control unit and then remains lit for 3 seconds to confirm that the system is armed. • The arming tone is given by the control unit. Disarm • To disarm all or part of the system, press the disarm button. • T he associated light blinks while communicating with the keypad/control unit and then remains lit for 3 seconds to confirm the instruction. • The disarmed tone is given by the keypad/control unit. Disarming after the alarm has been activated If the alarm has been activated during your absence: When you press the disarm button all three lights blink slowly. • T he system is not disarmed on the first attempt (this is to avoid beep tones sounding which might attract an intruder’s attention). • To confirm disarming, press the button once again. • The associated light blinks rapidly while communicating with the control unit and then remains lit for 3 seconds to confirm disarming. 10 11 How the sensors work 1. Door contact 2. Motion sensor with camera 3. Smoke alarm sensor 4. Carbon monoxide sensor door contact is a magnetic contact consisting of two A parts. One part is fixed to the door frame and the other to the door itself. When the door or window is opened, the sensor is activated. motion sensor, with a built-in camera, reacts to A temperature fluctuations caused by a person moving around. smoke alarm sensor is fitted to the ceiling. It covers A up to 50 square metres in an open area. This sensor can react to steam/cooking fumes. Avoid smoking in the vicinity of this sensor. The CO8M detects dangerous levels of Carbon Monoxide (CO). When dangerous levels of Carbon Monoxide are detected, the siren will sound and the red alarm light will flash to indicate an alarm status. lways ensure that all doors and windows are closed A before you set your alarm. When this sensor is activated, it simultaneously takes photographs that are transmitted to the PhoneWatch Alarm Receiving Centre. 4 2 1 12 3 13 STEP 2 The PhoneWatch alarm app STEP 6 STEP 5 STEP 6 How to set up your app Please follow the steps provided to set up your app preferably using a PC/laptop/tablet ps provided to set up your app preferably using a PC/ laptop / tablet STEP 1 STEP 2 1. Fill out the details (please note, the email address that you provide here will be your username) 2. Choose a password (this must contain at least eight characters: one capital letter, one 2. Select an alarm name, for example ‘Home’ or ‘Office number) 3. Select a four digit code – we recommend this code t 1. Enter your user name 1. Fill in the activation code – this code will have been 3. Click register – once this is done you will receive an email to the address provided from the alarm itself, this is for added security. given to you by the engineer who installed your alarm, 2. Enter your password alternatively 4. This will ask if you would like to be asked for this fou you can call the Customer Support team on [email protected] 3. Click login 1850 753 753 who will provide you with this code. We recommend you select ‘no’ here, for added secu 1. Fill in the activation code – this code will have been given to 2. Selectinstalled your alarm, alternatively you can call the Customer an alarm name, for example ‘Home’ or ‘Office’ *please be sure to check junk/spam/ other folders, if not found in your inbox folder. 1. Click into your google play store / app store on your mobile phone 3. Selectwho will provide you with this code. a four digit code – we recommend this code to 2. 1. Click on phonewatch.ie (see above image) phonewatch.ie (see above image) 2. Click on to mypages (top right) mypages (top right) 1. Enter your user name In the search bar at the top of the page, type in PhoneWatch 1. After you have clicked onto mypages, you will2. be Enter your password directed to this screen – click on register account. 3. You will see the following icon appear 3. Click login STEP 4 4. Click on this icon to download the app to your STEP 4 STEP 7 mobile phone. STEP 3 be different to the code you use for the alarm itself, this is for added security. Step 7 4. You will be asked if you would like to be asked for this four digit code when accessing your app. We recommend you select ‘no’ here, for added security. App Store – Iphone Play App Store – Iphone 2. Select an alarm name, for example ‘Home’ or ‘Office’ 3. Select a four digit code – we recommend this code to be different to the code you use for the alarm itself, this is for added security. 4. This will ask if you would like to be asked for this four digit code when accessing your app. We recommend you select ‘no’ here, for added security. 1. After you have clicked onto mypages, you will be directed to this screen – click on register STEP 6 account App Store – Iphone Play store – Android Phones / Smart Phones 1. Fill out the details (please note, the email address that you provide here will be your username) you will see an image of the email you will 1. Above receive.* 2. Choose a password (this must contain at least eight characters: one capital letter, one number) 2. You need1. to click on the ‘ACTIVATE’ link within this 2.In the search bar at the top of the page, type in Above you will see an image of the email you will receive. email to take you onto the next stage. PhoneWatch 1.Click into your Google Play/Apple App store on your mobile phone Play Store – Android Phones / Smart Phones 1. Click into your google play store / app store on your 2. In the search bar at the top of the page, type in Pho 2. You need to click on the ‘ACTIVATE’ link within this email to take you onto the next stage. 3. Click register – once this is done you will receive ails (please note, the email address that you provide here will be your an email to the address provided from mypages@ phonewatch.ie Step 7 word (this must contain at least eight characters: one capital letter, one *Please be sure to check junk/spam/ other folders, if not found in your inbox folder. 14 ve clicked onto mypages, you will be directed to this screen – click on register once this is done you will receive an email to the address provided from 3.You will see the following icon appear 4.Click on this icon to download the app to your mobile phone. 3. You will see the following icon appear 4. Click on this icon to download the app to your mobile phone. 15 en you log into the app, the following options will appear The PhoneWatch alarm app How to use your app 1.Enter your username (email address) 2.Enter password 3.Click login When you log into the app, the following options will appear When you log into the app, the following options will appear STATUS This will show the current status of the system, from the image to the left, we can see this system is currently disarmed. The image on the right displays a system which is armed. This feature will also allow you to arm or disarm the system by clicking Arm / Disarm in the coloured box. Status This will show the current status of the s system is currently disarmed. The image on the right displays a system The event option allows you to see the alarm history event option allows you to see the alarm history This feature will also allow you to arm or You will be able to view when the alarm was armed / disarmed box. will be able to view when the alarm was armed / disarmed The image on the left below shows the system was armed / disarmed using the mastercode [M] 1. Click arm – two sections will app image on the left below shows the system was armed / disarmed using the mastercode [M] EVENTS image above. • The event option allows you to see the alarm history* The image on the right below shows the alarm was partially armed using one of the keytags, the image on the right below shows the alarm was partially armed using one of the keytags, the • You will be able to view when the alarm was armed / disarmed assigned name would display here. • The image on the left below shows the system was armed / disarmed using the mastercode [M] gned name would display here. 1. Click arm the middle image above. Part Arm refers to your part sett – two sections will appear, part arm and full arm – as displayed in2. • The image on the right below shows the alarm was partially armed using one of the keytags, the assigned name 2. Part Arm refers to your part setting (image relates to the same setting on your panel) panel) *Approximately the 20 events will be displayed would display here. nts Events proximately the 20 events will be displayed 3. Full Arm refers to your full setting (image relates to the same setting ion your Status 3. panel) Full Arm refers to your full settin *Approximately 20 events will be displayed Events Status Status This will show the current status of the system, from the image to the left above we can see this This will show the current status of the system, from the image to the left above we can see this This will show the current status of the system, from the image to the left above we can see this SETTINGS system is currently disarmed. system is currently disarmed. The event option allows you to see the alarm history You will be able to view when the alarm was armed / disarmed Logoutsystem is currently disarmed. – this will allow you to log out of the app after use. The image on the right displays a system which is armed. We would recommend you do this each time you finish The image on the right displays a system which is armed. The image on the right displays a system which is armed. using the app as an added security feature. The image on the right b elow shows the alarm was partially armed using one of the keytags, the assigned name would d isplay here. 16 This feature will also allow you to arm or disarm the system by clicking Arm / Disarm in the coloured This feature will also allow you to arm or disarm the system by clicking Arm / Disarm in the coloured Home -This feature will also allow you to arm or disarm the system by clicking Arm / Disarm in the coloured Ifbox. you have more than one alarm system you can Settings box. select each box. system here. The image on the left below shows the system was armed / disarmed using the mastercode [M] *Approximately the 20 events will be displayed panel) 1. Click arm – two sections will appear, part arm and full arm – as displayed in the middle 1. Click arm – two sections will appear, part arm and full arm – as displayed in the middle Click arm – two sections will appear, part arm and full arm – as displayed in the middle 1. image above. image above. image above. 2. Part Arm refers to your part setting (image relates to the same setting on your 2. Part Arm refers to your part setting (image relates to the same setting on your Part Arm refers to your part setting (image relates to the same setting on your 2. panel) panel) panel) 3. Full Arm refers to your full setting (image relates to the same setting ion your 3. Full Arm refers to your full setting (image relates to the same setting ion your 3. Full Arm refers to your full setting (image relates to the same setting ion your panel) panel) panel) Settings Settings Settings Logout – this will allow you to log out of the app after use. We would Logout – this will allow you to log out of the app after use. We would recommend you do this each time you finish using the app as an Logout – this will allow you to log out of the app after use. We would recommend you do this each time you finish using the app as an added security feature. recommend you do this each time you finish using the app as an added security feature. added security feature. Home -‐ If you have more than one alarm system you can select each Home -‐ If you have more than one alarm system you can select each system here. Home -‐ If you have more than one alarm system you can select each Logout – th recommen added secu Home -‐ If y system he 17 Maintenance and recommendations Notes • W e recommend you test your alarm system weekly. Prior to testing, contact our Customer Support department during normal business hours on 1850 753 753. • Avoid impacts to the components and ensure especially that you do not drop the wireless remote control. • No component should be immersed in water. • Only use a dry cloth to clean components (not cleaning products). • Keep clean and dry at room temperature. • Used batteries should be disposed of in the correct way. • Avoid prolonged exposure to the sound of the siren. • Do not hide motion sensors behind curtains, furniture etc. • Components must not be painted or papered over. • Do not try to open or move components. • Components are protected against tamper and some could cause electric shock. 18 19