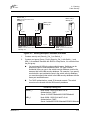
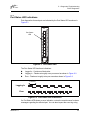
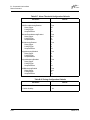
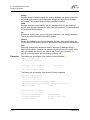
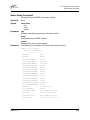
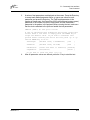
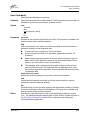
1
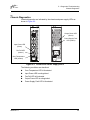
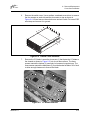
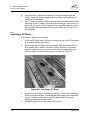
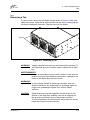
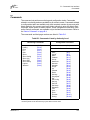
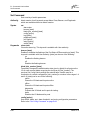
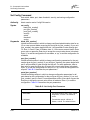
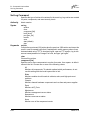
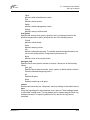
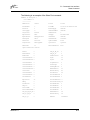
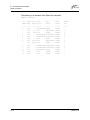
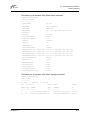
D Simplify SANbox2-64 Fibre Channel Switch Installation Guide 59043-03 A Page i D SANbox2-64 Fibre Channel Switch Installation Guide Information furnished in this manual is believed to be accurate and reliable. However, QLogic Corporation assumes no responsibility for its use, nor for any infringements of patents or other rights of third parties which may result from its use. QLogic Corporation reserves the right to change product specifications at any time without notice. Applications described in this document for any of these products are for illustrative purposes only. QLogic Corporation makes no representation nor warranty that such applications are suitable for the specified use without further testing or modification. QLogic Corporation assumes no responsibility for any errors that may appear in this document. QLogic, SANbox, SANbox2, SANblade, SANsurfer, and Multistage are trademarks or registered trademarks of QLogic Corporation. Java and Solaris are registered trademarks of Sun Microsystems, Inc. Pentium is a registered trademark of Intel Corporation. Linux is a registered trademark of Linus Torvalds. Microsoft, Windows NT, and Windows 2000, and Internet Explorer are registered trademarks of Microsoft Corporation. Netscape Navigator is a registered trademark of Netscape Communications Corporation. Red Hat is a registered trademark of Red Hat Software Inc. SANmark is a registered trademark of the Fibre Channel Industry Association. All other brand and product names are trademarks or registered trademarks of their respective owners. Document Revision History Revision A, Release, September 2003 © 2000–2003 QLogic Corporation First Printed: May 2002 All Rights Reserved Worldwide. Printed in U.S.A. Page ii 59043-03 A Table of Contents Section 1 Introduction 1.1 1.2 1.3 1.4 1.5 1.6 1.6.1 1.6.2 1.6.4 1.6.5 1.6.6 1.7 1.8 1.9 1.10 1.11 1.12 1.12.1 1.12.2 1.12.3 1.13 1.13.1 1.13.2 1.13.3 Intended Audience ............................................................................................. 1-1 Related Materials ............................................................................................... 1-2 Safety Notices .................................................................................................... 1-3 Sicherheitshinweise............................................................................................ 1-3 Notes informatives relatives à la sécurité........................................................... 1-3 Communications Statements.............................................................................. 1-4 Federal Communications Commission (FCC) Class A Statement ............ 1-4 Canadian Department of Communications Class A Compliance Statement .............................................................................. 1-4 Avis de conformité aux normes du ministère des Communications du Canada ..................................................................... 1-4 CE Statement ............................................................................................ 1-5 VCCI Class A Statement ........................................................................... 1-6 BSMI Class A Statement ........................................................................... 1-6 Laser Safety Information .................................................................................... 1-7 Electrostatic Discharge Sensitivity (ESDS) Precautions .................................... 1-7 Accessible Parts................................................................................................. 1-8 Pièces Accessibles............................................................................................. 1-8 Zugängliche Teile ............................................................................................... 1-8 General Public License ...................................................................................... 1-9 Preamble ................................................................................................... 1-9 Terms And Conditions For Copying, Distribution And Modification ......... 1-10 How to Apply These Terms to Your New Programs ................................ 1-14 Technical Support............................................................................................. 1-16 Availability................................................................................................ 1-16 Training.................................................................................................... 1-16 Contact Information ................................................................................. 1-16 Section 2 General Description 2.1 2.2 2.2.1 2.2.1.1 2.2.1.2 2.2.2 Chassis Hardware .............................................................................................. 2-2 Chassis Controls and LEDs ............................................................................... 2-4 Maintenance Button................................................................................... 2-4 Resetting a Switch ............................................................................ 2-5 Placing the Switch in Maintenance Mode ......................................... 2-5 Chassis LEDs ............................................................................................ 2-6 1.6.3 59043-03 A Page iii SANbox2-64 Fibre Channel Switch Installation Guide D 2.2.2.1 2.2.2.2 2.2.2.3 2.2.2.4 2.3 2.3.1 2.3.2 2.3.3 2.3.3.1 2.3.3.2 2.4 2.5 2.6 2.7 2.8 Over Temperature LED (Amber)....................................................... 2-6 Fan Fail LED (Amber)....................................................................... 2-6 Heartbeat LED (Amber) .................................................................... 2-7 Input Power LED (Green) ................................................................. 2-7 Fibre Channel Ports ........................................................................................... 2-7 Port Status LED ......................................................................................... 2-8 Small Form-Factor Pluggable (SFP) Transceivers .................................... 2-8 Port Modes ................................................................................................ 2-9 Fabric Ports ...................................................................................... 2-9 Expansion Port ................................................................................. 2-9 Ethernet Port ...................................................................................................... 2-9 Serial Port......................................................................................................... 2-10 Power Supply Modules..................................................................................... 2-12 Fans ................................................................................................................. 2-13 Switch Management......................................................................................... 2-14 Section 3 Planning 3.1 3.2 3.2.1 3.2.2 3.3 3.3.1 3.3.2 3.3.3 3.4 3.4.1 3.4.2 3.4.3 3.5 3.5.1 3.5.2 3.5.2.1 3.5.2.2 3.5.3 3.6 Devices............................................................................................................... 3-1 Multiple Chassis Fabrics .................................................................................... 3-4 Domain ID, Principal Priority, and Domain ID Lock ................................... 3-4 Common Topologies.................................................................................. 3-5 Performance....................................................................................................... 3-6 Distance..................................................................................................... 3-6 Bandwidth.................................................................................................. 3-7 Latency ...................................................................................................... 3-7 Device Access.................................................................................................... 3-8 Soft Zones ................................................................................................. 3-9 Access Control List Hard Zones ................................................................ 3-9 Virtual Private Fabric Hard Zones ........................................................... 3-10 Fabric Security ................................................................................................. 3-11 User Account Security ............................................................................. 3-11 Device Security........................................................................................ 3-12 Security Example: Switches and HBAs .......................................... 3-12 Security Example: Host Authentication .......................................... 3-15 Fabric Services........................................................................................ 3-17 Fabric Management ......................................................................................... 3-17 Section 4 Installation 4.1 4.1.1 Site Requirements.............................................................................................. 4-1 Fabric Management Workstation............................................................... 4-1 Page iv 59043-03 A D SANbox2-64 Fibre Channel Switch Installation Guide 4.1.2 4.1.3 4.2 4.2.1 4.2.2 4.2.3 4.2.4 4.2.4.1 4.2.4.2 4.2.5 4.2.6 4.2.7 4.2.8 4.2.9 4.2.10 4.2.10.1 4.2.11 4.2.12 4.2.13 4.3 4.3.1 4.3.2 4.3.3 4.4 Switch Power Requirements ..................................................................... 4-1 Environmental Conditions.......................................................................... 4-2 Installing a Switch............................................................................................... 4-2 Mount the Switch ....................................................................................... 4-3 Install SFP Transceivers............................................................................ 4-6 Connect the Switch to AC Power .............................................................. 4-6 Connect the Management Workstation to the Switch............................... 4-9 Ethernet Connection ....................................................................... 4-10 Serial Connection ........................................................................... 4-10 Install SANbox Manager.......................................................................... 4-11 SANsurfer Management Suite Disk - Windows Installation..................... 4-12 SANsurfer Management Suite Disk - Linux Installation........................... 4-12 SANsurfer Management Suite Disk - Solaris Installation ........................ 4-13 SANbox2 Installation Disk - Windows Installation ................................... 4-14 SANbox2 Installation Disk - Linux Installation ......................................... 4-15 SANbox2 Installation Disk - Solaris Installation .............................. 4-15 Configure the Switch ............................................................................... 4-15 Configure the Ports.................................................................................. 4-16 Cable Devices to the Switch.................................................................... 4-16 Install Firmware ................................................................................................ 4-17 Using SANbox Manager to Install Firmware............................................ 4-17 Using the CLI to Install Firmware ............................................................ 4-18 Using FTP and the CLI to Install Firmware.............................................. 4-19 Powering Down a Switch.................................................................................. 4-20 Section 5 Diagnostics/Troubleshooting 5.1 5.1.1 5.1.1.1 5.1.1.2 5.1.1.3 5.1.1.4 5.1.1.5 5.1.2 5.1.2.1 5.1.2.2 5.2 5.2.1 5.2.2 5.2.3 POST Diagnostics .............................................................................................. 5-1 Heartbeat LED Blink Patterns.................................................................... 5-1 Normal (all pass)............................................................................... 5-1 Maintenance Mode Pattern .............................................................. 5-2 Internal Firmware Failure Blink Pattern ............................................ 5-2 Fatal Error Blink Pattern ................................................................... 5-2 Configuration File System Error Blink Pattern .................................. 5-2 Port Status LED Indications....................................................................... 5-5 E_Port Isolation ................................................................................ 5-6 Excessive Port Errors ....................................................................... 5-7 Chassis Diagnostics ........................................................................................... 5-9 Over Temperature LED is Illuminated...................................................... 5-10 Input Power LED Is Extinguished ............................................................ 5-10 Fan Fail LED is Illuminated...................................................................... 5-10 59043-03 A Page v SANbox2-64 Fibre Channel Switch Installation Guide D 5.2.4 5.2.5 5.3 5.3.1 5.3.2 5.3.3 5.3.4 5.3.5 5.3.6 5.3.7 5.3.8 5.3.9 5.3.10 Output Power LED Is Extinguished ......................................................... 5-11 Power Supply Fault LED is Illuminated ................................................... 5-11 Recovering a Switch......................................................................................... 5-12 Maintenance – Exit .................................................................................. 5-13 Maintenance – Image Unpack................................................................. 5-13 Maintenance – Reset Network Config ..................................................... 5-14 Maintenance – Reset Password File ....................................................... 5-14 Maintenance – Copy Log Files ................................................................ 5-14 Maintenance – Remove Switch Config.................................................... 5-14 Maintenance – Remake Filesystem ........................................................ 5-14 Maintenance – Reset Switch ................................................................... 5-14 Maintenance – Show Firmware Versions ................................................ 5-15 Maintenance – Set Active Image............................................................. 5-15 Section 6 Removal/Replacement 6.1 6.2 6.2.1 6.2.2 6.3 6.4 6.4.1 6.4.2 6.5 6.5.1 6.5.2 6.6 6.6.1 6.6.2 SFP Transceivers ............................................................................................... 6-1 CPU Module ....................................................................................................... 6-2 Removing the CPU Module ....................................................................... 6-2 Installing the CPU Module ......................................................................... 6-4 I/O Blades........................................................................................................... 6-7 Cross-Connect Blades ..................................................................................... 6-11 Removing a CC Blade ............................................................................. 6-12 Installing a CC Blade ............................................................................... 6-14 Power Supply Modules..................................................................................... 6-16 Removing a Power Supply Module ......................................................... 6-16 Installing a Power Supply Module ........................................................... 6-18 Fans ................................................................................................................. 6-18 Removing a Fan ...................................................................................... 6-19 Installing a Fan ........................................................................................ 6-20 Appendix A Specifications A.1 A.2 A.3 A.4 A.5 A.6 A.7 A.8 A.9 Page vi Fabric Specifications ..........................................................................................A-1 Maintainability.....................................................................................................A-2 Fabric Management ...........................................................................................A-3 Dimensions.........................................................................................................A-3 Electrical.............................................................................................................A-3 Environmental ....................................................................................................A-4 Regulatory Certifications ....................................................................................A-5 Shortwave Laser SFP 1G/2G (multi-mode)........................................................A-6 Longwave Laser SFP 1G/2G (single-mode) ......................................................A-7 59043-03 A D SANbox2-64 Fibre Channel Switch Installation Guide Appendix B Command Line Interface B.1 B.2 B.3 59043-03 A Logging On to a Switch ......................................................................................B-1 Command Syntax...............................................................................................B-2 Commands .........................................................................................................B-3 Admin Command.......................................................................................B-4 Alias Command .........................................................................................B-5 Config Command.......................................................................................B-7 Date Command .......................................................................................B-10 Fallback Command.................................................................................. B-11 Group Command .....................................................................................B-12 Hardreset Command ...............................................................................B-16 Help Command........................................................................................B-17 History Command....................................................................................B-19 Hotreset Command .................................................................................B-20 Hotswap Command .................................................................................B-21 Image Command .....................................................................................B-23 Lip Command ..........................................................................................B-24 Passwd Command ..................................................................................B-25 Ping Command........................................................................................B-26 Ps Command...........................................................................................B-27 Quit Command ........................................................................................B-28 Reset Command......................................................................................B-29 Security Command ..................................................................................B-35 Securityset Command .............................................................................B-38 Set Command..........................................................................................B-40 Set Config Command ..............................................................................B-42 Set Log Command...................................................................................B-54 Set Port Command ..................................................................................B-57 Set Setup Command ...............................................................................B-58 Show Command ......................................................................................B-63 Show Config Command...........................................................................B-78 Show Log Command ...............................................................................B-81 Show Perf Command ..............................................................................B-83 Show Setup Command............................................................................B-85 Shutdown Command ...............................................................................B-88 Test Command ........................................................................................B-89 Uptime Command....................................................................................B-92 User Command .......................................................................................B-93 Whoami Command..................................................................................B-96 Page vii D SANbox2-64 Fibre Channel Switch Installation Guide Zone Command.......................................................................................B-97 Zoneset Command ................................................................................B-101 Zoning Command ..................................................................................B-104 Glossary Index Figures Figure Page 2-1 SANbox2-64 64-Port Fibre Channel Switch................................................................... 2-2 2-2 Slot and Fibre Channel Port Numbering ........................................................................ 2-3 2-3 Chassis Controls and LEDS........................................................................................... 2-4 2-4 Chassis LEDs................................................................................................................. 2-6 2-5 Fibre Channel Ports ....................................................................................................... 2-7 2-6 SFP Transceiver ............................................................................................................ 2-8 2-7 Ethernet Port ................................................................................................................ 2-10 2-8 Serial Port and Pin Identification .................................................................................. 2-11 2-9 Power Supply Components.......................................................................................... 2-12 2-10 Fans ............................................................................................................................. 2-13 3-1 Single Switch Fabric with Initiators and Targets ............................................................ 3-2 3-2 Dual Switch Fabric with Initiators and Targets ............................................................... 3-3 3-3 Security Example: Switches and HBAs........................................................................ 3-13 3-4 Security Example: Management Server....................................................................... 3-15 4-1 SANbox2-64 Fibre Channel Switch................................................................................ 4-2 4-2 SANbox2-64 Rail Kit ...................................................................................................... 4-5 4-3 Ethernet and Serial Cable Connections ......................................................................... 4-9 5-1 Port Status LED ............................................................................................................. 5-5 5-2 Port Status LED Indications ........................................................................................... 5-5 5-3 Chassis and Power Supply LEDs .................................................................................. 5-9 6-1 Removing the CPU Module............................................................................................ 6-4 6-2 Removing an I/O Blade .................................................................................................. 6-9 6-3 CC Blade Slots............................................................................................................. 6-11 6-4 Switch Cover Removal................................................................................................. 6-13 6-5 CC Blade Removal....................................................................................................... 6-13 6-6 Installing a CC Blade.................................................................................................... 6-14 6-7 Removing a Power Supply Module .............................................................................. 6-17 6-8 Removing a Fan........................................................................................................... 6-19 6-9 Installing a Fan............................................................................................................. 6-20 Page viii 59043-03 A D SANbox2-64 Fibre Channel Switch Installation Guide Tables Table 2-1 3-1 3-2 4-1 6-1 B-1 B-2 B-3 B-4 B-5 B-6 B-7 B-8 B-9 B-10 B-11 B-12 B-13 B-14 B-15 B-16 B-17 B-18 B-19 Page Serial Port Pin Identification ......................................................................................... 2-11 Port-to-Port Transmission Combinations ....................................................................... 3-7 Port-to-Port Latency ....................................................................................................... 3-7 Management Workstation Requirements....................................................................... 4-1 Marginal Operating Configurations ................................................................................ 6-1 Command-Line Completion ...........................................................................................B-2 Commands Listed by Authority Level.............................................................................B-3 Group Member Attributes.............................................................................................B-12 Group Member Attributes.............................................................................................B-13 Switch Configuration Defaults ......................................................................................B-30 Port Configuration Defaults ..........................................................................................B-31 Alarm Threshold Configuration Defaults ......................................................................B-32 Zoning Configuration Defaults......................................................................................B-32 SNMP Configuration Defaults ......................................................................................B-33 System Configuration Defaults.....................................................................................B-34 Security Configuration Defaults....................................................................................B-34 Set Config Port Parameters .........................................................................................B-42 Security Configuration Parameters ..............................................................................B-45 Set Config Switch Parameters .....................................................................................B-46 Set Config Threshold Parameters................................................................................B-48 Set Config Zoning Parameters.....................................................................................B-49 SNMP Configuration Settings ......................................................................................B-58 System Configuration Settings.....................................................................................B-59 Show Port Parameters .................................................................................................B-65 59043-03 A Page ix SANbox2-64 Fibre Channel Switch Installation Guide D Notes Page x 59043-03 A Section 1 Introduction This manual describes the features and installation of the SANbox2-64 Fibre Channel switch, firmware version 3.0. This manual is organized as follows: Section 1 describes the intended audience, related materials, safety notices, communications statements, laser safety information, electrostatic discharge sensitivity precautions, accessible parts, general program license, and technical support. Section 2 is an overview of the switch. It describes indicator LEDs and all user controls and connections. Section 3 describes the factors to consider when planning a fabric. Section 4 explains how to install and configure the switch. Section 5 describes the diagnostic methods and troubleshooting procedures. Section 6 describes the removal/replacement procedures for all field replaceable units (FRUs). Appendix A lists the switch specifications. Appendix B describes the Command Line Interface. Please read the communications statements and laser safety information later in this section. Use this manual with the SANbox2-64 Switch Management User’s Guide. 1.1 Intended Audience This manual introduces users to the switch and explains its installation and service. It is intended for users who are responsible for installing and servicing network equipment. 59043-03 A 1-1 D 1 – Introduction Related Materials 1.2 Related Materials The following manuals and materials are referenced in the text and/or provide additional information. SANbox2-64 Switch Management User’s Guide, Publication Number 59048-03. Fibre Channel-Arbitrated Loop (FC-AL-2) Rev. 6.8. Fibre Channel-10-bit Interface Rev. 2.3. Definitions of Managed Objects for the Fabric Element in Fibre Channel Standard (draft-ietf-ipfc-fabric-element-mib-04.txt). The Fibre Channel Standards are available from: Global Engineering Documents, 15 Inverness Way East, Englewood, CO 80112-5776 Phone: (800) 854-7179 or (303) 397-7956 Fax: (303) 397-2740. 1-2 59043-03 A D 1 – Introduction Safety Notices 1.3 Safety Notices A Warning notice indicates the presence of a hazard that has the potential of causing personal injury. 4-3, 4-6, 6-2, 6-8, 6-12, 6-15, 6-16, 6-19 A Caution notice indicates the presence of a hazard that has the potential of causing damage to the equipment. 4-4, 5-14, 6-2, 6-3, 6-7, 6-8, 6-11, 6-16, 6-19 1.4 Sicherheitshinweise Ein Warnhinweis weist auf das Vorhandensein einer Gefahr hin, die möglicherweise Verletzungen zur Folge hat. 4-3, 4-7, 6-2, 6-8, 6-12, 6-15, 6-16, 6-19 Ein Vorsichtshinweis weist auf das Vorhandensein einer Gefahr hin, die möglicherweise Geräteschäden zur Folge hat. 4-4, 5-14, 6-2, 6-3, 6-7, 6-8, 6-11, 6-16, 6-19 1.5 Notes informatives relatives à la sécurité Une note informative Avertissement indique la présence d’un risque pouvant entraîner des blessures. 4-3, 4-7, 6-2, 6-8, 6-12, 6-15, 6-16, 6-19 Une note informative Attention indique la présence d’un risque pouvant entraîner des dégâts matériels. 4-4, 5-14, 6-2, 6-3, 6-7, 6-8, 6-11, 6-16, 6-19 59043-03 A 1-3 1 – Introduction Communications Statements D 1.6 Communications Statements The following statements apply to this product. The statements for other products intended for use with this product appear in their accompanying manuals. 1.6.1 Federal Communications Commission (FCC) Class A Statement This equipment has been tested and found to comply with the limits for a Class A digital device, pursuant to Part 15 of the FCC Rules. These limits are designed to provide reasonable protection against harmful interference when the equipment is operated in a commercial environment. This equipment generates, uses, and can radiate radio frequency energy, and, if not installed and used in accordance with the instruction manual, may cause harmful interference to radio communications. Operation of this equipment in a residential area may cause unacceptable interference, in which case the user will be required to correct the interference at their own expense. Neither the provider nor the manufacturer is responsible for any radio or television interference caused by unauthorized changes or modifications to this equipment. Unauthorized changes or modifications could void the user's authority to operate the equipment. This device complies with Part 15 of the FCC Rules. Operation is subject to the following two conditions: This device may not cause harmful interference, and This device must accept any interference received, including interference that may cause undesired operation. 1.6.2 Canadian Department of Communications Class A Compliance Statement This equipment does not exceed Class A limits for radio emissions for digital apparatus, set out in Radio Interference Regulation of the Canadian Department of Communications. Operation in a residential area may cause unacceptable interference to radio and TV reception requiring the owner or operator to take whatever steps necessary to correct the interference. 1.6.3 Avis de conformité aux normes du ministère des Communications du Canada Cet équipement ne dépasse pas les limites de Classe A d'émission de bruits radioélectriques por les appareils numériques, telles que prescrites par le Réglement sur le brouillage radioélectrique établi par le ministère des Communications du Canada. L'exploitation faite en milieu résidentiel peut 1-4 59043-03 A D 1 – Introduction Communications Statements entraîner le brouillage des réceptions radio et télé, ce qui obligerait le propriétaire ou l'opérateur à prendre les dispositions nécwssaires pour en éliminer les causes. 1.6.4 CE Statement The CE symbol on the equipment indicates that this system complies with the EMC (Electromagnetic Compatibility) directive of the European Community (89/336/EEC) and to the Low Voltage (Safety) Directive (73/23/EEC). Such marking indicates that this system meets or exceeds the following technical standards: 59043-03 A EN60950/A11:1997 – “Safety of Information Technology Equipment, Including Electrical Business Equipment”. EN55022:1998 – “Limits and Methods of Measurement of Radio Interference Characteristics of Information Technology Equipment”. EN55024-1:1998 – “Electromagnetic compatibility - Generic immunity standard Part 1: Residential commercial, and light industry.” IEC1000-4-2:1995 – “Electrostatic Discharge Immunity Test” IEC1000-4-3:1995 – “Radiated, Radio-Frequency, Electromagnetic Field Immunity Test” IEC1000-4-4:1995 – “Electrical Fast Transient/Burst Immunity Test” IEC1000-4-5:1995 – “Surge Immunity Test” IEC1000-4-6:1996 – “Immunity To Conducted Disturbances, Induced By Radio-Frequency Fields” IEC1000-4-8:1993 – "Power Frequency Magnetic Field Immunity Test” IEC1000-4-11:1994 – “Voltage Dips, Short Interruptions And Voltage Variations Immunity Tests” EN61000-3-2:1995 – “Limits For Harmonic Current Emissions (Equipment Input Current Less Than/Equal To 16 A Per Phase)” Class A EN61000-3-3:1995 – “Limitation Of Voltage Fluctuations And Flicker In Low-Voltage Supply Systems For Equipment With Rated Current Less Than Or Equal To 16 A” 1-5 1 – Introduction Communications Statements D 1.6.5 VCCI Class A Statement This is a Class A product based on the standard of the Voluntary Control Council For Interference by Information Technology Equipment (VCCI). If this equipment is used in a domestic environment, radio disturbance may arise. When such trouble occurs, the user may be required to take corrective actions. 1.6.6 BSMI Class A Statement Warning: This is a Class A product. In a domestic environment, this product may cause radio interference in which case the user will be required to take adequate measures. 1-6 59043-03 A D 1 – Introduction Laser Safety Information 1.7 Laser Safety Information This product may use Class 1 laser optical transceivers to communicate over the fiber optic conductors. The U.S. Department of Health and Human Services (DHHS) does not consider Class 1 lasers to be hazardous. The International Electrotechnical Commission (IEC) 825 Laser Safety Standard requires labeling in English, German, Finnish, and French stating that the product uses Class 1 lasers. Because it is impractical to label the transceivers, the following label is provided in this manual. 1.8 Electrostatic Discharge Sensitivity (ESDS) Precautions The assemblies used in the switch chassis are ESD sensitive. Observe ESD handling procedures when handling any assembly used in the switch chassis. 59043-03 A 1-7 D 1 – Introduction Accessible Parts 1.9 Accessible Parts The Field Replaceable Units (FRUs) in the SANbox2-64 switch are the following: Small Form-Factor Pluggable (SFP) optical transceivers Power supply modules Fans CPU module I/O blades Cross-Connect blades Refer to Section 6 Removal/Replacement for more information. 1.10 Pièces Accessibles Les pièces remplaçables, Field Replaceable Units (FRU), du commutateur SANbox2-64 Fibre Channel Switch sont les suivantes: Interfaces aux media d’interconnexion appelés SFP transceivers. Modules d'alimentation de courant Ventilateurs Module d'unite centrale Modules d'entrée/sortie Modules des Cross-Connect Se reporter à la Section 6 (Procédures de retrait et remplacement) pour plus de renseignements. 1.11 Zugängliche Teile Nur die folgenden Teile im SANbox2-64 Fibre Channel Switch können kundenseitig ersetzt werden: Schnittstellen für die Zwischenverbindungsträger, SFP transceivers genannt. Netzteilmodule Gehäuselüfte Zentraleinheitsmodule Blätter Des Einganges/Ausganges Blätter Des Cross-Connects Weitere Informationen finden Sie im Abshcnitt 6 (Ausbauen der ersetzbaren Teile). 1-8 59043-03 A D 1 – Introduction General Public License 1.12 General Public License QLogic Fibre Channel switches are powered by the Linux operating system. A machine-readable copy of the Linux source code is available upon written request to the following address. A nominal fee will be charged for reproduction, shipping, and handling costs in accordance with the General Public License. QLogic Corporation 6321 Bury Drive Eden Prairie, MN 55346-1739 Attention: Technical Support - Source Request Warning: Installation of software or files not authorized by QLogic will immediately and irrevocably void all warranty and service contracts on the affected units. The following general public license has been reproduced with permission from: GNU General Public License Version 2, June 1991 Copyright (C) 1989, 1991 Free Software Foundation, Inc. 59 Temple Place - Suite 330, Boston, MA 02111-1307, USA 1.12.1 Preamble The licenses for most software are designed to take away your freedom to share and change it. By contrast, the GNU General Public License is intended to guarantee your freedom to share and change free software--to make sure the software is free for all its users. This General Public License applies to most of the Free Software Foundation's software and to any other program whose authors commit to using it. (Some other Free Software Foundation software is covered by the GNU Library General Public License instead.) You can apply it to your programs, too. When we speak of free software, we are referring to freedom, not price. Our General Public Licenses are designed to make sure that you have the freedom to distribute copies of free software (and charge for this service if you wish), that you receive source code or can get it if you want it, that you can change the software or use pieces of it in new free programs; and that you know you can do these things. To protect your rights, we need to make restrictions that forbid anyone to deny you these rights or to ask you to surrender the rights. These restrictions translate to certain responsibilities for you if you distribute copies of the software, or if you modify it. For example, if you distribute copies of such a program, whether gratis or for a fee, you must give the recipients all the rights that you have. You must make sure that they, too, receive or can get the source code. And you must show them these terms so they know their rights. 59043-03 A 1-9 1 – Introduction General Public License D We protect your rights with two steps: (1) copyright the software, and (2) offer you this license which gives you legal permission to copy, distribute and/or modify the software. Also, for each author's protection and ours, we want to make certain that everyone understands that there is no warranty for this free software. If the software is modified by someone else and passed on, we want its recipients to know that what they have is not the original, so that any problems introduced by others will not reflect on the original authors' reputations. Finally, any free program is threatened constantly by software patents. We wish to avoid the danger that redistributors of a free program will individually obtain patent licenses, in effect making the program proprietary. To prevent this, we have made it clear that any patent must be licensed for everyone's free use or not licensed at all. The precise terms and conditions for copying, distribution and modification follow. 1.12.2 Terms And Conditions For Copying, Distribution And Modification 1. This License applies to any program or other work which contains a notice placed by the copyright holder saying it may be distributed under the terms of this General Public License. The "Program", below, refers to any such program or work, and a "work based on the Program" means either the Program or any derivative work under copyright law: that is to say, a work containing the Program or a portion of it, either verbatim or with modifications and/or translated into another language. (Hereinafter, translation is included without limitation in the term "modification".) Each licensee is addressed as "you". Activities other than copying, distribution and modification are not covered by this License; they are outside its scope. The act of running the Program is not restricted, and the output from the Program is covered only if its contents constitute a work based on the Program (independent of having been made by running the Program). Whether that is true depends on what the Program does. 2. You may copy and distribute verbatim copies of the Program's source code as you receive it, in any medium, provided that you conspicuously and appropriately publish on each copy an appropriate copyright notice and disclaimer of warranty; keep intact all the notices that refer to this License and to the absence of any warranty; and give any other recipients of the Program a copy of this License along with the Program. You may charge a fee for the physical act of transferring a copy, and you may at your option offer warranty protection in exchange for a fee. 3. 1-10 You may modify your copy or copies of the Program or any portion of it, thus forming a work based on the Program, and copy and distribute such 59043-03 A D 1 – Introduction General Public License modifications or work under the terms of Section 1 above, provided that you also meet all of these conditions: a. You must cause the modified files to carry prominent notices stating that you changed the files and the date of any change. b. You must cause any work that you distribute or publish, that in whole or in part contains or is derived from the Program or any part thereof, to be licensed as a whole at no charge to all third parties under the terms of this License. c. If the modified program normally reads commands interactively when run, you must cause it, when started running for such interactive use in the most ordinary way, to print or display an announcement including an appropriate copyright notice and a notice that there is no warranty (or else, saying that you provide a warranty) and that users may redistribute the program under these conditions, and telling the user how to view a copy of this License. (Exception: if the Program itself is interactive but does not normally print such an announcement, your work based on the Program is not required to print an announcement.) These requirements apply to the modified work as a whole. If identifiable sections of that work are not derived from the Program, and can be reasonably considered independent and separate works in themselves, then this License, and its terms, do not apply to those sections when you distribute them as separate works. But when you distribute the same sections as part of a whole which is a work based on the Program, the distribution of the whole must be on the terms of this License, whose permissions for other licensees extend to the entire whole, and thus to each and every part regardless of who wrote it. Thus, it is not the intent of this section to claim rights or contest your rights to work written entirely by you; rather, the intent is to exercise the right to control the distribution of derivative or collective works based on the Program. In addition, mere aggregation of another work not based on the Program with the Program (or with a work based on the Program) on a volume of a storage or distribution medium does not bring the other work under the scope of this License. 4. You may copy and distribute the Program (or a work based on it, under Section 2) in object code or executable form under the terms of Sections 1 and 2 above provided that you also do one of the following: a. 59043-03 A Accompany it with the complete corresponding machine-readable source code, which must be distributed under the terms of Sections 1 and 2 above on a medium customarily used for software interchange; or, 1-11 1 – Introduction General Public License D b. Accompany it with a written offer, valid for at least three years, to give any third party, for a charge no more than your cost of physically performing source distribution, a complete machine-readable copy of the corresponding source code, to be distributed under the terms of Sections 1 and 2 above on a medium customarily used for software interchange; or, c. Accompany it with the information you received as to the offer to distribute corresponding source code. (This alternative is allowed only for noncommercial distribution and only if you received the program in object code or executable form with such an offer, in accord with Subsection b above.) The source code for a work means the preferred form of the work for making modifications to it. For an executable work, complete source code means all the source code for all modules it contains, plus any associated interface definition files, plus the scripts used to control compilation and installation of the executable. However, as a special exception, the source code distributed need not include anything that is normally distributed (in either source or binary form) with the major components (compiler, kernel, and so on) of the operating system on which the executable runs, unless that component itself accompanies the executable. If distribution of executable or object code is made by offering access to copy from a designated place, then offering equivalent access to copy the source code from the same place counts as distribution of the source code, even though third parties are not compelled to copy the source along with the object code. 1-12 5. You may not copy, modify, sublicense, or distribute the Program except as expressly provided under this License. Any attempt otherwise to copy, modify, sublicense or distribute the Program is void, and will automatically terminate your rights under this License. However, parties who have received copies, or rights, from you under this License will not have their licenses terminated so long as such parties remain in full compliance. 6. You are not required to accept this License, since you have not signed it. However, nothing else grants you permission to modify or distribute the Program or its derivative works. These actions are prohibited by law if you do not accept this License. Therefore, by modifying or distributing the Program (or any work based on the Program), you indicate your acceptance of this License to do so, and all its terms and conditions for copying, distributing or modifying the Program or works based on it. 7. Each time you redistribute the Program (or any work based on the Program), the recipient automatically receives a license from the original licensor to copy, distribute or modify the Program subject to these terms and conditions. You may not impose any further restrictions on the recipients' exercise of the 59043-03 A D 1 – Introduction General Public License rights granted herein. You are not responsible for enforcing compliance by third parties to this License. 8. If, as a consequence of a court judgment or allegation of patent infringement or for any other reason (not limited to patent issues), conditions are imposed on you (whether by court order, agreement or otherwise) that contradict the conditions of this License, they do not excuse you from the conditions of this License. If you cannot distribute so as to satisfy simultaneously your obligations under this License and any other pertinent obligations, then as a consequence you may not distribute the Program at all. For example, if a patent license would not permit royalty-free redistribution of the Program by all those who receive copies directly or indirectly through you, then the only way you could satisfy both it and this License would be to refrain entirely from distribution of the Program. If any portion of this section is held invalid or unenforceable under any particular circumstance, the balance of the section is intended to apply and the section as a whole is intended to apply in other circumstances. It is not the purpose of this section to induce you to infringe any patents or other property right claims or to contest validity of any such claims; this section has the sole purpose of protecting the integrity of the free software distribution system, which is implemented by public license practices. Many people have made generous contributions to the wide range of software distributed through that system in reliance on consistent application of that system; it is up to the author/donor to decide if he or she is willing to distribute software through any other system and a licensee cannot impose that choice. This section is intended to make thoroughly clear what is believed to be a consequence of the rest of this License. 59043-03 A 9. If the distribution and/or use of the Program is restricted in certain countries either by patents or by copyrighted interfaces, the original copyright holder who places the Program under this License may add an explicit geographical distribution limitation excluding those countries, so that distribution is permitted only in or among countries not thus excluded. In such case, this License incorporates the limitation as if written in the body of this License. 10. The Free Software Foundation may publish revised and/or new versions of the General Public License from time to time. Such new versions will be similar in spirit to the present version, but may differ in detail to address new problems or concerns. 11. Each version is given a distinguishing version number. If the Program specifies a version number of this License which applies to it and "any later version", you have the option of following the terms and conditions either of that version or of any later version published by the Free Software Foundation. If the Program does not specify a version number of this 1-13 1 – Introduction General Public License D License, you may choose any version ever published by the Free Software Foundation. 12. If you wish to incorporate parts of the Program into other free programs whose distribution conditions are different, write to the author to ask for permission. For software which is copyrighted by the Free Software Foundation, write to the Free Software Foundation; we sometimes make exceptions for this. Our decision will be guided by the two goals of preserving the free status of all derivatives of our free software and of promoting the sharing and reuse of software generally. NO WARRANTY 13. BECAUSE THE PROGRAM IS LICENSED FREE OF CHARGE, THERE IS NO WARRANTY FOR THE PROGRAM, TO THE EXTENT PERMITTED BY APPLICABLE LAW. EXCEPT WHEN OTHERWISE STATED IN WRITING THE COPYRIGHT HOLDERS AND/OR OTHER PARTIES PROVIDE THE PROGRAM "AS IS" WITHOUT WARRANTY OF ANY KIND, EITHER EXPRESSED OR IMPLIED, INCLUDING, BUT NOT LIMITED TO, THE IMPLIED WARRANTIES OF MERCHANTABILITY AND FITNESS FOR A PARTICULAR PURPOSE. THE ENTIRE RISK AS TO THE QUALITY AND PERFORMANCE OF THE PROGRAM IS WITH YOU. SHOULD THE PROGRAM PROVE DEFECTIVE, YOU ASSUME THE COST OF ALL NECESSARY SERVICING, REPAIR OR CORRECTION. 14. IN NO EVENT UNLESS REQUIRED BY APPLICABLE LAW OR AGREED TO IN WRITING WILL ANY COPYRIGHT HOLDER, OR ANY OTHER PARTY WHO MAY MODIFY AND/OR REDISTRIBUTE THE PROGRAM AS PERMITTED ABOVE, BE LIABLE TO YOU FOR DAMAGES, INCLUDING ANY GENERAL, SPECIAL, INCIDENTAL OR CONSEQUENTIAL DAMAGES ARISING OUT OF THE USE OR INABILITY TO USE THE PROGRAM (INCLUDING BUT NOT LIMITED TO LOSS OF DATA OR DATA BEING RENDERED INACCURATE OR LOSSES SUSTAINED BY YOU OR THIRD PARTIES OR A FAILURE OF THE PROGRAM TO OPERATE WITH ANY OTHER PROGRAMS), EVEN IF SUCH HOLDER OR OTHER PARTY HAS BEEN ADVISED OF THE POSSIBILITY OF SUCH DAMAGES. END OF TERMS AND CONDITIONS 1.12.3 How to Apply These Terms to Your New Programs If you develop a new program, and you want it to be of the greatest possible use to the public, the best way to achieve this is to make it free software which everyone can redistribute and change under these terms. To do so, attach the following notices to the program. It is safest to attach them to the start of each source file to most effectively convey the exclusion of warranty; and each file should have at least the "copyright" line and a pointer to where the full notice is found. 1-14 59043-03 A D 1 – Introduction General Public License one line to give the program's name and an idea of what it does. Copyright (C) yyyy name of author This program is free software; you can redistribute it and/or modify it under the terms of the GNU General Public License as published by the Free Software Foundation; either version 2 of the License, or (at your option) any later version. This program is distributed in the hope that it will be useful, but WITHOUT ANY WARRANTY; without even the implied warranty of MERCHANTABILITY or FITNESS FOR A PARTICULAR PURPOSE. See the GNU General Public License for more details. You should have received a copy of the GNU General Public License along with this program; if not, write to the Free Software Foundation, Inc., 59 Temple Place - Suite 330, Boston, MA 02111-1307, USA. Also add information on how to contact you by electronic and paper mail. If the program is interactive, make it output a short notice like this when it starts in an interactive mode: Gnomovision version 69, Copyright (C) year name of author Gnomovision comes with ABSOLUTELY NO WARRANTY; for details type `show w'. This is free software, and you are welcome to redistribute it under certain conditions; type `show c' for details. The hypothetical commands `show w' and `show c' should show the appropriate parts of the General Public License. Of course, the commands you use may be called something other than `show w' and `show c'; they could even be mouse-clicks or menu items--whatever suits your program. You should also get your employer (if you work as a programmer) or your school, if any, to sign a "copyright disclaimer" for the program, if necessary. Here is a sample; alter the names: Yoyodyne, Inc., hereby disclaims all copyright interest in the program `Gnomovision' (which makes passes at compilers) written by James Hacker. signature of Ty Coon, 1 April 1989 Ty Coon, President of Vice This General Public License does not permit incorporating your program into proprietary programs. If your program is a subroutine library, you may consider it more useful to permit linking proprietary applications with the library. If this is what you want to do, use the GNU Library General Public License instead of this License. 59043-03 A 1-15 D 1 – Introduction Technical Support 1.13 Technical Support Customers should contact their authorized maintenance provider for technical support of their QLogic switch products. QLogic-direct customers may contact QLogic Technical Support; others will be redirected to their authorized maintenance provider. Visit the QLogic support Web site listed in Contact Information for the latest firmware and software updates. 1.13.1 Availability QLogic Technical Support is available from 7:00 AM to 7:00 PM Central Standard Time, Monday through Friday, excluding QLogic-observed holidays. 1.13.2 Training QLogic offers certification training for the technical professional for both the SANblade HBAs and the SANbox2 switches. From the training link at www.qlogic.com, you may choose Electronic-Based Training or schedule an intensive "hands-on" Certification course. Technical Certification courses include installation, maintenance and troubleshooting QLogic SAN products. Upon demonstrating knowledge using live equipment, QLogic awards a certificate identifying the student as a Certified Professional. The training professionals at QLogic may be reached by email at [email protected]. 1.13.3 Contact Information 1-16 Address: QLogic Switch Products Inc. 6321 Bury Drive Eden Prairie, Minnesota 55346 USA Telephone: +1 952-932-4040 Fax: +1 952-932-4018 Email: Technical Service Technical Training [email protected] [email protected] Switch Support Web Site: http://support.qlogic.com 59043-03 A Section 2 General Description This section describes the features and capabilities of the SANbox2-64 Fibre Channel switch. The following topics are described: Chassis hardware Chassis controls and LEDs Fibre channel ports Ethernet port Serial port Power supply modules Fans Switch management Fabrics are managed with the SANbox Manager switch management application (version 3.00) and the Command Line Interface (CLI). Refer to the SANbox2-64 Switch Management User’s Guide for information about using the SANbox Manager application. Refer to Appendix B Command Line Interface for more information about the command line interface. 59043-03 A 2-1 D 2 – General Description Chassis Hardware 2.1 Chassis Hardware The SANbox2-64 switch is set of up to eight 8-port I/O blades. Each I/O blade is interconnected with all other I/O blades through the backplane which is supported by four cross-connect ASICs. A CPU module provides configuration, monitoring, data path management, and control functions. The base SANbox2-64 switch is configured as a 16-port switch. The 16-port switch is equipped with 2 I/O blades, 2 power supply modules, and a CPU module. To maintain proper air flow and cooling in the 16-port switch, blank panels are installed in empty I/O blade slots. You can expand the switch by installing additional I/O blades up to a total of eight. The 64-port switch is equipped with 8 I/O blades, 2 power supply modules, and a CPU module as shown in Figure 2-1. Refer to Section 6 Removal/Replacement for the marginal operating configurations. Power Supply Modules I/O Blades CPU Module I/O Blades Figure 2-1. SANbox2-64 64-Port Fibre Channel Switch There are 11 slots numbered #0–#10 as shown in Figure 2-2. Power supply modules occupy slots #0 and #10. The CPU module occupies slot #5. I/O blades occupy slots #1–#4 and #6–#9. The Fibre Channel ports on the I/O blades are 2-2 59043-03 A D 2 – General Description Chassis Hardware numbered 0–63 from top to bottom according to slot number as shown in Figure 2-2. For example, the ports 0–7 are always associated with the I/O blade in slot #1; ports 8–15 are always associated with slot #2, and so on. For example, if there were no I/O blade in slot #1, I/O blade #2 would retain the 8–15 port numbering. Slot #0 Slots #1–#4 Slot #5 Slots #6–#9 Slot #10 0 8 16 24 32 40 48 56 1 9 17 25 33 41 49 57 2 10 18 26 34 42 50 58 3 11 19 27 35 43 51 59 4 12 20 28 36 44 52 60 5 13 21 29 37 45 53 61 6 14 22 30 38 46 54 62 7 15 23 31 39 47 55 63 Figure 2-2. Slot and Fibre Channel Port Numbering The base SANbox2-64 switch comes with I/O blades in slots 1 and 9. You can expand the switch to 24, 32, 40, 48, 56, or 64 ports by installing 1, 2, 3, 4, 5, or 6 additional I/O blades. Install additional I/O blades in open slots in the following order: 59043-03 A 3rd I/O blade in slot 2 4th I/O blade in slot 8 5th I/O blade in slot 3 6th I/O blade in slot 7 7th I/O blade in slot 4 8th I/O blade in slot 6 2-3 D 2 – General Description Chassis Controls and LEDs 2.2 Chassis Controls and LEDs The Maintenance button on the CPU module, shown in Figure 2-3, is the only chassis control and is used to reset a switch or to recover a disabled switch. Power is applied to the switch logic circuitry when one or both power supply modules are connected to a 110 or 230 VAC power source. The chassis LEDs are located on the CPU module and provide information about the switch’s operational status. The chassis LEDs provide information about the switch’s operational status. The chassis LEDs include the Input Power LED, Heartbeat LED, Over Temperature LED, and the Fan Fail LED. Refer to ”Power Supply Modules” on page 2-12 for information about power supply LEDs and to ”Port Status LED” on page 2-8 for information about the Port Status LED. Power Supply LEDs Chassis LEDs Ethernet Port LEDs Maintenance Button Figure 2-3. Chassis Controls and LEDS 2.2.1 Maintenance Button The Maintenance button is dual function control on the CPU module that resets the switch or places the switch in maintenance mode. Maintenance mode sets the IP address to 10.0.0.1 and provides access to the switch for maintenance purposes when flash memory or the resident configuration file is corrupted. Refer to ”Recovering a Switch” on page 5-12 for information about maintenance mode. 2-4 59043-03 A D 2 – General Description Chassis Controls and LEDs 2.2.1.1 Resetting a Switch To reset the switch, use a pointed tool to press and release (less than 2 seconds) the Maintenance button. The switch will respond as follows: 1. All of the chassis LEDs will illuminate and then extinguish leaving only the Input Power LED illuminated. 2. After approximately 1 minute, the power-on self test begins illuminating all chassis LEDs. 3. When the POST is complete, the chassis LEDs extinguish leaving the Input Power LED illuminated and the Heartbeat LED flashing once per second. 2.2.1.2 Placing the Switch in Maintenance Mode To place the switch in maintenance mode, do the following: 1. Isolate the switch from the fabric. 2. Press and hold the Maintenance button with a pointed tool for about 2 seconds. When the Input Power LED alone is illuminated, release the button. 3. After approximately 1 minute, the power-on self test begins illuminating all chassis LEDs. 4. When the POST is complete, the chassis LEDs extinguish leaving the Input Power LED and the Heartbeat LED illuminated. The Heartbeat LED illuminates continuously while the switch is in maintenance mode. To exit maintenance mode and return to normal operation, press and release the Maintenance button to reset the switch. 59043-03 A 2-5 D 2 – General Description Chassis Controls and LEDs 2.2.2 Chassis LEDs The chassis LEDs shown in Figure 2-4 provide status information about switch operation. Refer to ”Port Status LED” on page 2-8 for information about the Port Status LED. Refer to ”Power Supply Mo