1
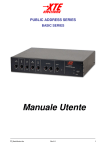
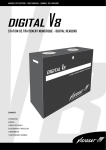
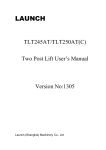
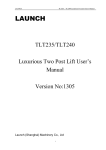
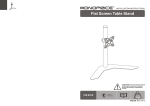
Warning: It needs 2 people to put up some TV! Our company will not
responsible for any damage by man-made.
Plasma LCD bracket
3
INSTALLATION GUIDE
Item No.:PWLB805
2
Fig3a
Fig3b
TV Size Rang : 10 "- 24 "
Thinnest design: Distance to the wall is only 30mm
Safe lock: install safe bolt to luck up
Max load capacity:15kg/33lbs
-4-
Important: If don't understand about right install ways, please
consult to normal installing specialist.
Parts:
1
2
Letter
Qty
1
1
Monitor Plate
2
3
A
1
2
4
Wall Plate
Safety bolt
M4x8 bolt
B
C
D
E
F
4
4
4
4
4
4
M4x12 bolt
M5x8 bolt
M5x12 bolt
M5 washer
Long bolt
G
A
B
C
D
Description
Step 2:Mount the part-b to the wall.(Wood stud, Brick, Solid Concrete and
Masonry wall mo-unting options are provided below)
Wood stud mounting
First determine the required position in the wall.Mark 4 locations at the wall
according to the holes in the Wall Plate(2) , according to the Fig 2a. Then
pre-drill 50mm (at l east) deep hole with a 3mm drill bit . Fix the Wall Plate(2)
to the wall by bolt ( F ) , as the Fig 2b shows . Please note the hooks in the
Wall Plate(2) is up.
Brick, Solid Concrete and Masonry wall mounting
After determine the required position in the wall, mark 4 locations at the
wall according to the holes in the Wall Plate(2) , then pre-drill 50mm ( at
least ) deep hole with a 11mm drill bit at the position of marks. Insert the
Wall anchor cover to every hole. Last fix the Wall Plate(2) to the wall by
bolt (F).Please note the hooks in the Wall Plate(2) is up.
Wall anchor
E
F
G
3
Step1:Install the display
According to the Fig. 1, mount the
part-a to the back of the LCD . First
determine the right holes,which should
be level to each other, on the part-a
according to the holes in the back of
the LCD. Mount the part-a to the back
of the LCD by 4 bolts and washers (D).
F
2
1
E
Fig2a
Fig2b
Step 3 mount the LCD display to the part b in the wall
A,B,C,D
Fig 1
Carefully: Don't force the bolt to LCD
hole, avoiding damage to people and
instrument. Don't use electronics drill to fasten screw.
-2-
Lift the Monitor Plate against to the Wall Plate(2) with hole to hole, and
according to the Fig 3a.Then slide the part a to the slot of the part b, as the
Fig 3b shows.Then tighten the safety bolt.
-3-