1
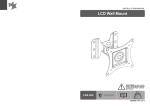
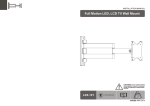
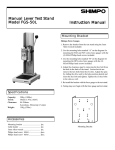
Step 4
Carefully position monitor so that Wall and
Monitor Plates are vertically aligned, with the
bottom of Monitor plate overlapping the top of
the Wall Plate by approximately 1”.
1
Gently lower monitor into position, sliding the
two plates together until the Monitor Plate
bottoms out. (Fig. 3)
Caution: Make sure that the plates are engaged
on both sides of the mount before releasing grip
on monitor.
2
Flat Panel Fixed Mount
INSTALLATION GUIDE
3
Fig 3
Item No.:PWLB006
Step 5
Install two Safety Bolts (3) through bottom of Wall Plate.
(Fig. 3)
Caution : This Product LCD /Plasma Wall Mount Bracket is
intended for use only with the maximum weights indicated .See apparatus
instructions .Use with products heavier than the maximum weights
indicated may result in instability causing possible injury .
TV Size Rang : 10 "- 24 "
Universal VESA mount
Low profile: only 17mm from wall
Easy to install: sliding plate operation
Max load capacity:15Kg/33lbs
-4-
IMPORTANT If don’t understand about right install ways, please
IMPORTANT:
consult to normal installing specialist.
Parts:
2
1
Letter
Qty
1
1
Monitor Plate
2
3
A
1
2
4
Wall Plate
M5x10 Safety bolt
M4x8 bolt
B
C
D
E
M4x12 bolt
M5x8 bolt
M5x12 bolt
1 / 4”-20x5 / 8” bolt
F
4
4
4
4
6
G
H
I
4
2
2
3
A
B
C
D
E
F
G
Description
M5 washer
M6 washer
Long bolt
Wall anchor
H
Step 2
Wooden Stud Mounting:
Using an electronic stud finder, locate the center of the wooden stud.
Position the Wall Plate (2) in desired mounting location over stud.
Level the Wall Plate with a bubble level, and then using the wall plate
as a template, mark mounting hole locations over the center of the stud.
Drill 2 mounting holes 50mm deep, into the stud using a 3mm drill bit.
Masonry Mounting:
Position the Wall Plate (2) in desired mounting location on wall.
Level the Wall Plate with a bubble level, and then using the wall plate
as a template, mark mounting hole locations on wall.
Drill 2 mounting holes 50mm deep, using a 8mm masonry bit. Insert
Wall Anchors (I) into the mounting holes, and lightly tap them flush to
the wall with a hammer.
Caution: Wall Anchors should only be used for masonry mounting.
NEVER use wall anchors to mount the mount to drywall.
I
Securely mount Wall Plate with supplied Long Blot (H) and washer(F).
Step 3
Attach Monitor Plate to back of the monitor with 4mm , 5mm or 1/4”-20x5/8”
supplied hardware. (A-E) (Fig. 2) Check the monitor’s owners manual
for correct length screw to use.
Step 1
Determine the desired location
for the monitor.
Important : Make sure there is
adequate mounting space
available for the monitor,
considering the monitor dimensions.
This mount is supplied with the
necessary hardware for either
Wooden Stud Mounting or
Masonry Mounting. Determine
your mounting type and proceed accordingly.
-2-
Caution: Never force screws into the monitor, as damage may occur.
G
Fig 1
F
E
A,B,C,D,
Fig 2
-3-