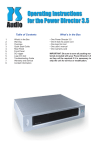
1
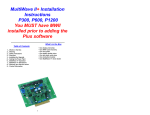
Table of Contents
1....What’s in the Box
2....Overview
3....Quick Start Guide
4....Rear Panel Layout
5....Front Panel Controls
6....IR Remote Control
7....Setup Menu
10..Using the Home Theater Bypass
10..Using the Loop function
10..Using the 12 Volt Triggers
10..Using the PS Bus
12..Troubleshooting Guide
15..Appendix
15..Warranty and Service Issues
16..Contact Information
What’s in the Box
• One PCA-2 Preamplifier
• One IR remote control
• Two AAA batteries
• One 6 foot AC power cable
• One user’s manual
• One warranty card
• One spare 3 amp fast blow fuse
IMPORTANT:
Be sure to save all packing materials included
with the PCA-2 Preamplifier as this will be
required if you ever need to ship the unit for service or modification.
Overview
• Expansion slot accommodates optional upgrade
cards
The PCA-2 is a reference level stereo preamplifier that can integrate into any type of audio or
home theater system.
• Optional rack mount capability
The PCA-2 Preamplifier is designed to accommodate input switching and volume control to
a number of external source components while
providing a signal as faithful and musically satisfying as technologically possible today.
• Optional outboard power supply
The PS Audio PCA-2 offers extraordinary user
control over a wide variety of selectable options
and features including:
• 1 XLR and 6 RCA inputs
• 2 RCA and 2 XLR outputs, plus 1 tape loop (RCA)
• Fully balanced circuit architecture
• Class A zero feedback gain stage
• IR Remote control
• Home Theater Bypass function
• Front panel LED display for system control and
input name display
• Customizable input names
• Individual input gain control
• Discrete headphone amplifier
• Built in Ultimate Outlet performs internal AC
cleansing
• Massive toroidal transformer for extended headroom
• PS Audio’s brushed aluminum FRAME chassis
•PS Bus for communication with other PS Audio
devices
• 25 custom setup parameters
2
Quick Start Guide
* The PCA-2 does not include a phono preamplifier stage. To connect a turntable, use a phono
peamplifier.
1. Place the PCA-2 in a rack or on a shelf in the
audio/video system.
2. Turn off all associated components
3a. Connect the left and right analog audio outputs from all audio/video source equipment to
any of the inputs labeled 1-7 on the back of the
PCA-2. Use input 1 for XLR type connections
and inputs 2-7 for RCA type connections.
For a complete list of input names see appendix
A.
3b. Connect the left and right analog audio outputs from the back of the PCA-2 to the inputs of
an audio amplifier. Use XLR type connectors if
XLR inputs are available on the amplifier.
There are 2 pair of both XLR and RCA outputs.
There is no sonic difference between each pair
of outputs.
4. Plug the PCA-2 into the wall AC outlet. Use
the supplied AC power cable, or an aftermarket
power cable. For optimum results we recommend the use of a PS Audio xStream Power
Cable.
5. Once the PCA-2 is connected to power, the
PCA-2 will initiate a countdown sequence from
30 seconds. During this time the PCA-2 is initializing its internal circuitry.
6. The PCA-2 will default to the 1st input (1 XLR)
when it is ready for use.
7. Use the Input Up/Down buttons to select the
desired input and slowly raise the volume level
using the front panel knob or the included IR
remote control to a comfortable setting.
Default Settings
The PCA-2 comes from the factory with standard
default settings that should work well for most
situations. There are 25 custom setup parameters which can be adjusted by the user as well
as custom input names for all 7 inputs.
3
Rear Panel Layout
Note: Unplug the power cord before checking
the fuse.
1. PS Bus and 12 Volt Triggers
The PCA-2 comes equipped with a built in PS
Bus. The PS Bus allows other PS Audio products equipped with a PS Bus to communicate via
standard RJ11 phone cable.
6. Analog Inputs
One analog XLR (balanced) and six analog RCA
(single-ended) inputs allow for the connection of
up to seven external sources.
For a complete list of input names see Appendix
A.
Note: The phone cable must have at least
four wires attached to the connector (a 2-line
phone cable) to function properly.
7. Expansion Slot Cover
This cover is to be removed upon installing an
expansion card for the PCA-2 (cards sold separately). See the instructions included with the
expansion card for installation details.
If communication between other non-PS products is desired the 12 Volt Trigger can be used
with other 12 Volt Trigger equipped products to
relay commands such as power status. There
are 2 output triggers and 1 input trigger (See
“Using the 12 Volt Trigger” for more information).
8. Loop Output
The loop output is to be connected to the input
of a device such as a tape deck or an equalizer. The return loop signal should be connected
to input number seven and can be activated by
pressing the loop button.
2. Ground Terminal
The PCA-2 includes a grounding post for use
with associated equipment, such as a turntable.
Attach the grounding wire by tightening the binding post to the wire.
9. Analog Outputs
Two pair of XLR and two pair of RCA analog outputs are both active at all times to allow connectivity to any combination of amplifiers or to use
the system in a bi-amped configuration. There
is no sonic difference between each pair of outputs.
3. IEC Power Input
15 amp male IEC standard power socket.
4. Accessory Power Inputs
Two Neutrik power connectors attach to the
PCA-2 for use with the optional external power
supply (sold separately).
*The PCA-2 does not include a phono preamplifier stage. To connect a turntable, use a phono
peamplifier.
5. Fuse
The fuse is a 3 Amp fast blow. It can be removed
by inserting a flat device into the fuse holder and
twisting counter-clockwise.
4
Front Panel Controls
Mute
Pressing the Mute button will silence the output
of the PCA-2. If Mute is activated, the number
of the current input will still be displayed while
the display will read MUTE. To exit the mute
status, press mute again or simply adjust the volume control.
The PCA-2 front panel includes a volume knob
and the following five buttons:
1.
2.
3.
4.
5.
Power
Input Down
Input Up
Loop
Mute
By default the PCA-2 will not produce any signal
when in mute, however the mute volume level
can be specified by the user (see Setup Menu).
Power On/Off
The Power Button activates the front panel display, engages the volume control and routes the
input signal to the appropriate output(s). The PS
logo will also illuminate blue.
Volume Knob
Adjusting the Volume Knob will increase or
decrease the output volume. When the volume
is adjusted it will numerically display the volume
level in the display window. After 3 seconds the
display will return to the input name. By default
the volume level is displayed in a 0 to 100 scale.
A decibel reference level scale from -90dB to
+10dB can also be used (see Setup Menu).
Pressing the Power Button again will put the
PCA-2 in a standby mode. It will consume very
little power and not pass any signal to the amplifier. The display and the logo will not illuminate.
For optimum performance keep the PCA-2
attached to a live outlet.
Input Up/Down
The Input Up/Down buttons cycle though
all inputs. The front panel will display the
number of the present input as well as
the input name. This name can be
specified by the user (see Setup
Menu).
Loop
The Loop function will activate the Loop output. Loop
Output is a fixed level
output, which is not
affected by the volume control. LOOP
will illuminate in the
front panel display
when it is active.
The Loop function
is useful in conjunction with recording
devices or equalization equipment.
5
3. Volume
Pressing the volume + or - buttons will increase
or decrease the output volume. When the volume is adjusted it will numerically display the volume level in the display window. After 3 seconds
it will return to display the input name. By default
the volume level is displayed in a 0 to 100 scale.
A decibel reference level scale from -90dB to
+10dB can also be used (see also Setup Menu).
4. Balance
The Balance control is used to offset the relative
volume level from one channel to the other. Use
this control if your speakers, listening room or
listening position are asymmetrical and must be
corrected to overcome volume differences from
proximity to the speakers or room resonances.
The display will show an arrow which will point to
the direction of the channel which is being offset.
A number will illuminate showing the amount of
offset in decibels.
When the display reads [ <-- --> ] the system
is centered and will send an equal level to each
speaker.
IR Remote Control
5. Phase
The Phase button will invert the polarity (sometimes called phase) of both the left and right
audio signal 180˚. Once pressed, PHASE will
illuminate in the front panel display. Inverting the
phase may be desired if there is a component
in your system which inverts the absolute phase
(polarity) and needs to be corrected. Pressing
this button a second time will return the phase to
the original non-inverting polarity.
Included with the PCA-2 is an IR remote control.
All functions can be accessed by the IR remote
control with the exception of the Setup Menu.
1. Power
The Power button will toggle the PCA-2 from
an active state to standby. While in standby no
sound will pass through the PCA-2. The PCA-2
will consume very little power in standby mode.
6. HT (Home Theater Bypass)
2. Mute
Pressing the HT button will switch to the designated Home Theater Bypass input. The designated input can be specified in the setup mode.
By default it is not assigned to any of the inputs,
and pressing the HT button does not activate
any function.
Pressing the Mute button will silence the output
of the PCA-2. If Mute is activated the number of
the present input will still be displayed but the
display will read MUTE. To exit the mute status,
press mute again or adjust the volume control.
By default the PCA-2 will not produce any signal
when in mute, however the mute volume level
can be specified by the user (see Setup Menu).
In this mode the volume control will be bypassed
and the audio signal will pass through the unit.
The balance controls are also bypassed in this
6
Setup Menu
mode. For more information on setting up a system to use the Home Theater bypass function,
see the section called "Using Home Theater
Bypass".
There are 25 additional parameters that you can
access in the Setup Menu. The Setup Menu is
activated by pressing the Input Up and Input
Down buttons simultaneously while powering on
the PCA-2.
CAUTION: Engaging the HT input without
using a separate HT controller to control the
volume may result in damage to your speakers.
Pressing Input Up/Down will scroll through the
25 setup parameters. The setup parameters are:
7. Inputs
Each input can be selected directly by pressing
the corresponding input button on the remote
control. While input 7 is reserved for the loop
function it can also be used as a regular input.
Input 8 is reserved for use with future expansion
cards and is otherwise inactive.
1.
2.
3.
4.
5.
6.
7.
8.
9.
10.
11.
12.
13.
14.
15.
16.
17.
18.
19.
20.
21.
22.
23.
24.
25.
While the PCA-2 is in standby pressing any input
button or the HT button will power on the unit
and select the chosen input
8. Dim
Pressing the Dim button will cycle through 3
display levels. By default the display is set on
the brightest setting. Pressing the Dim button
once will decrease the light output level slightly.
Pressing the Dim button a second time will place
the unit into display blanking mode. In this mode
the PS logo and the display will not illuminate.
When changing inputs, adjusting the volume
control or making any other adjustments, the
front panel will briefly display the present status
and then return to the blanking mode.
Software version
Input 1 name
Input 1 gain
Input 2 name
Input 2 gain
Input 3 name
Input 3 gain
Input 4 name
Input 4 gain
Input 5 name
Input 5 gain
Input 6 name
Input 6 gain
Input 7 name
Input 7 gain
HT Bypass input
Mute Level
Volume Display Mode
Volume On
Maximum Volume
Headphone operation
Network Address
Network Group
Remote Codes
Reset
[VER.]
[1 NAME]
[1 GAIN]
[2 NAME]
[2 GAIN]
[3 NAME]
[3 GAIN]
[4 NAME]
[4 GAIN]
[5 NAME]
[5 GAIN]
[6 NAME]
[6 GAIN]
[7 NAME]
[7 GAIN]
[HT]
[MUTE]
[V MODE]
[V ON]
[V MAX]
[HEADP]
[N ADDR]
[N GROUP]
[REMOT]
[RESET]
While in the Setup Menu the Input Up and Down
buttons are used to move through the different
parameters. They are also used to move the cursor position while editing the input names.
The Loop button is used to select the parameter
to edit. Pressing the Input Up/Down button will
store any changes made and return to the list of
parameters.
The volume control is used to edit the selected
parameter.
7
To exit the setup menu at any time, press the
power button on the front panel and all changes
will be saved and the PCA-2 will go into standby.
thus eliminating the need to adjust the volume
when selecting different sources.
Press the loop button to enter the gain setting for
the desired input. Use the volume knob to make
an adjustment from -10 to +10 decibels in .5
decibel increments.
The settings in the Setup Menu are non-volatile.
Even if the PCA-2 is disconnected from its power
source, all Setup Menu entries will be stored.
Software Version
This mode will display the current version of the
PCA-2 operation software. Press the Loop key
to display the version number. This mode cannot
be edited.
The default setting is +0.0 decibels.
HT Bypass Input
Before using the Home Theater Bypass mode an
input must be designated to be the HT Bypass
input.
Input [#] Name
The Input name
parameter allows
for the user to
assign a custom
name for each
input. This name
will be displayed
when it is selected
as the active input
There are 5 editable characters for
each input.
Press the loop
button to enter
the input selection screen. Use
the volume knob
to select the
input desired
to function as a
Home Theater
Bypass.
The default setting is 0. When
set to 0 no input is designated as a HT Bypass
input and all inputs will function as normal inputs.
While in the Setup Menu pressing the loop button while the desired input is selected will allow
modification of its name. The cursor will blink
under the 1st character. This indicates the character that is active for editing. Use the volume
control to scroll through the alphanumeric character list (for the complete list of alphanumeric
characters see Appendix B). Once the desired
character is chosen press the Mute button to
move one character to the right or the Loop button to move one character to the left. Pressing
either Input button again will exit the Input [#]
Name editing mode and save the changes to the
input name.
Mute Level
The Mute Level function allows for a different
volume level to be specified when mute is activated.
Press the loop button to enter the Mute Level
selection screen. Use the volume knob to adjust
the desired volume level for the system to be set
at while in mute mode. The readout will display
either a 0 to 100 scale or -90 to +10 dB scale,
depending on what scale is chosen in Volume
Display Mode.
For a complete list of default name settings see
Appendix A.
The default setting is 0. When set to 0 no audio
will be heard while in mute.
Input [#] Gain
Each input also allows for a user adjustable
volume gain. This can be useful for eliminating
volume discrepancies between different sources,
Volume Display Mode
Volume can be displayed in either a standard
scale from 0 to 100 or a decibel reference scale
8
from -90 to +10 dB.
maximum value that the volume will reach. The
readout will display either a 0 to 100 scale or
-90 to +10 dB scale, depending on what scale is
chosen in Volume Display Mode.
Press the loop button to access the selction screen. Rotate the volume knob to select
between STD (standard) or DB (decibel) mode.
The default setting is either 100 (standard mode)
or +10 (decibel mode).
The default setting is STD.
Volume On
The Volume ON setting can be adjusted to set
a threshold for the volume level of the PCA-2
when it is powered on. This is a useful protection
feature to ensure that the PCA-2 is never set to
too high a volume level for immediate playback,
thus preventing damage to the connected speakers or amplifier.
Headphone Operation
The Headphone operation setting allows the
PCA-2 to either automatically mute the main outputs or leave them active while the headphones
are plugged in.
Press the loop button to access the selection screen. Rotate the volume knob to choose
between ON or MUTE. If set to ON the PCA-2
will continue to send audio to the main outputs
if headphones are connected to the front panel
jack. If set to MUTE the PCA-2 will mute the
main outputs while headphones are connected
to the front panel jack.
Press the loop button to access the selection
screen. Rotate the volume knob to select the
Volume On threshold. The readout will display
either a 0 to 100 scale or -90 to +10 dB scale,
depending on what scale is chosen in Volume
Display Mode.
The default setting is MUTE.
A good example of the Volume On threshold
would be the following. Consider the V ON setting to be 60. If the last volume setting was only
30, the PCA-2 will power on at 30 because it
falls below the safe limits. However, if the last
volume used was 80, the PCA-2 will automatically activate the Volume On threshold and power
on at a volume setting of 60, therefore preventing damage to the connected speakers or amplifier.
Network Address
If more than one piece of PS Audio equipment
is used in a system, then each piece connected
to the PS Bus must have a unique Network
Address. In this way, each piece of PS Audio
equipment can easily be recognized and identified in the Network Bus.
Press the loop button to access the selection
screen. There are 8 possible Addresses which
can be selected by rotating the volume knob
while in the Network Address mode.
The default setting is either 100 (standard mode)
or +10 (decibel mode). This indicates that the
PCA-2 will power on with the last volume setting
used and there is no threshold level in effect.
If no Network Address is set then the PCA-2 will
operate independently of any other PS Audio
equipment on the PS Bus.
Maximum Volume
The Maximum Volume setting can be adjusted to
limit the volume level of the PCA-2. This setting
is useful if the PCA-2 is used in an environment
where the volume could accidentally be bumped
or turned to a volume that could potentially damage the connected speakers or amplifier.
Network Group
It is possible to assign the PCA-2 to a unique
Network Group. Separate groups will allow all
PS Audio products to exist on the same bus
and still be able to communicate individually (by
group).
Press the loop button to access the selection
screen. Rotate the volume knob to select the
Press the loop button to access the selection
screen. There are 3 possible groups which can
9
be selected by rotating the volume know while in
the Network Group mode.
Reset
If at any time it is necessary to reset all parameters of the PCA-2 to their default settings, it can
be done by pressing the Loop button twice while
in RESET mode (See also the troubleshooting
guide).
troller. Any 2-channel sources can be selected
directly with the PCA-2 while multi-channel
sources can be selected by the HT controller
while the PCA-2 is set to HT bypass mode.
CAUTION: Engaging the HT input without
using a separate HT controller to control the
volume may result in damage to your speakers.
Using the Loop function
Using the Home Theater Bypass
The PCA-2 is designed to function as a standalone stereo preamp. However it can also integrate seamlessly into any home theater system
and deliver uncompromised performance with
2-channel sources.
When using the Home Theater Bypass Function
the PCA-2 will simply pass the audio signal from
the specified input directly to all outputs. This will
bypass the volume control and any balance settings.
The Home Theater Bypass Function is designed
to work with a separate HT controller and multichannel amplifier, however it will also function
with some HT Receivers equipped with Pre-Outs
and Main Inputs. The process for integrating the
PCA-2 into a theater system is described below.
Connect the front left and front right Pre-outputs
on the home theater controller to the desired
input on the PCA-2. Either XLR or RCA type
connectors can be used. The main output on the
PCA-2 should then be connected to the front left
and front right inputs on the multi-channel amplifier or the receiver Main Inputs. The remaining
channels should connect directly to the amplifier
from the HT controller.
To designate the specific input as the HT Bypass
simply select the input used for the bypass in the
Setup Menu. (See Setup Menu for more information on selecting the HT Bypass input).
All 2-channel sources should be connected to
the inputs on the PCA-2. Any multi-channel
sources should be connected to the HT con-
The Loop function is used for sources with
record monitoring or equalization functions,
such as an external analog recording device or
an external graphic or parametric equalizer. The
loop function differs from a standard input as it
will allow for monitoring of the source as the signal passes through the associated equipment.
To use the Loop function, connect the associated
equipment to Input 7. Then connect the Loop
Out on the back of the PCA-2 to the input or
"monitor in" on the associated equipment.
To use the connected device in loop mode,
select the desired input and then press the loop
button on the remote or front panel. This will
engage the loop operation and the signal will first
pass through the connected equipment before
the signal is sent through the volume control and
output of the PCA-2.
The Loop Input (Input 7) can also function as a
normal audio input while the loop function is not
activated.
Using the 12 Volt Triggers
The PCA-2 is equipped with three 12 Volt output
triggers. Two triggers are for output and one is
an input trigger.
The output triggers can be used to activate
another audio/video product when the PCA-2 is
powered on. Use a 3.5 mm mini jack cable to
connect the device to the PCA-2.
The input trigger will allow other devices to
10
change the power status of the PCA-2 when connected. Use a 3.5 mm mini jack cable to connect
the device to the PCA-2.
Since control is bi-directional, one unit does not act
as the “slave” or “master”. Instead each component
has the capability to control the other.
While the PS Bus and the 12 Volt triggers can be
used simultaneously they should not both be used
with the same piece of equipment.
For more information on how to set the Network
Group and Network Address for the PCA-2 see the
Setup Menu section.
Using the PS Bus
The PS Bus uses standard RJ11 (phone) cable to
allow multiple pieces of PS Audio components to
communicate with each other. The PS Bus offers
more functionality than a standard 12 Volt trigger.
The PS Bus can control other modes such as the
display dim and power status to each amplifier
channel.
For more information on how to set up the Network
Group and Network Address for other PS Audio
products please refer to the instruction manual supplied with the product.
Note: The phone cable must have at least four
wires attached to the connector (a 2-line phone
cable) to function properly.
To allow control between 2 or more PS audio products set the Network Group to the same number
for both products. Next set the Network Address to
unique numbers so each product will have a
discrete Network Address.
*HCA-2 not included.
11
Trouble Shooting Guide
The PCA-2 was designed to provide many years
or reliable, trouble-free operation. In the event the
PCA-2 is not working correctly, please refer to the
following suggestions:
Unit will not turn on
1. Check the obvious. Is it plugged in and is the
AC wall outlet live? You can easily test this by
every time you press the “Mute” button.
Exit the setup mode by pressing the power button.
Exit the setup mode by pressing the power button.
The PCA-2 does not return to the last volume
setting
The PCA-2 was designed to remember the volume
setting from the last time it was used and ensure
that this volume setting is safe for immediate playback. This information will be stored in memory
even if the PCA-2 is powered down into standby.
One input plays too loud or too quiet
The PCA-2 allows the user to adjust the gain of
each individual input. Follow these steps to check
this setting and make any necessary adjustments.
Turn the PCA-2 off. Press and hold both “Input”
buttons and turn the PCA-2 back on. You are now
in the Setup Menu.
Scroll using the “Input Up/Down” buttons until you
reach the appropriate input number and the word
“GAIN” displayed after it, for example “3 GAIN.”
Press the “Loop” button to enter this setting. Using
the volume knob, adjust the gain setting to the
desired level.
Exit the setup mode by pressing the power button.
One channel (left or right) plays too loud or too
quiet
The balance control for the PCA-2 can be found
on the remote control. Use these buttons to adjust
the left and right channel levels to achieve the
appropriate amount of balance.
When the display reads [ <-- --> ] the system is
centered and will send an equal level to each
speaker.
The volume is displaying negative numbers
The PCA-2 is set to display the volume level in
decibels, from -90 dB to +10 dB. This mode displays the actual amount of attenuation. The PCA-2
also allows the user to display the volume in a less
technical format, from 0 to 100. Follow these steps
to check this setting and make any necessary
adjustments.
Turn the PCA-2 off. Press and hold both “Input”
buttons and turn the PCA-2 back on. You are now
in the Setup Menu.
Scroll using the “Input Up/Down” buttons until you
reach “V MODE.” Press the “Loop” button to enter
this setting. Using the volume knob, adjust the volume display mode to either “DB” or “STD.”
“DB” indicates that the volume will be displayed in
decibels (-90 dB to +10 dB). “STD” indicates that
the volume will be displayed in the standard format, from 0 to 100.
However, if the last volume setting was left above
the Volume On threshold, the PCA-2 will activate this protection system during the power up
sequence.
To determine this threshold, the PCA-2 will refer
to the setting called Volume On, or “V ON.” Follow
these steps to check this setting and make any
necessary adjustments.
Turn the PCA-2 off. Press and hold both “Input”
buttons and turn the PCA-2 back on. You are now
in the Setup Menu.
Scroll using the “Input Up/Down” buttons until you
reach “V ON.” Press the “Loop” button to enter this
setting and a number will be displayed. This level
represents the Volume On threshold of the PCA-2
after being powered on from standby. Using the
volume knob, adjust the initial volume setting to
the desired level.
A low setting will ensure that the PCA-2 never
powers up at a dangerous volume level.
Exit the setup mode by pressing the power button.
The volume knob/buttons do not respond and
the music plays too loud on ONE input
The PCA-2 allows the user to assign any of the
seven inputs to become the Home Theater Bypass
(HT bypass). This feature must be used in conjunction with a surround sound processor to control the volume. Follow these steps to check this
setting and make any necessary adjustments.
Turn the PCA-2 off. Press and hold both “Input”
buttons and turn the PCA-2 back on. You are now
in the Setup Menu.
Scroll using the “Input Up/Down” buttons until you
reach “HT.” Press the “Loop” button to enter this
setting. Using the volume knob, assign the HT
bypass to any one of the inputs 1-7. To turn the
HT bypass off, set it to 0.
Exit the setup mode by pressing the power button.
13
CAUTION: Engaging the HT input without
using a separate HT controller to control the
volume may result in damage to your speakers.
With the unit powered down, hold down both
Input buttons (Up and Down) and press the
power button. This will activate the Setup Mode.
Using the Input Up or Down buttons, cycle to the
“RESET” mode. Press the loop button and the
display will read “GO ->” to confirm your choice.
Press Loop button again to perform the reset
function. Once it is complete, the PCA-2 will exit
the Setup Mode automatically.
The “HT” button on the remote does not work
The HT bypass is set to 0, meaning the HT
bypass feature has been turned off.
Refer to page 8 for instructions to properly assign
the HT bypass input (or see the instructions listed
in the Trouble Shooting Guide under “The volume
does not respond and the music plays too loud
on ONE input”).
The PCA-2 does not respond to any commands from the supplied IR remote control
1. Check the batteries. Insert fresh, new batteries
in the remote control and try operating the PCA-2
again.
2. The Setup Menu in the PCA-2 offers the ability to adjust the remote code that the preamp
will operate with. This is not a function the
user should need to change. It exists only for
advanced troubleshooting of remote control interferences.
For normal operation, the remote code should
always be left on 4. Follow these steps to check
this setting and make any necessary adjustments.
Turn the PCA-2 off. Press and hold both “Input”
buttons and turn the PCA-2 back on. You are now
in the Setup Menu.
Scroll using the “Input Up/Down” buttons until you
reach “REMOT.” Press the “Loop” button to enter
this setting and a number will be displayed. Using
the volume knob, change the remote code to
make sure it reads 4.
Exit the setup mode by pressing the power button
How do I reset the settings to factory default?
The PCA-2 was designed to easily reset the
microprocessor back to the original factory
default. If the PCA-2 is displaying any characters
in the front panel that seem abnormal, if the front
panel buttons do not correlate with the display
read-outs or to simply reset all settings back to
the factory defaults follow these instructions.
14
Appendix
A. Default Input Names
1. XLR
2. CD
3. VIDEO
4. PHONO
5. TUNER
6. TAPE
7. LOOP
B. Character selection list
[space] 0 1 2 3 4 5 6 7 8 9 10 % * # . ! .0 .5 A B C
DEFGHIJKLMNOPQRSTUVWXYZ
<- - -> +
Warranty inside the U.S. and Canada
PS Audio’s warranty is 3 years parts and labor, from
the date of original purchase, and is fully transferable. This means that we warranty the product
itself regardless of ownership, new or used. For the
official warranty statement please refer to the warranty card included with this user’s manual.
Warranty outside the U.S. and Canada
PS Audio has authorized distribution in many
countries of the world. In each country, the authorized importing retailer or distributor has accepted
the responsibility for warranty of products sold by
that retailer or distributor. Warranty service should
normally be obtained from the importing retailer or
distributor from whom you purchased your product.
In the unlikely event of service required beyond the
capability of the importer, PS Audio will fulfill the
conditions of the warranty. Such product must be
returned at the owner’s expense to the PS Audio
factory. Contact your PS Audio distributor or the PS
Audio customer service department for more information.
Service issues
Should your unit ever require service or if you have
any technical questions about the PCA-2, you must
either contact your dealer (PS Audio if purchased
direct) or your PS Audio distributor. No equipment
will be received at our service facilities without an
attached RA number.
If purchased through an authorized PS Audio dealer
or distributor, the RA number must be obtained by
the dealer or distributor. If the product was purchased from PS Audio direct, this can easily be
obtained by calling PS Audio at 720-406-8946 or by
contacting us via E-mail at [email protected].
15
PS Audio International, Inc.
4824 Sterling Dr.
Boulder, CO 80301 USA
Toll Free: 877-772-8340
Ph: 720-406-8946
Fax: 720-406-8967
www.psaudio.com
16