1
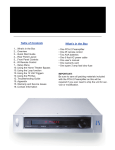
Table of Contents
2.
2.
2.
3.
6.
6.
6.
7.
7.
8.
Warning
Safety Instructions
Overview
Installation Guide
Multichannel Connections
Multichannel Operation
Level Balance Settings
Troubleshooting Guide
Warranty and Service
Contact Information
What’s in the Box
• One Multichannel Card
• One Multichannel back plate
• Two #4 x 3/8” sheet metal screw
• Five #4 x 3/16” machine screw
• One 3.5” 2-connector ribbon cable
• One 4.5” 3-connector ribbon cable
• One 13” 2-connector ribbon cable
• One user’s manual
• One warranty card
IMPORTANT: Be sure to save all packing materials included with your Multichannel Card
as they will be required if it is necessary to
ship the unit for service or modification.
PS Audio International, Inc.
4826 Sterling Dr.
Boulder, CO 80301 USA
Toll Free: 877-772-8340
Ph: 720-406-8946
Fax: 720-406-8967
www.psaudio.com
Warning
Overview
Troubleshooting Guide
Warranty and Service
To prevent fire or shock hazard, do not
expose the Multichannel Card to rain or
moisture. To avoid electrical shock, do not
open the enclosure. Refer servicing to qualified personnel only.
The Multichannel Card is an upgrade device for
the PS Audio PCA-2 Preamplifier. It provides an
additional 4 RCA inputs and 4 RCA outputs. It
will allow the PCA-2 to control the volume from
any analog 5.1 channel source. The source
must provide the decoding and processing of
the multichannel signal.
In the event you experience difficulties with the
operation of your Multichannel Card, we offer
the following suggestions:
Inside the U.S. and Canada
PS Audio’s warranty is 3 years parts and
labor, from the date of original purchase. The
warranty follows the product itself regardless of
ownership, new or used.
The Multichannel Card also provides individual
level trim for each channel.
2. Check the fuse on the PCA-2. Check to make
sure the fuse is not blown. If it is blown, replace
the fuse with a 3 amp fast blow fuse
To prevent electric shock, use only a 3
prong, grounded type power cable.
Any change or modifications not expressly
approved in the manual could void your warranty.
Unit will not turn on.
1. Check the obvious. Is it plugged in, and is the
AC wall outlet live?
Outside the U.S. and Canada
PS Audio has authorized distribution in many
countries of the world. In each country, the
authorized importing retailer or distributor has
accepted the responsibility for warranty of
products sold by that retailer or distributor.
Warranty service should normally be obtained
from the importing retailer or distributor from
whom you purchased the product. In the
unlikely event of service required beyond the
capability of the importer, PS Audio will fulfill the
conditions of the warranty. Such product must
be returned at the owner’s expense to the PS
Audio factory. Contact your PS Audio distributor
or the PS Audio customer service department
for more information.
Tools you will need for the installation include:
• A clean work space
Safety Instructions
The display will not illuminate
Verify the connection of the ribbon cables which
connect to the front panel display.
• A #2 Screwdriver
Read the operating instructions provided with
the Multichannel Card.
• A #1 Screwdriver
Retain the operating instructions for later use
and reference.
By installing the Multichannel Card the Home
Theater Bypass feature is disabled.
Unplug the PCA-2 from the wall outlet before
changing the fuse or performing any cleaning
or service.
Service issues
Should your unit ever require service or if
you have any technical questions about the
Multichannel Card, you must either contact your
dealer (PS Audio if purchased direct) or your PS
Audio distributor. No equipment will be received
at our service facilities without an attached RA
number.
Do not operate the PCA-2 near water. Avoid
placement near a water reservoir or excessive
moisture.
When replacement parts are required, ensure
they are specified by the manufacturer to have
the same characteristics as the original part.
Unauthorized substitutions may result in fire,
electric shock, or other hazards.
If the product was purchased through an
authorized PS Audio dealer or distributor, the
RA number must be obtained by the dealer
or distributor. If the product was purchased
from PS Audio direct, the RA number can
be easily obtained by contacting PS Audio
by phone at 720-406-8946 or by e-mail at
<[email protected]>
Do not operate with faulty or frayed power
cables.
2
7
Multichannel Connections
Level Balance Settings
Installation Guide
5.1 Channel operation
Connect the 5.1 channel output of the source
(DVD-A/SACD/DVD) to the inputs on the PCA2. Connect the front channels to the standard
(inputs 1-7) RCA or XLR jacks on the PCA-2.
Connect the surround, center and sub channels
to the RCA jacks from the multichannel card.
The balance between each of the multichannel
inputs can be set in the Setup Menu Mode.The
default setting for all channels is ±0.0 dB. The
trim settings are adjustable in 0.5 dB increments
to ± 10.0 dB for each channel.
1. Unplug the PCA-2
The first step in converting your PCA-2 to a
multichannel device is to ensure everything is
unplugged from the back of the PCA-2.
After installing the Multichannel Card there
will be 4 new menu items in the Setup Menu
Mode:
Connect the outputs of the PCA-2 to the amplifier. The front channels will output through the
standard PCA-2 output RCA or XLR jacks. The
surround, center and sub channels will output
from the multichannel card.
S
S
S
S
Alternative multichannel operation
The Multichannel Card will also allow for operation of a 4.1 or 5.0 system. The setup of the system must be done in the source and the PCA-2
will simply pass the channels and control the
volume of the channels as they are input.
LEFT
RIGHT
CNTR
SUB
Adjusts
Adjusts
Adjusts
Adjusts
the
the
the
the
Left Surround trim
Right Surround trim
Center channel trim
Subwoofer trim
To adjust the trim on any of the channels follow
these steps:
• With the PCA-2 in standby mode hold the Up
and Down Input keys while pressing the power
button on the front panel. This will enable the
Setup Menu Mode.
Multichannel Operation
• Press the Up Input key until [S LEFT] (or
whichever channel to be edited is displayed).
• Press the [LOOP] key.
Once all the proper connections are made
the PCA-2 must be configured to switch the
additional multichannel inputs with a standard
2-channel input.
Unplug the PCA-2 from the wall, power distribution device or Analog HCPS external power
supply. Remove any RCA and XLR interconnects and any additional cables such as PS
bus cables.
2. Remove Top Cover Screws
Before starting this step, it’s it is very important
to ensure the PCA-2 is not connected to anything!
Once the PCA-2 is fully unplugged, the top
cover should be removed. Use the #2 Phillips
head screwdriver to remove all 12 top cover
screws. The top cover should easily lift off once
all screws are removed. Set it aside for now.
• Turn the volume knob to the desired correction factor.
Follow these steps to assign the corresponding
2-channel input to the multichannel input:
• Press the Input Up or Down arrow to save the
changes and move to the next channel.
• With the PCA-2 in standby mode hold the Up
and Down Input keys while pressing the power
button on the front panel. This will enable the
Setup Menu Mode.
• Once all channels have been set press the
Power button. This will save the changes and
return the PCA-2 to standby.
• Press the Up Input key until [HT] is displayed.
3. Remove the Expansion Slot blank cover
Use the #1 screwdriver remove the 4 screws
which attach the blank cover to the rear panel.
Set the panel and screws aside. Keep them in
a safe location in case you desire to return the
PCA-2 to its original condition.
• Press the [LOOP] key.
• Rotate the volume knob until the desired 2channel input is displayed.
4. Install the new Multichannel cover
Using the four supplied #4 x 3/16” black machine
screws, attach the new multichannel cover.
Ensure that the text is oriented right-side up.
Also make sure that the included screws are
used and not the original screws used for the
blank panel.
• Press the Power button. This will save the
changes and return the PCA-2 to standby.
• Select the assigned multichannel input.
The PCA-2 should deliver audio through all 6
channels.
By installing the Multichannel Card the Home
Theater Bypass feature is disabled.
6
3
5. Remove the ribbon cables
Remove the 2 ribbon cables which connect
the input and output boards. The cables are
highlighted in the photo. Pull directly up on the
ribbon header when removing. Do not pull from
the ribbon cable itself, only the ribbon header.
10. Insert back panel set screws
Using the supplied two #4 x 3/8” sheet metal
screws tighten the multichannel card to the back
plate. The RCA connectors will pull further through
the back plate holes when tightening the screws.
6. Locate the 13” 2-connector ribbon cable
Ensure that the cable is folded as shown in
the picture to the right. It may require some
straightening and refolding after shipping and
unpacking.
7. Connect the ribbon cable to the card
Connect the ribbon cable header to the connector
on the bottom right side of the Multichannel card.
The cable is “keyed” to the connector so it will
only fit in one orientation.
The cable should orient itself as shown in the
photo to the right.
8. Insert the card into the PCA-2
Orient the card so the ribbon cable sits at the
bottom of the chassis. Insert the connector end
of the multichannel card into the PCA-2 first.
Align the RCA plugs through the holes in the new
multichannel back plate. The bottom of the card
should rest on the bottom of the chassis.
Ensure that the contact paper on the back of the
multichannel card does not fold when inserting
the card.
9. Attach the loose end of the ribbon cable
The other end of the ribbon cable should be run
under all other cables in the chassis. Connect the
cable to the open connector on the front panel
display board as show in the picture to the right.
4
11. Insert bottom stabilizer screw
Insert the #4 x 3/16” machine screw through the
slot in the bottom of the PCA-2. The stabilizer
screw should thread through the bottom L-bracket
on the multichannel card. Tighten the screw until
the L-bracket is flush with the bottom panel of the
PCA-2.
12. Attach bridge cables to the card
Using the supplied 3.5” 2-connector ribbon cable
connect the cable header to the connectors on
the input and output boards. The connectors are
keyed and will only connect in one orientation.
Using the 4.5” 3-connector ribbon cable, connect
the cable header to the connectors on the input
and output boards and the multichannel card.
The connectors are keyed and will only connect
in one direction.
13. Replace the top cover
Replace the top cover and use the #2 screwdriver
to replace all 12 top cover screws.
14. Test!
Plug the PCA-2 into a power source or wall outlet and ensure normal operation (the standard
countdown sequence should commence and then
default to Input 1). If the PCA-2 does not operate normally then verify all connections in the
steps above. If the PCA-2 continues to behave
abnormally contact your nearest PS Audio service
center.
5