1
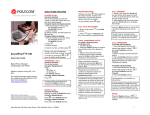
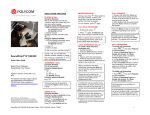
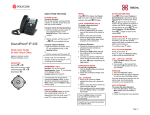
Polycom SoundPoint® IP 601 User Guide For training/documentation, please visit us @ http://customertraining.verizonbusiness.com or call 1-800-622-1049 © 2006, 2007, 2008 Verizon. All Rights Reserved. The Verizon and Verizon Business names and logos and all other names, logos, and slogans identifying Verizon’s products and services are trademarks and service marks or registered trademarks and service marks of Verizon Trademark Services LLC or its affiliates in the United States and/or other countries. All other trademarks and service marks are the property of their respective owners. Version 1.08 1 Table of Contents Table of Contents 2 Introduction 4 Installation 4 Connect the Network and Power Source Connect the Handset and Optional Headset Attach the Base 4 5 5 Features 6 Key Descriptions 7 Configure Basic Settings 8 Appearance of Date/Time Display Contrast Headset Memory Mode Ring Type Directory Search 8 8 8 9 9 Call Lists 9 Contacts 10 Add/Edit a Contact Search Speed Dial Remove a Speed Dial Entry Place a Call Use the Handset Use the Hands-Free Speakerphone Use the Headset 11 12 12 12 Answer a Call 12 Call Hold 13 Call Hold and Resume Multiple Calls on Hold 2 10 10 10 11 13 13 Mute 13 Volume 14 Call Transfer 14 Call Forward 14 Disable Call Forwarding End a Call 14 Shared Call Appearance 15 Multiple Lines Multiple Keys per Line Multiple Call Appearance Shared Lines Voice Mail Listen to Messages 3 14 15 15 16 17 17 17 Introduction The Polycom SoundPoint IP 601 is a full‐duplex, hands‐free Session Initiation Protocol (SIP) phone. It provides telephony features such as Shared Call Appearance, Call Hold, Call Transfer, and Do Not Disturb. Installation The following instructions provide basic installation instructions. Contact your system administrator for additional information or assistance. Connect the Network and Power Source Use Power over Ethernet (PoE) for network and power source connections unless otherwise directed by your system administrator. NOTE: The AC power adapter is a separate, optional accessory. Your system administrator will provide one to you if necessary. AC Power Option Connect the supplied network cable between the LAN jack on the phone and the LAN port on the wall or hub/switch device port. Connect the DC plug on the AC wall adapter to the DC jack marked on the phone. In-Line Power Option Plug the supplied network cable between the LAN jack on the phone and an available Power and Data port on the In‐Line Power switch if the phone is connected to a compatible Ethernet switch. 4 Connect the Handset and Optional Headset 1. Connect the short straight end of the phone cord to the handset, and the corresponding longer straight end of the cord to the handset jack on the back of the phone. 2. Connect the headset (optional) to the headset jack on the side of the phone. Attach the Base 1. Place all cords in the recessed area above the modular jacks in the first example above. 2. Align the two protrusions on the on the bracket with their corresponding holes in the phone and snap them together to lock the base to the phone. 5 Features The features of the SoundPoint IP 601 are shown below: 6 Key Descriptions 7 Configure Basic Settings You can customize your SoundPoint IP 601 phone by adjusting the settings for time and date, display contrast, ring type, etc. You can also add contacts to the phone’s directory manually or from call lists. You can configure basic settings by pressing the Menu button and then selecting Settings > Basic. Appearance of Date/Time You can configure how the date/time appears on the display. The display flashes if the phone cannot obtain a time and date from a configured SNTP server. Contact your system administrator if the date/time is incorrect. Go to http://customertraining.verizonbusiness.com for information on Daylight Savings Time programming. 1. Press the Menu button. 2. Select Settings > Basic > Preferences > Time & Date. 3. Select Clock Date, Clock Time, Clock Order, or Enable/Disable. 4. Scroll through the options under each of these selections using the arrow keys. 5. Press Select to confirm your choice. 6. Press Menu to the idle display. Display Contrast 1. Press the Menu button. 2. Select Settings > Basic > Contrast. 3. Press the Up or Down soft keys to increase or decrease the display contrast. 4. Press the Ok or Cancel soft keys to accept or reject changes. 5. Press Menu or the Exit soft key to the idle display. Headset Memory Mode This feature is useful for permanent or full‐time headset users. 1. Press the Menu button. 2. Select Settings > Basic > Preferences > Headset Memory. 3. Use the up or down arrows and Select soft key to enable Headset Memory Mode. 4. Press Menu to return to the main menu. 8 Ring Type You can select from different ring types to distinguish between lines or to have a different ring from a co‐worker close by. 1. Press the Menu button. 2. Select Settings > Basic > Ring Type. 3. Select the line you want to change using the up or down arrow keys if multiple lines are configured on your phone, if applicable. 4. Use the up or down arrow keys to select the ring type you want. 5. Press the Play soft key to hear the ring type, if applicable. 6. Press the Select soft key. 7. Press Menu or the Exit soft key to the idle display. Directory Search You can configure how the search of the Contact Directory is performed. You can search by first name or last name. 1. Press the Directories button. 2. Select Contact Directory. 3. Select More. 4. Select Search. 5. Use the dial pad for to enter the first few characters for First or Last names. 6. Press Search. Successful matches can be dialed from the results screen. NOTE: The reconfiguration could take a few minutes depending on the size of your contact directory. Call Lists Local lists of incoming (missed and received) calls and outgoing (also known as placed) calls are maintained by the phone (up to 100 for each list). Press the Directories button. Press the Call Lists soft key. o Press the Missed Calls soft key to view missed calls. o Press the Received Calls soft key to view received calls. o Press the Placed Calls soft key to view outgoing calls. Press the Edit soft key to change the dial string before dialing. 9 Press the Dial soft key to call a number from one of the call lists. Press the Exit soft key return to the previous menu. To quickly view respective call lists from the idle display: Press the right arrow for Placed Calls Press the left arrow for Received Calls Press the down arrow for Missed Calls For additional options, press the More soft key followed by: Info to view information about the call. Save to store the contact to the Contact Directory. Clear to delete the call from the list. More and Exit to return to the idle display. Contacts In addition to your missed, placed, and received calls directory, the phone can store a local directory of 500 or more contacts. You can add, delete, edit, dial, or search for any contact in this list. Add/Edit a Contact 1. Press the Directories button. 2. Select Contact Directory. 3. Press the 1/A/a soft key to select between numeric and upper/lower case alphanumeric modes. 4. Enter the first and/or last name using the keypad. 5. Enter the contact number. This is a required field and it must be unique. Search From the Contact Directory: 1. Press the More soft key. 2. Press the Search soft key. 3. Use the dial pad to enter the first few characters for First or Last names. 4. Press the Search soft key. Successful matches can be dialed from the results. Speed Dial Pre‐assigned numbers can be associated with line keys for rapid automated dialing. Speed dial entries are consecutively placed next to assigned line keys on the phone. Example: To assign Jane to a speed dial entry: 10 1. Press the Directories button. 2. Select Contact Directory. 3. Press the Add soft key to enter Jane’s contact details. ‐OR‐ Select Jane’s existing entry and press Edit. 4. Use the dial pad to enter and assign Jane a speed dial index number. Jane is assigned to the fist available line key on the display. 5. Press the Save soft key to confirm, or the Cancel soft key to cancel. 6. Press the Exit soft key to return to the idle display. The idle display will look like this: Press the line key labeled Jane to dial her number. Remove a Speed Dial Entry 1. 2. 3. 4. Press the Directories button. Select Contact Directory. Scroll the speed dial entry you want to remove. Press the Edit soft key. key to remove the speed dial 5. Press the key, then the index number. 6. Press the Save soft key. 7. Press the Exit soft key to return to the idle display. To quickly view a complete list of assigned speed dial entries, press the up arrow. Dial directly from a selected number. Place a Call You can alternate between the handset, headset, or hands‐free by pressing the 11 or buttons, or picking up the handset. Use the Handset 1. Pick up the handset to obtain a dial tone. 2. Dial the number. ‐OR‐ Dial the SIP URL/IP address (e.g., 10.3.0.42, [email protected], sip: [email protected]). Press Name after obtaining the dial tone. Enter the URL or IP (press * for “.” And # for “@”). Press the Send soft key to complete the call. Use the Hands-Free Speakerphone 1. Press any assigned line key, the button, or the NewCall softkey to obtain a dial tone with the handset on‐hook. 2. Dial the number. ‐OR‐ Dial by SIP URL/IP address. Use the Headset 1. Press any assigned line key, the button, or the NewCall soft key to get a dial tone with the headset connected. 2. Dial the number. ‐OR‐ Dial the SIP URL/IP address. NOTE: You can dial directly from the dial pad without getting a dial tone first. Enter the number, left the handset, press the Dial soft key, or press the or buttons. Answer a Call After answering a call, it appears on the display showing the duration and destination. NOTE: Incoming calls can be ignored by pressing the Reject soft key or the Do Not Disturb button. Do Not Disturb remains active when the call is dropped. You must toggle it off to disable it. 12 Pick up the handset. ‐OR‐ Press the button to answer with the speakerphone. ‐OR‐ Press the line key with the active indicator (with the handset on the hook). ‐OR‐ Press the Answer soft key (with the handset on the hook). ‐OR‐ Press the headset. button to answer through your connected NOTE: Incoming calls can be ignored by pressing the Reject soft key or the Do Not Disturb button. Do Not Disturb remains active when the call is dropped. You must toggle it off to disable it. Call Hold Call Hold and Resume 1. Press the button or the Hold soft key. The call is places on hold and is indicated on the display. 2. Press the Resume soft key or the line button to retrieve the call. NOTE: Calls on hold may generate music, so be careful if you are on a conference call. Multiple Calls on Hold You can use the arrow keys to switch between calls, then press the Resume soft key to retrieve a call when multiple calls are on hold on a single line. An indicator appears on the display if more than two calls are on hold on a single key. For example, “2/3” shows that this is the second call out of three calls. The details of calls on any line key can viewed by pressing that line key and holding it down for a few seconds if calls are on hold on more than one line. If a line key is pressed briefly, the first call on hold on that line is retrieved. Mute During a call, press . The Message Waiting Indicator (MWI) turns red and a microphone on the graphic display indicates that the other party (or parties) cannot hear you. Microphone Mute applies to all modes: handset, headset, and hands‐ free speakerphone. You can still hear all other parties while mute is enabled. 13 To turn off microphone mute, press Volume again. Press to adjust the receiver volume during a call. Pressing these keys in the idle state adjusts the ringer volume. NOTE: To conform to regulatory requirements, handset and headset volume returns to a preset level after each call. Call Transfer 1. Press the Transfer button during a call. The active call is placed on hold. ‐OR‐ Press the Trnsfer soft key during a call. The active call is placed on hold. 2. Press the Blind soft key if you want to perform a blind transfer (without informing the party to whom you are transferring). 3. Dial the number to which you want to transfer the call, or use the arrow keys to access speed dial numbers, missed, placed, or received call lists. 4. Press the Dial soft key. 5. Press the Transfer button or the Trnsfer soft key again. Call Forward You can forward calls to another extension in your location. 1. Press the Forward soft key from the phone’s idle display (select which line to forward of multiple lines are in use). 2. Enter the number or URL to which you want to forward the call. 3. Press the Enable soft key. Disable Call Forwarding 1. Press the Forward soft key from the phone’s idle display (select which line to forward of multiple lines are in use). 2. Press the Disable soft key. End a Call To end a call, perform one of the following steps: 14 Press the EndCall soft key. ‐OR‐ Replace the handset. ‐OR‐ Press if in hands‐free/speakerphone mode. ‐OR‐ Press if in headset mode. Shared Call Appearance Multiple Lines Up to six lines can be configured for private or shared use. Typically, the top‐most line key is reserved for the principle directory number of the phone. Depending on how your phone is configured, the display would resemble one of the examples below: Multiple Keys per Line Each line on the phone can be configured to have more than one line key associated with it. In this case, the display would look like the example below. 15 Multiple Call Appearance Each line on the phone can be configured to have one or more call appearances. More than one call appearance is useful if there is an active call and an incoming call rings on the same line. In the first example on the right, extension 9301 is in an outbound call with 9304. The second example shows an incoming call from John Brown. To answer the call, put the original button to call on hold or press the access the new call. Softkey labels are updated on the display with the following options: Answer the incoming call – places the original call on hold and refreshes the softkey labels as shown in the third example. If more than two call appearances are in use, two appear on the display and the total number is indicated by a counter at the bottom right corner of the display. For example, “2/3” indicates that the highlighted call is the second one out of a total of three. Reject the incoming call Forward the incoming call to another extension In the example, another outbound call can be placed on the same first line. 1. Press the Hold softkey during the first call. 2. Press the NewCall softkey to obtain a dial tone and a new call appearance for a second call. 16 Shared Lines A shared line is indicated by a different line icon. In the following example, the first line is private and the second line is shared. An incoming call to that number causes both phones to ring if two phones share a line. The call can be answered on either phone, but not both. If a shared line is in use on one of the phones, it cannot be used on the other one. The shared line icon changes to a moving icon, and the line LED turns red when it is in use remotely. Calls on shared lines can be transferred, put on hold, or added to a conference. Voice Mail Received messages are indicated by a flashing Message Waiting Indicator (MWI) on the front of the phone. Individual line indicators reflect voice or text messages left on that line (useful if multiple lines are in use). A stutter dial tone in place of a normal dial tone also indicates that one or more voice messages are in your message center. Listen to Messages 1. Press the Messages button. 2. Press the Message Center soft key. 3. Select the line you want to retrieve messages from if multiple lines are in use. The display indicates the number of messages and their importance. 4. Press the Connect soft key to retrieve messages. ‐OR‐ Press the Clear soft key to turn off the flashing MWI without listening to messages. 5. Follow the voice prompts to listen to messages. 17