1
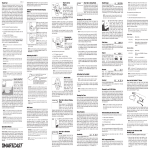
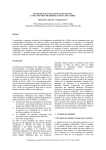
ReadiManager® SE200
Getting Started Guide
ReadiManager SE200 Getting Started Guide
Trademark Information
Polycom®, the Triangles logo, ReadiManager®, SoundPoint®, SoundStation®, ViaVideo®,
VoiceStation®, and Vortex are registered trademarks of Polycom, Inc. ConveneT , Global
Management SystemTM, iPowerTM, MGCTM, People+ContentTM, People On ContentTM, Polycom
Conference SuiteTM, Polycom HD VoiceTM, Polycom PathNavigatorTM, Polycom VideoPlusTM,
Polycom VoicePlusTM, PVXTM, RASTM, ReadiConveneTM, RMX 2000TM, RSSTM, V2iUTM, VS4000TM,
VSXTM, and VTXTM are trademarks of Polycom, Inc.
Other product and corporate names may be trademarks of other companies and are only used as
a fair use reference without intent to infringe.
Patent Information
The accompanying product is protected by one or more U.S. and foreign patents and/or pending
patent applications held by Polycom, Inc.
DOC2131E (12/2007)
3.0
© 2007 Polycom, Inc. All rights reserved.
Polycom Inc.
1765 West 121st Avenue
Westminster, CO 80234-2301 U.S.A.
No part of this document may be reproduced or transmitted in any form or by any means,
electronic or mechanical, for any purpose, without the express written permission of Polycom,
Inc. Under the law, reproducing includes translating into another language or format.
As between the parties, Polycom, Inc. retains title to, and ownership of, all proprietary rights with
respect to the software contained within its products. The software is protected by United States
copyright laws and international treaty provision. Therefore, you must treat the software like any
other copyrighted material (e.g. a book or sound recording).
Every effort has been made to ensure that the information in this manual is accurate. Polycom,
Inc. is not responsible for printing or clerical errors. Information in this document is subject to
change without notice.
ii
Polycom, Inc.
Contents
About This Guide . . . . . . . . . . . . . . . . . . . . . . . . . . . . v
Documentation Resources . . . . . . . . . . . . . . . . . . . . . . . . . . . . . . . . . . . –v
1
ReadiManager® System Setup
Collect Necessary Materials . . . . . . . . . . . . . . . . . . . . . . . . . . . . . . . . . 1–1
Complete the First-Time Setup Worksheet . . . . . . . . . . . . . . . . . . . . . 1–2
Ensure System Safety . . . . . . . . . . . . . . . . . . . . . . . . . . . . . . . . . . . . . . . 1–3
Electrical Safety Precautions . . . . . . . . . . . . . . . . . . . . . . . . . . . . . . 1–4
Rack-Mount Safety Precautions . . . . . . . . . . . . . . . . . . . . . . . . . . . 1–4
Unpack and Install the Hardware Components . . . . . . . . . . . . . . . . 1–5
Identify Appliance Connections and Controls . . . . . . . . . . . . . . . . . . 1–5
Connect to the ReadiManager SE200 Appliance . . . . . . . . . . . . . . . . 1–7
2
ReadiManager® Software Setup
Log into the ReadiManager System . . . . . . . . . . . . . . . . . . . . . . . . . . . 2–1
Run the First-time Setup Wizard . . . . . . . . . . . . . . . . . . . . . . . . . . . . . 2–2
Complete the Setup . . . . . . . . . . . . . . . . . . . . . . . . . . . . . . . . . . . . . . . . 2–5
3
ReadiManager® System Specifications
Electrical . . . . . . . . . . . . . . . . . . . . . . . . . . . . . . . . . . . . . . . . . . . . . . . . . . 3–1
Physical . . . . . . . . . . . . . . . . . . . . . . . . . . . . . . . . . . . . . . . . . . . . . . . . . . 3–1
Environmental . . . . . . . . . . . . . . . . . . . . . . . . . . . . . . . . . . . . . . . . . . . . . 3–2
Regulatory Compliance . . . . . . . . . . . . . . . . . . . . . . . . . . . . . . . . . . . . . 3–2
Electromagnetic Emissions . . . . . . . . . . . . . . . . . . . . . . . . . . . . . . . 3–2
Polycom, Inc.
iii
ReadiManager SE200 Getting Started Guide
Electromagnetic Immunity . . . . . . . . . . . . . . . . . . . . . . . . . . . . . . . 3–2
Safety . . . . . . . . . . . . . . . . . . . . . . . . . . . . . . . . . . . . . . . . . . . . . . . . . 3–2
iv
Polycom, Inc.
About This Guide
This guide provides the first-time setup information you need to install a
ReadiManager® scheduling and management system. Once you
Documentation Resources
In addition to this guide, the available documentation that describes the
ReadiManager system includes:
• ReadiManager Operations Guide
• ReadiManager Web Scheduling Guide
• ReadiManager Scheduling Guide for Microsoft® Outlook®
• ReadiManager Scheduling Guide for IBM® Lotus® Notes®
The ReadiManager system also has online help available through the user
interface.
Translated versions of this ReadiManager Getting Started Guide are available
through the main Polycom website at www.polycom.com. Check the
website to determine if the guide is available in your native language.
Polycom, Inc.
v
ReadiManager SE200 Getting Started Guide
vi
Polycom, Inc.
1
ReadiManager® System Setup
This chapter describes the steps to set up a ReadiManager® SE200 network
appliance and connect it to the network.
Note
If you are installing a redundant ReadiManager system configuration, perform all of
the procedures in this chapter on both ReadiManager SE200 appliances.
Collect Necessary Materials
Before you install a ReadiManager SE200 appliance, collect these materials:
• ReadiManager SE200 shipment
• Completed Site Survey and First-Time Setup Worksheet
• Computer with a serial or ethernet port
To connect to the ReadiManager SE200 appliance through an ethernet port,
make sure you also have:
• A crossover cable OR
• A hub or a switch and two ethernet cables
Polycom, Inc.
1-1
ReadiManager SE200 Getting Started Guide
Complete the First-Time Setup Worksheet
Before you start system setup, fill out the My System Values column of this
worksheet.
Note
In redundant configurations, complete a First Time Setup Worksheet for each
ReadiManager SE200 appliance.
Table 1-1
Item
First-Time Setup Worksheet
My System
Value
Factory-Set
Default Value
Description
System Information
System Name
System IP Address
NetBIOS name of the Windows
server. The name must be between 6
and 15 characters and can include
dashes and underscores.
192.168.1.254
System Virtual IP
Address
Static, physical IP address for the unit
For redundant ReadiManager system
configurations only
System Subnet Mask
255.255.255.0
Network subnet mask of the server
Default Gateway IP
192.168.1.1
IP address of the server gateway
DNS Server IP
192.168.1.1
IP address of the DNS server
Note: This is a necessary entry. If
there is no DNS Server, enter the
system address or Gateway address.
Current Date
Current Time
Time Zone
Database Information
Internal Database
No more information necessary
External Database
Server IP Address
1-2
IP address of the server
Polycom, Inc.
ReadiManager® System Setup
Table 1-1
First-Time Setup Worksheet (continued)
My System
Value
Item
Factory-Set
Default Value
Description
Port
Port number of the server
Database Server
Instance Name
See your SQL server administrator
Username and Password
LDAP Integration
IP Address of LDAP
Server or DNS Name
Username and Password
This LDAP user must have at least
read access to the LDAP server.
SMTP Integration
IP Address of SMTP
(email) Server
Username and Password
Information Necessary for Customer Support
Serial Number
License Number
Ensure System Safety
To ensure system safety, follow these guidelines:
• Keep the area around the ReadiManager SE200 appliance clean and
uncluttered.
• To lift the appliance, two people (one at each end) must lift slowly, with
their feet spread apart to distribute the weight evenly. Always keep your
back straight and lift with your legs.
Polycom, Inc.
1-3
ReadiManager SE200 Getting Started Guide
Electrical Safety Precautions
To ensure electrical safety, follow these guidelines:
• Find the power switch for the appliance, and the room's emergency
power-off switch, disconnection switch, or electrical outlet. If an electrical
accident occurs, shut off power quickly.
• Do not work alone when working with high-voltage components.
• Use rubber mats that supply electrical insulation.
• The power-supply power cords must include a grounding plug. Connect
them into grounded electrical outlets only.
Rack-Mount Safety Precautions
To ensure rack-mount safety, follow these guidelines:
• Find a good location for the equipment rack. Choose a clean, dust-free,
area with good airflow near a grounded power outlet. Avoid areas with
high-levels of heat, electrical noise, or electromagnetic discharge.
• Fully extend the leveling jacks on the bottom of the rack to the floor, so the
full weight of the rack rests on them.
• In a single-rack installation, attach stabilizers to the rack.
• In multiple-rack installations, couple the racks together.
• Make sure the rack is stable before you extend a component from the rack.
• You should extend only one component at a time. If you extend two or
more components at the same time, the rack can become unstable.
• Install the heaviest components on the bottom of the rack first, and then
work up.
• Use a regulating, un-interruptible power supply (UPS) to protect the
system from power surges, voltage spikes, and power failures.
• Let the power supply cool before you touch it.
• To let the components cool adequately, keep the rack's front door and all
panels and components on the systems closed, except during maintenance.
1-4
Polycom, Inc.
ReadiManager® System Setup
Unpack and Install the Hardware Components
To unpack and install the hardware:
1 Examine the ReadiManager SE200 shipping container for damage.
2 Open and review the container packing slips.
3 Open the containers and examine the contents. The ReadiManager SE200
package includes these items:
— ReadiManager SE200 appliance
— Power cord
— Rack-mount brackets
— Serial cable
4 Also examine the contents for damage.
If you find damage, file a claim with the delivery carrier. Polycom is not
responsible for damage sustained during shipment of this product.
5 Remove all of the components from their containers.
6 To rack-mount the ReadiManager SE200 appliance, use the brackets
provided. Follow the “Rack-Mount Safety Precautions” on page 1-4.
Identify Appliance Connections and Controls
The ReadiManager SE200 appliance has front and rear panels.
• The front panel includes two lights to show when the appliance has power
and the hard drive is working.
• The rear panel includes the main power switch and connections for power,
network, serial ports, and Universal Serial Bus (USB) ports.
Figure 1-1 and Figure 1-2 show the location of these controls. Table 1-2 and
Table 1-3 describe these controls.
Polycom, Inc.
1-5
ReadiManager SE200 Getting Started Guide
Figure 1-1 Front Panel
1
Table 1-2
2
Front Panel Controls
Item
Description
1
Hard Drive Indicator
Light that shows when the hard drive is working
2
Power Indicator
Light that shows when the system has power
Figure 1-2 Rear Panel
2 3
1
Table 1-3
5 6
Rear Panel Controls
Item
1-6
4
Description
1
USB1
Two USB ports.
2
LAN 2
Ethernet port to connect to the network.
3
LAN 1
Do not use. Not active in the current version.
4
COM1 Port (Serial)
RS-232 serial port.
5
Power Plug
Plug to connect to electrical power.
6
Power Switch
Main power switch to switch power on and off.
Polycom, Inc.
ReadiManager® System Setup
Connect to the ReadiManager SE200 Appliance
You can configure the ReadiManager SE200 appliance through a serial port or
ethernet port connection. These sections give the two connection procedures.
To connect to the ReadiManager SE200 appliance through the serial port
1 With an RS-232 serial cable, connect a computer to the 9-pin, serial port on
the ReadiManager SE200 appliance.
2 Connect the ReadiManager SE200 appliance to the LAN2 port.
Note
If you do not connect to the LAN port now, the system IP address, DNS IP address,
and Default Gateway will show 0.0.0.0.
3 Turn on the computer and the ReadiManager SE200 appliance.
4 From the Start menu, select All Programs > Accessories >
Communications> HyperTerminal.
5 In the Connection Description dialog box, enter SE200 in the Name field,
accept the default icon selection, and click OK.
6 In the Connect To dialog box, select the appropriate comport number
from the Connect using menu.
7 In the Properties dialog box, enter these values for port settings and click
OK.
— Bits per second: 19200
— Data bits: 8
— Parity: None
— Stop bits: 1
— Flow control: None
8 Click OK.
9 In the SE200 - HyperTerminal window, press Enter.
10 From the SE200 Menu, enter 2 for System Setup and press Enter.
11 Enter these values from Table 1-1, First-Time Setup Worksheet.
a Enter 1 for DNS Server IP and press Enter. At the prompt, enter the
DNS Server IP address and press Enter.
Polycom, Inc.
1-7
ReadiManager SE200 Getting Started Guide
b Enter 2 for Default Gateway IP and press Enter. At the prompt, enter
the Default Gateway IP address and press Enter.
c
Enter 3 for the system name, IP address, and subnet mask, and press
Enter. At the prompt, enter the necessary information and press Enter.
Note
In redundant configurations, enter the physical IP address for the server.
12 Enter x and press Enter to exit.
Go to Chapter 2, “ReadiManager® Software Setup.”
To connect to the ReadiManager SE200 appliance through an ethernet port
1 Choose one of the following procedures:
— Connect the appliance directly to an Ethernet port on the computer
through a crossover cable.
— Connect the appliance and the computer to the same Ethernet switch or
hub through standard Ethernet cables.
2 Turn on the power for the two devices.
3 Record the original IP address and subnet mask of your computer, so you
can restore these values after completing system setup.
Note
Use these steps for Microsoft Windows XP. If you have a different version of
Windows, the steps may differ slightly.
4 From the Start menu, choose Control Panel > Network Connections >
Local Area Connection Properties.
5 Select Internet Protocol (TCP/IP) and click Properties.
6 In the Internet Protocol (TCP/IP) Properties dialog box, enter these
values from Table 1-1, First-Time Setup Worksheet.
— IP address:
Note
In redundant configurations, this is still the physical IP address for the server.
— Subnet mask: 255.255.255.0
1-8
Polycom, Inc.
ReadiManager® System Setup
— Default gateway: Keep blank, or do not change.
— Preferred DNS server: Keep blank, or do not change.
— Alternate DNS server: Keep blank, or do not change.
7 Click OK and close the Internet Protocol (TCP/IP) Properties and Local
Area Connection Properties dialog boxes.
Go to Chapter 2, “ReadiManager® Software Setup.”
Polycom, Inc.
1-9
ReadiManager SE200 Getting Started Guide
1-10
Polycom, Inc.
2
ReadiManager® Software Setup
This chapter describes the ReadiManager® software setup tasks.
Note
If you are installing a redundant ReadiManager system configuration, perform
all of the procedures in this chapter on both ReadiManager SE200 appliances.
Log into the ReadiManager System
To log into the ReadiManager system, you need:
• An internet browser
• Adobe® Flash® Player 9.x
• The IP address of the ReadiManager SE200 network appliance. See the
First-Time Setup Worksheet (Table 1-1 on page 1-2).
Note
The ReadiManager user interface is best viewed with an SXGA display
resolution of at least 1280x1024 pixels. The minimum support display resolution
is XGA 1024x768 pixels.
To log into the ReadiManager system
1 Open a browser window and in the Address field enter the
ReadiManager SE200 appliance IP address.
If prompted to install the Adobe Flash Player, click OK.
Polycom, Inc.
2-1
ReadiManager SE200 Getting Started Guide
If you receive a Security Alert, click Yes.
2 When the ReadiManager system login screen appears, if necessary
select a different Language.
3 Enter the administrator Username and Password. The factory default
is admin/admin.
Notes
Once you’ve completed the First Time Setup, you should change the default
admin password.
4 Click Login.
The ReadiManager First Time Setup wizard appears.
Run the First-time Setup Wizard
To run the First-time Setup Wizard:
1 Read the license agreement and click Accept to accept the terms and
continue.
When the Network Information screen appears, the fields contain the
network information you entered previously.
2 Make sure that the network information is correct and click Next.
Note:
If you change the IP address of the ReadiManager server, the system will
reboot at this point. Log in back in 5 minutes.
3 From the System Time Information screen, select the correct System
Time Zone for the system.
4 If necessary, check Auto adjust for Daylight Savings.
5 Click the Use Current Time checkbox and set the current date and
time.
2-2
Polycom, Inc.
ReadiManager® Software Setup
6 After you set the initial system date and time, we recommend
synchronizing the system with an external NTP server. To do this:
a Select Use External NTP Server Time Synchronization.
b Enter the IP address or full DNS name for the NTP server.
c
Set the Minutes between synchronization attempts.
Note
If you set the system to use an external NTP server without first setting the
current date and time, the system time may be wrong until the system’s first
synchronization.
7 Click Next.
The Database Setup screen appears. By default, the ReadiManager
system uses its own internal database.
8 To continue to use the default internal database, skip to step 10 on
page 2-4.
Note
If you are installing a redundant ReadiManager system configuration, leave
both servers configured to use the internal database. You will point them to an
external database after completing the first time setup.
9 To use an external Microsoft SQL database server:
a Select the Use an external SQL Server database check box.
b Click Database Setup and download the Remote Database Setup
Utility, DBSetup.exe, to your computer.
c
Run the Remote Database Setup Utility and complete the
information requested in the setup screens.
» Make sure you know the path to the Microsoft SQL server.
» If you use Microsoft Windows authentication, be sure the login
ID has administrator privileges on the SQL server.
» If you use Microsoft SQL authentication, be sure the login ID is a
member of the sysadmin role.
Polycom, Inc.
2-3
ReadiManager SE200 Getting Started Guide
» If a ReadiManager database was installed previously on the
server, make sure you overwrite it.
d Enter the database server’s IP address, SQL server port number, and
the database instance name (if necessary, otherwise leave it blank)
in the Database screen.
e Click Next.
The system connects to the server, and when the operation
completes, it reboots.
f
Wait 5 minutes and when the system competely reboots, log into the
ReadiManager system again. See “Log into the ReadiManager
System” on page 2-1.
The ReadiManager First Time Setup wizard reappears.
10 Click Next.
The LDAP Server Setup screen appears.
11 To use only the default internal user directory, skip to step 13 on
page 2-5.
By default, ReadiManager system accesses an internal user database.
However, ReadiManager does support the Microsoft Active Directory
implementation of LDAP.
12 To use an external LDAP server:
a In the First Time Setup - LDAP Server Setup screen, select the
Integrate with LDAP Server check box.
b Enter the IP address or DNS name of the LDAP server.
Note
When entering the DNS Name of the LDAP server, make sure to enter the fully
qualified domain name e.g., <server.domain.com>.
2-4
Polycom, Inc.
ReadiManager® Software Setup
Enter an LDAP server user login ID and password to access the
LDAP server.
c
Note
•
This user ID must have read access to the LDAP server.
•
This user ID is automatically associated to a ReadiManager Administrator
role.
13 Click Next.
If you selected an internal database, the system reboots. If you selected
an external database, the First Time Setup Completed screen appears.
Complete the Setup
After finishing First Time Setup, refer to the ReadiManager Operations
Guide to perform these tasks and test the installation:
• If you’re installing redundant ReadiManager SE200 appliances
complete the procedures for configuring redundancy. This includes
setting up the external database, inputting the virtual IP address, and
testing failover.
• Add licenses to your system
• Set up users, rooms, and devices
• Associate devices with users and rooms
• Schedule a test conference
• Set up client computers with Internet Explorer
• Download the ReadiManager Scheduling Plug-ins for Microsoft®
Outlook® and/or IBM® Lotus® Notes®
Polycom, Inc.
2-5
ReadiManager SE200 Getting Started Guide
2-6
Polycom, Inc.
3
ReadiManager® System
Specifications
This chapter shows the electrical, physical, environmental, and regulatory
compliance specifications for the ReadiManager® SE200 appliance.
Electrical
• Power supply: Full-range, 220W ATX AC power supply with PFC
• AC voltage: 100 to 240 VAC, 50 to 60 Hz, 4 Amps
Physical
• Form factor: 1U, 19-inch rack-mount
• Height: 1.73 in. (44 mm)
• Width: 16.83 in. (430 mm)
• Depth: 15.35 in. (390 mm)
• Gross weight: 19.8 lbs (9 kg)
Polycom, Inc.
3-1
ReadiManager SE200 Getting Started Guide
Environmental
• Operating temperatures: 0° C to 40° C
• Storage temperatures: 0° C to 80° C
• Relative humidity: 5% to 90% (non-condensing)
Regulatory Compliance
Electromagnetic Emissions
• FCC Class A
• EN 55022 Class A
• EN 61000-3-2 or EN 61000-3-3
• CISPR 22 Class A
Electromagnetic Immunity
• EN 55024 or CISPR 24
• EN 61000-4-2 through EN 61000-4-6, EN 61000-4-8, and EN 61000-4-11
Safety
• EN 60950-compliant or IEC 60950-compliant
• UL Listed (USA)
• CUL Listed (Canada)
• CE Marking (Europe)
3-2
Polycom, Inc.