1
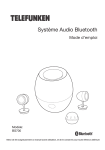
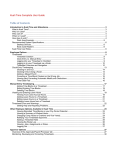
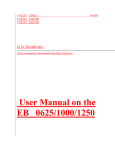
Polycom® Halo® 1.0 Upgraded
Solutions User’s Guide
1.0.0 | September 2012 | 3725-71352-001/A
Trademark Information
Polycom®, Halo®, and the names and marks associated with Polycom's products are trademarks and/or service
marks of Polycom, Inc. and are registered and/or common law marks in the United States and various other
countries.
All other trademarks are property of their respective owners.
Patent Information
The accompanying product is protected by one or more U.S. and foreign patents and/or pending patent
applications held by Polycom, Inc.
Contact Polycom Support
To contact the Polycom Halo Concierge service, please send an email to [email protected] or call one
of the following numbers:
US Toll Free: 1-877-715-2121
Outside the US (toll charges may apply): +1-281-518-6259
© 2012 Polycom, Inc. All rights reserved.
Polycom, Inc.
6001 America Center Drive
San Jose CA 95002
USA
No part of this document may be reproduced or transmitted in any form or by any means, electronic or
mechanical, for any purpose, without the express written permission of Polycom, Inc. Under the law, reproducing
includes translating into another language or format.
As between the parties, Polycom, Inc., retains title to and ownership of all proprietary rights with respect to the
software contained within its products. The software is protected by United States copyright laws and international
treaty provision. Therefore, you must treat the software like any other copyrighted material (e.g., a book or sound
recording).
Every effort has been made to ensure that the information in this manual is accurate. Polycom, Inc., is not
responsible for printing or clerical errors. Information in this document is subject to change without notice.
ii
About this Guide
The Polycom Halo 1.0 Upgraded Solutions User’s Guide introduces you to the
Polycom® Halo® 1.0 Upgraded Solution systems. This guide explains how to
use the Polycom® Touch Control, describes what you can expect to see on the
displays during meetings in the Polycom Halo 1.0 Upgraded Room, and
provides general guidelines for conducting successful meetings.
This guide is intended for all users of the Polycom Halo 1.0 Upgraded Room
equipped with Polycom endpoints.
For quick reference information about Polycom Halo 1.0 Upgraded Rooms,
refer to the Quick Tips for Polycom Halo 1.0 Solutions document. This document
describes how to use the Polycom Touch Control to perform common user
tasks, such as making and ending calls, controlling audio, and sharing content.
Additional Polycom documentation is available at the Polycom web site,
http://www.polycom.com/support/video/index.html.
For support or service, please contact the Polycom Halo Concierge via email at
[email protected] or call one of the following numbers:
US Toll Free: 1-877-715-2121
Outside the US (toll charges may apply): +1-281-518-6259
iii
Contents
Contents
1
Introducing the Polycom Halo
1.0 Upgraded Room . . . . . . . . . . . . . . . . . . . . . . . . . . . . . 1-1
The Polycom Halo Environment . . . . . . . . . . . . . . . . . . . . . . . . . . . . . . 1–1
Getting Help from the Polycom Halo Concierge . . . . . . . . . . . . . . . . . 1–3
2
Using the Polycom Touch Control . . . . . . . . . . . . . . . . . . . . 2-1
Powering the Polycom Touch Control On and Off . . . . . . . . . . . . . . . . . . 2–2
Accessing the Home Screen . . . . . . . . . . . . . . . . . . . . . . . . . . . . . . . . . . . . . . 2–2
Understanding the Polycom Touch Control Indicators . . . . . . . . . . . . . . . 2–4
Calling . . . . . . . . . . . . . . . . . . . . . . . . . . . . . . . . . . . . . . . . . . . . . . . . . . . . . . . . 2–5
Calling by Entering a Name or Number . . . . . . . . . . . . . . . . . . . . . . . . 2–6
Calling from the Directory . . . . . . . . . . . . . . . . . . . . . . . . . . . . . . . . 2–7
Ending a Call . . . . . . . . . . . . . . . . . . . . . . . . . . . . . . . . . . . . . . . . . . . . . . . 2–8
Adjusting the Volume . . . . . . . . . . . . . . . . . . . . . . . . . . . . . . . . . . . . . . . 2–8
Adjusting the Volume at Your Site . . . . . . . . . . . . . . . . . . . . . . . . . . . . 2–8
Adjusting the Polycom Touch Control Volume . . . . . . . . . . . . . . . . . . 2–8
Muting the Microphones . . . . . . . . . . . . . . . . . . . . . . . . . . . . . . . . . . . . . 2–9
Getting Help . . . . . . . . . . . . . . . . . . . . . . . . . . . . . . . . . . . . . . . . . . . . . . . . . . . 2–9
Understanding Error Messages . . . . . . . . . . . . . . . . . . . . . . . . . . . . . . . 2–9
Calling the Polycom Halo Concierge . . . . . . . . . . . . . . . . . . . . . . . . . . 2–10
3
Viewing People and Content . . . . . . . . . . . . . . . . . . . . . . . 3-1
Viewing People . . . . . . . . . . . . . . . . . . . . . . . . . . . . . . . . . . . . . . . . . . . . . . . . 3–1
Point-to-Point Video Conferences . . . . . . . . . . . . . . . . . . . . . . . . . . . . . 3–1
Multipoint Video Conferences . . . . . . . . . . . . . . . . . . . . . . . . . . . . . . . . 3–2
Three or four connections . . . . . . . . . . . . . . . . . . . . . . . . . . . . . . . . 3–2
Five to seven connections . . . . . . . . . . . . . . . . . . . . . . . . . . . . . . . . . 3–2
Using a Laptop in the Halo 1.0 Upgraded Room . . . . . . . . . . . . . . . . 3–2
Using a Document Camera . . . . . . . . . . . . . . . . . . . . . . . . . . . . . . . . . . . 3–4
4
Conducting Successful Meetings . . . . . . . . . . . . . . . . . . . . . 4-1
Meeting Tips . . . . . . . . . . . . . . . . . . . . . . . . . . . . . . . . . . . . . . . . . . . . . . . . . . . 4–1
General Meeting Tips . . . . . . . . . . . . . . . . . . . . . . . . . . . . . . . . . . . . . . . . 4–1
Video Tips . . . . . . . . . . . . . . . . . . . . . . . . . . . . . . . . . . . . . . . . . . . . . . . . . 4–2
Polycom, Inc.
iv
Contents
Audio Tips . . . . . . . . . . . . . . . . . . . . . . . . . . . . . . . . . . . . . . . . . . . . . . . . . 4–2
Document Camera Tips . . . . . . . . . . . . . . . . . . . . . . . . . . . . . . . . . . . . . . 4–3
Common Connectivity Issues . . . . . . . . . . . . . . . . . . . . . . . . . . . . . . . . . . . . 4–3
Connecting to Polycom Halo 1.0 Upgraded Rooms . . . . . . . . . . . . . . 4–4
5
Troubleshooting . . . . . . . . . . . . . . . . . . . . . . . . . . . . . . . . 5-1
Halo 1.0 Upgraded Rooms . . . . . . . . . . . . . . . . . . . . . . . . . . . . . . . . . . . . . . . 5–1
How to Contact Technical Support . . . . . . . . . . . . . . . . . . . . . . . . . . . . . . . . 5–2
Getting Help from the Polycom Halo Concierge . . . . . . . . . . . . . . . . . 5–2
Polycom Touch Control . . . . . . . . . . . . . . . . . . . . . . . . . . . . . . . . . . 5–2
Direct access . . . . . . . . . . . . . . . . . . . . . . . . . . . . . . . . . . . . . . . . . . . . 5–2
A
Meeting Topologies . . . . . . . . . . . . . . . . . . . . . . . . . . . . . A-1
Point to Point . . . . . . . . . . . . . . . . . . . . . . . . . . . . . . . . . . . . . . . . . . . . . . . . . A–1
Two Halo 1.0 Upgraded Rooms . . . . . . . . . . . . . . . . . . . . . . . . . . . . . . A–1
Multipoint . . . . . . . . . . . . . . . . . . . . . . . . . . . . . . . . . . . . . . . . . . . . . . . . . . . . A–2
Three Halo 1.0 Upgraded Rooms . . . . . . . . . . . . . . . . . . . . . . . . . . . . . A–2
Four Halo 1.0 Upgraded Rooms . . . . . . . . . . . . . . . . . . . . . . . . . . . . . . A–3
Five Halo 1.0 Upgraded Rooms . . . . . . . . . . . . . . . . . . . . . . . . . . . . . . A–3
Six Halo 1.0 Upgraded Rooms . . . . . . . . . . . . . . . . . . . . . . . . . . . . . . . A–4
Seven Halo 1.0 Upgraded Rooms . . . . . . . . . . . . . . . . . . . . . . . . . . . . A–4
Polycom, Inc.
v
List of Figures
List of Figures
Polycom, Inc.
Figure 1-1
Polycom Halo Collaboration Studio 65” . . . . . . . . . . . . . . . . . . . . . . . . 1-2
Figure 1-2
Polycom Halo 1.0 Upgraded Room Equipment . . . . . . . . . . . . . . . . . 1-2
Figure 2-1
Home Screen Page One . . . . . . . . . . . . . . . . . . . . . . . . . . . . . . . . . . . . . . 2-2
Figure 2-2
Home Screen Page Two . . . . . . . . . . . . . . . . . . . . . . . . . . . . . . . . . . . . . . 2-3
Figure 2-3
Home Screen Page Three . . . . . . . . . . . . . . . . . . . . . . . . . . . . . . . . . . . . . 2-4
Figure 2-4
Call Screen (In a Call) . . . . . . . . . . . . . . . . . . . . . . . . . . . . . . . . . . . . . . . . 2-4
Figure 2-5
Keypad Screen (In a Call) . . . . . . . . . . . . . . . . . . . . . . . . . . . . . . . . . . . . 2-5
Figure 2-6
Keypad Screen (Not in a Call) . . . . . . . . . . . . . . . . . . . . . . . . . . . . . . . . 2-6
Figure 2-7
Alphanumeric Keyboard Screen (Not in a Call) . . . . . . . . . . . . . . . . . 2-6
Figure 2-8
Directory Screen . . . . . . . . . . . . . . . . . . . . . . . . . . . . . . . . . . . . . . . . . . . . 2-7
Figure 2-9
Help Desk Screen . . . . . . . . . . . . . . . . . . . . . . . . . . . . . . . . . . . . . . . . . . 2-10
Figure 3-1
Point-to-Point Video Conference between Two
Polycom Halo 1.0 Upgraded Rooms . . . . . . . . . . . . . . . . . . . . . . . . . . . 3-1
Figure 3-2
Multipoint Video Conference with Four Polycom Halo 1.0 Upgraded
Rooms . . . . . . . . . . . . . . . . . . . . . . . . . . . . . . . . . . . . . . . . . . . . . . . . . . . . . 3-2
Figure 3-3
Multipoint Video Conference with Seven Polycom Halo 1.0 Upgraded
Rooms . . . . . . . . . . . . . . . . . . . . . . . . . . . . . . . . . . . . . . . . . . . . . . . . . . . . . 3-2
Figure 3-4
Laptop Button on the Show Content Screen . . . . . . . . . . . . . . . . . . . . . 3-3
Figure 3-5
Laptop Stop Button on the Show Content Screen . . . . . . . . . . . . . . . . 3-4
Figure 3-6
Doc Cam Button on the Show Content Screen . . . . . . . . . . . . . . . . . . . 3-5
Figure 3-7
Document Camera Controls on the Show Content Screen . . . . . . . . . 3-5
Figure 3-8
Document Camera Spotlight Location . . . . . . . . . . . . . . . . . . . . . . . . . 3-6
Figure A-1
Two Halo 1.0 Upgraded Rooms Connected . . . . . . . . . . . . . . . . . . . . . A-1
Figure A-2
Three Halo 1.0 Upgraded Rooms Connected . . . . . . . . . . . . . . . . . . . . A-2
Figure A-3
Four Halo 1.0 Upgraded Rooms Connected . . . . . . . . . . . . . . . . . . . . . A-3
Figure A-4
Five Halo 1.0 Upgraded Rooms Connected . . . . . . . . . . . . . . . . . . . . . A-3
Figure A-5
Six Halo 1.0 Upgraded Rooms Connected . . . . . . . . . . . . . . . . . . . . . . A-4
Figure A-6
Seven Halo 1.0 Upgraded Rooms Connected . . . . . . . . . . . . . . . . . . . A-4
vi
1
Introducing the Polycom Halo
1.0 Upgraded Room
The Polycom Halo 1.0 Upgraded Rooms facilitate face-to-face meetings
between people located at different sites. The design and placement of the
Halo 1.0 UHR video equipment, coupled with Polycom’s superb audio, will
enable you to pick up minute facial expressions and gestures and clearly hear
every bit of conversation. Before long, the extraordinary realism will make you
feel as if your colleagues were sitting across the table from you rather than
being miles away.
The Polycom Halo Environment
Although different Polycom Halo 1.0 Upgraded Room locations may have
different seating capacities, each location contains a similar set of fixtures:
•
Conference table with twelve, six, four, or two seats
•
Lower display or displays for viewing up to six other participants in other
Halo 1.0 UHR locations
•
Upper display, for collaborating and sharing information
•
Polycom Touch Control for operating the Halo 1.0 UHR
•
VGA cable for connecting video output from an optional laptop computer
•
Other equipment, such as microphones, speakers, and cameras, needed to
conduct a meeting
•
User's Guide containing operating instructions
A two-seat or four-seat meeting center has only one lower display, whereas a
six-seat or twelve seat Halo 1.0 UHR has three lower displays. However, both
locations can see the same views of participants in other locations.
1–1
Introducing the Polycom Halo 1.0 Upgraded Room
Figure 1-1 Polycom Halo Collaboration Studio 65”
Figure 1-2 shows an example of a fully furnished six-seat Polycom Halo 1.0
Upgraded Room
Upper display
Overhead camera
Lower displays
VGA cable
Audio cable
Polycom Touch Control
Microphone
Power and LAN
Figure 1-2 Polycom Halo 1.0 Upgraded Room Equipment
1–2
Introducing the Polycom Halo 1.0 Upgraded Room
Do not clean or repair any of the displays or other Polycom Halo 1.0 UHR
furnishings. Improper cleaning or repair could cause damage. Special cleaners and
procedures are required for most items. Please notify the local Polycom Halo 1.0
UHR administrator about any items needing maintenance.
Getting Help from the Polycom Halo Concierge
If any problems or questions arise, you have instant access to the Polycom
Halo Concierge. With a simple press of a button on your Polycom Touch
Control or a phone call, you're connected to the concierge for a quick solution
to your problem. The concierge is an expert on the Polycom Halo 1.0
Upgraded Room and can operate your Polycom Halo 1.0 UHR remotely or
answer your questions.
To contact the Polycom Halo Concierge, see the How to Contact Technical
Support section on page 5-2.
1–3
2
Using the Polycom Touch Control
The Polycom Touch Control is your interface to the Polycom Halo 1.0
Upgraded Solutions experience. It enables you to place video and audio calls,
adjust the volume, show content, select options, and hang up calls. The
Polycom Touch Control is located on the table within easy reach of the center
seats at the table.
To use the Polycom Touch Control:
•
Touch the Polycom Touch Control screen to select an item.
•
Drag your finger across the screen to scroll.
•
Touch
Back to go to the previous screen.
•
Touch
Home to go to the Home screen.
Most buttons on the Polycom Touch Control will either visually depress or
change color when touched. If a button indicates a state (such as mute), it may
take up to a second for the button to visually indicate the changed state. If the
response time is consistently longer than this or if you receive no response,
contact the Polycom Halo Concierge as described in the Getting Help section
on page 2-9.
Depending on your Halo 1.0 UHR configuration, some Polycom Touch Control
functions may not be operational.
2–1
Using the Polycom Touch Control
Powering the Polycom Touch Control On and Off
The Polycom Touch Control goes to sleep after two minutes of inactivity.
>> Touch the screen to wake up the control panel.
Accessing the Home Screen
The first screen you see on the Polycom Touch Control is the first page of the
Home screen. Each of the three Home screens contains three launcher buttons.
Drag your finger across the screen to view the other buttons.
From page one of the Home screen, you can:
•
Touch
Place a Call to place an audio or video call.
•
Touch
Directories to view and search the directory.
•
Touch
camera.
Show Content to show content using a laptop or document
Figure 2-1 Home Screen Page One
2–2
Using the Polycom Touch Control
From page two of the Home screen, you can:
•
Touch
Audio to mute or adjust the volume of the audio at your site.
•
Touch
including:
System to display system information for all codecs
— IP address, model, software version, and system name
— Transmit/receive call speed and format statistics
— Software version for the System Controller paired with the Polycom
Touch Control
Figure 2-2 Home Screen Page Two
Depending on your Polycom Halo 1.0 UHR configuration, some Polycom Touch
Control functions may not be operational.
From page three of the Home screen, you can:
•
Touch
User Settings to display Polycom Touch Control settings
including brightness, volume, and power.
•
Touch
Administration to display administration settings. Contact
your system administrator if you require any changes to the
administration settings.
•
Touch
Call for Help to get help from the Polycom Halo Concierge.
2–3
Using the Polycom Touch Control
Figure 2-3 Home Screen Page Three
Understanding the Polycom Touch Control Indicators
When you are in a call, the Call screen appears.
Figure 2-4 Call Screen (In a Call)
From the Call screen, you can complete these tasks:
•
Touch the Mute/Unmute button to mute or unmute your microphones.
•
Touch the Volume slider to adjust the volume at your site.
•
Touch Hang up to end the call.
•
Touch Keypad to send DTMF tones.
2–4
Using the Polycom Touch Control
•
Touch Show Content to select, start showing, or stop showing content.
Note that the background color of the Call screen will change when you
are in a call and receiving content.
•
Touch Help Desk to get help from the Polycom Halo Concierge.
•
Touch Participants to get more information about the participants in the
call.
•
If you navigate away from the Call screen during a call, you can return to
it at any time by touching the green Back to the Call button. Figure 2-5
shows how this button appears on the Keypad screen when you are in a
call.
Figure 2-5 Keypad Screen (In a Call)
Calling
This section describes how to:
•
Place a call by calling by entering a name or number or by calling from the
Directory
•
End a call
2–5
Using the Polycom Touch Control
Calling by Entering a Name or Number
To call by entering a name or number:
1
From the Home screen, touch
Place a Call.
The Keypad screen appears.
Figure 2-6 Keypad Screen (Not in a Call)
2
Using the keypad, enter the video or phone number, IP address, or E.164
extension for the site.
3
To dial by name or to enter letters:
— Touch
Keyboard
The alphanumeric keyboard appears.
Figure 2-7 Alphanumeric Keyboard Screen (Not in a Call)
2–6
Using the Polycom Touch Control
4
If you make a mistake while dialing, touch
5
Touch
Backspace.
Call to place the call.
Calling from the Directory
If you are registered with a directory server, you can browse or search for a site
to call.
To call from the directory:
1
From the Home screen, touch
Search the Directory.
Alternatively, from the Home screen, touch
touch Directory.
Place a Call, and then
The Directory screen appears.
Figure 2-8 Directory Screen
2
Do one of the following:
— Scroll to the entry you want, and then touch the entry to place the call.
— Touch the Search field, start entering the name using the keyboard,
and then touch the entry to place the call.
2–7
Using the Polycom Touch Control
Ending a Call
To end a call:
1
From the Call screen, touch Hang Up.
You will receive a message that the call has ended.
2
Touch OK.
With audio calls, if the person on the telephone hangs up first, you still need to end
the call by touching Hang Up, just as you would hang up a telephone receiver in a
regular phone call.
Adjusting the Volume
This section describes how to adjust the sound you hear at your site, how to
change the volume on the Polycom Touch Control, and how to mute the
microphones.
Adjusting the Volume at Your Site
Raising or lowering the volume affects only the sound you hear at your site.
To adjust the volume:
1
From the Home screen, touch
Audio.
2
Use the Volume slider to increase or decrease the call volume.
When you are in a call, volume control is available on the Call screen and
in the top right corner of other screens.
Adjusting the Polycom Touch Control Volume
You can adjust the volume levels of the Polycom Touch Control ring tone and
user alert tones.
To adjust the Polycom Touch Control volume:
1
From the Home screen, touch
User Settings.
2
Use the Volume slider to adjust the Polycom Touch Control volume.
2–8
Using the Polycom Touch Control
Muting the Microphones
You can mute the microphones if you do not want the far site to hear you.
To mute or unmute the microphones:
1
From the Home screen, touch
Audio.
The Audio screen appears.
2
Touch
Mute or
Unmute to control your microphones.
When you are in a call, mute controls are available on the Call screen and in
the top right corner of other screens.
Getting Help
This section lists the error messages that you may receive on the Polycom
Touch Control when you place a call that does not connect. It also describes
how to contact the Polycom Halo Concierge via the Help Desk whenever you
need help with your Polycom Halo 1.0 Upgraded Room.
Understanding Error Messages
If you make a call using the Polycom Touch Control and the call does not
connect, you will receive an error message. The following table describes some
of the more common error messages that you may receive:
Error Message
Description
The call has ended.
Your site or the far site hung up the call.
The far end system is capable of
accepting the call, but the call was
rejected for an unknown reason.
Contact the Polycom Halo Concierge for
assistance.
The far site has automatic answer set to
Do not disturb.
The far site is busy. Try the call again
later.
The far site is already in a call.
The far site could not be reached. Make
sure the far system is operational, and
then try the call again.
The far site is not reachable for an
unknown reason.
2–9
Using the Polycom Touch Control
Calling the Polycom Halo Concierge
When you experience technical difficulties or have a question about your
Polycom Halo 1.0 Upgraded Room, you can call the Polycom Halo Concierge
via the Help Desk function on your Polycom Touch Control.
The Help Desk number is configured for the Polycom Halo Concierge. If your
Help Desk button is not working, contact the concierge via email or phone.
To call the Polycom Halo Concierge via the Polycom Touch Control:
1
Do one of the following:
— Touch
— Touch
1
Touch
Call for Help from the Home screen.
Help Desk from any dialing screen.
Help Desk.
The Halo 1.0 Upgraded Room will automatically place an audio call to the
Polycom Halo Concierge.
Figure 2-9 Help Desk Screen
Note that the four buttons at the bottom of Figure 2-9 appear only when you
touch Help Desk from a dialing screen.
If you touch
Call for Help when an audio call is connected, the Halo 1.0
Upgraded Room must hang up the audio call in order to place the help call. A
message informs you of this before hanging up the audio call.
2–10
Using the Polycom Touch Control
To contact the Polycom Halo Concierge directly:
For direct access to the Polycom Halo Concierge, please call one of the
following numbers:
•
US Toll Free: 1-877-715-2121
•
Outside the US (toll charges may apply): +1-281-518-6259
You can also contact the Polycom Halo Concierge via email at
[email protected].
2–11
3
Viewing People and Content
What can you expect to see on the displays during a video conference in a
Polycom Halo 1.0 Upgraded Room?
Your Polycom Halo 1.0 Upgraded Room display layout changes depending on
if your video conference is with a single Halo 1.0 Upgraded Room (point to
point) or with multiple Halo 1.0 Upgraded Rooms (multipoint). This chapter
describes what you can expect to see in these various scenarios.
This chapter also describes how to bring content (such as slides, spreadsheets,
or other documents) into a Halo 1.0 Upgraded Room using a laptop or doccam.
Viewing People
Up to seven Polycom Halo 1.0 Upgraded Rooms can connect to a video
conference (your Halo 1.0 UHR and up to six additional Halo 1.0 UHRs). For
detailed layout information, see Meeting Topologies in Appendix A.
Point-to-Point Video Conferences
If two Polycom Halo 1.0 Upgraded Rooms are connected in a point-to-point
video conference, the center six seats of the Halo 1.0 UHR show in the meeting
display, with two seats in each window.
Figure 3-1 Point-to-Point Video Conference between Two
Polycom Halo 1.0 Upgraded Rooms
.
3–1
Viewing People and Content
Multipoint Video Conferences
Three or four connections
If three or four Polycom Halo 1.0 Upgraded Rooms are connected in a
multipoint conference, the center four seats of each Halo 1.0 UHR connected
to the meeting show in a lower display. With the smaller number of
participants, each Halo 1.0 UHR has its own dedicated display panel.
Figure 3-2 Multipoint Video Conference with Four Polycom Halo 1.0 Upgraded
Rooms
Five to seven connections
If five to seven Polycom Halo 1.0 Upgraded Rooms are connected in a
multipoint conference, the center four seats of each connected Halo 1.0 UHR
in the meeting display. With the larger number of participants, each display is
divided in half, with two Halo 1.0 UHRs occupying a single display. Your
Halo 1.0 UHR will automatically place participants in the displays for optimal
viewing.
Figure 3-3 Multipoint Video Conference with Seven Polycom Halo 1.0 Upgraded
Rooms
Using a Laptop in the Halo 1.0 Upgraded Room
If you want to share content that is stored on your laptop, you must connect
the laptop with a VGA cable. In addition, your laptop resolution must be
supported by your codec.
3–2
Viewing People and Content
To view content using a laptop in the Halo 1.0 Upgraded Room:
1
Access the content cable and connect the VGA connector to the VGA
connector on your laptop.
Some laptops require you to enable VGA output (such as by pressing
Shift-F5). Refer to your laptop documentation for more information.
Most laptops will auto-detect the screen resolution at 720p and switch the settings.
If your laptop doesn’t identify the resolution automatically, please refer to your
laptop documentation for information on how to manually change the resolution
settings.
2
If you want to transmit audio, connect the audio cable to your laptop.
Note that even if you want to send audio-only content, you must first
share video.
3
From the Home screen of the Polycom Touch Control, touch
Content.
Show
The Show Content screen appears.
Figure 3-4 Laptop Button on the Show Content Screen
4
Display the content on your laptop screen, and then touch
Laptop.
The following then occurs:
— The Laptop button moves up slightly on the screen, the button title
changes to Stop, and the laptop content is shown to the video
conference participants.
— Content appears on the upper display of all connected Polycom Halo
1.0 Upgraded Rooms.
3–3
Viewing People and Content
5
When you are done using the laptop, touch
Stop.
Figure 3-5 Laptop Stop Button on the Show Content Screen
The Laptop button moves down on the screen, and the laptop content is
no longer shown to the video conference participants.
IMPORTANT: Always disconnect the cables from the laptop when you are done
displaying the content so that you do not inadvertently display any private or
personal content that may be stored on the laptop.
Using a Document Camera
Your Polycom Halo 1.0 Upgraded Room is equipped with an optional
document camera. You can use the document camera to show content to the
other conference participants.
3–4
Viewing People and Content
To view content using a document camera:
1
From the Home screen, touch
Show Content.
The Show Content screen appears.
Figure 3-6 Doc Cam Button on the Show Content Screen
2
Place the content in view of your document camera, and then
touch
Doc Cam.
Note that the button label depends on what your system administrator
chose as the label name.
Figure 3-7 Document Camera Controls on the Show Content Screen
The following then occurs:
— The Doc Cam button moves up slightly on the screen, the document
camera content is shown to the call participants, and the document
camera controls become visible.
3–5
Viewing People and Content
— The document camera powers on in about three seconds. For more
information, refer to the setup sheet that came with your document
camera.
— If there are content monitors in the room, the content appears on all of
those content monitors.
— If the other site in the conference is equipped with content monitors,
the content appears on those content monitors.
— If the other site in the conference has only one display, the content
appears on that display.
3
Since your Polycom Halo 1.0 UHR comes equipped with a VZ-C122
document camera, a spotlight field appears on the main table. Figure 3-8
shows the location of the spotlight field.
4
Place your content on the spotlight field.
Figure 3-8 Document Camera Spotlight Location
5
Use the Document Camera controls as needed:
— Touch
Zoom to zoom in or out on the document.
— Touch
Focus to manually focus in or out on the
document, or touch
AutoFocus to allow the document camera
to focus automatically.
— Touch
6
Touch
Freeze/Snapshot to take a still image of the document.
Stop to stop sharing content.
The Doc Cam button moves down on the screen, and the content is no
longer shown to the call participants.
3–6
4
Conducting Successful Meetings
Conducting a successful meeting in a Polycom Halo 1.0 Upgraded Room is
easy. Because your Polycom Halo 1.0 Upgrade Solution is a fully managed
service that administers the cameras, microphones, speakers, remote controls,
and other equipment, you can be free to concentrate on making your meeting
as effective as possible.
This chapter gives tips on maximizing your meeting experience and resolving
common connectivity issues. It also provides technical support contact
information should you need to access the Polycom Halo Concierge.
Meeting Tips
This section provides you with tips on how to take full advantage of the video
and audio in the Halo 1.0 UHR.
General Meeting Tips
To help your meeting run more smoothly and efficiently:
•
Connect and test any additional equipment (such as a content-sharing
laptop) before the meeting.
•
Make sure you can see and hear the far-site participants. If you have any
problems with your audio or visual equipment, see the Common
Connectivity Issues section on page 4-3 or contact the Help Desk to speak
with a Polycom Halo Concierge.
•
Avoid wearing bright colors, all-light or all-dark clothing, or “busy”
patterns. Light pastels and muted colors look the best on the screen.
•
Introduce all participants when the meeting starts.
4–1
Conducting Successful Meetings
Video Tips
Polycom Halo 1.0 Upgraded Room cameras are located above each of the three
main displays. To achieve the best video from the cameras:
•
Do not sit in front of the table seams. If you do, your image will look “split”
to the far-end participants. You can be sure to avoid the seams by sitting
in one of the designated seating locations.
•
Avoid repetitive motions that may distract other participants, such as
tapping your pen or fingers on the tabletop. Remember that, in video
conferences, all movements, expressions, and gestures are visible to
everyone in the meeting.
Audio Tips
Polycom’s superior audio and microphone arrays are extremely sensitive.
Keep in mind that they will pick up all sound in the Halo 1.0 Upgraded Room,
even gentle noises and whispers — and even if you are not in camera range.
For detailed information on the in-Halo 1.0 UHR audio control, see the
Adjusting the Volume section on page 2-8.
Other helpful audio tips you should consider include:
•
When speaking, you do not have to direct your speech to a certain location
or speak louder than normal. Simply speak in your normal tone of voice.
•
Do not touch the tabletop microphones, and do not place laptops or other
obstructions directly in front of or on top of them. You should also avoid
facing your laptop exhaust near the microphones to eliminate noise from
your laptop’s fan.
•
As in any meeting, you should refrain from sidebar conversations. These
can be distracting, especially in multipoint meetings where participants at
a number of sites are present.
•
Whenever you are in a Polycom Halo 1.0 Upgraded Room, remember that
the microphones may be on. If you want to have a private conversation,
check that the microphones are muted.
To mute or unmute the microphones:
1
From the Home screen of the Polycom Touch Control, touch
Audio.
The Audio screen appears.
2
Touch
Mute or
Unmute to control your microphones.
When you are in a call, mute controls are available on the Call screen and in
the top right corner of other screens.
4–2
Conducting Successful Meetings
Document Camera Tips
Your Polycom Halo 1.0 Upgraded Room is equipped with an optional
document camera. You may find these tips helpful when using the camera:
•
If your room does not have a whiteboard, you can annotate on a document
that you display using your document camera.
•
When writing on a document, use a black marker or a dark pen so that
your notations show more clearly.
•
If you are right-handed and are planning to use the document camera, sit
at the seat marked in red on the following illustration. Additionally, you
may not want anyone to sit at the seat marked in blue so that you have
more room to use the document camera.
•
If you are left-handed and are planning to use the document camera, sit at
the seat marked in blue above. Additionally, you may not want anyone to
sit at the seat marked in red so that you have more room to use the
document camera.
Common Connectivity Issues
This section identifies a few common issues participants might experience
during a video conference. For more in-depth troubleshooting information on
your Polycom Halo 1.0 Upgraded Room you can search the Knowledge Base
at support.polycom.com or contact the Polycom Halo Concierge.
4–3
Conducting Successful Meetings
Connecting to Polycom Halo 1.0 Upgraded Rooms
If you are unable to connect to your meeting:
•
Make sure you have selected the correct Polycom Halo 1.0 UHR from the
Directory, then try the call again (point to point).
•
Make sure you have selected the appropriate meeting room from the
Directory and that all meeting participants are connected to the same
meeting room (multipoint).
•
To find out if the problem exists in your Halo 1.0 UHR suggest that the far
site connect to your Halo 1.0 UHR instead.
Contact the Polycom Halo Concierge:
Contact the Polycom Halo Concierge for any problems or to troubleshoot any
issues you may encounter while using your Polycom Halo 1.0 Upgraded
Room. For information on how to contact the Polycom Halo Concierge, see
How to Contact Technical Support on page 5-2.
4–4
5
Troubleshooting
For more troubleshooting information, you can search the Knowledge Base at
support.polycom.com. or contact the Polycom Halo Concierge.
Halo 1.0 Upgraded Rooms
If you have trouble making video calls:
•
Make sure the number you dialed is correct, then try the call again.
•
To find out if the problem exists in your system, ask the person you were
trying to reach to call you instead.
•
Make sure the system you are calling has its power turned on and is
functioning properly.
•
If you can make calls but not receive them, make sure that your system is
configured with the correct number.
Contact the Polycom Halo Concierge:
Contact the Polycom Halo Concierge for any problems or troubleshooting
issues you may encounter while using your Polycom Halo 1.0 Upgraded
Room . For contact information, see How to Contact Technical Support on
page 5-2.
Polycom, Inc.
5–1
Halo Services for Polycom® Endpoints User’s Guide
How to Contact Technical Support
Getting Help from the Polycom Halo Concierge
If any problems or questions arise, you have instant access to the Polycom
Halo Concierge. With a simple press of a button on your Polycom Touch
Control or a phone call, you're connected to the concierge for a quick solution
to your problem. The concierge is an expert on the Polycom Halo system and
can operate your Polycom Halo system remotely or answer your questions.
Polycom Touch Control
1
Do one of the following:
— From the Home screen, touch
Call for Help.
— From any dialing screen, touch
Help Desk.
2
Touch
Help Desk.
Direct access
For direct access to the Polycom Halo Concierge, please call one of the
following numbers:
•
US Toll Free: 1-877-715-2121
•
Outside the US (toll charges may apply): +1-281-518-6259
You can also contact the Polycom Halo Concierge via email at
[email protected].
Be prepared with the following information. This information helps The
Polycom Halo Concierge respond faster to your issue:
5–2
•
Your name
•
Your location (your company, city, and your Halo 1.0 Upgraded Room)
•
A phone number where you can be reached
•
A brief description of your problem
•
The action you were trying to take when you experienced the problem,
including the number of the meeting rooms you were trying to join, and
the room names or numbers of other participants you were trying to
connect with (as applicable)
•
Any steps you have already taken to resolve the issue, as well as any
additional anomalies
Polycom, Inc.
A
Meeting Topologies
Depending on the number of Halo 1.0 Upgraded Rooms connected to the
video conference, all displays may not be active. If your meeting contains
three, five, or six total Halo 1.0 Upgraded Rooms, one or two of the displays
will show a blank black screen.
Point to Point
For point-to-point video conferences, the display layout will usually be in the
same configuration each time you make a call.
Two Halo 1.0 Upgraded Rooms
Point-to-point conferences between two Halo 1.0 Upgraded Rooms will show
two seats in each display, for a total of six participants.
Halo 1.0 UHR 2 right seats
Halo 1.0 UHR 2middle seats
Halo 1.0 UHR 2left seats
Halo 1.0 UHR 1 Viewpoint
Figure A-1 Two Halo 1.0 Upgraded Rooms Connected
Polycom, Inc.
A–1
Meeting Topologies
Multipoint
In multipoint video conferences, the display layouts will shift configuration
based on a variety of factors such as eye gaze, video image size, and seating
orientation. As participants enter or leave a conference, the display layout may
change to update and accommodate the new video parameters.
In video conferences with two to four participants, each Halo 1.0 Upgrade
shows in one the lower display screens. With five to seven participants, each
endpoint shows on one half of the lower display screens.
Three Halo 1.0 Upgraded Rooms
Halo 1.0 UHR 2
Halo 1.0 UHR 3
Inactive display
Halo 1.0 UHR 1 Viewpoint
Figure A-2 Three Halo 1.0 Upgraded Rooms Connected
Polycom, Inc.
A–2
Meeting Topologies
Four Halo 1.0 Upgraded Rooms
Halo 1.0 UHR 2
Halo 1.0 UHR 4
Halo 1.0 UHR3
Halo 1.0 UHR 1 Viewpoint
Figure A-3 Four Halo 1.0 Upgraded Rooms Connected
Five Halo 1.0 Upgraded Rooms
Halo 1.0 UHR 2
Halo 1.0 UHR 5
Halo 1.0 UHR 3
Halo 1.0 UHR 4
Inactive displays
Halo 1.0 UHR 1 Viewpoint
Figure A-4 Five Halo 1.0 Upgraded Rooms Connected
Polycom, Inc.
A–3
Meeting Topologies
Six Halo 1.0 Upgraded Rooms
Halo 1.0 UHR 2
Halo 1.0 UHR 5
Halo 1.0 UHR 3
Halo 1.0 UHR 6
Halo 1.0 UHR 4
Inactive display
Halo 1.0 UHR 1 Viewpoint
Figure A-5 Six Halo 1.0 Upgraded Rooms Connected
Seven Halo 1.0 Upgraded Rooms
Halo 1.0 UHR 2
Halo 1.0 UHR 5
Halo 1.0 UHR3
Halo 1.0 UHR 6
Halo 1.0 UHR 4
Halo 1.0 UHR 7
Halo 1.0 UHR 1 Viewpoint
Figure A-6 Seven Halo 1.0 Upgraded Rooms Connected
Polycom, Inc.
A–4