1
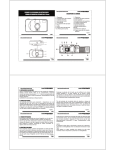
Full Duplex Conference Phone
and Wireless Microphone System
Installation Instructions
and User’s Guide
TABLE OF CONTENTS
Chapter 1
SoundStation Premier ......................................................1 – 1
Introduction ...................................................................................1 – 2
Checklist of Parts............................................................................1 – 2
To Ensure Better Performance........................................................1 – 2
Installing the conference phone ......................................................1 – 3
Using the conference phone............................................................1 – 4
In Case of Difficulty .......................................................................1 – 7
Chapter 2
SoundStation Premier with Extended
Hypercardioid Microphones .........................................2 – 1
Introduction.....................................................................................2 – 2
Checklist of Parts............................................................................2 – 2
To Ensure Better Performance........................................................2 – 2
Installing the conference phone ......................................................2 – 3
Using the conference phone............................................................2 – 6
Permanent Installation ..................................................................2 – 1 0
Chapter 3
The Wireless Microphone System ...........................3 – 1
Introduction.....................................................................................3 – 2
Checklist of Parts............................................................................3 – 2
To Ensure Better Performance........................................................3 – 2
The Wireless Receiver ....................................................................3 – 2
Powering the Receiver................................................................3 – 3
Antenna.......................................................................................3 – 3
Connecting Audio Output ...........................................................3 – 3
The Wireless Transmitter............................................................... 3 – 4
Transmitter Operation.................................................................3 – 4
Chapter 4
Specifications and Warranty ........................................4 – 1
The SoundStation Premier Specifications ......................................4 – 2
Limited Warranty and Limitation of Liability ................................4 – 4
SoundStation Premier Full Duplex Conference Phone and Wireless Microphone User’s Guide
SoundStation Premier
Chapter 1
SoundStation Premier Full Duplex Conference Phone and Wireless Microphone User’s Guide
INTRODUCTION
INSTALLING THE CONFERENCE PHONE
Thank you for selecting the SoundStation Premier, the next generation of full duplex conference
phones. It will forever change your expectations regarding voice quality. Its super sensitive
hypercardioid microphones allow you to zero in on meeting participants, while its high fidelity
neodymium speaker provides both clarity and volume for even the largest conference rooms. But
what puts the SoundStation Premier in a class all by itself is its virtually echo-free simultaneous
two-way communications. Together with automatic gain control and noise reduction, meeting
participants will have a difficult time realizing that they are not on a telephone handset.
Furthermore, this product is simple and straightforward to use. The next several pages will explain
the product in its entirety. Should you have any questions or comments, please call our technical
support line at 1-800-451-0995 or fill out our customer registration card.
1. Plug the long SoundStation cable from the Wall Module into the slot under the
SoundStation Premier console as illustrated below.
CHECKLIST OF PARTS
Your SoundStation audio conferencing system includes the following items:
2. Thread the cable through the channels on the underside of the SoundStation Premier
console, as shown below.
3. Insert the Wall Module plug into a nearby electrical outlet.
The SoundStation Premier console will run a brief self-test, and then you’ll hear a tone. If you
don’t hear the tone, make sure the outlet is working and the power is switched on.
If any of the above parts is missing, please contact your Polycom representative or your Polycom
authorized dealer.
TO ENSURE BETTER PERFORMANCE
▼ Locate the SoundStation Premier in a quiet environment, with soft furnishings — such as
carpets, curtains, and sound-absorbing walls and ceilings.
▼ Place the unit at the center of a table or desk.
▼ Keep papers and other objects away from the unit.
▼ Seat all participants the same distance from the SoundStation Premier console.
▼ Speak at normal conversation levels.
▼ Direct your voice toward the SoundStation Premier console.
▼ Do not move the SoundStation Premier console during a call.
SoundStation Premier Full Duplex Conference Phone and Wireless Microphone User’s Guide
4. Plug the short cable from the Wall Module into a modular wall jack for a standard analog
phone line. Your telephone system administrator or service technician can help you identify a
standard analog phone line. A standard analog line supports fax machines, answering machines,
modems, and most single-line telephones.
SoundStation Premier Full Duplex Conference Phone and Wireless Microphone User’s Guide
5. Place the SoundStation Premier console on a flat, stable surface in the
center of the room, then press the “On/Off” button to hear a dial tone.
If you don’t hear a dial tone, you may not be connected to an analog
telephone line.
USING THE SOUNDSTATION PREMIER
To program and retrieve the conference phone’s phone number
To access digital services, such as voice mail, where only pulse dialing is available,
SoundStation Premier can provide temporary tone dialing. When the phone is ON, press
SHIFT, then press REDIAL. The display must read TONE DIALING for this feature to be
activated. Once the phone is hung up, dialing will revert to its previous mode.
NOTE: Changing the type of
dialing used when a call is in
progress in only temporary.
When power is first applied to the phone, the display will read ENTER PHONE #. Type in
the phone number with area code use the * key to enter a space. When finished, press
the FLASH key.
To retrieve the phone number at any time during a phone call, press SHIFT, then press
the FLASH key. The phone number will be displayed for 10 seconds, then return to its
previous mode.
To place or answer a phone call
Press ON/OFF to turn the unit on and dial the number. The display will go blank, then show
each number as it is being dialed.
NOTE: If caller ID is not
available, there will be no
time of day clock.
To adjust the phone’s ringer volume
When the phone is off, press SHIFT, then press
VOL or VOL . There are four options:
OFF, LOW, MID, HIGH, and the levels will be heard after each key press. After 5 seconds, the
phone will return to its previous mode.
For incoming calls and when caller identification is activated, the display will show the
caller’s phone number. The time of day clock will be initiated once a call is made to the phone.
Once the call is connected, a clock will appear on the display showing how long the call has
been in progress.
To adjust tone volume and speaker volume
When the phone is on and dial tone is heard, adjustment of the dial tone volume can be made
by pressing
VOL or VOL .
To use tone dialing or pulse dialing
When the phone is off, press SHIFT, then press REDIAL . The display will read either TONE
DIALING, or if REDIAL is depressed again, PULSE DIALING. The display will return to your
phone number after 5 seconds.
NOTE: Toggle between
TONE or PULSE by
depressing the REDIAL
key only.
SoundStation Premier Full Duplex Conference Phone and Wireless Microphone User’s Guide
NOTE: There are 32
volume levels for both
dial tone and speaker
volume.
NOTE: The volume levels for
dial tone and speaker are
stored independently in the
phone’s memory.
The display will show: TONE VOL IIIII II. After 5 seconds, the display will revert to its
previous mode.
Once a call is connected, the speaker volume can be made louder by pressing VOL
or softer
by pressing
VOL. The display will show SPKR VOL IIIII II. After 5 seconds, the display
will revert to its previous mode.
SoundStation Premier Full Duplex Conference Phone and Wireless Microphone User’s Guide
To place the call on hold or mute
At any time during a phone call, press SHIFT, then press MUTE on the main keypad to place a
call on HOLD, or simply press HOLD on the remote keypad. This shuts off the speaker and all
microphones. The display will show HOLD and all LEDs begin blinking red.
To program and use One-Touch dialing
NOTE: The main keypad does
not enable One-Touch
dialing.
When the phone is off, up to six phone numbers can be stored from the remote keypad.
To take the phone off HOLD press only the MUTE key on the main keypad or HOLD on the
remote keypad. To shut off the microphones while keeping the speaker on, simply press
MUTE.
To program One-Touch dialing phone numbers, press PROG. If the SoundStation Premier is
connected to a PBX, press either 8 or 9, then press PAUSE (this inserts a two second delay so
the PBX can access an outside line). Next, type in the desired phone number, then press
STORE, and finally press the desired location to store this phone number, 1-6. On the reverse
side of the remote keypad, there is a place to record these phone numbers.
To use 1-Touch dialing, simply press any of the six stored phone number locations. There is no
need to press ON/OFF.
NOTE: If no PBX exists,
PAUSE is not required.
Your Wall Module is equipped with an RCA jack to record a conversation. Plug one end of an
RCA-type connector into the jack on a tape recorder unit labeled AUX IN and the other end
into the Wall Module jack labeled AUX OUT .
The display will show MUTE and the LED’s will turn from green to red. To take the phone off
MUTE , press MUTE on either keypad.
To redial the last phone number called
Aux Out
Press the redial key. The display on the main keypad shows the last phone number which you
have called or attempted to call.
NOTE: The ON/OFF key
does not have to be pressed
for REDIAL to operate.
IN CASE OF DIFFICULTY
No dial tone
▼ Check that all connections are correct and tight.
▼ Make sure the short cable is connected to a standard analog telephone line.
To make a 3-way conference call or to transfer a call to another extension
(if enabled on your telephone system)
Once a call is in progress, press the FLASH key.
A second dial tone will be heard and the display will read FLASH. To transfer the call, dial the
extension and hang up the phone by pressing ON/OFF. To make a 3-way conference call, dial
the second phone number. Once connected, press FLASH again, the two other parties will now
be connected.
NOTE: To hold a conference
call with more than three
parties, a conference call
service provider (such as
Confertech, AT&T, MCI and
Sprint) is required, or contact
your telecom manager.
SoundStation Premier Full Duplex Conference Phone and Wireless Microphone User’s Guide
▼ Try a different telephone line.
Short silences, echoes, or clipped speech
▼ Don’t move the SoundStation Premier console while it’s in use.
▼ Keep your hands away from the unit during calls.
▼ Keep papers, cups, coffee pots, etc., away from the unit.
▼ At the beginning of a call, let someone at each location speak in turn for a few moments, to
enable SoundStation Premier to adapt to its environment.
▼ The other party may be using lower-quality equipment or a half-duplex conference bridge,
in which case there may be little you can do.
▼ Try calling again to see if another line provides a better connection.
SoundStation Premier Full Duplex Conference Phone and Wireless Microphone User’s Guide
Muffled or “in a well” reception
▼ Speak closer to the unit so the microphones can pick up your speech.
▼ Add more sound absorbency to the room.
SoundStation Premier with
Extended Hypercardioid Microphones
Excessive noise
▼ Noisy equipment, such as a computer or fan, may make it difficult for you to hear the other
party. Both parties should turn off any noisy equipment.
▼ Try calling again to see if another line provides a better connection.
Physical damage
▼ If physical damage is severe enough that the internal parts become visible, disconnect
the SoundStation Premier immediately. Do not reconnect it to the network until the
SoundStation Premier has been repaired.
If you need more help, please call Polycom technical support at 1-800-451-0995, or your
Polycom authorized dealer.
SoundStation Premier Full Duplex Conference Phone and Wireless Microphone User’s Guide
Chapter 2
SoundStation Premier Full Duplex Conference Phone and Wireless Microphone User’s Guide
INTRODUCTION
INSTALLING SOUNDSTATION PREMIER WITH EXTENDED MICROPHONES
Thank you for selecting the SoundStation Premier, the next generation of full duplex conference
phones. It will forever change your expectations regarding voice quality. Its super sensitive
hypercardioid microphones allow you to zero in on meeting participants, while its high fidelity
neodymium speaker provides both clarity and volume for even the largest conference rooms. But
what puts the SoundStation Premier in a class all by itself is its virtually echo-free simultaneous
two-way communications. Together with automatic gain control and noise reduction, meeting
participants will have a difficult time realizing that they are not on a telephone handset.
Furthermore, this product is simple and straightforward to use. The next several pages will explain
the product in its entirety. Should you have any questions or comments, please call out technical
support line at 1-800-451-0995 or fill out our customer registration card.
1. Plug the long SoundStation Premier cable from the Wall Module into the slot under the
SoundStation Premier console as illustrated below.
CHECK LIST OF PARTS
2. Thread the cable through the channels on the underside of the SoundStation Premier
console, as shown below.
Your SoundStation Premier System includes the following items:
3. Connect the microphone cables to the SoundStation Premier console shown below:
f any of the above parts are missing, please contact your Polycom representative or your Polycom
uthorized dealer.
TO ENSURE BETTER PERFORMANCE
▼ Use in a conference room up to 30 × 40 feet.
▼ Position Extended Microphones 6 to 8 feet from the SoundStation Premier console.
▼ Participants should sit 3 to 6 feet from a microphone.
SoundStation Premier Full Duplex Conference Phone and Wireless Microphone User’s Guide
SoundStation Premier Full Duplex Conference Phone and Wireless Microphone User’s Guide
4. Insert the Wall Module plug into a nearby electrical outlet.
The SoundStation Premier will run a brief self-test, and then you’ll hear a tone. If you don’t hear
the tone, make sure the outlet is working and the power is switched on.
5. Plug the short cable from the Wall Module into a modular wall jack for a standard analog
phone line.
Your telephone system administrator or service technician can help you identify a standard
analog phone line. A standard analog line supports fax machines, answering machines, modems,
and most single-line telephones.
6. Place the SoundStation Premier console on a flat, stable surface in the center of the room.
Position the two extended hypercardioid microphones for best coverage. See examples
below.
7. Press the “On/Off” button to hear a dial tone.
If you don’t hear a dial tone, you may not be connected to an analog
telephone line.
SoundStation Premier Full Duplex Conference Phone and Wireless Microphone User’s Guide
SoundStation Premier Full Duplex Conference Phone and Wireless Microphone User’s Guide
USING THE SOUNDSTATION PREMIER WITH TWO
EXTENDED HYPERCARDIOID MICROPHONES
To place a call:
Press ON/OFF to turn the SoundStation Premier console on, and dial the number.
To access digital services, such as voice mail, where only pulse dialing is available,
SoundStation Premier can provide temporary tone dialing. When the phone is ON, press
SHIFT, then press REDIAL. The display must read TONE DIALING for this feature to be
activated. Once the phone is hung up, dialing will revert to its previous mode.
USING THE SOUNDSTATION PREMIER
To program and retrieve the conference phone’s phone number
When power is first applied to the phone, the display will read ENTER PHONE #. Type in
the phone number with area code use the * key to enter a space. When finished, press
the FLASH key.
To retrieve the phone number at any time during a phone call, press SHIFT, then press
the FLASH key. The phone number will be displayed for 10 seconds, then return to its
previous mode.
To adjust the phone’s ringer volume
When the phone is off, press SHIFT, then press
VOL or VOL . There are four options:
OFF, LOW, MID , HIGHMng7 78D (, )0eacha cod75 0 58.027 0 TD [ (. )31 (Aften retur )]89ress
To place or answer a phone call
Press ON/OFF to turn the unit on and dial the number. The display will go blank, then show
each number as it is being dialed.
For incoming calls and when caller identification is activated, the display will show the
caller’s phone number. The time of day clock will be initiated once a call is made to the phone.
Once the call is connected, a clock will appear on the display showing how long the call has
been in progress.
To adjust tone volume and speaker volume
When the phone is on and dial tone is heard, adjustment of the dial tone volume can be made
by pressing
VOL or VOL .
NOTE: There are 32
volume levels for both
dial tone and speaker
volume.
The display will show: TONE VOL IIIII II. After 5 seconds, the display will revert to its
previous mode.
Once a call is connected, the speaker volume can be made louder by pressing VOL
or softer
by pressing
VOL. The display will show SPKR VOL IIIII II. After 5 seconds, the display
will revert to its previous mode.
SoundStation Premier Full Duplex Conference Phone and Wireless Microphone User’s Guide
To place the call on hold or mute
At any time during a phone call, press SHIFT, then press MUTE on the main keypad to place a
call on HOLD, or simply press HOLD on the remote keypad. This shuts off the speaker and all
microphones. The display will show HOLD and all LEDs begin blinking red.
To program and use One-Touch dialing
NOTE: The main keypad does
not enable One-Touch
dialing.
When the phone is off, up to six phone numbers can be stored from the remote keypad.
To take the phone off HOLD press only the MUTE key on the main keypad or HOLD on the
remote keypad. To shut off the microphones while keeping the speaker on, simply press
MUTE.
To program One-Touch dialing phone numbers, press PROG. If the SoundStation Premier is
connected to a PBX, press either 8 or 9, then press PAUSE (this inserts a two second delay so
the PBX can access an outside line). Next, type in the desired phone number, then press
STORE, and finally press the desired location to store this phone number, 1-6. On the reverse
side of the remote keypad, there is a place to record these phone numbers.
To use 1-Touch dialing, simply press any of the six stored phone number locations. There is no
need to press ON/OFF.
NOTE: If no PBX exists,
PAUSE is not required.
To mute all microphones, press MUTE :
The display will show MUTE and the LED’s will turn from green to red. To take the phone off
MUTE , press MUTE on either keypad.
To redial the last phone number called
Press the redial key. The display on the main keypad shows the last phone number which you
have called or attempted to call.
NOTE: The ON/OFF key
does not have to be pressed
for REDIAL to operate.
To resume two-way communications, press MUTE again. The blinking red LED will
return to green.
A local MUTE button is located on each of the extended microphones:
To make a 3-way conference call or to transfer a call to another extension
(if enabled on your telephone system)
Once a call is in progress, press the FLASH key.
A second dial tone will be heard and the display will read FLASH. To transfer the call, dial the
extension and hang up the phone by pressing ON/OFF. To make a 3-way conference call, dial
the second phone number. Once connected, press FLASH again, the two other parties will now
be connected.
NOTE: To hold a conference
call with more than three
parties, a conference call
service provider (such as
Confertech, AT&T, MCI and
Sprint) is required, or contact
your telecom manager.
SoundStation Premier Full Duplex Conference Phone and Wireless Microphone User’s Guide
By switching to the O position, the LED MUTE light will turn red and only this microphone
will be shut off. Switching to the 1 position will turn the microphone back on.
SoundStation Premier Full Duplex Conference Phone and Wireless Microphone User’s Guide
PERMANENT INSTALLATION
Lavalier Wireless Microphone System
To hide cables and install permanently:
1. Locate microphones 6 to 8 feet from the SoundStation Premier console.
Chapter 3
2. Drill holes in table to accommodate for thickness of cord. For the extended mircrophone, drill a
1/2" hole. For the SoundStation Premier console, drill a 5/8" hole.
3. Route cables through holes under table.
SoundStation Premier Full Duplex Conference Phone and Wireless Microphone User’s Guide
SoundStation Premier Full Duplex Conference Phone and Wireless Microphone User’s Guide
INTRODUCTION
(8) Low Battery LED
Thank you for choosing the SoundStation Wireless Microphone System. This system operates on a
long-range, interference-free VHF high band frequency. It also utilizes a patented companding noise
reduction system for excellent dynamic range (120 dB) and hiss-free performance.
(2) Softwire Antenna
(7) On/Off Switch
(5) Output Jack
CHECKLIST OF PARTS
Your SoundStation Wireless Microphone System includes the following items:
(4) Signal LED
(6) Power Jack
(3) Mute Control
(1) Battery Compartment
(on the bottom)
If any of the above parts are missing, please contact your Polycom representative or your Polycom
authorized dealer.
TO ENSURE BETTER PERFORMANCE
▼ Position microphone six inches from mouth.
▼ Check battery condition indicator before using.
Powering the Receiver
Plug the AC adapter jack into the “Power” Jack (6) on top of the receiver, then plug the adapter into
a 110V AC socket. For battery operation, slide the battery cover on the receiver to the right and
place a fresh 9V battery in the Battery Compartment (1), observing the correct polarity. Although a
fresh alkaline battery can last up to eight hours in the receiver, in order to ensure optimum performance
it is recommended that the battery be replaced after five hours of use. Turn the receiver on by
sliding the ON/OFF Switch (7) to the left. The “Low Battery” LED (8) will flash briefly, indicating
adequate battery strength. If the “Low Battery” LED (8) lights during use, replace the battery.
▼ Fully extend softwire antenna.
Antenna
THE SOUNDSTATION WIRELESS RECEIVER
The wireless receiver is powered by the included AC adapter. As an option, the receiver can be
powered by a 9 V battery (not included). LED lights indicate low battery and received signal.
Controls include an ON/OFF switch and a MUTE adjustment. Audio output and AC adapter
connectors are 3.5 mm jacks. An attached softwire antenna extends from the top of the receiver.
When the system is in use, the “Softwire Antenna” (2) on the receiver should be fully extended to obtain
maximum range.
Connecting Audio Output
Using the RCA cable provided, connect the 3.5 mm jack to the “Output” Jack (5) on the receiver.
Connect the RCA jack to the AUX connector on the Wall Module.
The standard SoundStation Wireless Microphone System operates on a frequency of 171.905 MHz.
Multiple systems operating in close proximity must operate on different frequencies to avoid
crosstalk, however, systems using an alternate operating frequency of 203.4 MHz are available.
Please contact your Polycom representative or Polycom’s authorized dealer if you need an alternate
system.
SoundStation Premier Full Duplex Conference Phone and Wireless Microphone User’s Guide
SoundStation Premier Full Duplex Conference Phone and Wireless Microphone User’s Guide
LAVALIER WIRELESS TRANSMITTER
SPECIFICATIONS
Transmitter Operation
Slide the transmitter’s battery cover open and place the included 9V battery into the Battery
Compartment (4), observing the correct polarity. Turn on the transmitter by pushing the Transmitter
O N / O F F Switch (2) to the O N position. The “Low Battery” LED (3) will give a single quick flash.
In the case of a dead or low battery, the LED will not go on at all or will stay on continuously,
indicating a battery voltage below 7 V. If this occurs, replace with a fresh 9V battery. To preserve
battery strength, turn the transmitter off when not in use.
With the transmitter O N / O F F Switch (2) switched to O N, clip the transmitter to a belt or place in a
pocket. Attach the Microphone (5) at chest level. Do not place too close to mouth — a distance of
six inches works best. When ready to speak, turn on the microphone by pushing the Audio
O N / O F F Switch (1) to the O N position.
Chapter 4
(1) Audio On/Off Switch
(2) Transmitter On/Off Switch
(3) Low Battery LED
(5) Microphone
(4) Battery Compartment
(on the bottom)
SoundStation Premier Full Duplex Conference Phone and Wireless Microphone User’s Guide
SoundStation Premier Full Duplex Conference Phone and Wireless Microphone User’s Guide
THE SOUNDSTATION Premier Full Duplex Conference
THE SOUNDSTATION Premier Full Duplex Conference
Specifications
Audio Bandwidth
200 to 3500 Hz
Loudspeaker Volume
89dBSPL
Network Interface
Two-wire RJ-11 analog PBX or Public Switched
Telephone Network interface
Power Requirements
Extended Microphones
Dimensions:
Weight:
Cabling: Two-wire RJ9, 8 feet
Remote Keypad
Console
Dimensions:
Weight:
Batteries: 2, AAAAlkaline
typical power __________
Size:
Weight:
Power Supply/
Telephone Interface
Wall Module
Power: 90-130VAC, 50/60 Hz, 30W
Dimensions:
Cable Length: 25' to console, 10' to telephone wall jack
Weight:
Auxiliary Input/Output (auto-sensing) RCA Jack
Output: Line level to tape recorder
Wireless Microphone
System Specifications
Overall System Performance
Frequency Response:
Dynamic Range:
Harmonic Distortion:
RF Carrier Frequency:
Frequency Stability:
Modulation:
Maximum Operating Range:
200 to 3400 Hz
120 dB (max. SPL to A-weighted
noise level)
< 0.3%
171.905 MHz and 203.4 MHz
±.005%, crystal controlled
FM / ±15 KHz
50 to 200 feet
FPO
Universal Module
Power: 200-260VAC, 50/60 Hz, 25W
Dimensions:
Cable Length: 25' to console, 10' to telephone wall jack
Weight:
RCA Jack; Line level to tape recorder
Output: Line level to tape recorder
Wireless VHF Receiver
Controls:
Audio output:
Connectors:
Environmental
Requirements
Temperature:
Humidity:
Indicators:
Mute:
Recommended Room
Conditions
Reverberation time: < 0.4 seconds
Noise level: < 48 dBA
Unwanted Signal Rejection:
Power Requirements:
Registration
UL, FCC, Canada
FCC ID:
SoundStation Premier Full Duplex Conference Phone and Wireless Microphone User’s Guide
Mute adjust
600 ohm unbalanced
Audio output; RCA jack. Power
input; 3.5 mm jack
Low battery and transmitter “TX”
Externally adjustable; 1µV
preset minimum
60 dB image and spurious
Single 9 V alkaline, internal, or 9 V
DC power adapter
Registration # CKT 78E 151VR
SoundStation Premier Full Duplex Conference Phone and Wireless Microphone User’s Guide
THE SOUNDSTATION Premier Full Duplex Conference
Polycom’s obligation to repair, replace, or refund, as set forth above, is your exclusive remedy.
Except as specifically set forth above, Polycom, its affiliates, suppliers, and dealers make no
warranties, express or implied, and specifically disclaim any warranties of merchantability or
fitness for a particular purpose.
Wireless Microphone
System Specifications
(cont’d)
Wireless Transmitter
Audio Input Impedance:
600 ohm electric condenser
microphone, permanently attached
Controls:
Transmitter “On/Off”,
Audio “On/Off”
Indicators:
Low battery LED
Battery:
9 V alkaline
Battery Life:
8 hours
FCC:
Registration # BEK 9E3T20
Limitation of Liability
Except as provided below, the liability of Polycom and its affiliates and suppliers for any claims,
losses, damages, or expenses from any cause whatsoever (including acts or omissions of third
parties), regardless of the form of action, whether in contract, tort, or otherwise, shall not exceed
the lessor of: (1) the direct damages proven; or (2) the repair cost, replacement cost, license fee,
annual rental charge, or purchase price, as the case may be, of the equipment that gives rise to the
claim. Except as provided below, Polycom and its affiliates and suppliers shall not be liable for any
incidental, special, reliance, consequential, or indirect loss or damage incurred in connection with
the equipment. As used in this paragraph, consequential damages include, but are not limited to,
the following: lost profits, lost revenues, and losses arising out of unauthorized use (or charges for
such use) of common carrier telecommunications services or facilities accessed through or
connected to the equipment. For personal injury caused by Polycom’s negligence, Polycom’s
liability shall be limited to proven damages to person. No action or proceeding against Polycom or
its affiliates or suppliers may be commenced more than twenty-four (24) months after the cause of
action accrues. THIS PARAGRAPH SHALL SURVIVE FAILURE OF AN EXCLUSIVE REMEDY.
Polycom Limited Warranty and Limitation of Liability
Polycom warrants you, the customer, that your system will be in good working order on the date
Polycom or its authorized reseller delivers or installs the system, whichever is later (“Warranty
Date”). If you notify Polycom or its Authorized Dealer within one year of the Warranty Date that
your system is not in good working order, Polycom will without charge to you repair or replace, at
its option, the system components that are not in good working order. Repair or replacement parts
may be new or refurbished and will be provided on an exchange basis. If Polycom determines that
your system cannot be repaired or replaced, Polycom will remove the system and, at your option,
refund the purchase price of your system or apply the purchase price towards the purchase of
another Polycom system. If you purchased your system directly from Polycom, Polycom will
perform warranty repair in accordance with the terms and conditions of the specific type of Polycom
maintenance coverage you selected. A written explanation of Polycom’s types of maintenance
coverage may be obtained from Polycom by calling 1 800 247-7000 (in the continental U.S. only).
If you purchased your system from an Polycom Authorized Dealer, contact your reseller for the
details of the maintenance plan applicable to your system.
This Polycom limited warranty covers damage to the system caused by power surges.
Unless otherwise expressly agreed to in a written agreement signed by Polycom, Polycom will not
be responsible under this limited warranty for damages resulting from:
▼ Failure to follow Polycom’s installation, operation, or maintenance instructions.
▼ Unauthorized system modification, movement, or alteration.
▼ Unauthorized use of common carrier communication services accessed through the system.
▼ Abuse, misuse, negligent acts or omissions of the customer and persons under the customer’s
control; or
▼ Acts of third parties and acts of God.
SoundStation Premier Full Duplex Conference Phone and Wireless Microphone User’s Guide
SoundStation Premier Full Duplex Conference Phone and Wireless Microphone User’s Guide
SoundStation Premier Full Duplex Conference Phone and Wireless Microphone User’s Guide
SoundStation Premier Full Duplex Conference Phone and Wireless Microphone User’s Guide