1
Polycom® RSS™ 4000 System
Getting Started Guide
6.0.0 | Apr. 2010 | 3725-32871-002/A
Trademark Information
Polycom®, the Polycom “Triangles” logo, and the names and marks associated with Polycom’s products are
trademarks and/or service marks of Polycom, Inc., and are registered and/or common-law marks in the United
States and various other countries.
All other trademarks are the property of their respective owners.
Patent Information
The accompanying product is protected by one or more U.S. and foreign patents and/or pending patent
applications held by Polycom, Inc.
© 2010 Polycom, Inc. All rights reserved.
Polycom, Inc.
4750 Willow Road
Pleasanton, CA 94588-2708
USA
No part of this document may be reproduced or transmitted in any form or by any means, electronic or
mechanical, for any purpose, without the express written permission of Polycom, Inc. Under the law,
reproducing includes translating into another language or format.
As between the parties, Polycom, Inc., retains title to and ownership of all proprietary rights with respect to the
software contained within its products. The software is protected by United States copyright laws and
international treaty provision. Therefore, you must treat the software like any other copyrighted material (e.g.,
a book or sound recording).
Every effort has been made to ensure that the information in this manual is accurate. Polycom, Inc., is not
responsible for printing or clerical errors. Information in this document is subject to change without notice.
Polycom® RSS™ 4000 Getting Started Guide – Version 6.0
General Safety Precautions
Follow these rules to ensure general safety:
Keep the area around the Polycom® RSS™ 4000 unit clean, free of clutter and well
ventilated.
Decide on a suitable location for the equipment rack that will hold the Polycom®
RSS™ 4000 unit and is near a grounded power outlet.
Use a regulating uninterruptible power supply (UPS) to protect the Polycom®
RSS™ 4000 unit from power surges and voltage spikes, and to keep it operating in
case of a power failure.
Preparations before Configuration
Obtaining the Network Information
Before the initial configuration, get the following information from your network
administrator to configure Polycom® RSS™ 4000 to your local network:
IP address, subnet mask, and default gateway IP address to be assigned to
Polycom® RSS™ 4000.
(Optional) DNS server address.
(Optional) Gatekeeper address, and the H.323 prefix and E.164 number to be
assigned to the Polycom® RSS™ 4000.
1
Polycom® RSS™ 4000 Getting Started Guide – Version 6.0
Obtaining the Product Activation Key
Before using Polycom® RSS™ 4000, you need to activate the device.
To obtain the product activation key
1
Enter the following website address in the address bar of the browser:
http://portal.polycom.com, and go to Polycom Resource Center Login page.
2
Enter your Email address and password in the login box, and click Sign In. If you
are a new user, click the Register for An Account link to be registered.
3
After successful login, click Service & Support>License and Product
Activation>Activation/Upgrade in the upper navigation bar on the page.
4
Follow the onscreen instructions. You will need to enter the License Number and
the Serial Number of the device. (You can find the license number and serial
number of the device from the document provided with the Polycom® RSS™ 4000
device.)
5
Click the Submit button, and then record the activation key displayed on the
page.
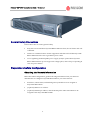
System Hardware Installation
To unpack the system package:
1
Check the package to ensure its completion.
2
Open the package and check the items included. The following items should be
included:
― One Polycom® RSS™ 4000 server unit
― Two power cables
― Two RJ-45 network cables
― One DB-9 serial port cable
― A CD
― A license and a user registration card
3
Take all items out of the package and check if any of them is in poor condition.
If you find damage, file a claim with the delivery carrier. Polycom is not responsible for
damage sustained during shipment of this product.
To install system hardware
1
Place the Polycom® RSS™ 4000 unit on a stable flat surface in the selected
2
Polycom® RSS™ 4000 Getting Started Guide – Version 6.0
location.
2
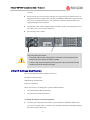
Insert each power cord connector into the rear of the unit and connect each to an
appropriately rated socket outlet. The Polycom® RSS™ 4000 unit is supplied with
two power cords, BOTH power cords should be connected to the mains power
supply during normal operation.
3
Connect the LAN cable to LAN1 in the back of the system. The LAN2 port is not
used now, and is reserved for future use.
4
Turn on the power switch.
Plug Acts as Disconnect Device:
The socket outlets to which this apparatus is connected must be installed near the
equipment and must always be readily accessible.
In order to fully isolate the equipment then both power cords should be disconnected
otherwise the system will remain energized.
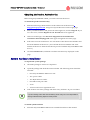
Initial IP Address Modification
The system default IP address before delivery is:
IP Address: 192.168.1.254
Subnet Mask: 255.255.255.0
Gateway: 192.168.1.1
There are two ways to change the system initial IP address:
Via Web interface (Recommended)
Via Console or Telnet connection
To change IP address via the Web interface:
1
Connect your computer to the LAN 1 port of the Polycom® RSS™ 4000 with a
cross-over network cable, or connect your computer and Polycom® RSS™ 4000 to
the same switch in the LAN.
3
Polycom® RSS™ 4000 Getting Started Guide – Version 6.0
2
Set your computer IP address to be in the same network segment as the Polycom®
RSS™ 4000.
3
Run the Web browser on your computer, enter https://<system IP address> in the
address bar, and then press Enter.
By default, Polycom® RSS™ 4000 Web server has an untrusted certificate and uses the
HTTPS protocol to set up SSL secure connection with client end.
If you use Internet Explorer as a browser, you will be prompted that the security
certificate for the website has some problem. Please choose Continue to this website to
enter the Login page.
If you use Firefox browser, you will be prompted that the connection is not trusted.
Please add the site being connected to Security Exception as suggested on the page
and enter the Login page.
After you install the security certificate issued by the Certification Authority in your system,
you will not receive this alert again.
4
(Optional) Select a language for the Web interface from the Select language list in
the top right of the page.
5
On the Login page, enter the administrator’s username and password, and then
click the Log In button.
The default username and password are both admin.
6
The Product Activation page displays when you first-time log in. Enter the
activation key in the Activation Key box and click Update.
If you do not activate the system, you can still use the Web interface, but cannot perform
calling, recording, live streaming and video playing operations using the system.
7
When prompted to restart the system, select No to proceed with setting the IP
address.
8
Click System Config>IP Setting to enter the IP Setting page. Set the following
parameters:
Parameter
Description
If the user network is configured with a Dynamic Host Configuration
Obtain an IP Address
Protocol (DHCP) server, select this option to automatically obtain the
Automatically (DHCP)
IP address.
Note: This option is not recommended as the address assigned by
4
Polycom® RSS™ 4000 Getting Started Guide – Version 6.0
Parameter
Description
the DHCP server could change over time.
Using the following IP
Address
Select this option to use the static IP address. You may need to
manually enter the IP address, subnet mask, and gateway IP
address.
Used in combination with the DHCP option. When the Obtain an IP
Obtain DNS Server
Address Automatically (DHCP) option is selected, the system will
Address Automatically
automatically obtain DNS server address from a DHCP server in the
network.
Using the following
DNS Server Address
If you did not select the option to automatically obtain DNS address,
you must enter the preferred/alternate DNS server addresses here
for the system to resolve domain names.
The Network Address Translation (NAT) function of the system
Using the following
NAT Server
enables you to translate the private network IP address of packet into
a public network IP address before transmission. To enable NAT,
select this check box and then enter the public network IP address to
be displayed publicly.
Sets the speed/duplex modes for LAN ports. Supports the 10/100M
Full Duplex or Half Duplex mode and the 1000M network. Select
Auto to use auto-negotiation.
LAN Speed
Note: When setting LAN port speed, contact your network
administrator to ensure that the switch link rate matches the system
port.
9
Click Update and a dialog box will pop up, in which you should confirm to restart
the system to apply the setting.
To change IP address via RS-232 Console or Telnet:
1
Connect your PC to the RS232 port of the Polycom® RSS™ 4000 with a serial port
cable and activate the console port (115200,8bits).
2
After you logged in to the console port, input the default password POLYCOM to
enter the system.
3
Enter "?" or "help" after the prompt "#" and the system displays available
command information.
4
Change IP address using the command in the format below:
set lan1 ip {dhcp | static <ip> netmask <mask> gw <gateway>}
5
Polycom® RSS™ 4000 Getting Started Guide – Version 6.0
For example, to set the IP address of LAN1 port to 172.21.103.29, subnet mask to
255.255.255.0 and gateway address to 172.21.103.254, enter the following
command:
The same steps are also applicable for a Telnet connection.
Only one console (Telnet or RS232) at a time can be connected.
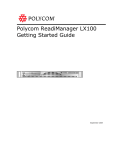
(Optional) Gatekeeper Configuration
If a gatekeeper is configured on your network, register the Polycom® RSS™ 4000 to
the gatekeeper to simplify calling.
To register the system with the gatekeeper:
1
Click System Config>Signaling Setting>Gatekeeper in the Web configuration
interface.
2
Set the following parameters in the gatekeeper page:
Parameter
Register to Gatekeeper
Description
Indicates whether or not to register the system with the gatekeeper.
You must check this option to set the following parameters.
Primary (Alternate)
Indicates whether or not the device is registered to the primary (or
Gatekeeper
alternate) gatekeeper.
Gatekeeper IP Address
Specifies the IP address for the primary (or alternate) gatekeeper.
Gatekeeper Port
Specifies the port number for the primary (or alternate) gatekeeper.
System Prefix/E164.
Sets the E.164 number for the system.
System H.323 Alias
Sets the H.323 alias for the system.
3
Click Update and a dialog box will pop up, in which you should confirm to restart
the system to apply the setting.
6
Polycom® RSS™ 4000 Getting Started Guide – Version 6.0
Ready for Use
The system is now ready for use. For additional configuration instructions, refer to the
user guide.
7
Polycom® RSS™ 4000 Getting Started Guide – Version 6.0
Maximum Capacity
Device maximum capacity
Feature
Description
Small
Medium
Large
15
15
15
5
10
15
4
6
8
15
15
15
How many H.323 devices can
connect to a Polycom® RSS™
4000 simultaneously?
H.323 Connection
Note: Include connection types:
H.323 recording with live
streaming, H.323 recording only
and H.323 playback.
How many conferences can be
recorded simultaneously?
Conference
Recording
Note: Include connection types:
H.323 recording with live streaming
and H.323 recording.
How many conferences can be live
Conference Live
streamed simultaneously?
Streaming
Note: The conferences being live
streamed can also be recorded.
How many endpoints can connect
H.323 Playback
to Polycom® RSS™ 4000 to view
playback simultaneously?
100/200
How many web connections are
[128 kbps ~ 1024 kbps] – It supports
supported to view playback (or live
200 simultaneous archived
streaming) simultaneously?
playbacks / live steaming;
Web Playback /
Note: After purchasing and
(1024 kbps ~ 2048 kbps] – It
Live Streaming
activating the HD Live Streaming
supports 100 simultaneous archived
option, the web playback (live
playbacks / live streaming;
streaming) connections will
(2048 kbps ~ 4096 kbps] – It
increase from 100 to 200.
supports 50 simultaneous archived
playbacks / live steaming.
The resources used for H.323 playback, conference recording, and live streaming increase
progressively; and they are exclusive. For example, on a Small Model device, if there are
8
Polycom® RSS™ 4000 Getting Started Guide – Version 6.0
already 4 conferences being live streamed (also being recorded.), and then the fifth live
streaming will be rejected, but one more recording and 10 H.323 playbacks are allowed.
TCP/UDP Port Usage
Usage
Type
Port Range
http
TCP
80
https
TCP
443
Trace (for technical support usage)
UDP
60001(configurable)
Telnet
TCP
23
SMTP
TCP
25
TCP
554
RTSP Streaming
Random
UDP(optional)
(for source port)
RAS
UDP
1721
Q.931 Socket
TCP
1720
H.245 Socket
TCP
Endpoint /
H.323
10000 – 10199
(configurable)
audio / video /
data
30000 – 30600
UDP
(configurable)
Notes Regarding On Demand Archive and Live streaming
The UDP ports used for on demand archives and live streaming are randomly chosen
on Polycom® RSS™ 4000. You need to configure firewalls and Windows Media Player
for usage with Polycom® RSS™ 4000 on demand archives and live streaming.
Configuring Windows Media Player to receive streaming media
To use UDP ports to receive streaming media:
1
Launch Window Media Player on your computer;
2
Click Tools->Options->Network;
9
Polycom® RSS™ 4000 Getting Started Guide – Version 6.0
3
Enable RTSP/UDP (or UDP) and “Use ports”, and define the port range.
Open an outbound UDP port range matching what is used by Windows Media Player, or
open all UDP ports outbound from Polycom® RSS™ 4000 to effectively bypass the firewall
for outbound traffic. Also open the port range used by Windows Media Player for inbound
traffic to the viewing PC.
To use TCP ports to receive streaming media:
1
Launch Window Media Player on your computer;
2
Click Tools->Options->Network;
3
Disable RTSP/UDP (or UDP).
Disable UDP connections in WMP will force to use TCP Port 554 only.
Hardware Specification
Parameter
Description
Intel Xeon 2.33GHzx2, 4G RAM, 1TBx2 Hard disk
(Disk 1: 1TB / Disk 2(for mirroring): 1TB)
Hardware Capability
Note: V5.0 system has same capacity on both Disk 1 and Disk 2, but
500GB out of 1TB is reserved for Linux upgrade. After migrating to
v6.0, this 500GB is available.
Form Factor
2U 19” rack mount
Height
89 mm
Width
441 mm
Depth
485 mm
Gross Weight
19.5 kg
700W ATX AC power supply w/PFC,
Power Supply
1 + 1 Redundant Power Supply
AC Voltage
100 - 240 VAC, 60-50 Hz, 10-4 Amps
Operation System
Linux
10
Polycom® RSS™ 4000 Getting Started Guide – Version 6.0
Polycom Solution Support Services
Polycom Implementation and Maintenance services provide support for Polycom
solution components only. Additional services for supported third-party Unified
Communications (UC) environments integrated with Polycom solutions are
available from Polycom Global Services and its certified Partners. These additional
services will help customers successfully design, deploy, optimize and manage
Polycom visual communications within their UC environments. Professional
Services for Microsoft Integration is required for Polycom Conferencing for
Microsoft Outlook and Microsoft Office Communications Server integrations. For
additional information and details please see
http://www.polycom.com/services/professional_services/index.html or contact
your local Polycom representative
11