1
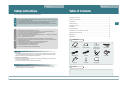
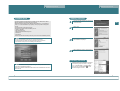
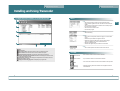
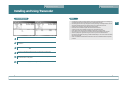
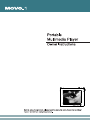
Safety Instructions Safety Instructions Table of Contents Table of Contents Please read the safety instructions below before using the player. Warning Description of each part.................................................................................................................. 4 • Do not overload the Mains outlet with too many power cords at any time . (It may cause the generation of abnormal heat and/or fire.) • Do not excessively bend the power cord or be squeezed by heavy objects. (It may cause fire.) • Do not handle the power plug with wet hands. (It may cause electric shock.) • Plug the player properly so that it can be stable. (If it is not properly plugged, it may cause fire.) Viewing an external source ............................................................................................................ 6 Viewing video ................................................................................................................................. 7 ENG Viewing an image ........................................................................................................................... 8 Listening to the music ................................................................................................................... 10 Text Viewer....................................................................................................................................12 Using a setup menu ..................................................................................................................... 13 Caution • • • • • • • • • • • • • Never disassemble or modify the player in any way. Do not let chemicals, such as benzene, thinner, and etc., come in contact with the player. Do not use the player near a magnetic material (magnet, and etc.). Do not let dirt or foreign materials go in the player. Avoid using the player in a place where has high temperature (40°… or higher) or low temperature (5°… or lower), or has much moisture. Do not drop the player or give a shock. Keep the player away from a place where has severe vibration or a magnetic material. Interruption by electromagnetic wave may damage the player. Be sure to completely untie the adaptor cable before using it. Avoid using the player near a direct ray of light or heat-generating device. Avoid using the player near a place where has much dirt or soot. Unplug the power cord when cleaning the adaptor. Do not drop the adaptor or give a severe shock. Do not use another adaptor (Use a supplied adaptor.) Notes when using an earphone Traffic safety • Do not use the earphone while riding a bicycle or driving a car or motorcycle. It is not only dangerous, but also illegal depending on the region. If the earphone is used while walking on the road, keeping its volume high on the crosswalk is very dangerous. Connecting an external component and USB .............................................................................. 16 Setting and using a transcoder..................................................................................................... 17 Miscellaneous .............................................................................................................................. 24 Specifications .............................................................................................................................. 26 Accessories Owner’s Instructions Lithium ion battery Installation CD (Transcoder program) Power cable Video/Audio cables Audio cable USB cable AC adaptor Earphone Hand strap Carrying case Protection for hearing ability • Do not keep the earphone volume high. Most doctors point out that keeping the volume high for a long time is very harmful to ears. • If ears ring, turn down the volume or stop using the earphone. Environmental information • Separate packing materials, batteries, and/or old electronic products when disusing. • Packing materials are classified into cardboard, polyethylene, and etc. Unnecessary packing materials have not been used for this player. 2 OPTION 3 Overview Overview Overview 1 2 3 4 5 6 DC 5V 7 8 9 10 11 12 13 14 15 16 17 18 19 LCD display Charge indication lamp: This lights on when the battery is charged by the input of DC power or connecting a USB cable. REC button: Use to record an external input signal. Use to display operating time while video playback and recording. REPEAT button: Use to repeat playback. MENU button: Use to return to the menu screen. VOL -,+ buttons: Use to adjust the volume. SLIDE TIME buttons: Use to select a showing time of the slide show. (Power/Stop) button: Use to turn on or off the power of the main set, or use to stop playback. (JOG/Select/Play/Pause/Search/Skip) button JOG ( ): Move it left or right to go to, search, or skip the desired position in the menu. SELECT ( ): Use to select a menu, or play/pause the player. AV IN (external input) jack: Use to connect an external component. DC IN (DC power input) jack: Use to input power. SD CARD insertion slot Charger insertion slot USB Connection jack NTSC/PAL switch: Use to select a display format on LCD display. HOLD switch: If the HOLD function is set, the player does not operate even in the entry of another button during playback. LCD ON/OFF switch: Use to turn on or off the LCD display. Headphone jack: Use to connect a headphone. 55° TILT: Install hand strap circular stand into 55° slot. 30° TILT: Install hand strap circular stand into 30° slot. Personal Multimedia Player Designed for plawa '2004 4 5 ENG Operation Viewing an External Source Operation Viewing Video This player allows you to view an external input signal. For connection of an external component, see page 16. INPUT MODE VIDEO LIST ENG After moving to "INPUT MODE" by using the JOG key, press the JOG key. The external component that is being currently connected will play and the playback screen will be displayed. Press the MENU button to exit. The menu screen will be displayed. Recording External Signals Œ Video Recording:Press the REC button once to start video recording. Press the REC button again during video recording to set a recording time. If the REC button is pressed during video recording, "TIME:000" appears in the recording time section at the top of the screen. Move the JOG key to the left or right to set the recording time in units of one minute and press the JOG key. The recording continues for the set time and automatically stops when the set time has lapsed. If you press the REC button after setting the recording time during video recording, the time setting is released. Press the STOP button to stop recording. ´ MP3 Recording: Hold down the REC button to record MP3. Press the STOP button to stop recording. ˇ JPEG Recording: Press the JOG button to save a JPEG image. Press the STOP button to pause or to release the current image and operate the JOG key to save the current image. Hold down the JOG key to consecutively record images at an interval of 1~1.5 seconds. Œ After moving to "VIDEO LIST" by using the JOG key, press the JOG key for selection. Video files in the built-in memory or SD card will appear. ´ After moving to a desired video file by using the JOG key, press the JOG key for playback. - The selected video file will play. - When the STOP button is pressed, playback will stop and the list of files will be displayed. - If the JOG key is used short during playback, the previous file or next file will play. - If the JOG key is used long (two seconds or longer) during playback, forward playback or reverse playback will be available. Note: If the message "N/A" appears during the operation of Fast Forward (FF) or Fast Reverse (FR), it means the information on the FF or FR operation (Index) is not included in the file. Press the MENU button to move from the FILE LIST to the MENU SCREEN. The menu screen will be displayed. Repeating Playback Press the REPEAT button. Every entry of the REPEAT button will select the following sequence of modes: "OFF" → "ONE" → "ALL". OFF: After the current file is played, the next file plays automatically. ONE: Repeats the file which is currently playing. ALL: Repeats all the video files in the current folder. Note • Video recording and JPEG recording are only possible in external input mode. • If Macrovision has been set, the Recording function does not operate. The message "Macrovision detect cannot record” will be displayed. 6 7 Operation Viewing Video Repeat Section Operation Viewing an Image IMAGE LIST Œ Repeats a section selected from the currently playing file. ´ Press the MENU button to select the start (point A). ˇ Press the MENU button again to select the end (point B). Section A-B will be played repeatedly. ¨ If you press the MENU button during the REPEAT SECTION, the REPEAT SECTION is canceled. Deleting a File Œ When deleting a file from the list of files, select the file you want to delete by using the JOG key and hold the key for at least two seconds. (When selecting all the files in the folder, press and hold the REPEAT button for two seconds or longer.) ´ When the STOP button is pressed, the selected files will be deleted. ˇ Deletion of the selected files can be cancelled in the same way as the selection of files. ENG Œ After moving to "JPEG LIST" by using the JOG key, press the JOG key for selection. JPEG files in the built-in memory or SD card will appear. ´ After moving to a desired JPEG file by using the JOG key, press the JOG key. - The selected JPEG file will appear on the whole screen. - You can view the previous file or next file by using the JOG key. - When the STOP button is pressed, playback will stop and the list of files will return. Press the MENU button to exit. The menu screen will be displayed. Setting a Slide Show Œ Press the REPEAT button to switch to the "SLIDE" mode. ´ Press the SLIDE TIME + or – button to select the showing time of the slide show. - You can select the time up to 30 seconds. - The default time is 3 seconds. Deleting a File Œ When deleting a file from the list of files, select the file you want to delete by using the JOG key and hold the key for at least two seconds. (When selecting all the files in the folder, press and hold the REPEAT button for two seconds or longer.) ´ When the STOP button is pressed, the selected files will be deleted. ˇ Deletion of the selected files can be cancelled in the same way as the selection of files. 8 9 Operation Listening to the Music MP3 LIST Operation Listening to the Music Search Function Œ Hold the JOG key to the left or to the right to move the playback position of the current file forwards or backwards. ´ A search can be executed at a maximum speed of 16´. The sound is muted during a search. ˇ If you press the JOG key during a search, the file is played. Œ After moving to "MP3 LIST" by using the JOG key, press the JOG key for selection. MP3 files in the built-in memory or SD card will appear. ´ After moving to a desired MP3 file by using the JOG key, press the JOG key. - The selected MP3 file will play. - When the JOG key is used during playback, the previous file or next file will play. - When the STOP button is pressed, playback will stop the list of files will return. Repeat Section Press the MENU button to exit. The menu screen will be displayed. Deleting Files Repetitive Playback ENG Œ Repeats a section selected from the currently playing file. ´ Press the MENU button to select the start (point A). ˇ Press the MENU button again to select the end (point B). Section A-B will be played repeatedly. ¨ If you press the MENU button during the REPEAT SECTION, the REPEAT SECTION is canceled. Œ Select a file to delete from the file list using the JOG key and hold down the JOG key for more than 2 seconds. (Hold down the REPEAT button for more than 2 seconds to select all files in a folder) ´ Press the STOP button to delete the selected file(s). - You can cancel the selection in the same manner as when you select files. Press the REPEAT button. Whenever you press the REPEAT button, the repeat mode changes in the order of “OFF” → “ONE” → “ALL” → “SHUFFLE” → “PROGRAM”. OFF: After the current file has played, the next file is played automatically. ONE: The current file is repeated. ALL: All MP3 files in the current folder are played repeatedly. SHUFFLE: All MP3 files in a current folder are played repeatedly in random order. PROGRAM: Selected MP3 files are repeated sequentially. - Select a file and hold down the JOG key. The icon of the selected file is changed and the file is added to the PROGRAM LIST. - Select a file from the PROGRAM LIST and hold down the JOG key. The icon of the selected file is changed and the file is released from the PROGRAM LIST. - Whenever you hold down the REPEAT key, all files are alternately added to and released from the PROGRAM LIST. - If you change repeat mode, the PROGRAM LIST is released. Note: In program play mode, you cannot delete a file. 10 11 Operation TEXT VIEWER TEXT VIEWER Œ Operate JOG to move to the “TEXT VIEWER LIST” and press the JOG key. Text files saved in the internal memory or the SD card will appear. ´ Operate JOG to move to a text file and press the JOG key. - The text file will appear. - You can view the previous or next text file, using JOG. - Press the STOP button to go back to the FILE LIST. Note: If you reload the last file, the file is displayed starting from the last section viewed. Operation Using a Setup Menu How to use a Setup Menu GENERAL SETUP GENERAL SETUP ✓ MEMORY LANGUAGE POWER SAVE RESET UP GRADE ✓ MEMORY LANGUAGE POWER SAVE RESET UP GRADE ✓ INTERNAL EXTENDED ENG Œ Select the item you want to set among GENERAL SETUP, RECORD SETUP, MEMORY SETUP, DISPLAY SETUP, SETUP EXIT by using the JOG key. ´ Move to a detailed setup item in the selected setup menu by using the JOG key. ˇ After moving to a desired menu by using the JOG key, press the JOG key for selection. ¨ After moving to or adjusting a desired menu by using the JOG key, press the JOG key to save the state of setup. - Press the STOP button to move to the upper menu. - Press the MENU button to move to the menu screen. Press the MENU button to exit. The menu screen will be displayed. Search Mode If you press the JOG button while playing a text file, you can start the search mode. If you press the JOG key in search mode, the search mode window appears. Select the position of the file you want to find in the search mode window by moving the JOG key to the left or right and press the JOG key to move to the selected position. Deleting Files Œ Select a file to delete from the file list using the JOG key and hold down the JOG key for more than 2 seconds. (Hold down the REPEAT button for more than 2 seconds to select all files in a folder) ´ Press the STOP button to delete the selected file(s). ˇ You can cancel the selection in the same manner as when you select files. 12 13 Operation Operation Using a Setup Menu MEMORY FORMAT GENERAL SETUP GENERAL SETUP ✓ MEMORY LANGUAGE POWER SAVE RESET UP GRADE ✓ INTERNAL EXTENDED • MEMORY INTERNAL: Use when playing, recording, deleting, and formatting the contents of the built-in memory. An SD card cannot be used. EXTENDED: Use when playing, recording, deleting, and formatting the contents of an external SD card. The built-in memory cannot be used. MEMORY FORMAT ✓ INTERNAL EXTENDED ✓ FORMAT • FORMAT INTERNAL: Use to delete all the files in the built-in memory. EXTENDED: Use to delete all the files in the external SD card. ENG • LANGUAGE Use to select a language. • POWER SAVE Use to set the power saving function. When the function is set, power will be shut down after a certain time (five minutes) elapses in the state of stop. • RESET Use to initialize all settings (factory default). • UPGRADE Use to upgrade the firmware that has been downloaded through USB. DISPLAY SETUP DISPLAY SETUP ✓ BRIGHTNESS CONTRAST LCD BRIGHTNESS SETUP • BRIGHTNESS Use to adjust the brightness of the LCD window. • CONTRAST Use to adjust the sharpness of the LCD window. RECORD SETUP RECORD SETUP ✓ MPEG4 MP3 INPUT ✓ S-FINE FINE NORMAL ECONOMY • MPEG4 Use to select the picture quality of video recording. S-FINE: Highest quality FINE: High quality NORMAL : Normal quality ECONOMY : Lowest quality ✽ Please refer to the page 26 regarding each recording time. SETUP EXIT SETUP EXIT The Setup menu will disappear and the menu screen will be displayed. • MP3 SAMPLE RATE/BIT RATE: Use to select the quality of recording. CHANNEL: Use to select MONO or STEREO during recording. • INPUT Sets the level of the input audio. 14 15 Connection Connecting an External Component and USB Connecting an AV Component Right side of the player A/V component (DVD/VCR) Connecting an Audio Component Right side of the player Video/Audio cable Audio component (Portable CD Player, Portable Cassette Player, PC Audio output) Audio cable • Connect a Video/Audio cable between the A/V component (DVD/VCR) and the player. Installing and Using Transcoder Using Environment [PC requirements] • • • • ENG Pentium III 1G at least Memory: 256MB at least Microsoft DirectX supported VGA Sound card-required [OS] • Microsoft Windows ME/Windows 2000/Windows XP • Connect an Audio cable between the audio component and the player. Connecting USB Note Left side of the player Installing and Using Transcoder PC • When moving, copying, or deleting a file through USB, remove the USB after making sure that the USB connection message window disappears. During the connection of USB, all the buttons on this player do not operate. USB cable [Codec] • Divx 5.1.1 Visit at the web site http://download.divx.com/divx/DivX511.exe and download Divx codec for installation. • A unified codec for running media files on a PC. A unified codec must be installed on the PC to run a file normally. [Others] • Microsoft DirectX 8.0 at least • Microsoft Windows Media Player 9.0 • Connect an USB cable between a PC (Windows ME, Windows 2000, Windows XP) and the player. • Enter Windows Explorer after USB is recognized by the PC. • This player is displayed as a portable disc in the list of folders of Windows Explorer. • Methods of copying or deleting a file with a portable disc are same with the using methods in Windows. 16 17 Installing and Using Transcoder Installation Guide Transcoder software decodes files such as WMV, ASF, AVI, MPEG, MPG, WMA, MPGA, VOB and DAT so that the files can be played. Most files having the video formats, MPEG4-SP and DivX Ver 3.11, and audio formats, 4.0, 5.03 SP and MPEG1 Layer3 (MP3), can be played without being transformed. Use a Transcoder for files that do not play, The following programs will be installed to your PC. 1. DivX 5.1.1 Bundle 2. All Codec Packs Link 3. Microsoft Windows Media Player 9.0 4. DirectX9.0 5. Transcoder Insert the CD that came with the product into your PC to start the installation process. Note You can download files from the Internet by using the enclosed CD. The download time may differ according to the kind of Internet connection. If you insert the CD into your PC, the following menu will appear. Installing and Using Transcoder Installing Transcoder 1 2 Insert the supplied installation CD and execute "TransCoder.EXE". ENG Select "Next". 3 As shown in the figure right, the process of program installation is displayed. 4 After installation is complete, select "Finish" to end installation. Executing Transcoder Note Make sure to select the icons sequentially starting from the top of the MENU window in this order to install all five programs. Refer to the Installation Guide and the Q&A at the bottom of the MENU for the installation methods 18 Select the menus at the right bottom of Windows in the following sequence: "Start" → "Program (P)" → "TRANSCODER" → "TRANSCODER". Or double click "TRANSCODER( )" on the Windows background screen. 19 Installing and Using Transcoder Installing and Using Transcoder Installing and Using Transcoder Configuration and Function of Transcoder Screen Menu Œ • File - New schedule: Calls a new file in the list of transcoded files. - Open schedule: Applies the saved *.dmt files in the list of transcoded files. - Save: Saves the contents of the operation which is under progress. in the list of transcoded files. - Save As: Saves as another name. - Exit: Exits the program. ´ ˇ ¨ • Build - Starts transcoding. ˆ • Option - Sami: If there is a caption file, whether to apply or not will be determined. - Media file: Only media files are applied in the list. - Media Info: Displays the files which can play without change. This is not available in any version after Windows XP. - Refresh: Re-applies the file. - Savefile Path: Applies the path of a file to be transcoded. Ø ∏ ” Œ Menu ´ Function icon ˇ File search window: This has the same function as Windows Explorer. ¨ File list window: This has the same function as Windows Explorer. ˆ Transcoded files list window: The files to be transcoded are displayed. Ø Location where the transcoded files are saved: This displays the location where the transcoded files are saved. ∏ Capacitance of memory: This displays the capacitance of the location where the transcoded files are saved. ” Display of transcoding progress: This displays the progress rate. 20 • Help - About: Guides product information and the whole web site. Tool Bar New schedule - New schedule: Builds a new list of transcoded files. Open schedule - Open schedule: Calls a list of saved transcoded files. Save - Save: Saves the contents of the list of transcoded files under operation. Start File Switching - Start File Switching: Starts the schedule which is applied to the list of transcoded files. 21 ENG Installing and Using Transcoder Installing and Using Transcoder Installing and Using Transcoder Note Transcoding files 1 2 3 4 5 6 22 Select the location where has a file to be transcoded in the File Search window. • If Codec does not exist, the player will notice you through a message window. The message window disappears three seconds later and an icon in red appears on the list. • If the saving space is not enough, the player will notice you through a message window. The message window disappears three seconds later and an icon in red appears on the list. • If Caption does not exist, the player will operate without caption. • DivX Codec can be installed only after the user downloads Freeware. • Combined Codec can be installed only after the user downloads Freeware. • If Inter Video Sound Codec has been installed, the player may not play normally. • If there are any errors in the files to be converted, this may result in the file being corrupted. • When the quality of an original file is not good, errors may occur in the transformed file. Files that are interrupted when playing in Windows Media Player or do not have index information may have poor quality. • Refer to the INSTALLATION GUIDE and the Q&A on the CD for installation details and possible problems. Drag a file to be transcoded in the File List window and move it into the Transcoded Files List window. Select the "Transcoding ( )" function icon for execution. The cursor in blue will be located on the file under transcoding and transcoding will proceed. After transcoding is complete, the transcoded file will be saved in the specified location. The default folder is "C:\My Media". The transcoded file can play by downloading it with a portable disc. 23 ENG Miscellaneous Miscellaneous Miscellaneous Battery and Power • The player uses an exclusive Lithium-Ion battery which can be fully charged within two hours of being completely discharged. • When video plays while the player is fully charged, the player can keep playing for about two hours. When only MP3 plays, the player can keep playing for about four hours. Troubleshooting Symptom ENG The player is dead. 1. Check a battery or AC adaptor is installed 2. Check the battery is fully charged. If not, charge it with an AC adaptor or USB cable. 3. Check the HOLD key or LCD OFF key is turned on. 4. Press the POWER button. When connecting an A/V cable, the playback screen of an external component is not displayed normally 1. Check an A/V cable is properly connected. 2. If the screen is biased upper or lower, check for the broadcasting system (NTSC or PAL) Earphone volume is not output normally. 1. Check for the level of volume. 2. Check for the connection of the earphone. (If there is a dirt or foreign material in the terminal, noise may occur.) 3. If the data of the file which is playing is damaged, noise may occur or sound may be interrupted. Check with another file. Charging does not work or the charge indication lamp does not light on. 1. Check for the connection of an AC adaptor. 2. Check for the installation of a battery. 3. Check whether the player is fully charged or not. An external memory (SD card) is not recognized normally. 1. Check for the installation of an external memory. 2. Check for the WRITE PROTECT switch of an SD card. 3. This player supports only “FAT and FAT16” formats. A downloaded moving image file does not play Play the moving image file after transcoding it through the included TRANSCODER PROGRAM. • Depending on the user's convenience, the player can be charged by using a USB cable or adaptor. - Charging with a USB cable Connect a USB cable between a PC and the player. Then the player will be charged automatically while it is turned off. Note: The charge indication lamp lights on only during charging. After charging is complete, the lamp lights off. - Charging with an AC adaptor The player can be charged with a AC adaptor included in the player. Note: Even though the player is turned off, charging will continue. The charge indication lamp lights on only during charging. After charging is complete, the lamp lights off. Cautions on use • There may be abnormality in a saved file when removing USB after the PC USB downloading operation is complete. Remove it safely after making sure that the message "USB CONNECTED TRANSFERRING FILES" disappears. • Be careful that an AC adaptor is not connected to the AV IN jack. Solution • While playing a file in the external memory, do not remove the external memory forcedly. • This player supports USB2.0. If PC environment is USB1.1, however, this player will operate in USB1.1. • When connecting USB, the operation of this player will be limited. • Do not remove a battery forcedly during playback or recording. • When charging the player with USB, turn it off first. 24 25 Miscellaneous Specifications Model MOVO_1 Size (Wx D x H) 96 x 18 x 79(mm) / 3.8 x 0.7 x 3.1(inch) Including battery: 133 g / 4.7 lbs Weight Audio Without battery: 107 g / 3.8 lbs Frequency characteristics 20Hz ~ 20KHz Headphone output 20mW, Impedance: 16ohm S/N Typical 90 dB (based on MP3) Direct playback: AVI (Video: ISO MPEG-4, Audio: MP3) Video Supported files Encoding Trans S/W used: WMV, ASF, AVI, MPEG, MPG, WMA Audio MP3, ID3 Tag ver1.1 Image JPEG Video/Audio MPEG-4/MP3, Extension = asf Audio MP3 128MB 256MB 512MB Recording time ECONOMY 90 minutes 180 minutes 360 minutes (based on the NORMAL 50 minutes 100 minutes 200 minutes FINE 30 minutes 60 minutes 120 minutes S-FINE 20 minutes 40 minutes 80 minutes built-in memory) 3.5" Color TFT LCD, 480 x 234 dot Picture display PC connection Memory type NTSC/PAL (selectable) USB 2.0 Built-in 128MB/256MB/512MB FLASH MEMORY Extended SD card slot (8MB ~ 1GB) Video playback: two hours Battery use time Audio playback: four hours (LCD OFF mode) DC 5V 2.0A adaptor Power specification DC 3.7V, 1100mA lithium ion battery Recommended OS Windows ME/Windows 2000/Windows XP system CPU Pentium III 1 GHz or faster specification Memory 256MB 26