1
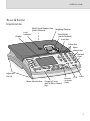
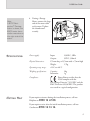
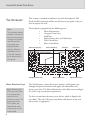
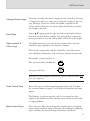
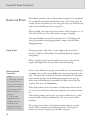
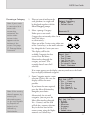
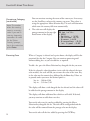
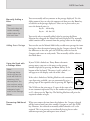
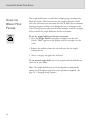
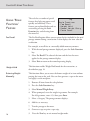
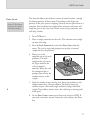
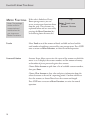
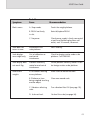
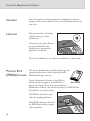
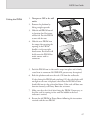
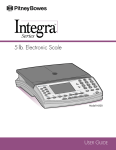
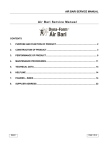
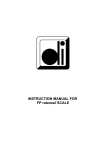
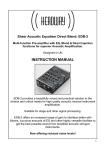
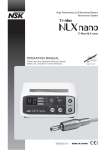
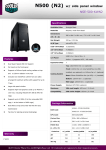
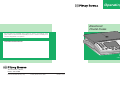
Operating Guide
Electronic
Postal Scale
We have made every reasonable effort to assure the accuracy and usefulness of this
guide, however we cannot assume responsibility for errors or omissions or liability for the
misuse or misapplication of our products.
FOR SERVICE AND SUPPLIES:
ld
Weight Ho
N500 series
- UK Model N521 & N521P
The Pinnacles, Harlow,
Essex, CM19 5BD
Form No. N572001 REV B (11-02)
© Pitney Bowes Limited, 2002
Printed in U.S.A.
CHAPTER 1
INTRODUCTION
Offers a brief description of the scale and keypad, covers safety
precautions, cabling, specifications, and help information.
About Your Scale .................................................................... 2
Sleep Mode ..........................................................................................2
Safety Precautions ................................................................ 2
Mains Electrical Connection ......................................................... 2
Scale & Keypad Identification ............................................. 3
Connecting Wires, Cables, & Meter ..................................... 4
Specifications ......................................................................... 5
Getting Help............................................................................ 5
1
CHAPTER 1: INTRODUCTION
ABOUT YOUR
SCALE
The N500 series Electronic Postal Scale is a 2kg capacity decision
making scale which uses computer technology to give you an accurate,
automatic display of weight, postal rate and charges. Place the mail on
the scale and select the appropriate category and any fees required; the
scale will display the correct postal charges.
The postage rate information is all contained within a small electronic
‘chip’ called a PROM. When the postage rates change, you can easily
remove the old PROM and fit a new one to instantly update your scale.
If the scale is linked to a Pitney Bowes electronic postage meter, it can
automatically set the postage value and control the accounts set up on
the postage meter.
If the scale is linked to a Pitney Bowes Electronic Postage Meter with a
Mailing Base capable of tape dispensing, the scale will also enable a tape
to be produced automatically.
Sleep Mode
The scale enters sleep mode if it remains inactive at zero weight for
more than three minutes. During sleep mode, the display is
extinguished.
SAFETY
PRECAUTIONS
Never attempt to remove covers from your scale. No user serviceable
parts are contained within the unit, servicing should be referred to
qualified personnel.
The scale platform may be removed to gain access to the Postage Rate
PROM (see page 26). Always ensure power is turned OFF at the mains
socket outlet before removing the platform.
Mains electrical
connection
The N500 is supplied with a power supply suitable for use on standard
UK 13A mains sockets. Only the power supply provided with the scale
should be used.
Note:
The socket outlet should be near to the equipment
and should be easily accessible.
2
N500 User Guide
SCALE & KEYPAD
IDENTIFICATION
Level
Indicator
Model/Serial Number Plate
(Under Platform)
Weighing Platform
Rate PROM
(Under Platform)
Display
Scroll Keys
Colour Keys
Alphanumeric Keys
Decimal
Point
ld
Weight Ho
Adjustable
Feet (4)
Menu Selection Keys
Category/Carrier,
Scale & Meter Control
Keys
Zero Key C/CE
(re-zeroes
scale)
Enter
3
CHAPTER 1: INTRODUCTION
CONNECTING
WIRES, CABLES, &
METER
Your scale should already have been installed, either by yourself or by a
Pitney Bowes engineer. This section has been included to assist you if a
lead comes loose or you relocate the system.
1. Connect the small end
of the power cord to the
scale.
2. If using a Postage Meter,
connect the small end
of the meter cable to the
scale connector A.
Some meter cables may
have a second connector
which locates onto scale
connector B. If your
cable doesn’t have this
second connector,
nothing needs to be
connected at point B.
3. Tuck the cord(s) under
the guides on the
bottom of the scale.
4
A
B
1
N500 User Guide
Note:
A B700 Postperfect™ Postage
meter is shown, the
B900 meter has a
similar connector on
the right side of the
meter.
SPECIFICATIONS
GETTING HELP
4. If using a Postage
Meter, connect the large
end of the meter cable
to the meter. Tighten
the thumbscrews
securely.
UL
Power supply:
Input:
Output:
230VAC, 50Hz
9VDC, 300mA
Physical dimensions:
271mm deep x 237mm wide x 75mm high
Weight:
1.7kg
Operating temp. range:
+10C to +40°C
Weighing specifications:
Capacity:
Increment:
Compliance:
Pitney Bowes certifies that the
N500 complies with the
Low Voltage Directive 73/23/EEC and the
EMC Directive 89/336/EEC. The product
was tested in a typical configuration.
2kg
1g
If you require assistance during the installation process, call our
Helpline on 0990 13 47 00.
If you require service after the initial installation process, call our
Careline on 0990 12 13 14.
5
CHAPTER 1: INTRODUCTION
6
CHAPTER 2
USING YOUR SCALE
This Chapter describes the process of weighing a mailpiece and
calculating postage. It also provides information on special scale
features and meter interface.
The Keyboard ....................................................................... 8
Menu Selection Keys .................................................................. 8
Category/Carrier Keys ............................................................... 9
Scroll Keys ..................................................................................... 9
Alpha-numeric & Colour Keys .................................................. 9
Scale Control Keys ..................................................................... 9
Meter Control Keys..................................................................... 9
Using the Scale .................................................................10
Sleep Mode ................................................................................... 10
Postage Meter Accounts ......................................................... 10
Choosing a Category .................................................................. 11
Choosing Fees .............................................................................. 12
Manually Adding a Value ........................................................... 13
Using the Scale with a Postage Meter ................................ 13
Processing Additional Items ................................................... 13
Using the Weight Hold Feature .............................................. 14
Currency Breakdown .................................................................. 15
Using ‘Scale Functions’ Feature .....................................16
Fee Recall ...................................................................................... 16
Entering Weight Manually ........................................................ 16
Parts Count .................................................................................. 17
Meter Functions ............................................................... 18
Funds ............................................................................................. 18
Account Status ......................................................................... 18
Changing Setup Options ................................................. 19
User Options ................................................................................ 19
Supervisor Options ...................................................................20
7
CHAPTER 2: USING YOUR SCALE
THE KEYBOARD
Note:
The keyboard layout
shown is correct at
the time of printing.
Changes to postal
rate structures
may mean your
keyboard looks
slightly different.
Operation of the
scale will, however,
be as described in
this guide.
This section is intended to familiarise you with the keyboard. Full
details of all key functions will be covered later in this guide as they are
used to operate the scale.
The keyboard is grouped into the following areas:•
Menu Selection keys
•
Category/Carrier keys
•
Scroll keys
•
Alpha-numeric keys and Colour keys
•
Scale Control keys
•
Meter Control keys
Menu Selection keys
Scale Control keys
Scroll keys
Colour keys
Weight Hold
Category/Carrier keys
Menu Selection Keys
Note: Pressing the
C/CE key once, while
in a transaction,
reverts to the
previous screen. The
second press of
C/CE clears the
transaction and
returns you to the
ready mode.
8
Meter Control keys
Alpha-numeric keys
The N500 features a menu driven user interface, which guides you
through each postal transaction and applies the information and
features you select. The Menu Selection keys also allow you to configure
the scale’s setup to your own requirements.
To select an item from the menu, press the key which is aligned with
you choice. The scale will accept your choice and advance to the next
menu screen, if appropriate.
N500 User Guide
Category/Carrier Keys
These keys are either one-touch Category keys or Carrier keys. Pressing
a Category key will act as a short cut to select the Category in one easy
step. Pressing a Carrier key will list all available Categories for the
Carrier selected, then press the relevant Menu Selection key to choose
the Category you want.
Scroll Keys
Arrows ▲ ▼ appearing on the right hand side of the display indicate
that there are more choices available. Use the Scroll keys to move the
menu up or down to view the choices which will not fit on the display.
Alpha-numeric &
Colour Keys
The Alpha-numeric keys are used to enter country codes, select the
number of tapes required or enter monetary amounts.
When used in conjunction with the Colour Keys, they allow you to
enter alphabetic information, such as names of countries or passwords.
For example, to enter the letter ‘S’:
First, press and release the blue key
Next, press the S key
Remember: to enter alphabetic information, press the colour key before each
press of an alpha key.
Scale Control Keys
Keys in this area are used to control functions of the scale. The Zero
key is covered below, see pages 15 and 18 for scale functions and setup
options.
The Zero key is used to re-zero the scale if it was turned on with a
weight on the platform or if the scale does not read zero correctly with
an empty platform.
Meter Control Keys
Keys in this area allow you to change the account batch at the postage
meter, transfer monetary values to the meter for franking or producing
tapes, and allow you to view/change information at the meter.
9
CHAPTER 2: USING YOUR SCALE
USING THE SCALE
The following assumes you or a Pitney Bowes engineer have completed
the installation instructions included with your scale. If not, please do
so now. Ensure that before you start using your scale, you check that the
scale has been levelled correctly (see page 26).
Where possible, sort items of mail into batches of like categories, i.e. 1st
Class or 2nd Class etc. This will minimise category changing.
Your scale should be turned ON and ready for use. The display will
show 0g (provided the weighing platform is empty) and the Select
Category prompt.
Sleep Mode
During operation, if the scale is at zero weight and not used for 3
minutes, it will enter Sleep Mode. During Sleep Mode the display is
extinguished.
When a weight is placed on the platform or any key is pressed, the
display will relight with all the previous selections showing.
Postage Meter
Accounts
Notes:
1. Selecting account
0, cancels out of
the current account
and prevents mail
processing until a
valid account is
entered.
2. If an arrow
appears on the
display, use the
scroll keys to
display accounts
not on the screen.
10
If your scale is linked to a postage meter which has internal accounting,
you must select a valid account before you start processing mail on the
scale. This operation can be done from the scale keyboard. Dependant
upon whether you have the Datalink option fitted to your postage
meter, one of the following two methods will allow you to select the
account. First, press the Account key…
If the display shows the list of accounts available down the left side of
the screen, press the menu selection key alongside the account to select.
or…
If the display prompts you to enter an account number, key in a valid
account number and press the Enter key. The new account will be
displayed.
The postage meter will set to the chosen account and you can now
process mail as described in the following section. To change the
account at any time, simply repeat the above sequence.
N500 User Guide
Choosing a Category
Note: If your scale
is connected to a
meter with
accounting
activated, the
active meter
account also
appears at the
bottom of the
screen. See page
10, Postage Meter
Accounts.
1. Place an item of mail onto the
scale platform; its weight will
be displayed together with the
Select Category prompt.
2. Select a postage Category:
0g
Select Category
- Royal Mail
- Parcelforce
Account:01
Either press a one-touch
Category key to instantly select 1st or
2nd Class letters.
or, alternatively…
Select one of the Carriers using either one
of the Carrier keys, or the menu selection
key alongside the Carrier you want.
The display will list the
available Categories for that
carrier. Press the Menu
Selection key alongside the
category you want. (The
example shows Letters Int’l
selected).
13g
Royal Mail
- 1st Class
- 2nd Class
- Ist Priority
- Letters Int'l
- Printed & News
- Small Packets
If an arrow appears on the display, you may need to use the Scroll
keys to display additional categories.
3. Some Categories require a zone
selection. If this is the case, the
display will list the zones
possible.
Note: If the country
doesn’t appear, try
entering an
alternative name
i.e. for Irish Republic
try Republic of
Ireland, or for
Holland try
Netherlands.
If you know the zone required,
press the Menu Selection key
alongside your choice.
Alternatively, for air mail
categories, you can press the
Menu Selection key alongside
‘Air - Country’ and the scale
will ask for a country selection.
Key in the first letter of the
country name using the Alphanumeric and Colour keys.
13g
Ryl Let Int
- Air - Country
- Air Europe
- Air Zone 1
- Air Zone 2
- Surface O/S Eur
13g
Ryl Let Int Air
- U.A.E.
- Uganda
- Ukraine
- Uruguay
- U.S.A.
- Uzbekistan
11
CHAPTER 2: USING YOUR SCALE
Choosing a Category
(continued)
Note: The number
after the country
name is a country
code. If you mail a
country frequently,
remember its code.
At the ‘Enter
Country’ prompt,
key in the code then
press Enter.
Choosing Fees
You can continue entering the name of the country or, if necessary,
use the Scroll keys to locate the country you want. Then select it
using the appropriate Menu Selection key. The scale will determine
which zone the country falls into automatically.
4. The scale now will display the
postage amount in the top right
hand corner of the display.
6g
£ 0.47
RM Let Int Air
¶ USA/1
- Swiftair £ 3.30
- Swift+Comp £ 4.30
- Airsure £ 4.00
- Airsure+Comp £ 5.00
- Int. Signed £ 2.85
When a Category is selected and a price shown, the display will list the
permitted fees for the Category. You can continue processing mail
without adding fees, or you can add fees as required.
To add a fee, press the Menu Selection key alongside the fee you want.
If the fee selected is value dependent (varies with the value of the item
to be mailed), the scale will ask you to enter the value of the item. Key
in the value on the numeric keys followed by the Enter key. Values are
in pounds unless you enter the decimal point i.e.
key in… 500 for £500
key in… 5.01 for £5.01
The display will show a tick alongside the fee selected and the value will
be added to the postage amount in the display.
The display will show additional fees which are still valid. If desired,
you may continue to add these extra fees.
You can de-select any fee you have added by pressing the Menu
Selection key alongside the fee. The tick will be extinguished and the
fee value will be removed from the postage value on the display.
You can de-select all the fees added by pressing the C/CE key.
12
N500 User Guide
Manually Adding a
Value
Note:
The scale does not
retain manually
added values for
the next item.
You can manually add any amount to the postage displayed. Use the
Alpha-numeric keys to select the amount and then press the Enter key
to add this to the postage displayed. Values are in pence unless you
enter the decimal point i.e.
key in… 40 for 40p
key in… 40. for £40
You can de-select a manually added value by pressing the Menu
Selection key alongside the Manul Add entry displayed. The manually
added amount will be removed from the postage value on the display.
Adding Excess Postage
You can also use the Manual Add facility to add excess postage for items
having less than the required postage for the Category selected. To add
the difference to the item, press the C/CE key twice to clear the
Category and return to ready mode. Then manually add the value as
described above.
Using the Scale with
a Postage Meter
If your N500 is linked to a Pitney Bowes electronic
postage meter, you can set the meter to the postage
amount displayed by pressing the Meter Set key at the
bottom of the keyboard. The meter ‘ready’ symbol ( ≡ )
will appear on the display each side of the value.
Note:
If Postage Meter
funds are low, the
scale will blink the
monetary field
decimal point. You
can continue using
the scale as long as
adequate funds
exist in the Postage
Meter.
Processing Additional
Items
If the scale is linked to a Mailing Machine with automatic
tape dispensing available, you can automatically print a
postage tape of the required value by pressing the Tape key.
The N500 can also print up to 25 tapes of the same value
in one automatic operation. Key in the number of tapes you want (up
to 25), then press the Tape key. The Mailing Machine will print the
requested number of tapes.
When you remove the item from the platform, the Category selected
will be retained until you select another Category or press the C/CE
key. However, fees selected or manually added amounts will not be
retained. This is to prevent you accidentally leaving fees or other
additions operating on subsequent items of mail.
13
CHAPTER 2: USING YOUR SCALE
USING THE
WEIGHT HOLD
FEATURE
The weight hold feature is useful when weighing large envelopes that
block the display. This feature retains the weight reading for a brief
time after you remove an item from the scale. It allows you to continue
selecting categories and fees even though the item is no longer on the
scale. Pressing any key other than zero (for example, to select a category
of fee) extends the weight hold time for that transaction.
To use the weight hold feature for one transaction:
1. Press the Weight Hold key and place a mailpiece on the scale.
Result: "Hold" appears on the display (only if no weight is on the
scale).
2. Remove the mailpiece from the scale and note that the weight
reading remains.
3. Select a category and apply fees if desired.
To exit manual weight hold, wait a few seconds until the hold feature
times out or press Zero.
Note: The weight hold feature can be configured to automatically
operate for all mailpieces placed on to the platform if required. (See
page 19 - Changing Setup Options).
14
N500 User Guide
Currency Breakdown
This function allows you to generate multiple tapes to equal a postage
amount greater than the printing capacity of the attached meter.
For example, if your meter has a maximum printing capacity of £99.99
and the item you are weighing requires £110 of postage:
1. Press the Meter Set or Tape key. The
postage amount and Currency
Breakdown prompt displays to
indicate the total exceeds the meter's
printing capacity.
2. Press the Meter Set or Tape key again. The meter sets to £99.99
and generates a tape (if tape was selected) for that amount. The
remaining amount is displayed on the scale.
3. Press the Meter Set or Tape key again. The meter sets to the
remaining amount and generates a tape (if tape was selected) for
that amount. The scale display returns to the original total postage
amount.
4. Remove the item from the scale and press C/CE twice to return to
ready mode.
To cancel the currency breakdown function, press C/CE any time
during the transaction.
15
CHAPTER 2: USING YOUR SCALE
USING ‘SCALE
FUNCTIONS’
FEATURE
The scale has a number of special
features that help you process mail
quickly and efficiently. These
features are explained below and are
accessed by pressing the Scale
Functions key and selecting from
the menu list.
Fee Recall
The Fee Recall option allows you to review the fees included in the total
postage amount during a transaction. It also displays the item value for
verification.
13g
Scale Functions
- Fee Recall
- Weight Hold
- Manual Weight Entry
- Parts Count
For example, to recall fees or a manually added monetary amount:
1. With the total postage amount displayed, press the Scale Functions
key.
2. Select Fee Recall. The value of the item and the fees that were
applied to the postage amount display.
3. Select Exit to return to the normal operating display.
Weight Hold
This function enables Weight Hold mode for the transaction, as
described on page 14.
Entering Weight
Manually
This function allows you to enter the known weight of an item without
putting the item on the scale. You can then generate a tape on the meter
and apply it to the mailpiece.
1. Remove all items from the scale platform.
2. Press the Scale Functions key.
3. Select Manual Weight Entry.
4. When prompted, enter the weight in grammes. For example:
For 456 grammes, enter 4 5 6 then press Enter
5. Select a Category. The postage amount displays.
6. Add fees as necessary.
7. Transfer postage to the meter.
8. Generate a tape or print a tape strip.
16
9.
Press the Zero key to exit manual weight mode.
N500 User Guide
Parts Count
Note: All like Items
must be the same
individual weight.
This function allows you to obtain a count of items based on a sample
of a known quantity of those items. Depending on the shape and
quantity of the parts you are weighing, you may need to place them in a
container. You can deduct the weight of the container, and count and
weigh the parts at the same time. If you are not using a container, start
with Step 3 below.
1. Press C/CE twice.
2. Place an empty container on the scale. (The container must weigh
no more than 40g).
3. Press the Scale Functions key and select Parts Count from the
menu. The scale re-zeros and prompts you to place a counted
sample on the scale platform.
4. Place parts in the
container (or on the scale
platform). The total
weight of the parts must
be 50g or more for the
scale to calculate
correctly. When the scale
has enough weight, it
prompts you to enter the
number of parts in the
sample.
0
5. Note the number of parts on the scale. Enter that number via the
Alpha-numeric keys, then press Enter. The display shows the
number of parts, their total weight and their average individual
weight. If you add or remove items, the scale keeps a running total
of the parts.
6. To exit Parts Count, remove parts from scale and press C/CE. If
you used a container, remove it from the scale and press the Zero
key.
17
CHAPTER 2: USING YOUR SCALE
METER FUNCTIONS
Note: The postage
meter must be
connected and
switched on for
you to access
Meter Functions.
If the scale is linked to a Pitney
Bowes postage meter, you can
access certain meter functions direct
from the scale. These features are
explained below and are accessed by
pressing the Meter Functions key
and selecting from the menu list.
13g
Meter Functions
- Funds
- Account Status
Funds
Select Funds to read the amount of funds available and used and the
total number of mailpieces processed by your postage meter. Press C/CE
once to return to Meter Functions, or twice for normal operation.
Account Status
Account Status allows you to view the status of the account to which the
meter is set. It displays the account number, and the amount of money
and number of pieces processed against that account.
Choose Select Account to pick from a list of available account numbers,
then press Enter.
Choose Clear Account to clear value and pieces information from the
selected account at the end of a reporting period. Confirm with Yes to
clear the account, or choose No to leave the account unchanged.
Press C/CE once to return to Meter Functions, or twice for normal
operation.
18
N500 User Guide
CHANGING
SETUP OPTIONS
You may want to configure the scale
to more closely meet your
requirements. To enter Setup
Mode, press the Setup key and
review the list of user setup options
User Setup
- Exit
- OFF Autoclear Cat
- OFF Autoclear Zone
- ON ClrZoneNewCat
- OFF Auto Weigh Hold
- Supervisor Setup
- Service Setup
Service Setup is accessible only by
Pitney Bowes Customer Service Representatives.
User Options
User Options are set to either on or off. They concern information you
can retain from mailpiece to mailpiece. The options are defined below.
Option
Function
Autoclear Cat
When on, category information clears when
you remove a mailpiece from the scale.
Autoclear Zone
(Displays only when
Autoclear Cat is off.)
When on, zone information
clears when you remove a mailpiece from
the scale.
Clear Zone New Cat
When on, the zone clears when you select a
new category.
Auto Weigh Hold
When on, automatically retains weight
reading for 10 seconds after mailpieces are
removed from the platform. See page 14
1. Press the menu selection key next to the option you want to
change. The screen indicates your change.
2. Select Exit to escape this menu.
3. Select Save or Cancel to save or cancel your changes.
After exiting setup mode, the scale reinitializes and returns to ready
mode.
19
CHAPTER 2: USING YOUR SCALE
Supervisor Options
Certain options are password-protected for supervisory control.
You can access these options by pressing the Setup key and selecting
Supervisor Setup.
At the Enter Password prompt:
1. Enter the supervisor password, M G R, on the colour-coded and
alphanumeric keys from left to right as shown.
2. Press Enter. The menu options are Exit and Configure Scale. See
Green
Green
→
→
Red
→
→
→
the chart below for definitions of Configure Scale. Pressing Exit
returns you to the User Setup screen.
3. Select the desired options and respond to the prompts.
Note: Pressing Exit
while in a supervisor
option returns you
to the previous
screen.
Default
Option
Description
Off
Other Language
Not used in the UK at this time.
Off
Inscriptions
Not used in the UK at this time.
Off
Accounting
Not used in the UK at this time.
Off
Vibration Filter
Turn on this option only in areas of
excessive vibration to aid the
display of stable weight.
4. When finished, select Exit twice to exit the supervisor and user
setup menus.
5. Select Save or Cancel to save or cancel your changes.
6. After exiting Setup Mode, the scale reinitializes and returns to ready
mode.
20
CHAPTER 3
TROUBLESHOOTING
Clearing Error Messages ................................................. 22
Diagnosing Problems ........................................................ 22
21
CHAPTER 3: TROUBLESHOOTING
CLEARING ERROR
MESSAGES
Occasionally, error messages display on the screen. Sometimes they
identify an incorrect entry and indicate corrective action. To clear most
errors:
1. Press C/CE to return to previous menu.
2. Press C/CE a second time to return to the beginning of the
transaction.
If the error does not clear, call the Pitney Bowes CARELINE at
0990 12 13 14 for help.
DIAGNOSING
PROBLEMS
22
You may be able to diagnose and correct problems yourself by referring
to the symptoms vs. recommendations chart on the next page. If
performing the suggested action is not successful, call the Pitney Bowes
CARELINE.
N500 User Guide
Symptom
Probable
Cause
Blank screen.
A. Sleep mode.
Touch the weight platform.
B. PROM not firmly
in slot.
Reinstall/replace PROM.
C. No power.
Check power supply is firmly connected
at each end. Remove plug from wall
outlet, wait 10 seconds; reconnect.
Scale does not
return to zero.
Interference with
scale platform.
Press Zero key.
Scale displays
zero weight only.
Out of calibration or
mechanical
interference.
Check for foreign matter under scale
platform. Call CARELINE.
Scale display does
not reach 2kg.
Platform incorrectly
seated or mechanical
interference.
Ensure platform correctly seated. Check
for foreign matter under platform.
Inconsistent
weights.
A. Air currents moving
across platform.
Move scale to another location.
B. Platform or item
being weighed touching
another object.
Clear area around scale.
C. Vibrations affecting
scale.
Turn vibration filter ON (see page 19).
D. Scale not level.
Re-level the scale (see page 26).
Recommendation
23
CHAPTER 3: TROUBLESHOOTING
24
CHAPTER 4
MAINTAINING YOUR SCALE
Includes cleaning instructions and how to install rate PROMs.
Cleaning .................................................................................. 26
Levelling .................................................................................. 26
Postage Rate (PROM) Change ........................................... 26
Fitting the PROM ........................................................................... 27
Service ....................................................................................28
25
CHAPTER 4: MAINTAINING YOUR SCALE
CLEANING
Your scale requires very little maintenance. Simply keep it clean by
wiping it with a soft dry cloth. Do not use harsh chemical cleaners on
your scale.
LEVELLING
The scale must have a firm base
and be level to give its best
performance.
To level the scale, adjust the four
feet until the bubble in the
levelling device on top of the
platform is centralised.
Turn the feet clockwise to raise them or anticlockwise to lower them.
POSTAGE RATE
(PROM) CHANGE
This section describes how to update the postage rates
contained within your scale by removing the old
PROM and fitting a new one.
Service Maintenance Contracts in the UK may
include automatic supply of a new PROM at a
Rate PROM
postage rate change. If not, or if you do not have a
Maintenance Contract, you will need to order a new PROM from
Pitney Bowes at each rate change.
The PROM is located in a slot
under the weighing platform.
The PROM’s label gives details of
the PROM part number, country
and revision date.
26
N500 User Guide
Fitting the PROM
1. Turn power OFF at the wall
outlet.
2. Remove the platform by
lifting straight upwards.
3. Slide the old PROM out of
its location slot. Resistance
will be felt. Put this PROM
to one side for now.
4. Slide the new PROM into
the empty slot ensuring the
opening in the PROM
handle is in the top right
hand corner. Resistance will
be felt once the PROM has
made contact with its
connector.
5. Push the PROM into its slot until it snaps into place and is firmly
seated into its connector. MODERATE pressure may be required.
6. Refit the platform and turn the scale ON from the wall outlet.
If, after fitting the PROM and switching ON, the scale display will
not light or an error is displayed, check that the PROM has been
fitted fully into its slot as described above. If the scale still does not
function correctly, call Pitney Bowes for assistance.
7. Make sure the scale is level after fitting the PROM. If necessary, relevel the scale by turning its feet until the bubble in the level
indicator is centred.
8. Return the old PROM to Pitney Bowes following the instructions
received with the new PROM.
27
CHAPTER 4: MAINTAINING YOUR SCALE
SERVICE
Pitney Bowes provides service throughout the UK.
Should you require service or assistance call the Pitney Bowes
CARELINE on 0990 12 13 14
A service maintenance contract is available to keep your system in top
operating condition at nominal cost. Contact Pitney Bowes for full
information.
28
Operating Guide
Electronic
Postal Scale
We have made every reasonable effort to assure the accuracy and usefulness of this
guide, however we cannot assume responsibility for errors or omissions or liability for the
misuse or misapplication of our products.
FOR SERVICE AND SUPPLIES:
ld
Weight Ho
N500 series
- UK Model N521 & N521P
The Pinnacles, Harlow,
Essex, CM19 5BD
Form No. N572001 REV B (11-02)
© Pitney Bowes Limited, 2002
Printed in U.S.A.