1
A9MK2_CUXCN.book
1 ページ
2009年4月7日 火曜日 午前10時26分
A9
SX-A9MK2-K Stereo Receiver
SX-A9MK2-K Ampli-Tuner Stéréo
Register your product on:
http://www.pioneerelectronics.com (US)
http://www.pioneerelectronics.ca (Canada)
• Protect your new investment
The details of your purchase will be on file for reference in the event of an insurance claim such as loss or theft.
• Receive free tips, updates and service bulletins on your new product
• Improve product development
Your input helps us continue to design products that meet your needs.
• Receive a free Pioneer newsletter
Registered customers can opt in to receive a monthly newsletter.
http://www.pioneerelectronics.com (US)
http://www.pioneerelectronics.ca (Canada)
Operating Instructions
Mode d’emploi
A9MK2_CUXCN_cover_anki.fm 2 ページ
2009年4月7日 火曜日 午後5時29分
IMPORTANT
CAUTION
RISK OF ELECTRIC SHOCK
DO NOT OPEN
The lightning flash with arrowhead symbol,
within an equilateral triangle, is intended to
alert the user to the presence of uninsulated
“dangerous voltage” within the product’s
enclosure that may be of sufficient
magnitude to constitute a risk of electric
shock to persons.
CAUTION:
TO PREVENT THE RISK OF ELECTRIC
SHOCK, DO NOT REMOVE COVER (OR
BACK). NO USER-SERVICEABLE PARTS
INSIDE. REFER SERVICING TO QUALIFIED
SERVICE PERSONNEL.
The exclamation point within an equilateral
triangle is intended to alert the user to the
presence of important operating and
maintenance (servicing) instructions in the
literature accompanying the appliance.
D3-4-2-1-1_A1_En
NOTE:
This equipment has been tested and found to comply with the limits for a Class B digital device, pursuant to Part 15
of the FCC Rules. These limits are designed to provide reasonable protection against harmful interference in a
residential installation. This equipment generates, uses, and can radiate radio frequency energy and, if not installed
and used in accordance with the instructions, may cause harmful interference to radio communications. However,
there is no guarantee that interference will not occur in a particular installation. If this equipment does cause
harmful interference to radio or television reception, which can be determined by turning the equipment off and on,
the user is encouraged to try to correct the interference by one or more of the following measures:
— Reorient or relocate the receiving antenna.
— Increase the separation between the equipment and receiver.
— Connect the equipment into an outlet on a circuit different from that to which the receiver is connected.
— Consult the dealer or an experienced radio/TV technician for help.
D8-10-1-2_A1_En
IMPORTANT NOTICE
THE SERIAL NUMBER FOR THIS EQUIPMENT IS LOCATED IN THE REAR.
PLEASE WRITE THIS SERIAL NUMBER ON YOUR ENCLOSED WARRANTY CARD AND KEEP IN A SECURE AREA.
THIS IS FOR YOUR SECURITY.
D1-4-2-6-1*_A1_En
Information to User
Alterations or modifications carried out without appropriate authorization may invalidate the user’s right to operate
the equipment.
D8-10-2_A1_En
CAUTION
This product satisfies FCC regulations when shielded cables and connectors are used to connect the unit to other
equipment. To prevent electromagnetic interference with electric appliances such as radios and televisions, use
D8-10-3a_A1_En
shielded cables and connectors for connections.
CAUTION
The POWER switch on this unit will not completely
shut off all power from the AC outlet. Since the
power cord serves as the main disconnect device for
the unit, you will need to unplug it from the AC outlet
to shut down all power. Therefore, make sure the
unit has been installed so that the power cord can
be easily unplugged from the AC outlet in case of an
accident. To avoid fire hazard, the power cord should
also be unplugged from the AC outlet when left
unused for a long period of time (for example, when
D3-4-2-2-2a_A_En
on vacation).
WARNING:
Wash hands after handling
D36-P4_A_En
+$!)$)+ !!%$,'(*%%!- '(
$' #)$$*#)'-$'' $#(*')))
%$,'(*%%!-+$!)$)',') (*# )
, !!*(")()'&* '+$!)
#
$',' ))#$#)''%#!
Operating Environment
Operating environment temperature and humidity:
+5 °C to +35 °C (+41 °F to +95 °F); less than 85 %RH
(cooling vents not blocked)
Do not install this unit in a poorly ventilated area, or in
locations exposed to high humidity or direct sunlight (or
D3-4-2-1-7c*_A1_En
strong artificial light)
A9MK2_CUXCN_cover_anki.fm 3 ページ
2009年5月28日 木曜日 午後6時27分
1)
2)
3)
4)
5)
6)
7)
Read these instructions.
Keep these instructions.
Heed all warnings.
Follow all instructions.
Do not use this apparatus near water.
Clean only with dry cloth.
Do not block any ventilation openings. Install in
accordance with the manufacturer’s instructions.
8) Do not install near any heat sources such as
radiators, heat registers, stoves, or other apparatus
(including amplifiers) that produce heat.
9) Do not defeat the safety purpose of the polarized or
grounding-type plug. A polarized plug has two
blades with one wider than the other. A grounding
type plug has two blades and a third grounding
prong. The wide blade or the third prong are
provided for your safety. If the provided plug does
not fit into your outlet, consult an electrician for
replacement of the obsolete outlet.
10) Protect the power cord from being walked on or
pinched particularly at plugs, convenience
receptacles, and the point where they exit from the
apparatus.
11)
manufacturer.
12) Use only with the cart, stand, tripod, bracket, or
table specified by the manufacturer, or sold with the
apparatus. When a cart is used, use caution when
moving the cart/apparatus combination to avoid
injury from tip-over.
13) Unplug this apparatus during lightning storms or
when unused for long periods of time.
14) Refer all servicing to qualified service personnel.
Servicing is required when the apparatus has been
damaged in any way, such as power-supply cord or
plug is damaged, liquid has been spilled or objects
have fallen into the apparatus, the apparatus has
been exposed to rain or moisture, does not operate
normally, or has been dropped.
P1-4-2-2_En
FEDERAL COMMUNICATIONS COMMISSION DECLARATION OF CONFORMITY
This device complies with part 15 of the FCC Rules. Operation is subject to the following two conditions: (1) This
device may not cause harmful interference, and (2) this device must accept any interference received, including
interference that may cause undesired operation.
Product Name: Stereo Receiver
Model Number: SX-A9MK2-K
Responsible Party Name: PIONEER ELECTRONICS (USA), INC.
SERVICE SUPPORT DIVISION
Address: 1925 E. DOMINGUEZ ST. LONG BEACH, CA 90810-1003, U.S.A.
Phone: 1-800-421-1404
URL: http://www.pioneerelectronics.com
D8-10-4*_B1_En
POWER-CORD CAUTION
Handle the power cord by the plug. Do not pull out the
plug by tugging the cord and never touch the power
cord when your hands are wet as this could cause a
short circuit or electric shock. Do not place the unit, a
piece of furniture, etc., on the power cord, or pinch the
cord. Never make a knot in the cord or tie it with other
cords. The power cords should be routed such that they
are not likely to be stepped on. A damaged power cord
can cause a fire or give you an electrical shock. Check
the power cord once in a while. When you find it
damaged, ask your nearest PIONEER authorized
service center or your dealer for a replacement. S002*_En
VENTILATION CAUTION
When installing this unit, make sure to leave space
around the unit for ventilation to improve heat
radiation (at least 60 cm at top, 10 cm at rear, and
30 cm at each side).
WARNING
Slots and openings in the cabinet are provided for
ventilation to ensure reliable operation of the
product, and to protect it from overheating. To
prevent fire hazard, the openings should never be
blocked or covered with items (such as newspapers,
table-cloths, curtains) or by operating the
D3-4-2-1-7b_A_En
equipment on thick carpet or a bed.
If the AC plug of this unit does not match the AC
outlet you want to use, the plug must be removed
and appropriate one fitted. Replacement and
mounting of an AC plug on the power supply cord of
this unit should be performed only by qualified
service personnel. If connected to an AC outlet, the
cut-off plug can cause severe electrical shock. Make
sure it is properly disposed of after removal.
The equipment should be disconnected by removing
the mains plug from the wall socket when left unused
for a long period of time (for example, when on
vacation).
D3-4-2-2-1a_A1_En
&$(# !'&!"'*'%#%"""#%)!'%
"%&"-%"!"'#!,"!'!%
*'$(!%'&$(# !'&(&)&"%
"*%#"'"%+#"&''"%##!&#&!%!
!
"% "&'(% A9MK2_CUXCN.book
4 ページ
2009年4月7日 火曜日 午前10時26分
We Want You Listening For A Lifetime
Selecting fine audio equipment such as the unit
you’ve just purchased is only the start of your
musical enjoyment. Now it’s time to consider how
you can maximize the fun and excitement your
equipment offers. This manufacturer and the
Electronic Industries Association’s Consumer
Electronics Group want you to get the most out of
your equipment by playing it at a safe level. One that
lets the sound come through loud and clear without
annoying blaring or distortion-and, most importantly,
without affecting your sensitive hearing.
Sound can be deceiving. Over time your hearing
“comfort level” adapts to higher volumes of sound.
So what sounds “normal” can actually be loud and
harmful to your hearing. Guard against this by
setting your equipment at a safe level BEFORE your
hearing adapts.
Used wisely, your new sound equipment will
provide a lifetime of fun and enjoyment. Since
hearing damage from loud noise is often
undetectable until it is too late, this manufacturer
and the Electronic Industries Association’s
Consumer Electronics Group recommend you avoid
prolonged exposure to excessive noise. This list of
sound levels is included for your protection.
Decibel
Level Example
30
40
50
60
70
80
Quiet library, soft whispers
Living room, refrigerator, bedroom away from traffic
Light traffic, normal conversation, quiet office
Air conditioner at 20 feet, sewing machine
Vacuum cleaner, hair dryer, noisy restaurant
Average city traffic, garbage disposals, alarm clock
at two feet.
THE FOLLOWING NOISES CAN BE DANGEROUS
UNDER CONSTANT EXPOSURE
To establish a safe level:
@ Start your volume control at a low setting.
@ Slowly increase the sound until you can hear it
comfortably and clearly, and without distortion.
90 Subway, motorcycle, truck traffic, lawn mower
100 Garbage truck, chain saw, pneumatic drill
120 Rock band concert in front of speakers,
thunderclap
140 Gunshot blast, jet plane
180 Rocket launching pad
Once you have established a comfortable sound
level:
@ Set the dial and leave it there.
Information courtesy of the Deafness Research Foundation.
Taking a minute to do this now will help to prevent
hearing damage or loss in the future. After all, we
want you listening for a lifetime.
S001_En
CAUTION
To prevent fire hazard, the Class 2 Wiring Cable
should be used for connection with speaker, and
should be routed away from hazards to avoid
damage to the insulation of the cable.
(Symbol examples for batteries)
These symbols are only valid
in the European Union.
Pb
K058c_A1_En
"#%)!'%+%"!"'#!*!
&"(%&&(&'!"!'
!
$(# !' For U.S. and Australia Model
A9MK2_CUXCN.book
5 ページ
2009年4月7日 火曜日 午前10時26分
Thank you for buying this Pioneer product.
Please read through these operating instructions so that you will know how to operate your
model properly. After you have finished reading the instructions, put them in a safe place for
future reference.
Contents
01 Before you start
05 Using the tuner
Features . . . . . . . . . . . . . . . . . . . . . . . . . . . . . 6
What’s in the box . . . . . . . . . . . . . . . . . . . . . . 6
Inserting the battery . . . . . . . . . . . . . . . . . . . . 7
Installing the receiver . . . . . . . . . . . . . . . . . . . 7
Listening to the radio . . . . . . . . . . . . . . . . . . . 17
Saving station presets . . . . . . . . . . . . . . . . . . 17
Naming station presets . . . . . . . . . . . . . . . . 17
Listening to station presets . . . . . . . . . . . . . 18
02 Connecting up
06 Other connections
Making cable connections . . . . . . . . . . . . . . . 8
Connecting audio components . . . . . . . . . . . . 8
Connecting antennas . . . . . . . . . . . . . . . . . . . 9
Using external antennas . . . . . . . . . . . . . . . 10
Connecting the speakers. . . . . . . . . . . . . . . . 10
Plugging in . . . . . . . . . . . . . . . . . . . . . . . . . . 11
Using XM Radio. . . . . . . . . . . . . . . . . . . . . . . 19
Connecting your XM Radio receiver . . . . . . 19
Listening to XM Radio . . . . . . . . . . . . . . . . . 19
Saving channel presets . . . . . . . . . . . . . . . . 20
Using the USB interface . . . . . . . . . . . . . . . . 21
Connecting an additional amplifier . . . . . . . . 22
Connecting an IR receiver . . . . . . . . . . . . . . . 23
Operating other Pioneer components
with this unit’s sensor . . . . . . . . . . . . . . . . . . 23
Switching components on and off
using the 12 volt trigger . . . . . . . . . . . . . . . . . 24
03 Controls and displays
Front panel . . . . . . . . . . . . . . . . . . . . . . . . . . 12
Remote control . . . . . . . . . . . . . . . . . . . . . . . 13
Using the remote control . . . . . . . . . . . . . . 14
Display . . . . . . . . . . . . . . . . . . . . . . . . . . . . . 14
04 Listening to your system
Using Direct listening . . . . . . . . . . . . . . . . . . 15
Using the Sound Retriever. . . . . . . . . . . . . . . 15
Using the balance and tone controls. . . . . . . 15
Playing other sources . . . . . . . . . . . . . . . . . . 15
Making an audio recording . . . . . . . . . . . . . . 16
07 Additional information
Troubleshooting. . . . . . . . . . . . . . . . . . . . . . . 25
XM radio messages. . . . . . . . . . . . . . . . . . . 26
Specifications . . . . . . . . . . . . . . . . . . . . . . . . 26
Cleaning the unit. . . . . . . . . . . . . . . . . . . . . 27
5
En
A9MK2_CUXCN.book
01
6 ページ
2009年4月7日 火曜日 午前10時26分
Before you start
Chapter 1:
Before you start
Features
• Quick response power supply circuit
The superior power supply circuit adopted by
this unit achieves vastly improved response by
employing ‘no feedback’ circuitry, toriodal
transformers and low impedence parallel main
capacitors characteristicly used in
professional audio monitoring.
• Twin-mono symmetrical construction
This receiver offers a new advancement in
stereo imaging with the completely
independent construction of left/right power
amplification units and twin transformers.
• Direct construction
In addition to the improved symmetrical
design, the signal path of each block is
designed for shortest signal path for minimum
deterioration of signal clarity.
• Wide-Range Linear Circuit
Through this proprietary feedback circuit, an
output signal of low impedance offering a flat,
even response over the widest possible
frequency range is delivered to your speakers.
• Sound Retriever
The analog Sound Retriever feature employs
new technology that helps remove the adverse
effects of compression on audio files by
restoring bandwidth and smoothing jagged
artifacts left over after they have been
compressed, resulting in a wider sound stage.
• USB interface
The USB interface allows you to listen to twochannel audio from a PC connected to this
receiver.
6
En
• XM Radio ready
The XM Radio terminal on this receiver
provides a quick and easy connection to XM
Radio, the leading provier of satellite radio
service in the United States. Visit
www.xmradio.com for more details on this
service.
• Fine-tuned to world-class standards
With the cooperation of the world-class studio
engineers at AIR Studios, this receiver has
been AIR Studios certified:
What’s in the box
Please confirm that the following accessories
are in the box when you open it.
• Remote control
• AAA/IEC R03 dry cell batteries x2
• AM loop antenna
• FM wire antenna
• Power cord
• Operating instructions (This document)
• Warranty card
A9MK2_CUXCN.book
7 ページ
2009年4月7日 火曜日 午前10時26分
Before you start
Installing the receiver
• When installing this unit, make sure to put
it on a level and stable surface.
Caution
Incorrect use of batteries may result in such
hazards as leakage and bursting. Observe the
following precautions:
English
Inserting the battery
01
Don’t install it on the following places:
– on a color TV (the screen may distort)
– near a cassette deck (or close to a device that
gives off a magnetic field). This may interfere
with the sound.
– in direct sunlight
– in damp or wet areas
– in extremely hot or cold areas
– in places where there is vibration or other
movement
– in places that are very dusty
– in places that have hot fumes or oils (such as
a kitchen)
• Never use new and old batteries together.
• Insert the plus and minus sides of the
batteries properly according to the marks
in the battery case.
• Batteries with the same shape may have
different voltages. Do not use different
batteries together.
• When disposing of used batteries, please
comply with governmental regulations or
environmental public institution’s rules
that apply in your country or area.
• WARNING
Do not use or store batteries in direct
sunlight or other excessively hot place,
such as inside a car or near a heater. This
can cause batteries to leak, overheat,
explode or catch fire. It can also reduce the
life or performance of batteries.
7
En
A9MK2_CUXCN.book
02
8 ページ
2009年4月7日 火曜日 午前10時26分
Connecting up
Chapter 2:
Connecting up
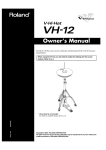
Making cable connections
Connecting audio components
Make sure not to bend the cables over the top
of this unit (as shown in the illustration). If this
happens, the magnetic field produced by the
transformers in this unit may cause a
humming noise from the speakers.
The number and kind of connections depends
on the kind of component you’re connecting.
Follow the steps below to connect a CD player,
tape recorder, turntable or other audio
component.
3
Turntable
FM UNBAL
75
AM LOOP
ANTENNA
XM
USB
AUDIO IN IN
CONTROL
OUT
IR
IN
OUT
SIGNAL
GND
L
Important
12V
TRIGGER
REC
OUT
PRE
OUT
R
R
PLAY
IN
TAPE
L
MM/MC
AUX1
AUX2
CD
PHONO
This receiver
• Before making or changing any
connections, switch off the power and
disconnect the power cord from the AC
outlet.
L
2
1
OUT
R
IN
REC
OUT
PLAY
AUDIO IN/OUT
R
L
AUDIO OUT
D6
Tape deck, etc.
CD player, etc.
1 Connect the analog audio outputs of your
CD player (or other component) to the CD
inputs on this receiver.
Use a stereo RCA phono cable as shown.
8
En
A9MK2_CUXCN.book
9 ページ
2009年4月7日 火曜日 午前10時26分
Connecting up
2 Connect the analog outputs of your tape
deck (or other recorder) to the TAPE inputs
(IN) on this receiver. Then connect the audio
inputs on the tape deck to the TAPE outputs
(OUT) on this receiver.
This will allow you to make recordings from the
components connected to this receiver. Use
stereo RCA phono cables as shown.
3 Turntables only: Connect the audio
outputs of your turntable to the PHONO
inputs on this receiver.
• If your turntable has a grounding wire,
secure it to the ground terminal on this
receiver.
Connecting antennas
Connect the AM loop antenna and the FM wire
antenna as shown below. To improve reception
and sound quality, connect external antennas
(see Using external antennas below).
fig. a
English
• Connect any other components (such as
an iPod1 dock or a portable audio player) to
the AUX inputs in the same way.
02
fig. b
3
FM UNBAL
75
AM LOOP
ANTENNA
5
4
• If your turntable has line-level outputs (i.e.,
it has a built-in phono pre-amp), connect it
to the AUX inputs instead.
1
• Make sure the MM/MC switch is in the
proper position. If the sound of the
turntable seems loud and distorted, or
overly soft, try switching the setting.
2
1 Pull off the protective shields of both AM
antenna wires.
2 Push open the tabs, then insert one wire
fully into each terminal, then release the tabs
to secure the AM antenna wires.
3 Fix the AM loop antenna to the attached
stand.
To fix the stand to the antenna, bend in the
direction indicated by the arrow then clip the
loop onto the stand (fig. a).
• If you plan to mount the AM antenna to a
wall or other surface, secure the stand with
screws (fig. b) before clipping the loop to
the stand. Make sure the reception is clear.
Note
1 iPod is a trademark of Apple Inc., registered in the U.S. and other countries.
9
En
02_connecting_up.fm
02
10 ページ
2009年4月15日 水曜日 午前10時22分
Connecting up
4 Place the AM antenna on a flat surface
and in a direction giving the best reception.
5 Connect the FM wire antenna in the same
way as the AM loop antenna.
For best results, extend the FM antenna fully
and fix to a wall or door frame. Don’t drape
loosely or leave coiled up.
Using external antennas
To improve FM reception
Use a 75 Ω coaxial cable to connect an external
FM antenna.
One-touch
PAL connector
FM UNBAL
75
AM LOOP
Connecting the speakers
Make sure you connect the speaker on the
right to the right terminal and the speaker on
the left to the left terminal. Also make sure the
positive and negative (+/–) terminals on the
receiver match those on the speakers. You can
use speakers with a nominal impedance
between 4 Ω to 16 Ω.
Be sure to complete all connections before
connecting this unit to the AC power source.
Left speaker
ANTENNA
CONTROL
OUT
OUT
75 Ω coaxial cable
SIGNAL
GND
To improve AM reception
Connect a 5 m to 6 m (15 ft. to 18 ft.) length of
vinyl-coated wire to the AM antenna terminal
without disconnecting the supplied AM loop
antenna.
Outdoor
antenna
5 m to 6 m
(15 ft. to 18 ft.)
Indoor antenna
(vinyl-coated wire)
FM UNBAL
75
AM LOOP
ANTENNA
For the best possible reception, suspend
horizontally outdoors.
10
En
AC IN
L
R
MM/MC
PHONO
SPEAKER
L
• Connect the speakers to the speaker
terminals as shown above.
Connections for the left speaker are shown.
Connect the right speaker in the same way. You
can use either bare wire connections to do this
(see below).
Bare wire connections
Make sure that the speaker cable you’re going
to use is properly prepared with about 10 mm
(3/8 in.) of insulator stripped from each wire,
and the exposed wire strands twisted together
(fig. A).
02_connecting_up.fm
11 ページ
2009年4月15日 水曜日 午前10時22分
Connecting up
02
fig. A
10 mm
(3/8
fig. B
English
To connect a terminal, unscrew the terminal a
few turns until there is enough space to insert
the exposed wire (fig. B). Once the wire is in
position, tighten the terminal until the wire is
firmly clamped (fig. C).
fig. C
in.)
Important
• Please refer to the manual that came with
your speakers for details on how to connect
the other end of the speaker cables to your
speakers.
Caution
• These speaker terminals carry
HAZARDOUS live voltage. To prevent the
risk of electric shock when connecting or
disconnecting the speaker cables,
disconnect the power cord before touching
any uninsulated parts.
• Make sure no exposed speaker wire is
touching the rear panel, this may cause the
receiver to turn off automatically.
Plugging in
Make sure to complete all connections before
connecting to an AC outlet.
• Connect the AC power cord to the AC IN
inlet on the rear panel of the receiver, then
plug into an AC outlet.
11
En
A9MK2_CUXCN.book
03
12 ページ
2009年4月7日 火曜日 午前10時26分
Controls and displays
Chapter 3:
Controls and displays
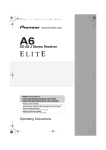
Front panel
1
2
4
3
5
6
A9
VOLUME
INPUT SELECTOR
POWER
STANDBY
OFF
7
ON
DIRECT
PHONES
8
1
POWER OFF ON1
2
STANDBY indicator
3
Display (page 14)
4 DIRECT
Press to switch the Direct listening feature on
or off (page 15).
5 INPUT SELECTOR dial
Selects an input source.
6
Master VOLUME
7
Remote sensor
8 PHONES jack
Use to connect headphones (when connected,
there is no sound output from the speakers).
Note
1 When the unit is in the standby mode, if the power is turned off by pressing the main unit’s POWER button, the power will not
turn on if the button is pressed again. To turn on the power in this case, press either the remote control unit’s AMP button or
the DIRECT button on the main unit for about five seconds.
12
En
A9MK2_CUXCN.book
13 ページ
2009年4月7日 火曜日 午前10時26分
Controls and displays
03
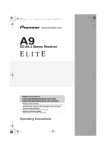
RECEIVER
7
1
2
6 TONE/BAL controls
Use to adjust the tone and balance (page 15).
DIMMER
CD
TAPE
PHONO
TUNER
XM
USB
AUX1
AUX2
DISPLAY
1
2
3
4
5
6
7
8
9
0
DIRECT
8
3
S.RETRIEVER
4
9
MUTE
10
6
L
R
TONE/BAL
MPX
T.EDIT
CATEGORY
BAND
TUNE
CLASS
PRESET
ENTER
PRESET
TUNE
RETURN
D.ACCESS
7 DIMMER
Dims or brightens the display (or switches the
backlight off).
8 DISPLAY (XM Radio only)
Switches between named station presets and
radio frequencies (page 17).
9 DIRECT
Press to access Direct listening (page 15).
VOLUME
5
English
5 VOLUME +/–
Use to set the listening volume.
Remote control
11
10 MUTE
Mutes/unmutes the sound.
11 Tuner and XM Radio controls
MPX (Tuner only) – Switches between
stereo and mono reception of FM
broadcasts (page 17).
T.EDIT – Memorizes/names stations for
recall (page 17).
CATEGORY (XM Radio only) – Press to
browse digital radio broadcasts (page 19).
CD PLAYER
12
BAND (Tuner only) – Switches between the
AM and FM bands (page 17).
CLASS – Switches between the three
banks of radio station presets (page 17).
STEREO RECEIVER
1 AMP
Switches the receiver between standby and on.
2 Input select buttons
Press to select an input source.
3 Number buttons
Use the number buttons to directly select a
radio frequency (page 17).
D.ACCESS – Press to access a radio
station directly using the number buttons
(page 17).
RETURN (XM Radio only) – Press to confirm
and exit the current menu.
(TUNE/PRESET) /ENTER
Use the TUNE buttons to find radio
frequencies and use PRESET to find
preset stations (page 17).
12 CD PLAYER control buttons
Use to control Pioneer CD player.
4 S. RETRIEVER
Press to switch the Sound Retriever on/off
(page 15).
13
En
A9MK2_CUXCN.book
03
14 ページ
2009年4月7日 火曜日 午前10時26分
Controls and displays
Using the remote control
Keep in mind the following when using the
remote control:
Display
1
• Make sure that there are no obstacles
between the remote and the remote sensor
on the unit.
TUNED
STEREO
MONO
• The remote has a range of about 7 m (23 ft.)
at an angle of about 30º from the remote
sensor.
• Remote operation may become unreliable
if strong sunlight or fluorescent light is
shining on the unit’s remote sensor.
2
3
4
TREBLE
BASS
dB
XM
FM
AM
5
1
MHz
KHz
6
7
8
Tuner Indicators
TUNED – Lights when a broadcast is being
received.
• Remote controllers for different devices
can interfere with each other. Avoid using
remotes for other equipment located close
to this unit.
STEREO – Lights when a stereo FM
broadcast is being received in auto stereo
mode.
• Replace the batteries when you notice a fall
off in the operating range of the remote.
MONO – Lights when the MPX button is
used to select mono mode.
2
Tone control indicators
TREBLE – Lights when high-range tone
adjustment is applied.
BASS – Lights when low-range tone
adjustment is applied.
3 Sound Retriever indicator
Lights when the Sound Retriever function is
enabled.
4
Master volume level
5
FM – Lights when FM broadcasts are
received.
AM – Lights when AM broadcasts are
received.
6
XM – Lights when XM radio broadcasts are
received.
7 Character display
Displays various system information.
8
14
En
MHz – Lights when an FM frequency is
displayed.
KHz – Lights when an AM frequency is
displayed.
04_listening_to_your_system.fm 15 ページ
2009年4月15日 水曜日 午前10時10分
Listening to your system
04
Listening to your system
Using Direct listening
Use the Direct listening feature when you want
to hear the truest possible reproduction of a
source. All unnecessary signal processing1 is
bypassed, and you’re left with the pure sound
source.
• Press TONE/BAL to select the option you
want, then use the L/– and R/+ buttons to
adjust as necessary.
• BASS – Adjust the amount of bass from
–10 to +10.
• TRE – Adjust the amount of treble from
–10 to +10.
• BAL – Adjust the amount of left/right
balance as you like. FLAT indicates a
centered balance.
• While listening to a source, press DIRECT
to switch Direct listening on or off.
Using the Sound Retriever
When audio data is removed during the
compression process, sound quality often
suffers from an uneven sound image. The
analog Sound Retriever feature employs new
technology that helps remove the adverse
effects of compressing 2-channel audio files by
restoring bandwidth and smoothing jagged
artifacts left over after they have been
compressed, resulting in a wider sound stage.
• Press S. RETRIEVER to switch the sound
retriever on or off.
The
indicator in the front display lights to
indicate the Sound Retriever is on.
Using the balance and tone
controls
English
Chapter 4:
Wait about five seconds for your changes to be
input automatically. The BASS and TREBLE
indicators light in the front panel when the
corresponding tone control is active.
• To return to the flat setting (tone control
off), press L/– and R/+ at the same time.
Playing other sources
1 Turn on the power of the playback
component.
2
Turn on the power of the receiver.
3 Select the source you want to playback.
Use the input select buttons (or INPUT
SELECTOR dial).
4 Start playback of the component you
selected in step 1.
Depending on what you are listening to, you
may want to adjust the bass, treble or left/right
balance using the remote control.
Note
1 The Sound Retriever, balance and tone controls are disabled, and the front panel display switches off.
15
En
A9MK2_CUXCN.book
04
16 ページ
2009年4月7日 火曜日 午前10時26分
Listening to your system
Making an audio recording
You can make an audio recording from any
audio source connected to the receiver.
1 Select the source you want to record.
Use the input select buttons (INPUT
SELECTOR).
2 Prepare the source you want to record.
Tune to the radio station, load the CD, set up
the turntable, etc.
3 Prepare the recorder.
Insert a blank tape, MD, etc. into the recording
device and set the recording levels.1
Refer to the instructions that came with the
recorder if you are unsure how to do this.
4 Start recording, then start playback of the
source component.
Note
1 The receiver’s volume, balance and tone controls have no effect on the recorded signal.
16
En
A9MK2_CUXCN.book
17 ページ
2009年4月7日 火曜日 午前10時26分
Using the tuner
05
English
Chapter 5:
Using the tuner
Listening to the radio
The following steps show you how to tune in to
FM and AM radio broadcasts.
1 Press TUNER then press BAND to select
the tuner band.
2 Tune to a station.
There are four ways to do this:
Automatic tuning – Press and hold /
for about a second. Searching
automatically stops at the next station.
Manual tuning – To change the frequency
one step at a time, press /.
High speed tuning – Press and hold /
continuously.
Direct access – Use the number buttons to
enter the frequency (For example, to tune
to 106.00 (FM), press 1, 0, 6, 0, 0).1
If the TUNED or STEREO indicators don’t light
when tuning to an FM station because the
signal is weak, press the MPX button to switch
the receiver into mono reception mode. This
should improve the sound quality and allow
you to enjoy the broadcast.
2 Press CLASS to select one of the three
classes then press / to select the station
preset you want.
3
Press ENTER to store the station.
Naming station presets
You can name your station presets for easy
recall.
1 Choose the preset you want to name.
See Listening to station presets below.
2 Press T.EDIT.
A cursor appears at the first character position.
3 Input the name you want then press ENTER.
Names can be up to four characters long.
• Use the / buttons to select
characters, and ENTER to confirm. If no
character is input, a space is input.
Tip
• Once you have named a station preset, you
can press DISPLAY when listening to a
station to switch the display between the
name and the frequency.
Saving station presets
This receiver can memorize up to 30 stations,
stored in three banks of 10 stations each.2
1 Tune to a station you want to memorize
then press T.EDIT.
The display shows ST. MEMORY, then a
blinking memory class.
Note
1 If you make a mistake halfway through, press D.ACCESS twice to cancel the frequency and start over.
2 When saving an FM frequency, the MPX setting is also stored.
17
En
A9MK2_CUXCN.book
05
18 ページ
2009年4月7日 火曜日 午前10時26分
Using the tuner
Listening to station presets
You will need to have some presets stored to do
this. See Saving station presets above if you
haven’t done this already.1
1
Press TUNER to select the tuner.
2 Press CLASS to select the class in which
the station is stored.
Press repeatedly to cycle through classes A, B
and C.
3 Press / to select the station preset
you want.
Note
1 Station memories will be lost if the receiver is left disconnected from the AC power outlet for an extended period.
18
En
A9MK2_CUXCN.book
19 ページ
2009年4月7日 火曜日 午前10時26分
Other connections
06
English
Chapter 6:
Other connections
Connecting your XM Radio receiver
Listening to Satellite Radio
To listen to Satellite Radio, you’ll need to
connect an XM Satellite Radio tuner (sold
separately) to your XM-Ready receiver. XM
Satellite Radio is available to residents of the
US (except Alaska and Hawaii) and Canada.
Satellite Radio delivers a variety of commercialfree music from categories ranging from Pop,
Rock, Country, R&B, Dance, Jazz, Classical
and many more plus coverage of all the top
professional and college sports including play
by play games from select leagues and teams.
Additional programming includes expert
sports talk, uncensored entertainment, comedy,
family programming, local traffic and weather
and news from your most trusted sources.
Once you’ve purchased an XM tuner you’ll
need to activate and subscribe to begin
enjoying the service. Easy to follow installation
and setup instructions are provided with the
satellite tuners. There are a variety of
programming packages available, including
the option of adding “The Best of SIRIUS”
programming. The “Best of SIRIUS” service is
not available to XM Canada subscribers at this
time.
Family friendly packages are also available to
restrict channels featuring content that may be
inappropriate for children.
To subscribe to XM, U.S. customers should
visit xmradio.com or call 1-800-XMRADIO
(1-800-967-2346); Canadian customers should
visit xmradio.ca or call XM Listener Care at
1-877-GETXMSR (1-877-438-9677).
After purchasing a Connect-and Play™
antenna (sold separately), you will also need to
activate the XM Radio digital radio service to
receive broadcasts.1
Connect-and-Play antenna
XM
USB
AUDIO IN IN
CONTROL
OUT
IR
IN
OUT
SIGNAL
GND
L
AC IN
L
R
R
MM/MC
AUX1
AUX2
CD
PHONO
SPEAKER
L
This receiver
1 Connect an XM Radio Connect-and-Play™
antenna to the XM Radio jack on the rear of
this receiver.
You will also need to activate the XM Radio
service.
When activating the XM Radio ‘Connect-andPlay’ ™ digital antenna, make sure to wait until
the activation process is complete before
changing the XM-RADIO function. Changing to
another input source will stop the activation
process.
2 Use the XM input select button to switch
to the XM Radio input.
For best reception, you may need to move the
Connect-and-Play™ antenna near a window
(the southernmost window should produce the
best results).
Note
1 Hardware and required basic monthly subscription sold separately. Premium Channel available at additional monthly cost.
Installation costs and other fees and taxes, including a one-time activation fee may apply. Subscription fee is consumer only. All
fees and programming subject to change. Channels with frequent explicit language are indicated with an XL. Channel blocking
is available for XM radio receivers by calling 1-800-XMRADIO. Subscriptions subject to Customer Agreement available at
xmradio.com. Only available in the 48 contiguous United States.
19
En
A9MK2_CUXCN.book
06
20 ページ
2009年4月7日 火曜日 午前10時26分
Other connections
• If after pressing XM the display shows
ANTENNA, try disconnecting the antenna
and reconnecting.1
Listening to XM Radio
After connecting, you will be able to use this
receiver to select channels and navigate
categories using the front panel display.
Selecting channels and browsing by genre
You can browse XM Radio channels in the
order that they appear, or you can narrow your
channel search by genre.
• Use the / buttons to select a channel
then press ENTER to listen to the XM radio
broadcast.
• To browse by genre, first press
CATEGORY, use / to select a genre
then press ENTER.2
• To cancel and exit any time, press
RETURN.
Tip
• You can select channels directly by
pressing D.ACCESS then the three-digit
channel number.
• You can press DISPLAY to change XM
Radio information in the front panel
display.
Saving channel presets
This receiver can memorize up to 30 channels,
stored in three banks, or classes, (A, B and C)
of 10 stations each.
1 Select the channel you want to memorize.
See Selecting channels and browsing by genre
above.
2 Press T.EDIT.
The display shows a blinking memory class.
3 Press CLASS to select one of the three
classes then press / to select the channel
preset you want.
You can also use the number buttons to select
a preset.
• The default for all presets is CH001.
4 Press ENTER.
After pressing ENTER, the preset class and
number stop blinking and the receiver stores
the XM channel.
Listening to channel presets
You will need to have some presets stored to do
this.
1 Press CLASS to select the class in which
the channel is stored.
Press repeatedly to cycle through classes A, B
and C.
2 Press / to select the channel preset
you want.
• You can also use the number buttons on
the remote control to recall the channel
preset.
About XM
XM, SIRIUS and all related marks and logos are
trademarks of Sirius XM Radio Inc. and its
subsidiaries. All other marks and logos are the
property of their respective owners. All rights
reserved. XM subscription sold separately.
Taxes and a one-time activation fee may apply.
XM tuner and home dock required (each sold
separately) to receive the XM service. All
programming and fees subject to change. It is
prohibited to copy, decompile, disassemble,
reverse engineer, hack, manipulate or
otherwise make available any technology or
software incorporated in receivers compatible
with the XM Satellite Radio System. Service not
available in Alaska or Hawaii.
Note
1 After unplugging the receiver, LOADING shows in the display for about 1 minute when switched back on.
2 Select CH000 (RADIO ID) from the front panel display to check the Radio ID of the Connect-and-Play antenna.
20
En
A9MK2_CUXCN.book
21 ページ
2009年4月7日 火曜日 午前10時26分
Other connections
06
It is possible to listen to two channels of audio
from your computer by connecting to the USB
interface on the rear of this receiver.
Depending on your model of computer and the
software installed, you can listen to the stereo
audio source through the speaker setup you’ve
connected to this receiver.1
B-type USB
connector
FM UNBAL
75
AM LOOP
ANTENNA
XM
USB
AUDIO IN IN
CONTROL
OUT
IR
IN
OUT
SIGNAL
GND
L
12V
TRIGGER
PRE
OUT
REC
OUT
MM/MC
AUX1
AUX2
4 Press USB to select the USB input.
You can also use the INPUT SELECTOR dial on
the front panel.
5 Make any necessary settings required to
select the USB interface as your computer
audio output.
You will need to make sure the correct speaker
setting is selected with the audio software
you’re using. Please refer to the manual that
came with the software to make these settings.
R
R
PLAY
IN
TAPE
L
3 If you’re connecting for the first time,
wait for the USB driver installation to finish.
The installation may take a minute or two to
complete. Make sure you leave the USB cable
connected until the dialog box indicates that
the USB setup is finished. Note that some
older operating systems may require a disc for
installation.2
English
Using the USB interface
CD
PHONO
This receiver
A-type USB
connector
6 Turn up the volume control on your
computer and this receiver.
You may want to start with a fairly low volume
on this receiver and turn it up as necessary
after you’ve checked your levels.
7 Start playback of a source on your
computer.
Important
1 Connect your computer’s USB terminal to
the USB terminal on the rear panel of this
receiver.
2 Switch on your computer and this
receiver.
If you have followed the steps above, and still
can’t hear any audio output, try the following:
• Switch the receiver off, then on again.
• Selecting another input source (like CD or
TAPE), then back to USB.
Note
1 • Microsoft® Windows® Vista Home Basic/Home Premium/Business/Ultimate,Windows® XP, Windows® 2000, Windows®
Millennium Edition and Windows® 98 Second Edition operating systems have been tested for compatibility, but depending on
your computer setup, you may find that your system is not compatible.
• Make sure your USB cable connects from an A-type connector (from your PC) to a 4-pin B-type connector (to this unit).
• The USB specification is version 1.1 compatible, and the USB Audio Class specification is version 1.0 compatible.
• Computer alert sounds will also be heard through the speakers unless you disable them from the computer’s control panel.
• You won’t be able to hear the audio from the USB connection through the digital outputs of this unit.
• Note that using hubs or extensions may cause connection problems.
2 If your PC doesn’t recognize this unit, try reconnecting the USB cable. If it is still unrecognized, restart the computer.
21
En
A9MK2_CUXCN.book
06
22 ページ
2009年4月7日 火曜日 午前10時26分
Other connections
Caution
• Make sure you don’t switch off the
computer or unplug the USB cable during
playback.
• To prevent noise being output, don’t use
other software on your computer during
playback.
• Pioneer is not responsible for computer
system damage, software crashes or
failures, or any other possible computer
problems due to this configuration.
Connecting an additional
amplifier
This receiver has more than enough power for
any home use, but it’s possible to add an
additional amplifier using the pre-outs. Make
the connections shown below to add an
amplifier to power your speakers.
• Before making or changing the
connections, switch off the power and
disconnect the power cord from the AC
outlet.
Microsoft®, Windows® Vista, Windows® XP, Windows®
2000, Windows® Millennium Edition and Windows® 98
Second Edition are either registered trademarks or
trademarks of Microsoft Corporation in the United States
and/or other countries.
FM UNBAL
75
AM LOOP
ANTENNA
CONTROL
OUT
IR
XM
USB
AUDIO IN IN
IN
OUT
SIGNAL
GND
L
12V
TRIGGER
PRE
OUT
REC
OUT
R
R
PLAY
IN
TAPE
MM/MC
AUX1
AUX2
CD
PHONO
This receiver
INPUT
R
Stereo amplifier
22
En
ANALOG
L
L
A9MK2_CUXCN.book
23 ページ
2009年4月7日 火曜日 午前10時26分
Other connections
06
If you keep your stereo components in a closed
cabinet or shelving unit, you can use an
optional IR receiver (such as a Niles or Xantech
unit) to control your system instead of the
remote sensor on the front panel of this
receiver.1
1 Connect the IR receiver sensor to the IR IN
jack on the rear of this receiver.
Closet or shelving unit
Non-Pioneer
component
IR
IN
Pioneer
component
CONTROL
IN
OUT
USB
AUDIO IN
IN
R
L
MM/MC
CD
1 Connect the CONTROL OUT of this
receiver to the CONTROL IN jack of another
Pioneer component.
Use a cable with a mono mini-plug on each
end for the connection.
Pioneer component
This receiver
SIGNAL
GND
L
AUX2
• Note that if you use this feature, make sure
that you also have at least one set of analog
audio jacks connected to another
component for grounding purposes.
OUT
R
AUX1
Many Pioneer components have SR CONTROL
jacks which can be used to link components
together so that you can use just the remote
sensor of one component. When you use a
remote control, the control signal is passed
along the chain to the appropriate component.
CONTROL
OUT
IR
XM
IN
Operating other Pioneer
components with this unit’s
sensor
PHONO
This receiver
Pioneer
component
remote
control
IR receiver
2 Connect the IR IN jack of another
component to the IR OUT jack on the rear of
this receiver to link it to the IR receiver.
Please see the manual supplied with your IR
receiver for the type of cable necessary for the
connection.
• If you want to link a Pioneer component to
the IR receiver, see Operating other Pioneer
components with this unit’s sensor below
to connect to the CONTROL jacks instead
of the IR OUT jack.
English
Connecting an IR receiver
CONTROL
OUT
IR
IN
L
CD
CONTROL
OUT
OUT
SIGNAL
GND
PLA
YER
2 If the Pioneer component also has a
CONTROL OUT jack, you can continue the
chain in the same way for as many
components as you have.
Note
1 • Remote operation may not be possible if direct light from a strong fluorescent lamp is shining on the IR receiver remote
sensor window.
• Note that other manufacturers may not use the IR terminology. Refer to the manual that came with your component to check
for IR compatibility.
• If using two remote controls (at the same time), the IR receiver’s remote sensor takes priority over the remote sensor on the
front panel.
23
En
A9MK2_CUXCN.book
06
24 ページ
2009年4月7日 火曜日 午前10時26分
Other connections
Switching components on and
off using the 12 volt trigger
You can connect components in your system to
this receiver through a 12 volt trigger. If you
turn the power to a connected component on,
the power to this receiver is also turned on.
This receiver will not turn on if you turn a
connected component off while this receiver is
currently off.1
12V
TRIGGER
FM UNBAL
75
SPEAKER
R
12V
TRIGGER
PR
OU
• Connect the 12V TRIGGER jack of this
receiver to the 12V trigger of another
component.
Use a cable with a mono mini-plug on each
end for the connection.
Note
1 When this system is already on, switching the connected component on will have no effect (switching the connected
component off will have no effect in any case).
24
En
A9MK2_CUXCN.book
25 ページ
2009年4月7日 火曜日 午前10時26分
Additional information
Additional information
English
Chapter 7:
07
Troubleshooting
Incorrect operations are often mistaken for trouble and malfunctions. If you think that there is
something wrong with this component, check the points below. Sometimes the trouble may lie in
another component. Investigate the other components and electrical appliances being used. If the
trouble cannot be rectified even after exercising the checks listed below, ask your nearest Pioneer
authorized service center or your dealer to carry out repair work.
• If the unit does not operate normally due to external effects such as static electricity
disconnect the power plug from the outlet and insert again to return to normal operating
conditions.
Problem
Remedy
The power does not turn on.
• Disconnect the power plug from the outlet, and insert again.
• Make sure there are no loose strands of speaker wire touching the rear
panel. This could cause the receiver to shut off automatically.
• If you’re trying to switch on using the remote control, make sure the
front panel POWER button is switched on first.
• If the power shuts off automatically, take the unit to your nearest
Pioneer authorized service center or your dealer for servicing.
No sound is output when a
function is selected.
• Make sure the component is connected correctly (refer to Connecting
up on page 8).
• Press MUTE on the remote control to turn muting off.
Considerable noise in radio
broadcasts.
• Connect the antenna (page 9) and adjust the position for best reception.
• Route any loose cables away from the antenna terminals and wires.
• Fully extend the FM wire antenna, position for best reception, and
secure to a wall (or connect an outdoor FM antenna).
• Connect an additional internal or external AM antenna (page 9).
• Turn off equipment causing interference or move it away from the
receiver (or move antennas farther away from equipment causing noise).
Broadcast stations cannot be
selected automatically.
• Connect an outdoor antenna (refer to page 9).
Noise during playback of a
cassette deck.
• Move the cassette deck further from your receiver, until the noise
disappears.
Turntable seems noisy and
distorted, or low in volume.
• Make sure the MM/MC switch on the rear of the receiver (near the
PHONO input) is in the proper position for your turntable.
25
En
A9MK2_CUXCN.book
07
26 ページ
2009年4月7日 火曜日 午前10時26分
Additional information
Problem
Remedy
Can’t operate the remote
control.
• Replace the battery (refer to page 7).
• Operate within 7 m (23 ft.), 30° of the remote sensor on the front panel
(refer to page 14).
• Remove the obstacle or operate from another position.
• Avoid exposing the remote sensor on the front panel to direct light.
The display is dark or off.
• Press DIMMER on the remote control repeatedly to return to the default.
XM radio messages
Message
Cause
Action
ANTENNA
The XM antenna is not connected.
Check that the XM antenna cable is attached
securely.
ANT ERR
A short-circuit occurring in the antenna or
surrounding antenna cable.
Make sure that there is nothing unusual with
the antenna or antenna cable. Switch the
power off then back on again.
UPDATING
The radio is being updated with the latest
encryption code.
Wait until the encryption code has been
updated. Channels 00 and 01 should function
normally.
NO SIGNAL
The XM signal is too weak at the current
location.
n/a
LOADING
The receiver is acquiring audio or program
information.
Wait until the information has been received.
OFF AIR
The channel currently selected has stopped
broadcasting.
Select another channel.
CH– – –
You have selected a channel that does not
exist, or that you have not subscribed to.
The receiver will automatically switch to
channel 001 (or the last selected channel).
There is no artist name/feature, song/
No action needed.
program title, or channel category associated
with the channel at this time.
Specifications
Amplifier section
26
En
• FTC Continuous power output (both
channels driven at 1 kHz)
THD 1.0 %, 4 Ω . . . . . . . . . . . . . . . . . 65 W + 65 W
THD 1.0 %, 8 Ω . . . . . . . . . . . . . . . . . 55 W + 55 W
Power output specification is for when power
supply is 120 V.
•
• Continuous power output (both channels
driven at 20 Hz to 20 kHz)**
THD 0.2 %, 4 Ω . . . . . . . . . . . . . . . . . 70 W + 70 W
THD 0.2 %, 8 Ω . . . . . . . . . . . . . . . . . 55 W + 55 W
* Measured with DIRECT button switched on.
** Measured by Audio Spectrum Analyzer
Total harmonic distortion**
20 Hz to 20 kHz, 25 W, 8 Ω . . . . . . . . . . . . 0.05 %*
07_additional_info.fm 27 ページ
2009年4月15日 水曜日 午前10時11分
Additional information
Audio section
Input (Sensitivity/Impedance)
•
Frequency response
CD, TAPE, AUX . . . . . . . . . . . . . . . .200 mV/22 kΩ
PHONO (MM). . . . . . . . . . . . . . . . . . 2.8 mV/47 kΩ
PHONO (MC) . . . . . . . . . . . . . . . . . . 0.3 mV/100 Ω
CD, TAPE, AUX . . . . . . . . . 5 Hz to 100 kHz dB
PHONO (MM). . . . . . . . . 20 Hz to 20 kHz ±0.2 dB
PHONO (MC) . . . . . . . . . 20 Hz to 20 kHz ±0.3 dB
•
PHONO (MM) overload level
1 kHz, THD 0.2 % . . . . . . . . . . . . . . . . . . . . . 60 mV
•
PHONO (MC) overload level
1 kHz, THD 0.2 % . . . . . . . . . . . . . . . . . . . . . . 6 mV
•
Output (Level/Impedance)
•
Tone control
TAPE REC . . . . . . . . . . . . . . . . . . . . . . 200 mV/1 kΩ
Bass . . . . . . . . . . . . . . . . . . . . . . .±10 dB (100 Hz)
Treble . . . . . . . . . . . . . . . . . . . . . .±10 dB (10 kHz)
• Signal-to-Noise Ratio (IHF SHORTED,
A-Network)
CD, TAPE, AUX (200 mV input). . . . . . . . . . 103 dB
PHONO (MM, 2.8 mV input) . . . . . . . . . . . . . 80 dB
PHONO (MC, 0.2 mV input) . . . . . . . . . . . . . 70 dB
•
FM Tuner Section
Frequency Range. . . . . . . . .87.5 MHz to 108 MHz
Usable Sensitivity . . . . . . . . . Mono:13.2 dBf, IHF
(1.3 µV/ 75 Ω)
50 dB Quieting Sensitivity. . . . . . . Mono: 20.2 dB
Stereo: 38.6 dBf
Signal-to-Noise Ratio. . . .Mono: 73 dB (at 85 dBf)
Stereo: 70 dB (at 85 dBf)
Distortion . . . . . . . . . . . . . . . Stereo: 0.5 % (1 kHz)
Alternate Channel Selectivity . . . 60 dB (400 kHz)
Stereo Separation . . . . . . . . . . . . . . 40 dB (1 kHz)
Frequency Response . . . . . . . . . . .30 Hz to 15 kHz
(±1 dB)
Antenna Input . . . . . . . . . . . . . . 75 Ω unbalanced
•
AM Tuner Section
Frequency Range . . . . . . . . . 530 kHz to 1700 kHz
Sensitivity (IHF, Loop antenna) . . . . . . . 350 µV/m
Signal-to-Noise Ratio . . . . . . . . . . . . . . . . . . 50 dB
Antenna . . . . . . . . . . . . . . . . . . . . . . .Loop antenna
English
•
07
Miscellaneous
Power requirements. . . . . AC 120 V, 50 Hz/60 Hz
Power consumption . . . . . . . . . . . . . . . . . . . 200 W
Power consumption (standby) . . . . . . . . . . 0.8 W
Dimensions
. . . . . . . 420 mm (W) x 113 mm (H) x 369 mm (D)
(16 9/16 in. (W) x 47/16 in. (H) x 14 17/32 in. (D))
Weight (without package)
. . . . . . . . . . . . . . . . . . . . . . . . .11.5 kg (25 lb. 6 oz.)
Accessories
Remote control . . . . . . . . . . . . . . . . . . . . . . . . . . .
AAA/IEC R03 dry cell batteries . . . . . . . . . . . . .
AM loop antenna . . . . . . . . . . . . . . . . . . . . . . . . .
FM wire antenna. . . . . . . . . . . . . . . . . . . . . . . . . .
Power cord . . . . . . . . . . . . . . . . . . . . . . . . . . . . . .
Warranty card . . . . . . . . . . . . . . . . . . . . . . . . . . . .
Operating instructions (This document)
1
2
1
1
1
1
Note
• Specifications and the design are subject
to possible modifications without notice,
due to improvements.
Cleaning the unit
• Use a polishing cloth or dry cloth to wipe
off dust and dirt.
• When the surface is dirty, wipe with a soft
cloth dipped in some neutral cleanser
diluted five or six times with water, and
wrung out well, and then wipe again with a
dry cloth. Do not use furniture wax or
cleansers.
• Never use thinners, benzine, insecticide
sprays or other chemicals on or near this
unit, since these will corrode the surface.
Published by Pioneer Corporation.
Copyright © 2009 Pioneer Corporation.
All rights reserved.
27
En
A9MK2_CUXCN-fr.book
Page 2
Wednesday, April 22, 2009
2:04 PM
IMPORTANT
ATTENTION
DANGER D´ELECTROCUTION
NE PAS OUVRIR
Ce symbole de l’éclair, placé dans un
triangle équilatéral, a pour but d’attirer
l’attention de l’utilisateur sur la présence, à
l’intérieur du coffret de l’appareil, de
“tensions dangereuses” non isolées d’une
grandeur suffisante pour représenter un
risque d’électrocution pour les êtres
humains.
ATTENTION :
POUR ÉVITER TOUT RISQUE
D’ÉLECTROCUTION, NE PAS ENLEVER LE
COUVERCLE (NI LE PANNEAU ARRIÈRE).
AUCUNE PIÈCE RÉPARABLE PAR
L’UTILISATEUR NE SE TROUVE À
L’INTÉRIEUR. CONFIER TOUT ENTRETIEN À
UN PERSONNEL QUALIFIÉ UNIQUEMENT.
Ce point d’exclamation, placé dans un
triangle équilatéral, a pour but d’attirer
l’attention de l’utilisateur sur la présence,
dans les documents qui accompagnent
l’appareil, d’explications importantes du
point de vue de l’exploitation ou de
l’entretien.
D3-4-2-1-1_A1_Fr
Cet appareil numérique de la Classe B est conforme
à la norme NMB-003 du Canada.
D8-10-1-3_A1_Fr
AVERTISSEMENT
Avant de brancher l’appareil pour la première, lisez
attentivement la section suivante.
La tension de l’alimentation électrique disponible
varie selon le pays ou la région. Assurez-vous que
la tension du secteur de la région où l’appareil sera
utilisé correspond à la tension requise (par ex. 230
V ou 120 V), indiquée sur le panneau arrière.
D3-4-2-1-4_A_Fr
ATTENTION
! ! !
& ! !
(#! !"* ((!
"! !!! & (! "%
, &!
!* ((
! !(" ! ! ((!"! !"!
("$%!((! #" !( "
D3-4-2-2-2a_A_Fr
Milieu de fonctionnement
Température et humidité du milieu de fonctionnement :
De +5 °C à +35 °C (de +41 °F à +95 °F) ; Humidité
relative inférieure à 85 % (orifices de ventilation non
obstrués)
N’installez pas l’appareil dans un endroit mal ventilé ou
un lieu soumis à une forte humidité ou en plein soleil
(ou à une forte lumière artificielle).
D3-4-2-1-7c*_A1_Fr
Si la fiche d’alimentation secteur de cet appareil ne
convient pas à la prise secteur à utiliser, la fiche doit
être remplacée par une appropriée. Ce
remplacement et la fixation d’une fiche secteur sur le
cordon d’alimentation de cet appareil doivent être
effectués par un personnel de service qualifié. En cas
de branchement sur une prise secteur, la fiche de
coupure peut provoquer une sérieuse décharge
électrique. Assurez-vous qu’elle est éliminée
correctement après sa dépose.
L’appareil doit être déconnecté en débranchant sa
fiche secteur au niveau de la prise murale si vous
prévoyez une période prolongée de non utilisation
(par exemple avant un départ en vacances).
D3-4-2-2-1a_A1_Fr
A9MK2_CUXCN-fr.book
Page 3
Wednesday, April 22, 2009
NOTE IMPORTANTE SUR LE CABLE
D’ALIMENTATION
Tenir le câble d’alimentation par la fiche. Ne pas
débrancher la prise en tirant sur le câble et ne pas
toucher le câble avec les mains mouillées. Cela risque
de provoquer un court-circuit ou un choc électrique. Ne
pas poser l’appareil ou un meuble sur le câble. Ne pas
pincer le câble. Ne pas faire de noeud avec le câble ou
l’attacher à d’autres câbles. Les câbles d’alimentation
doivent être posés de façon à ne pas être écrasés. Un
câble abîmé peut provoquer un risque d’incendie ou un
choc électrique. Vérifier le câble d’alimentation de
temps en temps. Contacter le service après-vente
PIONEER le plus proche ou le revendeur pour un
S002*_Fr
remplacement.
PRÉCAUTION DE VENTILATION
Lors de l’installation de l’appareil, veillez à laisser
un espace suffisant autour de ses parois de
manière à améliorer la dissipation de chaleur (au
moins 60 cm sur le dessus, 10 cm à l’arrière et 30 cm
de chaque côté).
AVERTISSEMENT
Les fentes et ouvertures du coffret sont prévues
pour la ventilation, pour assurer un fonctionnement
stable de l’appareil et pour éviter sa surchauffe.
Pour éviter les risques d’incendie, ne bouchez
jamais les ouvertures et ne les recouvrez pas
d’objets, tels que journaux, nappes ou rideaux, et
n’utilisez pas l’appareil posé sur un tapis épais ou
un lit.
D3-4-2-1-7b_A_Fr
"
2:04 PM
)%%' !#()%(.)#$*'.+ )'!(
' (&*( ## ).'.!)' &*#
%!-%'0(!* *#'. % #)'"%! *)!
&**#+($**#%$)!*'()#!,%$(-%(
2($*))(*(.!$*((*'(!%!* '
$*!*" ).
ATTENTION
Pour éviter les risques d’incendie, des fils de câblage
de Classe 2 doivent être utilisés pour le branchement
de haut-parleurs et ils doivent être acheminés à
l’écart de dangers potentiels afin d’éviter
d’endommager leur isolant.
(Exemples de marquage pour les batteries)
Ces symboles ne sont
valables que dans les pays
de l’Union Européenne.
Pb
K058c_A1_Fr
AVERTISSEMENT
Pour éviter les risques d’incendie, ne placez aucune
flamme nue (telle qu’une bougie allumée) sur
l’appareil.
D3-4-2-1-7a_A_Fr
A9MK2_CUXCN-fr.book
Page 4
Wednesday, April 22, 2009
2:04 PM
Merci d’avoir acheté ce produit Pioneer.
Veuillez lire entièrement ce mode d’emploi afin de pouvoir faire fonctionner correctement le
modèle que vous avez choisi. Après avoir fini la lecture du mode d’emploi, placez-le dans un
endroit sûr afin de pouvoir vous y référer plus tard.
Table des matières
01 Préparatifs
05 Utilisation du syntoniseur
Caractéristiques . . . . . . . . . . . . . . . . . . . . . . .
Contenu de la boîte . . . . . . . . . . . . . . . . . . . . .
Insertion de la pile. . . . . . . . . . . . . . . . . . . . . .
Installation de l’ampli-tuner . . . . . . . . . . . . . .
5
5
6
6
02 Raccordement
06 Autres raccordements
Raccordements des câbles . . . . . . . . . . . . . . . 7
Raccordement des composants audio . . . . . . 7
Connecter les antennes . . . . . . . . . . . . . . . . . 8
Utilisation des antennes externes. . . . . . . . . 9
Raccordement des enceintes . . . . . . . . . . . . . 9
Branchement . . . . . . . . . . . . . . . . . . . . . . . . 10
Écoute de la radio par satellite . . . . . . . . . . . 18
Raccordement de votre ampli-tuner
de radio XM . . . . . . . . . . . . . . . . . . . . . . . . 18
Écoute de la radio XM . . . . . . . . . . . . . . . . . 19
Enregistrement des canaux préréglés. . . . . 19
Utilisation de l’interface USB . . . . . . . . . . . . 20
Raccordement d’un amplificateur
supplémentaire . . . . . . . . . . . . . . . . . . . . . . . 21
Raccordement d’un récepteur IR . . . . . . . . . 22
Fonctionnement d’autres composants
Pioneer avec le capteur de cette unité. . . . . . 22
Mise sous et hors tension de composants à
l’aide du déclencheur de 12 volts . . . . . . . . . 23
03 Commandes et afficheur
Panneau avant . . . . . . . . . . . . . . . . . . . . . . .
Télécommande . . . . . . . . . . . . . . . . . . . . . . .
Utilisation de la télécommande . . . . . . . . .
Afficheur . . . . . . . . . . . . . . . . . . . . . . . . . . . .
11
12
13
13
04 Écoute de votre système
Utilisation de l’écoute en mode direct. . . . . .
Utilisation de la fonction Sound Retriever . . .
Utilisation des commandes de balance
et de tonalité . . . . . . . . . . . . . . . . . . . . . . . . .
Lecture d’autres sources. . . . . . . . . . . . . . . .
Réalisation d’un enregistrement audio . . . . .
4
Fr
Écoute de la radio . . . . . . . . . . . . . . . . . . . . . 16
Enregistrement des stations préréglées . . . . 16
Nommer les stations préréglées . . . . . . . . . 16
Écoute de stations préréglées. . . . . . . . . . . 17
14
14
14
14
15
07 Informations supplémentaires
Guide de dépannage . . . . . . . . . . . . . . . . . . . 24
Messages de radio XM . . . . . . . . . . . . . . . . 25
Spécifications . . . . . . . . . . . . . . . . . . . . . . . . 25
Nettoyage de l’unité . . . . . . . . . . . . . . . . . . 26
A9MK2_CUXCN-fr.book
Page 5
Wednesday, April 22, 2009
2:04 PM
Préparatifs
01
Chapitre 1 :
Préparatifs
• Circuit d’alimentation électrique à
réponse rapide
Le circuit d’alimentation électrique supérieur
adopté par cette unité permet une bien
meilleure réponse en employant une
circuiterie ‘no feedback (sans retour)’, des
transformateurs toriques et des
condensateurs principaux en parallèle à faible
impédance utilisés typiquement pour le
contrôle d’écoute professionnel.
• Construction symétrique double mono
Cet ampli-tuner offre une nouvelle avancée
dans le domaine de l’image stéréo grâce à la
construction entièrement indépendante des
unités d’amplification de puissance gauche/
droite et aux transformateurs doubles.
• Construction directe
En plus de la conception symétrique
améliorée, le trajet du signal de chaque bloc
est conçu de manière à ce que le trajet du
signal soit le plus court possible afin de
détériorer au minimum la clarté du signal.
• Circuit linéaire à plage étendue
Par l’intermédiaire de ce circuit de retour
breveté, un signal de sortie de faible
impédance offrant une réponse uniforme et
régulière sur la plage de fréquence la plus
étendue possible est transmis à vos enceintes.
• Sound Retriever
La fonction analogique Sound Retriever utilise
une nouvelle technologie qui aide à supprimer
les effets adverses de la compression de
fichiers audio en rétablissant la bande
passante et en lissant les artéfacts dentelés
restants après qu’ils aient été compressés, ce
qui a pour conséquence un étage audio plus
étendu.
• Interface USB
L’interface USB vous permet d’écouter l’audio
sur deux canaux à partir d’un PC connecté à
cet ampli-tuner.
• Prêt pour la radio XM
La borne de radio XM de cet ampli-tuner
permet une connexion rapide et facile à une
radio XM, le premier fournisseur de radio par
satellite aux États-Unis. Rendez-vous sur le site
www.xmradio.com pour davantage de détails
sur ce service.
Français
Caractéristiques
• Ajusté aux normes de niveau
international
Avec la coopération des ingénieurs du son de
niveau international de AIR Studios, cet
ampli-tuner a été certifié AIR Studios :
Contenu de la boîte
Veuillez confirmer que les accessoires
suivants sont présents dans la boîte quand
vous l’ouvrez.
• Télécommande
• Piles sèches AAA/IEC R03 x 2
• Antenne cadre AM
• Antenne à fil FM
• Cordon d’alimentation
• Mode d’emploi (ce document)
• Carte de garantie
5
Fr
A9MK2_CUXCN-fr.book
01
Page 6
Wednesday, April 22, 2009
2:04 PM
Préparatifs
Insertion de la pile
Installation de l’ampli-tuner
• Lors de l’installation de l’appareil, assurezvous que ce dernier est posé sur une
surface plane et stable.
Attention
Toute utilisation incorrecte des piles peut
entraîner des accidents, par exemple une fuite
ou une explosion. Respectez les précautions
suivantes :
• N’utilisez jamais des piles neuves et des
piles usagées ensemble.
• Insérez correctement les pôles positifs et
négatifs des piles en suivant les marques
du boîtier.
• Des piles de forme identique peuvent
présenter des tensions différentes. Utilisez
uniquement des piles du même type.
• Lorsque vous vous débarrassez de piles
usées, veuillez vous conformer aux
réglementations gouvernementales ou
environnementales des institutions
publiques en vigueur dans votre pays ou
votre région.
• AVERTISSEMENT
N’utilisez ni ne conservez les piles sous la
lumière directe du soleil ou dans un
endroit excessivement chaud, comme une
voiture ou à proximité d’un appareil de
chauffage. Les piles risqueraient de fuir, de
surchauffer, d’exploser ou de s’enflammer.
Leur durée de vie ou leur performance
pourrait également être réduite.
6
Fr
N’installez pas l’appareil dans les endroits
suivants :
– sur un téléviseur couleur (les images à
l’écran pourraient être déformées)
– à proximité d’une platine à cassettes (ou d’un
appareil qui produit un champ magnétique). Le
son pourrait s’en trouver affecté.
– à la lumière directe du soleil
– à l’humidité
– à des températures extrêmes
– en présence de vibrations ou autres
mouvements
– à la poussière
– à la fumée ou aux émanations graisseuses
(cuisine par ex.)
A9MK2_CUXCN-fr.book
Page 7
Wednesday, April 22, 2009
2:04 PM
Raccordement
02
Chapitre 2 :
Raccordement
Assurez-vous de ne pas plier les câbles par
dessus cette unité (comme indiqué dans
l’illustration). Si cela se produit, le champ
magnétique produit par les transformateurs
dans cette unité peut provoquer un ronflement
des enceintes.
Raccordement des composants
audio
Le nombre et le type de raccordements dépend
du type de composant que vous raccordez.
Suivez les étapes ci-dessous pour raccorder un
lecteur CD, un magnétophone, une platine ou
un autre composant audio.
Français
Raccordements des câbles
3
Platine
FM UNBAL
75
AM LOOP
ANTENNA
XM
USB
AUDIO IN IN
CONTROL
OUT
IR
IN
OUT
SIGNAL
GND
L
Important
12V
TRIGGER
REC
OUT
PRE
OUT
R
R
PLAY
IN
TAPE
L
MM/MC
AUX1
AUX2
CD
PHONO
Cet ampli-tuner
• Avant d’effectuer ou de modifier les
raccordements, mettez l’appareil hors
tension et débranchez le cordon
d’alimentation de la prise secteur.
L
2
1
OUT
R
IN
REC
OUT
PLAY
AUDIO IN/OUT
R
L
AUDIO OUT
D6
Lecteur de cassettes, etc.
Lecteur CD, etc.
7
Fr
A9MK2_CUXCN-fr.book
02
Page 8
Wednesday, April 22, 2009
2:04 PM
Raccordement
1 Raccordez les sorties audio analogiques
de votre lecteur CD (ou d’un autre
composant) aux entrées CD de cet
ampli-tuner.
Utilisez un câble stéréo phono RCA comme
indiqué.
• Raccordez tout autre composant (comme
un dock iPod1 ou un lecteur audio
portable) aux entrées AUX de la même
façon.
2 Raccordez les sorties analogiques de
votre lecteur de cassettes audio (ou d’un
autre enregistreur) aux entrées TAPE (IN) de
cet ampli-tuner. Raccordez ensuite les entrées
audio du lecteur de cassettes audio aux
sorties TAPE (OUT) de cet ampli-tuner.
Cela vous permettra d’effectuer des
enregistrements à partir des composants
raccordés à cet ampli-tuner. Utilisez des
câbles stéréo phono RCA comme indiqué.
3 Uniquement pour les platines : Raccordez
les sorties audio de votre platine aux entrées
PHONO de cet ampli-tuner.
• Si votre platine dispose d’un fil de mise à la
terre, fixez-le à la borne de terre de cet
ampli-tuner.
• Si votre platine dispose de sorties de
niveau ligne (c.-à-d. si elle possède un
préampli phono intégré), raccordez-la aux
entrées AUX à la place.
• Assurez-vous que le commutateur
MM/MC est dans la position correcte. Si le
son de la platine est fort et distordu ou
excessivement doux, essayer de modifier le
réglage.
Connecter les antennes
Raccordez l’antenne cadre AM et l’antenne à
fil FM comme indiqué ci-dessous. Pour
améliorer la réception et la qualité sonore,
raccordez les antennes externes (voir
Utilisation des antennes externes ci-dessous).
fig. a
3
FM UNBAL
75
ANTENNA
4
1
2
1 Retirez les gaines protectrices de chacun
des fils de l’antenne AM.
2 Ouvrez les languettes en poussant, puis
insérez entièrement un fil dans chaque borne.
Relâchez ensuite les languettes pour fixer les
fils de l’antenne AM.
3 Fixez l’antenne cadre AM au support
intégré.
Pour fixer le support à l’antenne, pliez-la dans
le sens indiqué par la flèche puis attachez le
cadre au support (fig. a).
• Si vous souhaitez fixer l’antenne AM sur un
mur ou une autre surface, attachez le
support au moyen des vis (fig. b) avant
d’attacher le cadre au support.
Assurez-vous que la réception est bonne.
Remarque
Fr
AM LOOP
5
1 iPod est une marque commerciale d’Apple Inc., enregistrées aux états-Unis et d’autres pays.
8
fig. b
A9MK2_CUXCN-fr.book
Page 9
Wednesday, April 22, 2009
2:04 PM
Raccordement
02
4 Placez l’antenne AM sur une surface plane
et dans le sens qui offre la meilleure
réception.
Utilisation des antennes externes
Pour améliorer la réception FM
Utilisez un câble coaxial 75 Ω pour raccorder
une antenne FM externe.
Connecteur PAL à
une seule touche
FM UNBAL
75
AM LOOP
Assurez-vous de raccorder l’enceinte de droite
à la borne de droite et l’enceinte de gauche à la
borne de gauche. Vérifiez aussi que les bornes
positive et négative (+/–) sur l’ampli-tuner
correspondent à celles des enceintes. Vous
pouvez utiliser des enceintes ayant une
impédance nominale comprise entre 4 Ω et
16 Ω.
Français
5 Raccordez l’antenne à fil FM de la même
manière que l’antenne cadre AM.
Pour obtenir les meilleurs résultats, déployez
l’antenne FM au maximum et fixez-la à un mur
ou à un montant de porte. Ne la laissez pas
pendre ou enroulée.
Raccordement des enceintes
Assurez-vous d’avoir terminé tous les
raccordements avant de raccorder cette unité à
la source d’alimentation secteur.
Enceinte de gauche
ANTENNA
CONTROL
OUT
OUT
Câble coaxial 75 Ω
SIGNAL
GND
Pour améliorer la réception AM
Raccordez un câble revêtu de vinyle de 5 m à 6
m de longueur à la borne d’antenne AM sans
débrancher l’antenne cadre AM fournie.
Antenne
extérieure
5mà6m
Antenne intérieure
(fil revêtu de vinyle)
FM UNBAL
75
AM LOOP
ANTENNA
Pour obtenir la meilleure réception possible,
suspendez horizontalement et à l’extérieur.
AC IN
L
R
MM/MC
PHONO
SPEAKER
L
• Raccordez les enceintes aux bornes
d’enceinte comme indiqué ci-dessus.
Les raccordements pour l’enceinte de gauche
sont illustrés. Raccordez l’enceinte de droite
de la même façon. Pour ce faire, vous pouvez
utiliser n’importe lequel des fils dénudés (voir
ci-dessous).
Raccordements avec fil dénudé
Assurez-vous que le câble d’enceinte que vous
allez utiliser est correctement préparé avec
environ 10 mm inch d’isolateur retiré de
chaque fil et les brins de fil dénudés torsadés
ensemble (fig. A).
9
Fr
A9MK2_CUXCN-fr.book
02
Page 10
Wednesday, April 22, 2009
Raccordement
Pour raccorder une borne, dévissez la borne de
quelques tours jusqu’à ce qu’il y ait assez de
place pour insérer le fil dénudé (fig. B). Une fois
que le fil est bien positionné, serrez la borne
jusqu’à ce que le fil soit fermement fixé (fig. C).
fig. A
fig. B
fig. C
10 mm
Important
• Veuillez vous référer au manuel qui vous a
été fourni avec les enceintes pour
connaître les détails sur la façon de
raccorder l’autre extrémité des câbles
d’enceinte à vos enceintes.
Attention
• Les bornes des haut-parleurs sont sous
une tension ACTIVE DANGEREUSE. Pour
éviter tout risque de décharge électrique
lors du branchement et du débranchement
des câbles de haut-parleur, débranchez le
cordon d’alimentation avant de toucher
des parties non isolées.
• Vérifiez qu’aucun fil d’enceinte dénudé ne
touche le panneau arrière, car
l’ampli-tuner pourrait se mettre
automatiquement hors tension.
Branchement
Assurez-vous d’avoir terminé tous les
branchements avant de raccorder à une prise
secteur.
• Raccordez le cordon dalimentation
secteur à l’entrée AC IN sur le panneau
arrière de lamplificateur puis branchez-le
sur une prise secteur.
10
Fr
2:04 PM
A9MK2_CUXCN-fr.book
Page 11
Wednesday, April 22, 2009
2:04 PM
Commandes et afficheur
03
Chapitre 3 :
Commandes et afficheur
1
2
4
3
5
6
Français
Panneau avant
A9
VOLUME
INPUT SELECTOR
POWER
STANDBY
OFF
ON
7
DIRECT
PHONES
8
1
POWER OFF ON1
2
Voyant STANDBY
3
Afficheur (page 13)
4 DIRECT
Permet d’activer ou de désactiver la fonction
d’écoute en mode direct (page 14).
5 Cadran INPUT SELECTOR
Permet de sélectionner une source d’entrée.
6
Master VOLUME
7
Capteur de télécommande
8 Prise PHONES
Permet de raccorder des écouteurs (lorsqu’ils
sont raccordés, aucun son ne sort des
enceintes).
Remarque
1 Lorsque l’appareil est en mode veille, s’il est mis hors tension en appuyant sur la touche POWER de l’unité principale, il ne
sera pas remis sous tension simplement en appuyant de nouveau sur la touche. Dans ce cas, pour remettre l’appareil sous
tension, appuyez sur la touche AMP ou DIRECT de la télécommande de l’unité principale pendant cinq secondes environ.
11
Fr
A9MK2_CUXCN-fr.book
03
Page 12
Wednesday, April 22, 2009
2:04 PM
Commandes et afficheur
5 VOLUME +/–
Permet de régler le volume d’écoute.
Télécommande
RECEIVER
DIMMER
7
1
2
CD
TAPE
PHONO
TUNER
XM
USB
AUX1
AUX2
DISPLAY
1
2
3
4
5
6
7
8
9
S.RETRIEVER
0
DIRECT
7 DIMMER
Permet d’obscurcir ou d’éclaircir l’affichage
(ou de désactiver le rétroéclairage).
8
3
4
6 Commandes du TONE/BAL
Appuyez sur ces touches pour régler la tonalité
et la balance (page 14).
9
8 AFFICHEUR (Radio XM uniquement)
Permet de basculer entre les stations
préréglées et les fréquences radio (page 16).
9 DIRECT
Permet d’accéder à la fonction d’écoute en
mode direct (page 14).
VOLUME
5
MUTE
10
6
L
R
TONE/BAL
MPX
T.EDIT
CATEGORY
BAND
TUNE
CLASS
PRESET
ENTER
PRESET
TUNE
RETURN
D.ACCESS
11
CD PLAYER
12
STEREO RECEIVER
1 AMP
Cette touche permet d’allumer l’ampli-tuner et
de le mettre en veille.
2 Touches de sélection des entrées
Appuyez sur l’une de ces touches pour
sélectionner une source d’entrée.
3 Touches Numérotées
Utilisez les touches numérotées pour
sélectionner directement une fréquence radio
(page 16).
4 S. RETRIEVER
Permet d’activer ou de désactiver la fonction
Sound Retriever (page 14).
12
Fr
10 MUTE
Permet de couper/restaurer le son.
11 Commandes du syntoniseur et de la radio
XM
MPX (Syntoniseur uniquement) – Permet
de basculer entre la réception stéréo et
mono des programmes FM (page 16).
T.EDIT – Mémorise/nomme les stations
pour le rappel (page 16).
CATEGORY (Radio XM uniquement) –
Appuyez pour naviguer parmi les
programmes radio numériques (page 18).
BAND (Syntoniseur uniquement) – Permet
de basculer entre les bandes AM et FM
(page 16).
CLASS – Permet de basculer entre les trois
banques de stations préréglées (page 16).
D.ACCESS – Appuyez pour accéder
directement à une station radio à l’aide des
touches numérotées (page 16).
RETURN (Radio XM uniquement) – Appuyez
pour confirmer et quitter le menu actuel.
(TUNE/PRESET) /ENTER
Utilisez les touches TUNE pour
trouver les fréquences radio et PRESET
pour trouver les stations préréglées
(page 16).
12 Boutons de commande du CD PLAYER
Permet de contrôler le lecteur CD.
A9MK2_CUXCN-fr.book
Page 13
Wednesday, April 22, 2009
2:04 PM
Commandes et afficheur
03
Utilisation de la télécommande
Gardez à l’esprit ce qui suit lorsque vous
utilisez la télécommande :
Afficheur
1
• Assurez-vous de l’absence d’obstacles
entre la télécommande et le capteur de
l’appareil.
4
TREBLE
BASS
dB
XM
FM
AM
5
1
• Les télécommandes de différents appareils
peuvent interférer entre elles. Evitez
d’utiliser des télécommandes
commandant d’autres équipements situés
à proximité de cet appareil.
• Remplacez les piles lorsque vous constatez
une diminution de la portée de
fonctionnement de la télécommande.
3
MHz
KHz
6
7
8
Français
TUNED
STEREO
MONO
• La télécommande a une portée denviron
7 mètres avec un angle de 30° par rapport
au capteur de télécommande.
• La télécommande risque de ne pas
fonctionner correctement si la lumière du
soleil ou une lampe fluorescente puissante
éclaire le capteur de l’appareil.
2
Indicateurs du syntoniseur
TUNED – S’allume lors de la réception
d’une émission.
STEREO – S’allume lors de la réception
d’une émission FM stéréo en mode stéréo
automatique.
MONO – S’allume lorsque la touche MPX
est utilisée pour sélectionner le mode
mono.
2
Indicateurs de commande de la tonalité
TREBLE – S’allume lorsque le réglage de la
tonalité haute fréquence est appliqué.
BASS – S’allume lorsque le réglage de la
tonalité basse fréquence est appliqué.
3 Indicateur Sound Retriever
S’allume lorsque la fonction Sound Retriever
est activée.
4
Niveau du volume principal
5
FM – S’allume lors de la réception de
programmes FM.
AM – S’allume lors de la réception de
programmes AM.
6
XM – S’allume lors de la réception de
programmes XM.
7 Affichage alphanumérique
Affiche diverses informations système.
8
MHz – S’allume lors de l’affichage d’une
fréquence FM.
KHz – S’allume lors de l’affichage d’une
fréquence AM.
13
Fr
A9MK2_CUXCN-fr.book
04
Page 14
Wednesday, April 22, 2009
2:04 PM
Écoute de votre système
Chapitre 4 :
Écoute de votre système
Utilisation de l’écoute en mode
direct
Utilisez la fonction d’écoute en mode direct
lorsque vous souhaitez écouter la reproduction
la plus fidèle possible d’une source. Tous les
traitements de signaux1 inutiles sont ignorés et
il ne vous reste plus qu’une source de son pur.
• Lors de la lecture d’une source, appuyez
sur DIRECT pour activer ou désactiver
l’écoute en mode direct.
Utilisation de la fonction Sound
Retriever
Lorsque des données audio sont supprimées
lors de la compression, la qualité du son est
souvent amoindrie du fait de l’inégalité de
l’image sonore. La fonction analogique Sound
Retriever utilise une nouvelle technologie qui
aide à supprimer les effets adverses de la
compression de fichiers audio à deux canaux
en rétablissant la bande passante et en lissant
les artéfacts dentelés restants après qu’ils
aient été compressés, ce qui a pour
conséquence un étage audio plus étendu.
• Appuyez sur S. RETRIEVER pour activer
ou désactiver la fonction Sound Retriever.
L’indicateur
sur l’afficheur avant est
allumé pour indiquer que la fonction Sound
Retriever est activée.
Utilisation des commandes de
balance et de tonalité
Suivant ce que vous écoutez, il se peut que
vous vouliez régler les graves, les aigus ou la
balance gauche/droite à l’aide de la
télécommande.
• Appuyez sur TONE/BAL pour sélectionner
l’option souhaitée, puis utilisez les touches
L/– et R/+ pour effectuer les réglages
nécessaires.
• BASS – Permet de régler le niveau des
graves entre –10 et +10.
• TRE – Permet de régler le niveau des aigus
entre –10 et +10.
• BAL – Permet de régler le niveau de
balance gauche/droite à votre guise. FLAT
indique une balance centrée.
Patientez environ cinq secondes et vos
changements seront appliqués
automatiquement. Les indicateurs BASS et
TREBLE s’allument sur le panneau avant
lorsque la commande de tonalité
correspondante est active.
• Pour revenir au réglage uniforme
(commande de la tonalité désactivée),
appuyez simultanément sur les touches
L/– et R/+.
Lecture d’autres sources
1 Mettez sous tension le composant de
lecture.
2
Mettez sous tension l’ampli-tuner.
3 Sélectionnez la source que vous souhaitez
lire.
Utilisez les touches de sélection des entrées
(ou le cadran INPUT SELECTOR).
4 Débutez la lecture du composant que
vous avez sélectionné dans l’étape 1.
Remarque
1 La fonction Sound Retriever et les commandes de la balance et de la tonalité sont désactivées ainsi que l’affichage du panneau
avant.
14
Fr
A9MK2_CUXCN-fr.book
Page 15
Wednesday, April 22, 2009
2:04 PM
Écoute de votre système
04
Réalisation d’un enregistrement
audio
1 Sélectionnez la source que vous souhaitez
enregistrer.
Utilisez les touches de sélection des entrées
(INPUT SELECTOR).
Français
Vous pouvez faire un enregistrement audio à
partir de n’importe quelle source audio
raccordée à l’ampli-tuner.
2 Préparez la source que vous souhaitez
enregistrer.
Réglez la station de radio, insérez le CD,
installez la platine, etc.
3 Préparez l’enregistreur.
Insérez une cassette, un MD vierge, etc. dans
l’appareil d’enregistrement et réglez les
niveaux d’enregistrement.1
Consultez les instructions livrées avec
l’enregistreur si vous n’êtes pas sûr de
comment procéder.
4 Commencez l’enregistrement, puis
commencez la lecture du composant source.
Remarque
1 Les commandes du volume, de la balance et de la tonalité de l’ampli-tuner n’ont aucune incidence sur le signal enregistré.
15
Fr
A9MK2_CUXCN-fr.book
05
Page 16
Wednesday, April 22, 2009
2:04 PM
Utilisation du syntoniseur
Chapitre 5 :
Utilisation du syntoniseur
Écoute de la radio
Les étapes suivantes vous indiquent comment
régler des programmes FM et AM.
1 Appuyez sur TUNER puis sur BAND pour
sélectionner la bande du syntoniseur.
2 Réglez une station.
Vous disposez de quatre moyens pour régler
une station :
Réglage automatique – Appuyez sur
/ et maintenez enfoncé pendant une
seconde environ. La recherche s’arrête
automatiquement à la station suivante.
Réglage automatique – Pour changer de
fréquence étape par étape, appuyez sur
/.
Réglage à grande vitesse – Appuyez sur
/ et maintenez enfoncé d’une manière
continue.
Accès direct – Utilisez les touches
numérotées pour saisir la fréquence (par
exemple, pour sélectionner 106.00 (FM),
appuyez sur 1, 0, 6, 0, 0).1
Si les indicateurs TUNED ou STEREO ne
s’allument pas lors de la sélection d’une
station FM, en raison de la pauvreté du signal,
appuyez sur la touche MPX pour faire basculer
l’ampli-tuner vers le mode mono. Cela devrait
améliorer la qualité du son et vous permettre
de profiter de la diffusion.
Enregistrement des stations
préréglées
Cet ampli-tuner peut mémoriser jusqu’à 30
stations, enregistrées dans trois banques de 10
stations.2
1 Sélectionnez la station à mémoriser, puis
appuyez sur T.EDIT.
ST. MEMORY s’affiche, puis une catégorie de
mémoire clignote.
2 Appuyez sur CLASS pour sélectionner une
des trois catégories puis sur / pour
sélectionner la station préréglée souhaitée.
3 Appuyez sur ENTER pour mémoriser la
station.
Nommer les stations préréglées
Vous pouvez nommer vos préréglages pour
faciliter leur rappel.
1 Sélectionnez le préréglage à nommer.
Reportez-vous à Écoute de stations préréglées
ci-dessous.
2 Appuyez sur T.EDIT.
Un curseur s’affiche sur la première position
de caractère.
3 Saisissez le nom souhaité puis appuyez sur
ENTER.
Les noms peuvent contenir un maximum de
quatre caractères.
• Utilisez les touches / pour
sélectionner les caractères, puis sur
ENTER pour confirmer. Si aucun caractère
n’est saisi, un espace est enregistré.
Note
• Une fois que la station préréglée porte un
nom, vous pouvez appuyer sur DISPLAY
pendant l’écoute d’une station pour faire
basculer l’affichage entre le nom et la
fréquence.
Remarque
1 Si vous vous trompez en cours de route, appuyez deux fois sur D.ACCESS pour annuler la fréquence et recommencer.
2 Lors de l’enregistrement d’une fréquence FM, le réglage MPX est également mémorisé.
16
Fr
A9MK2_CUXCN-fr.book
Page 17
Wednesday, April 22, 2009
2:04 PM
Utilisation du syntoniseur
05
Écoute de stations préréglées
Pour faire cela, vous devez avoir des stations
préréglées en mémoire. Voir Enregistrement
des stations préréglées ci-dessus si ce n’est pas
encore fait.1
2 Appuyez sur CLASS pour sélectionner la
catégorie dans laquelle la station est
mémorisée.
Appuyez plusieurs fois pour passer entre les
classes A, B et C.
Français
1 Appuyez sur TUNER pour sélectionner le
syntoniseur.
3 Appuyez sur / pour sélectionner la
station préréglée souhaitée.
Remarque
1 Les stations mémorisées sont perdues si l’ampli-tuner est débranché de la prise secteur pendant une longue période.
17
Fr
A9MK2_CUXCN-fr.book
06
Page 18
Wednesday, April 22, 2009
2:04 PM
Autres raccordements
Chapitre 6 :
Autres raccordements
Écoute de la radio par satellite
Pour écouter la radio par satellite, il vous faut
raccorder un syntoniseur de radio par satellite
XM (vendu séparément) à votre ampli-tuner
prêt pour XM. La radio par satellite XM est
disponible pour les résidents des États-Unis
(sauf Alaska et Hawaii).
La radio par satellite offre une variété de
musique sans publicité dans des catégories
comme pop, rock, country, R&B, danse, jazz,
classique et bien d’autres, de même que des
programmes concernant les sports de niveau
professionnel ou étudiant, y compris les
matches de ligues et équipes particulières.
D’autres programmes comprennent des
discussions d’experts sur les sports, des
divertissements non censurés, des comédies,
des programmes familiaux, des infos locales
sur le trafic et la météo ainsi que des nouvelles
provenant de sources qui ont votre confiance.
Une fois que vous avez acheté un syntoniseur
XM, il vous faudra l’activer et vous abonner
pour profiter de ce service. Des instructions
faciles pour l’installation et la configuration
sont fournies avec les syntoniseurs de radio
par satellite. Des forfaits de programmes variés
sont disponibles, avec l’option d’ajouter le
programme “The Best of SIRIUS”. Le service
“Best of SIRIUS” n’est en ce moment pas
disponible aux abonnés XM du Canada.
Des forfaits familiaux sont également
disponibles pour limiter les canaux qui
contiennent des programmes inappropriés
pour les enfants.
Pour s’abonner à XM, il est conseillé aux
clients des États-Unis de se rendre sur
xmradio.com ou d’appeler 1-800-XMRADIO
(1-800-967-2346) ; les clients canadiens
peuvent se rendre sur xmradio.ca ou appeler
XM Listener Care au
1-877-GETXMSR (1-877-438-9677).
Raccordement de votre ampli-tuner
de radio XM
Après l’achat d’une antenne Connect-and
Play™ (vendue séparément), il vous faudra
également activer le service de radio
numérique XM pour recevoir les programmes.1
Antenne Connect-and-Play
XM
USB
AUDIO IN IN
CONTROL
OUT
IR
IN
OUT
SIGNAL
GND
L
AC IN
L
R
R
MM/MC
AUX1
AUX2
CD
PHONO
SPEAKER
L
Cet ampli-tuner
1 Raccordez une antenne de radio XM
Connect-and-Play™ à la prise de radio XM à
l’arrière de cet ampli-tuner.
Il vous faudra également activer le service de
radio XM.
Lors de l’activation de l’antenne numérique de
radio XM ‘Connect-and-Play’ ™, veuillez
attendre la fin de la procédure d’activation
avant de modifier la fonction XM-RADIO. Si
vous changer la source d’entrée, la procédure
d’activation est arrêtée.
2 Utilisez la touche de sélection d’entrée
XM pour basculer vers l’entrée de radio XM.
Pour obtenir une meilleure réception, il vous
faudra peut-être placer l’antenne Connect-andPlay™ près d’une fenêtre (la fenêtre la plus au
sud donne les meilleurs résultats).
Remarque
18
Fr
1 Matériel et abonnement mensuel de base vendus séparément. Canal de qualité supérieure disponible sous frais mensuels
supplémentaires. Des frais d’installation, taxes ou autres, y compris des frais d’activation, peuvent s’appliquer. Les frais
d’abonnement sont limités au consommateur. Tous les frais et tous les programmes sont sujets à modification. Les canaux qui
présentent un langage souvent explicite sont signalés par XL. Le blocage de canal est disponible aux ampli-tuners de radio XM
en appelant 1-800-XMRADIO. Abonnements sujets aux accords de clients disponibles sur xmradio.com. Disponibles
uniquement dans les 48 états contigus.
A9MK2_CUXCN-fr.book
Page 19
Wednesday, April 22, 2009
2:04 PM
Autres raccordements
• Si, après avoir appuyé sur XM, ANTENNA
s’affiche, essayez de débrancher puis de
rebrancher l’antenne.1
Écoute de la radio XM
Sélection des canaux et navigation par
genre
Vous pouvez parcourir les canaux de radio XM
dans leur ordre d’affichage, ou limiter votre
recherche par genre.
• Utilisez les touches / pour
sélectionner un canal puis appuyez sur ENTER
pour écouter un programme de radio XM.
• Pour naviguer par genre, appuyez d’abord
sur CATEGORY, utilisez / pour
sélectionner un genre puis appuyez sur
ENTER.2
• Pour annuler et quitter à n’importe quel
moment, appuyez sur RETURN.
Note
• Vous pouvez sélectionner directement des
canaux en appuyant sur D.ACCESS puis
sur le numéro de canal à trois chiffres.
• Vous pouvez appuyer sur DISPLAY pour
modifier les informations de radio XM sur
le panneau avant.
Enregistrement des canaux préréglés
Cet ampli-tuner est capable de mémoriser
jusqu’à 30 canaux, répartis dans trois
banques, ou catégories (A, B et C) de 10
stations.
1 Sélectionnez le canal que vous souhaitez
mémoriser.
Reportez-vous à Sélection des canaux et
navigation par genre ci-dessus.
2 Appuyez sur T.EDIT.
L’affichage montre une catégorie de mémoire
qui clignote.
3 Appuyez sur CLASS pour sélectionner une
des trois catégories puis sur / pour
sélectionner le canal préréglé souhaité.
Pour ce faire, vous pouvez également utiliser
les touches numérotées.
• Le réglage par défaut pour tous les
préréglages est CH001.
4 Appuyez sur ENTER.
Après avoir appuyé sur ENTER, la catégorie et
le numéro de préréglage s’arrêtent de
clignoter et l’ampli-tuner mémorise le canal
XM.
Français
Après le raccordement, vous pourrez utiliser
cet ampli-tuner pour sélectionner des canaux
et parcourir les catégories à l’aide du panneau
avant.
06
Écoute de canaux préréglés
Pour faire cela, vous devez avoir des stations
préréglées en mémoire.
1 Appuyez sur CLASS pour sélectionner la
catégorie dans laquelle le canal est mémorisé.
Appuyez plusieurs fois pour passer entre les
classes A, B et C.
2 Appuyez sur / pour sélectionner le
canal préréglé souhaité.
• Vous pouvez également utiliser les touches
numérotées de la télécommande pour
rappeler le canal préréglé.
À propos de XM
XM, SIRIUS ainsi que toutes les marques et
tous les logos apparentés sont des marques
commerciales de Sirius XM Radio Inc. et de
ses filiales. Toutes les autres marques et tous
les autres logos appartiennent à leurs
propriétaires respectifs. Tous droits de
reproduction et de traduction réservés
Abonnement XM vendu séparément. Des taxes
et frais d’activations peuvent être appliqués.
Syntoniseur XM et station d’accueil
nécessaires (vendus séparément) pour
recevoir les programmes XM. Tous les frais et
tous les programmes sont sujets à
modification. Il est interdit de copier,
décompiler, démonter, de faire de l’ingénierie
inverse, de pirater, de manipuler ou de rendre
disponible toute technologie ou logiciel intégré
aux ampli-tuners compatibles avec le système
de radio par satellite XM. Service non
disponible en Alaska ou à Hawaii.
Remarque
1 Après avoir débranché l’ampli-tuner, LOADING s’affiche pendant environ 1 minute lors de sa remise sous tension.
2 Sélectionnez CH000 (RADIO ID) depuis le panneau avant pour vérifier l’identifiant Radio de l’antenne Connect-and-Play.
19
Fr
A9MK2_CUXCN-fr.book
06
Page 20
Wednesday, April 22, 2009
2:04 PM
Autres raccordements
Utilisation de l’interface USB
Il est possible d’écouter deux canaux audio à
partir de votre ordinateur en le raccordant à
l’interface USB situé à l’arrière de cet
ampli-tuner. Selon le modèle de votre
ordinateur et le logiciel installé, vous pouvez
écouter la source audio stéréo par
l’intermédiaire des enceintes que vous avez
raccordées à cet ampli-tuner.1
Connecteur
USB type B
FM UNBAL
75
AM LOOP
ANTENNA
XM
USB
AUDIO IN IN
CONTROL
OUT
IR
IN
OUT
SIGNAL
GND
L
12V
TRIGGER
PRE
OUT
REC
OUT
R
R
PLAY
IN
TAPE
L
MM/MC
AUX1
AUX2
CD
PHONO
Cet ampli-tuner
Connecteur
USB type A
1 Raccordez la borne USB de votre
ordinateur à la borne USB située sur le
panneau arrière de cet ampli-tuner.
2 Mettez votre ordinateur et l’ampli-tuner
sous tension.
3 Si vous effectuez le raccordement pour la
première fois, attendez que l’installation du
pilote USB soit terminée.
L’installation peut prendre une minute ou deux
avant de se terminer. Assurez-vous de laisser le
câble USB raccordé jusqu’à ce qu’une boîte de
dialogue indique que l’installation USB est
terminée. Notez que certains systèmes
d’exploitation plus anciens peuvent nécessiter
un disque pour l’installation.2
4 Appuyez sur USB pour sélectionner
l’entrée USB.
Vous pouvez également utiliser le cadran
INPUT SELECTOR sur le panneau avant.
5 Effectuez les réglages nécessaires pour
sélectionner la sortie audio de votre
ordinateur comme interface USB.
Vous devrez vous assurer que le réglage des
enceintes sélectionné est le bon par rapport au
logiciel que vous utilisez. Veuillez vous référer
au manuel qui vous a été fourni avec le logiciel
pour effectuer ces réglages.
6 Réglez la commande du volume sur votre
ordinateur et sur cet ampli-tuner.
Nous vous conseillons de commencer avec un
volume plutôt faible sur l’ampli-tuner et de
l’augmenter si nécessaire après avoir vérifié
vos niveaux.
7 Commencez la lecture d’une source sur
votre ordinateur.
Important
Si vous avez suivi les étapes ci-dessus et qu’il
n’y a toujours aucune sortie audio, essayez
ceci :
• Mettez l’appareil hors tension, puis de
nouveau sous tension.
Remarque
1 • La compatibilité des systèmes d’exploitation Microsoft® Windows® Vista Home Basic/Home Premium/Business/Ultimate,
Windows® XP, Windows® 2000, Windows® Millennium Edition et Windows® 98 Second Edition a été testée, mais selon la
configuration de votre ordinateur, il se peut que votre système ne soit pas compatible.
• Assurez-vous que votre câble USB raccorde un connecteur type A (de votre PC) à un connecteur type B à 4 broches (à cette
unité).
• La spécification USB est compatible avec la version 1.1 et la spécification USB Audio Class est compatible avec la version 1.0.
• Vous entendrez les sons d’alerte de l’ordinateur dans les enceintes à moins que vous ne désactiviez ces derniers dans le
panneau de configuration de l’ordinateur.
• Vous ne pourrez pas entendre l’audio à partir de la connexion USB par les sorties numériques de cet appareil.
• Notez que l’utilisation de concentrateurs ou d’extensions peut provoquer des problèmes de raccordement.
2 Si votre ordinateur ne reconnaît pas cette unité, essayez de raccorder à nouveau le câble USB. S’il ne la reconnaît toujours
pas, redémarrez l’ordinateur.
20
Fr
A9MK2_CUXCN-fr.book
Page 21
Wednesday, April 22, 2009
2:04 PM
Autres raccordements
• Sélectionnez une autre source d’entrée
(comme CD ou TAPE), puis sélectionnez à
nouveau USB.
Attention
• Pour éviter les bruits, n’utilisez pas d’autre
logiciel sur votre ordinateur pendant la
lecture.
• Pioneer n’est pas responsable en cas de
dommages du système informatique, de
plantage ou de panne de logiciel ou
d’autres problèmes informatiques
éventuels dus à cette configuration.
Microsoft®, Windows® Vista, Windows® XP, Windows®
2000, Windows® Millennium Edition and Windows® 98
Second Edition sont des marques commerciales ou des
marques déposées de Microsoft Corporation aux
Etats-Unis et/ou dans le reste du monde.
Raccordement d’un
amplificateur supplémentaire
Cet ampli-tuner dispose de largement assez de
puissance pour une utilisation domestique
mais il est possible d’ajouter un autre
amplificateur en utilisant les présorties.
Effectuez les raccordements indiqués
ci-dessous pour ajouter un amplificateur afin
de donner plus de puissance à vos enceintes.
Français
• Assurez-vous de ne pas éteindre
l’ordinateur ou débrancher le câble USB
pendant la lecture.
06
• Avant d’effectuer ou de modifier les
raccordements, mettez l’appareil hors
tension et débranchez le cordon
d’alimentation de la prise secteur.
FM UNBAL
75
AM LOOP
ANTENNA
CONTROL
OUT
IR
XM
USB
AUDIO IN IN
IN
OUT
SIGNAL
GND
L
12V
TRIGGER
PRE
OUT
REC
OUT
R
R
PLAY
IN
TAPE
L
MM/MC
AUX1
AUX2
CD
PHONO
Cet ampli-tuner
INPUT
R
Amplificateur stéréo
L
ANALOG
21
Fr
A9MK2_CUXCN-fr.book
06
Page 22
Wednesday, April 22, 2009
2:04 PM
Autres raccordements
Raccordement d’un récepteur IR
Si vous placez vos composants dans une
armoire ou sur une étagère fermée, vous
pouvez utiliser un récepteur IR optionnel
(comme une unité Niles ou Xantech) pour
contrôler votre système au lieu d’utiliser le
capteur de télécommande sur le panneau
avant de l’ampli-tuner.1
1 Raccordez le capteur du récepteur IR à la
prise IR IN à l’arrière de cet ampli-tuner.
Armoire ou étagère
Composant
autre que
Pioneer
IR
IN
Pioneer
component
CONTROL
IN
CONTROL
OUT
IR
XM
IN
IN
OUT
SIGNAL
GND
R
De nombreux composants Pioneer disposent
de prises SR CONTROL qui peuvent être
utilisées pour relier les composants entre eux
de manière à ce que vous puissiez utiliser
uniquement le capteur de télécommande d’un
composant. Quand vous utilisez une
télécommande, le signal de commande est
transmis au composant approprié le long de la
chaîne.
• Notez que si vous utilisez cette fonction,
vous devez vous assurer que vous avez
aussi au moins un jeu de prises audio
analogiques raccordé à un autre composant
pour la mise à terre.
1 Raccordez le CONTROL OUT de cet
ampli-tuner à la CONTROL IN jack d’un autre
composant Pioneer.
Utilisez un câble avec une mini-fiche mono à
chaque extrémité pour le raccordement.
OUT
USB
AUDIO IN
Fonctionnement d’autres
composants Pioneer avec le
capteur de cette unité
R
Cet ampli-tuner
L
L
Composant Pioneer
MM/MC
AUX1
AUX2
CD
PHONO
Cet ampli-tuner
Récepteur IR
2 Raccordez la prise IR IN d’un autre
composant à la prise IR OUT à l’arrière de cet
ampli-tuner pour le relier au récepteur IR.
Veuillez consulter le manuel fourni avec votre
récepteur IR pour savoir quel type câble est
nécessaire à cette connexion.
• Si vous souhaitez relier un composant
Pioneer au récepteur IR, consultez
Fonctionnement d’autres composants
Pioneer avec le capteur de cette unité
ci-dessous pour raccorder aux prises
CONTROL plutôt qu’aux prises IR OUT.
Télécommande
du composant
Pioneer
CONTROL
OUT
IR
IN
L
CD
PLA
CONTROL
OUT
OUT
SIGNAL
GND
YER
2 Si le composant Pioneer dispose
également d’une prise CONTROL OUT, vous
pouvez continuer la chaîne de la même façon
pour autant de composants que vous
possédez.
Remarque
1 • La commande à distance peut être impossible si la lumière du soleil ou une lampe fluorescente donne directement sur la
fenêtre du capteur IR.
• Remarquez que d’autres fabricants n’utilisent peut-être pas la terminologie IR. Consultez le manuel fourni avec votre
composant pour vérifier la compatibilité avec IR.
• Si vous utilisez deux télécommandes (en même temps), le capteur de télécommande IR de l’ampli-tuner est prioritaire sur
le capteur de télécommande du panneau avant.
22
Fr
A9MK2_CUXCN-fr.book
Page 23
Wednesday, April 22, 2009
2:04 PM
Autres raccordements
06
Mise sous et hors tension de
composants à l’aide du
déclencheur de 12 volts
Français
Vous pouvez raccorder les composants de
votre système à cet ampli-tuner à l’aide d’un
déclencheur de 12 volts. Si vous mettez sous
tension l’un des composants connectés, cet
ampli-tuner est également mis sous tension.
Cet ampli-tuner ne sera pas mis sous tension si
vous mettez un composant raccordé hors
tension quand il est hors tension.1
12V
TRIGGER
FM UNBAL
75
SPEAKER
R
12V
TRIGGER
PR
OU
• Raccordez la prise 12V TRIGGER de cet
ampli-tuner au déclencheur 12V d’un autre
composant.
Utilisez un câble avec une mini-fiche mono à
chaque extrémité pour le raccordement.
Remarque
1 Si ce système est déjà sous tension, la mise sous tension du composant raccordé n’aura aucun effet (la mise hors tension du
composant raccordé n’aura de toute façon aucun effet).
23
Fr
A9MK2_CUXCN-fr.book
07
Page 24
Wednesday, April 22, 2009
2:04 PM
Informations supplémentaires
Chapitre 7 :
Informations supplémentaires
Guide de dépannage
Des opérations incorrectes sont souvent interprétées comme des problèmes et des mauvais
fonctionnements. Si vous pensez qu’il y a un problème avec ce composant, vérifiez les points
ci-dessous. Parfois le problème peut se trouver dans un autre composant. Examinez les autres
composants et les appareils électriques en usage. Si le problème ne peut pas se résoudre malgré
les indications ci-dessous, consultez votre service après-vente Pioneer le plus proche pour le faire
réparer.
• Si l’unité ne fonctionne pas normalement en raison d’effets externes comme l’électricité
statique, débranchez la fiche d’alimentation de la prise de courant et insérez-la de nouveau
pour rétablir les conditions normales de fonctionnement.
Problèmes
Solutions
Impossible de mettre sous
tension.
• Débranchez la fiche d’alimentation de la prise de courant et insérez-la de
nouveau.
• Vérifiez qu’il n’y a pas de brins de fils d’enceinte lâches en contact avec le
panneau arrière. Ceci pourrait provoquer la coupure automatique de
l’ampli-tuner.
• Si vous essayez de mettre le système en marche à l’aide de la
télécommande, vérifiez d’abord que la touche POWER du panneau avant
est activée.
• Si le récepteur s’arrête automatiquement, apportez-le au service
après-vente Pioneer ou à votre revendeur le plus proche pour le faire
réviser.
Aucun son n’est fourni quand
une fonction est sélectionnée.
• Vérifiez que le composant est raccordé correctement
(voir Raccordement à la page 7).
• Appuyez sur MUTE sur la télécommande pour désactiver la sourdine.
Présence d’un bruit
• Raccordez l’antenne (page 8) et ajustez la position pour obtenir la
considérable lors de la diffusion meilleure réception.
radio.
• Éloignez tout câble des bornes et fils de l’antenne.
• Déployez complètement l’antenne à fil FM, placez-la pour obtenir la
meilleure réception, et fixez-la sur un mur (ou branchez une antenne FM
extérieure).
• Raccordez une antenne AM interne ou externe supplémentaire (page 8).
• Désactivez l’appareil qui cause les interférence ou éloignez-le de l’amplituner (ou éloignez les antennes de l’appareil qui est source de bruit).
24
Fr
Les stations de diffusion ne
peuvent être sélectionnées
automatiquement.
• Raccordez une antenne extérieure (voir page 8).
Bruit lors de la lecture d’une
platine cassette.
• Éloignez la platine cassette de votre ampli-tuner, jusqu’à ce que le bruit
disparaisse.
Le son de la platine est fort et
distordu, ou très faible.
• Assurez-vous que le commutateur MM/MC sur le panneau arrière de
l’ampli-tuner (près de l’entrée PHONO) est dans la position correcte pour
votre platine.
A9MK2_CUXCN-fr.book
Page 25
Wednesday, April 22, 2009
2:04 PM
Informations supplémentaires
07
Solutions
Impossible de faire fonctionner
la télécommande.
• Remplacez les piles (voir page 6).
• Utilisez à moins de 7 m, 30° du capteur de télécommande du panneau
avant (voir page 13).
• Eliminez tout obstacle ou faites-la fonctionner d’une autre position.
• Évitez d’exposer le capteur de télécommande du panneau avant à la
lumière directe.
L’afficheur est sombre ou éteint. • Appuyez sur DIMMER sur la télécommande à plusieurs reprises pour
revenir au réglage par défaut.
Français
Problèmes
Messages de radio XM
Message
Cause
Action
ANTENNA
L’antenne XM n’est pas raccordée.
Vérifiez que le câble de l’antenne XM est
fermement attaché.
ANT ERR
Un court-circuit est survenu au niveau de
l’antenne ou du câble qui l’entoure.
Vérifiez qu’il n’y a aucune anomalie au niveau
de l’antenne ou du câble. Mettez hors
tension, puis de nouveau sous tension.
UPDATING
La radio est en cours de mise à jour avec le
code de cryptage le plus récent.
Attendez la fin de la mise à jour du code de
cryptage. Les canaux 00 et 01 devraient
fonctionner normalement.
NO SIGNAL
Le signal XM est trop faible à l’endroit actuel. sans objet
LOADING
L’ampli-tuner est en cours d’acquisition
d’informations audio ou de programmes.
Attendez la fin de la réception de ces
informations.
OFF AIR
Le canal sélectionné a arrêté de diffuser.
Sélectionnez un autre canal.
CH– – –
Vous avez sélectionné un canal qui n’existe L’ampli-tuner bascule automatiquement vers
pas, ou pour lequel vous n’êtes pas abonné. le canal 001 (ou le dernier canal sélectionné).
Il n’y a en ce moment pas de nom/
caractéristique d’artiste, pas de titre de
morceau/programme, ni de catégorie
associés à ce canal.
Spécifications
Section amplificateur
Aucune action requise.
• Puissance de sortie continue FTC
(les deux canaux fonctionnant à 1 kHz)
1,0 % THD, 4 Ω . . . . . . . . . . . . . . . . . 65 W + 65 W
1,0 % THD, 8 Ω . . . . . . . . . . . . . . . . . 55 W + 55 W
La spécification pour la puissance de sortie
concerne les cas où l’alimentation électrique est
de 120 V.
•
• Puissance de sortie continue (les deux
canaux fonctionnant entre 20 Hz et 20 kHz)**
0,2 % THD, 4 Ω . . . . . . . . . . . . . . . . . . 70 W + 70 W
0,2 % THD, 8 Ω . . . . . . . . . . . . . . . . . . 55 W + 55 W
* Mesure effectuée avec la touche DIRECT activée.
** Mesure effectuée par un analyseur de spectre
auditif
Distorsion harmonique totale**
20 Hz à 20 kHz, 25 W, 8 Ω . . . . . . . . . . . . . 0,05 %*
25
Fr
A9MK2_CUXCN-fr.book
07
Page 26
Wednesday, April 22, 2009
2:04 PM
Informations supplémentaires
Section audio
•
Entrée (Sensibilité/impédance)
•
Réponse en fréquence
CD, TAPE, AUX . . . . . . . . . . . . . . . . 200 mV/22 kΩ
PHONO (MM) . . . . . . . . . . . . . . . . . . 2,8 mV/47 kΩ
PHONO (MC). . . . . . . . . . . . . . . . . . . 0,3 mV/100 Ω
CD, TAPE, AUX . . . . . . . . . . 5 Hz à 100 kHz
dB
PHONO (MM) . . . . . . . . . 20 Hz à 20 kHz ±0,2 dB
PHONO (MC). . . . . . . . . . 20 Hz à 20 kHz ±0,3 dB
•
Niveau de surcharge PHONO (MM)
1 kHz, 0,2 % THD. . . . . . . . . . . . . . . . . . . . . . 60 mV
•
Niveau de surcharge PHONO (MC)
1 kHz, 0,2 % THD. . . . . . . . . . . . . . . . . . . . . . . 6 mV
•
Sortie (Niveau/impédance)
•
Commande de la tonalité
TAPE REC . . . . . . . . . . . . . . . . . . . . . 200 mV/1 kΩ
Graves . . . . . . . . . . . . . . . . . . . . . ±10 dB (100 Hz)
Aigus . . . . . . . . . . . . . . . . . . . . . . ±10 dB (10 kHz)
• Rapport signal/bruit (IHF SHORTED,
Réseau A)
CD, TAPE, AUX (entrée de 200 mV) . . . . . 103 dB
PHONO (MM, entrée de 2,8 mV) . . . . . . . . . 80 dB
PHONO (MC, entrée de 0,2 mV) . . . . . . . . . 70 dB
•
•
Section syntoniseur AM
Plage de fréquence . . . . . . . . .530 kHz à 1700 kHz
Sensibilité (IHF, antenne cadre) . . . . . . . 350 µV/m
Rapport signal/bruit. . . . . . . . . . . . . . . . . . . . 50 dB
Antenne . . . . . . . . . . . . . . . . . . . . . Antenne cadre
Divers
Puissance requise . . . . . . . 120 V CA, 50 Hz/60 Hz
Consommation. . . . . . . . . . . . . . . . . . . . . . . .200 W
Consommation (veille) . . . . . . . . . . . . . . . . . 0,8 W
Dimensions
. . . . . . . . . 420 mm (L) x 113 mm (H) x 369 mm (P)
Poids (sans emballage). . . . . . . . . . . . . . . . 11,5 kg
Accessoires
Télécommande . . . . . . . . . . . . . . . . . . . . . . . . . . . 1
Piles sèches AAA/IEC R03 . . . . . . . . . . . . . . . . . 2
Antenne cadre AM. . . . . . . . . . . . . . . . . . . . . . . . . 1
Antenne à fil FM . . . . . . . . . . . . . . . . . . . . . . . . . . 1
Cordon d’alimentation. . . . . . . . . . . . . . . . . . . . . . 1
Carte de garantie . . . . . . . . . . . . . . . . . . . . . . . . . . 1
Mode d’emploi (ce document)
Remarque
• Les spécifications et la conception sont
sujettes à de possibles modifications sans
préavis, suite à des améliorations.
Section syntoniseur FM
Plage de fréquence. . . . . . . . 87,5 MHz à 108 MHz
Sensibilité utilisable . . . . . . . Mono : 13,2 dBf, IHF
(1,3 µV/75 Ω)
Seuil de sensibilité de 50 dB . . . . .Mono : 20,2 dB
Stéréo : 38,6 dBf
Rapport signal/bruit . . . . Mono : 73 dB (à 85 dBf)
Stéréo : 70 dB (à 85 dBf)
Distorsion . . . . . . . . . . . . . . Stéréo : 0,5 % (1 kHz)
Sélectivité par rapport
au canal alternatif. . . . . . . . . . . . . 60 dB (400 kHz)
Séparation stéréo . . . . . . . . . . . . . . . 40 dB (1 kHz)
Réponse de fréquence . . . . . . . . . . 30 Hz à 15 kHz
(±1 dB)
Entrée antenne . . . . . . . . . . . . 75 Ω, non équilibré
Nettoyage de l’unité
• Utilisez un chiffon sec pour essuyer la
poussière et la saleté.
• Lorsque le surface est sale, essuyez avec
un chiffon doux trempé dans un nettoyant
neutre dilué dans une dose cinq ou six fois
supérieure d’eau, et bien essoré. Essuyez
encore avec un chiffon sec. Ne pas utiliser
de cire ou nettoyant pour meubles.
• Ne jamais utiliser de diluants, benzine,
insecticides en bombe ou autres produits
chimiques sur ou près de cet appareil au
risque d’entraîner une corrosion.
Publication de Pioneer Corporation.
© 2009 Pioneer Corporation.
Tous droits de reproduction et de traduction réservés.
26
Fr
A9MK2_CUXCN_back_cover.fm
28 ページ
2009年6月1日 月曜日 午後4時17分
Should this product require service in the U.S.A. and you wish to locate the nearest Pioneer
Authorized Independent Service Company, or if you wish to purchase replacement parts,
operating instructions, service manuals, or accessories, please call the number shown
below.
1–800–421–1404
Please do not ship your product to Pioneer without first calling the Customer Support at the
above listed number for assistance.
Pioneer Electronics (USA), INC.
Service Support Division
1925 E. Dominguez St. Long Beach, CA 90810-1003, U.S.A.
For warranty information please see the Limited Warranty sheet included with your product.
Should this product require service in Canada, please contact a Pioneer Canadian
Authorized Dealer to locate the nearest Pioneer Authorized Service Company in Canada.
Alternatively, please contact the Customer Satisfaction Department at the following address:
Pioneer Electronics of Canada, Inc.
Customer Satisfaction Department
300 Allstate Parkway, Markham, Ontario L3R 0P2
1-877-283-5901
905-479-4411
For warranty information please see the Limited Warranty sheet included with your product.
Si ce produit doit être réparé au Canada, veuillez vous adresser à un distributeur autorisé
Pioneer du Canada pour obtenir le nom du Centre de Service Autorisé Pioneer le plus près
de chez-vous. Vous pouvez aussi contacter le Service à la clientèle de Pioneer:
Pioneer Électroniques du Canada, Inc.
Service Clientèle
300, Allstate Parkway, Markham, Ontario L3R 0P2
1-877-283-5901
905-479-4411
Pour obtenir des renseignements sur la garantie, veuillez vous reporter au feuillet sur la
garantie restreinte qui accompagne le produit.
S018_D_EF
Published by Pioneer Corporation.
Copyright © 2009 Pioneer Corporation.
All rights reserved.
Publication de Pioneer Corporation.
© 2009 Pioneer Corporation.
Tous droits de reproduction et de traduction réservés.
PIONEER CORPORATION
4-1, Meguro 1-Chome, Meguro-ku, Tokyo 153-8654, Japan
PIONEER ELECTRONICS (USA) INC.
P.O. BOX 1540, Long Beach, California 90801-1540, U.S.A. TEL: (800) 421-1404
PIONEER ELECTRONICS OF CANADA, INC.
300 Allstate Parkway, Markham, Ontario L3R 0P2, Canada TEL: 1-877-283-5901, 905-479-4411
PIONEER EUROPE NV
Haven 1087, Keetberglaan 1, B-9120 Melsele, Belgium TEL: 03/570.05.11
PIONEER ELECTRONICS ASIACENTRE PTE. LTD.
253 Alexandra Road, #04-01, Singapore 159936 TEL: 65-6472-7555
PIONEER ELECTRONICS AUSTRALIA PTY. LTD.
178-184 Boundary Road, Braeside, Victoria 3195, Australia, TEL: (03) 9586-6300
PIONEER ELECTRONICS DE MEXICO S.A. DE C.V.
Blvd.Manuel Avila Camacho 138 10 piso Col.Lomas de Chapultepec, Mexico,D.F. 11000 TEL: 55-9178-4270
K002_B_En
Printed in China / Imprimé en Chine
<5707-00000-241-1S>