1
1
A
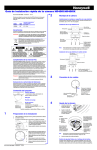
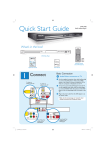
Connect
Placement
2
C
Proper speakers system placement is important to
ensure optimum sound performance.
Connect the Sound Bar system and
subwoofer
E
Connect the radio antennas and
power cable
Keep the antennas away from the electronic devices to
prevent unwanted interference.
Subwoofer (rear)
A
Set up
Finding the viewing channel
A Press 2 (STANDBY ON) on the main unit to turn
it on.
B Turn on the TV. Use the TVs remote control to
select the correct viewing channel.
Subwoofer (rear)
FM 75
SPEAKERS
RIGHT
LEFT
A
FM antenna
FM/AM/MW ANTENNA
Am/MW FM 75
L
R
COAXIAL
DIGITAL IN
TO MAIN UNIT
AUX 1
AUX 2
MAINS
TO SUBWOOFER
SPEAKERS
RIGHT
LEFT
AM/MW
antenna
FM/MW ANTENNA
MW
FM 75
L
R
COAXIAL
DIGITAL IN
Pr
TO MAIN UNIT
AUX 1
AUX 2
Pb
B Place the subwoofer on the floor, at least one meter
away from the TV.
B
z Connect the TO MAIN UNIT cable from the
subwoofer to the rear of the main unit. One end
connect to TO SUBWOOFER jack and another end
connect to LOUDSPEAKERS jack.
Welcome
A Connect the FM antenna to the inner pin of the
FM 75 socket. Extend the antenna for optimum
reception.
B Unfold the AM/MW loop antenna and fix the claw
into the slot. Push the tabs and insert the wires into
the AM/MW jacks
Preparing for rear connections
D
Connect the main unit to TV
C Connect the power cable from subwoofer to the AC
F
VIDEO IN
(CVBS)
or
HDMI OUT
Connect audio output from TV
(optional)
To hear the TV audio through this home theater system,
use the red and white audio cables (not supplied) to
connect the AUDIO IN jacks on the main unit to the
AUDIO OUT jacks on your TV.
TUO OEDIV
AUDIO
OUT
Note All the cables must be placed properly inside
the rear panel in order for the rear cover to close.
Ambisound home theater system to match your
listening environment.
Stop: Exit
Continue
A Press cursor right key on the remote control to
access Sound Bar system setup.
cursor right key to continue.
VIDEO IN
(CVBS)
to the CABLE OUT point (see the following sections
for details.)
The next few steps will help you set up your
B When the { Orientation } screen appears, press
power outlet.
Television ( rear)
VIDEO IN
(CVBS)
z Connect a composite video cable (supplied) from the
VIDEO OUT jack on main unit to the VIDEO IN jack
on your TV.
VIDEO OUT
OR
z If your TV supports HDMI, connect the HDMI cable
(supplied) from the HDMI OUT to the HDMI IN
jack on your TV.
Note It is important to connect the main unit
directly to your TV.
C Select a most suitable predefined setting according
to your room environment and setup, press cursor
right key to confirm and go to the next screen.
{ Room Acoustics }
Select the type of walls that surround your room.
The default setting is ‘Hard (concrete, wood).’
{ Room Placement }
Select the Sound Bar system’s placement position in
your room. The default setting is ‘Middle.’
{ Height }
Select the height at which the Sound Bar system is
placed. The default setting is between 0.8~1.2 meters.
Main unit (rear)
A Push up the catches to lift up the rear cover.
B Connect the required cables and direct all the cables
Setting up the speakers
When you turn on this unit for the first time, the
speaker setup message appears on the TV. Follow the
on-screen instructions to complete the setup.
B
C
Main unit (rear)
ear-level, or at least above the knee-level. Face it
straight ahead towards the listening area.
B
MAINS
Ñ LOUDSPEAKERS
A Place the Sound Bar system at the normal listening
Note To search for the correct viewing channel,
press the Channel Down button on the TVs remote
control repeatedly (or AV, SELECT, ° button) until
you see the Video In channel. If you are using a RF
modulator, set the TV to channel 3 or 4.
{ Distance }
Select the distance between the listening position and
the Sound Bar system. The default setting is between
2~3 meters.
D When the { Complete } screen appears, press
cursor right key to exit.
Main unit (rear)
Note Press TV on the remote control to get the
sound output from the speakers system when watching
the TV program.
Note Refer to the accompanying user manual
for other setup options.