1
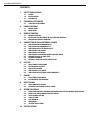
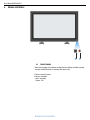
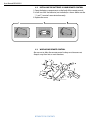
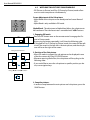
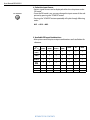
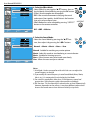
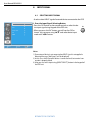
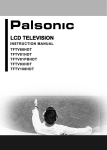
Philips Professional & Business Solutions EN TYPE Nr. User Manual BDH5031V.00 User Manual BDH5031V 1. SAFETY PRECAUTIONS DISPOSAL OF USED ELECTRICAL & ELECTRONIC EQUIPMENT The meaning of the symbol on the product, its accessory or packaging indicates that this product shall not be treated as household waste. Please, dispose of this equipment at your applicable collection point for the recycling of electrical & electronic equipments waste. In the European Union and Other European countries which there are separate collection systems for used electrical and electronic product. By ensuring the correct disposal of this product, you will help prevent potentially hazardous to the environment and to human health, which could otherwise be caused by unsuitable waste handling of this product. The recycling of materials will help conserve natural resources. Please do not therefore dispose of your old electrical and electronic equipment with your household waste. For more detailed information about recycling of this product, please contact your local city office, your household waste disposal service or the shop where you purchased the product. ROHS •DIRECTIVE 2002/95/EC• COMPLIANT This environment-friendly product does not contain the EU RoHS restricted substances (Pb, Hg, Cd, Cr6+, PBB, and PBDE). ALWAYS OBEY ALL SAFETY MESSAGES • All the safety and operating instructions should be read before the product is operated. If anything strange happens, unplug this product from the wall outlet. • Do not disassemble or replace any parts of the Monitor. Refer to a qualified service personnel for repair. WARNING You can be killed or seriously injured if you do not follow these instructions. 1.1 POWER This product must be properly grounded. • Improper grounding may cause malfunction or electric shock. • When proper grounding is not possible, install circuit breaker. • Do not ground to gas pipe, water pipe, lightning rod, or telephone line. • An apparatus with CLASS I construction shall be connected to a MAINS socket outlet with a protective earthing connection. During a lightning storm, or when it is left unattended and unused for a long period of time, unplug it from the wall outlet. • It can result in fire. User Manual BDH5031V When unplugging your Monitor, always grip the plug firmly and pull straight out from the socket. • It can result in fire or electric shock due to damaged power cord. When moving your Monitor, remove the power plug, and cables, and be sure to move it by using two people. • Failure to follow this instruction can result in electric shock or personal injury. Do not touch the power plug with wet hands when plugging or unplugging it into the wall socket. • It can result in a risk of electric shock. 1.2 INSTALLATION Do not place this Monitor on an unstable cart, stand, or table. • It may cause the product and cart to overturn, damaging equipment or causing possible injury. Do not use this product in the neighbourhood of a bath or shower. • It can result in electric shock or fire. Please place the Monitor set in such a way that the main plug can be easily disconnected. User Manual BDH5031V Do not install the product where there is oil, smog, moist, or dust. • It may cause malfunction. Do not install the product where it will be exposed to the direct sunlight, and the product should not be near heat sources such as radiators, stoves, etc. • It may cause malfunction. For proper ventilation, separate the product from the wall, and keep a distance of more than 10 cm (4 inches). • Due to the increase of temperature inside the Monitor, it may cause fire. Minimum distances around the apparatus for sufficient ventilation. Due to the increase of temperature inside the Monitor, it may cause a fire. If you wish to install this product on the wall or ceiling, refer to a professional. • Failure to do so may cause damage to product and injury to human. User Manual BDH5031V 1.3 DURING USE Do not open the cover (or back) because high voltage is present within the Monitor enclosure. • It may cause electric shock. Never push any kind of objects into this product through openings at the back of Monitor. • It may cause fire or electric shock. The apparatus shall not be exposed to dripping or splashing and that no objects filled with liquids, such as vases, shall be placed on the apparatus. • Spilled liquids may cause electric shock or fire. Do not allow children to play or hang on the Monitor. • These actions may tip it over, causing personal injury. Do not place a candle or lighted cigarette on the Monitor. • If these fall into the inside of the Monitor, it may cause a fire or explosion. User Manual BDH5031V Do not disassemble batteries, and do not leave around in case children swallow them. • Heavy metal may contaminate environment, and can be harmful or detrimental to human health. (If children swallow the batteries, go to hospital and consult with a doctor.) Batteries could explode if fitted incorrectly. Align the batteries according to the (+) and (-) indication inside the case. Do not spray water onto the Monitor or wipe with damp cloth. • It may cause an electric shock or fire. Unplug the Monitor from the wall outlet when smoke or a strange smell occurs, then refer to a service personnel. • Leaving the Monitor on in this condition, may cause fire or electric shock. The plasma display panel consists of fine cells. Although the panels are produced with more than 99.9 percent active cells, there may be some cells that do not produce light or remain lit. Do not allow a still picture to be displayed for an extended period, as this can cause a permanent ghost image to remain on the Plasma Display. • Examples of still pictures include logos, video games, computer images, teletext and images displayed in 4:3 mode. The warranty does not cover any damage caused by image retention. Do not wipe the Monitor using a cloth damped with chemicals (benzene, thinners, etc.). • The Monitor appearance may be marred. (Unplug the power plug and wipe with soft cloth.) User Manual BDH5031V Do not place heavy objects or heat sources on the power cord. • It may damage the power cord, causing fire or electric shock. Do not place any object or cover on the Monitor. • In an event of improper ventilation, the Monitor will be overheated causing fire. When watching the Monitor, the distance between the Monitor screen and your eye should be 5~7 times the diagonal size of the Monitor. • Watching the Monitor for a long time may hurt your eye sight. When cleaning of the inside of the Monitor is required, consult a qualified service personnel. • When the Monitor is not cleaned for a long period of time, dust in it may cause fire or malfunction. When the Monitor is placed on a cart or table, the front side of the Monitor should not project outward. • Unbalance may cause the Monitor to drop, resulting in personal injury or equipment malfunction and damage. User Manual BDH5031V 2. CHECKING ACCESSORIES 2.1 SUPPLIED ACCESSORIES Check to be sure that the following items are packed with your Plasma panel. 1. Remote Control 2. Batteries 3. EDFU 4. VGA Cable 5. Ferrite Core 6. AC Power Cable (UK, Europe) P.MODE PICTURE FMT AV S.MODE S.EFFECT PIXEL SHIFT PIP POSITION COLOR TEMP PIP SOURCE SWAP 1 UNIT 2 UNIT 1 UNIT 1 UNIT 1 UNIT 2 UNITS RECALL MENU VOL VOL TIMER STILL MUTE R-48F01 Remote Control Batteries EDFU VGA Cable Power Cable Europe Ferrite Core Power Cable UK User Manual BDH5031V CONTENTS 1. SAFETY PRECAUTIONS 1.1 1.2 1.3 2. CHECKING ACCESSORIES 2.1 3. SELECTING SOUND MODE CUSTOMIZING SOUND MODE INPUT SIGNAL 8.1 8.2 9. SELECTING PICTURE MODE CUSTOMIZING PICTURE ADJUSTING SCREEN WATCHING A STILL IMAGE WATCHING TWO PICTURES SIMULTANEOUSLY SOUND 7.1 7.2 8. WATCHING DIGITAL BROADCASTS WATCHING CABLE BROADCASTS WATCHING SATELLITE BROADCASTS WATCHING A DVD IMAGE WATCHING A VCR IMAGE WATCHING A CAMCORDER/GAME CONSOLE IMAGE CONNECTING PC (15 PIN D-SUB) CONNECTING HDMI CONNECT WITH THE DOLBY DIGITAL AMP. PICTURE 6.1 6.2 6.3 6.4 6.5 7. REMOTE CONTROL INSTALLING THE BATTERIES IN YOUR REMOTE CONTROL WHEN USING REMOTE CONTROL CONNECTING WITH AN EXTERNAL SOURCE 5.1 5.2 5.3 5.4 5.5 5.6 5.7 5.8 5.9 6. FRONT PANEL REAR PANEL REMOTE CONTROL 4.1 4.2 4.3 5. SUPPLIED ACCESSORIES PANEL CONTROLS 3.1 3.2 4. POWER INSTALLATION DURING USE SELECTING INPUT SIGNAL CHECKING THE CURRENT INPUT SIGNAL OTHER FUNCTIONS 9.1 9.2 9.3 9.4 9.5 9.6 9.7 MENU BACKGROUND, LANGUAGE, KEYBOARD LOCK SETTING AND RC LOCK SETTING MGDI PLUS (META GENUINE DIGITAL IMAGE) AUTO POWER SETTING TIME SETTING ANTI BURN-IN MODE RESET SETTING SLEEP TIMER 10. SPECIFICATIONS User Manual BDH5031V 3. PANEL CONTROLS 1 3.1 2 FRONT PANEL * Items having the same name on the plasma display and the remote control would function in exactly the same way. 1. Power control sensor 2. Power Stand by: Red : Stand by Green : ON RETURN TO THE CONTENTS User Manual BDH5031V HDMI INPUT PC AUDIO PC IN PC OUT COMPONENT INPUT AV1 AV2 DIGITAL AUDIO OPTICAL VIDEO AUDIO AUDIO SERVICE MENU MENU 2 HDMI INPUT PC AUDIO PC IN PC OUT COMPONENT INPUT 3 AV1 MOVE 4 AV2 MOVE 5 6 1 DIGITAL AUDIO OPTICAL VIDEO AUDIO AUDIO SERVICE 7 3.2 8 9 10 11 12 13 REAR PANEL 1. Power cord input 2. AV button 3. Menu button Use this button to enter and exit the MENU. 4. Volume UP/DOWN buttons Use these buttons to change your TV’s volume or to move the cursor in the menu. 5. Move Buttons Use these buttons to navigate through the the On Screen Display menu. 6. Main Power button Use this button to switch TV to Stand By mode or TV ON mode. 7. HDMI INPUT 8. PC AUDIO INPUT 9. PC INPUT (15 pin D-sub) 10. PC OUTPUT (15 pin D-sub) 11. COMPONENT A/V jacks 12. SCART, A/V INPUT/OUTPUT 13. External Speaker 14. AV3 INPUT RETURN TO THE CONTENTS 14 User Manual BDH5031V 4. REMOTE CONTROL Note: • Use two “AAA” batteries. • Be sure to use replacement batteries of the same type as the original ones. • The life of a battery depends on how much it has been used. 4.1 REMOTE CONTROL Power button - while the AC power cord is connected, turn the display ON (Green light) or OFF (red light stand-by). P.MODE PICTURE FMT AV S.MODE S.EFFECT PIXEL SHIFT PIP POSITION COLOR TEMP PIP SOURCE SWAP RECALL P.MODE button - Whenever pressing the button, it cycles in the following order. Normal Dynamic Cinema User PICTURE FMT button - Adjusts the size of the screen (Normal, 16:9, etc). AV button - Use this function to make video input selection. It changes in the following sequence: AV 1 AV 2 AV 3 Component PC HDMI. S.MODE button - Whenever pressing the button, it cycles in the following order: Normal Movie Music News User. MENU VOL VOL S.EFFECT button - Press to use a spatial sound effect. PIXEL SHIFT button - The whole screen shifts up/down, left/right at 25 sec interval to minimize image sticking. PIP; POSITION; PIP SOURCE; SWAP - PIP buttons. COLOR TEMP button - Change the colour mood of the panel. TIMER STILL MUTE RECALL button - Indicates the current state and resolution. Menu button - Used to display a desired menu. Volume buttons “ / ” R-48F01 Timer button - Each time you press this button, a different input mode appears. The sequence is as follows: 15Min. 30Min. 60Min. 90Min. 120Min. OFF After the time is selected, it automatically becomes stand-by state. STILL button - Press this button to freeze the picture. Mute button - Mute sound. RETURN TO THE CONTENTS User Manual BDH5031V 4.2 INSTALLING THE BATTERIES IN YOUR REMOTE CONTROL 1. Open the battery compartment on the back of the remote control. 2. Install two AAA-size batteries (not included) as shown. Make sure the “+” and “-” terminals are oriented correctly. 3. Replace the cover. 4.3 WHEN USING REMOTE CONTROL • Be sure not to allow the remote control to drop or to become wet. • Keep it away from hot or moist locations. RETURN TO THE CONTENTS User Manual BDH5031V 5. CONNECTING WITH AN EXTERNAL SOURCE 5.1 WATCHING DIGITAL BROADCASTS • To watch digital broadcasts: - Purchase a separate Digital Broadcasting Receiver (SET-TOP BOX). - Connect the PDP to a Digital Broadcasting Receiver as shown left. HDMI INPUT PC AUDIO PC IN PC OUT COMPONENT INPUT AV1 AV2 DIGITAL AUDIO OPTICAL VIDEO AUDIO AUDIO SERVICE MENU INPUT PC AUDIO HDMI PC IN MOVE PC OUT AV1 COMPONENT INPUT AV2 DIGITAL AUDIO OPTICAL VIDEO AUDIO AUDIO SERVICE Component Video Audio 1. Connect a Digital Broadcasting Receiver to the PDP. • Prepare A/V cables. • Connect the cables from the digital TV Receiver output terminal to the PDP (Component ) input terminal. • When connecting the cables, be sure to match the cable colours. 2. Press the Power Buttons. • Turn the PDP and the receiver ON. Digital Broadcasting Receiver (Set-Top Box) AV 1 Picture AV 2 4. Select the Desired Channel and Function. • Select the desired channel and function by using the remote control of the Digital Broadcasting Receiver. AV 3 Sound Component PC Screen HDMI Feature Input Move Select 3. Input Select. • Select [Component] by pressing the “AV” button of the remote control or using the button of the PDP unit. • When you press the “AV” button, you will see the OSD as shown. You can move using “/“ and select desire input mode with “/“ button. Exit Notes: 1) Possible digital broadcasting signals: 1080i, 720p, 576p, 576i, 480p, 480i. 2) What is a component? : Signals with which luminance and chrominance are separated, producing a sharp picture. 3) If the Digital Broadcasting Receiver has PC output terminal or HDMI output terminal, connect to ‘PC INPUT’ or ‘HDMI INPUT’ at the rear of the panel of the PDP. RETURN TO THE CONTENTS User Manual BDH5031V 5.2 WATCHING CABLE BROADCASTS • To watch cable broadcasts, subscribe to your local cable TV broadcasting, and then connect a cable Broadcasting Receiver to the PDP as shown left. HDMI INPUT PC AUDIO PC IN PC OUT COMPONENT INPUT AV1 AV2 DIGITAL AUDIO OPTICAL 1. Connect a Cable Broadcasting Receiver to the PDP. • Prepare the A/V cable. • Connect the receiver (Output) to PDP (Video Input) as shown below. VIDEO AUDIO AUDIO SERVICE MENU MOVE • N.B. : If both S-Video and Video/Audio (RCA) cables are connected together in AV3 input, S-Video always takes precedence. However, the left and right audio leads should be connected for the sound even though you would like to use S-Video as AV3 input. 2. Press the Power Buttons. • Turn the PDP and the receiver ON. 3. Input Select. • Select [AV 1 (Scart), AV 2 (Scart) or AV3 (S-Video)] by pressing the “AV” button of the remote control or the in keypad of the PDP unit. • When you press the “AV” button, you will see the OSD as shown. You can move using “/“ and select desire input mode with “/“ button. Video/Audio S-Video Video/ Audio 4. Select the Desired Program and Function. • Select the desired program and function by using the remote control of the Cable Broadcasting Receiver. Notes: 1) If your local cable company re-transmits digital broadcasts, you may watch normal broadcasts and digital broadcasts simultaneously. For detailed information, refer to your local cable company. 2) Only AV1 provides ‘Monitor Out’ function. 3) AV1 full scart (RGB/CVBS). 4) AV2 half scart (CVBS). Cable Broadcasting Receiver AV 1 Picture AV 2 AV 3 Sound Component PC Screen HDMI Feature Input Move Select Exit RETURN TO THE CONTENTS User Manual BDH5031V 5.3 WATCHING SATELLITE BROADCASTS • To watch satellite broadcasting, subscribe to Digital Satellite Broadcasting, then connect the satellite Broadcasting Receiver to the PDP as shown left. HDMI INPUT PC AUDIO PC IN PC OUT COMPONENT INPUT AV1 AV2 DIGITAL AUDIO OPTICAL 1. Connect a Satellite Broadcasting Receiver to the PDP. • Prepare the A/V cable. • Connect the receiver (Output) to PDP (Video Input) as shown left. • When connecting to an external AV source, be sure to match the colours. • N.B. : If both S-Video and Video/Audio (RCA) cables are connected together in AV3 input, S-Video always takes precedence. However, the left and right audio leads should be connected for the sound even though you would like to use S-Video as AV3 input. VIDEO AUDIO AUDIO SERVICE MENU MOVE 2. Press the Power Buttons. • Turn the PDP and the Satellite receiver ON. 3. Input Select. • Select [AV 1 (Scart), AV 2 (Scart) or AV3 (S-Video)] by pressing the [AV] button of the remote control or the in keypad of the PDP unit. • When you press the “AV” button, you will see the OSD as shown. You can move using “/“ and select desire input mode with “/“ button. Video/Audio S-Video Video/ Audio 4. Select the Desired Program and Function. • Select the desired program and function by using the Remote Control of the Satellite Broadcasting Receiver. Satellite Broadcasting Receiver AV 1 Picture AV 2 AV 3 Sound Component PC Screen HDMI Feature Input Move Select Exit RETURN TO THE CONTENTS User Manual BDH5031V 5.4 WATCHING A DVD IMAGE • Component Input is set to 480i/576i and 480p/576p mode. • Connect the cable from the DVD Video output (Y, Pb/Cb, Pr/Cr) to the Component Input at the back of PDP, and connect the cable from DVD audio output (Left, Right) to the Audio Input at the back of PDP. HDMI INPUT PC AUDIO PC IN PC OUT COMPONENT INPUT AV1 AV2 DIGITAL AUDIO OPTICAL VIDEO AUDIO AUDIO 1. Connect a DVD Player to the PDP. • Prepare the AV cable. • Connect the DVD (Output) to the PDP (Component or Video Input) as shown below. • When connecting to an external AV source, be sure to match the colours. SERVICE MENU MOVE • N.B. : Video input can be via scart cable, S-Video, or Yellow phone. The red and white plugs are for left and right audio to accompany the yellow video lead or to be used with the S-Video lead to produce sound. 2. Press the Power Buttons. • Turn the PDP and the DVD ON. S-Video Audio Component Video Video/ Audio DVD DVD Video/ Audio DVD 4. Select the Desired Title and Function. • Select the desired title and function by using the remote control of the DVD. AV 1 Picture 3. Input Select. • Select [Component, AV1 (Scart), AV2 (Scart) or AV3 (S-Video)] by pressing the [AV] button of the remote control or the in keypad of the PDP unit. • When you press the “AV” button, you will see the OSD as shown. You can move using “/“ and select desire input mode with “/“ button. AV 2 AV 3 Sound Component PC Screen HDMI Feature Input Move Select Exit Notes: 1) Y/Cb/Cr, which stands for component video DVD player’s output can also be written as Y/B-Y/R-Y, Y/Pb/Pr depending on the kinds of DVD model. 2) The way of connecting the DVD to the PDP is as follows: Y Y, Cb Pb, B-Y, Cr Pr, R-Y 3) The DVD output can be Video, S-Video or Component Video depending on the DVD model. There are various output modes, so be sure to check when you purchase it. 4) When connecting S-Video and Video simultaneously, only S-Video will be displayed on the screen as it takes precedence. RETURN TO THE CONTENTS User Manual BDH5031V 5.5 WATCHING A VCR IMAGE • Video can use either the video terminal or the S-video terminal. HDMI INPUT PC AUDIO PC IN PC OUT COMPONENT INPUT AV1 AV2 DIGITAL AUDIO OPTICAL 1. Connect a VCR to the PDP. • Prepare the AV cable. • Connect the Video (Output) to PDP (Video Input) as shown left. VIDEO AUDIO AUDIO SERVICE MENU MOVE 2. Press the Power Buttons. • Turn the PDP and the VCR ON. 3. Input Select. • Select [AV 1 (Scart), AV 2 (Scart) or AV 3 (S-Video)] by pressing the [AV] button of the remote control or the in keypad of the PDP unit. • When you press the “AV” button, you will see the OSD as shown. You can move using “/“ and select desire input mode with “/“ button. 4. Select the Desired Title and Function. • Select the desired title and function by using the remote control of the VCR. Video/ Audio S-Video Video/ Audio Notes: 1) When connecting a VCR, the S-Video terminal provides a better image than the Video terminal. 2) When connecting to the Video terminal, connect 3 colour AV cables (video, left audio, right audio) to the PDP; for the S-Video terminal, connect the Audio terminal (Left, Right) in the same way, and connect the S-Video cable (sold separately). 3) When connecting the Video terminal and the S-Video simultaneously, the S-Video terminal is selected. This can be checked by the [Recall] button of the remote control. VCR AV 1 Picture AV 2 AV 3 Sound Component PC Screen HDMI Feature Input Move Select Exit RETURN TO THE CONTENTS User Manual BDH5031V 5.6 WATCHING A CAMCORDER/GAME CONSOLE IMAGE • Enjoy images recorded by camcorder or the game console after connecting to the PDP. HDMI INPUT PC AUDIO PC IN PC OUT COMPONENT INPUT AV1 AV2 DIGITAL AUDIO OPTICAL 1. Connect a Camcorder/Game Console to the PDP. • Prepare the AV cable. • Connect the Video (Output) to the PDP (Video Input) as shown below. • When connecting to an external AV source, be sure to match the colours. VIDEO AUDIO AUDIO SERVICE MENU MOVE 2. Press the Power Buttons. • Turn the PDP and the Camcorder/Game Console ON. 3. Input Select. • Select [AV 1 (Scart), AV 2 (Scart) or AV 3] by pressing the [AV] button of the Remote Control or the in keypad of the PDP unit. • When you press the “AV” button, you will see the OSD as shown. You can move using “/” and select desire input mode with “/” button. Video/ Audio S-Video Video/ Audio 4. Select Function. • Select the function by using the remote control of camcorder or game console. Notes: 1) When connecting the device, the S-Video terminal provides a better image than the Video terminal. 2) When connecting to the Video terminal, connect 3 colour AV cables (video, left audio, right audio) to the PDP; for the S-Video terminal, connect the Audio terminal (Left, Right) in the same way, and connect the S-Video cable (sold separately). 3) If connecting via component video, refer to “Watching a DVD Image”. Game Console/Camcorder AV 1 Picture AV 2 AV 3 Sound Component PC Screen HDMI Feature Input Move Select Exit RETURN TO THE CONTENTS User Manual BDH5031V 5.7 CONNECTING PC (15 PIN D-SUB) • This product supports resolutions of VGA, SVGA, XGA, WXGA, SXGA. • Before connecting a PC to the PDP, be sure to adjust the resolution of the PC. 1. Before Connecting to the PDP, Set the Resolution of the PC. • Go to SETUP-CONTROL PANEL-DISPLAY PROPERTIES in Window Screen of the PC. • Choose the SETTINGS tab in the DISPLAY menu. • In the SETTINGS menu, select 640 x 480, 800 x 600, 1024 x 768 or 1280 x 1024 2. Connect the PC to the PDP. • Prepare the PC cable (D-sub 15 pin) and the PC audio cable. • Connect the PC (Output) to the PDP (Input) as shown below. • If using the audio cable for connection, put the ferrite core to the middle of the cable for preventing EMI. HDMI INPUT PC AUDIO PC IN PC OUT COMPONENT INPUT AV1 AV2 DIGITAL AUDIO OPTICAL HDMI INPUT PC AUDIO PC IN COMPONENT INPUT AV1 AV2 DIGITAL AUDIO OPTICAL VIDEO AUDIO AUDIO SERVICE SERVICE MENU Audio PC OUT VIDEO AUDIO AUDIO MENU MOVE 15 PIN D-sub Output connect Ferrite Core RETURN TO THE CONTENTS MOVE User Manual BDH5031V 3. Press the Power Buttons. • Turn on the PDP and the PC. 4. Input Select. • Select [PC] by pressing the AV button of the remote control or PDP unit. • When you press the “AV” button, you will see the OSD as shown. You can move using “/” and select desire input mode with “/” button. AV 1 Picture AV 2 AV 3 Sound Component PC Screen HDMI • N.B. : You cannot select PC if the picture in picture mode is on. Feature 5. Enjoy Dynamic Ultra Screen Monitor by Using PC’s Keyboard or Mouse. Input Move Select Exit Notes: 1) The resolution of the PC monitor is the best at 800 x 600 (SVGA) for SD panel and at 1024 x 768 (XGA) for HD panel. 2) If there is a [Vertical Frequency] setting menu in the [Display] menu of the PC, adjust the frequency to 60Hz. 3) If the PC resolution is too high, it may be hard to read letters. Select a suitable resolution. 4) If the picture don’t fit with the size or position of the screen, select the [Auto] function in the Screen Menu in order to make fit automatically. Also, you can adjust the position of the picture with [H.position] and [V.position] functions manually. 5) If the picture quality is not clear, select [Auto] function in the Screen OSD menu. It will find the best quality by itself. If you are still unsatisfied in the picture quality, please adjust [Phase] and [Frequency]. RETURN TO THE CONTENTS User Manual BDH5031V 5.8 CONNECTING HDMI • This product supports resolution of VGA, SVGA, XGA, SXGA. • Before connecting a PC to the PDP, be sure to adjust the resolution of PC. • This product is supported by Plug and Play only at HDMI. • This Plasma unit is compliant with HDMI 1.1 version. HDMI INPUT PC AUDIO PC IN PC OUT COMPONENT INPUT AV1 AV2 DIGITAL AUDIO OPTICAL VIDEO AUDIO AUDIO 1. Connect the HDMI to the PDP. • Prepare the HDMI cable. • Connect the HDMI (Output) to the PDP (Input) as shown left. SERVICE MENU MOVE 2. Press the Power Buttons. • Turn on the PDP and DVD or Game console. 3. Input Select. • Select [HDMI] by pressing the AV button of the remote control or the button on the PDP unit. • When you press the “AV” button, you will see the OSD as shown. You can move using “/” and select desire input mode with “/” button. Notes: HDMI input port receives only digital signal. HDMI Game Console DVD PC and HDMI Input Resolution Available in PDP • Depending on graphic card, problems like no signal detected or line noises can happen. If these problems happen, contact the graphic card company for help. AV 1 Picture AV 2 AV 3 Sound Resolution Component PC Screen 640 x 480 HDMI 720 x 400 Feature 800 x 600 Select Exit V Freq. (Hz) Remark HDMI PC 31.469 59.940 DOS o o 37.861 72.809 VESA o o 37.500 75.000 VESA o o 31.469 70.087 IBM o o 35.156 56.250 VESA o o 37.879 60.317 VESA o o 1024 x 768 48.363 60.004 VESA o o 1280 x 1024 63.981 60.020 VESA o o Input Move H Freq. (KHz) RETURN TO THE CONTENTS User Manual BDH5031V 5.9 CONNECT WITH THE DOLBY DIGITAL AMP. If you connect the optical output to a Dolby digital AMP, you can listen to better sound. HDMI INPUT PC AUDIO PC IN PC OUT COMPONENT INPUT AV1 AV2 DIGITAL AUDIO OPTICAL VIDEO AUDIO AUDIO SERVICE Optical output I N P U T Dolby Digital AMP L Woofer Center Surround L R Surround R RETURN TO THE CONTENTS User Manual BDH5031V 6. PICTURE 6.1 P.MODE SELECTING PICTURE MODE • Select the Picture mode that is appropriate depending on the kinds of pictures, you enjoy. 1. Selecting Picture Mode. • Press the “P.MODE” on the remote control. • While pressing the “P.MODE” for the first time, the current picture mode will be displayed. 2. Each Press of the Button Will Select One of Four Picture Modes. • Each time you press the button, a different picture mode appears. The sequence used is as follows: Normal Dynamic Cinema User * Normal: For a highly defined image in a normally bright room * Dynamic: For a clear-cut image emphasizing high contrast for sports viewing. * Cinema: For a movie * User: Allows the user to customise settings as desired. 3. Menu on the Screen will disappear. • After selecting a desired picture mode, the menu on the screen will be disappeared. • If you want to customise the picture mode, refer to the following page. Notes: 1) Normal, Dynamic, and Cinema modes are factory preset values. 2) When adjusting sub-menus while you are in Normal, Dynamic, and Cinema modes, the Picture Mode will be automatically converted to User Mode, and the adjustments will be made. 3) Selecting [Mode Reset] in the [Feature], menu will allow the Brightness, Contrast, etc. to return to the factory preset values. RETURN TO THE CONTENTS User Manual BDH5031V 6.2 CUSTOMIZING PICTURE • You can adjust the colour tone and brightness to your preference. Mode Picture Sound Dynamic Brightness 40 Contrast 80 Sharpness 8 Colour Screen 1. Press the MENU Button. • The MENU shown below will display on the screen. 60 Colour Temp. Normal Noise Reduc. On Feature Input Move Select Mode Picture Sound MENU Exit Dynamic Brightness 40 Contrast 80 Sharpness 8 Colour Screen 2. Press the / button. • After selecting [Picture] by the “/” buttons, press the “” button. Then the sub menu of [Picture] will be displayed. 60 Colour Temp. Normal Noise Reduc. On Feature Input Move Adjust Mode Picture Sound MENU Exit User Brightness 40 Contrast 80 Sharpness 8 Colour Screen 3. Select the User Mode. • Select [User] by the “/” buttons in the [Mode]. 60 Colour Temp. Normal Noise Reduc. On Feature Input Move Adjust MENU Exit RETURN TO THE CONTENTS User Manual BDH5031V Mode Picture Sound User Brightness 40 Contrast 80 Sharpness MENU VOL VOL 8 Colour Screen 4. Select User Mode Adjustments. • While you are in [Picture Mode – User], press the “/” buttons to select a specific adjustment item. 60 Colour Temp. Normal Noise Reduc. On Feature Input Move Adjust Mode Picture Sound MENU Exit User Brightness 50 Contrast 50 Sharpness 8 Colour Screen 5. Picture Condition Adjustments. • Press the “/” buttons to adjust the picture of your preference. • Noise Reduc. functions the noise reduction. 50 Colour Temp. Normal Noise Reduc. On Feature Input Move Adjust Mode Picture Sound MENU Exit User Brightness 50 Contrast 50 Sharpness 8 Colour Screen 50 Colour Temp. Normal Noise Reduc. On Normal Warm Cool Feature Input Move Adjust MENU 6. Press the “COLOR TEMP” button on the remote con- COLOR TEMP trol. • Pressing the “COLOR TEMP” button first time will display the current setting for COLOR TEMP. • Each time you press the button, a different colour temp appears. The sequence used is as follows : Exit Notes: 1) While you are in the PC or HDMI input mode, you can only adjust brightness, contrast and colour temperature. 2) When you adjust Brightness, Contrast, and Colour in DTV mode or adjust Brightness and Contrast in PC and HDMI mode, the picture is adjusted finely. 3) The Tint control is used when the input signal is NTSC or Component. If input signal is NTSC, Tint control is displayed in picture menu. 4) Selecting the colour temperature makes the mood : normal, warm or cool. RETURN TO THE CONTENTS User Manual BDH5031V 6.3 ADJUSTING SCREEN • You can adjust screen size or aspect ratio a desired. 6.3.1 Adjusting with PICTURE FMT button PICTURE FMT 1. Press the PICTURE FMT Button. • The current screen size will be displayed on the screen. • Each time you press the PICTURE FMT button on the remote control, a different screen size appears. The sequence used is as follows in case of AV1, AV2 and AV3 modes : Auto 16:9 4:3 LB(16:9) LBS(16:9) 14:9 LB(14:9) LBS(14:9) Auto • N.B. : You cannot select screen size if the picture in picture mode is on. Notes: 1) Displaying a picture in a 4:3 mode for a long time may cause phosphor of the PDP to be burned. So avoid displaying a picture in 4:3 screen size for a long time. 2) Under PC and HDMI inputs, only 16:9 and 4:3 are available. 3) Auto : Displays pictures of original picture size. 16:9 : 16:9 picture formats; 14:9 : 14:9 picture formats; 4:3 : 4:3 picture formats like an analog TV; LB : Enlarges the screen as to fill the black part above and below the picture; LBS : Enlarges the screen, and shifts up as to see the subtitles in case you are watching video with subtitles. 4) If the picture shows unclear image in the 480P component input source, try to toggle the resolution from the DTV/DVD of the Screen Mode. RETURN TO THE CONTENTS User Manual BDH5031V 6.3.2 Adjusting Screen in the MENU • You can adjust the screen in the menu. • This function is same to the [PICTURE FMT] of remote controller. Mode Picture Sound Dynamic Brightness 40 Contrast 80 Sharpness 8 Colour Screen 1. Press the MENU Button. • The MENU screen as shown below will appear. 60 Colour Temp. Normal Noise Reduc. On Feature Input Move Select Mode Picture Sound Screen MENU Exit 16:9 H. position 91 V. position 50 Phase 32 Frequency 50 Auto DTV/DVD 640x480 Feature Input Move Select MENU Exit 2. Press the “/” button. • Press the “/” buttons to select “Screen”. MENU VOL 3. Press the Volume “/” buttons. MENU • Press the Volume “/” buttons to enter the sub menu VOL “Screen”. • While you are in “Screen” menu, press the “” or “” button to select a desired item, and then, adjust the value by pressing the “” or “”. < In case of PC input > Notes: 1) Screen Mode is different according to the input modes. Input Available Screen Mode AV 16:9, 4:3, LB(16:9), LBS(16:9) 14:9, LB(14:9), LBS(14:9), Auto Component 16:9, 4:3, LB(16:9), LBS(16:9) 14:9, LB(14:9), LBS(14:9) PC, HDMI 16:9, 4:3 2) Other Screen adjustments < Under PC mode > [H. Position] : As the value increases, the screen moves to the right. [V. Position] : As the value increases, the screen moves up. [Phase] : Adjust phase. [Frequency] : Adjust frequency. [Auto] : Adjusting automatically the screen to optimum states. < Under PIP mode > [Alpha Blend] : Adjusting the translucent rate of the subpicture. RETURN TO THE CONTENTS VOL VOL User Manual BDH5031V 6.4 WATCHING A STILL IMAGE • You can view still images with this function. However, displaying the same images such as still images for a long time may cause image burn. 1. Press the “STILL” button. • If you wish to freeze a picture, press the “STILL” button. You can still hear the sound. • Press “STILL” button again to cancel the “STILL” function. Still STILL Notes: 1) Displaying the same images such as still images for a long time may cause image burn (after-image lagging). 2) In this case, such “image burn” may become less noticeable if moving images are later displayed for a long time. 3) However, an image burn may become a permanent one, damaging the Plasma Display; therefore, avoid displaying the same images for a long time. 4) Use the function [Anti Burn-in], while displaying still images for a long period of time to minimize this effect. Anti Burn-in (on or off) is in the Feature menu. RETURN TO THE CONTENTS User Manual BDH5031V 6.5 P.MODE PICTURE FMT AV S.MODE S.EFFECT PIXEL SHIFT PIP POSITION COLOR TEMP PIP SOURCE SWAP WATCHING TWO PICTURES SIMULTANEOUSLY • PIP (Picture-in-Picture) and P-by-P (Picture-by-Picture) modes allow users to watch two pictures simultaneously. Screen Adjustment of the Sub-picture • Alpha Blend of the sub-picture can be adjusted on Screen Menu of OSD. • Alpha Blend is only available in PIP mode. RECALL Alpha Blend - The adjustment of alpha blend allows the subpicture to be translucent. The translucent rate is controlled with “/” buttons. MENU VOL Main Main PIP P by P Main VOL Sub Sub <Using ‘Position’ button> TIMER Main STILL MUTE Main Sub Sub Sub Sub R-48F01 Main Main 1. Engaging PIP mode. • Press the ‘PIP’ button once on the remote control to engage the Picture-in-Picture mode. • By pressing the button repeatedly, it will show the following cycle. • If switched to P-by-P (Picture-by-Picture) mode, the screen will be split in half. The screen on the left side is the main picture, and the sub-picture will be on the right of the screen. 2. Position of the Sub-picture. • When PIP mode is engaged, the sub-picture can be displayed in one of the four corners by using ‚POSITION’ button. • Whenever pressing the button, the sub-picture will be cycling in the following order. • If you would like to move the sub-picture to specific position you desire, use navigation keys. <Using “/” and “/” button> Sub 3. Swap the pictures. • In order to swap between the main picture and sub-picture, press the ‘SWAP’ button. RETURN TO THE CONTENTS User Manual BDH5031V PIP SOURCE 4. Select the Input Source. • Various signal sources can be displayed within the sub-picture under PIP mode. • Once the PIP mode is on, you may change the input source of the subpicture by pressing the “SOURCE” button. • Pressing the “SOURCE” button repeatedly will cycle through following order: AV1 AV2 AV3 5. Available PIP Input Combinations. • Main-picture and sub-picture input combinations are listed below for reference. Main AV1 (CVBS) AV2 (CVBS) AV3 (CVBS/S) AV1 (RGB) COMP PC HDMI AV1 (CVBS) X X X X X X AV2 (CVBS) X X X X X X AV3 (CVBS/S) X X X X X X AV1 (RGB) X X X X X X COMP X X X X X X X PIP PC X X X X X X X HDMI X X X RETURN TO THE CONTENTS User Manual BDH5031V 7. SOUND 7.1 SELECTING SOUND MODE • Enjoy various sound modes by selecting your favourite Sound Mode depending on the kinds of moving pictures. S.MODE 1. Select “SOUND MODE”. • Press the “S.MODE” on the remote control. • While pressing the “S.MODE” for the first time, the current sound mode will be displayed. 2. Every Press of the Button Changes Modes. • Each time you press the button, a different sound mode appears. The sequence used is as follows: Normal Movie Music News User Normal : Suitable for watching any motion picture Movie : Select this mode to simulate being at a movie theatre Music : Ideal for listening to music News : Allows human voice to be heard more clearly User : Allows the user to adjust as desired. 3. MENU will Disappear. • After selecting a desired Sound Mode, the on-screen menu will disappear in about 2~3 seconds. • Normal, Movie, Music and News modes are factory preset values. If you want to customise the sound modes for your preference, refer to the following page. RETURN TO THE CONTENTS User Manual BDH5031V 7.2 CUSTOMIZING SOUND MODE • This feature allows the user to adjust for their preference. Mode Picture Sound Dynamic Brightness 40 Contrast 80 Sharpness 8 Colour Screen 1. Press the MENU Button. • The MENU screen as below will be displayed. 60 Colour Temp. Normal Noise Reduc. On Feature Input Move Select MENU Exit Balance Picture Sound 0 Effect Off AVL Off Mode 2. Press the “/” Button. • Select [Sound] by the “/” buttons, then press the “” button to display the following. Normal Equalizer Screen Feature Input Select Select Move MENU Exit Exit Balance Picture Sound 0 Effect Off AVL Off Mode 3. Select SOUND BALANCE. • Select “Sound-Balance” by the “/” buttons, then adjust it. Normal Equalizer Screen Feature Input Move Adjust MENU Exit RETURN TO THE CONTENTS User Manual BDH5031V Balance Picture Sound 0 Effect Off AVL Off Mode Normal Equalizer Screen Feature Input Move Adjust MENU Picture Sound 0 Effect Off AVL Off Mode Normal 5. Select the Sound Mode. • Select the Sound Mode by pressing the “/” buttons, then adjust it by pressing the “/” buttons. MENU VOL VOL Normal Movie Music News User Equalizer Screen Normal : Suitable for watching any motion picture Movie : Select this mode to simulate being at a movie theater Music : Suitable for listening to music News : Allows human voice to be heard more clearly User : Allows the user to adjust as desired. Feature Input Move S.EFFECT Off BBE M.Voice Exit Balance 4. Select the Effect Mode. • Select [Effect] by pressing the “/” buttons, then select the desire sound effect by pressing the “” button. • [Effect]: Used to emphasize stereo effect. • BBE is the sound enhancement clarifying the sound and outputs finest quality. And M.Voice is the function that you can hear clearer voice. • Effect Mode also can be selected by pressing “S.EFFECT” button on the remote controller. Adjust MENU Exit Notes: 1) User Mode : Used as an equalizer with which the user can adjust the sound frequency as desired. 2) If you modify the sound frequency in auto Sound Mode (News, Movie, Music, etc.), it is automatically switched to the User Mode. 3) For a realistic sound effect, lower than 120Hz frequency sound and greater than 12kHz frequency adjust the equalizer accordingly. 4) AVL function : This function adjusts volume to the set level automatically. However, dependent on the sources, it may have different volume levels because the sound sources have their own initially set up levels. RETURN TO THE CONTENTS User Manual BDH5031V 8. INPUT SIGNAL 8.1 SELECTING INPUT SIGNAL • Used to select INPUT signal of external device connected to the PDP. 1. Press the Input Signal Selecting Button. • Press the “AV” button on the remote control, or select the desire input signal using Keypad of the PDP unit. • When you press the “AV” button, you will see the OSD as shown. You can move using “/” and select desire input mode with “/” button. AV 1 Picture AV 2 AV 3 Sound Component PC Screen HDMI AV Feature Input Move Select Exit Notes: 1) If an external device is not connected or INPUT signal is not applied a Warning Message (“No Signal”) will be displayed. 2) In this case, check if external device is connected and / or terminal connection is properly fitted. 3) Also, you can select input using [INPUT SELECT] button in the keypad of the PDP unit RETURN TO THE CONTENTS User Manual BDH5031V 8.2 CHECKING THE CURRENT INPUT SIGNAL • Press the [RECALL] button on the remote control, then displays basic informations of the current input signal, Under this state, pressing the [RECALL] button once more, additional informations about the current input signal will be displayed on the OSD. • Used to check the INPUT signal mode, current time, resolution, etc. Component PM 12:00 1. Press the “RECALL” Button. • Press the “RECALL” button on the Remote Control. RECALL H:1920 V:1080 1. If you watch Component, PC, or HDMI: Component PM 12:00 H:1920 V:1080 Displays which input terminal is used, and indicates the input signal mode. Indicates the mode and current time. Indicates the horizontal and vertical resolution of the current input signal 2. If you watch VCR image: AV1 PM 12:00 Video PAL B/G Displays the program number and input terminal, which is used. Indicates the mode and current time. Displays the video system of input signal Notes: 1) “1920 x 1080” displayed in the INPUT signal is not the resolution of the set, but the signal that is sent by the Digital Broadcasting Receiver. RETURN TO THE CONTENTS User Manual BDH5031V 9. OTHER FUNCTIONS 9.1 MENU BACKGROUND, LANGUAGE, KEYBOARD LOCK SETTING AND RC LOCK SETTING • Used to select the translucent level of MENU background and language used in MENU. Mode Picture Sound Dynamic Brightness 40 Contrast 80 Sharpness 8 Colour Screen 1. Press the MENU Button. • The MENU screen will be displayed as below. 60 Colour Temp. Normal Noise Reduc. On Feature Input Move Select MENU Exit MENU Background Picture Sound Screen Language 10 English Keyboard Lock Off RC Lock Off MGDI plus On Auto Power Off 2. Press the “/” button. • Select [Feature] by the “/” button. Time Setting Feature Anti Burn-In Mode Reset Input Operation hrs. Move Select 50 MENU Exit Background Picture Sound Screen Language 10 English Keyboard Lock Off RC Lock Off MGDI plus On Auto Power Off 3. Select the menu Background. • Select the MENU [Background] by pressing the “” button. • Adjust the translucent level of OSD background using “/” buttons. Time Setting Feature Anti Burn-In Mode Reset Input Move Operation hrs. Adjust 50 MENU Exit RETURN TO THE CONTENTS VOL VOL User Manual BDH5031V Background Picture Sound Screen Language 10 English Keyboard Lock Off RC Lock Off MGDI plus On Auto Power Off Time Setting Feature Notes: * When power is turned on the first time, ‘SELECT LANGUAGE’ mode will be displayed, then, select the desired language by using “” button. (Displayed only once) Anti Burn-In Mode Reset Input Operation hrs. Move Adjust 50 MENU Exit Background Picture Sound Screen Language 10 English Keyboard Lock Off RC Lock Off MGDI plus On Auto Power Off Time Setting Feature Anti Burn-In Mode Reset Input Operation hrs. Move Adjust 50 MENU Sound Screen Language 10 English Keyboard Lock Off RC Lock Off MGDI plus On Auto Power Off Time Setting Feature Anti Burn-In Mode Reset Input Move Operation hrs. Adjust 5. Keyboard Lock Setting. • Select [Keyboard Lock] by the “/” buttons. • Whenever “” button is pressed, the lock mode would cycle On and Off. • While the Keyboard Lock is ON, if you have not turned off the PDP, all of it’s keys will work normally. However, after turning the PDP off, the PDP will not be turned on with the keypad on the PDP. Only by the remote controller, the PDP is turned on. • At Stand-By state while the Keyboard Lock is ON, the LED of the Plasma unit will be flickering in red. Exit Background Picture 4. Select LANGUAGE by using the “/” button. • Select [Language] by using the “/” button. • Every press of the “” button while you are in the [Language] mode would cycle through the different languages. 6. RC Lock Setting. • Select RC Lock by the “/” buttons. • In order to turn the RC Lock on, press “” button of remote controller or keyboard. • When RC Lock is On, you cannot make it Off using remote controller. Please use the keyboard instead of remote controller to unlock. • In case of that both Keyboard Lock and RC Lock are On, you can unlock those only using RS-232 control. Please reference ‚SICP User Manual’ for the usage of RS-232 control. 50 MENU Exit RETURN TO THE CONTENTS User Manual BDH5031V 9.2 MGDI PLUS (META GENUINE DIGITAL IMAGE) • MGDI Plus is the image enhancement technology of which provides more clear, realistic, and delicate images. • MGDI Plus function can not be used In PC and HDMI modes. Mode Picture Sound Dynamic Brightness 40 Contrast 80 Sharpness 8 Colour Screen 1. Press the MENU Button. • The MENU screen will be displayed as below. 60 Colour Temp. Normal Noise Reduc. On Feature Input Move Select MENU Exit Background Picture Sound Screen Language 10 English Keyboard Lock Off RC Lock Off MGDI plus On Auto Power Off 2. Select Feature. • Select [Feature] by the “/” button. Time Setting Feature Anti Burn-In Mode Reset Input Operation hrs. Move Select 50 MENU Exit Background Picture Sound Screen Language 10 English Keyboard Lock Off RC Lock Off MGDI plus On Auto Power Off 3. MGDI Plus Setting. • Enter the sub Menu by using the “” button. • Select the [MGDI Plus] by pressing the “/” button. • You can select [MGDI Plus] On or Off mode by using the “” button. Time Setting Feature Anti Burn-In Mode Reset Input Move Operation hrs. Adjust 50 MENU Exit RETURN TO THE CONTENTS MENU VOL VOL User Manual BDH5031V 9.3 AUTO POWER SETTING POWER/STANDBY Indicator Front panel LED lights • When the AC power is on : Green. • When the AC power is in the stand-by mode : Red. Background Picture Sound Screen Language 10 English Keyboard Lock Off RC Lock Off MGDI plus On Auto Power Off 1. Auto Power Setting. • Select the [Auto Power] by pressing the “/” button from [Feature]. • You can select [Auto Power] ON and OFF mode by using the “” button. Time Setting Feature Anti Burn-In Mode Reset Input Move Operation hrs. Adjust 50 MENU Exit Auto Power 1) ON : When the AC power is ON, the Monitor will be turned on automatically without pressing the power button on the remote control. AC POWER ON PDP SET ON Automatically 2) OFF : When the AC power is ON, the Monitor will be turned on by pressing the power button on the remote control or the keypad of the front panel. AC POWER ON STAND-BY MODE PDP SET ON With the remote control or the keypad of front panel. 3) If Keyboard Lock function is ON, this function is not operated. RETURN TO THE CONTENTS User Manual BDH5031V 9.4 Mode Picture Sound Dynamic Brightness 40 Contrast 80 Sharpness 1. Press the MENU Button. • The MENU screen will be displayed as below. 8 Colour Screen TIME SETTING 60 Colour Temp. Normal Noise Reduc. On Feature Input Move Select MENU Exit Background Picture Sound Screen Language 10 English Keyboard Lock Off RC Lock Off MGDI plus On Auto Power Off 2. Select Feature. • Select [Feature] by the “/” button. Time Setting Feature Anti Burn-In Mode Reset Input Operation hrs. Move Select 50 MENU Exit Background Picture Sound Screen Language 10 English Keyboard Lock Off RC Lock Off MGDI plus On Auto Power Off 3. Select Time Setting. • Enter the sub menu by using the “” button. • Select the [Time Setting] with the “/” button. • Enter [Time Setting] by pressing the “” button. Time Setting Feature Anti Burn-In Mode Reset Input Move Operation hrs. Select 50 MENU Exit RETURN TO THE CONTENTS MENU VOL VOL User Manual BDH5031V • The “Current time” must be set up ahead of setting up other time memories. 4. Off-Time setting. MENU • Select Functions by pressing the “/” button. First, set [Clock]- current time, and then You can setup VOL off-time. • [Clock] : Adjust the desired hour and minute with “/" button. • [Off Time] Setting methods are same as [Clock] setting method. • [Off Timer] : Setting [On] and [Off ] of each Timer. Time Setting Picture Sound Clock AM 11 : 50 Off Timer Off Off Time AM 12 : 00 Screen Feature VOL Input Move Adjust MENU Exit Time Setting Functions This time memory function automatically turns the Monitor set “Off” at a desired time. Once set up, this function works every day unless the set time is counselled or the Monitor set is unplugged. RETURN TO THE CONTENTS User Manual BDH5031V 9.5 ANTI BURN-IN • Displaying a still image for a long time causes part image sticking on the screen. • The Anti Burn-In function minimises this effect. Mode Picture Sound Dynamic Brightness 40 Contrast 80 Sharpness 8 Colour Screen 1. Press the MENU Button. • The MENU screen will be displayed as below. 60 Colour Temp. Normal Noise Reduc. On Feature Input Move Select MENU Exit Background Picture Sound Screen Language 10 English Keyboard Lock Off RC Lock Off MGDI plus On Auto Power Off 2. Press the “/” button. • Select [Feature] by the “/" button. Time Setting Feature Anti Burn-In Mode Reset Input Operation hrs. Move Select 50 MENU Exit Background Picture Sound Screen Language 10 English Keyboard Lock Off RC Lock Off MGDI plus On Auto Power Off 3. Select Anti Burn-In. • Enter the sub menu by using the “” button. • Select the [Anti Burn-In] by pressing the “/” button. • Press of the “” button while you are in the Anti BurnIn. Time Setting Feature Anti Burn-In Mode Reset Input Move Operation hrs. Select 50 MENU Exit RETURN TO THE CONTENTS MENU VOL VOL User Manual BDH5031V 4. Select Functions. • Every press of the “” button after select function by the “/” button would switch between ON/OFF. Anti Burn-In Picture Sound Pixel Shift Off Low Bright Off Image Invert Off Screen Feature Input Move Adjust PIXEL SHIFT MENU Exit Notes: * Pixel Shift : The whole screen shifts up/down, left/right at 25 sec interval to minimize image sticking. * Low Bright : When displaying a still picture or a fixed pattern for a long time (5Min), the brightness level decreases to minimize image sticking, and the initial default value of Low Bright is ‚On’ state. * Image Invert : Inverting colour of the original image to minimisation image sticking. RETURN TO THE CONTENTS User Manual BDH5031V Mode Picture Sound 9.6 Dynamic Brightness 40 Contrast 80 Sharpness • You can restore the values of the adjustment setting made in the MENU back to factory settings. 8 Colour Screen MODE RESET Colour Temp. Normal Noise Reduc. On 60 1. Press the MENU Button. • The MENU screen will be displayed as below. 10 2. Select Feature. • Select [Feature] by the “/” button. Feature Input Move Select MENU Exit Background Picture Sound Screen Language English Keyboard Lock Off RC Lock Off MGDI plus On Auto Power Off MENU VOL VOL Time Setting Feature Anti Burn-In Mode Reset Input Operation hrs. Move Select 50 MENU Exit Background Picture Sound Screen 10 Language English Keyboard Lock Off RC Lock Off MGDI plus On Auto Power Off Time Setting Feature Anti Burn-In Mode Reset Input Operation hrs. Move Select 3. Mode Reset. • Enter the sub Menu by using the “” button. • Select the [Mode Reset] by pressing the “/” button, then press the “” button. • A confirmation message will be displayed. • To perform Mode Reset, press the “” button after selecting [Yes] by the “/” button. • To return to MENU, press „MENU” button. 50 MENU Exit Are you Sure? Picture No When [Mode Reset] is completed: 1) When [Mode Reset] is completed, those values that have been set in the User Mode of [Picture Mode] and [Sound Mode] will be returned to the factory preset values. 2) Once reset, you can not undo. 3) The items in the [Screen] Menu are also reset. 4) Language, Program, Time, Volume, OSD Background, input mode, Keyboard Lock, RC Lock and Operation Hour are not reset. Yes Sound Screen Feature Input Move Select MENU Exit RETURN TO THE CONTENTS User Manual BDH5031V 9.7 SETTING SLEEP TIMER • Sleep Timer turns the PDP off after a preset time. 1. Press the “TIMER” Button. TIMER • Press the “TIMER” button on the Remote Control. • Pressing the “TIMER” button first time will display the current setting for Sleep Timer. • To cancel the Sleep Timer, press the “TIMER” button to select ‘Off’. Sleep Timer Off Sleep Timer off Sleep Timer 15 Sleep Timer 30 Sleep Timer 60 Sleep Timer 90 Sleep Timer 120 Sleep Timer off Notes: 1) On-screen information disappears if you do not take any action for about two seconds after pressing the TIMER button. 2) If you turn the PDP off after setting TIMER, the setting is erased. RETURN TO THE CONTENTS User Manual BDH5031V 10. SPECIFICATIONS DISPLAY UNIT Diagonal Size Screen Aspect Ratio System Display Resolution Pixel Pitch Dimension 127cm(50”) 16 : 9 PAL B/G, ,D/K, I/I, SECAM B/G, D/K, L/L’ HD Panel: 1365(H) X 768(V) dots HD Panel: 0.81(H) X 0.81(V) mm 1240(W) X 753(H) X 100.5(D) mm (without Stand) 1240(W) X 817(H) X 370(D) mm (with Stand) Weight (without stand) Power Requirement 43.2Kg 100 - 240V~, 50/60Hz * Appearance and specifications of this product are subject to change for improving the product without prior notice. CONNECTION TERMINAL EXTERNAL INPUT ITEMS HDMI INPUT INPUT PC OUTPUT RCA OUTPUT Component INPUT AV 1, 2 AV 3 VIDEO HDMI Jack One 15 pin D-sub jack RCA jack (LEFT/RIGHT) One Y Pb/Cb, Pr/Cr RCA jack (LEFT/RIGHT) SCART jack (Video In/Out, RGB In-AV1, Video In-AV2) (LEFT/RIGHT) (In/Out) RCA jack (LEFT/RIGHT) 20W (10W + 10W), 8 Ohm RETURN TO THE CONTENTS PHONE Jack One 15 pin D-sub jack AUDIO FEATURES AUDIO OUTPUT AUDIO