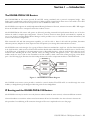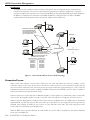
1
IOLINK-520
&
IOLINK-PRO
Reference Manual
Issue 1
All Software Versions
© Copyright 2001 by Perle Systems Ltd.
Part # 197-41707
01/2001
Section 1 — Introduction
The IOLINK-PRO & 520 Routers
The IOLINK-PRO & 520 routers provide IP and IPX routing combined with a protocol transparent bridge. This
bridge/router combination is often the best solution to linking remotely located LANs where most of the traffic is IP or IPX
with smaller amounts of traffic from other protocols such as NetBIOS or DEC LAT.
The IOLINK router supports the widely implemented Routing Information Protocol, otherwise known as RIP. RIP support
allows the IOLINK router to interoperate with other vendors’ routers.
The IOLINK-PRO & 520 routers will operate as delivered, providing increased LAN performance directly out of the box
without the need for complex pre-configuration. However, in those situations where specific customization is required, an
easy-to-use “hotkey” menuing Bridge/Router Manager console provides access to LAN and Link statistical information, and
control of the network configuration.
With increased LAN and Link management capability, you will be able to detect LAN and Link problems, determine
utilization patterns, and plan for future expansion that will optimize your existing data-communication resources.
The IOLINK router can be thought of as a group of discrete functions combined in a single box. The first functional module
is the LAN interface, which receives all LAN traffic and then decides where individual frames should be sent: to the IP router,
to the IPX router, to the bridge, to the management system, or discarded altogether. After the LAN interface there are several
functional units including the IP router, the IPX router, the bridge, and the management system. Any traffic that these
modules need sent across a link is then forwarded to the link modules, which control data coming and going on the WAN
ports. The following figure illustrates the relationships between the various component modules in a IOLINK router.
IP Router
Module
LAN Interface
Module
IPX Router
Module
Link #1
Module
Bridge
Module
Link #2
Module
Management
Module
Figure 1 - 1 IOLINK Router Block Diagram
The IOLINK router menu system provides a method to control whether IP & IPX traffic is routed through the router
modules, or bridged through the bridge module along with all other bridged data.
IP Routing and the IOLINK-PRO & 520 Routers
The IOLINK router may be used to route only between subnets within the same network, or between different networks.
Network broadcasts sent within a subnet-routed environment will not be forwarded to the other subnets in the network.
The procedure for establishing an IP connection through an IP router is explained on the next few pages.
IOLINK-PRO & 520 Reference Manual — 1.1
Introduction
ARP—Address Resolution Protocol
A protocol called ARP (Address Resolution Protocol) is used to determine the MAC address of a particular IP address. The
MAC (Medium Access Control) address is unique predefined number for each device on the LAN. The manufacturer of the
device assigns MAC addresses. The IP address for each device is assigned by the network administrator according to the
network structure.
If the originating station does not know the MAC address of the destination station, a MAC broadcast will be transmitted
onto the LAN asking “Who has IP address 170.22.10.4?” This MAC broadcast is called an ARP request. Because the ARP
request is a MAC broadcast, every device on the LAN will see the frame. The device that has the IP address 170.22.10.4 will
respond with a frame to the originating station. The ARP reply frame will include the MAC address of the destination device.
Now when the two devices wish to send data across the LAN to each other, they will both use the MAC and IP address of
the other device.
Each device on the LAN maintains a table for MAC addresses and IP addresses called the ARP cache. The ARP cache
contains a list of IP addresses and their corresponding MAC addresses.
Proxy ARP
Each time an originating station does not know the MAC address of a destination station, the originating station sends out an
ARP request. If the destination station is on a different network, the router connected to the originating network will see
from the IP address that the frame is to be routed to another network. If the router has an entry for the destination address,
the router will generate an ARP reply to send back to the originating station. The ARP reply will specify the MAC address of
the router as the MAC address to send frames to for the IP address of the destination station.
The Complete IP Connection
The following are the steps that a frame of data will take when being transmitted from an originating station on an IP network
to a destination station on a different IP network. In this example, the two networks are separated by a third network with
two router hops between the originating network and the destination network.
•
Originating station will send an ARP request if it does not have the MAC address of the destination station.
•
Local router will see ARP request and send an ARP reply to the originating station with the MAC address of the local
router port.
•
Originating station will send the data frame addressed to the IP address of the destination station, and the MAC
address of the local router port.
1.2 — IOLINK-PRO & 520 Reference Manual
Introduction
•
Local router will receive the data frame and strip off the MAC portion. The resulting IP frame will be examined to
determine the destination IP address.
•
Local router will look in its routing table to find the IP address of the router to send the IP frame to next. The local
router will see that the destination router is the next router.
•
Local router will look in its ARP cache to find the MAC address of the destination router as determined by the IP
address in the routing table.
•
Local router will rebuild the complete frame with a new MAC header indicating the MAC address of the destination
router. The local router does not alter the destination IP address, so the destination IP address will still be the IP
address of the destination station.
•
Destination router will receive the data frame and strip off the MAC portion. The resulting IP frame will be
examined to determine the destination IP address.
•
Destination router will look in its routing table to find the IP address of the router to send the IP frame to next. The
destination router will see that the destination IP address is on a locally connected network.
•
Destination router will look in its ARP cache to see if it has a MAC address for the destination IP address. If it does
not have an entry, the destination router will generate an ARP request. The destination station will send an ARP
reply.
•
Destination router will rebuild the complete frame with a new MAC header indicating the MAC address of the
destination station. The destination IP address once again will be unchanged and remain as the destination station IP
address.
•
Destination station will receive the data frame and process it.
If the destination station wishes to send a frame back to the originating station, the process will happen in the reverse
direction.
If the path from the originating station to the destination station causes the frame to pass through more than two routers, the
above process will simply be extended to include the interaction between the intermediate routers.
IOLINK-PRO & 520 Reference Manua — 1.3
Introduction
IP Header Details
Every IP header has common fields of information. The layout of the information is always the same. Refer to the following
diagram for a representation of the IP header.
Figure 1 - 2 IP Header
Protocol
The protocol section is used to indicate the protocol being used by the transport layer. This could be TCP, UDP, or
something else.
Time to live
The time to live section is used to prevent a frame from traversing the network forever. This field contains a number
(maximum 255) that is set when the frame is originally generated. Each time the frame is passed through the
bridge/router, the bridge/router will decrement the time to live by two. When the time to live reaches zero, the
frame is discarded.
Header Checksum
The header checksum is used to verify the data in the IP header. The IP header is recalculated each time a frame is
passed through a router. The recalculation is necessary because the time to live field is changed.
Fragmentation
Fragmentation occurs when an IP frame must be split up into smaller IP frames. When the originating device
generates the IP frame, the device is not aware of all the paths the frame must traverse to get to the destination
device. If the IP frame is to pass through a network that has small packet capabilities, the IP frame must be split up
and reassembled at the destination device. Each of the fragments is assigned a fragment offset value, which
determines where the fragment fits into the original IP frame.
The IOLINK router will accept fragmented frames directed to itself and reassemble them, but it will not fragment
frames.
1.4 — IOLINK-PRO & 520 Reference Manual
Introduction
Options
There are various options that may be set for any IP frame.
Source Routing
Source routing is used to predetermine the path that the IP frame must travel through the network. There are two
types of source routing: strict source routing and loose source routing.
Strict source routing will contain a list of IP addresses of routers that must be used when the IP frame is sent through
the network. Strict source routing is used mainly to provide some type of data security. Once the IP frame has
reached the destination station, the destination station will take the list of IP addresses from the options field, reverse
them, and use them for a strict route back to the originating station.
Loose source routing will also contain a list of IP address of routers to be used on the path to the destination station.
However, the IP frame may pass through other intermediate routers to get to the next IP address in the loose source
routing list.
Route Recording
Route recording simply keeps a list of all the IP addresses of the routers that the IP frame has passed through on its
way to the destination station.
Time Stamps
The time stamp option is used to record the time at which the IP frame passed through each router on its way to the
destination station.
ICMP Messages
Internet Control Message Protocol (ICMP) messages are used to perform station and router protocol participation. ICMP
messages are passed between routers, or between routers and stations. There are several different messages, as discussed
below.
Unreachable
The “unreachable” message is sent back to the originating station when the path to the destination network has
disappeared. A destination network may be unreachable because of a broken link, a downed router, a downed station,
or other reasons.
Redirect
The “redirect” message is sent to the originating station when there is a better router to use to reach the destination
network. Because the routers share routing tables, each router has the ability to determine whether it is the best
router to use for network traffic. Once a station receives a redirect, all future IP frames destined for the particular
destination network will be sent to the new router.
Quench
The “quench” message is sent to the originating station when the path to the destination network has become
congested. The originating station will slow down the rate of transmission of frames for an internally (to the station)
predetermined period of time upon receiving a quench message.
IOLINK-PRO & 520 Reference Manua — 1.5
Introduction
Ping
The “ping” message is actually a query status message that may be sent to devices on the LAN to determine their
operation status. The LAN device will reply with a message if it is active.
Time and Mask server
Two other ICMP messages are used to query the time and/or subnet mask from a particular LAN device. A message
is sent to a LAN device asking for the time or mask, and the device replies appropriately.
1.6 — IOLINK-PRO & 520 Reference Manual
Introduction
RIP—Routing Information Protocol
The most important function of the IP protocol is routing. IP routers constantly exchange information keeping their routing
tables up to date. A method of communication is required to ensure compatibility between all IP routers in the network. RIP
is the portion of the IP protocol that is used for router communication.
Route Tables
Each router will maintain a table of network addresses and the appropriate action to take with an IP frame it receives.
A routing table entry will usually consist of the following items:
•
•
•
•
•
•
Network or sub-network address
IP address of the next hop router
Network interface to use to get to the next hop router
Subnet mask for this network interface
Number of hops to reach the destination network
Number of seconds since this route was updated
When a router receives an IP frame, the router will examine it to determine the destination network address. The
router will then look in the routing table, determine the next router to send the IP frame to, and send the frame to
that router.
The selection of the best route path is based solely on the number of hops to the destination network.
Update Mechanism
In order to ensure that the routing tables of all routers in the network are kept up to date, each router will broadcast
its routing table onto each of its locally connected networks. The broadcast of the routing tables occurs every 30
seconds.
The process of updating a routing table with current information, and deciding which router to use to reach a
destination network, creates a ripple effect of changes through the network. When a router goes down and an
adjacent router determines that the path has disappeared, the remaining adjacent routers on that network must
determine the next path to use to reach the destination network. Each router will now broadcast its new routing table
with the updated information. The updated information will propagate through the network until all routing tables
have been brought up to date. This process is called convergence.
The broadcast of the routing tables is also used as a method of determining whether a router is still alive or has been
removed from the network. If a router has not heard from an adjacent router in 180 seconds, the local router will
mark the adjacent router as unreachable and start to adjust the routing table, if necessary.
IOLINK-PRO & 520 Reference Manua — 1.7
Introduction
IPX Routing and The IOLINK-PRO & 520 Routers
The IOLINK router may be used to route between IPX networks.
Novell Netware uses a suite of protocols for LAN communications. The Novell protocols include IPX, SPX, RIP, SAP, plus
others, and operate at layers 3 and above. These protocols, their relationship with each other, and the general operation of a
Novell network are discussed in this section.
The Netware Network Operating System implements the concept of “Client-Server” computing. In this system, there are
various Servers, such as File Servers, Print Servers, and Fax Servers, to name a few. The Client stations, where the users work,
connect to these servers to retrieve files, get application software, or submit print jobs. Most of the interaction between the
Clients and Servers is invisible to the users. These operations rely on the transfer of packets between Clients and Servers using
the IPX/SPX protocols.
IPX Addressing
The IPX protocol is based on the Xerox XNS protocol. The IPX header contains all the IPX addressing information, and
not much else.
Network Layer Addressing vs. MAC Addressing
An Ethernet frame has at least two levels of addressing. The MAC addresses for both the source and destination are
contained in the MAC header. The MAC addresses are essentially physical port addresses, and are globally unique.
Hardware vendors encode the port MAC address as part of the manufacturing process. All Ethernet devices have the
same MAC address format. The MAC address is used to communicate frames between LAN ports regardless of
protocol.
The Network layer addressing is assigned by the network administrator, in a format prescribed by the layer 3
protocol, for example IPX. The network address is used to structure the network system and for communications
between ports operating the same protocol.
Note that it is possible for a single network port to have several different network addresses, but it can have one and
only one MAC address. An example of this is a computer acting as an IPX File Server, an IPX Router, and an IP
Router. In this case the port would have a MAC address, an IPX address for its IPX functions, and an IP address for
the IP Routing functions.
IPX Address Format
The IPX Address is made up of three components: the Network Number, the Node Number, and the Socket
Number. These components are fixed length (unlike the IP addressing) and function.
Figure 1 - 3 IPX Address Format
Network Addresses
The Network Number addresses the network. All stations on the same “network” will have the same Network
Number. Note that a network could be a single segment, or multiple segments joined by either bridges or repeaters.
In IPX internetworks, routers must be used to join different networks together.
1.8 — IOLINK-PRO & 520 Reference Manual
Introduction
Node Addresses
The Node Number identifies the individual stations in a Network. In IPX devices, this address is assigned
automatically and is identical to the MAC address. This means that the Node Number is self-configuring, and will be
unique within the Network because the MAC address that was copied is (supposed to be) unique.
The use of the MAC address as the Node Number allows IPX stations to be self-configuring. This makes the initial
configuration of a station much simpler, but there are factors to consider before doing this. The Node Numbers
cannot be assigned in a way that you might desire; for example with groups of stations having consecutive addresses.
Instead, the network is forced to use whatever MAC address is assigned to the LAN port.
Socket Addresses
The Socket Number identifies the process within the source/destination that is communicating. Common Sockets
include File Servers (Socket Number 0451), SAP (Socket Number 0452), and RIP (Socket 0453). The Socket
Number can be thought of as the address of the upper layer using the IPX communication.
The Socket Numbers are assigned by Novell and do not change from LAN to LAN. In other words, all
communications with File Servers use Socket Number 0451. When a software vendor uses IPX to communicate
across a Netware network, the vendor will apply to Novell to receive a Socket Number for the application. As an
example, if Acme Schedule Company made a groupware scheduling program for Netware, they would get a Socket
assigned for their use. No other communications on the LAN would use the Acme Scheduler Socket.
Other IPX Header Information
The IPX header contains some other information besides the source and destination addresses.
Figure 1 - 4 IPX Header
The checksum is a hold-over field from the XNS model used by Novell. The checksum is no longer used and this
field is now permanently set to FFFF.
The length field indicates the total length of the IPX packet. Note that the data portion can be any length up to 546
bytes, so the length field is needed in the header.
The Transport Control field is used for counting the number of routers the frame has traversed. In other words, it is
a hop count. This operation uses only 4 of the 8 bits; the remaining 4 bits are reserved (by Novell) for future use so
we could see additional information contained in the Transport Control field if Novell decides to use the excess
capacity.
The Packet Type indicates what type of service is using the packet. Some common packet types include type 1, RIP;
type 2, Echo; type 4, IPX; and type 17, Netware Core Protocol.
IOLINK-PRO & 520 Reference Manua — 1.9
Introduction
Establishing an IPX Connection
The Netware model is Client/Server, where Clients initiate calls to Servers for various purposes. The Clients are made aware
of the presence of Servers by listening for Service Advertisement Protocol (SAP) broadcasts. Servers send SAP broadcasts
regularly to identify themselves, including their address and what type of service they offer (File Server, Print Server, Fax
Server, etc.).
Services also are referred to by their name. Server names are assigned by the network administrator, and are usually
representative of the server’s function. As an example, a network might have three File Servers named “GeneralFS”,
“OrderProcessingFS”, and “DevelopmentFS.” Each of these servers would send out SAPs to inform the Clients of their
presence. The Clients can display a list of Servers, and initiate a connection to the desired server using the servers name.
Typically, Clients are pre-programmed with the name of the “Preferred Service,” which allows the Client station to connect
automatically (without human intervention) to the Preferred Server. When no Preferred Service is set, the Client automatically
connects to the first Server it hears. This is because a Client without a Server is almost useless in most Novell applications.
Once an IPX connection has been established between a Client and the Server, there is often a security screen to manage
access. File Servers are protected by a User ID/Password scheme to ensure that only authorized users are let into the server.
Access privileges within the server are also assigned to the individual users. This prevents a Client logged into the “General”
server from accessing files which are the private property of another user on the same “General” server.
Service Advertisement Protocol
The SAPs are broadcast by Servers at regular intervals, and collected by Clients so that they can keep track of what Servers are
out there. Also, a Client may broadcast a Server Request (“Is there a Server named ‘XYZ’ out there?”), which would be heard
by all Servers, and hopefully the Server which the Client is searching for would respond directly, telling the Client about itself
(the Server).
SAP Broadcasts
The Service Advertisement Protocol broadcast is the standard mechanism that Servers use to announce their
availability to the rest of the network. A server will broadcast a SAP containing from 1 to 15 different Services
offered. Therefore if a single high-end PC is acting as a File Server, a Print Server, and a Fax Server, it would send
out a single SAP that lists all three available Servers. Other servers that offer only a single Service would have only
the one Server in the SAP.
SAP broadcasts are sent out every 30 seconds. They are received by all stations on the LAN (it is a broadcast after
all), and the station decides what to do with it. Both Clients and Servers maintain a list of all Servers that are
broadcasting availability. A Novell user can execute the SLIST.EXE program to display the current list of known
servers.
When a Client or Server notices that a Server from its known Server list has missed a broadcast (it should get one
about every 30 seconds), it starts up a counter, and when the Server has missed 3 broadcast intervals (about 180
seconds) that Service is removed from the known Server list. In this way Servers that crash or go off-line for any
reason are aged out of the network.
1.10 — IOLINK-PRO & 520 Reference Manual
Introduction
SAP Requests
Sometimes Clients will need to find out if a specific Server is available. This may occur immediately after a Client is
brought up, and before it has received any SAP broadcasts. The Client (or a new Server) sends out a SAP Request
broadcast asking for a specific Server. That Server, or a router with the best route to that Server, will respond to the
Client (Server) making the request.
Server Types
There are many different types of Servers. Each type is defined and given a type code by Novell. When new types of Servers
are invented they will be assigned a new Server type. Some common Servers are:
Type
0000
0003
0004
0005
0006
0007
0009
0024
0027
Description
Unknown
Print Queue
File Server
Job Server
Gateway
Print Server
Archive Server
Remote Bridge Server
TCP/IP Gateway
Routing Information Protocol
The Novell Routing Information Protocol (RIP/X, where the X indicates IPX) is similar, but not identical, to the Routing
Information Protocol used in IP routers. Novell RIP/X performs similar functions to IP RIP, in that RIP/X is used to
communicate information about routes through routers to remote networks.
RIP/X Operation
The operation of RIP/X is, for all intents and purposes, identical to the operation of IP RIP. Routers send out
broadcasts every 30 seconds containing the contents of that router’s route table (the list of best routes to known
remote networks). When a router comes on line, the extent of its route tables will be its explicit route. In the case of
a local router, it will be a route between the two networks to which the router is connected. In a pair of remote
routers linked via a WAN connection, the first RIP broadcasts will contain only the route to the remote network. As
time goes on, and assuming there are more routers in the network (and correspondingly more remote networks), the
various routers will by way of RIP broadcasts inform each other of the various routes.
RIP/X Broadcasts
A RIP broadcast is sent out by IPX routers every 30 seconds or so. Each broadcast may contain information on up
to 15 different routes (to 15 different networks; of course). If a router knows of more than 15 networks it will send
out two (or more) broadcasts.
Note that to spread the network overhead a router will stagger the generation of RIP/X and SAP broadcasts. The
router will send a RIP/X broadcast, followed 15 seconds later by a SAP broadcast, followed 15 seconds later by
another RIP/X broadcast, etc., etc. The SAP and RIP/X broadcasts are sent every 30 seconds as required, but they
are staggered by 15 seconds to spread the overhead.
IOLINK-PRO & 520 Reference Manua — 1.11
Introduction
RIP/X Requests
A Client may also request a route to a given network or server. To do so, the Client generates a Route Request
broadcast that the routers hear, and routers that know of the route requested will respond to the originating station.
In this way a new Client may find routes without waiting for the routers’ broadcast, that could be up to 30 seconds
away (if it just missed one). A new router on a network will also broadcast a general Route Request to fill its route
tables quickly. Again, without this mechanism the router would have to wait for about 30 seconds until it heard from
all other routers via their standard RIP/X broadcasts.
RIP/X Metrics
The RIP/X routing protocol measures routes based on two metrics, the hop count and the ticks delay. These metrics
are used to compare different routes to the same network, with the goal of selecting the best (shortest) route.
The ticks delay is the primary metric used to determine the optimal route. The tick count is an indicator of how long
a packet will take to get to the destination. Novell has defined 1 tick to be the length of time it takes a 512-byte frame
to be transmitted on a 10-Mbps (Ethernet) LAN. This works out to about 18 ms. The real value of the tick delay is
when evaluating routes across WAN connections. In these cases, the tick count is dependent on the link speed of the
WAN connection(s), where a slower link will have a higher tick count.
The hop count is the secondary measure of the length of a route; it is exactly the same as the IP hop count. If a route
goes through 1 router (the shortest route), it will have a hop count of 1. If a route goes through 6 routers, the hop
count for that route will be 6. The maximum number of hops RIP/X supports is 15, but this is a very large number,
considering the size of most internetworks. When two or more routes to the same network have the same tick count,
the router will use the route with the smallest hop count.
Bridging and the IOLINK-PRO & 520 Routers
The bridge portion of the IOLINK-PRO & 520 router is an Ethernet Media Access Control (MAC) level bridge providing an
efficient means of interconnecting IEEE 802.3 Local Area Networks supporting a choice of standard Ethernet (10Base5),
Thin Ethernet (10Base2) and Twisted Pair (10BaseT) interfaces. With the support of these industry-standard LAN interface
technologies, the IOLINK-PRO & 520 routers will resolve the media conflicts that might have otherwise prevented the
consolidation of these resources.
The IOLINK-PRO & 520 routers will also fit right into those environments that may require more than one bridge by using
the IEEE 802.1D Spanning Tree Protocol. With this protocol, the IOLINK-PRO & 520 routers will perform automatic
network reconfiguration in the event of a link failure to one of the LAN segments. This provides maximum availability of the
attached LAN services.
Immediately following are several short descriptions of LAN bridging operations specific to the IOLINK-PRO & 520
routers. These descriptions will help you understand the concepts of bridging and how the IOLINK-PRO & 520 routers
performs these functions.
The remaining sections of this document describe how these functions are performed and configured. You are urged to
spend the small amount of time necessary to familiarize yourself with the IOLINK-PRO & 520 router and the advanced
functions it may perform for you.
1.12 — IOLINK-PRO & 520 Reference Manual
Introduction
The Initial Bridging Process
Each time a IOLINK router is powered up, it will perform extensive hardware and software tests to ensure the integrity of the
unit and its attached LAN and Link interfaces. Upon successful completion of the power-up diagnostics, the IOLINK router
will follow rules to “learn” several aspects of your LAN environment. These rules define what actions are taken under
particular situations.
One of the more important rules employed by the IOLINK router is also a very fundamental part of the bridging process.
This rule dictates how Ethernet Station Addresses are processed by the bridge. The process is outlined below:
Station Address Learning
The IOLINK router performs an important bandwidth-conserving function by a process termed Station Address
Learning. This process determines the location of all active LAN Stations by monitoring the Ethernet frames being
transmitted onto the LAN segments. Once it has learned the location of each station, the remote bridge/router will
not forward those Ethernet frames destined for a station if the receiving station exists on the same LAN. Under
these conditions, the bridge/router will only forward a frame if the location of the destination station has not yet
been learned, or if the location has been determined to exist on the other LAN segment.
To perform this process, the IOLINK router follows the steps outlined below:
Learning Local Addresses
When the bridge/router is powered up, and after completing the power-up diagnostics, it will not immediately begin
forwarding frames between LAN segments. Instead it will listen to local LAN activity in order to learn the location
of each station address on each side of the bridge.
The bridge/router captures each frame and looks at the source address contained within the Ethernet frame. Since
the bridge/router knows which LAN segment the frame was received from, it can determine that this station must be
located on this segment. As a result, it has just learned the location of the station.
This process will continue for the period defined by the Forwarding Delay option, and in this fashion the first stage
of the LAN address table is built.
Forwarding
Once the initial learning process is complete, the bridge/router enters a forwarding mode and examines frames that
may need to be forwarded. The learning process does not stop at this time, however: The bridge/router will continue
learning new stations as they become active on a LAN segment.
Local Destination Addresses
When a frame is received from a station on one segment, the frame is examined for the source address to ensure that
this station has already been entered into the address table. If the source address exists, the Ethernet destination
address is then viewed. The bridge searches the previously built address table for the location of the destination
station. If it is determined that the location of the destination station exists on the same LAN segment (i.e. the
destination address is local and the frame does not need to be forwarded across the bridge to the other LAN
segment), then the bridge will “filter” and discard it.
Initially, the bridge will only recognize those addresses that are local to a specific LAN segment. The bridge will
thereby filter (discard) all local packets and forward all unknown non-local packets to the second segment located on
the outbound port across the bridge.
IOLINK-PRO & 520 Reference Manua — 1.13
Introduction
Forwarding Unknown Destination Addresses
When a frame is received from a LAN segment with an unknown destination address (an address that does not yet
exist in the filter table), the bridge will forward the frame to the other segment, logging the address, and marking the
location as “unknown”.
Unknown Location Update
When the receiving station transmits a frame in the opposite direction, the bridge will now see the previously
unknown destination address in the source address field. It will now process this source address as it did during the
initial learning stage, adding the location to the address entry.
In this fashion (looking at source addresses of non-local packets), the bridge learns about non-local stations and their
associated arrival ports. The bridge then updates the location of each address in its table. In the future the bridge will
look up these stored non-local addresses to determine the bridge port on which to forward a packet destined for a
known non-local station.
In summary, the IOLINK router will “learn” the location of a station by examining the source Ethernet address,
and will “filter” frames based on destination address. A frame received from one segment that is of “unknown”
location will be forwarded to the other segment. A frame that is received with a source address equal to a known
address, but previously marked as an unknown location, will be updated in the filter table to add the location.
Aging Timer
During the bridging process, the filter table is built giving the location (bridge port or LAN segment) of known Ethernet
addresses. The table would become quite large, eventually reducing performance, if stations were added, removed, or moved
without the old information being purged periodically. Performance is affected since the larger the table, the more time it will
take to process an incoming frame.
This purging process, called “aging,” is an integral part of the learning function. It limits the size of the filter table and ensure
that performance is not reduced unnecessarily.
Aging assumes that many of the addresses may not be active all of the time, and could be purged after a specified interval to
keep the size of the filter table small. In general terms, the smaller the table, the higher the performance.
Address Purging
To achieve this routine housekeeping, each entry in the filter table contains the LAN addresses, the LAN port
identifier, and a timer flag. Each time a particular address is looked up or added to the table, a timer flag is set for the
“fresh” entry. When a time interval, defined by the Bridge/Router Manager expires, the address table is scanned and
any “stale” entries that have not been used since the timer expired are removed. This timer is called the “aging timer”
and may be controlled through the bridge options.
Purging the address does not prevent the station from using the bridging facilities, since the location of the station
may be re-learned. However, since a small aging timer value will mean that the bridge must re-learn addresses more
often, there must be a balance between table size and aging time to achieve optimal performance.
1.14 — IOLINK-PRO & 520 Reference Manual
Introduction
Aging Exception
“Permanent” address entries are an exception to the aging rule. A permanent address is one that is not subject to the
aging timer and will remain in the filter table for an indefinite period of time.
A table is reserved for permanent address entries, separate from the table that is used for those non-permanent
entries that are subject to aging. These tables may be displayed and modified with the bridge/router options
discussed in this manual. Access is made locally from each Bridge/Router Console or one bridge/router can be made
Master, able to control all functions of a partner IOLINK router.
Filled Address Table
The filter table can hold 2048 address entries.If filter address table becomes filled, the following automatic procedure is
followed:
This procedure defines that an address that is not in the table will not be added and will be treated as any other unknown
address. The frame will be passed to the other segment. An alarm will also be generated with the message “Station Address
Table Full,” and from this point, another alarm will be generated only if in the meantime the table empties by 1/3 and then
fills up again.
IOLINK-PRO & 520 Reference Manua — 1.15
Introduction
IOLINK Router Feature Definitions
Telnet
A Telnet LAN station or another IOLINK router has the ability to connect to the Operator Interface of any IOLINK router
supporting the Telnet feature. With the Telnet feature, all IOLINK routers on a network may be managed from a single
point.
Once a connection is established, all of the menus of the other bridge/router are now available on the bridge/router that
initiated the connection. All menu operation on the initiating bridge/router is suspended during the connection. Entering a
control-C character <^C> at any time during the connection will cause a disconnection, and you will be back to the menu of
the first bridge/router.
To implement the Telnet feature, each bridge/router requires an IP address (see the Internet Set-Up Menu). It is advisable to
assign an IP address to each IOLINK router in your network.
The IP address of another bridge/router may be assigned a name to simplify the connection process. Telnet connection to the
other IOLINK Router may be established by entering either the name or the IP address of that router. Refer to the Remote
Site Set-Up Menu (under Configuration / WAN Set-UP) for more information on adding names to the bridge/router.
If a bridge/router does not have an IP address, Telnet connections cannot be initiated or received.
If a Telnet connected bridge/router receives a second connection attempt from another bridge/router the connection attempt
will be ignored.
Connecting to a bridge/router while the remote bridge/router menu system is operating with a different terminal setting may
cause unexpected screen errors. Once the connection to the bridge/router has been established, it is recommended that the
operator change the terminal setting to be the same as the initiating device.
When a Telnet connection is made to a bridge/router, ensure that the Telnet session is in character mode, and carriage return
padding (or translation) is set to NULL (or no translation). The extra character sent when carriage return padding is on will
cause some displays to behave erratically.
Link Compression
The IOLINK router’s optional compression feature multiplies the effective data throughput across wide area links operating
at speeds from 9600 bps through to 256 Kbps. The exact amount a given transmission can be compressed is dependent upon
the type of data being transferred over the wide area network. As an example, because of their repetitive make-up, most
graphics and database files can easily be compressed by a ratio of 6:1. In contrast, other types of files (such as binary files),
that are not as repetitive, typically yield a compression ratio of 2:1. It should also be noted that compression ratios are entirely
dependent upon the make-up of the specific file — while it may be possible to compress a given ASCII file far beyond the 6:1
ratio, a different ASCII file may only compress to a ratio of 4:1 or lower.
At link speeds above 256 Kbps, link compression is not advised as the processing time involved in compressing the data does
not yield significant gains over the transmission of raw data.
1.16 — IOLINK-PRO & 520 Reference Manual
Introduction
7
6
5
4
Compression Ratio
3
2
1
0
Pre-compressed
Binary
Spreadsheet
C Source
ASCII
Post Script
Database
Graphic
File Type
Figure 1 - 5 Typical Compression Ratios by File Type
Data compression will give a 56/64 Kbps link an effective throughput range from 112/128 Kbps when transferring binary
files, to 364/384 Kbps when transferring graphic files. This increased throughput significantly reduces the bandwidth
required across the WAN link to achieve a given performance level and/or allows the use of lower-cost transmission facilities.
400
Uncompressed
350
Compressed
300
Throughput in 250
Kbps
200
150
100
50
0
Binary
Mixture
Graphic
File Type
Figure 1 - 6 Typical Throughput Over 56 Kbps Link
IOLINK-PRO & 520 Reference Manua — 1.17
Introduction
WAN Topologies
The IOLINK router may be connected to other IOLINK routers in two configurations: Multipoint or Point-to-Point. The
WAN routing method used is set in the WAN Set-Up Menu under the Link Operation option.
Point-to-Point
In a Point-to-Point configuration, two IOLINK routers are connected together with one or two WAN links. Each
link may be set to an always active (unconditional) state or a backup/recovery (conditional) state.
A single link may be used for general traffic, and the second link may be used for disaster recovery or increased
throughput. The Bandwidth on Demand feature controls the conditional behavior of the second link in a Point-toPoint configuration.
The Time of Day connect feature may be used in a Point-to-Point configuration to provide specific hours of access
or increased throughput.
Multipoint
In a Multipoint configuration, an IOLINK router is connected to more than one other IOLINK router. A
Multipoint configuration consists of three or more IOLINK routers connected together on the same wide area
network.
A dual-link IOLINK router that is connected to two different IOLINK routers (one on each link) is in a Multipoint
configuration.
The Time of Day connect feature may be used in a Multipoint configuration to provide specific hours of access.
Bandwidth On Demand
Each IOLINK router has the ability to automatically enable or disable a second link based on traffic activity, time of day, or
main link failure.
The Bandwidth on Demand feature allows you to use a second link only when required, thus saving the cost of having the
second link up and connected all of the time. The second link could be connected to an inexpensive dial-up line that is only
required when the main link fails or is exceeding a predefined traffic throughput level.
Bandwidth on Demand is accomplished by using the intelligence of the IOLINK router to measure the utilization of the
primary link. When it approaches saturation, Bandwidth on Demand will initialize and loadshare with a second stand-by link.
This will effectively increase the throughput of the IOLINK router, thereby alleviating the saturation and avoiding data loss.
The second link is then deactivated when traffic levels drop off to where the primary link can adequately handle the traffic
load once again.
When the stand-by link is activated, the IOLINK router raises the outgoing control signals. This control-signal transition is
then used to initiate autodial or auto call-setup procedures on the interface device. This autodial feature is standard on most
of the modems and terminal adapters on the market.
When the second link is deactivated, the IOLINK router lowers the outgoing control signals. This control-signal transition is
used to disconnect the call and bring down the link. The second link then remains in stand-by mode until the bridge/router
determines that the link must be used again.
1.18 — IOLINK-PRO & 520 Reference Manual
Introduction
To set up a Bandwidth on Demand installation, you would first connect the second link of the IOLINK router to a public
circuit-switched network using the appropriate interface device. You would use high-speed modems with telephone lines,
terminal adapters with an ISDN network, or digital modems with switched digital services.
This second link would now be placed in a stand-by mode by setting Conditional operation option in the Secondary
Activation Menu to Enabled.
Now you must choose the throughput level that will be required for activating the stand-by link. The throughput level is
measured in percentage of use of the primary link. This percentage level is defined by the Up Threshold parameter in the
Secondary Activation Traffic Set-Up Menu and may be set to any value from 50% to 100%.
A timer must be defined to determine the length of time to wait before bringing up the stand-by link. The Up Stability Timer
parameter in the Secondary Activation Traffic Set-Up Menu is used to define how long in minutes (from 1 to 60) the main
link must exceed the threshold before the stand-by link is started.
Once the activation-throughput threshold has been determined and set, you must decide what the throughput threshold will
have to be to drop the second link and operate on the main link only.
The Down Threshold level is set in the Secondary Activation Traffic Set-Up Menu and defaults to 10% lower than the Up
Threshold level. Remember that the down threshold looks at the total throughput (both links together) to determine if the
second link will be brought down. The Down Threshold is defined as the percentage of the main links bandwidth the current
total throughput represents. When the total throughput drops below the Down Threshold, the second link will be dropped.
A timer must also be defined to determine the length of time to wait before dropping the stand-by link. The Down Stability
Timer parameter in the Secondary Activation Traffic Set-Up Menu is used to define how long in minutes (from 1 to 60) the
combined links’ throughput must remain below the down threshold level before the stand-by link is stopped.
Time of Day Connect Application
In addition to the Bandwidth on Demand feature, the IOLINK router has the ability to establish link connections
based on a specific time-of-day schedule. Either one or two links may be controlled using the Time of Day feature.
The Time of Day feature may also be used in conjunction with the Bandwidth on Demand feature. It may be used in
both Multipoint and Point-to-Point configurations.
Point-to-Point
One example of a Point-to-Point configuration would consist of a head office and a remote office. Cost comparisons
might reveal that it is less expensive to use a dial-up line during business hours only instead of a permanent leased
line.
One IOLINK router will be installed at each office, and the link from each bridge/router will be connected to a dial
modem. Set the link operation of the bridge/router at the head office to Conditional, and then enter a time schedule
by using the Time Schedule option of the Activation Conditions Menu. The modem connected to the head-office
bridge/router will have an autodial number of the modem at the remote office. With the time schedule set to have
the link active from 8 am to 6 pm each day of the week, the IOLINK router will establish the link and keep it active
during those hours only. The time selection may be made in half-hour (30-minute) increments.
Another example of a Point-to-Point configuration would consist of two IOLINK routers connected together with
one link pair, with the other link pair being used for Time of Day connection. This extra link could be needed during
specific times for predicted traffic increases.
IOLINK-PRO & 520 Reference Manua — 1.19
Introduction
Multipoint
A simple Multipoint configuration would consist of a head office and two remote offices. Cost comparisons might
reveal that it is less expensive to use a dial-up line during business hours only instead of a permanent leased line.
One IOLINK router will be installed at each office (for a total of three units). Each IOLINK router at the remote
office locations will connect to a separate link on the IOLINK router at the head office. The link from each
bridge/router will be connected to a dial modem. Set the link operation of both links on the bridge/router at the
head office to Conditional, and then enter a time schedule for each link by using the Time Schedule option of the
Link Activation Conditions Menu. The modems connected to the head-office bridge/router will each have an
autodial number of one of the modems at the remote offices. With the time schedule set to have the link active from
8 am to 6 pm each day of the week, the IOLINK router will establish the link and keep it active during those hours
only.
Disaster Recovery Backup Link
Each Single Active Link IOLINK router has the ability to activate a secondary link when the main link fails. This secondary
link may be connected to a dial-up modem or ISDN service, so it can be used if something should happen to the main link.
The secondary link is available only for a disaster-recovery situation.
ISDN Single Active Link & Dual Active Link
On Single Active Link ISDN IOLINK Routers, when the WAN Environment option is set to Multipoint, only ISDN call 1 is
available; ISDN call 2 is disabled. A Single Active Link ISDN IOLINK router will be able to use both ISDN calls to connect
in a Point-to-Point topology to another ISDN IOLINK router.
On Dual Active Link ISDN IOLINK Routers, the WAN Environment option may be set to either Point-to-Point or
Multipoint. Both ISDN calls may be used to connect to the same ISDN IOLINK router or to two other ISDN IOLINK
routers.
Operating Software Upgrades
The IOLINK router includes flash memory, that allows new system code to be downloaded using the Trivial File Transfer
Protocol (TFTP). This allows software updates to be performed quickly and painlessly from a host server (with TFTP
capabilities) on the network.
The IOLINK Router also allows the downloading of software updates by using a direct management port connection and the
ZMODEM transfer protocol.
1.20 — IOLINK-PRO & 520 Reference Manual
Section 2 — ISDN Connection Management
IOLINK PRO & 520 ISDN Connection Management
In the world of ISDN the ability to decrease connection time is a financial bonus in the LAN interconnecting marketplace. If
ISDN connections can be controlled so that a minimum amount of cost is incurred while full LAN interconnecting
functionality is retained, the overall cost for WAN communications can be minimized.
In many LAN protocols, the interchange of data is sporadic and frequently long periods of time exist between successive data
transfers. If ISDN calls can be disconnected during the periods of inactive data transfers without the LAN connections being
aware of the disconnection, the ISDN call time and cost is reduced.
To accomplish this, the IOLINK router’s Connection Management function actively tracks all of the LAN connections and
maintains them while the ISDN call is deactivated. When the LAN devices require the connection to exchange more data, the
ISDN call is reactivated so that the LAN data may be transferred.
During the periods of ISDN call disconnection (suspension), each end of the LAN connection must believe that the complete
connection still exists. The generation of the regular status inquiries and responses normally generated by the two devices
involved in the LAN connection is performed by the IOLINK ISDN bridge/router while the ISDN call is suspended.
Wide Area Network Topologies Supported
Two types of Wide Area Network (WAN) topologies are supported with Connection Management
1. Two IOLINK Routers connected.
2. Three IOLINK Routers connected in a star configuration.
Connection Management is not functional when IOLINK routers are connected in a ring.
Call Establishment Methods
ISDN calls may be established according to the following connection methods:
1. Auto-Call
2. Address Connect
3. Manual call
4. Combination
IOLINK-PRO & 520 Reference Manual — 2.1
ISDN Connection Management
Auto-Call (Time-of-Day Connections)
An Auto-Call connection is an ISDN connection that is established each time the IOLINK router attempts to
start the link. This starting of the links occurs each time an IOLINK router powers up or when the link goes
through a restart or at the times specified by the Time-of-Day Activation Schedule. An Auto-Call connection
would be used for a static WAN configuration that needs to be maintained at all specified times between sites.
Network B
This ISDN connection is made
upon initial power-up and
is maintained during the
times defined in the
time-of-day schedule.
Network A
Figure 2 - 1 Auto-Call WAN Topology
The semi-permanent connection that results from an Auto-Call configuration means that the IOLINK router
will attempt to maintain a connection to the partner IOLINK router during the times specified in the Time-ofDay Schedule. When Connection Management is enabled, the ISDN call to the Auto-Call number may be
suspended during periods of inactivity.
2.2 — IOLINK-PRO & 520 Reference Manual
ISDN Connection Management
Address Connect
An Address Connect connection is an ISDN connection that is established to a specific destination IOLINK
router dependent upon the destination network address contained within traffic received from the local LAN.
When a device on the local LAN wishes to establish a session with a device on a remote LAN, the local device
will send a frame with a destination address of the remote device. The IOLINK router will receive the frame
and examine the destination network address contained within the frame.
If the IOLINK router can determine the route to the destination network address, the frame is passed along to
one of the currently connected partner IOLINK router. If the destination network is not located on a currently
connected partner IOLINK router, the local IOLINK router will then look in the Address Connect table to
determine which partner IOLINK router to call.
The Address Connect tables are used by the IOLINK router to determine which remote IOLINK router is
called when a specific destination network address is requested from a device on the local LAN. The Address
Connect tables are configured by the IOLINK router operator.
Network B
555-2000
Network A
555-1000
The ISDN connection is made
to the appropriate remote network
according to the entries in the
Address Connect table.
ISDN Network
Networks C through G
555-8000
Remote Network ISDN Number
555-2000
Network B
555-3000
Network C
555-4000
Network D
555-5000
Network E
555-6000
Network F
555-7000
Network G
555-8000
Network H
Network H
Figure 2 - 2 Address Connect WAN Topology
Manual Call
A manual call is simply an operator initiated ISDN call to a remote partner IOLINK router. The ISDN number
is entered by the operator and a call is made.
IOLINK-PRO & 520 Reference Manual — 2. 3
ISDN Connection Management
Combination
A combination of the Address Connect and Auto-Call options may be configured when a semi-permanent
connection is required to one remote site and a dynamic connection is required to multiple sites. A dynamic
connection indicates that the remote site for the second ISDN call will change depending upon what destination
IP address is required for the connection. One ISDN B-channel is configured to have an Auto-Call ISDN
number and the other B-channel may be used for the Address Connect functions.
Network X
This ISDN connection is made
using the first B-channel
upon initial power-up and is
maintained according to the
Auto-Call parameters.
Network B
555-2000
Network A
555-1000
The ISDN connection is made
using the second B-channel
to the appropriate remote network
according to the entries in the
Address Connect table.
ISDN Network
Networks C through G
555-8000
Remote Network ISDN Number
Network B
555-2000
Network C
555-3000
Network D
555-4000
Network E
555-5000
Network F
555-6000
Network G
555-7000
Network H
555-8000
Network H
Figure 2 - 3 Auto-Call & Address Connect WAN Topology
Connection Process
When a LAN client requests a session with a LAN server, the client will initiate the session by sending a session
connection request to the server. If the server is located on a remote LAN, the session connection request must be
sent to that remote LAN before the server can process the session connection request and reply to it. Any of the call
establishment processes may be used to establish the ISDN call between the IOLINK routers in order to establish a
LAN session between the local and remote LANs.
Once the client-server session has been established, keepalive or status packets are generated by either or both ends
of the session. The keepalive packets are used to verify the status of the device at the opposite end of the session.
When Connection Management is enabled, LAN sessions that are established across the ISDN calls are monitored
and maintained in a table. The session table may contain up to 256 entries for each supported session type, with the
IOLINK router filtering all traffic for any sessions over the 256 limit of the table. The 257th and greater LAN
sessions will not be allowed by the IOLINK router.
While an ISDN call is up and connected, all traffic within the sessions will be transferred to the partner IOLINK
router across the ISDN call.
2.4 — IOLINK-PRO & 520 Reference Manual
ISDN Connection Management
Protocol Awareness
For Connection Management to be effective, each of the IOLINK routers must be aware of the protocols used
within the data being transferred over the ISDN calls between them.
IP and IPX Client-Server sessions are established between devices located on the LANs that are routed by the
IOLINK Router. If the IOLINK router is to manage the ISDN calls between the routed LANs, the IOLINK
routers on each WAN end of the Client-Server session must be aware of the session and also must become
actively involved in the maintenance of the session. When an ISDN call is suspended, both the Client and the
Server must still believe that the session exists.
Suspension Process
The IOLINK router maintains a table for each ISDN call made to a partner ISDN IOLINK router in order to
determine when the ISDN call should be suspended during Connection Management.
Any number of LAN sessions may be currently using the established ISDN call to transfer data between the
client and the server. The IOLINK router monitors the ISDN call for interesting traffic passed on each of the
sessions currently using the ISDN call. If no interesting traffic is observed on the ISDN call for a period of time
greater than the defined Idle Timer value, the ISDN call is suspended and disconnected. While the ISDN call is
suspended, the IOLINK router will monitor the LAN sessions for interesting traffic and re-establish the ISDN
call when required.
A suspended ISDN call may only be re-established by the IOLINK router initiating the suspension or by the
partner IOLINK router that was connected just prior to the call being suspended. This prevents other IOLINK
routers from tying up the ISDN calls and interfering with the suspended calls.
ISDN calls may be connected and disconnected between the two IOLINK routers when required according to
the suspension and re-activation of the ISDN calls. When all of the sessions using the call in the table have been
closed, the call will be terminated and the ISDN B-channel becomes available for use to connect to a different
ISDN IOLINK router. When the connection to the partner ISDN IOLINK router is configured to use AutoCall, the ISDN call will be suspended when there are no sessions in the table.
Interesting Traffic
Interesting Traffic is defined as normal interactive user data for a session. Certain data exchanged during a
normal session is not considered to be interesting and usually is composed of keepalive messages, watchdog
messages, and routing messages. Non-interesting data is handled differently when Connection Management is
enabled.
Idle Timer
In order to determine the criteria for suspending an ISDN call, an Idle Timer is defined. The Idle Timer defines
the period of time that LAN traffic is monitored to determine when the ISDN call will be put in suspension and
disconnected. When Interesting Traffic is observed once again, the call is reconnected.
The Idle Timer is common to all ISDN calls and may be defined from 6 seconds to 5 minutes in 1 second
increments. The Idle Timer may be disabled so that only the partner IOLINK router determines when the
ISDN call will be suspended.
IOLINK Session Participation (Spoofing)
While an ISDN call is up and connected, all traffic within the sessions will be considered interesting and will be
transferred to the partner IOLINK router across the ISDN call. When the IOLINK router determines that the
ISDN call is to be suspended, the IOLINK router will consider keepalive and routing information packets to
now be non-interesting and will begin to generate and respond to keepalive and RIP packets.
IOLINK-PRO & 520 Reference Manual — 2. 5
ISDN Connection Management
When the IOLINK router receives a keepalive packet from the LAN for one of the sessions, the IOLINK
router will not activate the ISDN call and will not pass the keepalive packet to the remote LAN. The IOLINK
router will generate a response to the keepalive packet and send it to the originator of the packet. In this way,
the IOLINK router will keep the ISDN call suspended and will also keep the local side of the session active.
The IOLINK router at the remote site will also be participating in the keepalive process with the remote side of
the session.
The Server generates keepalive frames
which are to be sent to the Client and
acknowledged by the Client.
While the ISDN call is
suspended, this Router
will generate keepalive
frames and send them
to the Client and wait for
an acknowledement from
the Client.
The Client receives the
keepalive frames and
sends an acknowledged
back to the Server.
Suspended
Server
Client
This Router will receive the keepalive
frames destined for the Client and generate
a response back to the Server on behalf of the
Client while the ISDN call is suspended.
Figure 2 - 4 Session Keepalive Messages
While an ISDN call is suspended, if the IOLINK router observes that one of the devices in the session stops
sending keepalive packets, the IOLINK router will begin to generate keepalive packets and send them to the
device in order to determine the status of the device. The length of time the IOLINK router waits before
beginning to generate keepalive packets is definable by the operator.
IOLINK routers incorporate a settling time for routing updates. This means that an IOLINK router will wait
after an initial change in the network is reported before transmitting that change on to the remaining IOLINK
routers connected on the Wide Area Network.
The IOLINK will resume the suspended ISDN call in order to transmit routing messages to partner IOLINK
routers. If the ISDN call cannot be resumed, or has been closed, the routes will be aged out of the routing table.
Termination Process
When the IOLINK router has determined that there are no sessions active on an ISDN call, the IOLINK
router will attempt to close the call. If the partner IOLINK router still has sessions assigned to that call, the call
will be maintained until each side has determined that there are no active sessions using the call.
When the connection to the partner ISDN IOLINK router is configured to use Auto-Call, the ISDN call will be
suspended when there are no session in the table. The ISDN call will be re-established to the Auto-Call number
the next time the IOLINK router needs to send data to the partner ISDN IOLINK router.
If the operator of the IOLINK router performs a link reset, the suspended call will be closed unilaterally.
2.6 — IOLINK-PRO & 520 Reference Manual
ISDN Connection Management
IP Specifics
IP Address Connect
As stated previously, an IP Address Connect connection is an ISDN connection that is established to a specific
destination IOLINK router dependent upon the destination IP address contained within IP traffic received
from the local LAN.
This means that the IOLINK router continuously monitors IP traffic from the local LAN, as all IP routers do,
and makes ISDN connections to partner IOLINK routers when IP traffic needs to be sent to remote LANs.
Once the IP traffic is passed to the remote LAN and all sessions are closed, the local IOLINK router will then
disconnect the ISDN call and continue to monitor the local LAN for IP traffic.
The IP Address Connect table consists of IP addresses and associated ISDN numbers of remote partner
IOLINK IP Routers. Either one or both of the ISDN calls may be used for IP Address Connect use. When one
of the ISDN calls is defined for Auto-Call purposes, the remaining ISDN call may be used for IP Address
Connect use.
The combination of Auto-Call and Address Connect allows part of the WAN environment to be established
statically and still allow dynamic connections to other networks depending upon destination IP addresses.
Suspension of TCP/IP Sessions
When Connection Management is enabled, TCP sessions that are established across the ISDN calls are
monitored and maintained in a table. The TCP session table may contain up to 256 entries. The IOLINK will
filter all traffic for any TCP/IP session over the 256 limit of the table preventing any new TCP sessions from
being established.
While an ISDN call is suspended, if the IOLINK router observes that one of the devices in the session stops
sending keepalive packets, the IOLINK router will begin to generate keepalive packets and send them to the
device in order to determine the status of the device. The length of time the IOLINK router waits before
beginning to generate keepalive packets is definable by the operator.
If the device does not respond to five consecutive keepalive packets sent from the IOLINK router, the
IOLINK router will determine that the device has gone away and the IOLINK router will send a packet to each
end of the TCP session to shut down the session. When the shut down packet is generated for the remote
device, the IOLINK router will re-activate the suspended ISDN call and transmit the shut down packet to the
remote device. Once the remote IOLINK router determines that the TCP session is no longer active, the
remote IOLINK router will stop generating and responding to the keepalive packets for that TCP session.
RIP—Routing Information Protocol
IOLINK ISDN routers incorporate a 3 second settling time for IP RIP updates. This means that an IOLINK
will wait for three seconds after an initial change in the network is reported before transmitting that change on
to the remaining IOLINK routers connected on the Wide Area Network.
IOLINK-PRO & 520 Reference Manual — 2. 7
ISDN Connection Management
IPX Specifics
RIP/IPX and SAP/IPX
IOLINK ISDN routers incorporate a 3 second settling time for IPX RIP and SAP updates. This means that an
IOLINK will wait for three seconds after an initial change in the network is reported before transmitting that
change on to the remaining IOLINK routers connected on the Wide Area Network.
Suspension of IPX Sessions
When Connection Management is enabled, IPX sessions that are established across the ISDN calls are
monitored and maintained in a table. The IPX connection table may contain up to 256 entries. The IOLINK
will filter all watchdog traffic for any IPX session over the 256 limit of the table preventing any new IPX
sessions from being established.
Server IPX Watchdog Frames
When the IOLINK router on the server side of the IPX session receives an IPX watchdog packet from the
server on the local LAN, the IOLINK router will pass the watchdog packet to the remote partner IOLINK
router and then to the client side of the IPX session. Once the client side of the session has responded to the
IPX watchdog, the IOLINK router on the server side of the IPX session will consider all future IPX
watchdog packets for this session to be non-interesting and will not pass them across the ISDN call.
The IOLINK router on the server side of the IPX session will generate a response to each IPX watchdog
packet sent by the server and send the response back to the server on the local LAN. In this way, the local
IOLINK router will keep the ISDN call suspended and will also keep the local side of the IPX session active.
While an ISDN call is suspended, if the IOLINK router on the server side of the IPX session observes that
the server has stopped generating IPX watchdog packets, the IOLINK router will assume that the server has
gone away and alert the IOLINK router on the client side of the IPX session. The IOLINK router on the
client side of the IPX session will stop generating IPX watchdog packets for that IPX session.
Client IPX Watchdog Frames
When the IOLINK router on the client side of the IPX session observes an IPX watchdog packet from the
server side of the IPX session sent to the client, and later an IPX watchdog reply being sent from the client
back to the server, the IOLINK router on the client side of the IPX session will begin to generate and send
IPX watchdog packets to the client on behalf of the server.
While an ISDN call is suspended, if the IOLINK router on the client side of the IPX session observes that
the client has stopped responding to the IPX watchdog packets, the IOLINK router will assume that the
client has gone away and will alert the IOLINK router on the server side of the IPX session. The IOLINK
router on the server side of the IPX session will stop responding to the IPX watchdog packets for that IPX
session and will filter all remaining IPX watchdog packets generated by the server until the server has
determined that the client has gone away.
The time interval between the IPX watchdog packets generated by the IOLINK router on the client side of
the IPX session may be defined by the operator by setting the Watchdog Interval option in the IPX Routing
Set-Up menu.
IPX Serialization Frames
The IOLINK router will prevent IPX serialization frames from activating a suspended ISDN call by filtering the
IPX serialization frames. The IOLINK router will allow IPX serialization frames to be passed to the WAN
when the ISDN call is active.
2.8 — IOLINK-PRO & 520 Reference Manual
Section 3 — Link Interfaces Reference
Pinout Information
Each link interface available is described with detailed information on pin designation. Standard interface
cables will provide correct connections to modems, datasets, or DSU/CSUs.
When connecting two bridge/routers back-to-back without modems, a null-modem cable is required to
crossover the pins on the links. Crossing over the pins allows two bridge/routers both configured as DTE
interfaces to be connected together. With this configuration, both bridge/routers will provide clocking for
the links, and each bridge/router must have a link speed defined.
V.35 Module Identification:
V.35 links are provided as DB25 connectors on the back of the bridge/router, so an interface converter is
needed to convert to the standard V.35 connectors.
Link Clocking Information
All of the link interfaces on the IOLINK router act as DTE devices, this means that they may be directly
connected to DCE devices (modems, etc.) with the DCE devices providing the clocking for the link. The
link speed is controlled by the DCE device. Setting the link speed on the IOLINK router will not result in a
speed change on the link.
Some DCE devices allow the DTE devices connected to them to supply a clock signal which is then routed
back to the transmit clock pins on the DCE interface. This clock is then received by the IOLINK link
interface. By using this method, the IOLINK router may be in control of the link speed. The link speed
may also be controlled by the IOLINK router when a null-modem cable is used to connect two IOLINK
routers in a back-to-back configuration.
Changing the link speed within the menu system of the IOLINK router changes the clock output speed that
is generated on the DTE Terminal Timing pins on the link interfaces.
IOLINK-PRO & 520 Reference Manual — 3.1
Link Interfaces Reference
The IOLINK-PRO and 520 routers are currently produced with LXT CSU/DSU interface modules which
have their link speed configured in software (please see the PPP menus manual for configuration options);
however, the earlier model ATL CSU/DSU module is still compatible with the IOLINK router and may be
used with it. Note that ATL master mode signaling is not compatible with the current standard 64K master
mode signaling; therefore, for back to back connections, an ATL unit will only operate at 64K when
connected to another ATL unit. If one interface is an ATL unit and the other is not, back to back operation
must be set to 56K.
ATL CSU/DSU Link Module Information
The ATL CSU/DSU link module is normally configured to receive clock from the connected network.
When two ATL CSU/DSU link modules are to be used on a leased line in a back-to-back set-up, one of the
modules must provide the clock.
These modules may have either the UP/DOWN switch type or the ON/OFF slide switch type. Each type is
illustrated below.
Figure 3 - 1 Rear View of ATL CSU/DSU Link Module with UP/DOWN Switches
Figure 3 - 2 View of ATL CSU/DSU Link Module with Sliding ON/OFF Switches
When connecting two bridge/routers back-to-back with CSU/DSU link modules, a null-modem cable is
required to crossover the pins on the links. Crossing over the pins allows two bridge/routers both
configured as DTE interfaces to be connected together.
Switch number 1 determines whether the ATL CSU/DSU link module will generate clocks or receive clocks.
When switch 1 is down (on), the normal position, the module receive clocks from the connected network.
When switch 1 is up (up), the module will generate clocks. When a pair of IOLINK Routers are connected
back-to-back with ATL CSU/DSU link modules one module must be set to generate clocks and one module
must be set to receive clocks. On 64 Kbps units only, switch number 3 determines the mode of the ATL
CSU/DSU. When switch 3 is down (on), the CSU/DSU is in DDS (Digital Data Service) mode for normal
connection to the 64 Kbps digital service. When switch 3 is up (off), the CSU/DSU is in LDM (Limited
Distance Modem) mode for back-to-back connection with a null-modem cable.
On 56 Kbps units, the position of switch 3 is not a factor for back-to-back connection with a null-modem
cable. Switch 1 must still be set as noted above.
A DSU/CSU crossover cable would be constructed as follows:
1 --> 7
2 --> 8
7 --> 1
8 --> 2
3.2 — IOLINK-PRO & 520 Reference Manual
Link Interfaces Reference
Console Pinouts
The connector shown here and pinouts described here correspond to
the connector labeled “Console” on the back of the IOLINK-PRO & 520.
1
13
25
14
DB25 Female DCE
Contact
Number
1
2
3
5
6
7
8
20
22
CCITT
Circuit
Number
101
103
104
106
107
102
109
108.2
125
Circuit
AA
BA
BB
CB
CC
AB
CF
CD
CE
Circuit
Name
Protective Ground
Transmitted Data
Received Data
Clear to Send
Data Set Ready
Signal Ground
Received Line Signal Detector (CD)
Data Terminal Ready
Ring Indicator
Direction
To From
DCE DCE
NA
X
X
X
X
NA
X
X
X
Figure 3 - 3 Console Pinouts
The connecting cable must be a shielded cable.
When connecting the IOLINK router console directly to a modem, a null modem cable must be used
because both the IOLINK router console and the modem are DCE devices. A null modem cable with
pinouts according to the following figure must be used.
IOLINK Contact
Modem Contact
Number
Number
8
20
3
2
2
3
20
8
7
7
4
5
5
4
22
22
Figure 3 - 4 Console Null Modem Cable Pinouts
IOLINK-PRO & 520 Reference Manual — 3.3
Link Interfaces Reference
CSU/DSU Module:
The CSU/DSU interface module uses a standard RJ45 service connector, pinout specification RJ48S.
CSU/DSU
Figure 3 - 5 Rear View of the CSU-DSU Connector
The LXT411 CSU/DSU link connection is set to operate at 64 Kbps by default. The link may be set to 56
Kbps via the software menus if required.
When two CSU/DSU link routers are to be connected via a leased line in a back to back set-up, the unit
must be set to 56 Kbps link speed and a null-modem crossover cable used for the connection.
A DSU/CSU crossover cable would be constructed as follows:
1 --> 7
2 --> 8
7 --> 1
8 --> 2
T1/E1 Module:
The T1/E1 interface module use a standard RJ45 service connector, pinout specification RJ48C.
T1/E1
Figure 3 - 6 Rear View of the T1/E1 Connector
When two T1/E1 routers are to be connected in a back to back set-up, a null-modem crossover cable used
for the connection.
A T1/E1 crossover cable would be constructed as follows:
1 --> 4
2 --> 5
5 --> 2
4 --> 1
Pins 1 and 2 are receive (1 = ring, 2= tip)
Pins 4 and 5 are transmit (4 = ring, 5= tip)
3.4 — IOLINK-PRO & 520 Reference Manual
Link Interfaces Reference
V.24 & RS232C Link Pinouts
The connector shown here and pinouts described here correspond to
the connector labeled “RS232/ V.24” on the back of the IOLINK-PRO & 520.
1
13
25
14
DB25 Female DTE
Contact
Number
1
2
3
4
5
6
7
8
9
10
11
12
13
14
15
16
17
18
19
20
21
22
23
24
25
CCITT
Circuit
Number
101
103
104
105
Circuit
AA
BA
BB
CA
107
102
109
CC
AB
CF
114
DB
115
141
DD
108.2
CD
125
CE
113
DA
Circuit
Name
Protective Ground
Transmitted Data
Received Data
Request to Send
---------Data Set Ready
Signal Ground
Received Line Signal Detector (CD)
------------------------------------------------------Transmit Signal Element Timing (DCE Source)
---------Receive Signal Element Timing (DCE Source)
Local Loopback
---------Data Terminal Ready
---------Ring Indicator
---------Transmit Signal Element Timing (DTE Source)
----------
Direction
To From
DCE DCE
NA
X
X
X
X
NA
X
X
X
X
X
X
X
Figure 3 - 7 RS232 Link Pinouts
The connecting cable must be a shielded cable.
NOTE For U.K. Approval:
The connecting cable should be manufactured from Belden Cable, or a cable with equivalent specifications.
Each end must be terminated in a male 25 pin X.21 bis connector as defined in ISO-2110 1989. The cable
may be any length between 0 and 5M.
IOLINK-PRO & 520 Reference Manual — 3.5
Link Interfaces Reference
V.11 & X.21 Link Pinouts
The connector shown here and pinouts described here correspond to
the connector labeled “V.11/X.21” on the back of the IOLINK-PRO & 520.
8
1
15
9
DB15 Female DTE
Contact
Number
1
2
3
4
5
6
7
8
9
10
11
12
13
14
15
X.21
Circuits
Reference
Circuit
Name
Protective Ground
Transmitted Data (A)
Control (A)
Received Data (A)
Indication (A)
Signal Element Timing (A)
---------Signal Ground
Transmitted Data (B)
Control (B)
Received Data (B)
Indication (B)
Signal Element Timing (B)
-------------------
T (A)
C (A)
R (A)
I (A)
S (A)
Ground
T (B)
C (B)
R (B)
I (B)
S (B)
Direction
To From
DCE DCE
NA
X
X
X
X
X
NA
X
X
X
X
X
Figure 3 – 8 V.11 Link Pinouts
The connecting cable must be a shielded cable.
Circuits which are paired (contain an (A) and (B) reference) should be connected to twisted pairs
within the connecting cable.
NOTE For U.K. Approval:
The connecting cable should be manufactured from Belden Cable, or a cable with equivalent specifications.
Each end must be terminated in a male 15 pin X.21 connector as defined in ISO-4903 1989, but one end of
the cable must have UNC-4-40 screws and the other end must have M3 screws. The cable may be any length
between 0 and 5M.
3.6 — IOLINK-PRO & 520 Reference Manual
Link Interfaces Reference
RS442 & RS530 Link Pinouts
The connector shown here and pinouts described here correspond to
the connector labeled “RS530” on the back of the IOLINK-PRO & 520.
1
13
25
14
DB25 Female DTE
Contact
Number
1
2
3
4
5
6
7
8
9
10
11
12
13
14
15
16
17
18
19
20
21
22
23
24
25
Circuit
Shield
BA (A)
BB (A)
CA (A)
CB (A)
CC (A)
AB
CF (A)
DD (B)
CF (B)
DA (B)
DB (B)
CB (B)
BA (B)
DB (A)
BB (B)
DD (A)
LL
CA (B)
CD (A)
RL
CC (B)
CD (B)
DA (A)
Circuit
Name
Protective Ground
Transmitted Data
Received Data
Request to Send
Clear to Send
Data Set Ready
Signal Ground
Received Line Signal Detector
Receive Signal Element Timing (DCE Source)
Received Line Signal Detector
Transmit Signal Element Timing (DTE Source)
Transmit Signal Element Timing (DCE Source)
Clear to Send
Transmitted Data
Transmit Signal Element Timing (DCE Source)
Received Data
Receive Signal Element Timing (DCE Source)
Local Loopback
Request to Send
Data Terminal Ready
Remote Loopback
Data Set Ready
Data Terminal Ready
Transmit Signal Element Timing (DTE Source)
----------
Direction
To From
DCE DCE
NA
X
X
X
X
X
NA
X
X
X
X
X
X
X
X
X
X
X
X
X
X
X
X
X
Figure 3 – 9 RS530 Link Pinouts
The connecting cable must be a shielded cable.
Circuits which are paired (contain an (A) and (B) reference) should be connected to twisted pairs
within the connecting cable.
IOLINK-PRO & 520 Reference Manual — 3.7
Link Interfaces Reference
V.35 Link Pinouts
1
13
25
14
DB25 Female DTE
DB25
Contact
Number
1
2
3
4
5
6
7
8
9
10
11
12
13
14
15
16
17
18
19
20
21
22
23
24
25
M.34
Contact
Number
A
CCITT
Circuit
Number
C
105
E
B
F
P
S
R
T
107
102
109
103
103
104
104
V
115
X
115
U
W
H
J
Y
113
113
108.2
141
125
114
a
114
Circuit
Name
Protective Ground
------------------Request to Send
---------Data Set Ready
Signal Ground
Data Channel Received Line Signal Detector
Transmitted Data (A)
Transmitted Data (B)
Received Data (A)
Received Data (B)
---------Receiver Signal Element Timing (A)
---------Receiver Signal Element Timing (B)
---------Transmitter Signal Element Timing (A) DTE
Transmitter Signal Element Timing (B) DTE
Data Terminal Ready
Local Loopback
Calling Indicator
Transmitter Signal Element Timing (A)
---------Transmitter Signal Element Timing (B)
Direction
To From
DCE DCE
NA
X
X
NA
X
X
X
X
X
X
X
X
X
X
X
Figure 3 - 10 V.35 Link Pin Outs
The connecting cable must be a shielded cable.
Circuits which are paired (contain an (A) and (B) reference) should be connected to twisted pairs
within the connecting cable.
NOTE For U.K. Approval:
The connecting cable should be manufactured from Belden Cable, or a cable with equivalent specifications.
One end must be terminated in a male 34 pin X.21 bis connector as defined in ISO-2593 1984. The other
end must be terminated in a male 25 pin X.21 bis connector as defined in ISO-2110 1989. The cable may be
any length between 0 and 5M.
3.8 — IOLINK-PRO & 520 Reference Manual
X
X
X
Link Interfaces Reference
RS232 Null-Modem Cable Configuration
DB25 MALE
DB25 MALE
1
Shield
2
Transmitted Data
3
Received Data
4
Request To Send
6
Data Set Ready
Shield
Received Data 3
Transmitted Data
Signal Ground
8
Received Line Signal Detector (CD)
2
Data Set Ready 6
Request To Send
20 DTE Ready
7
1
4
Received Line Signal Detector (CD) 8
Signal Ground
7
DTE Ready 20
15 Transmit Timing DCE Source
Receiver Timing DCE Source 17
17 Receiver Timing DCE Source
Transmit Timing DCE Source 15
24 Transmit Timing DTE Source
Transmit Timing DTE Source 24
Figure 3 - 11 RS232 Null-Modem Cable
The connecting cable must be a shielded cable.
This cable is needed when it is necessary to connect two units back-to-back and a set of
modems is not available. Note that this cable specifies DB25 connectors on each end to allow
direct connection to the link interface connector on each unit.
The link speed must be defined for each of the two units.
IOLINK-PRO & 520 Reference Manual — 3.9
Link Interfaces Reference
V.35 Null-Modem Cable Configuration
DB25 MALE
DB25 MALE
1 Protective GND
Protective GND
1
9 Transmitted Data (A)
Received Data (A)
11
10 Transmitted Data (B)
Received Data (B) 12
11 Received Data (A)
Transmitted Data (A)
12 Received Data (B)
Transmitted Data (B) 10
9
18 Transmitter Signal Element Timing (A)
Receiver Signal Element Timing (A) 14
19 Transmitter Signal Element Timing (B)
Receiver Signal Element Timing (B) 16
14 Receiver Signal Element Timing (A)
Transmitter Signal Element Timing (A) 23
16 Receiver Signal Element Timing (B)
Transmitter Signal Element Timing (B) 25
23 Transmitter Signal Element Timing (A)
Transmitter Signal Element Timing (A) 18
25 Transmitter Signal Element Timing (B)
Transmitter Signal Element Timing (B) 19
20 Data Terminal Ready
Data Channel Received Line Signal Detector (CD)
8 Data Channel Received Line Signal Detector (CD)
8
Data Terminal Ready 20
7 Signal Ground
4 Request to Send
6 Data Set Ready
Signal Ground
7
Data Set Ready
6
Request to Send
4
Figure 3 - 12 V.35 Null-Modem Cable
The connecting cable must be a shielded cable.
Circuits which are paired (contain an (A) and (B) reference) should be connected to twisted pairs
within the connecting cable.
This cable is needed when it is necessary to connect two units back-to-back and a set of
modems is not available. Note that this cable specifies DB25 connectors on each end to allow
direct connection to the link interface connector on each unit.
The link speed must be defined for each of the two units.
3.10 — IOLINK-PRO & 520 Reference Manual
Link Interfaces Reference
RS530 Null-Modem Cable Configuration
DB25 MALE
1
Shield
2
Transmitted Data (A)
14 Transmitted Data (B)
3
3
2
Transmitted Data (B) 14
DCE Ready (A)
Request To Send (A)
6
DCE Ready (B) 22
Clear To Send (A)
Clear To Send (A)
5
Clear To Send (B) 13
13 Clear To Send (B)
6
Received Data (A)
Transmitted Data (A)
Received Data (A)
19 Request To Send (B)
5
1
Received Data (B) 16
16 Received Data (B)
4
DB25 MALE
Shield
DCE Ready (A)
Request To Send (A)
22 DCE Ready (B)
4
Request To Send (B) 19
20 DTE Ready (A)
Received Line Signal Detector (A)
23 DTE Ready (B)
Received Line Signal Detector (B) 10
8
7
Signal Ground
Signal Ground
8
Received Line Signal Detector (A)
DTE Ready (A) 20
10 Received Line Signal Detector (B)
DTE Ready (B) 23
7
15 Transmit Timing (A) DCE Source
Receiver Timing (A) DCE Source 17
12 Transmit Timing (B) DCE Source
Receiver Timing (B) DCE Source
24 Transmit Timing (A) DTE Source
Transmit Timing (A) DTE Source 24
11 Transmit Timing (B) DTE Source
Transmit Timing (B) DTE Source 11
18 Local Loopback
9
Local Loopback 18
21 Remote Loopback
Remote Loopback 21
17 Receiver Timing (A) DCE Source
Transmit Timing (A) DCE Source 15
Receiver Timing (B) DCE Source
Transmit Timing (B) DCE Source 12
9
25 Test Mode
Test Mode 25
Figure 3 – 13 RS530 Null-Modem Cable
The connecting cable must be a shielded cable.
Circuits which are paired (contain an (A) and (B) reference) should be connected to twisted pairs
within the connecting cable.
This cable is needed when it is necessary to connect two units back-to-back and a set of
modems is not available. Note that this cable specifies DB25 connectors on each end to allow
direct connection to the link interface connector on each unit.
The link speed must be defined for each of the two units.
IOLINK-PRO & 520 Reference Manual — 3.11
Link Interfaces Reference
RS530 To RS449 Conversion Cable
DB25 MALE
DB37 MALE/FEMALE
2
Transmitted Data (A)
4
14
Transmitted Data (B)
22
3
Received Data (A)
6
16
Received Data (B)
24
8
Received Line Signal Detector (A)
13
10
Received Line Signal Detector (B)
31
6
Data Set Ready (A)
11
22
Data Set Ready (B)
29
4
Request to Send (A)
7
19
Request to Send (B)
25
5
Clear to Send (A)
9
13
Clear to Send (B)
27
20
Data Terminal Ready (A)
12
23
Data Terminal Ready (B)
30
17
Receiver Signal Element Timing (DCE Source) (A)
8
9
Receiver Signal Element Timing (DCE Source) (B)
26
15
Transmit Signal Element Timing (DCE Source) (A)
5
12
Transmit Signal Element Timing (DCE Source) (B)
23
24
Transmit Signal Element Timing (DTE Source) (A)
17
11
Transmit Signal Element Timing (DTE Source) (B)
35
7
Signal Ground
19
1
Shield
1
Figure 3 – 14 RS530 to RS449 Conversion Cable
The connecting cable must be a shielded cable.
Circuits which are paired (contain an (A) and (B) reference) should be connected to twisted pairs
within the connecting cable.
This cable is used to connect an RS530 link to an RS449 device. The cable converts from a
DB25 connector to a DB37 connector.
3.12 — IOLINK-PRO & 520 Reference Manual
Link Interfaces Reference
V.11/X.21 Null-Modem Cable Configuration
Figure 3 – 15 V.11/X.21 Null-Modem Cable
The connecting cable must be a shielded cable.
Circuits which are paired (contain an (A) and (B) reference) should be connected to twisted pairs
within the connecting cable.
This cable is needed when it is necessary to connect two units back-to-back and a set of
modems is not available. Note that this cable specifies DB15 connectors on each end to allow
direct connection to the link interface connector on each unit. The link speed must be defined
for each of the two units.
When using this cable to connect two units back-to-back, a jumper must be installed on
pinheaders W8 and W9 on one of the V.11/X.27 interface modules. This allows that particular
module to generate the required timing signals.
IOLINK-PRO & 520 Reference Manual — 3.13
Link Interfaces Reference
WAN Link Control-Signal Operation
CTS flow control is not supported.
It is assumed that Dial In/Dial Out modes of dial-up operation will be configured externally to the
bridge/router, i.e. on the attached modem, by setting Originate Only/Answer Only modes. A dataset or
DSU/CSU can be used for a leased-line operation.
1) When a call is made to the bridge/router, RI will be asserted by the modem. The bridge/router
responds by driving DTR and RTS high to signal to the partner’s modem that it is ready to establish
communications. The bridge/router then waits (for the duration of the CD Wait Time, default 60
seconds) for the partner’s modem to respond with incoming CD and DSR signals driven high. (With a
dataset or DSU/CSU, RI is not applicable and the bridge/router will respond when CD is high).
2) After DTR goes high, if the incoming CD is not detected within the CD Wait Time then DTR and
RTS are lowered for 5 seconds. This clears the link, hangs up the modem and causes the modem to
redial in an attempt to establish the link. (This “DTR toggle” polling is continuous when the link is
inactive. When DTR is low, and RI is subsequently asserted, then the bridge/router immediately
drives DTR and RTS high and again waits for the duration of CD Wait Time for CD to be asserted).
NOTE: If the level 2 process times out, DTR toggle will be started.
3) When incoming CD and DSR signals both go high, then it indicates that the local modem, etc. has
established communications with the remote modem and that communications may begin.
4) If the link is up, and CD is subsequently interrupted for a period of 10 seconds, then the bridge/router
assumes the signal is lost and will display an Alarm. As stated previously, if the level 2 protocols can
continue to send, they will be allowed to do so. This prevents minor line glitches from taking the link
down upon the loss of CD.
5) If the RI signal is asserted while DTR is already high, the CD Wait Timer is restarted. Once the CD
signal is received by the called modem, the state of the RI signal is unimportant.
6) In the Conditional Link mode, the secondary link will be inactive by holding DTR and RTS low (the
modem, etc., will normally be configured to drop the call when DTR and RTS are held low). When
the secondary link needs to become active, DTR and RTS will be raised and the modem will make the
call.
3.14 — IOLINK-PRO & 520 Reference Manual
Appendix A - Event Logs
The IOLINK router generates event logs for various functions performed by the bridge/router. All of the event logs are
stored in the internal event log file, which is accessible through the Network Events menu.
Certain event logs are classified as alarms because they are deemed to be of higher urgency. Alarm logs are indicated by an
asterisk (“* ”) at the start of the alarm text and are printed on the ALARM line on the menu system as well as being stored in
the event log. Alarms are listed in the second part of this appendix.
All WAN-link-related events include the link number in the event log. All remote site-related events include the remote site
alias in the event log.
All LCP events are either link based or remote site based depending on whether frame relay is disabled or enabled.
Event logs:
CallerID X callback rejected (not resuming)
Generated when an incoming ISDN call from the specified CallerID has been identified as a request for
Callback and has been rejected. The request for Callback was rejected because all available circuits were
reserved for resuming connections, while the Callback request was for a new connection.
CallerID X callback rejected (call limit)
Generated when an incoming ISDN call from the specified CallerID has been identified as a request for
Callback and has been rejected. The request for Callback was rejected because the CallerID was associated
with a remote site whose call limit was exceeded.
CallerID X rejected (not resuming)
Generated when an incoming ISDN call from the specified CallerID has been rejected. The call was rejected
because all available circuits were reserved for resuming connections, while the incoming call was for a new
connection.
CallerID X rejected (usage limit)
Generated when an incoming ISDN call from the specified CallerID has been rejected. The call was rejected
because the CallerID was associated with a remote site whose usage limit was exceeded.
CallerID X security rejection
Generated when a call has been rejected for security reasons. CallerID security is enabled and the incoming
CallID does not match any of the numbers configured for any of the remote sites.
Capture off
Generated when link trace capture is turned off.
Client requested address X. No previous record stored.
Generated when a DHCP IP address request is received from a client and there is no record of that address in the
address table.
IOLINK-PRO & 520 Reference Manual — A.1
Event Logs
Completed BACP negotiation with <remote site alias>
Generated when the Bandwidth Allocation Control Protocol negotiation has been completed with the remote site
device associated with the stated remote site profile. Once BACP negotiations are complete, the two routers will
negotiate when required to bring up the second link.
Completed BCP negotiation with <remote site alias>
Generated when the Bridging Control Protocol negotiation has been completed with the remote site device
associated with the stated remote site profile. Once BCP negotiations are complete, IP routing may take
place between the two routers.
Completed CCP negotiation with <remote site alias>
Generated when the Compression Control Protocol negotiation has been completed with the remote site device
associated with the stated remote site profile. Once CCP negotiations are complete, IP routing may take place
between the two routers.
Completed CMCP negotiation with <remote site alias>
Generated when the Connection Management Control Protocol negotiation has been completed with the
remote site device associated with the stated remote site profile. Once IPCP negotiations are complete, IP
routing may take place between the two routers.
Completed IPCP negotiation with <remote site alias>
Generated when the Internet Protocol Control Protocol negotiation has been completed with the remote site
device associated with the stated remote site profile. Once IPCP negotiations are complete, IP routing may
take place between the two routers.
Completed IPXCP negotiation with <remote site alias>
Generated when the Internet Packet Exchange Control Protocol negotiation has been completed with the
remote site device associated with the stated remote site profile. Once IPXCP negotiations are complete,
IPX routing may take place between the two routers.
Configuration restored
Generated during a warm start when a configuration is successfully restored from non-volatile RAM.
Connection attempt to <IP address>
Generated when the bridge/router attempts a Telnet connection. The IP address of the target bridge/router is
specified.
DHCPserv_Request: client requested Address <IP address>. No previous record stored.
A client has requested an IP address from the DHCP server that the server has no record of being reserved; the client
will not receive an address from this server until the client times out and broadcasts an unreserved address request.
Usually caused by a client connecting from another network.
DHCP services – declined. Address <IP address> declined by client, mark it as unavailable.
Generated when a client declines an address offered by the DHCP service, usually because the client has found from
some other source that the addess is unavailable.
A.2 — IOLINK-PRO & 520 Reference Manual
Event Logs
DHCP services – release. <IP address> released.
Generated when IP address displayed is released from its assignment to a device and put back in the IP pool for reassignment.
Error executing: XXXXXX
Generated when an error is detected loading back a configuration. The invalid command is specified.
Incorrect password from <IP address>
Generated when an incorrect password is given for a Telnet connection. The connecting bridge/router’s
name or IP address is specified. After three incorrect login attempts within ten minutes, an alarm is generated
(see Security alarms: “Possible intruder”) and any further attempts from that IP address within the next ten
minutes are rejected.
Invalid Relay Destination for subnetted network
Generated when a device attempts to do a network broadcast on a subnetted network.
IP must be enabled on remote site <remote site id>
Generated when the Internet Protocol Control Protocol negotiations failed due to the remote site device having the
IPCP function disabled.
IPX: Network configuration error from X, network Y.
Generated when the router and server do not agree on a network number.
IPX: routing table full
Generated when the IPX RIP table has been filled. Any new RIP frames received will be discarded.
IPX: Service table full
Generated when the IPX SAP table has been filled. Any new SAP frames received will be discarded.
IPX: X, unknown RIP packet type received
Generated when the device receives an invalid RIP packet.
IPX: X, unknown SAP packet type received
Generated when the device receives an invalid SAP packet.
IPX: X, demand RIP failed
Generated when this device reaches the end of the attempts to negotiate demand RIP for the IPXCP
connection. After demand RIP has failed, the normal RIP and SAP updates will occur.
LCP X authenticating peer with CHAP
Generated when this device is using CHAP to authenticate the peer (remote) device.
LCP X authenticating peer with PAP
Generated when this device is using PAP to authenticate the peer (remote) device.
IOLINK-PRO & 520 Reference Manual — A.3
Event Logs
LCP X establishing
Generated when the Link Control Protocol of a PPP link or remote site is establishing between this device
and the remote site PPP device.
LCP X no reply to Y Echo-Requests
Generated just prior to a link going down. The link or remote site has gone down due to no replies to the
echo request messages sent.
LCP X operational
Generated when the Link Control Protocol of a PPP link or remote site has been negotiated and is now
operational between this device and the remote site PPP device.
LCP X peer authenticating with CHAP
Generated when the peer (remote) device is using CHAP to authenticate this device.
LCP X peer authenticating with PAP
Generated when the peer (remote) device is using PAP to authenticate this device.
LCP X received Protocol-Reject for <protocol>
Generated when the peer (remote) device rejects one of the Network Control Protocols.
Link X - CSU/DSU Digital Loopback Results [Total: X] [Good: X] [Errors: X]
Generated after the CSU/DSU link module has completed a digital loopback test.
Link X - CSU/DSU Remote Loopback Results [Total: X] [Good: X] [Errors: X]
Generated after the CSU/DSU link module has completed a remote loopback test.
Link X - CSU/DSU Self Test Results [Total: X] [Good: X] [Errors: X]
Generated after the CSU/DSU link module has completed a self test.
Link X CSU/DSU: Connected
Generated when the CSU/DSU link module has established a connection to the remote partner CSU/DSU.
Link X CSU/DSU: Initialized
Generated when the CSU/DSU link module has completed initialization and has established
communications with the IOLINK router.
Link X CSU/DSU: Line ERROR
Generated when the CSU/DSU link module is in an unknown error state.
Link X CSU/DSU: Loopback Ended
Generated after the CSU/DSU link module completes a loopback test.
A.4 — IOLINK-PRO & 520 Reference Manual
Event Logs
Link X CSU/DSU: Loopback Started
Generated when the CSU/DSU link module starts a new loopback test.
Link X - CSU/DSU out of service
Generated when the CSU/DSU is in communication with the local telco, but is not connected to the remote
partner CSU/DSU.
Link X CSU/DSU: No Signal
Generated when the CSU/DSU link module cannot establish communications with the local telco.
Link X CSU/DSU: Reset
Generated when the IOLINK router has initiated a reset of the CSU/DSU link module.
Link X - external loopback results[Total: X] [Good: X] [Errors: X]
Generated after the CSU/DSU link module has completed an external loopback.
Link X - CSU/DSU CSU telco loopback started
Generated when the telco has initiated a CSU loopback to this CSU/DSU link module
Link X - CSU/DSU CSU telco loopback ended
Generated when the telco has terminated the CSU loopback to this CSU/DSU link module
Link X - CSU/DSU DSU telco loopback started
Generated when the telco has initiated a DSU loopback to this CSU/DSU link module
Link X - CSU/DSU DSU telco loopback ended
Generated when the telco has terminated the DSU loopback to this CSU/DSU link module
Link X - CSU/DSU remote loopback ended - line unconnected
Generated when the CSU/DSU link module cannot establish a connection to the remote partner CSU/DSU to
perform a remote loopback test.
Link X - CSU/DSU remote slave loopback started
Generated when the remote partner CSU/DSU has initiated a loopback to this CSU/DSU link module
Link X - CSU/DSU remote slave loopback ended
Generated when the remote partner CSU/DSU has terminated the loopback to this CSU/DSU link module
Link X – LMI Error Threshold exceeded.
Generated when the number of LMI enquiry errors exceeds the user-defined limit.
Link X X [Total: X] [Good: X] [Errors: X]
Generated after the CSU/DSU link module has completed a test.
IOLINK-PRO & 520 Reference Manual — A.5
Event Logs
LMI discarding STATUS on link X – Enquiries not started
Generated when the bridge/router discards a Status message received from the frame relay network on a link
that the bridge/router has not yet started the Local Management Interface.
No NCP's open, tearing link down
Generated when a PPP link does not have a Network Control Protocol operating. This may be due to BCP,
IPCP, and IPXCP being disabled, or the NCP connection was not negotiated to completion.
Password accepted from <IP address>
Generated when a correct password is given for a Telnet connection. The connected Bridge/Router’s name
or IP address is specified.
Password timer has expired
Generated when a bridge/router has issued the password prompt for a Telnet connection and timed out
waiting for the password to be supplied.
Refused connection attempt from <remote site alias>
Generated when a connection attempt to a remote site is refused by that site
Remote Site <remote site alias> re-establishing due to multilink mismatch
Generated when multilink negotiated on by one end of the link and off by the other. The value for multilink
will be toggled on this device and LCP will be re-negotiated.
Remote Site <remote site alias> starting callback
Generated when an incoming CallID was matched to a remote site, and that remote site was configured for callback.
The incoming call will be rejected, and an outgoing callback to the remote site will be attempted.
Restoring boot DNLDSEG configuration
Generated upon entering Network Load Mode to initialize specific configuration information required for
retrieving new code image. Generated upon entering operational after a successful code burn into flash.
Restoring boot EEPROM configuration
Generated when restoring values in EEPROM configuration, this occurs when entering a load or operational
mode.
Running in BOOT mode
Generated when the bridge/router is starting in Boot mode. This is the mode for software upgrades. Once
the software upgrade has been successfully completed, the bridge/router restarts in Operational mode.
Running in OPERATIONAL mode
Generated when the bridge/router is starting in Operational mode. This is the mode for normal operations
of the bridge/router.
SNMP authentication failure for <IP address>
Generated when an SNMP authentication failure is detected. The SNMP message source is specified by its
IP address.
A.6 — IOLINK-PRO & 520 Reference Manual
Event Logs
Starting BACP negotiation with <remote site alias>
Generated when the Bandwidth Allocation Control Protocol negotiation has been initiated with the remote
site device associated with the stated remote site profile.
Starting BCP negotiation with <remote site alias>
Generated when the Bridging Control Protocol negotiation has been initiated with the remote site device
associated with the stated remote site profile.
Starting CCP negotiation with <remote site alias>
Generated when the Compression Control Protocol negotiation has been initiated with the remote site device
associated with the stated remote site profile.
Starting CMCP negotiation with <remote site alias>
Generated when the Connection Management Control Protocol negotiation has been initiated with the
remote site device associated with the stated remote site profile.
Starting IPCP negotiation with <remote site alias>
Generated when the Internet Protocol Control Protocol negotiation has been initiated with the remote site
device associated with the stated remote site profile.
Starting IPXCP negotiation with <remote site alias>
Generated when the Internet Packet Exchange Control Protocol negotiation has been initiated with the
remote site device associated with the stated remote site profile.
Station address table has been filled
Generated when the station address table is filled. This event is not regenerated until the table size drops
below 3/4 full and then fills again.
STP disabled
Generated when STP is disabled.
STP enabled
Generated when STP is enabled.
TFTP: stop putting filename to <IP address>
The bridge/router has sent the final data packet of a file (filename), but has timed out before receiving the
final ACK. The session may or may not have succeeded in delivering the entire file.
TFTP: <IP address> finished getting filename
The bridge/router has sent the final packet of a file (filename) that a LAN device with IP address displayed
was getting from the bridge/router.
TFTP: <IP address> finished putting filename
The bridge/router has ACK-ed the last packet of a file (filename) that a LAN device with IP address
displayed was putting onto the bridge/router.
IOLINK-PRO & 520 Reference Manual — A.7
Event Logs
TFTP: <IP address> getting filename
A LAN device with IP address displayed is getting a file (filename) from the bridge/router.
TFTP: <IP address> putting filename
A LAN device with IP address displayed is putting a file (filename) onto the bridge/router.
A.8 — IOLINK-PRO & 520 Reference Manual
Event Logs
Alarm Logs:
* Auto-learning of LMI type on link X unsuccessful
Generated when the LMI type on a link is not successfully auto-learned.
* Backup Battery is bad
The backup battery power for memory backup has dropped below operating level, replace the batteries (see
Installation and Applications Manual, Appendix D.
* Bad internal block checksum detected
Generated when power up diagnostics finds a fault in the internal block of the EEPROM.
* Call X connected
Generated when an ISDN call has completed connection and is ready to start B channel communication.
* Closing remote site X (call limit)
Generated when the specified number of calls has been exceeded.
* Closing remote site X (callback failure)
Generated when the remote site interpreted the call sequence as a callback. However, a callback was not
completed in the expected time frame.
* Closing remote site X (frame relay closing)
Generated due to the frame relay protocol being disabled on the bridge/router.
* Closing remote site X (force disconnect)
Generated when the connection to a remote site is being closed due to a force disconnect.
* Closing remote site X (inactivity)
Generated when the connection to a remote site is being closed due to an inactivity timeout.
* Closing remote site X (IP triggered RIP)
Generated when the connection to a remote site is being closed due to failure of IP triggered RIP.
* Closing remote site X (IPX demand RIP)
Generated due to the failure of IPX demand RIP.
* Closing remote site X (last session)
Generated due to the termination of the last session.
* Closing remote site X (link disabled)
Generated due to the link being disabled by the operator.
IOLINK-PRO & 520 Reference Manual — A.9
Event Logs
* Closing remote site X (no NCPs open)
Generated when no Network Control Protocols operating.
* Closing remote site X (nonexistant)
Generated when remote site being deleted by the operator.
* Closing remote site X (not enabled)
Generated when remote site autocall being disabled by the operator.
* Closing remote site X (PVC change)
Generated due to the enabling or disabling of PPP encapsulation over frame relay.
* Closing remote site X (resumption failure)
Generated due to failure to resume a suspended connection.
* Closing remote site X (scheduled down)
Generated due to time-of-day schedule deactivation of the connection.
* Closing remote site X (suspension timeout)
Generated due to reaching maximum time that the connection may be suspended.
* Closing remote site X (usage limit)
Generated due to reaching usage limit for this 24 hour period.
* Config. erase failed
Generated when, during a software update, the device configuration is not erased from the non-volatile
memory within the time limit. Possible hardware failt.
* Configuration saved
Generated when the save configuration option has been activated.
* Configuration too large to be saved
Generated when the bridge/router attempts to save a configuration that does not fit in the reserved area of
non-volatile RAM.
* Connection to LAN X failed, trying ...
Generated when failure of the LAN interface external loopback test is detected.
*Count overflow. Reset to history size.
Generated when the number of events since the event log was cleared exceeds the counter capacity (32,768). Event
numbers will start over again from 1.
* DHCP server – out of addresses in IP pool
Generated when the last address from the DHCP IP Address pool has been assigned to a device.
A.10 — IOLINK-PRO & 520 Reference Manual
Event Logs
* Download aborted – Incomplete file
Generated when a TFTP download is abortet before the file transfer is complete
* Download aborted – Invalid FCS
Generated when there is a checksum failure after a file download.
* Download aborted – Incompatible boot code
Generated when the operating code file downloaded is incopatible with the boot code in this device. The updated
boot code software must be loaded before the operating code can be updated.
* Download aborted – Incompatible software
Generated when the software downloaded is incompatible with this device
* Download configuration too large
The configuration file that is being downloaded will not fit in the memory of this router
* E-mail server added to firewall
The IP address of the E-mail server added to the table of services available through the firewall.
* E-mail server removed from firewall
The IP address of the E-mail server removed from the table of services available through the firewall.
* Erasing config. block: starting
Generated as a notification that the configuration of this device is being erased from non-volatile memory prior to
loading a software update.
* Error loading configuration
Generated during a warm start when an error is detected while restoring a configuration from non-volatile
RAM.
* Feature upgrade failure, try again
Generated when the device detects a checksum error for the feature upgrade block.
* File copy failed: file crc: X, verify crc: X
Generated when performing a code upgrade and the calculated CRC was found to be different from the
transferred CRC (flash.fcs) value.
IOLINK-PRO & 520 Reference Manual — A.11
Event Logs
* FTP server added to firewall
The IP address of the FTP server added to the table of services available through the firewall.
* FTP server removed from firewall
The IP address of the FTP server removed from the table of services available through the firewall.
* Gopher server added to firewall
The IP address of the Gopher server added to the table of services available through the firewall.
* Gopher server removed from firewall
The IP address of the Gopher server removed from the table of services available through the firewall.
* IP message received from self
Generated when the bridge/router receives an IP frame with the same source address as itself. This may be
caused by three situations: the network has a loop, another device on this network has the same IP address as
this bridge/router, or another device on this network is spoofing IP using the same IP address as this
bridge/router.
* IP protocol parameters uninitialized
Generated when IP protocol communications fail for a remote site configured for frame relay because an IP
address does not exist.
* ISDN BRI interface deactivated
Generated when the ISDN link module has lost a physical connection to the NT-1.
* ISDN BRI interface activated
Generated when the ISDN link module has established a physical connection to the NT-1.
* LAN connection established
Generated on startup when integrity of the LAN interface has been successfully verified by the external
loopback test.
* Link X attached to remote site <remote site alias>
Generated when a PPP ISDN call is attached to a remote site.
* Link X attached to remote site <remote site alias>
Generated when Link X has been identified as a connection to the specified remote site.
* Link X busy
Generated when a call was attempted on the link while it already had a call in progress. This may also occur
if the link was not activated at the time of the call.
* Link X control signals down
Generated when a high-to-low transition is detected on the CD control signal. Note that there is no
associated event for the low-to-high transition.
A.12 — IOLINK-PRO & 520 Reference Manual
Event Logs
* Link X Connected
Generated when and end-to-end ISDN call has been established.
* Link X connection rejected
Generated when Link X connection is being terminated as it could not be attached to a remote site. This
may be due to usage limits or suspension resumptions.
* Link X - CSU/DSU not responding, Power Cycle Device.
Generated when the IOLINK router cannot establish communications with the CSU/DSU link module.
The power must be cycled on the IOLINK router to cause a restart of the CSU/DSU module.
* Link X Disconnect: Y
Generated when the disconnect of an ISDN call is completed. This event is generated on both sides of the
ISDN call. The cause will be one of the causes as specified in the CCITT Recommendation Q.931. Causes
of “normal call clearing”, “User busy”, and “Number changed” are printed in words, all other are numeric.
Code
001
002
003
004
006
007
008
009
010
011
016
017
018
019
020
021
022
023
024
025
026
027
028
029
030
031
Description
Unallocated/unassigned number
No route to specified transit network
No route to destination
Channel unacceptable
Channel unacceptable
Call awarded and being delivered in an established channel
Prefix 0 dialed but not allowed
Prefix 1 dialed but not allowed
Prefix 1 dialed but not required
More digits received than allowed, call is proceeding
Normal call clearing
User busy
No user responding
No answer from user
Circuit operational
Call rejected
Number changed
Reverse charging rejected
Call suspended
Call resumed
Non-selected user clearing
Destination out of order
Invalid number format
Facility rejected
Response to STATUS INQUIRY
Normal, unspecified
IOLINK-PRO & 520 Reference Manual — A.13
Event Logs
Code
033
034
035
036
037
038
039
040
041
042
043
044
045
046
047
049
050
051
052
053
054
055
056
057
058
063
065
066
067
068
069
070
079
081
082
083
084
085
086
087
088
089
090
091
092
093
095
096
097
098
099
100
101
102
111
127
Description
Circuit out of order
No circuit/channel available
Destination unattainable
Out of order
Degraded service
Network out of order
Transit delay range cannot be achieved
Throughput range cannot be achieved
Temporary failure
Switching equipment congestion
Access information discarded
Requested circuit/channel not available
Preemption
Precedence call blocked
Resources unavailable, unspecified
Quality of service unavailable
Requested facility not subscribed
Reverse charging not allowed
Outgoing calls barred
Outgoing calls barred within CUG
Incoming calls barred
Incoming calls barred within CUG
Call waiting not subscribed
Bearer capability not authorized
Bearer capability not presently available
Service or option not available, unspecified
Bearer capability not implemented
Channel type not implemented
Transit network selection not implemented
Message not implemented
Requested facility not implemented
Only restricted digital information bearer capability is available
Service or option not implemented, unspecified
Invalid call reference value
Identified channel does not exist
A suspended call exists, but this call identity does not
Call identity in use
No call suspended
Call having the requested call identity has been cleared
Destination address not member of CUG
Incompatible destination
Non-existent abbreviated address entry
Destination address missing
Invalid transit network selection
Invalid facility parameter
Mandatory information element is missing
Invalid message, unspecified
Mandatory information element is missing
Message type non-existent or not implemented
Message not compatible with call state or type non-existent or not implemented
Information element non-existent or not implemented
Invalid information element contents
Message not compatible with call state
Recovery on timer expiry
Protocol error - unspecified
Interworking - unspecified
A.14 — IOLINK-PRO & 520 Reference Manual
Event Logs
* Link X, DLCI Y attached to remote site <remote site alias>
Generated for frame relay applications when a connection has been made for the DLCI associated with the remote
site alias.
* Link X down
Generated when a WAN link goes down.
* Link X down to <remote site alias>
Generated when a PPP ISDN call to a remote site is dropped.
* Link X down to <remote site alias>
Generated when a WAN link connection to the specified remote site goes down.
* Link X Incoming Data Call [to/from] [callingDN/calledDN]
Generated when an incoming data call is presented from ISDN and the caller directory number is not
presented.
* Link X – LMI Error Threshold exceeded
Generated when the defined error threshold has been exceeded on the specified link.
* Link not available for remote site <remote site alias>
The link associated with this remote site is already in use.
*Link not configured for frame relay on remote site <remote site alias>
The link that has been assigned to this remote site is not configured for frame relay.
*Link not configured for leased line on remote site <remote site alias>
The link that has been assigned to this remote site is not configured for leased line operation.
* Link X Outgoing Data Call to [DN]
Generated when a data call is outgoing to the dialing network.
* Link X Registered
Generated when the link has registered with the network. This alarm is only applicable for switchtype which
required SPID entry. No incoming or outgoing calls are possible on the link until the link has registered.
* Link X Registration Failed: Y
Generated when the registration of this link with the network has failed. Repeated failures may indicate that
the entered SPID value is incorrect.
* Link X up
Generated when a WAN link comes up.
IOLINK-PRO & 520 Reference Manual — A.15
Event Logs
* Link X up at Y baud
Generated when frame relay link is established.
* Link X up to <remote site alias>
Generated when a WAN link connection to the specified remote site comes up.
* Local DNS server added to firewall
The IP address of the Local DNS server added to the table of services available through the firewall.
* Local DNS server removed from firewall
The IP address of the Local DNS server removed from the table of services available through the firewall.
* Main Battery is bad
The main battery power for memory backup has dropped below operating level, replace the batteries (see Installation
and Applications Manual, Appendix D.
* Max number of NAT UDP entries reached
Generated when more than the allowed maximum number of UDP entries has been attempted. This feature is in
place to prevent denial of service attacks.
* NAT exported services added to firewall
The IP address of the NAT exported services added to the table of services available through the firewall.
* NAT exported services removed from firewall
The IP address of the NAT exported services removed from the table of services available through the firewall.
* NAT table full
Generated when no more ports are available for Network Address Translation.
* No available remote site for learned DLCI
Generated when, during Frame Relay Auto-learning, the remote site table is filled, no space is available to create
another entry. The user must manually edit the table to remove some remote site profiles before another entry can be
made.
* No available remote site for leased line X
Generated when attempting to set up a default leased line remote site and the remote site table is filled, no space is
available to create another entry. The user must manually edit the table to remove some remote site profiles before
another entry can be made.
* No saved configuration, using default
Generated during a cold start when no saved configuration is available.
* No ISDN call configured for remote site <remote site alias>
The remote site selected does not have the ISDN parameters configured properly to make a connection – re-edit the
site profile.
A.16 — IOLINK-PRO & 520 Reference Manual
Event Logs
* No ISDN line available for remote site <remote site alias>
All ISDN lines are currently in use; none are available for the new connection requested. May be generated when
CMCP is enabled and more ISDN calls are attempted than there are available ISDN lines.
* No ISDN resource available for remote site <remote site alias>
All ISDN lines are currently in use; none are available for the new connection requested. May be generated when
CMCP is enabled and more ISDN calls are attempted than there are available ISDN lines.
* No link number configured for remote site <remote site alias>
A remote site with a frame relay or leased line connection must have a link number assigned to it. If this messaage
appears, re-edit the remote site connection set-up to assign a link.
* No remote site available
The remote site table is full, there is no space available to create a remote site profile for this ISDN number or IP
address. The user must manually edit the table to remove some remote site profiles before another entry can be made.
* Old download method! Load in \”*.all\” file
Generated when an attempt is made to load a *.fcs or *.lda format program file into hardware which will only accept
*.all format code.
* Old format configuration, using default
Generated when the saved configuration does not match the expected correct revision number. The old
configuration formats will not be used.
* Outgoing call number X too long
Generated when an outgoing call has been attempted in which the number of dialed digits exceeds the limit.
* POP2/POP3 server added to firewall
The IP address of the POP2/POP3 server added to the table of services available through the firewall.
* POP2/POP3 server removed from firewall
The IP address of the POP2/POP3 server removed from the table of services available through the firewall.
* Remote Site <remote site alias> already active
Generated when a connection is attempted to a remote site that is busy.
* Remote Site <remote site alias> already connected
Generated when a connection is attempted to a site that is already connected to this router.
* Remote site <remote site alias> connected
Generated when the specified remote site has been connected for connection management.
* Remote site <remote site alias> down
Generated when the remote site configured for frame relay has gone down due to failure of security tests.
IOLINK-PRO & 520 Reference Manual — A.17
Event Logs
* Remote site <remote site alias> frame relay closing
Generated when frame relay is diabled on the link to the specified remote site.
* Remote site <remote site alias> resumed
Generated when the connection to the specified remote site has been resumed.
* Remote Site <remote site alias> still closing
Generated when a connection is attempted to a remote site whose link is still in the process of being disconnected.
* Remote site <remote site alias> suspended
Generated when the connection to the specified remote site has been suspended.
* Remote site <remote site alias> terminated
Generated when the connection to the specified remote site has been terminated for connection
management.
* Results of IPCP negotiation are incompatible
Generated when IPCP negotiations with a remote site PPP router result in a incompatible IP configuration.
The remote site is then disconnected.
* Running in System Load mode
Generated when entering System Load Mode in preparation for a download of code to be burned into flash.
* Service added to firewall
The IP address of the Service added to the table of services available through the firewall.
* Service removed from firewall
The IP address of the Service removed from the table of services available through the firewall.
* Telnet server removed from firewall
The IP address of the Telnet server removed from the table of services available through the firewall.
* Telnet server added to firewall
The IP address of the Telnet server added to the table of services available through the firewall.
* TFTP: Abort. ACK retry exceeded
Aborted a TFTP session because the bridge/router did not receive a new data packet within the TFTP “T1”
times “N2” interval.
* TFTP: Abort. ACK timeout
Aborted a TFTP session because the bridge/router did not receive an ACK for the last data packet it sent
within the TFTP “T1” times “N2” interval.
A.18 — IOLINK-PRO & 520 Reference Manual
Event Logs
* TFTP: Abort. Error (#) received
Aborted a TFTP session because of the reception of a TFTP error message from the connected device. The
errors are: 0 - not defined, 1 - file not found, 2 - access violation, 3 - disk full or allocation exceeded, 4 - illegal
TFTP operation, 5 - unknown transfer ID, 6 - file already exists, 7 - no such user.
* Unable to route!! UDP failure
Generated when the device tried to open an already open UDP channel, causing IP routing to fail.
* Unable to bind UDP Boot P client port
Generated as a result of a n internal device error. Try resetting the device. If this is unsuccessful, contact a
service representative.
* Unable to bind UDP Boot P server port
Generated as a result of a n internal device error. Try resetting the device. If this is unsuccessful, contact a service
representative.
* Unable to bind UDP DHCP server port
Generated as a result of a n internal device error. Try resetting the device. If this is unsuccessful, contact a
service representative.
* Unable to allocate memory for DHCP server save
Generated when the memory on this device has become too fragmented to find a contiguous block of memory large
enough for the DHCP server tables. Reset the device to defragment memory.
* Unknown call type on remote site X
The attempted call is not an ISDN, Frame Relay or PPP leased line call. Possible cause is a remote site profile being
deleted while a connection attempt is being made.
* WWW (HTTP) server removed from firewall
The IP address of the WWW (HTTP) server removed from the table of services available through the firewall.
* WWW (HTTP) server added to firewall
The IP address of the Telnet WWW (HTTP) added to the table of services available through the firewall.
* X count overflow. Reset to history size
Generated when the number of items logged exceeds the space available. X = “ALARM” or “EVENT”
IOLINK-PRO & 520 Reference Manual — A.19
Event Logs
PPP Security Logs:
CHAP authentication failure so terminate link.
Generated when the CHAP authentication sent by this router in response to a request from a remote site is
rejected.
CHAP failed for <remote site alias>
Generated when the remote site router failed a CHAP authentication request from this IOLINK router. The
remote site name is displayed if known.
CHAP failed to complete
Generated when the remote site router sent a CHAP challenge and this IOLINK router sent a response, but
no further information was received from the remote site router.
CHAP login refused by <remote site alias>
Generated when the remote site router sent a CHAP challenge and this IOLINK router sent a response, and
the remote site router refused the connection. The remote site name is displayed if know.
Link X refused to authenticate
Generated when the remote site router refused to do authentication.
PAP authentication failure for user Y
Generated when the PAP password sent by this router in reply to the remote site router PAP password request is
rejected.
PAP failed for <remote site alias>
Generated when the remote site router failed a PAP authentication request from this IOLINK router. The
remote site name is displayed if know.
PAP X failed to complete (Y)
Generated when the remote site router sent a PAP password request and this IOLINK router sent the PAP
password in reply, but no further information was received from the remote site router.
PAP X peer failed to authenticate
Generated when the remote site router did not respond to a request to authenticate.
Possible intruder <IP address> exceeded password attempts limit
A telnet connection attempt from the displayed IP address to gain access to the router management menus has tried
to login over three times with incorrect passwords within the past ten minutes. This may be an attempt to gain
unauthorized access to the management of this router. Any further attempts within the next ten minutes form this IP
address to gain access will be rejected.
Remote Site <remote site alias> refused to authenticate
Generated when the remote router refused to do authentication for the frame relay remote site.
A.20 — IOLINK-PRO & 520 Reference Manual
Appendix B - Programmable Filtering
Programmable filtering gives the network manager the ability to control under what conditions Ethernet frames are forwarded
across bridge or bridge/router ports. There are many reasons why this might need to be accomplished, some of which are
security, protocol discrimination, bandwidth conservation, and general restrictions.
To reach a specific filtering goal, there is usually more than one possible filter expression that may be used. This of course is
dependent on the specific filtering requirement, and how flexible the filter should be.
The following pages describe how programmable filters may be used in typical applications. Although this is only a small
sampling of the many possibilities, a cross-section of use of filters is presented.
MAC Address Filtering
Security
The need for security has become increasingly important in Local Area Networking, and with the use of programmable filters,
security may be easily and effectively implemented across segment boundaries. By defining a programmable filter, the
network manager may control what traffic is allowed between LAN segments, thereby controlling the security of resources by
preventing unauthorized user access.
The IOLINK router provides three built-in functions – in addition to defined programmable masks – to control the access to
resources. The first function is “Filter if Source”; the second is “Filter if Destination.” The third function allows you to
change the filter operation from “positive” to “negative.” Positive filter operation causes the specified MAC addresses to be
filtered according to the entered method. Negative filter operation causes the specified MAC addresses to be forwarded
according to the entered method.
You may easily prevent any station on one segment from accessing a specific resource on the other segment; for this,
“positive” filtering and the use of “Filter if Destination” would be appropriate. If you want to disallow a specific station from
accessing any service, “Filter if Source” could be used.
You may easily prevent stations on one segment from accessing all but a specific resource on the other segment; for this,
“negative” filtering and the use of “Forward if Destination” would be appropriate. If you want to disallow all but a specific
station from accessing any service on the other segment, the use of “Forward if Source” could be used.
Example cases are found on the following pages.
TCP/IP, XNS, and Novell Netware frame formats, as well as some common Ethernet type codes, are found by the back
cover.
IOLINK-PRO & 520 Reference Manual — B.1
Programmable Filtering
Security—“Filter if Destination”
Filter if Destination is a function that allows you to filter an Ethernet frame based on the destination of its address.
If the destination address equals the address that the Filter if Destination function has been applied to, the frame is
filtered.
Example:
Assume that a host Computer is located on LAN segment 2 located on a partner bridge/router with an Ethernet
address of:
00-00-01-02-03-04
(host Ethernet address)
Since each station on a LAN has a unique Ethernet address, this address uniquely identifies this host computer.
To prevent LAN users located on segment 1, located on the local bridge/router, from accessing this host system,
follow the instructions below:
1
From the MAIN MENU of the console of the local bridge/router, enter a 1.
(Enter a “=“ from any menu to go back to the MAIN MENU.)
This will place you at the CONFIGURATION MENU, where access to the filtering menu is obtained.
2
From the CONFIGURATION MENU, enter an 8.
This will place you at the FILTER SET-UP MENU, where access to the individual filtering menus is
obtained.
3
From the FILTER SET-UP MENU, enter a 1.
This will place you at the MAC ADDRESS FILTERS MENU, where access to the MAC Address filters is
obtained.
4
From the MAC ADDRESS FILTERS MENU, make sure that Filter Operation is currently set to positive.”
This will cause the MAC Address Filters specified to be used for filtering frames with the specified MAC
addresses.
5
From the MAC ADDRESS FILTERS MENU, enter a 1.
This will place you at the first EDIT MAC ADDRESS FILTER MENU screen.
At the prompt enter the MAC address for which you want to specify the filter.
6
Enter the 12-digit Ethernet address of the host system in the following format:
000001020304 (enter a Return)
The edit screen will fill in the information that the table knows about this address. For this example, let us
assume that it knows that the address is “present” and located on the LAN of the partner bridge/router.
7
Enter a 4 to Enable the “Filter if Destination” parameter. The screen will be updated with the new
information.
At this point, the address is added to the permanent filter table of the local LAN. This entry, therefore, will not be
subject to the aging timer, and will remain active until it is removed from the permanent entry table.
When a frame of information is seen on the local LAN that contains the address of the host system in the destination
field of the frame, the bridge/router will not forward it, effectively preventing any access to this host from the local
LAN.
B.2 — IOLINK-PRO & 520 Reference Manual
Programmable Filtering
Security—“Filter if Source”
Filter if Source is a function that allows you to filter an Ethernet frame if the source address of the frame equals the
address that the Filter if Source function has been applied to.
Example:
Assume that a Personal Computer is located on segment 1 on the local bridge/router. This station is a community
station that various departments may use for general processing. However, this station may only access those services
that exist on its local segment, and it must be restricted from accessing any services on remote LANs. This can be
easily accomplished with a “Filter if Source.”
The Ethernet Address for this Personal Computer is:
01-02-03-04-05-06
Again, this address uniquely identifies this computer station.
To configure the bridge/router to ensure that this station is unable to access facilities on a remote LAN segment,
follow the instructions below:
1
From the MAIN MENU of the console of the local bridge/router, enter a 1.
(Enter a “=“ from any menu to go back to the MAIN MENU.)
This will place you at the CONFIGURATION MENU, where access to the filtering menu is obtained.
2
From the CONFIGURATION MENU, enter an 8.
This will place you at the FILTER SET-UP MENU, where access to the individual filtering menus is
obtained.
3
From the FILTER SET-UP MENU, enter a 1.
This will place you at the MAC ADDRESS FILTERS MENU, where access to the MAC Address filters is
obtained.
4
From the MAC ADDRESS FILTERS MENU, make sure that the Filter Operation is currently set to
“positive.”
This will cause the MAC Address Filters specified to be used for filtering frames with the specified MAC
addresses.
5
From the MAC ADDRESS FILTERS MENU, enter a 1.
This will place you at the first EDIT MAC ADDRESS FILTER MENU screen.
At the prompt enter the MAC address for which you want to specify the filter.
6
Enter the 12-digit Ethernet address of the Personal Computer system in the following format:
010203040506 (enter a Return)
The edit screen will fill in the information that the table knows about this address. For this example, let us
assume that it knows that the address status is [not present] and is of [unknown] location.
In this example, the bridge/router is not aware of this station as of yet. The station has probably not been
active for the bridge/router to “learn” any information about it.
Therefore, you will have to tell the bridge/router a little bit more about the station.
7
Enter a 2 to enter the location of the station.
IOLINK-PRO & 520 Reference Manual — B.3
Programmable Filtering
8
The bridge/router will prompt you for the LAN that the station is located on; enter the name of the partner
bridge/router LAN (LAN345678, for example).
Note that the Status of the address is marked as [present], the location is updated to LAN345678 and the
Permanent entry is [enabled].
9
Enter a 3 to [enable] the “Filter if Source” parameter. The edit screen will be updated to show the new
information.
At this point, the address is added to the permanent filter table of the local LAN. This entry, therefore, will not be
subject to the aging timer, and will remain active until it is removed from the permanent entry table.
When a frame of information is seen on the local LAN that contains the address of the Personal Computer in the
source field of the frame, the bridge/router will not forward it, effectively preventing any access from the PC to
remote LANs.
Most programmable filtering options may be used for security purposes. The examples above are specific instances where the
two “Filter if” functions may be used.
Security—“Forward if Destination”
Forward if Destination is a function that allows you to forward an Ethernet frame based on the destination of its
address and filter all other frames. If the destination address equals the address that the Forward if Destination
function has been applied to, the frame is forwarded.
Example:
Assume that a host Computer is located on LAN segment 2 located on a partner bridge/router with an Ethernet
address of:
00-00-01-02-03-04
(host Ethernet address)
Since each station on a LAN has a unique Ethernet address, this address uniquely identifies this host computer.
To prevent LAN users located on segment 1, located on the local bridge/router, from accessing any only this host
system and no other systems, follow the instructions below:
1
From the MAIN MENU of the console of the local bridge/router, enter a 1.
(Enter a “=“ from any menu to go back to the MAIN MENU.)
This will place you at the CONFIGURATION MENU, where access to the filtering menu is obtained.
2
From the CONFIGURATION MENU, enter an 8.
This will place you at the FILTER SET-UP MENU, where access to the individual filtering menus is
obtained.
3
From the FILTER SET-UP MENU, enter a 1.
This will place you at the MAC ADDRESS FILTERS MENU, where access to the MAC Address filters is
obtained.
B.4 — IOLINK-PRO & 520 Reference Manual
Programmable Filtering
4
From the MAC ADDRESS FILTERS MENU, make sure that the Filter Operation is currently set to
“negative.”
This will cause the MAC Address Filters specified to be used for forwarding frames with the specified MAC
addresses.
5
From the MAC ADDRESS FILTERS MENU, enter a 1.
This will place you at the first EDIT MAC ADDRESS FILTER MENU screen.
At the prompt enter the MAC address for which you want to specify the filter.
6
Enter the 12-digit Ethernet address of the host system in the following format:
000001020304 (enter a Return)
The edit screen will fill in the information that the table knows about this address. For this example, let us
assume that it knows that the address is “present” and located on the LAN of the partner bridge/router.
7
Enter a 4 to Enable the “Forward if Destination” parameter. The edit screen will be updated to show the
new information.
At this point, the address is added to the permanent filter table of the local LAN. This entry, therefore, will not be
subject to the aging timer, and will remain active until it is removed from the permanent entry table.
When a frame of information is seen on the local LAN that contains the address of the host system in the destination
field of the frame, the bridge/router will forward it. All other frames seen on the local LAN that are destined for the
remote LAN will be filtered.
Security—“Forward if Source”
Forward if Source is a function that allows you to forward an Ethernet frame if the source address of the frame
equals the address that the Forward if Source function has been applied to.
Example:
Assume that a Personal Computer is located on segment 1 on the local bridge/router. This station belongs to the
head of Marketing. This station requires access to all the services that exist on the remote LAN but no other station
on the local LAN is allowed to access the remote LAN. This can be easily accomplished with a “Forward if Source.”
The Ethernet Address for this Personal Computer is:
01-02-03-04-05-06
Again, this address uniquely identifies this computer station.
To configure the bridge/router to ensure that only this station is able to access facilities on a remote LAN segment,
follow the instructions below:
1
From the MAIN MENU of the console of the local bridge/router, enter a 1.
(Enter a “=“ from any menu to go back to the MAIN MENU.)
This will place you at the CONFIGURATION MENU, where access to the filtering menu is obtained.
IOLINK-PRO & 520 Reference Manual — B.5
Programmable Filtering
2
From the CONFIGURATION MENU, enter an 8.
This will place you at the FILTER SET-UP MENU, where access to the individual filtering menus is
obtained.
3
From the FILTER SET-UP MENU, enter a 1.
This will place you at the MAC ADDRESS FILTERS MENU, where access to the MAC Address filters is
obtained.
4
From the MAC ADDRESS FILTERS MENU, make sure that the Filter Operation is currently set to
“negative.”
This will cause the MAC Address Filters specified to be used for forwarding frames with the specified MAC
addresses.
5
At this menu, enter a 1.
This will place you at the first EDIT MAC ADDRESS FILTER MENU screen.
At the prompt enter the MAC address for which you want to specify the filter.
6
Enter the 12-digit Ethernet address of the Personal Computer system in the following format:
010203040506 (enter a Return)
The edit screen will fill in the information that the table knows about this address. For this example, let us
assume that it knows that the address status is [not present] and is of [unknown] location.
In this example, the bridge/router is not aware of this station yet. The station has probably not been active
for the bridge/router to “learn” any information about it.
Therefore, you will have to tell the bridge/router a little bit more about the station.
7
Enter a 2 to enter the location of the station.
8
The bridge/router will prompt you for the LAN that the station is located on; enter the name of this
bridge/router’s LAN (LAN456789 for example).
Note that the Status of the address is marked as [present], the location is updated to LAN456789 and the
Permanent entry is [enabled].
9
Enter a 3 to [enable] the “Forward if Source” parameter. The edit screen will be updated to show the new
information.
At this point, the address is added to the permanent filter table of the local LAN. This entry, therefore, will not be
subject to the aging timer, and will remain active until it is removed from the permanent entry table.
When a frame of information is seen on the local LAN that contains the address of the Personal Computer in the
source field of the frame, the bridge/router will forward it. All other frames seen on the local LAN that are destined
for the remote LAN will be filtered.
Most programmable filtering options may be used for security purposes. The examples above are specific instances where the
two “Forward if” functions may be used. Filter masks are presented in subsequent pages of this section.
B.6 — IOLINK-PRO & 520 Reference Manual
Programmable Filtering
Pattern Filter Operators
The following operators are used in creating Pattern filters and will be discussed further in the following pages. For additional
information refer to the octet locations diagrams at the back of this manual. Each octet location may contain a HEX value.
-
offset
Used in pattern filters to determine the starting position to start the pattern checking.
Example:
|
OR
12-80
Used in combination filters when one or the other conditions must be met.
Example:
&
AND
10-20|12-80
NOT
10-20&12-80
brackets
This filter pattern will match if the packet information starting at
the 10th octet equals the 20 of the filter pattern and the packet
information starting at the 12th octet equals the 80 of the filter
pattern.
Used in pattern filters to indicate that all packets not matching the defined pattern will be filtered.
Example:
()
This filter pattern will match if the packet information starting at
the 10th octet equals the 20 of the filter pattern or if the packet
information starting at the 12th octet equals the 80 of the filter
pattern.
Used in combination filters when one and the other conditions must be met.
Example:
~
This filter pattern will match if the packet information starting at
the 12th octet equals the 80 of the filter pattern.
~12-80
This filter pattern will match if the packet information starting at
the 12th octet does not equal the 80 of the filter pattern.
Used in pattern filters to separate portions of filter patterns for specific operators.
Example:
12-80&(14-24|14-32)
This filter pattern will be checked in two operations. First the
section in brackets will be checked and then the results of the first
check will be used in the second check using the first portion of
the filter patter. If the packet information starting at the 14th octet
equals 24 or 32, and the information at the 12th octet equals 80, the
filter pattern will match.
Bridge Pattern Filtering
Protocol Discrimination
Protocol discrimination may be required to prevent or limit the protocols that may traverse a bridged Local Area Network.
In Local Area Networks there may be many different Network and Transport layer protocols that coexist on the same
physical media. TCP/IP, DECNET, and XNS are just a few of the common protocols in use today. Each of these protocols
is encapsulated within an Ethernet frame, and therefore is transparent to the normal bridging function. If you would like to
discriminate against a particular protocol to prevent its use of the bridged LAN facilities, the IOLINK router provides
programmable filter masks that may be defined to act on any part of the Ethernet frame.
In the examples below, several protocol types and combinations are presented to demonstrate the use of programmable filter
masks to control the protocol traffic between Local Area Network segments. Since there are many possible combinations,
these examples are only representative of some of them.
IOLINK-PRO & 520 Reference Manual — B.7
Programmable Filtering
The Bridge Filter Patterns menu is located under the FILTER SET-UP MENU. Within the Bridge Filter Patterns Menu
there exists a Help function that can be used as a reference during Bridge Filter Pattern creation. This Help function
includes all of the logical operators that may be applied to the mask expression.
Protocol Type Field
Within an Ethernet frame, a protocol field exists at octet 12 and 13. These two octets, or 8-bit bytes, will represent
the type of higher level protocol that exists in the Ethernet frame. There are more than 100 different protocol types
that are defined for use within an Ethernet frame. In many networks there will be fewer than 10 that are in use, but
in many larger networks there may be upwards of 30 or more. This, of course, will depend on the type of equipment
and the applications that are being used within the Local Area Network.
Internet Protocol (IP)
The Internet Protocol (IP) is the most widely used protocol within an Ethernet environment. As a result there may
be a need to restrict in one form or another this protocol traffic.
Filter all IP Packets
To prevent IP traffic from being passed across the bridged network, a mask must be created that represents this
protocol type. The IP protocol type is 0800H.
Since the protocol field starts at octet location 12, the necessary filter mask to prevent IP traffic from traversing the
bridged network is as follows: 12-0800
The 12 is the offset into the Ethernet frame, the “-” is the argument separator, and the 0800 represents the protocol
type of IP.
In this example, whenever a frame is seen on the LAN port, for which this filter mask has been specified, with a
protocol of type equal to IP, the frame will be filtered.
Note that when you filter on IP frames, all frames using the IP protocol will also be filtered. This includes TCP,
UDP, SNMP, etc.
IP, and no more
This example performs just the opposite function to the above example. Only IP packets will be allowed to be
passed across the bridged network.
For this function there must be a method to prevent all but IP packets from being filtered. For this the NOT (“~”)
logical operator is used. The NOT operator specifies that the expression has to be FALSE before the frame is
filtered. In other words, only frames that are NOT equal to the expression will be filtered and discarded.
To create this mask, the following expression is entered:
~(12-0800)
The parenthesis simply ensures that the NOT operator will apply to the entire expression.
In this case, whenever a frame is received, the frame will be filtered if the protocol type is NOT equal to 0800 (IP).
Only one filter pattern may be used that contains the NOT operator.
B.8 — IOLINK-PRO & 520 Reference Manual
Programmable Filtering
Transport Control Protocol / Internet Protocol (TCP/IP)
The previous example showed how to filter all Ethernet frames that contained an IP protocol packet. However, IP is
used as the Network-layer protocol for more than 40 different Transport-layer protocols, TCP being only one of
them. Therefore, with the mask that was used as noted in the previous IP example, all Transport layer protocols that
used IP would also be filtered. This may not be desirable in all cases.
For this example, the discrimination of the Transport Layer used within an IP packet will be demonstrated. This
requires an AND function, since we want to filter data that both is IP and contains TCP information.
Within the IP frame, there is a single octet field that may be used to indicate the protocol of the Transport layer, or
the protocol of the data in the IP packet. If TCP were the protocol within the IP packet, this octet, or 8-bit byte,
would be equal to 6.
The location of this field, remembering that the start of the Ethernet frame is always the base reference, is octet 23.
Filter only TCP/IP
To filter only those packets that are TCP/IP, the mask would therefore be: 12-0800&23-06
The 12-0800 is the IP expression and the 23-06 will represent TCP in an IP frame. The “&” is the logical AND
operator, so the expression requires that the frame be both an IP and TCP.
Filter all IP without TCP traffic
To filter all IP packets that do not contain TCP traffic, the mask would be:
12-0800&~(23-06)
Filter all except TCP/IP
To filter all other packets except TCP/IP packets, the mask would be:
~(12-0800&23-06)
Local Area Transport (LAT)
The Local Area Transport (LAT) protocol is used exclusively by DEC for terminal access between DEC hosts and
terminal servers located on an Ethernet network.
This example is similar to the Internet Protocol example described previously.
The protocol type field value that is used for LAT frames is equal to 6004.
Filter all LAT
Therefore, to filter all LAT frames, the filter mask would be:
12-6004
Filter all but LAT
To filter all frames but LAT frames, the filter mask would be:
~(12-6004)
IOLINK-PRO & 520 Reference Manual — B.9
Programmable Filtering
DEC
DEC uses protocol types 6000 to 600F, and although some are undefined, a simple filter mask can be created to filter
all DEC traffic.
Filter all DEC
The mask to filter all DEC traffic would be:
12-600X
The X is a variable representing the last four bits (a nibble) of the type. This will effectively filter all Ethernet frames
that contain a protocol type of 6000 through to 600F. All 16 possible combinations are covered.
Bandwidth Conservation
Reducing traffic on each LAN segment is one benefit of the bridging functions of a IOLINK router. There are several simple
methods that may be used to provide a further reduction of inter-LAN traffic. The examples that follow present a few very
simple methods to reduce inter-LAN traffic, without necessarily reducing resource capability.
Ethernet Broadcasting
On an Ethernet LAN, any station may broadcast information to all other stations by setting the Ethernet Destination
address to FF-FF-FF-FF-FF-FF. By configuring the destination address to this setting, it is telling all other stations
that this is a broadcast message.
In many situations, stations will abuse this broadcasting capability and send useless information to other stations in
the network. To prevent this information from being seen across the link on the other LAN segment, a filter mask
can be used.
To prevent broadcast information from being passed across the link, use the following filter mask:
0-FFFFFFFFFFFF
This prevents any frame with a destination address field set to the broadcast address from being passed to the second
LAN segment across the link.
Ethernet Multicasting
An Ethernet multicast is a frame of data where the destination address has the high-order bit set to a “one”
condition. It is similar to a broadcast, but is to be received by a “group” of stations that meet the remainder of the
address. In this manner, a broadcast is focused to a specific group of stations.
To filter multicast frames, the following mask could be used:
0-’1XXX’X
In this example the high-order bit by multi-cast definition must be set to a “one”. The single quotes around the first
four positions instructs that the four positions constitute 4 bits, or a nibble, of the entire expression; each position
representing a single bit. The “1” indicates that that bit position must be equal to a “1” before the expression is true.
The X’s that are included within the single quotes represent a single don’t care for those bit positions in the first
nibble. The X that is located outside of the single quotes represents a don’t care condition for the later nibble.
NOTE: With this mask, both broadcast frames and multicast frames will be filtered.
B.10 — IOLINK-PRO & 520 Reference Manual
Programmable Filtering
General Restrictions
Bridge Filter Masks may be created to generally restrict access for various purposes. Some of these purposes may be to filter
specific combinations of information. This section will generally depict masks that may be created to control traffic across the
bridged LAN network.
Internet Addresses
Within the Internet Protocol, there exist two address fields that are designated the Source and Destination Internet
Addresses. It is these addresses that the IP uses for routing purposes.
To filter Internet Addresses, a mask must be created to look at the Source or Destination address field within the IP
header.
As an example, assume a station’s Internet address is equal to 128.001.002.003, and a restriction is desired to prevent
any other station from across the link on the opposite LAN from gaining access to it. In this case, the mask must
filter any IP packet that is destined for this Internet address. The Destination address field within the IP header is at
an offset of 30 octets into the Ethernet frame. This address is four octets long.
(Note: Although an Internet address is written in decimal notation, the address within the IP header is always in
hexadecimal.)
To accomplish this, the mask would look like this:
12-0800&30-80010203
This will filter IP packets that contain the Internet address of 128.001.002.003.
As another example, assume that this Internet address should also be filtered if it originates any data. In addition to
the mask above, an OR condition will have to be added to look at the IP source address. The new mask would be as
follows: 12-0800&(26-80010203|30-80010203)
This would filter any frame that is both an IP packet destined for or originating from Internet address
128.001.002.003. The parenthesis must be added around the Internet portion to ensure that the proper logical
ordering is retained.
Ethernet Station Addresses
Ethernet addresses are assigned to LAN users in blocks. These blocks are normally assigned to manufacturers of
Ethernet LAN hardware, and the blocks are sufficiently large to provide unique addresses for a given manufacturer
for many years.
Thus, a manufacturer will have a block of addresses, and filtering may be performed to prevent a particular
manufacturer’s LAN hardware from using the bridge facilities.
As an example, Xerox has a block of addresses that cover the range from 0000AA000000 to 0000AAFFFFFF. To
prevent this equipment from accessing facilities on another LAN segment, a generic filter may be created. A mask
that looked at the Source Ethernet address field would be required. The mask would be as follows: 6-0000AA
The remainder of the address is considered a “don’t care” condition. This mask results in the entire address block
from using the segment LAN facilities.
IOLINK-PRO & 520 Reference Manual — B.11
Programmable Filtering
Mask Combinations
Mask combinations may be required to ensure that a frame is sufficiently qualified before the decision to filter is
made. The qualification a frame must go through before a filter decision is made depends on the reason for the filter.
Nonetheless, a few examples below have been provided that should aid in the creation of a mask that may require
that extra little bit of qualification.
Example
To prevent a specific Ethernet station from accessing any TCP/IP host on the other segment. Assume the Ethernet
address is 01-02-03-04-05-06.
The mask would be:
Example
6-010203040506&12-0800&23-06
To prevent a specific protocol type from accessing a specific Ethernet Address. Assume the Ethernet address is 0102-03-04-05-06, and the protocol type is Appletalk®. The filter mask would be: 0-010203040506&12-809B
Example
To prevent any Ethernet address with the 10th bit set to a 0 from accessing a LAT host or an IP host with an
Internet address of 128.001.001.128.
This particular mask, although not particularly useful, might be best served by creating two masks instead of one long
mask. The decision is up to the Bridge Manager, but a longer mask is always more difficult to understand later. Both
methods are presented below:
Combined Filters
Separate Filters
4-X’XX0X’&(12-6004|(12-0800&30-80010180))
4-X’XX0X’&12-6004
4-X’XX0X’&12-0800&30-80010180
B.12 — IOLINK-PRO & 520 Reference Manual
Programmable Filtering
IP Router Pattern Filtering
Pattern filtering may be used on any portion of the IP frame. IP pattern filtering behaves the same as bridge pattern filtering,
except the start of the IP frame is offset 0, because the IP router function of the bridge/router handles only the IP frame
itself.
IP pattern filtering may use any combination of filtering operators as described in the bridge pattern filters.
Protocol Discrimination
Protocol discrimination may be required to prevent or limit the protocols within an IP frame that may traverse a routed Local
Area Network.
In Local Area Networks, there may be many different Transport layer protocols that coexist within the IP Network layer.
TCP, UDP, and ICMP are just a few of the common protocols in use today. Each of these protocols is encapsulated within
an IP frame, and therefore is subject to the IP routing function. If you would like to discriminate against a particular protocol
to prevent its usage of the routed LAN facilities the IOLINK-PRO & 520 Router provides programmable filter masks that
may be defined to act on any part of the IP frame.
The IP Router Filter Patterns menu is located under the Filter Set-Up Menu. Within the IP Router Filter Patterns Menu there
exists a Help function that can be used as a reference during IP Router Filter Pattern creation. This Help function includes all
of the logical operators that may be applied to the mask expression.
IPX Router Pattern Filtering
Pattern filtering may be used on any portion of the IPX frame. IPX pattern filtering behaves the same as bridge pattern
filtering, except the start of the IPX frame is offset 0, because the IPX router function of the bridge/router handles only the
IPX frame itself.
IPX pattern filtering may use any combination of filtering operators as described in the bridge pattern filters.
The IPX Router Filter Patterns menu is located under the Filter Set-Up Menu. Within the IPX Router Filter Patterns Menu,
there exists a Help function that can be used as a reference during IPX Router Filter Pattern creation. This Help function
includes all of the logical operators that may be applied to the mask expression.
IOLINK-PRO & 520 Reference Manual — B.13
Appendix C - Frame Formats
This appendix provides octet locations for the various portions of three of the common Ethernet frames. When creating
pattern filters these diagrams will assist in the correct definition of the patterns. The offset numbers are indicated by the
numbers above the frame representations.
Note the differences in the TCP/IP and Novell frames when bridging and when routing. When routing, the TCP/IP and
Novell frames are examined after the Level 2 Ethernet portion of the frame has been stripped from the whole data frame.
This means that the offset numbers now start from 0 at the beginning of the routed frame and not the bridged frame.
Some of the common Ethernet type codes are also shown here. The Ethernet type codes are located at offset 12 of the
bridged Ethernet frame.
Octet Locations on a Bridged TCP/IP Frame
Octet Locations on a Bridged Novell Netware Frame
IOLINK-PRO & 520 Reference Manual — C.1
Frame Formats
ETHERNET TYPE CODES
Type Code
Description
0800
DOD IP
0801
X.75 Internet
0804
Chaosnet
0805
X.25 Level 3
0806
ARP
0807
XNS Compatibility
6001
DEC MOP Dump/Load
6002
DEC MOP Remote Console
6003
DEC DECNET Phase IV Route
6004
DEC LAT
6005
DEC Diagnostic Protocol
6006
DEC Customer Protocol
6007
DEC LAVC, SCA
8035
Reverse ARP
803D
DEC Ethernet Encryption
803F
DEC LAN Traffic Monitor
809B
Appletalk
80D5
IBM SNA Service on Ether
80F3
AppleTalk AARP (Kinetics)
8137-8138
Novell, Inc.
814C
SNMP
Octet Locations on an IP Routed TCP/IP Frame
C.2 — IOLINK-PRO & 520 Reference Manual
Frame Formats
Octet Locations on an IPX Routed Novell Netware Frame
Octet Locations on a Bridged XNS Frame
IOLINK-PRO & 520 Reference Manual — C.3