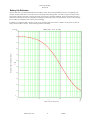
1
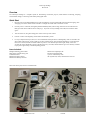
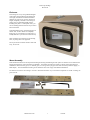
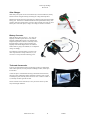
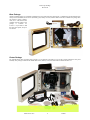
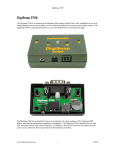
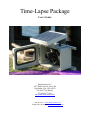
Time-Lapse Package
User’s Guide
Zoom in for details…
Harbortronics LLC
3417 Harborview Dr, Suite 300
Gig Harbor, WA. USA 98332
253-858-7769 (Phone)
253-858-9517 (Fax)
http://www.harbortronics.com/
Sales & Service: [email protected]
Technical & Customizing: [email protected]
Time-Lapse Package
Revision D
Overview ................................................................................................................................................................................................. 3
Quick Start ............................................................................................................................................................................................. 3
Items included: .................................................................................................................................................................................. 3
Configuring the DigiSnap...................................................................................................................................................................... 4
Connecting to a terminal .................................................................................................................................................................. 4
Configuring for Advanced Time-Lapse .......................................................................................................................................... 4
System Components ............................................................................................................................................................................... 5
Digital Camera .................................................................................................................................................................................. 5
Enclosure ........................................................................................................................................................................................... 7
Mount Assembly................................................................................................................................................................................ 7
Mechanical Package.......................................................................................................................................................................... 8
Battery pack ...................................................................................................................................................................................... 8
Camera Mount .................................................................................................................................................................................. 9
Time-Lapse Controller ..................................................................................................................................................................... 9
Solar Panel......................................................................................................................................................................................... 9
Solar Charger.................................................................................................................................................................................. 10
Battery Converter ........................................................................................................................................................................... 10
Tools and Accessories ..................................................................................................................................................................... 10
Base Package ................................................................................................................................................................................... 11
Pentax Package................................................................................................................................................................................ 11
Standard Package ........................................................................................................................................................................... 12
Battery Life Estimates......................................................................................................................................................................... 12
Battery Life Estimates.......................................................................................................................................................................... 13
Specifications ....................................................................................................................................................................................... 14
Service / Warranty................................................................................................................................................................................ 14
Harbortronics LLC
2
1/5/2007
Time-Lapse Package
Revision D
Overview
The Time-Lapse Package is a complete system for documenting construction projects, animal behavior monitoring, analyzing
environmental changes, or other long-term outdoor photographic tasks.
Quick Start
1.
Reconnect the two-pin Red and Black power cable to the Battery converter (intentionally disconnected for shipping). This
will apply power to the camera and the controller. You might check other cable connections as well!
2.
Once the power is connected, the DigiSnap should immediately blink yellow/orange, and then a few seconds later will
blink green four times to indicate that it’s ready to go. If you don’t see any blinking on the LED, then check the cables
again…
3.
Turn the camera on, using the rotating power switch on the top of the camera.
4.
Press the * button on the DigiSnap, and the camera should take a picture!
5.
Let’s try a Simple Time-Lapse (STL) test. Press and hold the time-lapse button on the DigiSnap. After two seconds it will
start to blink yellow/orange. Count 5 blinks (5 seconds), and then release. This has told the DigiSnap to set the time-lapse
interval to 5 seconds, and take an infinite number of pictures. Press the time-lapse button again, briefly. After a few
seconds, the camera should take a picture, and then again every 5 seconds, until the batteries give out or memory card fills.
If you press it again briefly, it should stop taking pictures.
Items included:
Fiberglass Housing, glass window.
High capacity internal battery pack.
5 Watt Solar Panel.
Harbortronics Solar Charger.
Harbortronics Battery Converter.
Harbortronics DigiSnap 2100.
Pentax K110D Digital SLR.
A pair of 2 GB memory cards.
All required tools, cables, manuals and accessories.
Here are all of the parts, before we assemble them!
Harbortronics LLC
3
1/5/2007
Time-Lapse Package
Revision D
Configuring the DigiSnap
Now that you’ve verified that things are working, you may want to configure the DigiSnap for your particular application. The first
time you do this can be trying, but once you’ve gone through the process once, it’ll be easy the next time. If you get stuck, give us a
call!
If we shipped the housing with a camera installed, or if you told us the camera you are planning to use, the DigiSnap should already
be configured properly for that camera model. All you should need to configure are the time-lapse settings.
Take a look at the DigiSnap 2000 manual, which is on the CD Rom supplied with the equipment. This should help you to understand
how the DigiSnap works with a terminal window, and what sort of operations the DigiSnap can perform.
Connecting to a terminal
If you have a desktop PC, you probably have a serial port on the back of your computer. This is most likely COM1, which is ideal.
Use the supplied beige cable (labeled Null-Modem), to connect the DigiSnap to your serial port.
If you have a newer laptop or a Mac, you may need to buy a USB to Serial converter, and get it working first. These are available at
any computer store from $15 and up. When you connect it, and install any required drivers, your computer will assign some number
COM port. Most of the time, it will use some higher number, like COM5. This can be frustrating, as your computer may not even tell
you which port it’s using. It’s really nice to switch this to COM1, using your computer’s operating system, but not essential.
You now need to run a program to open up a terminal window. If you are running Linux, you already know how to do this! If you
have a windows PC and are using COM1, you can use the DigiSnap_Terminal.exe program supplied on the CD Rom.
If you are using a windows PC and something other than COM1, you can use HyperTerminal that is supplied with windows. Double
click the DigiSnap.ht file on the CD Rom, and it will set up the HyperTerminal program for you… you may have to select the correct
COM port however. If you don’t know which COM port your computer is using, you may have to ‘disconnect’, select a different port
number, ‘reconnect’, and then cycle the DigiSnap power each time.
If you are using a Mac, you can use a program called ZTerm, or you may already have a terminal program installed with your
particular OS. The particular COM settings needed are listed in the DigiSnap 2000 manual.
Once you have your terminal program running, and ‘connected’, cycle the power on the DigiSnap, and you should see it present a
menu on the screen. You can select the different menus or particular commands. Once you have configured the DigiSnap via a
terminal, the settings are saved forever, or until the next time you change them using this same procedure.
Configuring for Advanced Time-Lapse
The majority of outdoor monitoring applications will use the Advanced Time-Lapse (ATL) feature of the DigiSnap controller. With
ATL, the camera can be made to take pictures only during daylight hours, or take pictures only at specific times of the day.
Please note that the DigiSnap controller does not have an internal clock. When used with a Nikon Coolpix camera, it can get the time
of day directly from the camera, but when used with an SLR camera, such as the Pentax K110D which is standard with the TimeLapse Package, the DigiSnap does not know what time it is; when you power it up, it will presume that it’s midnight. This doesn’t
mean you can’t use ATL, it just means you have to be a bit more clever. You can set up the ATL start times with an offset,
anticipating what time of day you are going to start the system, or you can simply have configure the DigiSnap to start taking pictures
at 00:01 (1 minute after midnight), and power up the system when you want it to start taking pictures. The DigiSnap will then start
keeping time, and taking pictures on a daily schedule.
We would be happy to pre-configure the DigiSnap for your particular application, to ease your project by one more step.
Harbortronics LLC
4
1/5/2007
Time-Lapse Package
Revision D
Zoom in for details…
System Components
Digital Camera
The Time-Lapse Package can be used with a wide range of cameras, from point & shoot, to SLR’s. Most customers prefer that we
supply the camera, and this is our preference as well, but we can also provide the system without a camera, if you already have a
camera that you’d like to use.
There are a host of considerations to evaluate when choosing a camera model for time-lapse photography, particularly in the field.
The ultimate goal of your project is to collect a series of images over a long period of time, regardless of the environmental
conditions. Shutter life, image quality, power consumption, and of course reliability are major concerns. We have done this research
for you, and believe we have a good recommendation.
As in many endeavors, “details count!”. For instance: some customers have asked to use their own Nikon SLR camera. While the
cameras would certainly be perfectly suited to capturing images, there are some difficulties accommodating most Nikon SLR’s in
time-lapse. Most Nikon SLR cameras have an external power connector… they are proprietary to Nikon, so we would have to buy
their expensive AC adapter, simply to cut off the connector. When powered externally, we have found that Nikon SLR’s never shut
off the metering… the camera continues to draw some power all the time, which is a battery killer! If powered via the battery
compartment, this isn’t an issue. However, getting power to the battery terminals is not easy either, and Nikon now has a proprietary
battery sensor, to ensure that only their batteries are used. Shutter release is another issue. The latest small Nikon SLR’s are sized
perfectly for the housing, but they do not have a shutter release connection. While we can modify a camera to add such a connector,
it’s not cost effective in most cases. Those SLR’s that do have a shutter release jack use proprietary connectors… again, making the
system more expensive. Nikon makes fine cameras, but they make it very difficult to use their cameras in this application!
We have less experience with Canon SLR’s. The Digital Rebel series use an industry standard connector for the shutter release, but
their ‘professional’ SLR cameras use a proprietary connector. Many Canon SLR’s do not have an external jack for power, but most
have some dummy battery pack accessory with an AC adapter. If you have a camera you would like to use, we may need to borrow
your camera for a day, to see if we can come up with the proper connections.
Harbortronics LLC
5
1/5/2007
Time-Lapse Package
Revision D
Again, given some extra effort and cost, we may be able to use your current camera, but we’d like to suggest using a Pentax SLR.
These cameras use industry standard connectors, draw negligible power between pictures, and yield equivalent image quality to
Nikon and Canon cameras.
Pentax K100D/K110D
The standard package will include the latest generation Pentax Digital SLR camera. Currently we install a K110D (6 MPixels, APS
sized sensor), with the standard ‘kit’ lens from Pentax, providing a good range of usable zoom. We have word from Pentax that the
K110D is going to be eliminated in favor of the K100D. This is the same camera, with the addition of image stabilization. We will
supply the K110D as long as they are available, as they cost slightly less.
We install a 2 GB memory card in the camera, as well as a set of AA Alkaline batteries. These are not the best batteries to power the
camera under normal conditions, but will work nicely here. The external battery pack will power the camera, so the internal batteries
are only needed to maintain the camera settings and clock when the external power is disconnected, such as in shipping, or storage.
A second 2 GB memory card is also included, to allow ‘hot swapping’ of cards during long-term applications. The card access door
on the camera must be closed to operate, and the space is limited in the housing, so the camera must be removed to swap cards.
Given the quick release head, this is a very easy operation, and the camera will be re-installed with essentially an identical orientation
each time. If you desire, you can attach the supplied USB cable, and leave it attached in the housing. This would allow you to
download the images directly to a laptop computer, in the field, without touching the camera.
Note that the operating temperature of the K110D/K100D is specified for 0C – 40C. This is the same range as most other digital
SLR cameras. While there is no guarantee of operation beyond this range, you may well find that it works fine! We have anecdotal
word from a customer testing the Time-Lapse Package in a chamber, that they have not had any problems, operating to as low as
minus 60C.
For the lowest power consumption, please configure the following camera settings. Refer to the camera manual for more details on
these settings. Instant Review : Off Auto power off : 1 minute Manual focus
As far as photographic settings are concerned, we only have basic suggestions. For most applications you may find that using the
Program mode (P) is perfectly adequate. The camera will adapt the aperture and shutter speed to suit the lighting conditions. This
does mean that there may be visible variations in the exposure from frame to frame. If your project requires consistent exposures
from frame to frame, accurately reflecting the changing light conditions, then you may need to set the camera up for manual
exposures. This could take a few days of experimenting to determine the proper settings however! There may be some advantage to
setting the camera for a fixed white balance, rather than using the camera’s auto white balance. We also suggest setting the ISO to
the lowest setting (200), for the minimum noise.
Our standing recommendation is to take pictures at high resolution, and take several times as many pictures as you think you will
need. It’s very easy to downsize or discard images, but you can’t get more of them after the fact.
Ideally, you would set up the system a week or two ahead of time, collect lots of test images, and adjust the exposure before the
‘event’ you are monitoring actually occurs. If you have this luxury, congratulate yourself for thinking ahead… you are in a minority!
Harbortronics LLC
6
1/5/2007
Time-Lapse Package
Revision D
Enclosure
The housing uses a very strong molded fiberglass
construction. Gaskets make the unit airtight and
water tight, and stainless steel hardware further
eliminate any concern for corrosion. The door is
hinged, and quickly removable. The housing is a
perfect size to accommodate digital cameras,
including many SLR’s. Unlike plastic units, you
can successfully paint this enclosure if you want to
hide it in the field.
Triangular headed screws, and a matching key are
used to ‘lock’ the door. While not completely
theft-proof, we’ve found that even with tools, it’s
awfully difficult to open the door without the key!
Some customers have wanted to buy the housing
alone, to package their own equipment.
We can provide the enclosure with door locks and
a key, for $191.88.
Mount Assembly
Thick aluminum brackets were developed for mounting the housing and attaching the solar panel. The brackets can be attached to the
housing in horizontal or vertical orientation for flexibility. The brackets be used with ‘U-Bolts’ to directly attach the housing to a
standard size chain link fence pipe (1.67” diameter pipe). You can get fence post pipe and U-bolts at most any hardware supply (i.e.
Home Depot). You will find that the housing can be attached to other sizes of pipe with minimal modification.
The mounts can attach to the housing in vertical or horizontal orientation. If you need these components to retrofit a housing, the
price is $83.65.
Harbortronics LLC
7
1/5/2007
Time-Lapse Package
Revision D
Mechanical Package
We can also provide the enclosure with mounting hardware. This package includes the external mounting bars as well as an internal
stainless steel mounting plate with right angle bracket, desiccant pack, felt and tools, for $422.63.
The internal stainless
steel panel provides
a solid base to mount
the camera and all
other components.
The panel can be
easily removed for
service, and then just
dropped back in
place. The panel
doesn’t need to be
removed for typical
use.
Battery Pack Assembly
We can supply a high capacity Lithium-Ion Polymer (LiPoly) rechargeable battery pack, having a nominal voltage of 11.1V, and
12.3AH capacity. A ‘universal AC’ battery charger is included. The battery pack assembly is priced at $375.86.
The most common battery chemistry for long term, remote applications is lead-acid. Unfortunately, lead-acid batteries have a number
of drawbacks. An equivalent capacity lead acid battery would add about 8 pounds to the system, and would be almost as large as the
housing itself. ALL Lead acid batteries (even the sealed ones) can vent gasses during charge and discharge, making them inadvisable
to install within a sealed housing. Most other secondary (rechargeable) battery chemistries have high self-discharge, meaning that
they won’t work well in a long term application. LiPoly batteries however, have low self-discharge, are very light-weight, and quite
compact. Good stuff, but not cheap!
The advantages of the LiPoly
battery pack for this application
outweigh the significantly
higher price, and allow the high
capacity battery to reside inside
the housing, making the entire
unit quite portable.
In order to save some money,
one customer ordered the
housing without the internal
battery, for connection to a
large, less expensive battery
outside the housing (i.e.
motorcycle battery). We have a
report that this worked well, up
until the time that arctic foxes
chewed through the cable!
Actually we’ve heard from a number of researchers over the years that electrical cables are a big attraction to a variety of wild
animals. If you really want to hike in a big heavy lead-acid battery, that’s fine, but you way want to also bring some armoring for the
cable!
Harbortronics LLC
8
1/5/2007
Time-Lapse Package
Revision D
Camera Mount
The camera is mounted on a high quality tilting head, with a quick release plate. You can easily remove and re-install the camera,
without having to re-align it! Of course a quick release head may not give you perfect pixel alignment, but for most applications it
should work quite well.
The camera head is attached via a bracket to the mounting plate. The head can be adjusted front and back on the bracket, as well as
rotated on the bracket. We suggest you locate the lens near the glass window, to minimize internal reflections.
The head can be tilted and rotated to orient the camera independently of the housing.
Time-Lapse Controller
The’ brains’ of the time-lapse system is the DigiSnap 2100. This device, designed
and produced at Harbortronics, is a digital camera controller, developed to work
with a variety of digital camera models. The DigiSnap can be configured to take
pictures at any interval desired, or to operate on a daily clock.
The DigiSnap series of controllers have been in continuous production since 1999,
and many thousands of units are in use around the world.
Solar Panel
The fully charged LiPoly battery pack has enough capacity for up to 3 months of operation between charges, depending on the details
of the application. Most photographers prefer to augment the battery with a solar panel, allowing for unlimited duration, and less
worry about the battery status.
A high quality 5 watt solar panel is a
standard feature with the Time-Lapse
Package. This is sufficient to keep the
battery charged in almost any situation.
We have a couple of suppliers for these
panels, so yours may not exactly match
the one in the pictures. If your installation
site does not get frequent full sun
exposure, or you have other power
concerns, please contact us. We can
supply long cables to re-locate the solar
panel, or work with you to develop other
options, such as external AC or DC
power.
Custom aluminum brackets are used to
mount the solar panel to the housing. The
brackets may be further formed by hand to
suit your particular needs. You may want to consider a couple of things when orienting the panel. If the panel is located over the
housing, it can serve as a shade to the housing, reducing the internal temperature when in the sun. The panel can also serve as a rain
shield to minimize drops on the front window of the housing.
A high quality ‘gland’ is used to pass the solar panel cable into the housing, maintaining the watertight integrity of the housing. The
price for the solar panel option (which includes the above, and the solar charger) is $267.25, installed.
Harbortronics LLC
9
1/5/2007
Time-Lapse Package
Revision D
Solar Charger
While many solar panels can be connected directly to Lead Acid batteries, LiPoly
batteries must be charged carefully, monitoring the voltage and temperature.
Harbortronics has developed a custom charger to adapt the solar panel to the LiPoly
battery pack. This device is installed between the solar panel and the battery, and
provides connections for the battery converter. Other external power sources can be
used in place of the solar panel, as long as the voltage is between 12 and 20V.
also
Battery Converter
While the battery pack provide 10 – 12.5 volts, the
DigiSnap controllers operate from 5 volts, and the
Pentax K110D/K100D requires 6.5V. Harbortronics
designed and produces a device to efficiently convert
the higher battery voltage to those required by the
DigiSnap 2100 and the digital camera. If a different
model camera is going to be installed, we can adjust the
voltage accordingly.
The cables that connect the battery converter to the
other components have unique connectors, so you
won’t have to worry about misconnecting power.
Tools and Accessories
Tools are provided with the Time-Lapse Package, to allow reconfiguration
of the camera position, the solar panel, the mounting brackets, and to open /
lock the door
A desiccant pack is included in the housing to minimize internal moisture,
which can cause condensation during temperature extremes. If the crystals
eventually turn pink, bake the pack in an oven at 150C / 350F for an hour or
so, until they turn blue again. Be careful!
We also include a sheet of black felt, in case you need to absorb ay other
stray internal light reflections.
Harbortronics LLC
10
1/5/2007
Time-Lapse Package
Revision D
Base Package
Another available package is a minimum configuration for long term time-lapse photography. In additional to the mechanical items
of the previous assemblies, all electronics (the battery pack, battery converter, and the camera controller) is added. This package does
not include a camera, memory
cards, nor a cable between the
controller and the camera. This
package is available for
$1169.31. If you’d like to add
the solar panel option, the price
is $1474.06.
Pentax Package
For applications that don’t need more than a month or so of operation in the field, we can provide a system without the solar panel
assembly. This package includes the K110D/K100D camera, memory cards, and cables and is available for $2011.19.
Harbortronics LLC
11
1/5/2007
Time-Lapse Package
Revision D
Standard Package
This is the normally recommended package, comprising everything required to perform unlimited duration time-lapse photography in
the field. All of the above subassemblies are included. The retail price for this package is US$2300. Each system is pre-configured
and tested. All you need do is connect one cable, and turn the camera on!
Harbortronics LLC
12
1/5/2007
Time-Lapse Package
Revision D
Battery Life Estimates
We have made some very detailed measurements of the battery current, when powering the Battery Converter, the DigiSnap 2100
controller, and the K110D camera. Given this current vs time profile when taking pictures, we are able to project how long a battery
pack will last, without a solar panel. Using the solar panel, the battery life is essentially unlimited. Please note that this projection is
based on the measurements of one set of equipment, presuming a perfect battery pack, at room temperature. There are a host of things
that can reduce the actual battery life, so please plan accordingly!
In summary, if configured to take 15 pictures or less per day, the battery may last as much as 3 months. At 100 pictures per day, the
battery can last as much as 50 days. See the following chart for more details.
Battery Life - 11.1V, 12.3AH
101.299195
110
100
90
Number of days battery will last
80
70
60
days
p
50
40
30
20
10
0
0
1
1
10
p
100
Number of pictures taken per day
Harbortronics LLC
13
1/5/2007
3
1 10
3
.
110
Time-Lapse Package
Revision D
Specifications
Standard Package
Weight
Housing Dimensions
Overall Dimensions
Shipping Dimensions
Price as shown
[Includes all items described above]
16 lbs
12” wide, 8” tall, 7” Deep
16” wide, 13” tall, 11” Deep
18” x 15” x 13”, 21 lbs
US $2300
Approximate Shipping Costs (not including customs fees where applicable)
Continental US
USPS Priority (2-3 Days)
US $84
USPS Express (1-2 days)
US $100
Fed-Ex Standard Overnight US $144
Canada
Postal Service
Fed-Ex
US $90
US $225
Europe
Postal Service
Fed-Ex
US $130
US $225
Japan
Postal Service
Fed-Ex
US $130
US $225
Australia/ NZ
Postal Service
Fed-Ex
US $150
US $285
Service / Warranty
All Harbortronics products are warranted against any manufacturing defects for a period of one (1) year from the date of purchase.
Defective products should be returned prepaid to Harbortronics. Harbortronics will at its discretion, repair or replace such products
without
as mentioned
charge, above,
and willnoreturn
other to
warranty
the customer
expressed
prepaid.
or implied,
Except applies
aims, of any nature, including but not limited to camera damage are not covered. This
misuse, accident, or abuse. This warranty does not cover consequential damages or other
low the exclusion or limitation of incidental or consequential damages, so the above
Harbortronics at www.Harbortronics.com for service instructions. Please note that used
.
Harbortronics LLC
14
1/5/2007