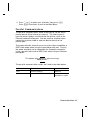
1
Monarch
917 Keypad
TC0917OI Rev. AA 1/01 ©1997 Monarch Marking Systems, Inc. All rights reserved.
Each product and program carries a respective written warranty, the only
warranty on which the customer can rely. Monarch reserves the right to make
changes in the product, the programs, and their availability at any time and
without notice. Although Monarch has made every effort to provide complete
and accurate information in this manual, Monarch shall not be liable for any
omissions or inaccuracies. Any update will be incorporated in a later edition of
this manual.
©1997 Monarch Marking Systems, Inc. All rights reserved. No part of this
publication may be reproduced, transmitted, stored in a retrieval system, or
translated into any language in any form by any means, without the prior
written permission of Monarch Marking Systems, Inc.
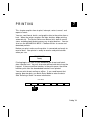
WARNING
This equipment has been tested and found to comply with the limits for a Class A digital
device, pursuant to Part 15 of the FCC Rules. These limits are designed to provide
reasonable protection against harmful interference when the equipment is operated in a
commercial environment. This equipment generates, uses, and can radiate radio frequency
energy and, if not installed and used in accordance with the instruction manual, may cause
harmful interference to radio communications. Operation of this equipment in a residential
area is likely to cause harmful interference in which case the user will be required to correct
the interference at his own expense.
CANADIAN D.O.C. WARNING
This digital apparatus does not exceed the Class A limits for radio noise emissions from
digital apparatus set out in the Radio Interference Regulations of the Canadian Department
of Communications.
Le présent appareil numérique n’émet pas de bruits radioélectriques dépassant les limites
applicables aux appareils numériques de la classe A prescrites dans le Réglement sur le
brouillage radioélectrique édicte par le ministère des Communications du Canada.
Trademarks
MONARCH, 917, 9403, 9446, 9835, 9840, and 9850 are trademarks of Monarch Marking Systems, Inc.
Paxar is a trademark of Paxar Corporation.
Monarch Marking Systems
P.O. Box 608
Dayton, Ohio 45401
Ta b l e o f C o n t e n t s
GETTING STARTED . . . . . . . . . . . . . . . . . . . . . . . . . . . . . . . . . . . . . . . . . . . . . . . . . . . . 1-1
Connecting the Cable . . . . . . . . . . . . . . . . . . . . . . . . . . . . . . . . . . . . . . . . . . . . .
Using the Keypad . . . . . . . . . . . . . . . . . . . . . . . . . . . . . . . . . . . . . . . . . . . . . . . .
Control Keys. . . . . . . . . . . . . . . . . . . . . . . . . . . . . . . . . . . . . . . . . . . . .
Selecting a Function . . . . . . . . . . . . . . . . . . . . . . . . . . . . . . . . . . . . . . . . . . . . . .
Exiting an Option . . . . . . . . . . . . . . . . . . . . . . . . . . . . . . . . . . . . . . . . . . . . . . . .
1-2
1-3
1-3
1-4
1-5
SETTING SUPPLY OPTIONS . . . . . . . . . . . . . . . . . . . . . . . . . . . . . . . . . . . . . . . . . . . . . 2-1
Ribbon . . . . . . . . . . . . . . . . . . . . . . . . . . . . . . . . . . . . . . . . . . . . . . . . . . . . . . . . 2-2
Batch Separators . . . . . . . . . . . . . . . . . . . . . . . . . . . . . . . . . . . . . . . . . . . . . . . . 2-2
Feed Mode . . . . . . . . . . . . . . . . . . . . . . . . . . . . . . . . . . . . . . . . . . . . . . . . . . . . . 2-4
Print Position. . . . . . . . . . . . . . . . . . . . . . . . . . . . . . . . . . . . . . . . . . . . . . . . . . . . 2-4
Supply Position . . . . . . . . . . . . . . . . . . . . . . . . . . . . . . . . . . . . . . . . . . . . . . . . . . 2-5
Margin Position . . . . . . . . . . . . . . . . . . . . . . . . . . . . . . . . . . . . . . . . . . . . . . . . . . 2-6
Cut Position . . . . . . . . . . . . . . . . . . . . . . . . . . . . . . . . . . . . . . . . . . . . . . . . . . . . 2-8
Supply Type . . . . . . . . . . . . . . . . . . . . . . . . . . . . . . . . . . . . . . . . . . . . . . . . . . . . 2-9
Speed . . . . . . . . . . . . . . . . . . . . . . . . . . . . . . . . . . . . . . . . . . . . . . . . . . . . . . . . 2-10
Backfeed. . . . . . . . . . . . . . . . . . . . . . . . . . . . . . . . . . . . . . . . . . . . . . . . . . . . . . 2-11
Verifier. . . . . . . . . . . . . . . . . . . . . . . . . . . . . . . . . . . . . . . . . . . . . . . . . . . . . . . . 2-12
COMMUNICATION VALUES . . . . . . . . . . . . . . . . . . . . . . . . . . . . . . . . . . . . . . . . . . . . . . 3-1
Baud Rate. . . . . . . . . . . . . . . . . . . . . . . . . . . . . . . . . . . . . . . . . . . . . . . . . . . . . .
Word Length . . . . . . . . . . . . . . . . . . . . . . . . . . . . . . . . . . . . . . . . . . . . . . . . . . . .
Stop Bits . . . . . . . . . . . . . . . . . . . . . . . . . . . . . . . . . . . . . . . . . . . . . . . . . . . . . . .
Parity. . . . . . . . . . . . . . . . . . . . . . . . . . . . . . . . . . . . . . . . . . . . . . . . . . . . . . . . . .
Flow Control . . . . . . . . . . . . . . . . . . . . . . . . . . . . . . . . . . . . . . . . . . . . . . . . . . . .
Reset to Default Values . . . . . . . . . . . . . . . . . . . . . . . . . . . . . . . . . . . . . . . . . . .
Parallel Communications . . . . . . . . . . . . . . . . . . . . . . . . . . . . . . . . . . . . . . . . . .
3-2
3-2
3-3
3-3
3-4
3-4
3-5
Table of Contents i
SETTING CONTRAST . . . . . . . . . . . . . . . . . . . . . . . . . . . . . . . . . . . . . . . . . . . . . . . . . . . 4-1
SETTING DEFAULTS . . . . . . . . . . . . . . . . . . . . . . . . . . . . . . . . . . . . . . . . . . . . . . . . . . . 5-1
Monetary Sign . . . . . . . . . . . . . . . . . . . . . . . . . . . . . . . . . . . . . . . . . . . . . . . . . .
Secondary Sign . . . . . . . . . . . . . . . . . . . . . . . . . . . . . . . . . . . . . . . . . . . . . . . . .
Decimal Places . . . . . . . . . . . . . . . . . . . . . . . . . . . . . . . . . . . . . . . . . . . . . . . . .
Slashed Zero . . . . . . . . . . . . . . . . . . . . . . . . . . . . . . . . . . . . . . . . . . . . . . . . . . .
Power-Up Mode . . . . . . . . . . . . . . . . . . . . . . . . . . . . . . . . . . . . . . . . . . . . . . . . .
Prompt Set . . . . . . . . . . . . . . . . . . . . . . . . . . . . . . . . . . . . . . . . . . . . . . . . . . . . .
5-2
5-3
5-4
5-4
5-5
5-6
SETTING FORMAT OPTIONS . . . . . . . . . . . . . . . . . . . . . . . . . . . . . . . . . . . . . . . . . . . . 6-1
PRINTING. . . . . . . . . . . . . . . . . . . . . . . . . . . . . . . . . . . . . . . . . . . . . . . . . . . . . . . . . . . . . 7-1
Pausing a Batch . . . . . . . . . . . . . . . . . . . . . . . . . . . . . . . . . . . . . . . . . . . . . . . . . 7-2
Restarting a Batch . . . . . . . . . . . . . . . . . . . . . . . . . . . . . . . . . . . . . . . . . . . . . . . 7-2
Canceling a Paused Batch. . . . . . . . . . . . . . . . . . . . . . . . . . . . . . . . . . . . . . . . . 7-3
Repeating a Batch . . . . . . . . . . . . . . . . . . . . . . . . . . . . . . . . . . . . . . . . . . . . . . . 7-5
Offline Printing . . . . . . . . . . . . . . . . . . . . . . . . . . . . . . . . . . . . . . . . . . . . . . . . . 7-6
Entering Numbers . . . . . . . . . . . . . . . . . . . . . . . . . . . . . . . . . . . . . . . . 7-6
Entering Letters . . . . . . . . . . . . . . . . . . . . . . . . . . . . . . . . . . . . . . . . . . 7-7
Entering Symbols . . . . . . . . . . . . . . . . . . . . . . . . . . . . . . . . . . . . . . . . 7-8
Using Bar Code 128 . . . . . . . . . . . . . . . . . . . . . . . . . . . . . . . . . . . . . . 7-9
Entering and Changing Data. . . . . . . . . . . . . . . . . . . . . . . . . . . . . . . . 7-9
Types of Data Entry . . . . . . . . . . . . . . . . . . . . . . . . . . . . . . . . . . . . . . 7-10
Entering a Batch . . . . . . . . . . . . . . . . . . . . . . . . . . . . . . . . . . . . . . . . 7-12
Printing Tags Without Cutting . . . . . . . . . . . . . . . . . . . . . . . . . . . . . . 7-16
Using Print Multiple with Inc/Dec Fields . . . . . . . . . . . . . . . . . . . . . . 7-18
Examples. . . . . . . . . . . . . . . . . . . . . . . . . . . . . . . . . . . . . . . . . . . . . . 7-19
DIAGNOSTICS. . . . . . . . . . . . . . . . . . . . . . . . . . . . . . . . . . . . . . . . . . . . . . . . . . . . . . . . . 8-1
Factory Set Password . . . . . . . . . . . . . . . . . . . . . . . . . . . . . . . . . . . . . . . . . . . .
Checking the Software Version . . . . . . . . . . . . . . . . . . . . . . . . . . . . . . . . . . . . .
Printing a Test Label. . . . . . . . . . . . . . . . . . . . . . . . . . . . . . . . . . . . . . . . . . . . . .
Checking Supply Quality . . . . . . . . . . . . . . . . . . . . . . . . . . . . . . . . . . . . . . . . . .
ii Table of Contents
8-1
8-1
8-2
8-3
Using Password Protection . . . . . . . . . . . . . . . . . . . . . . . . . . . . . . . . . . . . . . . .
Enabling the Password (System Administrators only). . . . . . . . . . . . .
Deleting Formats, Graphics or Fonts. . . . . . . . . . . . . . . . . . . . . . . . . .
Deleting Formats If Password Protection Is Disabled . . . . . . . . . . . . .
Service Diagnostics . . . . . . . . . . . . . . . . . . . . . . . . . . . . . . . . . . . . . . . . . . . . . .
8-4
8-4
8-5
8-7
8-8
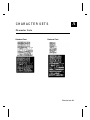
CHARACTER SETS . . . . . . . . . . . . . . . . . . . . . . . . . . . . . . . . . . . . . . . . . . . . . . . . . . . . . A-1
Character Sets . . . . . . . . . . . . . . . . . . . . . . . . . . . . . . . . . . . . . . . . . . . . . . . . . .
Uppercase Letters . . . . . . . . . . . . . . . . . . . . . . . . . . . . . . . . . . . . . . . . . . . . . . .
Lowercase Letters . . . . . . . . . . . . . . . . . . . . . . . . . . . . . . . . . . . . . . . . . . . . . . .
Currency Symbols . . . . . . . . . . . . . . . . . . . . . . . . . . . . . . . . . . . . . . . . . . . . . . .
Punctuation and Symbols. . . . . . . . . . . . . . . . . . . . . . . . . . . . . . . . . . . . . . . . . .
International Characters . . . . . . . . . . . . . . . . . . . . . . . . . . . . . . . . . . . . . . . . . . .
Code 128 Function Codes . . . . . . . . . . . . . . . . . . . . . . . . . . . . . . . . . . . . . . . . .
A-1
A-3
A-3
A-4
A-4
A-5
A-6
Table of Contents iii
iv Table of Contents
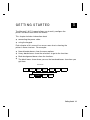
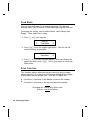
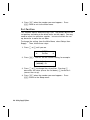
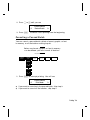
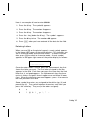
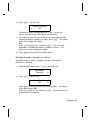
1
GETTING STARTED
The Monarch 917 keypad allows you to easily configure the
printer and enter data offline for formats.
This chapter includes information about
u
connecting the power cable.
u
using the keypad.
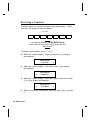
Each chapter of this manual has one or more charts showing the
printer’s menu structure. For example:
u
Normal border boxes show the menu options.
u
Heavy border boxes show the selections to get to the functions.
u
Black background boxes show the functions.
u
The black boxes show where you are; the bordered boxes show how you
got there.
MAIN MENU
CANCEL
ALL
PRINT
MODE
SUPPLY
BATCH
ENTRY
CONTRAST
REPEAT
BATCH
DEFAULTS
FORMAT
OPTIONS
SETUP
DIAG.
PORT
SETTINGS
Getting Started 1-1
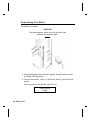
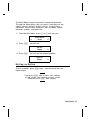
Connecting the Cable
To connect the cable:
CAUTION
The printer power switch must be off while you
connect the keypad cable.
1. Plug the keypad cable into the keypad. Plug the other end of
the cable into the printer.
2. Turn on the printer. Press (I) to turn on and (O) to turn off the
printer.
After you turn on the printer, you will see:
PRINT MODE
Ready
1-2 Getting Started
Using the Keypad
You can control printer operation and enter data offline using the
keypad.
The keypad has 24-keys allowing offline data entry. This keypad
includes 7 function keys, 10 numeric keys, and 5 symbol keys.
Control Keys
P
Interrupts printing.
Enters an international character for printing
when you enter P plus a three-digit code.
See Appendix A for more information.
e
Returns the display to the next higher menu,
when you press e once.
F
Feeds a blank label if there is no print job.
Prints a label in the on-demand mode.
c
Cuts the supply.
{
Clears an error.
R
Displays the next menu item.
L
Displays the previous menu item.
E
Selects the displayed menu item.
Use the alpha numeric keys to enter batch data. To switch
between characters and numbers, press |.
Getting Started 1-3
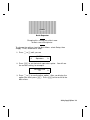
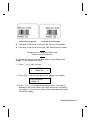
Selecting a Function
The Main menu has several functions (operating modes). These
functions are shown in the chart below.
MAIN MENU
CANCEL
ALL
PRINT
MODE
BATCH
ENTRY
REPEAT
BATCH
FORMAT
OPTIONS
SETUP
DIAG.
If the printer displays PRINT MODE Ready
when you turn it on, press e to display the
Main menu.
To display menu options, press L or R.
u
When the screen displays a right arrow, press R to display
more options.
MAIN MENU
Cancel All
u
When the screen displays a left arrow, press L to display
more options.
l
u
MAIN MENU
Diagnostics
When the screen displays a left and a right arrow, press either
L or R to display more options.
l
u
r
MAIN MENU
Print Mode
r
When you see the menu option you want, press E to select
it.
1-4 Getting Started
The Main Menu controls the printer’s setup and operation.
Through the Setup Menu, you can select a sub-menu for the
supply, contrast, default, or port settings. Each of those
sub-menus have several selections, such as ribbon, speed,
monetary symbols, and baud rate.
1. From the Main Menu, press L or R until you see
l
MAIN MENU
Setup
r
2. Press E. You will see
SETUP
Supply
r
3. Press E. You will see the following option:
SUPPLY
Ribbon
r
Exiting an Option
To exit an option, press e once. You will exit to the next
higher menu.
If you press e from a menu, your settings
are not saved. Your settings are only saved
when you press E from a menu.
Getting Started 1-5
1-6 Getting Started
2
SETTING SUPPLY OPTIONS
This chapter explains how to select a ribbon, separators, feed
mode, print position, supply position, margin position, cut position,
supply type, speed, backfeed, and verifier options.
MAIN MENU
CANCEL
ALL
PRINT
MODE
BATCH
ENTRY
SUPPLY
RIBBON
SEPARATORS
FEED
MODE
REPEAT
BATCH
CONTRAST
PRINT
POS
FORMAT
OPTIONS
DEFAULTS
SUPPLY
POS
SETUP
DIAG.
PORT
SETTINGS
MARGIN
POS
CUT
POSITION
SUPPLY
TYPE
SPEED
BACKFEED
VERIFIER
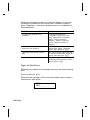
You may need to set supply options when you change supplies.
The options are listed in the table below.
Option
Choices
Default
Ribbon
Separators
Feed Mode
Print Position
Supply Position
Margin Position
Cut Position
Supply Type
No/Yes/High Energy
No/Yes/Long
Continuous/On-Demand
-99 to +99
-300 to +300
-99 to +99
-300 to +300
Aperture/Die Cut/Black
Mark/Continuous
2.5/4.0/6.0/8.0/10.0/Default
Off/On/Extended
Disabled/Enabled
Yes
No
Continuous
0
0
0
0
Die Cut
Speed
Backfeed
Verifier
Default
Off
Disabled
Setting Supply Options 2-1
To exit an option without changing the setting, press e.
Ribbon
You have to tell the printer if your supplies require a ribbon. To
change the setting, from the Main Menu, select Setup, then
Supply. Then, follow these steps.
1. Press L or R until you see
SUPPLY
Ribbon
r
2. Press E to set the ribbon option. You will see the current
setting, for example:
l
RIBBON
Yes
r
3. Press L or R to see the other options. After you display the
option you want, press E. Press e twice to exit to the
Main menu.
If you set the Ribbon option to Yes, install a
ribbon before printing.
Batch Separators
A batch separator is an extra tag with a pinstripe pattern. It is
printed between batches to make batches easier to find. If you
select "Long" for the separator, a double-length (two tags)
separator prints.
2-2 Setting Supply Options
Batch Separator
Changing this setting only affects new
formats sent to the printer.
To change the setting, from the Main Menu, select Setup, then
Supply. Then, follow these steps.
1. Press L or R until you see
l
SUPPLY
Separators
r
2. Press E to set the batch separators option. You will see
the current setting, for example:
SEPARATORS
Off
r
3. Press L or R to see the other option. After you display the
option you want, press E. Press e twice to exit to the
Main menu.
Setting Supply Options 2-3
Feed Mode
You can use continuous or on-demand printing. On-demand
printing allows you to remove a label before printing the next one.
To change the setting, from the Main Menu, select Setup, then
Supply. Then, follow these steps.
1. Press L or R until you see
l
SUPPLY
Feed Mode
r
2. Press E to set the supply type option. You will see the
current setting, for example:
SUPPLY TYPE
Continuous
r
3. Press L or R to see the other option. After you display the
option you want, press E. Press e twice to exit to the
Main menu.
Print Position
This function adjusts where data prints vertically on the supply.
Adjust the print if it is too close to the top or bottom of the supply,
or overtypes the pre-printed area. One dot is 0.0049 inch.
u
If the data is too close to the bottom, increase the number.
u
If the data is too close to the top, decrease the number.
Changing this setting only affects new
formats sent to the printer.
2-4 Setting Supply Options
To change the setting, from the Main Menu, select Setup, then
Supply. Then, follow these steps.
1. Press L or R until you see
l
SUPPLY
Print Pos
r
2. Press E. You will see the current setting, for example:
Enter print pos
[-99/99]: +0
3. Press L or R to change the print position. Pressing L
decreases the value (moves the image down); R increases it
(moves the image up).
4. Press E when the number you need appears. Press e
twice to exit to the Main menu.
Supply Position
This function adjusts how much supply feeds out of the exit chute.
You may need to adjust the supply in or out to allow
u
tags and labels to be removed.
u
die cut labels to be removed easily.
The adjustments are in dots (0.0049 inch).
Setting Supply Options 2-5
u
Increase the number to feed more supply out of the chute.
u
Decrease the number to feed less supply out of the chute.
This option takes effect on the next label or tag printed.
Changing supply position may also affect print position.
To change the setting, from the Main Menu, select Setup, then
Supply. Then, follow these steps.
1. Press L or R until you see
l
SUPPLY
Supply Pos
r
2. Press E. You will see the current setting, for example:
Enter supply pos
[-300/300]: +0
3. Press L or R to change the supply position. Pressing L
decreases the value (feeds less supply); R increases it
(feeds more supply).
4. Press E when the number you need appears. Press e
twice to exit to the Main menu.
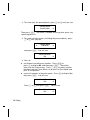
Margin Position
This function adjusts where the format prints horizontally on the
supply. The adjustments are in dots (0.0049 inch), which is the
smallest measurement the printer recognizes.
The width of the print area depends on your supply size.
Maximum width is four inches. When you move the image to the
right or left on the supply, avoid moving the image too close to
either edge, because it may not print.
2-6 Setting Supply Options
Print too far to the left.
Print too far to the right.
u
If the data is too close to the left side, increase the number.
u
If the data is too close to the right side, decrease the number.
Changing this setting only affects new
formats sent to the printer.
To change the setting, from the Main Menu, select Setup, then
Supply. Then, follow these steps.
1. Press L or R until you see
l
SUPPLY
Margin Pos
r
2. Press E. You will see the current setting, for example:
Enter margin pos
[-99/99]: +0
3. Press L or R to change the margin position. Pressing L
decreases the value (moves the image toward the left side of
the supply); R increases it (moves the image toward the right
side of the supply).
Setting Supply Options 2-7
4. Press E when the number you need appears. Press
e twice to exit to the Main menu.
Cut Position
This function adjusts where the tag is cut. The printer adjusts the
cut position according to the black marks on the supply. You may
need to adjust for aperature supplies. Increase to move the cut
up; decrease to move the cut down.
To change the setting, from the Main Menu, select Setup, then
Supply. Then, follow these steps.
1. Press L or R until you see
l
SUPPLY
Cut Pos
r
2. Press E. You will see the current setting, for example:
Enter knife adj
[-300/300]: +0
3. Press L or R to change the cut position. Pressing L
decreases the value (moves the cut down); R increases it
(moves the cut up).
4. Press E when the number you need appears. Press
e to exit to the Setup menu.
2-8 Setting Supply Options
S u p p l y Ty p e
You can print on aperture, black mark, die cut, or continuous
supplies. You have to tell the printer which supplies you are
using.
If you are using edge aperture supplies, use
the die cut setting. If you are using center
aperture supplies, use the aperture setting.
To change the setting, from the Main Menu, select Setup, then
Supply. Then, follow these steps.
1. Press L or R until you see
l
SUPPLY
Supply Type
r
2. Press E to set the supply type option. You will see the
current setting, for example:
l
SUPPLY TYPE
Black Mark
r
3. Press L or R to see the other options. After you display the
option you want, press E. Press e twice to exit to the
Main menu.
Setting Supply Options 2-9
Speed
You can change the print speed for bar codes or graphics. If you
select "default" for speed, formats with serial bar codes
automatically print at 2.5IPS. Other formats print at 6.0IPS.
Refer to the following table for maximum print speeds for your
printer.
Printer
Maximum Print Speed
9835
9840
9850
6.0 ips
8.0 ips
10.0 ips (thermal direct only)
NOTE: 203 dpi serial bar codes with narrow elements
3 dots (or greater) can be printed at 4.0 ips. For
additional high speed printing information, refer to your
9850 Operator’s Handbook.
To change the setting, from the Main Menu, select Setup, then
Supply. Then, follow these steps.
1. Press L or R until you see
l
SUPPLY
Speed
2. Press E to set the speed option. You will see the current
setting, for example:
SPEED
6.0 IPS
r
3. Press L or R to see the other options. After you display the
option you want, press E. Press e twice to exit to the
Main menu.
2-10 Setting Supply Options
Backfeed
Backfeed works by advancing each printed label to the desired
dispense position. Once that label is removed, the next label to
be printed is backed up underneath the printhead. In continuous
mode, only the last label in the batch is advanced to the dispense
position. Extended backfeed is available on 9835, 9840, or 9850
printers with a knife installed. Extended backfeed feeds a tag far
enough out to be cut and backfeeds the next tag to the printhead
line.
Extended backfeed eliminates printed tags being left between the
printhead and knife. Extended backfeed works with the selected
cut modes. Refer to the optional Packet Reference Manual to
learn how to define the Backfeed Control Packet. Extended
backfeed does not work with non-indexed (continuous)
supply/mode. Do not use backfeed (normal or extended) with
supplies less than 0.75 inches.
We recommend using 0.5-inch gap supplies in
peel mode when backfeed is disabled.
To change the setting, from the Main Menu, select Setup, then
Supply. Then, follow these steps.
1. Press L or R until you see
l
SUPPLY
Backfeed
r
2. Press E to set the backfeed option. You will see the
current setting, for example:
l
BACKFEED
On
r
Setting Supply Options 2-11
3. Press L or R to see the other options. After you display the
option you want, press E. Press e twice to exit to the
Main menu. You can only enable or disable
backfeed/extended backfeed. You cannot set the backfeed or
dispense position. Your System Administrator should refer to
the optional Packet Reference Manual to set the backeed or
dispense position.
Verifier
The verifier scans and checks the quality of bar codes as they are
printed. The optional verifier must be purchased separately.
This option only appears if you are using a
9850 printer.
To change the setting, from the Main Menu, select Setup, then
Supply. Then, follow these steps.
1. Press L or R until you see
l
SUPPLY
Verifier
2. Press E to set the verifier option. You will see the current
setting, for example:
VERIFIER
Disabled
r
3. Press l or r to see the other option. After you display the
option you want, press E. Press e twice to exit to the
Main menu. For additional verifier information, refer to your
verifier’s manual.
2-12 Setting Supply Options
C O M M U N I C AT I O N V A L U E S
3
This chapter tells you how to set the serial or parallel
communication values. These values provide the link for normal
online printing.
MAIN MENU
CANCEL
ALL
PRINT
MODE
SUPPLY
BATCH
ENTRY
CONTRAST
REPEAT
BATCH
DEFAULTS
FORMAT
OPTIONS
SETUP
DIAG.
PORT
SETTINGS
SERIAL
COMM
PARALLEL
COMM
You need to set your Serial Comm values to match your
computer’s online communications. Before entering the
communication values, see your System Administrator.
The serial communication values are listed in the table below.
Option
Choices
Default
Baud rate
1200/2400/4800/9600/19200/
38400/57600/115200
7/8
1/2
None/Odd/Even
None/Xon/Xoff/DTR/CTS
No/Yes
9600
Word length
Stop bits
Parity
Flow control
Reset
8
1
None
DTR
No
Communication Values 3-1
Baud Rate
To change the setting, from the Main Menu select Setup, Port
Settings, then User Comm. Then, follow these steps:
1. Press E to set the baud rate. You will see the current
setting, for example:
l
BAUD RATE
9600
r
2. Press L or R to display the baud rate you need, then press
E. Press e three times to exit to the Main Menu.
Only the 9850 printer supports 57600 and
115200 baud.
Word Length
To change the setting, from the Main Menu select Setup, Port
Settings, then User Comm. Then, follow these steps:.
1. Press L or R until you see
l
USER COMM
Word Length
r
2. Press E. You will see the current setting, for example:
l
WORD LENGTH
8
3. Press L or R to display the word length you need, then
press E. Press e three times to exit to the Main Menu.
3-2 Communication Values
Stop Bits
To change the setting, from the Main Menu select Setup, Port
Settings, then User Comm. Then, follow these steps:
1. Press L or R until you see
l
USER COMM
Stopbits
r
2. Press E. You will see the current setting, for example:
STOPBITS
1
r
3. Press L or R to display the number of stop bits you need,
then press E. Press e three times to exit to the Main
Menu.
Parity
To change the setting, from the Main Menu select Setup, Port
Settings, then User Comm. Then, follow these steps:
1. Press L or R until you see
l
USER COMM
Parity
r
2. Press E. You will see the current setting, for example:
PARITY
None
r
3. Press L or R to display the parity you need, then press
E. Press e three times to exit to the Main Menu.
Communication Values 3-3
Flow Control
To change the setting, from the Main Menu select Setup, Port
Settings, then User Comm. Then, follow these steps:
1. Press L or R until you see
l
USER COMM
Flow Control
r
2. Press E. You will see the current setting, for example:
l
FLOW CONTROL
DTR
r
3. Press L or R to display the flow control you need, then
press E. Press e three times to exit to the Main Menu.
XON is 17; XOFF is 19. Set flow control to DTR for PC
computers (unless you have XON/XOFF software).
Reset to Default Values
To change the setting, from the Main Menu select Setup, Port
Settings, then User Comm. Then, follow these steps:
1. Press R until you see
l
USER COMM
Reset
2. Press E. You will see
Are you sure?
No
3-4 Communication Values
r
3. Press L or R to make your selection, then press E.
Press e three times to exit to the Main Menu.
Parallel Communications
The parallel communications menu allows you to set the active
parallel port to either internal or external. The internal port is
used for printer options installed inside the printer, such as the
Ethernet communication port. Use the external selection when
connecting a printer cable or external device directly to the
parallel port.
The mode selection allows the user to select either compatible or
IEEE-1284 mode when using the selected parallel port. Usually,
the mode should be set to compatible for computer connection
using a parallel cable and to IEEE-1284 when using an Ethernet
port option.
This option only appears if you are using a
9850 printer.
The parallel communication values are listed in the table below.
Option
Choices
Default
Port
Mode
External/Internal
Compatible/IEEE-1284
External
Compatible
(Centronics mode)
Communication Values 3-5
To change the setting, from the Main Menu select Setup, Port
Settings, then Parallel Comm. Then, follow these steps:
1. Press L or R until you see
PARALLEL COMM
Port
r
2. Press E. You will see the current setting, for example:
PORT
External
r
3. Press E to select the external port. You are now ready to
communicate using an external connection through a cable or
external device, such as the external Ethernet print server.
3-6 Communication Values
4
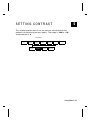
SETTING CONTRAST
This chapter explains how to set the contrast, which controls the
darkness of the printing on your supply. The range is -390 to +156
and the default is 0.
MAIN MENU
CANCEL
ALL
PRINT
MODE
SUPPLY
BATCH
ENTRY
CONTRAST
REPEAT
BATCH
DEFAULTS
FORMAT
OPTIONS
SETUP
DIAG.
PORT
SETTINGS
Setting Contrast 4-1
Correct contrast setting is important because it affects how well
your bar codes scan and how long your printhead lasts. You can
use a verifier to check bar codes for contrast.
1. From the Main Menu, press L or R until you see
l
MAIN MENU
Setup
r
2. Press E. You will be at the Setup menu. Press L or R
until you see
l
SETUP
Contrast
r
3. Press E. You will see the current setting, for example:
Enter contrast
[-390/156]: +0
4. Use the arrow keys to change the contrast. Pressing R
darkens the print; L lightens the print.
Press the arrow key once to change one number at a time.
5. Press E to select the displayed value. Press e to exit
to the Main Menu.
4-2 Setting Contrast
5
S E T T I N G D E F A U LT S
This chapter explains how to select the monetary sign, secondary
sign, decimal places, slashed zero, power-up mode, and prompt
set.
MAIN MENU
CANCEL
ALL
PRINT
MODE
BATCH
ENTRY
SUPPLY
MONETARY
SIGN
REPEAT
BATCH
CONTRAST
SECONDARY
SIGN
FORMAT
OPTIONS
DEFAULTS
DECIMAL
PLACES
SETUP
DIAG.
PORT
SETTINGS
SLASHED
ZERO
POWER-UP
MODE
PROMPT
SET
You can set your printer configurations to fit your daily operation,
using either the offline menus or the online configuration option.
After an option is selected in the online configuration or offline
Setup Menu, the option is saved when the printer is turned off.
The monetary formatting options are listed in the table below.
Option
Choices
Default
Monetary sign
None/USA/UK/Japan/
Germany/France/Spain/
Italy/Sweden/Finland/
Austria/India/Russia/
Korea/Thailand/China/Euro-Dollar
No/Yes
0/1/2/3
No/Yes
Online/Offline
English/French/German/Spanish
USA
Secondary Sign
Decimal Places
Slashed Zero
Power-up Mode
Prompt Set
No
2
No
Online
English
Setting Defaults 5-1
The monetary sign, secondary sign, and decimal places options
are used in conjunction with option 42. Refer to the Packet
Reference Manual for more information.
The settings for Monetary Sign, Secondary
Sign, Slashed Zero, and Decimal Places are
applied when a format is downloaded.
Changing the settings does not affect
batches already in the printer.
Monetary Sign
You can also select None if you do not want a monetary sign to
print in price fields. The monetary signs available for 15 countries
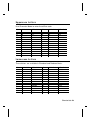
are shown in the table below.
Country
Currency
Description
USA
UK
Japan
Germany
France
Spain
Italy
Sweden
Finland
Austria
India
Russia
Korea
Thailand
China
Euro-Dollar
$
dollar
£
pound
¥
yen
1
F
deutsche mark
P
peseta
L.
lira
Kr
krona
2
markka
6
Rs
schilling
3
ruble
4
won
5
¥
baht
c
euro-dollar
5-2 Setting Defaults
franc
rupee
yuan
To change the setting, from the Main Menu, select Setup, then
Defaults. Then, follow these steps. To exit an option without
changing the setting, press e.
1. Press E. You will see the current setting, for example:
l
MONETARY SIGN
USA
r
2. Press L or R until you see the country’s monetary sign you
want.
3. Press E. Press e twice to exit to the Main menu.
Secondary Sign
If you select USA as the monetary sign, you can print amounts
less than $1.00 either by using a dollar sign and decimal ($0.30)
or by using a cent sign (30¢).
u
If you set the secondary sign option to No, prices under $1.00
will print like this: $ .45
u
If you set the secondary sign option to Yes, prices under $1.00
will print like this: 45¢
The same option applies to the appropriate secondary sign for
monetary signs other than USA.
To change the setting, from the Main Menu, select Setup, then
Defaults. Then, follow these steps.
1. Press L or R until you see
l
DEFAULTS
Secondary Sign
r
Setting Defaults 5-3
2. Press E. You will see the current setting, for example:
SECONDARY SIGN
No
r
3. Press L or R until you see the option you want. Then press
E. Press e twice to exit to the Main menu.
Decimal Places
You can set the printer for 0, 1, 2, or 3 places after the decimal in
a price field. In U.S. currency, you might print prices like this:
$24.00 (2 decimal places) or like this: $24 (0 decimal places).
1. Press L or R until you see
l
DEFAULTS
Decimal Places
r
2. Press E. You will see the current setting, for example:
l
DECIMAL PLACES
2
r
3. Press L or R until you see the option you want. Then press
E. Press e twice to exit to the Main menu.
Slashed Zero
The slashed zero feature lets you select how you want the zero
character printed; either without a slash, 0 or, with a slash, ø.
Standard or reduced fonts print the slashed zero character (ø).
Bold and OCR fonts print the standard zero (0) only. The slashed
zero selection will not be in effect until the format is sent to the
printer again. If you change the way zero is printed, you must
resend your formats.
5-4 Setting Defaults
To change the setting, from the Main Menu, select Setup, then
Defaults. Then, follow these steps.
1. Press L or R until you see
l
DEFAULTS
Slashed Zero
r
2. Press E. You will see the current setting, for example:
l
SLASHED ZERO
Yes
3. Press L or R until you see the option you want. Then press
E. Press e twice to exit to the Main menu.
Power-Up Mode
Power-up mode lets you decide how your printer starts each time
you turn it on. If you want the printer to be ready to start printing
when it is turned on, use the Online power-up mode. If you want
the operator to perform some other task first, use the Offline
power-up mode.
To change the setting, from the Main Menu, select Setup, then
Defaults. Then, follow these steps.
1. Press L or R until you see
l
DEFAULTS
Powerup Mode
r
2. Press E. You will see the current setting, for example:
l
POWER UP
Offline
Setting Defaults 5-5
3. Press L or R until you see the option you want. Then press
E. Press e twice to exit to the Main menu.
Prompt Set
Prompt set determines which language displays on the printer’s
menu. You can select English, French, German, or Spanish.
To change the setting, from the Main Menu, select Setup, then
Defaults. Then, follow these steps.
1. Press R until you see
l
DEFAULTS
Prompt Set
2. Press E. You will see the current setting, for example:
PROMPT SET
English
r
3. Press L or R until you see the option you want. Then press
E. Press e twice to exit to the Main menu.
This option only affects the displayed
prompts. It does not change what is printed
by the printer.
5-6 Setting Defaults
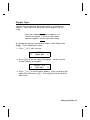
S E T T I N G F O R M AT O P T I O N S
6
You can select Format Options to change which prompts appear
during Batch Entry mode and set default values for those prompts.
Customizing which prompts appear during batch entry can reduce
the time it takes to enter data for a format. If the optional knife is
not installed, you can prevent those prompts from appearing
during batch entry mode. If you set a new default value for an
option, that value is used even if the prompt is not displayed. If
you do not change a default value for an option, the system
default is used if the prompt is not displayed.
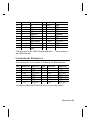
Option
System Default
Clear Fields
Number of Parts
Print Multiple
Quantity
Cut Option
Cut Multiple
Cut Last Ticket
No
1
1
1
No
1
No
Setting Format Options 6-1
The following steps assume you have Password Protection
enabled (through the Diagnostics menu) and you have just printed
a format. For more information about Password Protection, see
Chapter 8, "Diagnostics."
1. Press E at the Main menu, when you see Format Options.
You will see
Enter Password:
_______
2. Enter the password: P P P E. You will see
Select Format:
UPCA-1 r
3. Press L or R until you see the format you want. Press
E. You will see
Clear Fields?
Prompt? Yes
4. Decide if you want to see this prompt in Batch Entry mode
and press either L or R to display your selection. Press
E. You will see
Clear Fields?
Default? No
5. Decide if you want to change the default and press either L
or R to display your selection. Press E. You will see
Number of parts
Prompt? Yes
6-2 Setting Format Options
6. Decide if you want to see this prompt in Batch Entry mode
and press either L or R to display your selection. Press
E. You will see
Number of parts
Default? No
7. Decide if you want to change the default setting of one (1)
and press either L or R to display your selection. Press
E. If you select "Yes," you will see
Number of parts
[1/5]: +1
8. Select the number of parts to print across the supply by
pressing R to increase the number or L to decrease the
number. Press E. The range is one through five.
What you see next depends on if you have a knife installed.
Without a knife, the next prompt you see is for Print Multiple.
With a knife installed, you will see
Cut Option
Prompt? Yes
9. Decide if you want to see this prompt in Batch Entry mode
and press either L or R to display your selection. Press
E. You will see
Cut Option
Default? No
10. Decide if you want to change the default and press either L
or R to display your selection. Press E. You will see
Cut Option
No
Setting Format Options 6-3
If you select "Yes," you will see
Cut Multiple
Prompt? Yes
11. Decide if you want to see this prompt in Batch Entry mode
and press either L or R to display your selection. Press
E. You will see
Cut Multiple
Default? No
12. Decide if you want to change the default setting of one (1)
and press either L or R to display your selection. Press
E. If you select "Yes," you will see
Cut Multiple
0
13. Select the number of tags printed before cutting by pressing
R to increase the number or L to decrease the number.
Press E. The range is one through 32000.
To cut between batches, make the Cut
Multiple the same as the print quantity.
You will see
Cut Last Ticket?
Prompt? Yes
6-4 Setting Format Options
14. Decide if you want to see this prompt in Batch Entry mode
and press either L or R to display your selection. Press
E. You will see
Cut Last Ticket?
Default? No
15. Decide if you want to change the default and press either L
or R to display your selection. Press E.
If you select "Yes," the last tag in the batch is cut. The printer
must feed one or two tags past the printhead to cut the last
tag in the batch.
You will see
Cut After Batch:
Prompt? Yes
16. Decide if you want to see this prompt in Batch Entry mode
and press either L or R to display your selection. Press
E. You will see
Cut After Batch:
Default? No
17. Decide if you want to change the default and press either L
or R to display your selection. Press E.
If you select "Yes," the knife cuts before the first tag and cuts
after batch, so the tags are cuts in strips.
You will see
No Cut Before?
Prompt? Yes
18. Decide if you want to see this prompt in Batch Entry mode
and press either L or R to display your selection. Press
E. You will see
Setting Format Options 6-5
No Cut Before?
Default? No
19. Decide if you want to change the default and press either L
or R to display your selection. Press E.
If you select "Yes," the knife does not cut before the first tag
in a batch, but does cut between each tag and after the last
tag in a batch.
You will see
Quantity?
Prompt? Yes
20. Decide if you want to see this prompt in Batch Entry mode
and press either L or R to display your selection. Press
E. You will see
Quantity
Default? No
21. Decide if you want to change the default and press either L
or R to display your selection. Press E. If you select
"Yes," you will see
Quantity
0
22. Select the quantity of each label to print in a batch by
entering the number using the numeric keys on the keypad.
Press e to correct the quantity if you enter it incorrectly.
Press E to accept the quantity. The range is one through
32000.
After setting the format options, you are ready to use Batch
Entry mode to enter data for your formats.
6-6 Setting Format Options
Without a knife, you will see the prompts for Print Multiple
after the prompts for Number of Parts.
Print Multiple
Prompt? No
23. Decide if you want to see this prompt in Batch Entry mode
and press either L or R to display your selection. Press
E. You will see
Print Multiple
Default? No
24. Decide if you want to change the default and press either L
or R to display your selection. Press E. If you select
"Yes," you will see
Print Multiple
0
25. Select the number of copies of each tag to print as a set
within a batch by entering that number using the numeric keys
on the keypad. Press e to correct the quantity if you
enter it incorrectly. Press E to accept the quantity. The
range is one through 32000. You will see
Quantity
Prompt? Yes
26. Decide if you want to see this prompt in Batch Entry mode
and press either L or R to display your selection. Press
E. You will see
Quantity
Default? No
Setting Format Options 6-7
27. Decide if you want to change the default and press either L
or R to display your selection. Press E. If you select
"Yes," you will see
Quantity
0
28. Select the quantity of each label to print in the batch by
entering that number using the numeric keys on the keypad.
Press e to correct the quantity if you enter it incorrectly.
Press E to accept the quantity. The range is one through
32000.
After setting the format options, you are ready to use Batch Entry
mode to enter data for your formats.
6-8 Setting Format Options
7
PRINTING
This chapter explains how to print, interrupt, restart, cancel, and
repeat a batch.
You can send format, batch, and graphic data to the printer from a
host. When the printer receives the data, batches begin printing
automatically. The Packet Reference Manual tells how to create,
store, and download the data necessary to print batches. You can
also use the MONARCH® MPCL Toolbox utilities to create and
download packets.
Before you print, make sure the printer is connected and ready to
receive data. Your printer is ready to receive and print batches
when you see
PRINT MODE
Ready
Printing begins as soon as you download the format and batch
data from the host. You can also enter offline batch data from the
keypad. If there are offline batches in the print queue, the offline
batches print after the downloaded batches have printed.
You can print formats online or offline. If you send formats that
require operator data, use Batch Entry Mode to enter the data.
See "Entering a Batch" for more information.
MAIN MENU
CANCEL
ALL
PRINT
MODE
BATCH
ENTRY
REPEAT
BATCH
FORMAT
OPTIONS
SETUP
DIAG.
PRINT
MODE
READY
Printing 7-1
Pausing a Batch
You can pause printing by pressing e. You may want to
interrupt a batch to make adjustments for:
u
Loading a different roll of supply or a ribbon. Refer to your
Operator’s Handbook.
u
Adjusting the supply position or contrast using the Setup
menu. See Chapter 2, "Setting Supply Options," or Chapter 4,
"Setting Contrast."
When you press P you will see
l
PAUSE MENU
Print Mode
r
You can press E to resume printing or press L or R to
display the Pause Menu options.
The following chart shows the Pause Menu options.
PAUSE MENU
CANCEL
BATCH
CANCEL
ALL
PRINT
MODE
RESTART
BATCH
SETUP
DIAG.
Restarting a Batch
You can reprint a paused batch from the beginning (using the
original quantity).
1. When you press P, you will see
l
7-2 Printing
PAUSE MENU
Print Mode
r
2. Press L or R until you see
l
PAUSE MENU
Restart Batch
r
3. Press E. The batch starts printing from the beginning.
Canceling a Paused Batch
You can cancel a paused batch, delete a format, graphic, or font
in memory, or all the batches waiting to print.
Before any format, graphic, or font in memory
can be deleted, you must cancel all batches.
PAUSE MENU
CANCEL
BATCH
CANCEL
ALL
PRINT
MODE
RESTART
BATCH
SETUP
DIAG.
CANCEL
BATCH
CANCEL
FORMAT
CANCEL
GRAPHIC
CANCEL
FONT
1. Press P to interrupt printing. You will see
l
PAUSE MENU
Print Mode
r
u
If you want to cancel only the paused batch, skip step 3.
u
If you want to cancel all the batches, skip step 2.
Printing 7-3
2. To cancel only the paused batch, press L or R until you see
PAUSE MENU
Cancel Batch
r
Then press E. The batch is deleted and the printer prints any
remaining batches.
3. To cancel all the batches (including the paused batch), press
L or R until you see
l
PAUSE MENU
Cancel All
r
and press E. You will see
Cancel Batches?
No
r
4. You can
u
exit without canceling any batches. Press e or
press R to display No and then press E. The printer
returns to the Pause menu. Press L or R to select another
function from the Pause Menu, or to return to Print Mode and
print all the batches.
u
cancel all batches in the print queue. Press R to display Yes,
then press E. You will see
Cancel Format?
No
r
Press L or R then press E. You will see
Cancel Graphic?
No
r
7-4 Printing
Press L or R then press E. You will see
Cancel Font?
No
r
Press R, then press E. You will see
PRINT MODE
Ready
If you select "Yes," these prompts delete ALL
formats, graphics, and/or fonts in the printer.
Repeating a Batch
Before you start printing a new batch, you can reprint the last
batch. The batch can be either the last one you printed
completely or one that you canceled after starting to print.
MAIN MENU
CANCEL
ALL
PRINT
MODE
BATCH
ENTRY
REPEAT
BATCH
FORMAT
OPTIONS
SETUP
DIAG.
1. From the Main Menu, press L or R until you see
l
MAIN MENU
Repeat Batch
r
2. Press E . You will see
Printing
xxxx of xxxx
Printing 7-5
The number increments until the entire batch has printed. When
it is finished, you will see
PRINT MODE
Ready
Offline Printing
This section explains how to prepare your printer for offline
printing, use the data entry keys, and enter data. With offline
printing, you enter batch data from the keypad and print batches.
You can enter numbers, letters, and a variety of symbols
(including punctuation and international characters) from the
keypad. International characters are available by pressing P
and code numbers. See Appendix A for more information. You
can switch between character and numeric mode at any time by
pressing |. You must send the format to the printer first. You
can send several offline formats to the printer. After downloading
the format, select Batch Entry from the Main menu. Press E.
Select the format and press E. After entering the batch data,
press E. The batch prints. You can also select Repeat Batch
from the Main menu to print the batch. See "Entering a Batch" for
more information.
Entering Numbers
You must be in numeric mode to enter numbers. If a caret
appears in the upper right corner of the printer display, press |
to remove. If no caret appears in the upper right corner, you are
ready to enter numbers.
To enter numeric data, press the alphanumeric key that shows the
number you want. The screen displays the number, and the
cursor moves to the next position in the field. This is also how
you enter a period (.), comma (,), dollar sign ($) or pound sign
(#). You can switch back to character mode at any time by
pressing |. Each time you press this key, the mode switches
from one mode to the other.
7-6 Printing
Here is an example of how to enter $23.00.
1. Press the $ key. The symbol $ appears.
2. Press the 2 key. The number 2 appears.
3. Press the 3 key. The number 3 appears.
4. Press the . key (below the 2 key). The symbol . appears.
5. Press the 0 key twice. The numbers 00 appear.
6. Press E when you have entered all the data for the field.
Entering Letters
When you use | on the printer keypad, a caret symbol appears
in the upper right corner of the printer display. This indicates you
are in character mode and can enter letters. To enter character
data, press | to switch to character mode. A caret symbol
appears in the upper right corner of the printer display as follows:
Item:
__________
^
Once character mode is active, press the alphanumeric key that
shows the letter you want. The first letter assigned to the key
appears in the field. Each time you press the same key, the next
letter that is assigned appears. An alphanumeric key may have
up to six letters assigned, three in upper-case and three in lower
case. When the character you need appears, press r to move to
the next position in the field.
Some symbol characters are assigned to the dollar sign ($) and
pound sign (#). They switch between characters each time you
press the same key. They are (in the order assigned):
$
¢
#
?
@
&
!
_
p
\
^
~
Printing 7-7
Here is an example of how to enter the word Shirt.
Not all fonts support lower-case letters. See Appendix A,
"Character Sets," for the character set information.
1. Press | to switch to character mode.
2. Press the 1 key once. The letter S appears in upper case.
3. Press R to move the cursor to the next position on the
screen.
4. Press the 9 key five times. The letter h appears in lower-case.
5. Press R to move the cursor to the next position on the
screen.
6. Press the 9 key six times. The letter i appears in lower-case.
7. Press R to move the cursor to the next position on the
screen.
8. Press the 6 key six times. The letter r appears in lower-case.
9. Press R to move the cursor to the next position on the
screen.
10. Press the 1 key five times. The letter t appears in lower-case.
11. Press E when you have entered all the data for the field.
Entering Symbols
You can use character codes to enter symbols. See Appendix A,
"Character Sets" for symbols and corresponding character codes.
To enter a character code
1. Press P. Use the numeric keys to enter the three-digit
character code. For example, enter 179 for ¥ .
2. Press E.
7-8 Printing
Using Bar Code 128
You can enter function codes 1 - 4 for code 128 bar codes.
These codes only function as code 128 data. They do not print if
you enter them as data anywhere else. See the Code 128 table
in Appendix A for the function code you want.
To enter a function code
1. Press P. Use the numeric keys to enter the function code
you want.
2. Press E.
Entering and Changing Data
When you need to enter data, the screen shows a prompt with an
underscore for each character you can enter.
DEPT:
JUNIOR _ _ _
For example, this screen shows you can enter up to three
characters before pressing E. If you try to enter more than
three characters, the printer will not accept the data. Pressing
E accepts your entry.
Some fields specifically require numeric or alphabetic data. If you
try to enter numeric data for an alpha field, or alphabetic data for
a numeric field, the printer does not accept the data. Enter the
correct data and press E.
To change data
u
use L to back up; type the new data over the old data and
then press E, or
u
press { to clear all data; then re-enter the correct data and
press E.
Printing 7-9
When you enter data incorrectly, the printer displays a message.
Following are conditions that cause errors and how to correct
them. Sometimes a data entry problem may be a combination of
these conditions.
Problem
Action
The data you entered is not
accepted.
Refer to your format for
acceptable characters for this
field. Some fields accept only
letters, some accept only
numbers. Some accept only
specific ranges of letters or
numbers.
This field requires data for all
underscores shown. Enter the
correct data and press E.
The data and check digit must be
the correct combination. Enter the
correct data and press E.
This field requires data before
continuing to the next field. Enter
data and press E.
Your data was not accepted and
blanks are still showing.
You entered an incorrect check
digit.
You tried to skip a required field.
Ty p e s o f D a t a E n t r y
Following are samples of the prompts you may see when entering
data.
Entering General Data
When you see a prompt similar to the one below, you can enter a
character for each blank.
DEPT:
DEPT _ _ _ _
7-10 Printing
Entering a Price
At data entry, the price prompt includes the pricing symbols
(unless you select None for Monetary Sign). Your price prompt
may look like this
PRICE:
$0.00
...or like this
PRICE:
0¢
The difference between these prompts is the symbol used for
printing amounts less than $1.00. You can select the cent sign for
printing amounts less than $1.00 using the Defaults function. The
same option is available for other currencies. See Chapter 5,
"Setting Defaults."
You can enter and print: cent amounts, dollar and cent amounts,
or unit prices. For example: 3¢, $.59, $15.98, 2/59¢, or 3/$1.00.
Entering "2-For" Price Data
You can use any price field in a "2-for" pricing scheme. When
entering data for a price field offline (at the printer), use the # key
to separate the 2 and the price data in the "2-for" price. For
example, to enter the price "Two for $5.00," enter 2#500. If you
use option 42 to format the field online as a price field, enter the
quantity, a slash, and the price data. For example, to enter the
price "Two for $5.00," enter 2/500.
Printing 7-11
Prompts with Fixed Characters
When a field has fixed characters, they appear as part of the data
entry prompt. The fixed data stays the same, and prints on every
tag that uses the format. Only the data you enter can be
changed. In the example below, the first six digits are fixed
characters.
UPCA Barcode:
004156 _ _ _ _ _
The printed field contains both the fixed characters and the data
you enter.
Entering a Batch
Batch Entry lets you enter the data to print a batch (or batches) of
supplies. You can enter up to 3 batches before you print.
1. Press e until you see the Main menu.
2. Press L or R until you see
l
MAIN MENU
Batch Entry
r
3. Press E. You will see
Select Format:
FMT-1
r
4. Press L or R until you see the name of the format you want,
then press E.
7-12 Printing
5. If this format has been used since the printer was turned on
(and you have not used another format in the meantime), you
will see
Clear Fields?
No
r
u
Press E to keep the old data. Each field appears with the
previous data. You can press E to accept the data, or
change it and press E.
u
Press R then press E to erase the old data. Each field
appears with blanks (underscores). You have to enter new
data for each field.
6. You will see the first prompt for the format. Enter data and
press E for each prompt.
7. After you enter data for all the fields, the prompts you see
next varies, because you can choose to display or not to
display certain prompts.
You may see
Number of parts?
[1/5]: _
8. Type the number of times the data prints across the tag width.
Press E. You will see
Cut Option
No
r
u
If your printer has a knife and you want to cut tags, press to
display "Yes" and press E.
u
If your printer does not have a knife, select "No" by pressing
E. All the tags in the batch will be printed in one strip.
See "Printing Tags Without Cutting" for more information.
Printing 7-13
If you answered "Yes" to the cut option, you have several cut
modes to select from.
Cut Mode
Description
Cut after tag
(Cut Mode 1)
Cut after batch
(Cut Mode 2)
Cut last ticket
(Cut Mode 3)
Cuts before first tag, cuts each tag, and cuts
after last tag.
Cuts before first tag, cuts after batch. Cuts in
strips, not each tag.
Cuts before first tag, cuts each tag, cuts after the
last tag and feeds one or two tags past the
printhead when it cuts the last tag in the last
batch.
Does not cut before the first tag in a batch, but
cuts between each tag and after the last tag in
the batch.
No cut before
(Cut Mode 4)
If you do not specify a cut mode (cut last ticket, cut after batch, or
no cut before), the knife cuts after each tag. This is the same as
cut mode 1. The knife uses the last selected cut mode. For
example, if you select "Cut Last Ticket" and then select "Yes" to
"Cut After Batch," the knife only cuts after each batch instead of
after the last tag in the batch.
You will see
Cut multiple
[1/32000]: 1 _ _ _ _
9. Type the number of tags to print before cutting and press
E, or accept the default value of 1 by pressing E. A
cut multiple of one cuts after each tag. This is the same as
cut mode 1. You will see
Cut Last Ticket:
No
r
10. If you want to cut the last tag in the batch, press R to display
"Yes" and press E. The printer feeds one or two tags past
the printhead when it cuts the last tag in the last batch.
7-14 Printing
Depending on the length of your supply, you may lose up to
two tags after the last batch. This is the same as cut mode 3.
You will see
Cut After Batch:
No
r
11. If you want to cut after every batch, press R to display "Yes"
and press E. The knife cuts before the first tag and cuts
after batch, so the tags are cuts in strips. This is the same as
cut mode 2. You will see
No Cut Before?
No
r
12. If you do not want to cut before the first tag in a batch, press
R to display "Yes" and press E. The knife does not cut
before the first tag in a batch, but does cut between each tag
and after the last tag in a batch. This is the same as cut
mode 4. You will see:
Quantity
[1/32000]: 1 _ _ _ _
13. Type the number of tags or sets of tags you want to print in
this batch and press E. A cut multiple of two with a batch
quantity of 30 prints 30 tags (15 sets of two tags). You will
see
l
MAIN MENU
Print Mode
r
14. Press E. The batch begins to print. The display counts
the tags as they print and how many tags are in the batch.
Printing 7-15
P r i n t i n g Ta g s W i t h o u t C u t t i n g
If you answered "No" to the cut option, you will see
Print Multiple
[1/32000]: _ _ _ _ _
1. Type the number of copies of each tag to print as a set within
a batch. If you want three copies of each tag, use a print
multiple of 3. Press E. You will see
Quantity
[1/32000]: _ _ _ _ _
2. Type the number of tags or sets of tags you want to print in
this batch and press E. A print multiple of two with a
batch quantity of 30 prints 60 tags (30 sets of tags with two
tags per set). You will see
l
MAIN MENU
Print Mode
r
3. Press E. The batch begins to print. The display counts
the tags as they print and how many tags are in the batch.
When all the batches have printed, you will see
PRINT MODE
Ready
7-16 Printing
Keep in mind the following definitions:
Number of Parts
Number of times data prints across the tag’s
width. Using one for number of parts prints
data once on the tag. Using three for number
of parts prints data three times across the tag.
Cut Multiple
Number of tags printed between cuts as a
set. A cut multiple of one cuts after each tag.
To cut after each batch, set the cut multiple
equal to the print quantity.
If the cut multiple is three and the print
quantity is 15, five sets of three tags are
printed and cut (15 tags). If the cut multiple
is three and the print quantity is 16, five sets
of three tags and one set of one tag are
printed and cut (16 tags).
The cut multiple does NOT affect the printed
quantity.
Print Multiple
Number of copies of each tag to print as a set
within a batch. A print multiple of one prints
one set of one tag. A print multiple of three
prints three copies of each tag as a set.
If the print multiple is three and the print
quantity is 15, then 15 sets of tags with three
tags per set are printed (45 tags). If the print
multiple is two and the print quantity is four,
then four sets of tags with two tags per set
are printed (8 tags).
The most common application for print
multiple is with incrementing or decrementing
fields. See "Using Print Multiple with Inc/Dec
Fields" for more information.
The print multiple DOES affect the printed
quantity.
Printing 7-17
Print Quantity
Number of tags or sets of tags printed in a
batch. A print quantity of 30 prints 30 tags
when the print multiple is one.
Set
Number of tags to be printed together within a
batch.
Using Print Multiple with Inc/Dec Fields
If your tag has an incrementing or decrementing field, the print
multiple is the number of tags printed as a set before
incrementing or decrementing. If the incrementing field is set to
10, the print multiple is 2, and the print quantity is 2, then four
tags are printed. Two tags print "10" in the incrementing field, the
other two tags print "11" in the incrementing field.
7-18 Printing
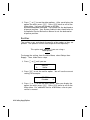
Examples
u
Number of parts = 1, cut multiple or print multiple = 1, print
quantity = 4, then four sets of one tag are printed (and cut
after each tag if using cut multiple).
u
Number of parts = 3, cut multiple = 2, print quantity = 2, then
two tags are printed and cut after the second tag is printed.
u
Number of parts = 3, print multiple = 2, print quantity = 2, then
four tags are printed as two sets of two tags.
u
Number of parts = 3, print multiple = 2, print quantity = 4, then
eight tags are printed as four sets of two tags.
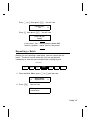
The following graphic shows the relationship between the number
of parts, cut multiple, and print multiple.
Three-part tag
(number of parts = 3)
Cut here for a cut multiple of 2
(Cut after two tags) OR
Print multiple = 2 (Prints two
tags as a set)
Cut here for a cut multiple of 1
(Cut after one tag) OR
Print multiple = 1 (Prints one tag
as a set)
Printing 7-19
7-20 Printing
8
DIAGNOSTICS
This chapter explains how to perform simple diagnostic functions
such as checking the software version, the supply quality, printing
test labels, and using password protection.
MAIN MENU
CANCEL
ALL
PRINT
MODE
BATCH
ENTRY
REPEAT
BATCH
VERSION
FORMAT
OPTIONS
USER DIAG.
SUPPLY
QUALITY
SETUP
DIAG.
SERVICE
DIAG.
TEST
LABEL
PASSWORD
Factory Set Password
You need a password to access diagnostic functions. The permanent
factory-set password is: P P P E.
Checking the Software Version
From the Diagnostics Menu, press L or R until you see
DIAGNOSTICS
Version
r
Press E. You will see
M9850
PN120395
V 1.1
Diagnostics 8-1
Line one lists the printer model number (M9850) and the part
number for the printer ROM. Line two is the version of software
in the printer.
P r i n t i n g a Te s t L a b e l
1. From the Diagnostics Menu, press L or R until you see
l
DIAGNOSTICS
User Diag
r
2. Press E and R until you see
l
USER DIAG
Test Label
3. Press E. The following test labels print.
The test labels display printer model number, software version
number, number of inches printed to date, user COM port
settings, and a test pattern. This information will help Technical
Support diagnose the problem. Refer to the Packet Reference
Manual for more information about the test label.
8-2 Diagnostics
Checking Supply Quality
The printer continuously stores data from the most recent 16
supplies printed to check the reflectivity of the sensor marks on
the supply. Before you check your supply quality, print a batch of
supplies or test labels.
1. From the Diagnostics menu, press L or R until you see
l
DIAGNOSTICS
User Diag
r
2. Press E. You will be at the User Diagnostics menu.
Press L or R until you see
USER DIAG
Supply Quality
r
3. Press E. If you have not printed any labels, the message
"No data! Press Enter" appears. You will also see the "No
data! Press Enter" message if you are using continuous
(non-indexed) supplies.
If you have printed labels since turning on the printer, you will
see
Len Min Max OK
l 1568 034 124 Y r
The Len listing is the length of the loaded supply in dots.
The Max listing should always be greater than the Min listing.
However, if you have used a Monarch® 9446 printer or a
Monarch® 9403 printer, the Min listing can be greater than the
Max listing. The OK listing tells whether the sense mark on the
supply passed a detection test. Press E to see the other
readings. If you are not using a Version 5.2 hardware (sensing
system) and you try to check the supply quality, the message "HW
not supported" appears.
Diagnostics 8-3
Using Password Protection
The password protection feature prevents formats, graphics or
fonts from accidentally being deleted from the printer’s memory.
Enabling the Password (System Administrators only)
A System Administrator can enable the password that must be
entered before formats, graphics or fonts can be deleted.
1. From the Main Menu, press L or R until you see
l
MAIN MENU
Diagnostics
2. Press E. You will see
Enter Password
______
3. Type your password: P P P E.
If you enter the wrong password, you return to the Main Menu.
4. From the Diagnostics Menu, press L or R until you see
l
DIAGNOSTICS
User Diag
5. Press E. Then, press L or R until you see
l
8-4 Diagnostics
USER DIAG
Password
6. Press E. You will see
l
Enable Password?
No
The default for password protection is "No," so you will
always see "No" even if passwords are enabled.
7. If you do not want the user to enter a password before they
can delete formats, graphics or fonts, press E. You return
to the User Diagnostics Menu.
OR
Press R to display "Yes" and press E. The password
protection is enabled for formats, graphics or fonts. You
return to the User Diagnostics Menu.
8. Press e twice to exit to the Main Menu.
Deleting Formats, Graphics or Fonts
To delete batches, formats, graphics or fonts if password
protection is enabled:
1. From the Main Menu, press L or R until you see
MAIN MENU
Cancel All
r
2. Press E. You will see
Cancel Batches?
No
r
Press e if you do not want to cancel batches. You return
to the Main Menu, OR
Press R to display "Yes" and press E. All batches in the
print queue are canceled.
Diagnostics 8-5
You will always be prompted to cancel
formats, graphics or fonts if you answer "Yes"
to cancel batches.
You will see
Cancel Format?
No
r
3. Press L or R and press E. If you select "Yes," you will
see
Enter Password
_______
4. Press P P P E and all formats are deleted.
If you enter the wrong password, you return to the Main Menu.
You see the prompts to cancel graphics or
fonts if you answer either "Yes" or "No" to
cancel formats.
You will see
l
Cancel Graphic?
Yes
5. Press L or R and press e. If you select "Yes," you will
see
Enter Password
_______
8-6 Diagnostics
6. Press P P P E and all graphics are deleted.
You will see
Cancel Font?
Yes
l
7. Press L or R and press E. If you select "Yes," you will
see
Enter Password
_______
8. Press P P P E and all fonts are deleted. You
return to the Main Menu.
Deleting Formats If Password Protection Is Disabled
The default for password protection is "No," which means you will
not be prompted for a password if you want to delete formats,
graphics or fonts. After you cancel batches from the Cancel All
menu, you will see
Cancel Format?
No
r
The default is "No."
1. Press R to display "Yes" and press E. You will not be
prompted for a password and all formats are deleted. You will
then see the prompts for deleting graphics or fonts.
2. Press L or R to display your selection ("Yes" or "No") and
press E. Your graphics and/or fonts are/are not deleted.
Diagnostics 8-7
Service Diagnostics
The Service Diagnostics menu can only be accessed by a
Monarch Representative, because it requires a separate
password. If you need to call Technical Support, print a test label
first.
8-8 Diagnostics
CHARACTER SETS
A
Character Sets
Standard Font
Reduced Font
Character Sets A-1
Bold Font
OCRA-like Font
CG Triumvirate Bold Font
CG Triumvirate Font
A-2 Character Sets
Uppercase Letters
Use Character Mode to enter the offline code.
Char.
Online Code
Offline Code
Char.
Online Code
Offline Code
A
B
C
D
E
F
G
H
I
J
K
L
M
A
B
C
D
E
F
G
H
I
J
K
L
M
7
77
777
8
88
888
9
99
999
4
44
444
5
N
O
P
Q
R
S
T
U
V
W
X
Y
Z
N
O
P
Q
R
S
T
U
V
W
X
Y
Z
55
555
6
66
666
1
11
111
2
22
222
3
33
Lowercase Letters
These letters are available in Standard and Reduced fonts.
Char.
a
b
c
d
e
f
g
h
i
j
k
l
m
Online Code
a
b
c
d
e
f
g
h
i
j
k
l
m
Offline Code
7777
77777
777777
8888
88888
888888
9999
99999
999999
4444
44444
444444
5555
Char.
n
o
p
q
r
s
t
u
v
w
x
y
z
Online Code
n
o
p
q
r
s
t
u
v
w
x
y
z
Offline Code
55555
555555
6666
66666
666666
1111
11111
111111
2222
22222
222222
333
3333
Character Sets A-3
Currency Symbols
You can enter international currency symbols offline by setting the
default monetary sign to the desired country setting and pressing
the $ key. The $ enters the monetary sign that is currently active.
| /$ enters the secondary sign (for example, ¢ in U.S. currency).
To change the monetary sign, see Chapter 5, "Setting Defaults."
Char.
Online Code
Offline Code
Char.
Online Code
Offline Code
~183
~184
P183
P184
$
$
$
L.
Kr
£
~178
P178
2
~185
P185
¥
~179
P179
6
~186
P186
1
~180
P180
Rs
~187
P187
F
~181
P181
3
~188
P188
P
~182
P182
4
~189
P189
¢
~155
| $
5
~190
P190
£
~156
P156
¥
~191
P191
c
~192
P192
Punctuation and Symbols
Char.
Online Code Offline Code
.
.
{1
[2
{
[
<
(
’
;
<
(
’
;
A-4 Character Sets
.
Char.
,
|,
}1
]2
}
]
|, ,
|,,,
>
)
"
:
>
)
"
:
|,,,,
|, , , , ,
|, , , , , ,
|,,,,,,,
,
|. .
| ...
|....
|. . . . .
|. . . . . .
|.......
Online Code Offline Code
Char.
Online Code Offline Code
Char.
Online Code Offline Code
#
?
@
&
!
_
#
?
@
&
!
_
(spc)
/
*
+
%
(spc)
/
*
+
%
|0
|00
|000
|0000
|00000
|000000
|1
‘1
^
=
¢
|
‘
"2
"
~
_2
\
~034
~198
~199
|0000000
P034
P198
P199
=
#
|#
| ##
|###
|####
| #####
|######
| #######
| ########
(None)
|$
1
Not available in the OCRA-like and Bold fonts.
the OCRA-like font.
2
Not available in
International Characters
These characters are available in Standard and Reduced fonts.
Char.
Online Code
Offline Code
Char.
Online Code
Offline Code
Ç
ü
é
â
ä
à
å
~128
~129
~130
~131
~132
~133
~134
P128
P129
P130
P131
P132
P133
P134
Ö
Ü
¢
£
¥
~153
~154
~155
~156
~157
~158
~159
P153
P154
P155*
P156*
P157*
P158*
P159
Pt
_
*Available in Bold and OCRA-like font using currency codes.
Character Sets A-5
Char.
Online Code
Offline Code
Char.
Online Code
Offline Code
ç
ê
ë
è
ï
î
ì
Ä
Å
É
~135
~136
~137
~138
~139
~140
~141
~142
~143
~144
P135
P136
P137
P138
P139
P140
P141
P142
P143
P144
á
í
ó
ú
ñ
Ñ
ª
º
¿
~160
~161
~162
~163
~164
~165
~166
~167
~168
~169
P160
P161
P162
P163
P164
P165
P166
P167
P168
P169
æ
~145
P145
~170
P170
Æ
ô
ö
ò
û
ù
ÿ
1/2
~146
~147
~148
~149
~150
~151
~152
~171
P146
P147
P148
P149
P150
P151
P152
P171
¬
¡
<<
>>
~
_
Ø
ø
~173
~174
~175
~198
~199
~210
~214
~224
P173
P 174
P175
P198
P199
P210
P214
P224
1/4
~172
P172
~225
P225
7
α
ß
Code 128 Function Codes
Code
Function Code
~201
~202
~203
~204
F1
F2
F3
F4
A-6 Character Sets