1
Chapter 5 Maintenance — Maintenance/replacement
Maintenance/replacement
Before performing maintenance/replacement
ff Make sure to turn off the power before maintaining or replacing the unit. (x pages 52, 55)
ff When switching off the projector, make sure to follow the procedures in “Switching off the projector” (x page 55).
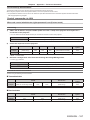
Maintenance
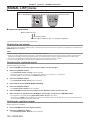
Outer case
Wipe off dirt and dust with a soft, dry cloth.
ff If the dirt is persistent, soak the cloth with water and wring it thoroughly before wiping. Dry off the projector with a dry cloth.
ff Do not use benzene, thinner, or rubbing alcohol, other solvents, or household cleaners. Doing so may deteriorate the outer case.
ff When using chemically treated dust cloths, follow the instructions written on its packaging.
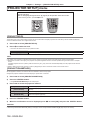
Lens front surface
Wipe off dirt and dust from the front surface of the lens with a soft clean cloth.
ff Do not use a cloth that is fluffy, dusty, or soaked with oil/water.
ff Since the lens is fragile, do not use excessive force when wiping the lens.
Attention
ff The lens is made of glass. Impacts or excessive force when wiping may scratch its surface. Handle with care.
Air filter unit
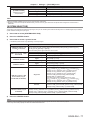
Perform maintenance of the air filter unit in the following cases.
ff The air filter is clogged with dust, causing the filter replacement message to appear on the screen and the filter indicator <FILTER> to light
in red.
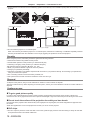
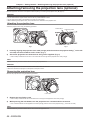
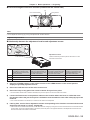
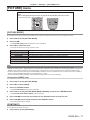
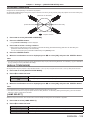
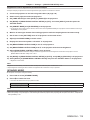
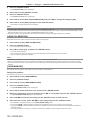
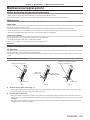
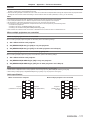
Removing the air filter unit
Air filter unit compartment and the
projector’s air intake port
Air filter cover fixing screw
Tabs on the
projector body
Tabs on the
projector body
Air filter cover
Fig. 1
Air filter unit
Fig. 2
Fig. 3
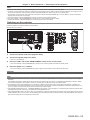
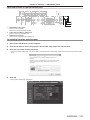
1) Remove the air filter cover. (Fig. 1)
ff Use a Phillips screwdriver to turn the air filter cover screw counterclockwise until it turns freely, and then remove the air filter cover.
ff Loosen the air filter cover fixing screw while putting your hand on.
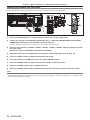
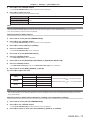
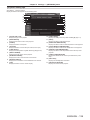
2) Pull out the air filter unit.
ff Pull out the air filter unit frame from the tabs of the projector body while slightly pressing around the center of the frame at the front
side (with the lens) inward as described with the arrow, and pull out the frame at the opposite side from the tabs to remove the air filter
unit. (Fig. 2)
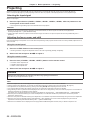
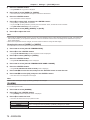
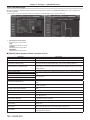
ff After pulling out the air filter unit, remove large foreign objects and dust from the air filter unit compartment and the air intake port of
the projector body if there are any. (Fig. 3)
ENGLISH - 157