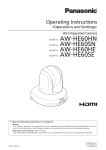
1
Panasonic Broadcast AW-HE100 Menu Information Basic menu operations Menus are displayed on the monitor when the unit’s settings are to be selected. The monitor is connected to the video signal output connector (VIDEO OUT connector or HD/SD ANALOG connector). The basic menu operations involve displaying sub-menus from the main menu items, and selecting settings on the sub-menus. Some sub-menus have menu items for performing more detailed settings. The menu operations are conducted using the accessory wireless remote control. If a controller is connected, they can also be conducted using the controller. It may be necessary to upgrade the controller’s version in order to support the AW-HE100. For further details, consult with your dealer. Described below are the basic operations for changing the menu item settings using the accessory wireless remote control and controller (AW-RP655, AW-RP555 or AW-RP400/AW-CB400). Only the steps taken using the accessory wireless remote control will be described here for the operations conducted to select and set the items. For details of the operations conducted using the controller, substitute “controller” for “wireless remote control” when reading the basic operations. Also, refer to the Operating Instructions of the controller. Table of operations Controller Menu operation Remote control AW-RP655 AW-RP555 AW-RP400/AW-CB400 (The following operations are performed using the AW‑CB400.) Press the [CAM1], [CAM2], [CAM3] or [CAM4] button. Press one of the [1] to [5] buttons of [CONTROL/ PREVIEW MONITOR OUT SEL]. Displaying the main menu Press the [MENU] button for two seconds. 1.Press the [MENU] button. The display on the AW‑RP655’s LCD panel changes to the menu mode. 2.Turn the jog dial (main), and display “CAMERA SETTING” Press the [MENU] button for on the LCD panel. two seconds. 3.Press the [OK] button, and display “OPEN CAMERA MENU? OK Key” on the LCD panel. 4.Press the [OK] button again. Selecting the items Press the [] or [] button. Turn the jog dial (L). Press the [MENU] or [ITEM] button. Press the [A] or [B] button of [OPTION SW]. Displaying the sub-menus Press the [] or [] button. Press the jog dial (L). Press the [YES] button. Press the [C] button of [OPTION SW]. Returning to the previous menu Press the [] or [] button while “Return” is blinking. Press the jog dial (L) while “Return” is blinking. Press the [YES] button while “Return” is blinking. Press the [C] button of [OPTION SW] while “Return” is blinking. Changing the settings Press the [] or [] button. Turn the jog dial (R). Press the [YES] or [NO] button. Press the [C] or [D] button of [OPTION SW]. Exiting the menu operations Press the [MENU] button for two seconds. Press the [MENU] button or [R/B GAIN/PED] button. Press the [MENU] button for two seconds. Press the [A] button of [OPTION SW] for two seconds. Selecting the camera to be operated Press one of the [1] to [5] buttons of [CONTROL]. Press one of the [1] to [5] buttons of [CONTROL SELECT]. Press the [A] button of [OPTION SW] for two seconds. Note Perform the menu operations and exit from the menus using the controller which displayed the main menu. If a menu operation has been performed or a menu has been exited using another controller, first display the main menu and exit from it using one controller, and then display the main menu and exit from it using the other controller. 40 Basic menu operations When performing the operations using the accessory wireless remote control 1Press the [CAM1], [CAM2], [CAM3] or [CAM4] button to select the unit which is to be operated. 2 Press the [MENU] button for two seconds. The main menu is displayed. 3 Press the [] or [] button to make the item to be selected blink. Each time the [] or [] button is pressed, the blinking item changes. 4 Press the [] or [] button. The sub-menu of the selected item is displayed. (Some sub-menu items have a sub-menu of their own.) 5 Press the [] or [] button to make the item to be set or the setting blink. Each time the [] or [] button is pressed, the blinking item changes. When “Return” is made to blink and the [] or [] button is pressed, operation returns to the previous menu. While the menus are displayed, the [] and [] button have the same functions. Bear in mind, however, that if the [] button is pressed when it is possible to change a value, the value will be changed by the button. 6 Press the [] or [] button to change the setting. 7 After the setting has been completed, press the [MENU] button for two seconds. The menu display is exited. 41 Basic menu operations When the camera is to be controlled from the AW-RP655 controller Jog dial (main) GAIN button When the LCD is in the gain adjustment mode (GAIN button: MANU) Select the desired gain setting from GAIN 0 dB to 18 dB. When the LCD is in the gain adjustment mode (GAIN button: AUTO) Select the desired gain setting from AGC MAX GAIN 6 dB, 12 dB or 18 dB. When the LCD is in the pedestal adjustment mode Adjust the PEDESTAL TOTAL setting (–30 to +30). This operation is invalid when the controller is in the camera menu mode. These buttons cannot be used for controlling the AW-HE100. Each time the [EXT(AF)] button is pressed, the mode switches between Auto Focus and Manual Focus. The [EXT(AF)] button lights when the camera is in the Auto Focus mode. Jog dial (L) Jog dial (R) When the LCD is in the gain adjustment mode Adjust the R GAIN setting (–30 to +30). When the LCD is in the pedestal adjustment mode This operation is not available. When the camera menu mode is established (Operate menu items) Changing items in the camera menu: • Turn clockwise: Moves downward. • Turn counterclockwise:Moves upward. • Press: Confirms the item selection*1. *1: Operation must be performed carefully, as pressing this jog dial, when the set value can be changed, will change the set value (in the positive direction). When the LCD is in the gain adjustment mode Adjust the B GAIN setting (–30 to +30). When the LCD is in the pedestal adjustment mode This operation is not available. When the camera menu mode is established (Change set value) Changing the set values in the camera menu: • Turn clockwise:Set value is changed in the positive direction*2. • Turn counterclockwise:Set value is changed in the negative direction. • Press: Operation unavailable. *2: Operation must be performed carefully, as pressing this jog dial, when the item can be changed, will confirm the item selection. When controlling the AW-HE100, the G/L SETTING is not displayed. The G/L must be set using the camera menu of the AW-HE100. Changes made using the wireless remote control to the PEDESTAL (TOTAL) in the camera menu of the AW-HE100 are not reflected on the LCD panel display of the AW-RP655. 1Press one of the [1] to [5] buttons of [CONTROL/PREVIEW MONITOR OUT SEL] to select the unit which is to be operated. 2 Press the [MENU] button. The display on the LCD panel of the AW-RP655 is set to the menu mode. 3 Turn the jog dial (main) and display “CAMERA SETTING” on the LCD panel. 4 Press the [OK] button. OPEN CAMERA MENU? OK Key The right display appears on the LCD panel: 42 Basic menu operations 5 Press the [OK] button again. CAMERA MENU CTRL. The right display appears on the LCD panel: ITEM SEL. VALUE SEL. 6 Turn the jog dial (L) to make the item to be selected blink. Each time the jog dial (main) is pressed, the blinking item changes. 7 Press the jog dial (L). The sub-menu of the selected item is now displayed. (Some sub-menu items have a sub-menu of their own.) 8 Turn the jog dial (L) to make the item to be set or the setting blink. Each time the jog dial (L) is turned, the blinking item changes. When the “Return” is made to blink and the jog dial (L) is pressed, operation returns to the previous menu. 9 Turn the jog dial (R) to change the setting. 10After the setting has been completed, press the [MENU] button or [R/B GAIN/PED] button. The menu display is exited. Press other buttons, when in the camera menu mode, to exit the menu mode. Perform operations 1 to 5 in order to again perform operations in the exited menu mode. It may be necessary to upgrade the software version in order to operate an AW-HE100 from a AW-RP655. Ask your dealer for details. 43 Basic menu operations When the camera is to be controlled from the AW-RP555 controller Press the [MENU] button for two seconds. The camera menu becomes available for operation. [MENU]:Opens the menu and also scrolls up the item list. [ITEM]: Scrolls down the item list. [YES]: Confirms the item selection and also changes a set value in the positive direction. [NO]: Changes a set value in the negative direction. Each time the [EXT(AF)] button is pressed, the mode switches between Auto Focus and Manual Focus. The [EXT(AF)] button lights when the camera is in the Auto Focus mode. These buttons cannot be used for controlling the AW-HE100. 1 Press one of the [1] to [5] buttons of [CONTROL] to select the unit which is to be operated. 2 Press the [MENU] button for two seconds. The main menu is displayed on the monitor. 3 Press the [MENU] or [ITEM] button to make the item to be selected blink. Press the [MENU] button to scroll up the item list. Press the [ITEM] button to scroll down the item list. 4 Press the [YES] button. The sub-menu of the selected item is displayed. (Some sub-menu items have a sub-menu of their own.) 44 Basic menu operations 5 Press the [MENU] or [ITEM] button to make the item to be set or the setting blink. Press the [MENU] button to scroll up the item list. Press the [ITEM] button to scroll down the item list. When “Return” is made to blink and the [YES] button is pressed, operation returns to the previous menu. 6 Press the [YES] or [NO] button to change the setting. Press the [YES] button to change the set value in the positive direction, and press the [NO] button to change the set value in the negative direction. 7 After the setting has been completed, press the [MENU] button for two seconds. The menu display is exited. It may be necessary to upgrade the software version in order to operate an AW-HE100 from a AW-RP555. Ask your dealer for details. 45 Basic menu operations When the camera is to be controlled from the AW-CB400/AW-RP400 controller The EXT command is allocated to the [OPTION SW] button to switch between Auto Focus and Manual Focus. Each time the [EXT] button is pressed, the focus mode switches between Auto Focus and Manual Focus. The following functions allocated to the [OPTION SW] are not available: DEF, WIP, HEATER/FAN, LAMP, OPTION, ND The following settings of the LCD menu do not function: TILT RANGE, MEMORY LENGTH Do not use the OPTION function of the AW-CB400 to operate the ZOOM/FOCUS, use the ZOOM lever or FOCUS dial of the AW-RP400 instead. The TRACING MEMORY function is not available. The R/B PED dial is not available. The camera menu operation becomes available when the CAMERA MENU CNT item is set to ENABLE in the LCD menu of the AW-CB400. [OPTION SW] [A]: Opens the menu and also scrolls up the item list. [B]: Scrolls down the item list. [C]: Confirms the item selection and also changes a set value in the positive direction. [D]: Changes a set value in the negative direction. 1Press one of the [1] to [5] buttons of [CONTROL SELECT] to select the unit which is to be operated. 2 Press the [A] button of [OPTION SW] for two seconds. The main menu is displayed on the monitor. 3 Press the [A] or [B] button of [OPTION SW] to make the item to be selected blink. Press the [A] button of the [OPTION SW] to scroll up the item list. Press the [B] button of the [OPTION SW] to scroll down the item list. 46 Basic menu operations 4 Press the [C] button of [OPTION SW]. The sub-menu of the selected item is displayed. 5 Press the [A] or [B] button of [OPTION SW] to make the item to be set or the setting blink. Press the [A] button of the [OPTION SW] to scroll up the item list. Press the [B] button of the [OPTION SW] to scroll down the item list. When “Return” is made to blink and the [C] button is pressed, operation returns to the previous menu. 6 Press the [C] or [D] button of [OPTION SW] to change the setting. Press the [C] button of the [OPTION SW] to change the set value in the positive direction, and press the [D] button of the [OPTION SW] to change the set value in the negative direction. 7 After the setting has been completed, press the [A] button of [OPTION SW] for two seconds. The menu display is exited. It may be necessary to upgrade the software version in order to operate an AW-HE100 from a AW-CB400/AW-RP400. Ask your dealer for details. 47 Setting the menu items Setting the menu items 3Tally lamp use selection [Tally: On, Off] (Factory setting: On = controlled) Using this item, set the function for having the tally lamp lighted or extinguished by the tally control signal to ON or OFF. When the unit’s settings are to be selected, the menus are displayed on the monitor. The monitor is connected to the video signal output connector (VIDEO OUT connector or HD/SD ANALOG connector). The basic menu operations involve displaying sub-menus from the main menu items, and selecting settings on the sub-menus. Some sub-menus have menu items for performing more detailed settings. 4Landing selection [Landing: Soft, Just] (Factory setting: Soft = Soft landing) Using this item, select “Soft” or “Just” (exact) as the landing characteristics. The level of vibration accompanying the acceleration or deceleration initiated by the stop operation is less at the “Soft” setting than at the “Just” (exact) setting. For details on the basic operations to display the menus and change the items using the accessory wireless remote control or controller (AW-RP655, AW-RP555 or AW-RP400), refer to pages 40 to 47. 5Desktop (stand-alone) installation/ Hanging (suspended) installation selection [Install Position: Desktop, Hanging] (Factory setting: Desktop) Using this item, select stand-alone (Desktop) or suspension from an overhead surface (Hanging) as the manner in which the unit is to be installed. Desktop: Stand-alone installation Hanging:Installation where the unit is suspended from an overhead surface Main menu HE100 menu 1-------- Pan Tilt Head Setting 2-------- Camera Setting 6Automatic picture flipping selection [Smart Picture Flip: Auto, Off] (Factory setting: Off = no flipping) Using this item, select the function for flipping the picture when tilting reaches the specified angle to ON or OFF. 1Pan Tilt Head Setting menu display 2Camera Setting menu display 7Tilt angle at which automatic picture flipping starts [Flip Detect Angle: 60 to 120] (Factory setting: 90°) Using this item, select the tilt angle at which the picture is flipped when “Auto” has been selected as the automatic picture flipping selection [Smart Picture Flip] setting. Pan-tilt head unit setting menu Pan Tilt Head Setting 3-------- Tally 4-------- Landing 5-------- Install Position 6-------- Smart Picture Flip 7---------- Flip Detect Angle 8-------- Controller 8Accept control from control device selection [Controller: All, RP, Option, RP/Option] On Soft Desktop Auto 90 All (Factory setting: All = All control devices) All:All control devices (Including accessory wireless remote control) RP: Controller only Option: Expansion board only RP/Option: Controller and expansion board 9------ Initialize ------ Return At the point when this item’s setting is changed, the new setting is not reflected in operation. It is reflected when the unit is set to the standby mode and its power is turned on. 48 Setting the menu items The operation for turning on the unit’s power can be performed from any control device regardless of what has been selected as this item’s setting. Concerning initialization When “Initialize” is selected, the initialization confirmation screen is displayed for about 10 seconds. (Press the [] or [] button to make “Initialize” blink, and press the [] or [] button.) Other operations can also be performed from the control device used to perform the operation for turning on the unit’s power. These operations take effect until the unit is next set to the standby mode and its power is turned on. Initialize (Pan Tilt Head Setting) Do you want to initialize Pan Tilt Head settings? Follow one of the procedures below if the item’s setting is changed and the unit can no longer be operated from a specific control device. O.K. CANCEL When menu operations can be performed using another control device: First change the item using a control device capable of performing menu operations, and then turn off the unit’s power and turn it back on. Initialization confirmation screen When “O.K.” is selected while the initialization confirmation screen is displayed, the screen shown below appears, and initialization is performed. (Press the [] or [] button to make “O.K.” blink, and press the [] or [] button.) When initialization has been completed, the display returns to the “Pan Tilt Head Setting” menu. When menu operations cannot be performed using other control devices: 1.Turn off the power of the units and devices that are connected. 2.Disconnect the unit’s power cable, and plug it back in. 3.Perform the operation for turning on the unit’s power from the control device that was no longer capable of performing the menu operations. 4.After changing this item, turn off the unit’s power and turn it back on. Pan Tilt Head Setting 9Initialization [Initialize] initialize Using this item, the settings of all the items on the “Pan Tilt Head Setting” menu are returned to the factory settings. (Refer to the section on the right.) Return to the previous menu (main menu) [Return] When “O.K.” is not selected or “CANCEL” is selected while the initialization confirmation screen is displayed, the screen shown below appears, and the display returns to the “Pan Tilt Head Setting” menu without performing initialization. Pan Tilt Head Setting unchanged 49 Setting the menu items Daylight mode setting menu Camera Setting menu The shooting mode is selected on this menu. Daylight Mode Set 6-------- Brightness Set 7-------- Color Set 8-------- G/L, Setup Set -------- Other Set Camera Setting 1-------- Halogen 2-------- Fluorescent 3-------- Daylight 4-------- User ------ Initialize ------ Return 5------ Return User mode setting menu 1Halogen menu display for the halogen light mode 2Fluorescent menu display for the fluorescent light mode 3Daylight menu display for the daylight mode 4User menu display for the user mode 5Return to the previous menu (main menu) [Return] User Mode Set 6-------- Brightness Set 7-------- Color Set 8-------- G/L, Setup Set -------- Sharpness(DTL) Set 9-------- Other Set ------ Initialize ------ Return Shooting mode setting menus The setting menus in the halogen light, fluorescent light and daylight modes are all configured in the same way. However, the settings are stored separately for each shooting mode (with the exception of some setting items). The user mode has its own setting menu. 6Brightness setting menu display [Brightness Set] The brightness setting menu of this shooting mode is displayed here. Halogen light mode setting menu 7Color setting menu display [Color Set] Halogen Mode Set The color setting menu of this shooting mode is displayed here. 6-------- Brightness Set 7-------- Color Set 8-------- G/L, Setup Set -------- Other Set 8Genlock/color bar setting menu display [G/L, Setup Set] ------ Initialize 9Other setting menu display [Other Set] ------ Return Initialization [Initialize] Fluorescent light mode setting menu This item is used to return the following settings to the factory settings. (Refer to the next page.) All the settings of the , and items in each of the shooting modes All the settings of items 8 and 9 (common to all shooting modes) except for the video format Fluorescent Mode Set 6-------- Brightness Set 7-------- Color Set 8-------- G/L, Setup Set -------- Other Set Bear in mind that when initialization is performed, the video format will remain unchanged, but the aspect ratio, focus auto/manual selection, genlock and other settings will be initialized. ------ Initialize ------ Return 50 Setting the menu items Return to the previous menu (main menu) [Return] Concerning initialization When “Initialize” is selected, the initialization confirmation screen is displayed for about 10 seconds. (Press the [] or [] button to make “Initialize” blink, and press the [] or [] button.) (User mode only) Sharpness setting menu display [Sharpness(DTL) Set] Initialize (Halogen Mode) The sharpness setting menu in the user mode is displayed here. Do you want to initialize Halogen Mode settings? O.K. CANCEL Example: Initialization confirmation screen in the halogen light mode When “O.K.” is selected while the initialization confirmation screen is displayed, the screen shown below appears, and initialization is performed. (Press the [] or [] button to make “O.K.” blink, and press the [] or [] button.) When initialization is completed, the display returns to the setting menu for the shooting mode concerned. Halogen Mode initialize Example: Halogen mode When “O.K.” is not selected or “CANCEL” is selected while the initialization confirmation screen is displayed, the screen shown below appears, and the display returns to the setting menu of the shooting mode concerned without performing initialization. Halogen Mode unchanged Example: Halogen mode 51 Setting the menu items Brightness setting menu User mode brightness setting menu Brightness setting menu for halogen light mode, fluorescent light mode and daylight mode Brightness Set 1-------- Picture Level 6-------- Shutter Mode 7-------- Step/Synchro 3-------- Gain 4---------- AGC Max Gain Brightness Set 1-------- Picture Level 2-------- Step 3-------- Gain 4-------- AGC Max Gain +1 1/100 Auto 18dB +1 Synchro 60.04Hz Auto 18dB 5------ Return 5------ Return (User mode only) 6Shutter mode selection [Shutter Mode: Step, Synchro] 1Picture level adjustment [Picture Level: –4 to +4] (Factory setting: ±0] The convergence level of the auto iris/auto gain increase is adjusted here. (Factory setting: Step) The camera operates at the shutter speed setting selected using the Shutter step/synchro scan setting (Step/Synchro) item. Step:The shutter speed is selected using the shutter step value. Synchro: The synchro scanning frequency is set. 2Shutter step selection [Step: Off, 1/100, 1/250, 1/500, 1/1000, 1/2000] (Factory setting: Off) Using this item, the shutter speed is selected (unit: sec.). Off: The electronic shutter is set to OFF. 7Shutter step/synchro scan setting [Step/Synchro: Off, 1/100, 1/250, 1/500, 1/1000, 1/2000 or 60.04Hz to 248.82Hz] When the 1/100 speed setting is used in areas where the power line frequency is 50 Hz, flicker caused by fluorescent lights becomes more noticeable. (Factory setting: Off, 60.04Hz) Using this item, the shutter speed is set. When “Step” has been selected as the shutter mode selection (Shutter Mode) setting, then Off, 1/100 sec., 1/250 sec., 1/500 sec., 1/1000 sec. or 1/2000 is selected as the shutter speed. Off: The electronic shutter is set to OFF. 3Gain adjustment [Gain: Auto, 0dB to 12dB, 15dB, 18dB] (Factory setting: Auto; 0dB for the user mode only) Using this item, the light quantity is adjusted. Auto: The light quantity is adjusted automatically. (AGC: Auto Gain Control) The maximum gain is adjusted using the AGC maximum gain selection “AGC Max Gain” item. When the 1/100 speed setting is used in areas where the power line frequency is 50 Hz, flicker caused by fluorescent lights becomes more noticeable. When “Synchro” has been selected as the shutter mode selection (Shutter Mode) setting, a scanning frequency ranging from 60.04 Hz to 248.82 Hz is set. When shooting subjects such as TV screens, the horizontal bar noise can be reduced by adjusting the synchro scanning frequency. If “Auto” is selected as the gain adjustment (Gain) setting when the manual setting has been selected for the iris, the iris will be automatically changed to the automatic setting. If the manual setting is selected for the iris when “Auto” has been selected as the gain adjustment (Gain) setting, the gain adjustment will be automatically changed to the last gain setting. 4AGC maximum gain selection [AGC Max Gain: 6dB, 12dB, 18dB, ---] (Factory setting: 18dB) Using this item, the maximum gain when “Auto” has been selected as the gain adjustment (Gain) setting is set. 5Return to the previous menu (menu for selecting the shooting mode) [Return] 52 Setting the menu items Color setting menu User mode color setting menu Color setting menu for halogen light mode, fluorescent light mode and daylight mode Color Set Color Set 1-------- Chroma Level 2-------- White Bal 1-------- Chroma Level 2-------- White Bal 4-------- Pedestal Painting 5---------- R Gain 6---------- B Gain +1 ATW +1 ATW ±0 ±0 ±0 3------ Return ------ Return (User mode only) 1Color density adjustment [Chroma Level: –3 to +3] 4Black level adjustment [Pedestal: –30 to +30] (Factory setting: ±0) Using this item, the black level (pedestal level) of the luminance (Y) signal is set. Align the black level when using a multiple number of cameras including the unit. (Factory setting: ±0; +2 for the user mode only) 2White balance selection [White Bal: ATW, AWC A, AWC B, 3200K, 5600K] (Factory setting: ATW; AWC A for the user mode only) ATW:The white balance is adjusted automatically and continuously, and it is automatically corrected even when the light source or color temperature has changed. • If very bright objects (such as fluorescent lights) appear on the screen, the ATW function may not work properly. • The white balance may shift out of adjustment if there are no white objects on the screen. AWC A, AWC B: When AWC A or AWC B is selected and the white balance is adjusted, the resulting status is stored in the memory. When the unit is used under the same conditions, the adjustment status can be reproduced simply by selecting AWC A or AWC B, thus obviating the need for readjustment. When a new status is stored in the memory, the previous status is erased from the memory. If AWC (auto white balance adjustment) or a manual white balance adjustment is performed in the status selected by AWC A or AWC B, the resulting status will be stored in the memory. 3200K:The white balance that was adjusted under 3200K lighting conditions (equivalent to a halogen light) is established. 5600K:The white balance that was adjusted under 5600K lighting conditions (equivalent to daylight) is established. 5Painting R gain adjustment [R Gain: –30 to +30] (Factory setting: ±0) 6Painting B gain adjustment [B Gain: –30 to +30] (Factory setting: ±0) When “AWC A” or “AWC B” has been selected as the white balance setting (White Bal), the white balance can be finely adjusted after AWC (auto white balance adjustment) has been executed. When AWC is executed, the setting is returned to ±0. 3Return to the previous menu (menu for selecting the shooting mode) [Return] 53 Setting the menu items Genlock/color bar setting menu Sharpness setting menu (user mode only) The same settings established on the genlock/color bar setting menu are common to all the shooting modes (halogen light mode, fluorescent light mode, daylight mode and user mode). (When a setting in one mode is changed, the same setting is established in the other modes.) The sharpness setting menu is provided in the user mode only. Sharpness(DTL) Set 1-------- Detail 2-------- Total Detail Level 3-------- V Detail Level 4-------- Noise Suppress G/L, Setup Set 1-------- H Phase 2-------- SC Coarse 3-------- SC Fine Setup Level 4---------- ±0 90deg ±0 On On 2 4 0 5------ Return 5------ Return 1Detail ON/OFF selection [Detail: On, Off] Using this item, ON or OFF is selected for detail compensation. When “On” is selected, the amount of the detail compensation can be adjusted using the “Total Detail Level” and “V Detail Level” menu items. 1Horizontal phase adjustment [H Phase: –206 to +49] (Factory setting: ±0) Using this item, the horizontal phase during genlock can be adjusted. 2Total detail level selection [Total Detail Level: 0 to 14, ---] 2Color phase coarse adjustment [SC Coarse: 0deg, 45deg, 90deg, 135deg, 180deg, 225deg, 270deg, 315deg] (Factory setting: 7) Using this item, the amount of the edge enhancement in the horizontal and vertical directions is selected. When “Off” is selected as the detail ON/OFF selection setting, “---” is displayed, and no selection is possible. (Factory setting: 90deg) Using this item, the color phase during genlock can be adjusted coarsely. This setting takes effect only when VBS or Y/C signals are output as the video signals. 3Vertical detail level selection [V Detail Level: –7 to +7, ---] 3Color phase fine adjustment [SC Fine: –127 to +127] (Factory setting: ±0) Using this item, the amount of the edge enhancement in the vertical direction is selected. When “Off” is selected as the detail ON/OFF selection setting, “---” is displayed, and no selection is possible. (Factory setting: ±0) Using this item, the color phase during genlock can be adjusted finely. This setting takes effect only when VBS or Y/C signals are output as the video signals. 4Noise suppression [Noise Suppress: 0 to 7] 4Setup level selection [Setup Level: Off (0 IRE), On (7.5 IRE)] (Factory setting: 0) Using this item, the amount of screen noise generated by the detail can be reduced. The higher the value selected, the greater the reduction of the noise. However, if too high a value is selected, the sharpness of detailed subjects will be reduced. (Factory setting: On) Using this item, the setup level can be selected. 5Return to the previous menu (menu for selecting the shooting mode) [Return] 5Return to the previous menu (menu for selecting the shooting mode) [Return] 54 Setting the menu items Other settings (Other Set) menu 4Video aspect ratio selection [Aspect: ---, 16:9, 4:3] Apart from the gamma correction level selection (Gamma) setting, the settings of the Other Set menu are common to all the shooting modes (halogen light mode, fluorescent light mode, daylight mode and user mode). (When a setting in one mode is changed, the same setting is established in the other modes.) (Factory setting: 16:9) When “480i” or “480psF” has been selected as the “video format (Format) setting”, either “16:9 (squeeze)” or “4:3 (sides cut off)” is selected as the aspect ratio. When “1080i” or “720p” has been selected as the “video format (Format) setting”, “---” appears, and the aspect ratio cannot be selected. At this time, the aspect ratio of the composite signals is fixed at “16:9 (squeeze)”. Other Set menu for halogen light mode, fluorescent light mode and daylight mode Other Set 1-------- Focus 2-------- Iris 3-------- Format 4-------- Aspect 5-------- Status 6-------- Component 7-------- Focus ADJ With Zoom 5AWC/ABC operation status display ON/OFF selection [Status: Off, On] Auto Auto 1080i --Off --On (Factory setting: Off) Using this item, the display of the operation status for AWC (auto white balance adjustment) or ABC (auto black balance adjustment) is set to ON or OFF. When AWC or ABC is executed with this item set to “On”, the following is displayed. 8------ Return AWC ACTIVE:This is displayed while AWC is being executed. AWC OK:This is displayed for 3 seconds after AWC was completed successfully. AWC NG:This is displayed for 3 seconds after AWC was not completed successfully. ABC ACTIVE:This is displayed while ABC is being executed. ABC OK:This is displayed for 3 seconds after ABC was completed successfully. ABC NG:This is displayed for 3 seconds after ABC was not completed successfully. 1Focus adjustment auto/manual selection [Focus: Auto, Manual] (Factory setting: Auto) Auto: The lens is always focused automatically. Manual: The lens is focused manually. 2Iris adjustment auto/manual selection [Iris: Auto, Manual] (Factory setting: Auto) Auto: The iris is always adjusted automatically. Manual: The iris is adjusted manually. 6Component signal selection [Component: ---, Y/Pb/Pr, Y/C] If “Auto” is selected as the gain adjustment (Gain) setting when the manual setting has been selected for the iris, the iris will be automatically changed to the automatic setting. If the manual setting is selected for the iris when “Auto” has been selected as the gain adjustment (Gain) setting, the gain adjustment will be automatically changed to the last gain setting. (Factory setting: Y/Pb/Pr) When “480i” or “480psF” has been selected as the “video format (Format) setting”, either “Y/Pb/Pr” or “Y/C” is selected as the component signals. When “1080i” or “720p” has been selected as the “video format (Format) setting”, “---” appears, and the component signal setting cannot be selected. 3Video format selection [Format: 1080i, 720p, 480i, 480psF] 7ON/OFF selection of focus compensation during zooming function [Focus ADJ With Zoom: On, Off] (Factory setting: 1080i) Even when this item’s setting is changed, the video format is not switched immediately. A screen on which to confirm the setting change appears when an operation involving a transfer to another item has been performed. (Refer to the next page.) (Factory setting: On) When the focus is set to manual, the subject may go out of focus during zooming. Select ON or OFF for the function which compensates for this out-of-focusing. If the function has been set to OFF, either adjust the focus, as required, after zooming or set the focus to auto. 8Return to the previous menu (menu for selecting the shooting mode) [Return] 55 Setting the menu items Other setting (Other Set) menu for the user mode (Other Set) At the 3 video format selection (Format) item, the video format is not switched immediately even when the setting is changed. The screen shown below on which to confirm the setting changes appears when an operation involving a transfer to another item has been performed (when the [] or [] button is pressed). Other Set 9-------- Gamma 1-------- Focus 2-------- Iris 3-------- Format 4-------- Aspect 5-------- Status 6-------- Component 7-------- Focus ADJ With Zoom Normal Auto Auto 1080i --Off --On Other Set Focus Iris Format -------------------Change Setting? 8------ Return Auto Auto 1080i O.K. CANCEL -------------------Return (User mode only) 9Gamma correction level selection [Gamma: Low, Normal, High] Example: Halogen mode (Factory setting: Normal) Low:At this setting, the pictures are stable, and the contrast is set to sharp. (The gamma curve inclines gently for the low-brightness areas.) Normal:When “1080i” or “720p” has been selected as the video format (Format), the setting suited to HD shooting is established. With all other video formats, the setting suited to SD shooting is established. High:At this setting, the gray scale of the dark areas increases in scope, and pictures with light tones are displayed. The contrast is set to soft. (The gamma curve inclines sharply in the low-brightness areas.) When “O.K.” is selected, the video format is changed, and the other setting menu (Other Set) is restored. (Press the [] or [] button, select “O.K.”, and press the [] or [] button.) If “CANCEL” is selected, the other setting menu (Other Set) is restored without changing the video format, and the settings established prior to the changes made are displayed. The video format is not changed even when the menu is closed. Note Do not make a change to a video format that is not supported by the connected monitor. Not only will the pictures not be displayed on the monitor properly but the menus will not be displayed either. As a result, no further menu operations will be possible, and neither will it be possible to perform the operations to return to the video format. In cases like this, connect a monitor that supports composite signals or the video format that has been changed, and then change the video format. 56 Menu item table Menu Pan Tilt Head Setting Item Tally Landing Install Position Smart Picture Flip Flip Detect Angle Controller Initialize Return Camera Brightness Picture Level Setting Set Step <Halogen> Gain AGC Max Gain Return Color Set Chroma Level White Bal Return G/L, Setup H Phase Set SC Coarse SC Fine Setup Level Return Other Set Focus Iris Format Aspect Status Component Focus ADJ With Zoom Return Initialize Return Camera Brightness Picture Level Setting Set Step <Fluorescent> Gain AGC Max Gain Return Color Set Chroma Level White Bal Return G/L, Setup H Phase Set SC Coarse SC Fine Setup Level Return Other Set Focus Iris Format Aspect Status Component Focus ADJ With Zoom Return Initialize Return Factory setting On Soft Desktop Off 90 All Menu amera C Setting <Daylight> ±0 Off Auto 18dB ±0 ATW ±0 90deg ±0 On Auto Auto 1080i 16:9 Off Y/Pb/Pr On User ±0 Off Auto 18dB ±0 ATW ±0 90deg ±0 On Auto Auto 1080i 16:9 Off Y/Pb/Pr On 57 Item Brightness Picture Level Set Step Gain AGC Max Gain Return Color Set Chroma Level White Bal Return G/L, Setup H Phase Set SC Coarse SC Fine Setup Level Return Other Set Focus Iris Format Aspect Status Component Focus ADJ With Zoom Return Initialize Return Brightness Picture Level Set Shutter Mode Step/Synchro (Step) (Synchro) Gain AGC Max Gain Return Color Set Chroma Level White Bal Pedestal Painting R Gain B Gain Return G/L, Setup H Phase Set SC Coarse SC Fine Setup Level Return Sharpness Detail (DTL) Set Total Detail Level V Detail Level Noise Suppress Return Other Set Gamma Focus Iris Format Aspect Status Component Focus ADJ With Zoom Return Initialize Return Factory setting ±0 Off Auto 18dB ±0 ATW ±0 90deg ±0 On Auto Auto 1080i 16:9 Off Y/Pb/Pr On ±0 Step Off 60.04Hz 0dB 18dB +2 AWC A ±0 ±0 ±0 ±0 90deg ±0 On On 7 ±0 0 Normal Auto Auto 1080i 16:9 Off Y/Pb/Pr On