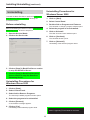
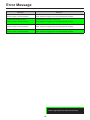
1
Operating Instructions
Back-End Server/Back-End Streaming Server/Service Watch
(Back-End Application)
Model No.
AG-JJLBE20P
Back-End Streaming Server is not available at present.
Upgrading is scheduled for the future.
•M
icrosoft and the Microsoft logo, Windows are registered trademarks or trademarks of Microsoft
Corporation in the United States and other countries.
ENGLISH
1009K0 -M
VQT2D96
Contents
Overview.................................................... 3
Operating Environment...................................................3
Installing/Uninstalling.............................. 4
Installing..........................................................................4
Preparation.................................................................4
Installing the Back-End Server application.................4
Installing the Back-End Streaming Server
application...............................................................8
Uninstalling...................................................................10
Before uninstalling....................................................10
Uninstalling Procedures for Windows Server 2003...10
Uninstalling Procedures for Windows Server 2008...10
Startup..................................................... 11
Description of the Screen Display........ 12
Log Tab.........................................................................12
Service Tab...................................................................13
Monitoring the Back-End Server........... 14
Filtering.........................................................................14
Updating the Log list automatically..........................14
Updating the Log list manually.................................14
Deleting the log........................................................14
Cancel deleting........................................................14
Output the log...........................................................14
Log details....................................................................15
Service window.............................................................15
Error Message......................................... 16
For obtaining the software, contact your supplier.
■ Display in this manual
Display on the screen may differ from the actual
product.
Back-End Streaming Server is not available at
present. Upgrading is scheduled for the future.
Overview
Operating Environment
Service Watch is a system to monitor the Back-End
server and to record its operations as a log. Using this
log, an administrator can watch the conditions of the
Back-End server and plan maintenance. Service Watch
can restart the Back-End server.
A PC that meets the following operating environment is
required for user of this application.
CPU
RAM
OS
: Intel Quad Core Xeon 5430 2.66 GHz or more
: 2 GB or more
: Windows Server 2003 Service Pack 2 or later
Windows Server 2008 Standard Edition SP2
DB
: Microsoft SQL Server 2008 Standard Edition
Service Pack 1
Add on: .Net Framework 3.5 Service Pack 1
Adobe Reader 8 or 9
Installing/Uninstalling
Installing
Installing the Back-End Server
application
The Back-End application is installed with the following
procedures. Each application can be installed on
separate computers connected via a network. For
installing the application, .Net Framework 3.5 Service
Pack 1 and SQL server must be installed on the
computer.
1. Click on the BESSetup.msi.
The License Agreement screen appears
1. Install the Back-End Server application.
2. Install the Back-End Streaming Server
Back-End Streaming Server is not available at
application.
present. Upgrading is scheduled for the future.
Preparation
1. Download “.Net Framework 3.5 Service
Pack 1” from the Microsoft download site.
If .Net Framework 3.5 has been installed, update it.
2. Select “I Agree”.
2. Install the “.Net Framework 3.5 Service
Pack 1” following the instructions.
3. Install the SQL server named “Microsoft
SQL Server 2008 Standard Edition”.
4. Select the SQL Server certification.
5. Select the Full-Text Search.
6. Select the SQL Server Browser.
7. Install the SQL server.
If the SQL server has been installed, new
installation is not required. Update the SQL server.
8. Create a user account for an OS belonging
to the Administrators group.
Using the authority of this user, execute the BackEnd Server.
The user is exclusive for executing the Back-End
Server. Do not delete this user, user name, or
password.
3. Click on [Next].
9. Login the OS with the new user and
install the Back-End Server, following the
steps in “Installing the Back-End Server
application.”
After installation, the Back-End Server operates
with the Local System account. For changing the
user account, see “Service Tab,” page 13.
Installing/Uninstalling (continued)
4. Click on [Next].
6. Click on [Next].
The file will be transferred to the following folder:
/Program Files/Panasonic/BES
The screen shown below appears.
When the file transfer is completed, the screen
shown below appears.
7. Select the SQL Server from the dropdown
list.
For referring the SQL server that can be currently
connected, click on [Reference].
If the SQL Server name is not displayed on the
dropdown list, SQL Server Browser services may
not be activated. Follow the procedures below to
activate the SQL Server Browser services, then
click on [Reference] again.
1.Click on [Start].
2.Select Control Panel.
3.Double-click on Administrative Tools.
4.Double-click on Services.
5.Right-click on the SQL Server Browser
services then click on Start.
5. Enter the License ID and Password.
Installing/Uninstalling (continued)
8. Select “SQL Server authentication”.
Initial data setting: For specifying the saving path
for various data
For SQL Server authentication, a user name and
password of a user for the SQL server having
sysadmin authentication is required. To use the
Windows authentication, the installer should be
started by a user having administrator authority.
Video InBox path: For temporarily saving video
files before registering the database
Default Library path: For saving video files
Unprocessed Video path: For saving
unprocessed video files
Archive path: For saving archive files
Free field setting: For naming of five fields used
as metadata
Naming the fields
The name defined in the free field setting will
be displayed on the Front-End application,
Back-End Client application, and Back-End
Administrator application. Up to 50 characters
can be used in a field name.
Field1: For defining the name of Field1
Field2: For defining the name of Field2
Field3: For defining the name of Field3
Field4: For defining the name of Field4
Field5: For defining the name of Field5 (Use
the name, such as Source or Vehicle,
because the system uses Field5 for
distinguishing vehicles.)
9. Enter the same user name as that used for
installing the SQL server.
Note
10.Enter the same password as that used for
installing the SQL server.
The name set here cannot be changed in the
application.
11.Click on [Next].
The screen shown below appears.
12.Set the settings and path if necessary.
13.Click on [Next].
The screen shown below appears.
14.Enter the SMTP Server address in SMTP
Server field.
(For details, refer to the Operating Instructions for
the Back-End Administrator application.)
Database server setting: For specifying to save
the database file
15.Enter the Port Number.
Normally use the default setting “25.”
Installing/Uninstalling (continued)
Setting the SMTP Server
16.Click on [Register].
The registration success dialog box appears.
If the SMTP setting has been canceled or the SMTP
Server is intended to be set later, follow the procedures
below.
1. Double-click on SMTPSetting.exe in the
folder shown below where the Back-End
Server has been installed.
C:\Program Files\Panasonic\ICV\BES\
SMTPSetting.exe
The screen shown below appears.
17.Click on [OK].
The screen shown below appears.
2. Enter the address of the Back-End Server,
User ID, and Password.
3. Click on [Connect].
18.Click on [Close].
Installation is completed.
Once installation is completed, the service will
start. The service will be activated once the OS has
started up.
4. Follow steps 14 to 18 above.
Installing/Uninstalling (continued)
Installing the Back-End Streaming
Server application
4. Click on [Next].
The file will be transferred to the following folder:
/Program Files/Panasonic/BESS
To install the Back-End Streaming server application,
the Back-End Server application should be installed.
1. Click on the BEStreamingSetup.msi.
The License Agreement screen appears.
When the file transfer is completed, the screen
shown below appears.
2. Select “I Agree”.
5. Select the SQL Server that is used with
the Back-End Server application from the
dropdown list.
3. Click on [Next].
For referring the SQL server that can be currently
connected, click on [Reference].
If the SQL Server name is not displayed on the
dropdown list, SQL Server Browser may not be
activated. Follow the procedures below to activate
the SQL Server Browser, then click on [Reference]
again.
1.Click on [Start].
2.Select Control Panel.
Back-End Streaming Server is not available at
present. Upgrading is scheduled for the future.
Installing/Uninstalling (continued)
3.Double-click on Administrative Tools.
4.Double-click on Services.
5.Right-click on the SQL Server Browser
services then click on Start.
10.Select the Back-End Server that will be
linked with the Streaming Server from the
list.
11.Specify the IP address of the Streaming
Server for being accessed by the Back-End
Client.
6. Select “SQL Server authentication”.
7. Enter the same user name as that used for
installing the SQL server.
12.Click on [Complete].
The screen shown below appears.
8. Enter the same password as that used for
installing the SQL server.
13.Click on [Close].
Installation is completed.
9. Click on [Next].
The screen shown below appears.
Back-End Streaming Server is not available at
present. Upgrading is scheduled for the future.
Installing/Uninstalling (continued)
Uninstalling
Uninstalling Procedures for
Windows Server 2008
Uninstall the Back-End Server application and BackEnd Streaming Server application following the
procedures below.
1. Click on [Start].
2. Select Control Panel.
Before uninstalling
3. Double-click on Programs and Features.
Before uninstalling the Back-End Server and Back-End
Streaming Server, be sure to stop them.
4. Select the program to be uninstalled.
The Uninstall or change a program window opens.
5. Click on Uninstall.
1. Start the Service Watch.
The User Account Control window opens.
2. Click on the Service tab.
6. Click on [Continue].
The Uninstall window opens.
7. Click on [Uninstall].
Uninstalling of the selected program starts.
3. Click on [Stop] in Back-End Server section
to stop the Back-End Server.
4. Click on [Stop] in Back-End Streaming
Server section to stop the Back-End
Streaming Server.
Uninstalling Procedures for
Windows Server 2003
1. Click on [Start].
2. Select Control Panel.
3. Select Add or Remove Programs.
The Currently installed programs window opens.
4. Select the program to be uninstalled.
5. Click on [Remove].
A confirmation message appears.
6. Click on [Yes].
Uninstalling of the selected program starts.
Back-End Streaming Server is not available at
present. Upgrading is scheduled for the future.
10
Startup
1. Turn on the PC and the Memory Card Video
Recorder.
2. Click on the Service Watch icon on the
desk top. The Service Watch screen is displayed.
11
Description of the Screen Display
When the Service Watch icon on the desktop of the PC
is clicked on, the screen shown below appears.
Log Tab
Event Type
The logs are filtered according to Event Type.
Setting values: Success, Error, No filtering
Default setting: No filtering
Event Category/ID
The logs are filtered according to Event Category/ID.
Setting values: No filtering, Disk, Network,
Service/Add to library, Service/Upload or Import to
Video Inbox, Service/Streaming, Service/Schedule,
Service/BEC
Default setting: No filtering
Start Date
The logs are filtered according to Start Date.
If the check box is checked, this filter is activated.
Default setting: No check
End Date
The logs are filtered according to End Date.
If the check box is checked, this filter is activated.
If unchecked, the Logs list will be updated in real
time.
Default setting: No check
Log tab
For displaying the Log list and setting the filtering
conditions.
Service tab
Start Time
For displaying the service information.
(See “Service window” on page 15.)
The logs are filtered according to Start Time.
If the check box is checked, this filter is activated.
Default setting: No check
Delete button
Click on this button to delete the log on the Log list.
End Time
The logs are filtered according to End Time.
If the check box is checked, this filter is activated.
If the check box is unchecked, the Log list is
updated in real time, and the latest log is displayed
on the Log list.
Default setting: No check
Output button
Click on this button to output the Log list as a text
file.
Log List
Shows the logs of the Back-End Server operations
after being filtered. The list will be updated in real
time if End Time is unchecked.
If you double-click on an item, the Information
screen for that item will be displayed.
(See “Log details” on page 15.)
Auto Update
When the check box is checked, the Log list is
updated automatically.
Update button
Click on this button to update the Log list manually.
Log Filtering
For specifying the filtering conditions.
Close button
For closing the Service Watch screen.
Back-End Streaming Server is not available at
present. Upgrading is scheduled for the future.
12
Description of the Screen Display (continued)
Service Tab
Stop button
Back-End Streaming Server is not available at
When this button is clicked, the Back-End
present. Upgrading is scheduled for the future.
Streaming Server stops.
Close button
When this button is clicked, the Service Watch
stops.
Help button
When this button is clicked, Help is displayed.
Stop button
When this button is clicked, the Back-End Server
stops.
Local System account option button
Select to use the Local System account.
The Back-End Server is activated with the Local
System account. This is the default setting. The
user specified in the Local System account has the
same authority as the members in the Administrator
group.
This account option button
Select to use this account. When this account is
selected, Account and Password should be set.
Select to set the user account for activating the
Back-End Server. After selecting this option button,
input the user account and password, confirm the
password, then click on [Change].
Account
Set the account.
Password
Enter the password.
Confirm password
Reenter the password to confirm it.
Change button
When the setting in Back-End Server section is
changed, click on this button.
13
Monitoring the Back-End Server
Filtering
2. Click on [Yes].
All log data on the Log list are deleted.
Collected logs are filtered according to the conditions
set in the Log Filtering section, and only the filtered
logs are displayed on the Log list.
Cancel deleting
Click on [No] on the confirmation dialog box.
Setting the filtering conditions
Set the filtering conditions following the procedures
below.
Output the log
1. Select the Event Type from the dropdown
list.
1. Click on [Output].
2. Select a folder in which to store the log file
then enter the log file name.
2. Select the Event Category/ID from the
dropdown list.
3. Click on [OK].
The log file is created in the specified folder.
3. Set the Start Date from the dropdown list,
and check the check box.
If the Start Date is not to be used for filtering,
uncheck the check box.
4. Set the End Date from the dropdown list,
and check the check box.
If the End Date is not to be used for filtering,
uncheck the check box.
5. Set the Start Time from the dropdown list,
and check the check box.
If the Start Time is not to be used for filtering,
uncheck the check box.
6. Set the End Time from the dropdown list,
and check the check box.
If the End Time is not to be used for filtering,
uncheck the check box.
Updating the Log list automatically
Check the Auto Update check box, and the Log list will
be updated automatically.
Updating the Log list manually
Click on [Update]. The Log list is updated.
Deleting the log
1. Click on [Delete].
The confirmation dialog box appears.
14
Monitoring the Back-End Server (continued)
Log details
Service window
Double-clicking on an item on the Logs list displays the
Information screen to show the details of each log.
Click on the Service tab on the main window. The
Service window appears.
To see the details of the previous log
Click on [Prev].
To stop the Back-End Server
Click on [Stop] in the Back-End Server section.
To see the details of the next log
Click on [Next].
To
stop the Back-End Streaming Server
Back-End Streaming Server is not available at
Click on [Stop] in the Back-End Streaming Server
present. Upgrading is scheduled for the future.
section.
To close the Information screen
Click on [Close].
To restart the application
Click on [START].
Note
Only the administrator of the server can stop and restart
the application.
15
Error Message
Message
Measure
“Cannot start BackEnd Server.
Please contact to the administrator."
The Back-End server cannot start.
Check whether the logged-in user has administrative privileges.
“Cannot start Streaming Server.
Please contact to the administrator.”
The Streaming Proxy server cannot start.
Check whether the logged-in user has administrative privileges.
“Cannot stop BackEnd Server.
Please contact to the administrator.”
The Back-End server cannot be shut down.
Check whether the logged-in user has administrative privileges.
“Cannot stop Streaming Server.
Please contact to the administrator.”
The Streaming Proxy server cannot be shut down.
Check whether the logged-in user has administrative privileges.
Back-End Streaming Server is not available at
present. Upgrading is scheduled for the future.
16
Panasonic Computer Solutions Company
50 Meadowlands Parkway, Panazip 2F-5,
Secaucus, NJ 07094
©
2009
P