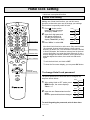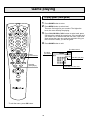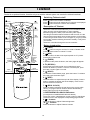
1
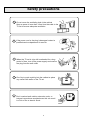
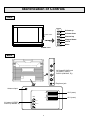
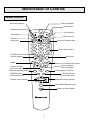
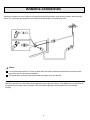
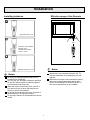
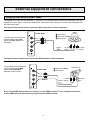
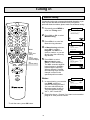
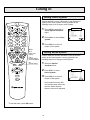
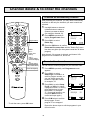
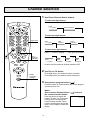
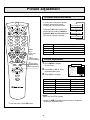
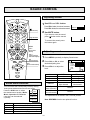
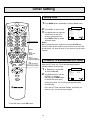
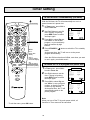
OWNER'S MANUAL
68CM CORDLESS REMOTE COLOUR TELEVISION
MODEL: 6845PFST
Type Tested
Electrical
Safety
AS/NZS 3250 Lic 4166
Standards Australia
APP No: N15900
PALSONIC CORPORATION PTY LTD
1 JOYNTON AVENUE
WATERLOO NSW 2017 AUSTRALIA
TEL: (02) 9313 7111
FAX: (02) 9313 7555
www.palsonic.com.au
PALSONIC CUSTOMER SERVICE
TELEPHONE
AUSTRALIA: 1300 657 888
Contents
Congratulations on your purchase of this Palsonic colour television.
We recommend that you thoroughly read this manual before use to fully enjoy the many functions and excellent
effects of this equipment.
Retain this manual in an easily accessible location for future reference.
* Screen displays and illustrations in this manual may differ from the actual ones for better visibility.
Contents
Features .................................... 1
Safety precautions ................... 2
Identification of Controls ........ 4
Front ..................................................
Back ..................................................
Remote Controller .............................
4
4
5
Antenna Connection ................ 6
Installation ................................ 7
External equipment
connections .............................. 8
Using the side Audio/Video jacks ......
to connect the 21-Pin scarts...............
To connect the AV outputs.................
8
9
9
Power on/off ............................. 10
Turning on ......................................... 10
Turning off ......................................... 10
Selecting Input Signal ............. 11
Watching AV program ....................... 11
Switching from AV to TV .................... 11
Tuning in ................................... 12
Automatic tuning ...............................
Manual Tuning ...................................
Fine tuning .........................................
Setting colour system ........................
Setting sound system ........................
12
13
14
15
15
Channel delete ......................... 16
To order the channels ............. 16
Channel Selection .................... 17
Picture adjustment ................... 18
to select the picture mode ................. 18
Picture adjustment ............................. 18
Sound Controls ........................ 19
Adjusting volume ...............................
Sound mode selection .......................
To select stereo/bilingual mode ........
To enter into earphone state .............
19
19
20
20
Timer Setting ............................ 21
Setting clock ...................................... 21
Setting OFF time ............................... 21
Setting ON timer ................................ 22
Setting Timer set ................................ 22
Special functions ..................... 23
To select OSD language ...................
Setting blue back ...............................
Rotate function ..................................
Screen aspect selection ....................
23
23
23
23
Child lock setting ..................... 24
Hotel Lock Setting ................... 25
Game playing ........................... 25
Teletext ..................................... 27
Troubleshooting Guide ........... 28
Specifications .......................... 30
Main features
. Hyperband
. Automatic channel preset
. Full function remote control
. 21-pin scarts and AV input/output (RCA) jacks
. Selectable picture and selectable sound
. NICAM and German stereo/bilingual broadcasts (optional)
. Teletext
. ON Timer, OFF Timer
. Real Clock (with teletext signal)
. Channel swap
. Child lock (option)
. Hotel lock (option)
. Digital comb-filter
. SMV (scan velocity modulation) (option)
. Black stretch, CTI (Colour Transient Improver) function
. Game
. AVL (automatic volume level) (option)
. Bass/Treble/Balance control
. MSS (Micronas surround sound) (option)
. DBE (Dynamic Bass Enhanced) (option)
. Picture rotate (option)
1
Safety precautions
Note: This TV set can operate on an AC power of 240V, 50Hz. You must not use a power supply of
any other type.
When any unusual situation occurs, turn off the
power supply at once and remove the plug from the
wall outlet. Contact a qualified service department in
your local area.
Do not expose the TV set to rain or excessive
moisture. Avoid using the set in very warm or
damp places and never use it in a bathroom.
When cleaning dust off the picture tube disconnect
the power first. You can wipe lightly with a piece of
dry, clean and soft cloth.
Avoid exposing the set to direct sunlight and other
sources of heat to prevent damage to the cabinet
and components.
High voltage exists in this TV set. Do not remove the
cover
2
Safety precautions
Do not cover the ventilating hole in the cabinet
Keep a space of more than 10cm from the walls to the
TV set to ensure adequate ventilation.
If the power cord or the plug is damaged contact a
qualified service department for service.
When the TV set is to be left unattended for a long
period of time, turn off the power supply and remove
the plug from the wall outlet.
Don't try to push anything into the cabinet or place
any vessel with water on the TV set.
Don't overload wall outlets; extension cords, or
integral convenience receptacles as this can result
in a risk of fire or electric shock.
3
Identification of Controls
Front
VOL+
Volume up
VOL-
Remote sensor
CH+
CHAV/TV
Volume down
Channel up
Channel down
AV/TV
MENU
Menu
POWER switch
S-VIDEO VIDEO
L/MOMO-AUDIO-R
AV3/SVHS
Back
AV3 input/S-VHS input
(S-VIDEO, VIDEO,
AUDIO (L/MONO, R))
Earphone jack
Antenna input
OUT
VIDEO
AV output (VIDEO,
AUDIO (L/MONO, R)
L/MONO
R
4
AV(2)
AV2 (scart)
AV(1)
AV1 (scart)
Identification of Controls
Remote controller
Power on/standby
Real clock (teletext)
Hold (teletext
Reveallconceal (teletext)
Size (teletext)
Mix (teletext)
Index (teletext)
?
Teletext/TV
Sound mute
i
Enter into Earphone state
1
2
3
4
5
6
7
8
9
TV/VIDEO input select
0/AV
Digit select
--/---
+
Previous program
Direct channel select
U
O
EN
VOL
VOL
-
+
Channel up/down
Menu item select
Red (teletext) Game playing
GREEN (teletext),
Sound mode select
K
CH
M
MENU
Volume up/down
Menu item adjust
CH
-
GAME
LOCK
+
Contrast control (teletext)
-
CYAN (teletext), Child lock
YELLOW (teletext)
Picture mode select
P.M
S.M
Return to TV mode/Clear the menu
+
Brightness control (teletext)
-
Stereo/Mono/Bilingual select
SOUND
Retain on-screen display
+
5
Antenna connection
Optimum reception of colour requires a good signal and will generally mean that an outdoor aerial must be
used. The exact type and position of the aerial will depend upon your particular area.
Notes:
It is recommended that the 75-ohm coaxial cable be used to eliminate interference and noise which
may occur due to radio wave conditions.
The aerial cable should not be bundled with the power cord and the like.
INSTALL the unit in a room where direct light will not fall upon the screen. Total darkness or a reflection on
the picture screen may cause eyestrain. Soft and indirect lighting is recommended for comfortable
viewing.
6
Installation
Effective range of the Remote
Installing batteries
Open the battery cover.
5m
Install two "AAA" batteries
matching the +/polarities of the battery
to the +/- marks.
?
i
1
2
4
5
7
8
3
6
9
0/AV
+
--/---
K
U
EN
O
M
CH
VOL
VOL
-
+
CH
-
GAME
LOCK
P.M
S.M
+
-
+
SOUND
+
Notes:
Replace the battery cover.
When there is an obstacle between the TV
and the transmitter, the transmitter may not
operate.
When direct sunlight, and incandescent lamp,
fluorescent lamp or any other strong light
shines on the REMOTE SENSOR of the TV
the remote operation may be unstable.
Notes:
Do not try to recharge batteries they are not
intended to be recharged.
Use only the size and type of batteries specified.
Do not mix different types of batteries together
or old batteries with fresh ones.
When the remote control will not be used for a
long period of time or when the batteries are
worn out, remove the batteries.
Do not throw the batteries into a fire. Dispose of
used batteries in the specified manner.
Do not drop, dampen or disassemble the remote
control.
7
External equipment connections
Using the side AUDIO/VIDEO Jacks
The optimal use for the side A/V jacks are to connect an A/V component that is used only occasionally, such as a
camcorder or video game. Connect the Audio/Video output jacks of the external unit to the Audio Input jacks and
the Video Input jacks.
AV3/SVHS
The figure below shows how to connect the AV3 input jacks to video equipment.
Yellow (video)
White (audio L/MONO)
R
Red (audio R)
W
R
L/MONO-AUDIO-R
Y
W
Y
Video game
VIDEO
To access the unit connected
to these jacks, press 0/AV
button until AV3 appears on
the screen.
TV SET SIDE
S-VIDEO
Signal
W
Y
To video
output
R
To audio
outputs
White (audio L/MONO)
R
Red (audio R)
Camcorder, etc.
R
W
W
L/MONO-AUDIO-R
TV SET SIDE
VIDEO
To access the unit connected
to these jacks, press 0/AV
button until AV3 SVHS
appears on the screen.
AV3/SVHS
The figure below shows how to connect the SVHS input to video equipment.
S-VIDEO
To audio
Signal outputs
W
R
To S-VIDEO
output
Note: The S-VIDEO input terminal has priority over AV3 VIDEO terminal. To use equipment connected
to AV3 VIDEO terminal, disconnect any plug from the S-VIDEO terminal.
8
External equipment connections
To connect the 21-Pin Scarts
This TV set is equipped with 21-Pin Scarts for your desired equipment to be connected.
The figure below shows how to connect the AV1 SCART to video equipment.
To access the unit connected to
AV1 SCART, press the 0/AV
button until AV1 appears on the
screen.
21-pin SCART
connector
Video equipment
OUT
If the signal source is RGB
signal, the OSD will be AV1
RGB.
VIDEO
L/MONO
R
DVD player, etc.
21-pin SCART
Converter
Note: If the equipment you want to connect is not equipped with 21-pin Scart, you can connect it by using
the 21-pin Scart Convertor (supplied) as illustrated above.
The figure below shows how to connect the AV2 SCART to video equipment.
AV2 SCART, press the 0/AV
button until AV2 appears on the
screen.
21-pin SCART
connector
Video equipment
OUT
VIDEO
L/MONO
If the signal source is RGB
signal, the OSD will be AV2
RGB.
R
DVD player, etc.
21-pin SCART
Converter
Note: If the equipment you want to connect is not equipped with 21-pin Scart, you can connect it by using
the 21-pin Scart Convertor (supplied) as illustrated above.
To connect the AV Outputs
You can connect a stereo system to the AV output jacks on the TV set rear to enjoy a high-quality sound from
the stereo system, or you can connect the AV output jacks to the VTR to record the program you like.
To external input
W
R
OUT
VIDEO
W
Signal
L/MONO
Stereo System
R
R
Y
Yellow (video)
W
White (audio L/MONO)
R
Red (audio R)
Signal
Another VTR for
recording
Y
Y
W
W
R
R
9
Power on/off
Turning on
(On/standby)
1
Press the Power Switch on the TV set.
Now the standby indicator lights up, the TV set is in
STANDBY mode. Now please follow step 2.
?
2
i
1
2
3
4
5
6
7
8
9
0/AV
In STANDBY mode, you can also press Channel
up/down or AV/TV button on the set to turn on the set.
0-9 digit
buttons
--/---
Turning off
+
U
K
O
EN
M
CH
VOL
VOL
-
+
In STANDBY mode, press the button or 0-9
digit button on the remote controller and the
TV set is turned on.
1
Press the Power Switch on the TV set if you
want to cut off the power completely.
2
If you want to turn off the TV set temporarily,
press the button.
CH
-
GAME
LOCK
P.M
S.M
+
-
+
SOUND
+
10
Channel delete & to order the channels
Watching AV program
This TV set provides AV input terminals and 21 -pin scarts
for your convenient connection to VCR, DVD or other
video equipments.
?
1
i
1
2
3
4
5
6
8
9
7
To watch video program from AV inputs or 21pin scarts, Press 0/AV button repeatedly until
you see the appropriate input indicator on the
screen.
AV1
AV2
AV3
2
Auto B/G
MONO
AV button
(TV/VIDEO
input select)
Notes:
0/AV
+
--/---
U
K
OK button
O
EN
M
CH
When the signal source input through AV1/AV2 is RGB
signal, the OSD is AV1 RGB/AV2 RGB.
VOL
VOL
-
+
CH
When AV3 S-VIDEO is used, the OSD is AV3 S-VHS.
CH+/- button
-
GAME
LOCK
Switching from AV to TV
P.M
S.M
+
-
+
SOUND
+
When the TV set is in AV mode, there are three ways for
you to switch back to TV mode as follows.
1
Press 0/AV button repeatedly until the TV
program appears.
2
Press the OK button to switch back to TV
mode.
3
Press CH+/- button to switch back to TV mode.
11
Tuning in
Automatic Tuning
1 Press MENU repeatedly to
Tuning
P+
display Tuning menu.
?
Automatic tuning
Manual tuning
-
P-
+
i
Tuning
P+
1
2
3
4
5
6
8
9
7
--/---
Automatic tuning.
MENU
+
U
K
O
EN
M
CH
VOL
VOL
-
+
-
-
GAME
CH+/(menu item
select)
LOCK
P.M
+
Automatic tuning
3 Press VOL+ to start automatic
tuning. All active channels will
be preset and stored into
memory automatically.
VOL+/(volume adjust
menu item adjust)
CH
Program
Band
5
VHF L
>>
OK
(exit the menu)
After automatic tuning, the set will return to the first
channel program.
During automatic tuning, pressing OK button will stop the
process.
+
-
Automatic tuning
Manual tuning
P-
0/AV
S.M
2 Press CH+ or CH- to select
+
-
Note:
Before Automatic tuning, we recommend you to set a
proper Sound System according to your local area. (see
page 15)
SOUND
+
* To exit the menu, press OK button.
12
Tuning in
Manual tuning
If automatic tuning can not preset the desired channels, or you
want to preset the desired channels one by one with the
preferred channel numbers, please make use of Manual tuning.
1
?
Repeatedly press MENU to
enter into Tuning menu.
Tuning
P+
i
2
1
2
3
4
5
6
7
8
9
--/---
P-
Press VOL+/- to enter into
Manual tuning submenu.
K
O
VOL
VOL
-
+
CH+/(menu item
select)
VOL+/(volume adjust
menu item adjust)
CH
-
GAME
LOCK
P.M
press CH+/- to select
Program, use VOL+/- to
select a number, or you can
directly input the number by
digit buttons.
5 Press CH+/- to select
Manual search, press
VOL+/- to start searching.
The VOL- searches towards
lower frequency; the VOL+
towards higher frequency.
When a channel is located,
the searching stops and the
channel is stored in the
specified position number.
OK
(exit the menu)
+
+
-
-
+
Manual tuning
P+
MENU
+
U
EN
M
CH
-
Press CH+ or CH- to select
Manual tuning.
4 In Manual tuning submenu,
0/AV
S.M
3
Automatic tuning
Manual tuning
P-
5
Program
VHF L
Band
Manual search
Fine Tune
-
+
Manual tuning
P+
P-
5
Program
VHF L
Band
Manual search >>
Fine Tune
-
+
SOUND
+
Notes:
1. In manual tuning, you can also
use BAND selection to
quicken searching process if
you know which band your
desired program locates in.
The band switches among
VHF L, VHF H and UHF.
2.
* To exit the menu, press OK button.
13
Manual tuning
P+
P-
5
Program
VHF L
Band
Manual search >>
Fine Tune
-
+
Repeat the above 1-5 steps if you want to store another
program in other position number.
Tuning in
Fine tuning
Fine tuning is not necessary under normal conditions.
However, in area of inferior broadcast conditions where
adjustment is necessary for a better picture and sound,
use Fine tuning.
1
?
i
1
2
3
4
5
6
8
9
7
0/AV
--/---
Digit buttons
Press MENU repeatedly to
display Tuning menu.
P-
3 Press CH+/- to select
Tuning
Automatic tuning
Manual tuning
-
K
O
VOL
-
+
VOL+/(volume adjust
menu item adjust)
CH
-
GAME
CH+/(menu item
select)
LOCK
Tuning
Automatic tuning
Manual tuning
-
P.M
4 Press CH+/- to select Fine
tune.
5 Press VOL+/- to begin fine
tuning until the best possible
picture and sound are
obtained.
+
+
SOUND
+
* To exit the menu, press OK button.
14
+
Manual tuning
P+
OK
(exit the menu)
+
P+
Manual tuning, press
VOL+/- to enter into Manual
tuning sub-menu.
MENU
+
U
EN
M
VOL
-
P+
P-
CH
S.M
2
Select a channel you want to
fine-tune (for example:
channel 28).
P-
Program
Band
Manual search
Fine Tune
-
+
Tuning in
Setting Colour System
If some channel's colour is abnormal, it may be that the
setting of the colour system is wrong, please do the
following steps to set a proper colour system.
1 Press MENU repeatedly to
?
display Special functions
menu.
i
1
2
3
4
5
6
7
8
9
0/AV
--/---
K
O
VOL
VOL
-
+
CH
-
GAME
LOCK
P.M
S.M
Press CH+/- to select Color
system.
3
P-
English
Language
On
Blue back
50
Rotate
4:3
Aspect
Off
Child lock
Auto
Color system
B/G
Sound system
-
+
Press VOL+/- to select a
proper colour system.
MENU
+
U
EN
M
CH
2
Special functions
P+
CH+/(menu item
select)
Setting Sound System
VOL+/(volume adjust
menu item adjust)
If some channel's sound is abnormal, it may be that the
setting of the sound system is wrong, please do the
following steps to set a proper sound system.
OK
(exit the menu)
1
Enter into Special
functions menu.
+
-
+
2 Press CH+/- to select
Sound system.
SOUND
Special functions
P+
3
+
Press VOL+/- to select a
proper sound system.
Some models are only with
one sound system and in this
case the Sound System
does not need to be adjusted.
* To exit the menu, press OK button.
15
P-
English
Language
On
Blue back
50
Rotate
4:3
Aspect
Off
Child lock
Auto
Color system
B/G
Sound system
-
+
Channel delete & to order the channels
To delete an unnecessary channel
After presetting the channels, you may delete unnecessary
channels so that only the channels you want to watch are
selected.
1
Use digit buttons or channel
up/down button to select a
channel you want to delete
(for example: channel 18).
?
i
1
2
3
4
5
6
8
9
7
0/AV
--/---
K
O
VOL
VOL
-
+
-
LOCK
P.M
S.M
+
-
+
3
Press CH+/- to select
Delete Prg.
4
CH+/(menu item
select)
VOL+/(volume adjust
menu item adjust)
CH
GAME
Digit buttons
Press MENU repeatedly to
display Program sort menu.
Swap Prg A
Swap Prg B
Delete Prg
P-
x
018
-
+
Press the S.M button to confirm.
Please wait for some time until the "Delete Prg" menu
item does not glitter (for the system needs time to delete
program)
MENU
+
U
EN
M
CH
2
Program sort
P+
Now channel 18's program is deleted, and channel 19's
program move to channel 18, and so on.
To order the channels
OK
(exit the menu)
S.M (confirm button)
You can edit the channel programs in your favourite order.
Cancel the inputting
1
-
2
SOUND
+
3
4
Press MENU repeatedly until Program sort menu
appears.
Press CH+/- to select
Swap Prg A, use VOL+/- to
select a program number, or
you can directly press digit
buttons to input the number,
for example, 23.
Press CH+/- to select Swap
Prg B, use VOL+/- to select
a program number, or directly
press digit buttons to input
the number, for example:
37. (If wrong in inputting, you
can press RED button to
cancel and input again.)
Program sort
P+
Swap Prg A
Swap Prg B
Delete Prg
P-
x
027
---
Program sort
P+
Swap Prg A
Swap Prg B
Delete Prg
P-
x
027
037
-
Press S.M button to confirm.
Now program 23 and
program 37 are swapped.
* To exit the menu, press OK button.
Repeat the above steps to edit the programs in your
favourite order.
16
+
+
Channel selection
1
Use Direct Channel Select buttons
To select one-digit channel:
Press --/--- button to display "-", then input the number.
Press
"--/---" button
?
Press 0-9 button
-
5
i
To select two-digit channel:
1
2
3
4
5
6
7
8
9
0/AV
Press --/--- button to display "--", then input the number.
Digit buttons
Press
"--/---" button
--/---
5-
Press
0-9 button
56
To select three-digit channel:
+
U
K
Press --/--- button to display "---", then input the number.
O
EN
M
CH
--
Press
0-9 button
VOL
VOL
-
+
(Previous
program)
CH+/(Channel
up/down)
CH
-
GAME
---
Press
"--/---" button
LOCK
Press
0-2 button
15-
156
Press
0-9 button
Press
0-9 button
* In this model the maximum channel number is 255.
P.M
S.M
1--
+
-
+
2
SOUND
Use CH+ or CH- button
Press CH+ button, the channel number increases;
Press CH- button, the channel number decreases.
Retain
on-screen
display)
+
3
Use previous program button (
)
Press this button to switch between the current program
and the previous one.
Notes:
Use on-screen display button (
the current channel number
Press this button to display the
current TV state. If in TV program
viewing, then it will display the
current channel number, colour
system, sound system and sound
mode. Press it again to cancel the
display.
17
+
) to know
12
Auto B/G
Picture adjustment
To select the picture mode
You can select the picture quality
instantly among three preset
modes and one user-set mode.
Press the P.M button to select the
desired picture quality. Standard,
Dynamic, Mild and Favourite (userset) can be selected cyclically.
?
i
1
2
3
4
5
6
7
8
9
0/AV
--/---
K
O
VOL
VOL
-
+
-
GAME
LOCK
P.M
+
-
Mode
Standard
Dynamic
Mild
Favourite
CH+/(menu item
select)
VOL+/(volume adjust
menu item adjust)
CH
Picture mode Dynamic
Picture mode Mild
Picture mode Favourite
MENU
+
U
EN
M
CH
S.M
Picture mode Standard
OK
(exit the menu)
P.M
(Picture mode select)
+
Picture adjustment
1
Press MENU to display
Picture menu.
Picture
P+
2 Press CH+ or CH- to select
desired adjusting item.
SOUND
Picture quality
Display normal pictures
Display more brightness and contrast pictures
Display mild pictures
The picture quality you set
3 Press VOL+/- to adjust.
+
Item
Contrast
Brightness
Colour
Sharpness
Tint*
SVM
Contrast
Brightness
Colour
Sharpness
Tint
SVM
On
P-
-
+
VOLVOL+
weaker
stronger
darker
lighter
paler
deeper
softer
sharper
purplish
greenish
High/Mid/Low/Off
Notes:
Tint is only for NTSC system.
Turning on SVM will greatly improve picture's sharpness.
* SVM is an optional function.
* To exit the menu, press OK button.
18
Sound controls
Adjusting volume
1 Use VOL+ or VOL- button.
Press VOL+ button, the volume increases;
Press VOL- button, the volume decreases.
?
i
(Sound mute)
1
2
3
4
5
6
8
9
7
0/AV
CH+/(menu item
select)
K
+
VOL+/(volume adjust
menu item adjust)
CH
-
GAME
LOCK
OK
(exit the menu)
P.M
S.M
Adjusting sound
1 Press MENU repeatedly to display Sound menu.
Sound
2 Press CH+ or CH- to select
P+
S.M
(Sound mode select)
+
-
X
MENU
O
VOL
-
If you want to mute the sound,
press
button on the remote.
To resume the sound, press
this button again.
+
U
EN
M
VOL
2 Use MUTE button.
Digit buttons
--/---
CH
Volume
+
desired adjusting item.
3 Press VOL+/- to adjust the
DBE
MSS
level.
-
Volume
Bass
Treble
Balance
Off
Off
-
P-
SOUND
Item
Volume
Bass
Treble
+
Sound mode selection
Balance
VOLweaker
weaker
weaker
decrease the
right channel
VOL+
stronger
stronger
stronger
decrease the
left channel
You can select the sound quality instantly among
three preset modes and one user-set mode.
DBE (Dynamic
bass enhanced)
ON/OFF
Press the S.M button to select
the desired sound quality. Movie,
Music, Speech and Favourite
(user-set) can be selected
cyclically.
MSS (Micronas
surround sound)
ON/OFF
Sound mode Movie
Sound mode Music
The adjusted level is stored in the Favourite position.
Sound mode Speech
Note: DBE/MSS function are optional function.
Sound mode Favourite
Mode
Movie
Music
Speech
Favourite
Sound quality
like a movie theatre filled with a dynamic sound
like a music hall filled with a rich warm sound.
Suitable for listening to news/dialouge
the sound quality you set
19
+
Sound Controls
The unit receives both stereo and bilingual broadcasts transmitted in either the NICAM or German
stereo/bilingual broadcast system.
Stereo Programs
1 When a stereo program is
12
Auto B/G
Mono
received, STEREO appears.
?
Enter into
earphone state
i
1
2
3
4
5
6
7
8
9
0/AV
--/---
K
O
VOL
VOL
-
+
-
GAME
LOCK
P.M
S.M
1
22
Auto B/G
Dual I
When a bilingual program is
received, DUAL appears.
CH+/(menu item
select)
VOL+/(volume adjust
menu item adjust)
CH
12
Auto B/G
Mono
Press the SOUND button to select
the stereo/monaural mode.
Bilingual Programs
Menu
+
U
EN
M
CH
2
2
Press SOUND button to select the sound to be heard,
Dual I and Dual II appear cyclically on the screen.
As for NICAM-dual program, Mono and Dual I and Dual II
appear cyclically on the screen.
OK
(exit the menu)
Notes:
+
-
+
-
SOUND
Monaural
Stereo
bilingual select
SOUND
+
As for FM Germany Dual program, press SOUND button,
the sound mode will switch between Dual I and Dual II.
To enter into earphone state
Press
button to enter into
earphone state, in this state, sound
is outputted through earphones and
speakers’ sound is muted. Press
the button again to restore.
In earphone state, the sound
menu is shown on the right figure:
* To exit the menu, press OK button.
In the menu, use CH+/- to select
item, VOL+/- to adjust the level.
Or you can directly press VOL+/button to adjust earphone
volume.
20
Sound
P+
Volume
Bass
Treble
Balance
DBE
MSS
P-
Off
Off
-
+
Timer setting
Setting clock
1 Press MENU button repeatedly to display Timer menu.
?
i
1
2
3
4
5
6
8
9
7
0/AV
--/---
K
O
VOL
VOL
-
+
-
GAME
LOCK
P.M
Clock
Timer off
Timer on
Timer set
Prog no
P-
10:01
--:---:---:-3
x
-
+
CH+/(menu item
select)
OK
(exit the menu)
Cancel the inputting
+
-
Use digit buttons to input the
current time for the set. If
wrong in setting the time,
press RED button to cancel
and input again.
P+
Notes:
Before setting the timer, please first set the CLOCK item.
Press the main power switch to turn off the set, the clock will
be cancelled. You need to reset it if you want to use the timer
function.
VOL+/(volume adjust
menu item adjust)
CH
Press CH+/- to select Clock.
Digit buttons
MENU
+
U
EN
M
CH
S.M
Timer
2
3
+
-
To turn off TV automatically (OFF timer)
With the OFF timer, the TV will automatically switch to
standby mode at a preset time.
1
2
SOUND
+
In Timer menu, press CHto select Timer off.
Use Digit Buttons to set the
OFF time. In wrong in
inputting, press RED button
to cancel and input again.
Timer
P+
Clock
Timer off
Timer on
Timer set
Prog no
P-
x
10:02
23:00
--:---:-3
-
+
At the preset time, the TV will go into standby mode
automatically.
Once the OFF timer has been fulfilled, next when you
want to use it, you should reset it again.
* To exit the menu, press OK button.
21
Timer setting
To turn on the TV automatically (ON timer)
(On/standby)
With the ON timer, the TV will automatically turn on to a
preset channel at a preset time.
1 In Timer menu, press CH- to
select Timer on.
?
2 Use Digit Buttons to set ON
i
1
2
3
4
5
6
7
8
9
0/AV
--/---
K
O
VOL
VOL
-
+
CH
-
GAME
LOCK
P.M
S.M
P-
10:02
12:00
14:05
--:-5
x
-
+
use VOL+/- to set the ON
program, or you can directly
input the number by digit
buttons.
Digit buttons
4 Press STANDBY (
CH+/(menu item
select)
) button to switch the TV to standby
mode.
At the preset time, the TV will turn on to the preset
program automatically.
VOL+/(volume adjust
menu item adjust)
Once the ON timer has been fulfilled, next when you want
to use it again, you should reset it.
OK
(exit the menu)
Cancel the inputting
+
-
Clock
Timer off
Timer on
Timer set
Prog no
3 Press CH- to select Prg no.,
MENU
+
U
EN
M
CH
time. If wrong in inputting,
press RED button to cancel
and input again.
Timer
P+
+
-
To switch the TV to a program at a preset time
1 In Timer menu, press CH+/to select Timer set.
2
SOUND
+
Use Digit buttons to set the
time. If wrong in inputting,
press RED button to cancel
and input again.
Timer
P+
Clock
Timer off
Timer on
Timer set
Prog no
P-
x
3 Press CH- to select Prg no.,
use VOL+/- to set a program
number, or directly input the
number by digit buttons.
At the preset time, the TV will
automatically switch to the
preset program.
10:05
23:00
--:-18:00
2
Timer
P+
Clock
Timer off
Timer on
Timer set
Prog no
P-
10:06
23:00
--:-18:00
14
x
Note:
When you turn off the TV by main power switch, all
functions in Timer menu will be cancelled.
* To exit the menu, press OK button.
22
+
-
+
Special functions
To select OSD language
There are multi OSD languages in this TV set provided for
you to select (OSD: on-screen display):
1
Press MENU repeatedly to display Special functions
menu.
Special functions
2
?
Now the first menu item is
highlighted and indicates the
current selected OSD
language. (if in English it will
display ENGLISH).
i
1
2
3
4
5
6
7
8
9
0/AV
--/---
K
O
VOL
VOL
-
+
-
GAME
LOCK
P.M
S.M
CH+/(menu item
select)
VOL+/(volume adjust
menu item adjust)
CH
-
P-
+
Press VOL+/- to select a proper OSD language.
OK
(exit the menu)
1
2
Enter into Special functions menu
Press CH+/- to select Blue
back.
3
Press VOL+/- to turn on/off
blue back.
P+
P-
Special functions
English
Language
On
Blue back
50
Rotate
4:3
Aspect
Off
Child lock
Auto
Color system
B/G
Sound system
-
+
If the Blue back is turned on, the TV will appear a blue back
on the screen when there is no input signal.
Rotate function
+
-
English
Language
On
Blue back
50
Rotate
4:3
Aspect
Off
Child lock
Auto
Color system
B/G
Sound system
Setting blue back
MENU
+
U
EN
M
CH
3
P+
+
SOUND
+
When you switch on your TV there may be a slight tilt of the
picture to the left or right. This is due to the earth's magnetic
field or position of your TV. To rectify, you can do the
following:
1
2
Enter into Special functions menu.
Press CH+/- to select
Rotate.
3
Press VOL+/- to rotate the
picture until you are satisfied.
P+
P-
Special functions
English
Language
On
Blue back
30
Rotate
4:3
Aspect
Off
Child lock
Auto
Color system
B/G
Sound system
-
+
Screen aspect selection
1
2
* To exit the menu, press OK button.
3
23
Enter into Special functions menu.
Press CH+/- to select
Aspect.
Press VOL+/- to select
picture size (ratio) between
4:3 and 16:9 according to
your preference.
P+
P-
Special functions
English
Language
On
Blue back
30
Rotate
4:3
Aspect
Off
Child lock
Auto
Color system
B/G
Sound system
-
+
Child lock setting
* Child lock is an optional function.
Child lock setting
Making use of child lock function, you can lock all the
programs to prevent children from viewing them.
1
?
Press LOCK button on the
remote control, the Lock
menu bar appears.
Lock
------
Lock
------
Lock
*****-
Lock
*****-
Lock
On
Lock
Off
New
------
New
------?
i
1
2
3
4
5
6
7
8
9
0/AV
+
--/---
U
K
O
EN
M
CH
VOL
VOL
-
+
Digit buttons
MENU
2
CH+/(menu item
select)
3
VOL+/(volume adjust
menu item adjust)
OK
(exit the menu)
CH
-
GAME
4
LOCK
Enter into
child lock setting
P.M
S.M
(or press MENU repeatedly
to display Special functions
menu. Press CH+/- to select
Child lock item, then press
VOL+/- to enter.)
Input the correct password. (6-digit, the preset password is
123456). After inputting, the screen displays "Lock: On".
After one or more seconds the screen will display
"New______", now press OK button (or wait for some
time until "New ______" disappear) and the child lock
function is active now, the screen only displays blue back
with Lock menu bar.
To unlock, input the correct password to set the Child
lock to OFF.
+
-
+
SOUND
+
Note: the preset password can be changed, the steps are
shown below:
After you set the lock to On (or Off), the screen will display
"New ______", input the new password, and confirm
again. Now the password has been changed. But make
sure to remember the new password.
In child lock OFF mode, if you press LOCK button
unintentionally, you can press OK button to exit.
In child lock ON mode, buttons on the TV set can not act.
Also most buttons on the remote control can not act.
To avoid forgetting the password, write it down here:
------
24
Hotel lock setting
* Hotel lock is an optional function.
Hotel lock setting
Making use of hotel lock function, you can limit some
functions so that other user can not change your settings.
This function is especially useful in hotel.
1 Press
+ button on the
remote control, the screen
will display "Hotel ------".
?
i
2
1
2
3
4
5
6
7
8
9
0/AV
Digit buttons
MENU button
+
--/---
U
K
O
EN
M
CH
VOL
VOL
-
+
Clear the OSD
VOL+/- buttons
CH
-
GAME
3 Press VOL+/- to select ON.
------
Hotel
*****-
Hotel
Off
Hotel
On
Now Hotel Lock function is active now. Only some buttons
(for example, channel select buttons, volume control
buttons, AV button, etc.) can act and the volume is limited.
In Hotel ON mode, the maximum volume level is the level
you set just before you enter the Hotel ON mode. If you
want to change the volume limitation, set the Hotel to OFF
and then adjust the volume, then enter into ON mode
again.
To exit the hotel lock, set Hotel to OFF.
LOCK
To clear the On-screen display, you can press OK button.
P.M
S.M
Input the 6-digit password
(the preset password is
123465), the screen will
display "Hotel Off ( or On)".
Hotel
+
-
+
-
Enter into
hotel lock setting
To change Hotel Lock password
SOUND
+
The preset password for hotel lock can be changed, the
steps are shown below:
1
2
After setting Hotel to OFF mode, press
MENU button, the screen displays
"New ------"
Input the new Password and confirm
again.
Now the password has been changed.
Hotel
------
Hotel
*****-
Hotel
Off
New
------
New
------?
To avoid forgetting the password, write it down here:
------
25
Game playing
To play game (card game)
1
2
Press GAME button to enter.
Press MENU button to select level.
There are five levels for you to select. The higher the
level, the more difficulty the playing.
?
3
i
1
2
3
4
5
6
8
9
7
0/AV
Press CH+/CH-/VOL+/VOL- button to select card, press
OK button the card will be turned over. If the second card
you turned over is different with the first card, it will cover
again unless the same two cards are selected. Only you
turn over all the cards, you win the game.
4 Press GAME button to exit.
The best record
+
--/---
U
K
O
EN
M
CH
VOL
VOL
-
+
Game
control buttons
The level
you select
Game
Best:190
Time:120
The time you play
P
CH
-
GAME
LOCK
Enter/exit
game playing
P.M
S.M
The card you turn over
+
-
+
SOUND
+
* To exit the menu, press OK button.
26
Teletext
Teletext is an optional function, therefore only a set with the teletext system can receive the teletext broadcast.
Switching Teletext on/off
(Real clock)
(Hold)
?
(Reveal/
Conceal)
Press
Press
Press
button once to switch on teletext.
button twice both teletext and TV program are displayed.
button third time to switch off the teletext.
Description of Teletext
(Size)
?
i
(Mix/Text)
i
(Text/TV
select)
1
2
3
4
5
6
7
8
9
0/AV
Button introduction
1
--/---
U
K
VOL
VOL
-
+
CH
Text page
up/down
-
GAME
LOCK
Coloured
text select
buttons
RED
GREEN
YELLOW
CYAN
P.M
S.M
+
Teletext
brightness control
2.
O
EN
M
CH
-
+
SOUND
(TEXT)
Press
button to bring the set from TV mode to Teletext mode.
Press it at the third time to resume TV mode.
+
Direct page
select
(Index)
Teletext is a free service broadcast by most TV stations which
gives up-to-the-minute information on news, weather,
television programs, share prices and many other topics.
The thing to remember about Teletext is that it is slow. It is the
nature of the system itself, where a large amount of information
is sent using a small fraction of the TV signal. If you get yourself
into trouble, read the following instruction carefully. It may have
your answer.
Teletext is controlled through the remote controller.
Teletext
contrast control
(MIX)
Press the button, the text will be superimposed on a TV picture.
Press again to restore text.
3.
i
In teletext mode press the button, the index page will appear.
4.
?
(REVEAL)
Some pages have sections that are concealed such as the
answers to riddles or puzzles. To see the concealed part, press
the button. Press it again to conceal.
5.
(HOLD)
To hold the current teletext page, press the button. To release
the page press the button again.
6.
+
(INDEX)
(SIZE)
Press the button to expand the top half of the display. Press it
again to expand the bottom half of the display. Press it once
more to resume normal size.
7.
(REAL CLOCK)
Press the button to display the real time on the screen while
viewing TV program which carries a teletext broadcasting.
Press again to turn off the time display.
8. RED/GREEN/YELLOW/CYAN buttons
(corresponds to GAMES/S.M/P.M/LOCK button)
These four colour-coded buttons control a memory that allows
instant access to the displayed corresponding page number.
9.
+/- buttons
Press the buttons to adjust Teletext brightness.
10.
+/- buttons
Press the buttons to adjust Teletext contrast.
27
Special Functions
Before calling service personnel, please check the following chart for a possible cause to the trouble you are
experiencing.
Symptoms
Check the following items
Power is not turned on
Be sure the power cord is plugged in.
Poor colour poor tint
Contrast, colour tint are not correctly adjusted
Spots appear on the screen
Possible interferences of automobiles, motorcycle,
trolley bus, neon lamps, etc.
Stripes appear on the screen
Possible interference of electronic interference
from another TV set, a computer, an electronics
game machine, a broadcast station, etc.
Double images or "ghosts"
This may be caused by reflections from nearby
mountains or buildings.
Check the antenna direction.
Snowy picture
It is possible that the aerial "lead-in" is damaged or
comes off.
Check the antenna direction.
The screen only displays
blue back. Buttons on the
TV set can not act.
The set may be in child lock ON mode. Use LOCK
button and password to unlock it. If you forget the
password, you can contact our company or the
dealer.
Only some buttons have
function while others can
not act, and the volume is
limited.
The set may be in hotel lock ON mode. Set hotel
lock to OFF. If you forget the password, you can
contact our company or the dealer.
TV cabinet creaks
Remote controller does
not work
Unevenness in colour in
some parts of the screen
Even if the picture or the sound is normal, changes
in the room temperature sometimes make the TV
cabinet expand or contract, making a noise. This
does not indicate a malfunction.
The batteries may be worn out.
The batteries may be installed with their polarity
reversed.
When the set is switched on, do not shift or move
the set around. Sometimes it may develop an
unevenness in colour in some parts of the screen.
This can be eliminated by switching off the set with
the POWER switch and wait for 30 minutes before
switching on again.
28
Toubleshooting Guide
Reception disturbances
Most types of television interference can be remedied by adjusting the height and position of the VHF/UHF antenna.
Outdoor antennas are recommended for best results if not using cable. The most common types of
television interference are shown below. If one of these symptoms appear when the TV is connected to a Cable TV
system, the disturbance may be caused by the local cable company broadcast.
IGNITION:
Black spots or horizontal streaks may appear, picture, may flutter or drift.
Usually caused by interference from automobile ignition systems, neon
lamps, electric drills and other electric appliances.
GHOSTS:
Ghosts are caused by the television signal following two paths. One is the
direct path and the other is reflected from tall buildings, hills or other
objects. Changing the direction or position of the antenna may improve the
reception.
SNOW:
If your receiver is located in the fringe area of a television station where the
signal is weak, your picture may be marred by the appearance of small dots.
When the signal is extremely weak, it maybe necessary to install an
external antenna to improve the picture.
RADIO FREQUENCY INTERFERENCE:
This interference produces moving ripples or diagonal streaks, and in some
cases, causes loss of contrast in the picture.
PICTURE SIZE VARIATION:
A slight picture size variation is quite normal when you adjust the
CONTRAST or BRIGHTNESS setting.
CARE AND MAINTENANCE
To prevent fire or shock hazard, disconnect your unit from the AC power source when cleaning. The finish on the
receiver may be cleaned with a dust cloth and cared for as other furniture. Use caution when cleaning and wiping
the plastic parts. Mild soap and a soft, damp cloth may be used.
29
Specifications
Power Supply:
AC 240V, 50Hz
Power Consumption:
180W
Dimensions (mm):
800 (W) x 595 (H) x 511 (D)
Weight (kg):
47
CRT:
68cm
TV system & channel range
System
VHF
UHF
CATV
PAL-B/G
2-12
21-69
X~Z+2, S1~S41
TELETEXT
WST TELETEXT
Colour System:
PAL-BG, NTSC(AV)
Stereo/bilingual system: NICAM-BG, IGR-BG
Sound output:
7WX 2
Note: Design and specifications are subject to change without notice.
30
PALSONIC CORPORATION PTY LTD
1 JOYNTON AVENUE
WATERLOO NSW 2017 AUSTRALIA
TEL: (02) 9313 7111
FAX: (02) 9313 7555
www.palsonic.com.au
PALSONIC CUSTOMER SERVICE
TELEPHONE
AUSTRALIA: 1300 657 888
604-TA29513-00