1
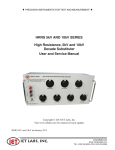
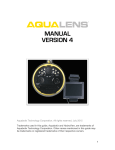
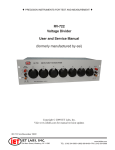
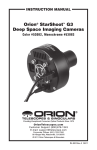
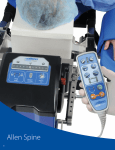
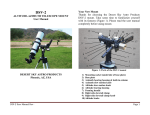
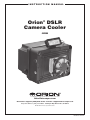
instruction Manual
Orion® DSLR
Camera Cooler
#52095
Providing Exceptional Consumer Optical Products Since 1975
OrionTelescopes.com
Customer Support (800) 676-1343 • E-mail: [email protected]
Corporate Offices (831) 763-7000 • 89 Hangar Way, Watsonville, CA 95076
© 2012 Orion Telescopes & Binoculars
IN 440 Rev. B 04/12
Inside/Outside
temperature
guage
DC power cable
On/Off
button
DSLR
Cooler
Desiccant
packets (2)
Figure 1. The DSLR Cooler comes with a DC power cable and
two desiccant packets.
Congratulations on your purchase of the Orion
DSLR Camera Cooler. It’s the first affordable commercially produced “cold box” for DSLR cameras,
which unlike most astronomical CCD cameras do
not have internal cooling systems to reduce thermal noise. Its insulated, thermoelectrically cooled
chamber chills the camera’s imaging sensor,
significantly reducing troublesome noise in your
astrophotos. When you’re imaging in warm or hot
weather, especially, such noise can wreak havoc
on deep-sky images. But with the DSLR Cooler,
thermal noise is minimized, resulting in smoother,
sharper, better images that are easier to process.
Cable
collar
a.
DC
power jack
External fan
and heatsink
Figure 2. The Orion DSLR Camera Cooler a) back side,
b) front side, and c) interior.
Flash
housing
This instruction manual covers how to set up and operate
the DSLR Cooler. Please read it thoroughly before attempting to use it.
First, verify that all the included components shown in
Figure 1 are present and intact. If anything is missing or
damaged, please call Orion Customer Service at (800)
676-1343.
Connecting
screws (4)
c.
Rubber gasket
¼"-20 Camera
mounting stud
2
b.
Insulation
Internal fan
and heatsink
Camera
aperture port
DC coupler
(replaces
battery)
Cable
collar
a.
Shutter
control
b.
USB
Figure 3. a) With the plastic cable collar removed, run your camera cables through the hole in the side of the housing, b) plug DC
coupler and other cables into the camera before installing the camera in the cooling chamber
Next, familiarize yourself with the features and components
of the DSLR Cooler in Figure 2.
Compatible Cameras
At the time of this manual’s writing, the following Canon EOS
cameras are known to be compatible with the DSLR Cooler:
350D (XT)
550D (T2i)
400D (XTi)
1000D (XS)
450D (XSi)
1100D (T3)
Camera
T-ring
500D (T1i)
Other Canon models and other brands of DSLR may not fit
physically in the Cooler due to their overall size or proportions, or to the position of their lens opening relative to the
¼"-20 mounting hole on the bottom of the camera.
Installing the Camera in
the DSLR Cooler
This section describes installing your compatible Canon
DSLR camera in the DSLR Cooler with a DC coupler, USB
cable, and shutter control cable, all of which are sold separately.
1. Disassemble the two parts of the cooler housing by
unscrewing the four plastic connecting screws using a
flat screwdriver.
2. Attach a T-ring (sold separately) to your camera.
Before installing the camera in the cooling chamber, you
will need to insert the DC power coupler into the battery
compartment and attach all necessary cables to the
camera. We recommend powering the camera with an
external power source via a “DC coupler” (fake camera
battery) designed for your particular camera model
rather than the standard internal battery, for several
reasons:
a. Batteries lose charge faster in cold conditions, so
the internal battery may not last for an entire imaging
session before needing replacement or recharging.
An external marine cell battery or AC power source
has plenty of extra capacity to keep your camera
Figure 4. With the camera installed, the T-ring on the camera
should be seated snugly in the aperture port of the housing.
powered on continuously for extended periods of
time.
b. It is not possible to swap a discharged internal
battery with a fresh one without opening up the
cooler housing.
c. You won’t be able to see the battery charge indicator
on the camera’s LCD screen to know when the
battery is about to die!
3. Remove the plastic cable collar from the housing by
pushing it with a finger from the inside while pulling it
from the outside. You may have to twist it or rock it a bit
to dislodge it.
4. Insert the USB, shutter control, and DC coupler cables
through the hole in the housing (Figure 3a). Then, insert
the USB and shutter control plugs into your camera
and install the DC coupler in the battery compartment
(Figure 3b).
5. Now attach the camera to the floor of the cooling
chamber. Line up the threaded socket in the bottom
of the camera with the ¼"-20 stud in the bottom of
the housing. When they are lined up, the T-ring on the
camera should be positioned snugly within the circular
opening of the housing (Figure 4). Now thread the stud
3
Open
cable collar
Figure 6. Lay the camera cables in the open cable collar, then
close it and re-insert it in the housing.
Do not set the
DSLR Cooler
down on the
flash housing!
Figure 5. The protruding flash housing could crack if it contacts a
hard surface!
into the camera by turning the knob clockwise until
secure.
CAUTION: Do not set the DSLR Cooler down on the protruding flash housing (Figure 5)! Doing so could damage the flash housing.
6. Pry open the collar’s tab with your fingers or the back
end of a pen and lay the cables in (Figure 6). Then
close the tab and insert the collar back into the open
port. The camera should now appear as in Figure 7.
7. Plug the small end of the included DC power cable
into the power jack on the side of the DSLR Cooler
and connect the other end to your 12V marine battery
(see below). Alternatively, you can use an optional 12V
AC-to-DC adapter rated at 5A (available from Orion), to
power the DSLR Cooler.
8. Set the camera to ON, then reattach the rear housing to
the front section.
NOTE: The interior temperature sensor is affixed to the roof
of the cooling chamber, as shown in Figure 8. It is NOT
intended to be removed from there and adhered to the camera body.
Desiccant Packets
We recommend placing one or both of the included silica gel
desiccant packets inside the DSLR cooler for each imaging
session. Although it is unlikely that moisture will condense
inside the chamber during operation (and even less likely
that it would condense on the camera itself), the moistureabsorbing desiccant will keep the air surrounding the camera dry, even in humid weather conditions.
The reusable desiccant packets can be dried, or “recharged,”
by heating them in an oven at 250°F (120°C) for two hours.
4
Attaching the Camera
with DSLR Cooler to Your
Telescope
1. Attach a 2" T-adapter, coma corrector, reducer or
flattener to the T-ring on your camera.
NOTE: Cooling performance will be compromised
somewhat if you use just a T-adapter with an open-tube
telescope such as a Newtonian reflector, as this allows
a constant flow of uncooled, ambient-temperature air
to enter the camera and warm the imaging sensor.
It’s best to “seal” the front opening of the camera by
using an optical adapter such as a coma corrector or
focal reducer – or even a clear filter threaded on the
T-adapter – or use a telescope with a “closed” tube,
such as a refractor, Maksutov-Newtonian, or SchmidtCassegrain.
2. Insert the 2" barrel of the T-adapter or other adapter into
the telescope’s focuser and tighten the screws on the
focuser to secure the camera/DSLR Cooler. Figure 9
shows the DSLR Cooler attached to an Orion 80mm
triplet refractor.
Given the weight of the DSLR Cooler and camera combination, you may need to increase the tension adjustment on
your focuser drawtube to prevent any slipping while focusing. Once focus is achieved, it’s a good idea to lightly tighten
the drawtube locking thumbscrew, if your focuser has one.
Operating the DSLR Cooler
1. Press the ON/OFF button once to turn on the Cooler.
It is recommended that you turn on the DSLR Cooler at least
1 hour before starting your imaging session, to allow sufficient time to cool the camera. Keep the DSLR Cooler powered on for the duration of your imaging session. Once it is
turned off, the temperature inside the chamber will remain
about the same for 5 minutes or so, then will start to rise
rapidly.
Figure 7. Here, a Canon 350D is installed in the DSLR Cooler,
with cables passing through the cable collar. The cable plugs are a
tight fit!
Temperature sensor
Figure 9. The DSLR Cooler in place and ready to chill!
Inside temperature
Figure 8. The interior temperature sensor should not be removed
from the ceiling of the housing.
After turning the Cooler on, you should see a temperature
drop of 17°C to 20°C (30.6°F to 36°F) within 30 minutes,
with a possible further decrease that levels off after about
an hour.
NOTE: The digital thermometer on the DSLR Cooler displays the internal temperature as “OUT” and the outside
(ambient) temperature as “IN” (Figure 10). We know, it’s
wacky!
2. After your imaging session, press the ON/OFF button
again to turn the Cooler off. You’ll know it is off when the
fan on the back of the housing stops rotating.
To prevent condensation from forming on the cold camera,
it is best to either:
a. Leave it in the closed Cooler for a half hour or so
before removing it, to allow the camera to warm up
slowly, or
Outside
temperature
Figure 10. On the LCD temperature gauge, the IN reading
is really the outside temperature and the OUT reading is the
temperature inside the Cooler! That’s what happens when you
repurpose an indoor/outdoor car thermometer.
seal it. (A large zip-lock freezer type food storage
bag is ideal.) This way the condensation will form on
the plastic bag, not on the camera itself.
Power Consumption
Drawing 3.7 to 4 amps of current, the DSLR Cooler requires
lots of power. We recommend running it on at least a 30
amp-hour (AH) deep-cycle marine battery or, if possible, on
household 110V power via an AC-to-12V DC adapter rated
for at least 4 amps (both sold separately). A 30AH battery
will provide power for up to 7.5 hours of continuous operation, theoretically (30AH ÷ 4A = 7.5H); a 55AH battery will
allow nearly 14 hours of continuous operation.
We do not recommend use of the Orion Dynamo Pro 12AH
or 17AH batteries, since they would power the DSLR Cooler
for only about 3 or 4 hours, respectively, on a full charge.
b. Remove it from the Cooler while still outside and
immediately place the camera into a plastic bag and
5
Specifications
Compatibility
Canon EOS 350D (XT), 400D (XTi),
450D (XSi), 500D (T1i), 550D (T2i),
1000D (XS), 1100D (T3)
Peltier cooler
51 watts
Voltage
12-volts DC, 5.5mm/2.5mm jack
Current draw
4 amp max
External heat sink
yes, fan diameter 80mm
Internal heat sink
yes, fan diameter 65mm
Cooling delta
17 - 20°C (30 - 36°F) in 30 minutes
Thermometer
LCD, interior/exterior reading (in °C)
Body
Plastic, insulated
Cable
12V DC auto-lighter cable included
Dimensions
8-3/8"L x 7-5/8"W x 6-1/2"H
Desiccant
Two silica gel packets included
Weight
2 lbs., 7 oz. (1.1 kg)
One-Year Limited Warranty
The Orion DSLR Cooler is warranted against defects in materials or workmanship for a period of one
year from the date of purchase. This warranty is for the benefit of the original retail purchaser only.
During this warranty period Orion Telescopes & Binoculars will repair or replace, at Orion’s option,
any warranted product that proves to be defective, provided it is returned postage paid to: Orion
Warranty Repair, 89 Hangar Way, Watsonville, CA 95076. Proof of purchase (such as a copy of the
original receipt) is required.
This warranty does not apply if, in Orion’s judgment, the product has been abused, mishandled, or
modified, nor does it apply to normal wear and tear. This warranty gives you specific legal rights, and
you may also have other rights, which vary from state to state. For further warranty service information, contact: Orion Customer Service (800) 676-1343; [email protected].
Orion Telescopes & Binoculars
OrionTelescopes.com
89 Hangar Way, Watsonville CA 95076
Customer Support Help Line (800) 676-1343
© 2012 Orion Telescopes & Binoculars
6