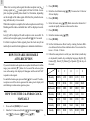
1
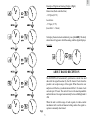
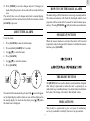
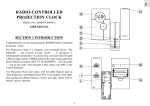
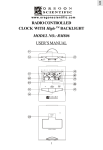
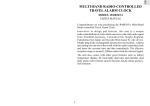
GB
TRAVEL RADIO-CONTROLLED
PROJECTION CLOCK
MODEL: RM888PA
USER'S MANUAL
SECTION 1
INTRODUCTION
Congratulations on your purchasing the RM888PA RF Travel
Projection Clock.
The Travel Clock has a slim, compact design i.e. ideal for travel.
The RM888PA is designed to automatically synchronize its current
time and date when brought within range with the U.S.Atomic
Clock.
The Travel Clock has features such as time with alarm on/off status
projection, multilingual day-of-the-week display, back-light, dual
clock displays (analog and digital), user-selectable default clock
display and 8-minute snooze function.
1
GB
E
D C
B. ANALOG CLOCK DISPLAY
F
1. Analog clock display
2. Radio-reception icon
3. Alarm-on indicator
A
CONTROL BUTTONS
B
2
C. [MODE] BUTTON
1
1
Press to change the display mode or press and hold to enter the
setting mode
2
3
D. [ALARM] BUTTON
Press to select the daily alarm function or press and hold to
enter the setting mode
I
E. [▲] AND [▼] BUTTONS
Change the value of a setting
F. [SNOOZE/
H
DC 7.5V
J
G
] BUTTON
Press to activate the snooze function or turn on the back-light
and projection
G. [RESET] BUTTON
K
Press to return all settings to default values
H. CLOCK DISPLAY [SWAP] BUTTON
DISPLAY
Press to change the default display of the clock
A. DIGITAL CLOCK DISPLAY
I. [LOCK] SLIDE SWITCH
1. Digital clock display
Locks the key-operation and protects the projection lens while
travelling
2. Alarm-on indicator
2
GB
Battery Installation:
J. [FOCUS] KNOB
Adjusts the focus of projection
1. Remove the battery compartment door.
K. 7.5 V DC JACK (with rubber-cover attached)
2. Insert two AAA-sized (UM-4) 1.5V batteries as shown.
For AC power adapter installation
3. Press RESET.
4. Replace the battery compartment door.
BEFORE YOU BEGIN
When the battery power level is low, the analog clock display will
start to blink. Replace the batteries or connect it with AC power
adapter and press RESET.
In order to operate this unit slide the [LOCK] to the left. This will
unlock the key-operation and expose the projection lens.
unlock
This unit is equipped with a short-term power back-up feature. It
can still operate for a short period of time even after it has been
disconnected from the power supply. Therefore, all settings can be
saved during battery replacement. During this period, the analog
clock display will also blink. In this case, replace the batteries or
connect it with AC power adapter .
lock
DC 7.5V
Note: Under normal circumstances, the batteries are good for 1
year. However, the battery life can be vastly reduced by frequent
use of the projector or snooze function.
If not disposed of properly batteries can be harmful. Protect the environment by taking the exhausted batteries
to authorized disposal stations.
POWER
This unit can be either operated by batteries or AC power or with
both AC power and batteries.
HOW TO ACTIVATE THE BACK-LIGHT
Press [SNOOZE/
DC 7.5V
3
] to turn on the back-light for 5 seconds.
GB
HOW TO USE THE PROJECTION
Note: Remember to leave the projection lens uncovered when the
continuous projection function is being activated.
At night-time the projection makes it easy to read the time and the
alarm on/off status.
When you are not using the clock projection feature, slide the
[LOCK] switch close in order to protect the lens and lock the keys.
1. Slide the [LOCK] slide switch to expose the projection lens.
SECTION 2
THE CALENDAR CLOCK
2. Press [SNOOZE/ ] to turn on the projection for 5 seconds.
The current time in digital format (as shown in the analog clock
display) will be projected onto the surface that the lens is facing. The alarm-on Indicator [ ] will also be projected if the
Alarm is activated.
DEFAULT ANALOG CLOCK DISPLAY
3. Adjust the projected image using the [FOCUS] knob.
You can select the local time or home time the radio-controlled
time as the default analog clock display by using [SWAP] switch
hidden inside the battery compartment.When the local time is
For continuous projection, you can also acquire an optional
universal power adapter from an authorized dealer. When the power
adapter is connected to the unit, the clock projection will be activated. To keep the clock projection activated press and hold
[SNOOZE/ ] for 2 seconds. To deactivate the feature, press and
hold the snooze button for 2 seconds again or simply remove the
power adapter.
selected or shown, the
icon will be displayed.
DIGITAL DISPLAY MODES
Press [MODE] to display the following in sequence:
DC 7.5V
DC 7.5V
4
•
Radio-Controlled Clock Time (same as the default analog clock
display) or Local Time.
•
Day of the week
•
Calendar (Month: Day or Day: Month format)
•
2nd time-zone (Local or home time)
GB
Example of Digital and Analog Display: (Fig.1)
Home-time (Radio-controlled time)
- 12:55pm (12:55)
Local-time
- 5:55pm (17:55)
(hour offset = +5 hours)
To display the alarm clock and details, press [ALARM]. The daily
alarm time will appear in both the analog and the digital displays.
Example:
ABOUT RADIO RECEPTION
The RM888PA will automatically synchronize current time and
date with the signal broadcast by the US Atomic Clock when the
product is in reception range of the signal. When the unit is new
and just out of the box, synchronization with the U.S. atomic clock
can take upto 72 hours. The unit will receive the most dependable
and interference free signal automatically between Midnight and 4
AM.
When the unit is within range of radio signals, its radio-control
mechanism will override all manual settings unless the signal reception is manually deactivated.
Fig.1
5
GB
When it is receiving radio signal, the radio-reception icon [
]
(strong signal) or [ ] (weak signal) will start to blink. A complete reception generally takes about 2 to 10 minutes, depending
on the strength of the radio signal. After that, the periodical scanning will take only a few seconds.
3. Press [MODE].
When the reception is complete, the radio-reception icon will stop
blinking and the radio-controlled time will be displayed accordingly.
6. Enter the hours using [▲]/[▼]. Hold down either button for 2
seconds to rapidly increase or decrease the value.
Icon [•] will be displayed if such reception is not successful. To
enforce such reception again, press and hold [▲] for 2 seconds.
8. Enter the minutes using [▲]/[▼].
For better reception of radio signals, place the clock away from
metal objects and electrical appliances to minimize interference.
10. Set the 2nd time-zone off-set hour by entering the hour difference between the local time and home time. You can select between + 23 and - 23 hours.
HOW TO ENABLE OR DISABLE
AUTO-RECEPTION
11. Follow the same pattern to set the year, date format (month-day
or day-month), month, day, and display language (English [E],
German [D], French [F], Italian [I] or Spanish [S]) for day-ofthe-week.
4. Enter the clock format using [▲]/[▼]. You can select 12-hour or
24-hour display.
5. Press [MODE].
7. Press [MODE].
9. Press [MODE].
If you wish to disable radio signal auto-reception while the unit is within
range, press and hold [ ▼ ] button for 2 seconds.The radio-reception
icon on the analog clock display will disappear and the unit will NOT
respond to radio signals.
Monday
To enable the feature again, press and hold [▲] for 2 seconds. The radioreception icon will be shown again and the analog clock display will
start blinking to initiate radio signal reception.
HOW TO SET THE CALENDAR CLOCK
MANUALLY
1.
Press and hold [MODE] for 2 seconds.
2.
], Mountain [
Enter the U.S. time-zone (Pacific [
tral [
] or Eastern [
]) using [▲]/[▼].
], Cen-
6
E
F
D
I
S
MON
LUN
MON
LUN
LUN
Tuesday
TUE
MAR
DIE
MAR
MAR
Wednesday
WED
MER
MIT
MER
MIE
Thursday
THR
JEU
DON
GIO
JUE
Friday
FRI
VEN
FRE
VEN
VIE
Saturday
SAT
SAM
SAM
SAB
SAB
Sunday
SUN
DIM
SON
DOM
DOM
GB
12. Press [MODE] to save the changes and exit. If changes are
made during the process, the seconds will reset and start from
zero.
The unit will also save all changes and return to normal display
automatically after the unit has been left idle for a minute or when
[ALARM] is pressed.
HOW TO USE THE DAILY ALARM
The alarm will go off for 2 minutes in a two-step crescendo pattern.
The alarm-on indicators will flash, the back-light and the clock
projection will be activated for 5 seconds. To mute the alarm, press
any key. Pressing [SNOOZE/ ] will activate the snooze function.
ABOUT THE ALARM
SNOOZE FUNCTION
To set the alarm,
When the snooze function is activated, the alarm will be muted
temporarily and set off again after 8 minutes. To disable the snooze
function, press [ALARM].
1. Press [ALARM] to enter the Alarm mode.
2. Press and hold [ALARM] for 2 seconds.
3. Use [▲]/[▼] to enter the hours.
4. Press [ALARM].
SECTION 3
5. Use [▲]/[▼] to enter the minutes.
6. Press [ALARM].
ADDITIONAL INFORMATION
THE RESET BUTTON
The [RESET] button is used to enhance synchronization of signals
after battery replacement or when the unit is operating in an
unfavorable way or malfunctioning. Use a blunt stylus to hold down
the button. All settings will return to their default values.
The alarm will be automatically activated. The icon will appear
on the digital display and the Alarm-on icon will be displayed on
the analog display. To deactivate the alarm, press [▲]/[▼] when
the alarm time is displayed.
PRECAUTIONS
This product is engineered to give you years of satisfactory
service if you handle it carefully. Here are a few precautions:
7
GB
1. Do not immerse the unit in water.
CUSTOMER ASSISTANCE
2. Do not clean the unit with abrasive or corrosive materials. They
may scratch the plastic parts and corrode the electronic circuit.
Should you require assistance regarding this product and its
operation, please contact our customer care department at 800853-8883 or via email at [email protected].
3. Do not subject the unit to excessive force, shock, dust,
temperature or humidity, which may result in malfunction,
shorter electronic life span, damaged battery and distorted parts.
WARRANTY
4. Do not tamper with the unit's internal components. Doing so
will invalidate the warranty on the unit and may cause
unnecessary damage. The unit contains no user-serviceable parts.
This product is warranted to be free of manufacturing defects for a
period of 1 year from date of retail purchase. Defective product
should be directed to the place of retail purchase for exchange.
Should this not be possible, contact our customer care department
for assistance and a return material authorization. No returns may
be made without a return authorization. Please retain your retail
receipt as you may be asked to provide a copy of it for proof of
date purchased.
5. Only use fresh batteries as specified in the user's manual. Do
not mix new and old batteries as the old ones may leak.
6. Always read the user's manual thoroughly before operating the
unit.
This warranty does not cover product subjected to abuse, misuse,
accidental damage or tampering.
SPECIFICATIONS
Power
: 2 pcs of UM-4 or AAA-size 1.5V
batteries
CAUTION
Power Adapter (Optional) : 7.5V DC
Weight
: 2.75 oz.( 78g )
Dimensions (mm)
: 3.94” x 2.36” x.79”
(100 x 60 x 20 mm)
Accessory
: Leather pouch for carrying
- The content of this manual is subject to change without
further notice.
- Due to printing limitation, the displays shown in this
manual may differ from the actual display.
- The contents of this manual may not be reproduced without
the permission of the manufacturer.
Company Name: Oregon Scientific, Inc.
Address: 19861 SW 95th Place, Tualatin, Oregon 97062, USA
Website address: www.oregonscientific.com
8