1
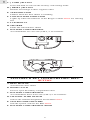
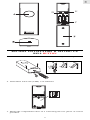
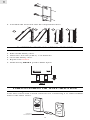
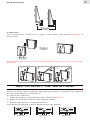
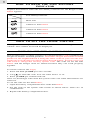
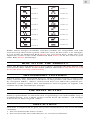
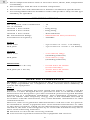
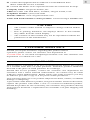
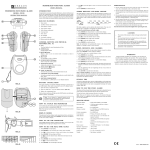
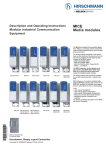
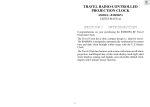
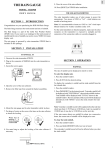
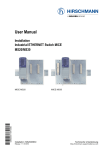
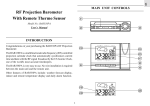
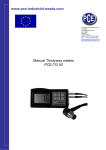
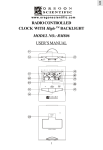
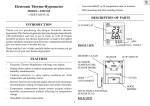
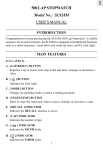
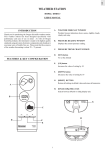
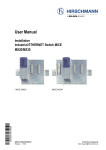
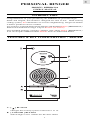
MODEL: BHDR619A
USER’S MANUAL
INTRODUCTION
Congratulations on your purchasing the BHDR619A personal ringer.
Sleek and elegant, this model is designed for ease of use. With security
coding system, the interference to or from neighbouring Oregon Scientific
wireless products can be avoided.
No wiring is required between the Ringer and the Bell button (BHDR229A).
Effective transmission range is up to 80 feet (25 meters).
The standard package contains a Ringer and a Bell button (BHDR229A).
You can acquire additional bell buttons from an authorized dealer.
FEATURES & KEY CONFIGURATION : RINGER
G
H
A. [
] BUTTON
Changes the security system code from 1 to 16
B. [ VOLUME ] BUTTON
Selects high or low volume for the door chime
1
GB
PERSONAL RINGER
GB
C. [ CODE ] BUTTON
Press and hold to activate the security code setting mode
D. [ RESET ] BUTTON
Returns all settings to their original values
E. LED INDICATOR
Flashes when the door chime is sounding
F. LOW-BATTERY INDICATOR
Lights up when the batteries of the Ringer or Bell button are running
low
G. LCD DISPLAY
H. SPEAKER
Emits the selected door chime
I. BATTERY COMPARTMENT
Accommodates two AA-size (UM-3) 1.5V batteries
I
FEATURES & KEY CONFIGURATION: BELL
BUTTON
A. BELL BUTTON
Activates the door chime
B. DOOR CATCH
Press to open the battery compartment door
C. BATTERY COMPARTMENT
Accommodates three AAA-size (UM-4) 1.5V batteries
D. CHANNEL SLIDE SWITCH
Selects the channel designation for the Bell button
E. SYSTEM CODE SWITCHES
Sets the system code for the Bell button
F. BATTERY COMPARTMENT DOOR
2
GB
E
D
C
BATTERY INSTALLATION & SETTING UP:
BELL BUTTON
1. Press the recessed door catch with a screwdriver to open the compartment.
1
2
3
2. Insert three AAA-size (UM4) 1.5V batteries.
3. Mount the compartment door on a wall using the two pieces of screws
provided.
3
GB
4. Assemble the front unit onto the compartment door.
3
2
4
1
BATTERY INSTALLATION: RINGER
1. Remove the screw on the bottom of the unit.
2. Pull out the battery door.
3. Insert two AA-size (UM-3) 1.5V batteries.
4. Close the battery door .
5. Replace the screws.
AA
AA
6. Hold down [ RESET ] with a blunt stylus.
TABLE-STANDING OR WALL-MOUNTING
Table-standing:
Your unit comes with a stand connector for connecting it to other modular
units in the same series.
STAND
CONNECTOR
4
GB
Wall-Mounting:
Connector:
Use wall-mount connector to align with other wall-mount brackets if
neccessary.
Wall mount the unit onto the wall with the help of 2 pieces of screws
provided.
HOW TO SELECT THE DOOR CHIME
The door chime is selected by the channel slide switch of the bell button.
There are three chime patterns: Ding Dong (channel 1), Ding Ding (channel
2) and West Minister (channel 3).
To select the channel,
1. Open the battery compartment door of the bell button.
2. Slide the channel switch to the desired setting.
3. Replace the battery compartment door.
The channel selected will be displayed on the Ringer.
channel 1
channel 2
5
channel 3
GB
HOW TO READ THE LOW BATTERY
INDICATOR
Replace the batteries when the low-battery indicator for the Ringer or bell
button appears.
Low battery indicator
main
Main unit
ch.1
Channel 1 bell button
ch. 2
Channel 2 bell button
ch. 3
Channel 3 bell button
HOW TO SET THE CHIME VOLUME
Press [ VOLUME ] on the main unit to select between high and low
volume. The volume level will be displayed.
HOW TO SET THE SYSTEM CODE
This product uses a coding system to avoid interference with neighbouring
Oregon Scientific wireless products. If another Oregon Scientific wireless
product in the neighbourhood is using the same codes as your own the unit
might ring even though you did not press the bell button. In such a case you
will need to change the security system code. The code set for the bell
button and the Ringer must be identical before they can work properly
together.
To set the code for the ringer,
1. Press and hold [ CODE ] for two seconds.
2. Use [
] to enter the code. You can select from 1 to 16.
3. Press [ CODE ] to confirm and exit.
Once set, the Ringer will retain the system code even when the batteries are
removed.
To set the code for the bell button,
1. Open the battery compartment door of the bell button.
2. Set the code on the system code switch as shown below. There are 16
combinations.
3. Replace the battery compartment door.
6
GB
CODE 1
CODE 9
CODE 2
CODE 10
CODE 3
CODE 11
CODE 4
CODE 12
CODE 5
CODE 13
CODE 6
CODE 14
CODE 7
CODE 15
CODE 8
CODE 16
Note: These Oregon Scientific wireless models are compatible and will
activate each other if the system codes are set to be the same. For example,
if you install an additional Bell button for your back door, make sure you
adjust the system code of the additional Bell button to be the same as your
other Bell button and Ringer.
HOW TO USE THE PRODUCT
Once the Ringer and bell button are in place, pressing the bell button will
activate the door chime in the chime pattern selected. If the button is held
down the bell will ring continuously.
TRANSMISSION COLLISION
Signals from other household devices, such as home security systems and
entry controls, may interfere with those of this product and cause temporarily reception failure. This is normal and does not affect the general performance of the product. The transmission and reception of signals will
resume once the interference recedes.
THE RESET BUTTON
The RESET button is used to enhance synchronization of signals after
battery replacement or when the unit is operating in an unfavorable way or
malfunctioning. Use a blunt stylus to hold down the button. All settings
will return to their original values.
PRECAUTIONS
This unit is engineered to give you years of satisfactory service if handled
carefully.
1. Do not immerse the unit in water.
2. Do not clean the unit with abrasive or corrosive materials.
7
GB
3. Do not subject the unit to snow or excessive force, shock, dust, temperature
or humidity.
4. Do not tamper with the unit’s internal components.
5. Do not mix new and old batteries or batteries of different specifications.
6. No rechargeable batteries should be used in this product. Only use the type
of battery as specified.
SPECIFICATIONS
General
No. of system code combination
: 16
No. of channel
: 3
Channel 1 door chime
: Ding Dong
Channel 2 door chime
: Ding Ding
Channel 3 door chime
: West Minister
RF Transmission Range
: Maximum 80 feet (25 meters)
Transmission Frequency
: 433MHz
Power
Main Unit
: 2 pcs UM-3 or "AA" 1.5V battery
Bell push
: 3 pcs UM-4 or "AAA" 1.5V battery
Weight
Main Unit
: 5.78 ounces(164g)
(including batteries)
Bell push
: 2.54 ounces (72g)
(including batteries)
Dimensions
Main Unit (H x W x D)
: 6.57x2.24x1.26 inches
(167x57x32mm)
Bell push (H x H x D)
: 4.25x1.46x1.06 inches
(108x37x27 mm)
NOTE ON COMPLIANCE
Warning: Changes or modifications to this unit not expressly approved by
the party responsible for compliance could void the user's authority to
operate the equipment.
FCC :
NOTE: This equipment has been tested and found to comply with the
limits for a Class B digital device, pursuant to Part 15 of the FCC Rules.
These limits are designed to provide reasonable protection against harmful
interference in a residential installation. This equipment generates, uses
and can radiate radio frequency energy and, if not installed and used in
accordance with the instructions, may cause harmful interference to radio
communications.
However, there is no guarantee that interference will not occur in a particular installation. If this equipment does cause harmful interference to radio
or television reception, which can be determined by turning the equipment
off and on, the user is encouraged to try to correct the interference by one or
more of the following measures:
o Reorient or relocate the receiving antenna.
o Increase the separation between the equipment and receiver.
8
o Consult the dealer of an experienced radio/TV technician for help.
Company Name: Oregon Scientific, Inc.
Address: 19861 SW 95th Place, Tualatin, Oregon 97062, USA
Telephone Number: (503)-639-8883
Website address: www.oregonscientific.com.
Name and model number of the product: Personal ringer BHDR619A
CAUTION
— The content of this manual is subject to change without further
notice.
— Due to printing limitation, the displays shown in this manual
may differ from the actual display.
— The contents of this manual may not be reproduced without the
permission of the manufacturer.
CUSTOMER ASSISTANCE
Should you require assistance regarding this product and its
operation, please contact our customer care department at
541-868-8205 or via email at [email protected]. Our customer care
department is available 24-7-365.
WARRANTY
This product is warranted to be free of manufacturing defects for a period
of 3 months from date of retail purchase. Defective product should be
directed to the place of retail purchase for exchange.
Should this not be possible, contact our customer care department for
assistance and a return material authorization. No returns may be made
without a return authorization. Please retain your retail receipt as you may
be asked to provide a copy of it for proof of date purchased.
This warranty does not cover product subjected to abuse, misuse, accidental
damage or tampering.
Upon return of the defective product, Oregon Scientific will at its discretion,
replace the product with either a new or a tested reconditioned product.
Should the product be out of warranty, the consumer may purchase directly
from Oregon Scientific a replacement at reasonable cost plus shipping and
handling.
9
GB
o Connect the equipment into an outlet on a circuit different from
that to which the receiver is needed.