1
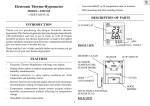
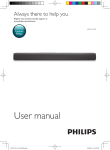
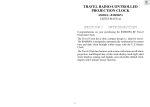
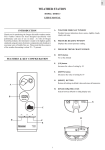
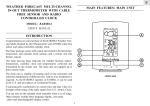
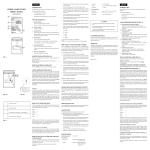
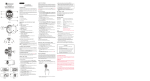
GB
WIRELESS RAIN GAUGE
MODEL: BHR616
USER’S MANUAL
A.
INTRODUCTION
- Displays the total rainfall, clock and date.
Congratulations on purchasing the BHR616 Wireless Rain Guage.
B.
Enclosed with this package is one (1) main display unit and one
(1) remote rain collector.
Daily and total rainfall display
-
Nine-day rainfall recall history
-
Easy wireless installation
RF Signal Indicator
- Indicates the signal-receiving status of the unit
C.
Lower Window
D.
MODE/SET BUTTON
The rain gauge is equipped with the following features and
functions:
-
Upper Window
- Displays the rainfall history
- Switches between the clock and calendar in normal mode
- Press and hold to enter the setting mode
E.
SINCE BUTTON
- Displays the start day for total rainfall
- Press and hold to clear the total and current rainfall and to
reset the start date
FEATURES & KEY CONFIGURATION :
MAIN UNIT
F.
HISTORY BUTTON
- Displays the rainfall history in normal mode
- Advances digits in setting mode.
G. SEARCH BUTTON
- Initiates a search for the rain gauge sensor
H. RESET BUTTON
- Returns all settings to their original default values
A
I.
[IN/MM] SWITCH
- Select rainfall measurement in inches or millimeters
B
H
C
D
E
G
F
I
1
GB
1. Remove the screws on the Rain collector as indicated in the
diagram and insert the batteries in accordance with the
polarities shown.
RAIN COLLECTOR: FEATURES
a
b
a.
2. Remove the fiber tape from the Rain Collector assembly.
Antenna
3. Position the main unit and rain collector within effective
range of each other (up to 100 feet).
-Transmits signal to main unit
b.
Cross
- To level the rain collector
4. Place the rain collector on a level surface. Add a few drops of
water; if the water collects at the center of the cross, the
collector is level.
BATTERY INSTALLATION: MAIN UNIT
The main unit uses 2 UM-3 or AA alkaline batteries.
1. Unscrew the battery door at the bottom of the unit.
2. Remove the battery door and insert batteries in accordance
with the polarities as indicated.
3. Select the display unit by the [IN/MM] switch.
Not Level
4. Replace the battery door and fasten the screw.
Level
5. If collector is not level, rotate the metal ring(s) on the feet
of the collector to adjust and level.
AA
AA
Metal Ring
Battery
door
6. Press the [RESET]
operation.
BATTERY INSTALLATION & SETTING
UP: RAIN COLLECTOR
button on the main unit to initiate
7. Press [SINCE] to display the default start date. Press and
hold to reset the start date to current date.
The Rain Collector uses 2 UM-3 or AA alkaine batteries.
2
GB
LOW BATTERY WARNING
HOW TO READ
THE RF SIGNAL INDICATOR
There are two low-battery indicators [
]. The indicator for
the rain collection unit is shown as " [
] out", and the
indicator for the main unit is shown as [
]. Replace the
batteries immediately when the respective indicator lights up.
The RF signal indicator shows the signal-receiving status of the
main unit. There are three possible forms:
The unit is in searching mode.
Note : Every time the batteries in the main unit are changed,
it is necessary to repeat installation steps 6 through
7 prior to use.
Transmission data are securely
registered.
No signals.
SETTING THE CLOCK & CALENDAR
1. Press and hold the MODE/SET button for 2 seconds.
INTERRUPTED SIGNALS
2. Choose the 12- or 24-hour display format by pressing the
HISTORY button. Press the MODE/SET button to confirm.
The success of wireless data transmission may vary and is directly
related to the positioning of the remote rain collector and the
environmental factors of that location. Should there be difficulty
in data transmission or should the main unit display go blank,
press [ SEARCH] to initiate a search signal between the main
unit and the Rain Collector unit.
3. Press and hold the MODE/SET button again. This time the
Clock will be displayed and the Hour will be flashing.
4. Press the HISTORY button once to increase its value by one.
Press the MODE/SET button to confirm its value.
5. The Minute will then be flashing. Repeat (4) to set the
minute.
If main unit remains blank verify that:
6. The calendar will now be displayed. Press and hold the
MODE/SET button for 2 seconds. The month will be
flashing. Repeat (4) again to set the current month, day and
calen dar display format (mm:dd or dd:mm).
7. After setting all values, the clock will be displayed.
-
The remote rain collector is still in place.
-
The batteries of both the main unit and rain collector are
good. Replace if necessary.
-
The transmission is within range and path is clear of
obstacles and interference. Shorten the distance if necessary.
Then press [SEARCH] again.
8. To display the calendar, press the MODE/SET button twice.
9. To display the clock again, press the MODE/SET button
twice.
THE RESET BUTTON
To reset the main unit, press the Reset button using a blunt stylus
to hold down the button. All main unit settings will return to
their original default values.
TOTAL RAINFALL
The total rainfall is displayed on the top window of the LCD
display. Upon initial activation, the rainfall amount will be
displayed in millimeters. Use the [IN/MM] switch to select
between inches and millimeters.
TABLE STANDING OR WALL MOUNTING
Table-Standing :
Your unit comes with stand connector for connecting it to other
modular units.
To display the start date of the record, press [SINCE] once.
The date will appear on top of the LCD screen. To clear the
record, hold [SINCE] for two seconds and the current date will
be set as the start date. Note that this will also clear the total
and current rainfall.
RAINFALL HISTORY
The rainfall history is displayed on the bottom window of the
LCD display. Zero (0) indicates the record for the current day.
Records for previous days are shown with a minus (-) sign; for
example : (-1) is the record for the previous day and (-2) would
be the record for two days preceding the current day. Press the
[History] button to scan the records of each day. A total of 9
day's rainfall history can be recorded and displayed.
To clear the current day rainfall, hold [SINCE] for two
seconds. Note that this will also clear the total rainfall record
and start date of the record.
STAND
CONNECTOR
3
GB
Wall-mounting:
4. Do not tamper with the unit’s internal components. Doing so
will terminate the unit’s warranty and may cause damage. The
unit contains no user-serviceable parts.
5. Only use new batteries as specified in this instruction manual.
Do not mix new and old batteries as the old batteries may
leak.
6. Read this instruction manual thoroughly before operating the
unit.
SPECIFICATIONS
Main unit
Wall mount
bracket
Proposed Operating Range
: -5°C to +50°C
Display rainfall range (total)
: 0 – 25,400 mm
Display rainfall range
: 0 – 2,540 mm
(23.0°F to 122.0°F)
Connector:
Use wall-mount connector to align with other wall-mount bracket
if necessary.
(0 - 999.99 inch)
(history / daily)
Rainfall resolution
(0 - 99.99 inch)
: 1 mm (0.04 inch)
Remote Rain Collector
Proposed operating range
: -20° C to +60°C
( -4° F to 140°C)
Wall Mount
Connector
General
Wall Mount
Bracket
RF Transmission Frequency
: 433 MHz
RF Transmission Range
: maximum 100 feet
Transmission Cycle
: 50 sec
CONNECTOR
Power
Un-install the brackets:
Main unit
: 2 pcs UM-3 or “AA” 1.5V
alkaline battery
Rain Collector unit
: 2 pcs UM-3 or “AA” 1.5V
alkaline battery
Weight
Main unit
: 4.7 ounces
Rain Collector unit
: 8.77 ounces
Dimensions
MAINTENANCE
Main unit
: 6.54" x 2.28" x 1.26"
Rain Collector unit
: Dia 4.53" x 5.71"
When handled properly, this unit is engineered to give you years
of satisfactory service. Here are a few product care instructions:
1. Do not immerse the unit in water. If the unit comes in contact
with water, dry it immediately with a soft lint-free cloth.
NOTE ON COMPLIANCE
2. Do not clean the unit with abrasive or corrosive materials.
Abrasive cleaning agents may scratch the plastic parts and
corrode the electronic circuit.
This device complies with Part 15 of the FCC Rules. Operation
is subject to the following two conditions: (1)This device may
not cause harmful interference, and (2) This device must accept
any interference received, including interference that may cause
undesired operations.
3. Do not subject the unit to excessive: force, shock, dust,
temperature, or humidity. Such treatment may result in
malfunction, a shorter electronic life span, damaged
batteries, or distorted parts.
4
GB
Warning: Changes or modifications to this unit not expressly
approved by the party responsible for compliance could void the
user’s authority to operate the equipment.
for assistance and a return material authorization. No returns
may be made without a return authorization. Please retail your
retail receipt as you may be asked to provide a copy of it for proff
of date purchased.
FCC :
This warranty does not cover product subjected to abuse, misuse,
accidental damage or tampering.
NOTE: This equipment has been tested and found to comply
with the limits for a Class B digital device, pursuant to Part 15 of
the FCC Rules. These limits are designed to provide reasonable
protection against harmful interference in a residential installation.
This equipment generates, uses and can radiate radio frequency
energy and, if not installed and used in accordance with the
instructions, may cause harmful interference to radio
communications.
However, there is no guarantee that interference will not occur in
a particular installation. If this equipment does cause harmful
interference to radio or television reception, which can be
determined by turning the equipment off and on, the user is
encouraged to try to correct the interference by one or more of
the following measures:
Reorient or relocate the receiving antenna.
Increase the separation between the equipment and receiver.
Connect the equipment into an outlet on a circuit different
from that of the receiver which the receiver is needed.
Consult the dealer of an experienced radio/TV technician for
help.
Company Name: Oregon Scientific, Inc.
Address:19861 SW 95th Place, Tualatain, Oregon 97062, USA
Telephone Number:1-800-853-8883
Name and model number of the product: Wireless Rain Gauge
BHR616
CAUTION
— The content of this manual is subject to change without
further notice.
— Due to printing limitation, the displays shown in this
manual may differ from the actual display.
— The contents of this manual may not be reproduced
without the permission of the manufacturer.
CUSTOMER ASSISTANCE
Should you require assistance regarding this product and its
operation, please contact our customer care department at 800853-8883 or via email at [email protected].
WARRANTY
This product is warranted to be free of manufacturing defects for
a period of 1 year from date of retail purchase. Defective product
should be directed to the place of retail purchase for exchange.
Should this not be possible, contact our customer care department
5