1
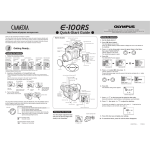
Shooting a Close Subject (at 10 cm ~ 0.5 m/0.4 in ~ 1.6 ft)
Using the Macro Mode
Using the Flash
1.
1.
Open the lens barrier.
Slide the lens barrier until it clicks to turn on the camera.
2.
Press the
2.
OK/menu button.
Press the
OK/menu button.
Displayed menu
Lens barrier
1 /3
2.
AUTO
OFF
END
OFF
OFF
OK
or
arrow pad key.
Press
Select
by pressing the
or
arrow pad key.
1 /3
AUTO
OFF
AUTO
OFF
OFF
OFF
SELECT
Each time you press the
or
END
OFF
OFF
OK
SELECT
arrow pad key, the flash mode changes:
Auto-Flash ➔
Red-Eye Reduction Flash ➔
Fill-In Flash ➔
Flash Off. Select one of these modes.
Scene ➔
Night
1 /3
AUTO
OFF
Display
changes as
key is pressed
When you have made your selection, press the
4.
Select “ON” by pressing the
5.
When you have made your selection, press the
button to enter the Macro mode.
Note: The macro mode is
automatically
canceled when the
camera is turned off.
Note: For the function and effect of each flash mode, refer to Page
56 of the camera’s Instructions.
OK/menu button.
The desired flash mode is set
or
END
Arrow pad
3.
To view other images, press the
1
or
Monitor
arrow pad key.
OK
OLYMPUS OPTICAL CO., LTD.
San-Ei Building, 22-2, Nishi Shinjuku 1-chome, Shinjuku-ku, Tokyo, Japan.
(Customer support) Tel. 0426-42-7499 Tokyo
http://www.olympus.co.jp
arrow pad key.
OK/menu
When you want to
cancel shooting,
close the lens
barrier.
OLYMPUS AMERICA INC.
Two Corporate Center Drive, Melville, NY 11747-3157, U.S.A. Tel. 631-844-5000
(Technical support) Tel. 1-888-553-4448 distec @ Olympus
http://www.olympus.com
OLYMPUS OPTICAL CO. (EUROPA) GMBH.
When you want to cancel viewing, press the
button again.
V T 2 5910 2
01/Quick start guide.En
Monitor button
OK
Arrow pad
3.
1 /3
5.
END
Monitor
by pressing the
The default setting is Auto-Flash.
4.
monitor button for a moment.
The last picture you took appears on the monitor.
AUTO
OFF
SELECT
Arrow pad
Press and hold the
QUICK START
GUIDE
1 /3
OFF
OFF
SELECT
If the lens barrier is open,
slide it to close.
OK/menu button
ss
P re
ss
Select
START
The monitor shows the shooting mode menu.
OK/menu button
3.
Using this camera for the first time
Make sure the lens barrier is closed.
Slide the lens barrier until it clicks to turn on the camera.
The monitor shows the shooting mode menu.
P re
Viewing Pictures
1.
Open the lens barrier.
E
N
D
01.3.15, 6:54 PM
monitor
(Premises/Goods delivery) Wendenstraße 14-18, 20097 Hamburg, Germany. Tel. 040-237730
(Letters) Postfach 10 49 08, 20034 Hamburg, Germany.
http://www.olympus-europa.com
Checking the Package Contents
First make sure that all the provided accessories listed below are
included in the package. If anything is missing or damaged, contact
your local Olympus representative immediately.
Attaching the Provided Strap
1.
1.
Attach the strap as shown.
1.
Make sure the lens barrier is closed.
Lens barrier
Insert the battery in the direction
shown in the
figure.
○
Hold the camera, and look through the
viewfinder.
3.
Press the shutter button halfway (half-press) to make sure the green lamp on
the right of the viewfinder lights.
○
○
○
○
○
○
Insert the card as far as it will go in
the direction
shown
in the figure.
The subject is in focus. You can shoot.
The subject is out of focus. Half-press the shutter button
again.
○
○
6x2
x1orLR
CR-V3
When lit:
When blinking:
○
○
6.
○
3.
○
USB cable
2.
R6x2
○
Video cable
x1orL
○
CR-V3
Strap
Open the card cover.
○
Slide the battery compartment
cover in the
direction of the
arrow q,
and lift the
cover in the
direction of
the arrow w.
○
CR-V3 lithium battery pack
5.
○
Battery compartment cover
2.
Lens barrier
If the lens barrier is open,
slide it to close.
Card cover
CD-ROM
Open the lens barrier.
Slide the lens barrier until it clicks to turn on the camera.
Strap eyelet
Camera
Shooting Pictures
Loading the Battery and Card (SmartMedia)
○
Green lamp
Labels for SmartMedia (2 pieces)
SmartMedia Instructions
01/Quick start guide.En
2
01.3.15, 6:54 PM
○
Be sure to hold the card so that the cut
corner is positioned correctly. There is
an arrow inside the card cover,
indicating the insertion direction.
7.
Close the card cover until it clicks.
○
○
x2
○
Write-protect seals for
SmartMedia (4 pieces)
orLR6
○
x1
CR-V3
○
Close the battery compartment
cover in the direction
of the arrow q,
and press the
cover in the
direction of
the arrow w
unti it clicks.
○
4.
○
Basic Manual/Warranty/
Quick Start Guide (this publication)
○
Static-free case for
SmartMedia
○
SmartMedia (8 MB)
○
○
○
○
Viewfinder
Note:
To remove the
card, hold the
card with your
fingertips, and
pull it out in the
direction of the
arrow .
4.
Press the shutter button all the way (full-press) to take the picture.
The shutter is released and the picture is
taken.
Once the picture has been taken, it is
displayed on the monitor for a
short time.
Monitor