1
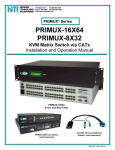
PRIMUX® Series
PRIMUX-16X64
PRIMUX-8X32
KVM Matrix Switch via CATx
Quick Start Guide
PRIMUX-16X64
(Front and Rear View)
PRIMUX-UZR
User Station (sold separately)
1
HA-UNV PS/2 and USB Host
Adapter (sold separately)
What's in the Box
Terminating Plug
NTI PRIMUX-16X64 or 8X32
Cat5 KVM Matrix Switch
AC Line Cord
Country Specific
Manual CD
Quick Start
Guide
What's also needed (sold separately)
•
•
•
NTI Host Adapter(s) HA-UNV PS2/USB Host Adapter (Includes a CT7038 USB-PS2 Adapter)/
HA-SUN-MTX SUN Host Adapter /
HA-RS-M Serial Host Adapter (see chart on page 7)
NTI PRIMUX-UZR User Station
CAT5/5e/6 unshielded twisted-pair cable(s) terminated with RJ45 connectors wired straight thru (pin 1 to pin 1, etc.)
Please Note:
The PRIMUX User Station and Host Adapters used in conjunction with the PRIMUX Matrix Switch must all be
running firmware version 2.0 or later in order to be compatible with the PRIMUX Matrix Switch. For updated firmware with
instruction for upgrading, go to http://www.networktechinc.com/download/d-kvmswitch-cat5.html .
2
Hardware Setup
1. Disconnect power from each CPU to be connected. (If your CPU fully supports hot-plugging, powering-down will not be necessary).
2. Plug the appropriate Host Adapter into the devices and video ports on the back of each CPU.
6 miniDIN
male connectors
6 pin miniDIN
female connectors
PS/2 keyboard (purple)
USB-PS/2 Adapter
(mouse)
(Front View)
15HD female
video connector
Note: When hotplugging the
mouse and keyboard cables into
a PS/2 CPU, be sure to connect
the mouse cable first, then the
keyboard cable. Failure to
connect in this order may cause
the mouse to not be recognized
by the CPU.
15HD male
video connector
Rear View of PS/2 CPU
PS/2 Keyboard Connector cannot be used
when the USB connector is plugged directly
into the USB CPU.
USB Type A male
USB Type A
device port
(Front View)
15HD female
video connector
Rear View of USB CPU
Rear View of Legacy SUN CPU
video
(Front View)
devices
3
15HD male
video connector
Cable to CPU
3. Connect a CAT5 cable from the "OUT" port on each Host Adapter to a "CAT5" port on the PRIMUX KVM
Matrix Switch.
4. Connect the Terminating Plug (supplied with Host Adapter) to the "IN" port on each Host Adapter.
!
WARNING: Never connect the PRIMUX Host Adapter, User Station, or Matrix
Switch to an Ethernet card, Ethernet router, hub or switch or other Ethernet
RJ45 connector of an Ethernet device. Damage to devices connected to
the Ethernet may result.
(Rear View)
CAT5 Cable
to Matrix Switch
NOTE: HA-SUN-MTX Host Adapters require the insertion of a Terminating Plug (included) into the "IN" port on the Host Adapter.
Be sure to insert this plug.
Cable to CPU
(Rear View)
Terminating
Plug (Supplied)
CAT5 Cable
to PRIMUX Switch
5. Connect the user keyboard and mouse to the proper "DEVICES" port(s) (USB or PS/2) on the PRIMUX-UZR User Station. (USB type
devices are shown in the following image.)
6. Connect the user monitor to the "MONITOR" port on the User Station.
Rear View of PRIMUX-UZR User Station
Rear View of PRIMUX-UZR User Station
5VDC
2A
RS232
USB
Devices
P S/2
Devices
SUN
M ouse Kybd Devices
N TI
R
N ET WO R K
1275 Da nner Dr
Tel:330-5 62-7 070
T EC HNO L OG IES Aurora, O H 44202 Fax:330-562-1999
IN C O R PO RA T ED w ww .ne tw orkte chinc.com
Cat5
M onitor
+
USB
Mouse
VGA
Multi-Scan
Monitor
USB Keyboard
4
7. Connect a Cat5 cable between the “Cat5” port on the User Station and a “User” port on the Matrix Switch.
Rear View of PRIMUX-Matrix Switch
32
31
30
29
28
27
26
CPU
25
24
23
22
21
20
19
18
17
7 USER 6
8
5
EXPANSION PORT
ETHERNET
RS232
16
14
15
13
12
11
9
10
CPU
8
6
7
5
3
4
2
4
1
3 USER 2
1
NTI
R
NETWORK TECHN OLOGIES INC Tel: 330-562-7070
1275 Dan ner Dr, Au ro ra, OH 44202 www.nti1.com
Rear View of PRIMUX-UZR User Station
Rear View of PRIMUX-UZR User Station
Rear View of PRIMUX-UZR
5VDC
2A
PS/2
Devices
SUN
Mouse Kybd Devices
USB
Devices
RS232
NTI
NE TW OR K
1275 D ann er Dr
Tel :330-562-7070
TE CHN OL OG IE S Au ro ra, OH 44202 Fax:330-562-1999
INCO RP O RATE D www .n etworktech in c.co m
R
Cat5
RJ45 male
connector
Monitor
+
Cat5 cable
RJ45 male
connector
Connect a Cat5 cable between the “OUT” port on each Host Adapter and a “CPU” port on the Matrix Switch.
Rear View of PRIMUX-Matrix Switch
32
31
30
29
28
27
26
25
CPU
24
23
22
21
20
19
18
17
8
7 USER 6
5
16
15
14
13
12
11
10
9
CPU
8
7
6
5
4
3
2
1
4
3 USER 2
1
EXPANSION PORT
ETHERNET
RS232
NTI
R
NETWO RK TECHN OLOGIES INC Tel: 330-562- 7070
1275 Danner Dr, Au ro ra, OH 44202 w ww .nt i1.com
Cable to CPU
RJ45 male
connector
(Rear View)
Cat5 cable
RJ45 male
connector
Terminating
Plug (Supplied)
8. Connect the AC adapter to the "5VDC" port on the User Station and the IEC line cord into the IEC port on the Matrix Switch.
Rear View of PRIMUX-UZR User Station
Rear View of PRIMUX-UZR User Station
5VDC
2A
R S23 2
U SB
D evices
NofT IPRIMUX-UZR
P S /2
D e v ic e s
Rear
S UView
N
M o u s e K y b d D e v ic e s
R
N ET W O R K
1 2 7 5 D a nne r D r
Te l:3 3 0 - 5 6 2 -7 0 7 0
T EC H N O L OGI ES A u r or a , O H 4 4 2 0 2 Fa x :3 3 0 - 5 6 2 -1 9 9 9
IN C O R P O R A T E D w ww .n e tw or k te c hinc . c om
C a t5
M o n it o r
+
Rear View of PRIMUX-Matrix Switch
32
31
30
29
28
27
26
25
CPU
24
23
22
21
20
19
18
17
8
7 USER 6
5
16
15
14
13
12
11
10
9
CPU
8
7
6
5
4
3
2
1
4
3 USER 2
1
EXPANSION PORT
5 VDC
AC
ADAPTER
AC Adapter
RS232
IEC Line Cord
9. Power-up the monitor, User Station and Matrix Switch.
10. Power-up the CPU(s).
5
NTI
R
ETHERNET
NETWORK TECHNOLOGI ES INC Tel :330-562-7070
1275 Danner Dr, Aurora, OH 44202 www. nti1.com
Initial Startup
Upon startup, the Command Mode On Screen Display (OSD) menu will be displayed, auto-logging you in as the administrative user
“root”. By default, the user “root” has full administrative rights and access to all Host Adapters and their connected CPUs.
To logout as a user, press <L> and the login screen will appear
If you logout and want to log back in as the administrator “root” either ;
A) type <root> at the user prompt and press <Enter> or <Tab>
type <nti> at the password prompt and press <Enter>
-orB) power-cycle the PRIMUX and be automatically logged-in as root
NOTE: In PRIMUX units with firmware version 1.9 and earlier, the administrator name was “ADMINISTRATOR” and the password
was “NTI” (all upper case letters). The PRIMUX must be using version 2.0 and later to work with a PRIMUX Matrix Switch.
Configure User Station for Matrix Mode
The User Station must be configured for use with a Matrix Switch instead of as a Stand Alone unit before the Command Mode menu will
recognize any connected CPUs. From the Command Mode menu, enter the following key sequence:
<A>-<R>-<M>-<Spacebar>-<Y> , then power-cycle the User Station.
This sequence of key presses will open the Administration menu (A), then the User Station Configuration menu (R), select the Mode
configuration option (M), toggle the mode from Standalone (the default) to Matrix (Spacebar), and confirm the configuration change (Y).
You must power-cycle the User Station to establish communication with the Matrix Switch.
Menu sequence for Matrix Switch Mode
To return to the Command Mode menu, either press <Esc> twice, or <F10> once. Any connected CPUs should now be listed in the
Command Mode OSD menu as “PN:xxxxxxxx>” where xxxxxxxx is the part number of the Host Adapter (this number can be found on the
back side of the Host Adapter).
6
Make a Connection
From the Command Mode menu, to make connection to any Host Adapter,
press <Up arrow> or <Down arrow> to highlight and select the desired Host Adapter,
press <Enter> to connect to it.
-ORuse the mouse to highlight the desired Host Adapter to connect to and left-click on it to connect.
Press <Esc> to exit Command Mode and use the connected CPU.
Press <Ctrl> + <`> to return to the Command Mode OSD menu.
Congratulations, you have successfully installed your PRIMUX Matrix Switch.
Host Adapter Ordering Chart
NTI #
HA-UNV
HA-SUN-MTX
HA-RS-M
Application
PS2/USB CPU
Legacy SUN CPU
Serial-Controlled Devices
To order CAT5/5e/6 cables, Host Adapters, or User Stations either visit our website at www.networktechinc.com or call us at 1-800-RGBTECH (800-742-8324) or 1-330-562-7070.
Please Note: The PRIMUX User Station and Host Adapters used in conjunction with the PRIMUX Matrix Switch must all be
running firmware version 2.0 or later in order to be compatible with the PRIMUX Matrix Switch. For updated firmware with
instruction for upgrading, go to http://www.networktechinc.com/download/d-kvmswitch-cat5.html .
MAN106 Rev 6/17/2010
7