1
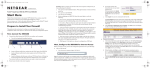
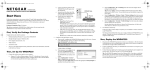
2. RESTART
)NSTALLATION'UIDE
FVX538 ProSafe™ VPN Firewall 200
Now, power on the FVX538.
Follow these instructions to set up your firewall. You can also consult the online
c.
Last, turn on your computer.
FVX538 ProSafe VPN Firewall 200 Reference Manual or the NETGEAR Knowledgebase
at http://kbserver.netgear.com. A link to the online Reference Manual is on the Resource
CD.
d.
Before configuring your FVX538, check the status lights to verify the following:
•
Power. The power light (5) should turn solid green. If it does not turn solid
green, see the Troubleshooting section of the full manual.
Prepare to Install Your FVX538 VPN Firewall
•
Test. When you first turn on the router, the amber test light (4) will be lit for
approximately 2 minutes. If it is still on after several minutes, see the
Troubleshooting Tips below.
This guide provides instructions for setting up a simple dual WAN port rollover
configuration. Refer to the Reference Manual for other WAN port configuration options.
•
WAN. The Link/Act lights on each WAN port (1) and (2) should be lit. If not,
make sure the Ethernet cable is securely attached to the modem and the
WAN port, and that the modem is powered on.
•
LAN. A LAN light (3) should be lit. Green indicates your computer is
communicating at 100 Mbps; amber indicates communication at 10 Mbps. If
a LAN light is not lit, ensure that the Ethernet cable from the computer to the
router is securely attached at both ends, and that the computer is turned on.
First, Connect the FVX538
1. CONNECT THE CABLES BETWEEN THE FVX538, THE MODEMS, AND A
COMPUTER
Turn off and unplug the broadband modems.
For security reasons, the
firewall has its own user
name and password.
When prompted, enter
admin for the firewall User
Name and password for the
firewall Password.
First, power on the broadband modems. Wait approximately 2 minutes until they
power up.
b.
a.
b.
Warning: Failure to restart your network in the correct sequence could prevent you
from connecting to the Internet.
a.
Start Here
YOUR NETWORK IN THE CORRECT SEQUENCE
c.
Click Login. You are now
connected to the firewall.
The WAN1 ISP Settings
screen will display.
The Web Support tab on the main menu contains links to the online NETGEAR
FVX538 product documentation and support Knowledgebase. Be aware that the
default login time-out is 5 minutes of inactivity, after which automatic logout will
occur.
Next, Configure the FVX538 for Internet Access
2. CONNECT
Before you begin, be sure you have the configuration parameters from your ISP handy.
1. LOG
a.
5
4
1
2
3
b.
Insert an Ethernet cable from a modem into the WAN1 port (1) of the FVX538.
c.
Insert an Ethernet cable from the other modem into the WAN2 port (2) of the
FVX538.
d.
Insert the Ethernet cable that came with your firewall into a LAN port on the
router (3) and insert the other end into the Ethernet port of your computer.
Your network cables are connected and you are ready to restart your network.
IN TO THE
ROUTER
a.
Click Auto Detect at the bottom of the WAN1 ISP Settings screen. The router
will automatically attempt to detect your connection type. If you know your ISP
connection type, you can manually configure the router settings on the WAN1
ISP screen. If connecting manually, click Apply to save your settings.
b.
When finished, click Test to verify that the Internet connection is active.
c.
Select the WAN2 ISP tab and complete the same steps you just completed in
steps a and b.
Use a browser to connect to http://192.168.1.1
http://192.168.1.1
Note: To connect to the firewall, your computer needs to be configured to obtain
an IP address automatically via DHCP. If you need instructions on how to do this,
please refer to the online reference manual. A link to the manual is on your
Resource CD.
TO THE INTERNET
Now, Configure WAN Rollover Mode
3.
The dual WAN ports of the FVX538 ProSafe™ VPN Firewall 200 can be configured for
either rollover for increased system reliability or load balancing for maximum bandwidth
efficiency. The rollover option is presented here; refer to the manual for instructions on
configuring the load balancing mode.
In rollover mode, expect the following:
WAN failure is detected using DNS queries to the DNS server or PING messages to
an IP address. If the replies are not received, the WAN interface is considered down.
Fill in the appropriate fields:
• Configured DNS Servers – In this case, DNS queries are sent to the ISP DNS
servers configured on the WAN ISP pages.
•
Using this DNS Server – In this case, DNS queries are sent to a specified DNS
Server.
•
Ping to this IP address – In this case, PING queries are sent to the specified IP
address.
•
You designate one WAN port as primary and the other as the rollover link.
•
While the primary link is up, all traffic goes over the primary WAN port. If the
primary link goes down, traffic is sent over the rollover link.
•
Test Period – a DNS or PING query is sent after every test period. The minimum
test period is 30 seconds.
•
Traffic will automatically roll back to the primary link once it is back up.
•
Failover after – The WAN link is considered down after the configured number
of queries fail to get a reply. The minimum number of failed queries is four. The
rollover link is brought up after this.
To configure the dual WAN ports for rollover:
1.
Select WAN Mode from the sub-menu. The WAN Mode screen will display.
4.
Click Apply to save your changes.
Troubleshooting Tips
Here are some tips for correcting common problems you may encounter.
Be sure to restart your network in this sequence:
1.
2.
3.
4.
Turn off and unplug the modems, turn off the FVX538, and shut down the computer.
Plug in and turn on the modems. Wait for the modems to power up (approximately 2
minutes).
Turn on the FVX538. Wait until the amber test light goes out.
Turn on the computer.
Make sure the Ethernet cables are securely plugged in.
2.
From the Auto-Rollover pull-down menu, select which WAN port will be primary.
June 2006
•
The WAN Link/Act light on the firewall will be lit if the Ethernet cable to the firewall
from each modem is plugged in securely and the modems and firewall are turned on.
•
For each powered on computer connected to the firewall with a securely plugged in
Ethernet cable, the corresponding firewall LAN port status light should be lit. The
front of the FVX538 identifies the number of each LAN port.
Make sure the network settings of the computer are correct.
Computers must be configured to obtain IP and DNS addresses automatically via DHCP.
For help with this, please see the online FVX538 ProSafe VPN Firewall 200 Reference
Manual; a link to the manual is on the Resource CD.
For Cable Modem connections, use MAC spoofing.
Some cable modem ISPs require that you use the MAC address of the computer registered
on the account. If so, in the Router’s MAC Address section (accessed through the
Advanced link on the WAN1 ISP Settings screen), select either “Use this Computer’s
MAC” or “Use this MAC address” and enter the appropriate MAC address. The router
will then capture and use the MAC address of the computer that you identified. You must
select the computer that is registered with the ISP. Click Apply to save your settings.
Restart the network in the correct sequence.
Use the FVX538 status lights to verify correct operation.
If the FVX538 Test light does not go out approximately 2 minutes after turning the router
on, reset the router as described in the FVX538 ProSafe VPN Firewall 200 Reference
Manual.
Technical Support
Thank you for selecting NETGEAR products.
After configuring your FVX538 VPN Firewall, locate the serial number on the bottom
label of your product and use it to register your product at
http://www.netgear.com/register. Registration on the web site is required before you can
use our telephone support service.
The phone numbers for worldwide regional customer support centers are on the Warranty
and Support Information card that came with your product.
Go to http://www.netgear.com/support for product updates and web support.
This symbol was placed in accordance with the European Union Directive 2002/
96 on the Waste Electrical and Electronic Equipment (the WEEE Directive). If
disposed of within the European Union, this product should be treated and
recycled in accordance with the laws of your jurisdiction implementing the
WEEE Directive.
©2006 by NETGEAR, Inc. All rights reserved.
NETGEAR, the NETGEAR logo and ProSafe are tradenarks or registered trademarks of NETGEAR, Inc., in the
United States and/or other countries.
Other brand and product names are trademarks or registered trademarks of their respective holders. Information
is subject to change without notice.