1
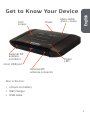
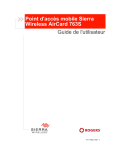
Sierra Wireless
AirCard®
Mobile Hotspot
QUICK START GUIDE
GUIDE DE DÉMARRAGE RAPIDE
Power
LCD
screen
External RF
antenna
connector
English
Get to Know Your Device
Mute switch
(Red = mute)
Power
LED
micro USB port
External RF
antenna connector
Also in the box:
• Lithium ion battery
• Wall charger
• USB cable
1
Your Device LCD Screen
1
2
9
4
5
6
4G
7
8
3
Network
SSID: AC754S-1234
Wi-Fi Passphrase: 12345678
To conĮŐƵre yŽƵƌŚŽƚƐƉŽƚ
10
11
Signal strength
6
Battery
2
1
Mobile network
7
Status icons
3
Messages
(View at http://swi.hotspot)
8
Operator name
4
GPS finding fix or tracking
9
Wi-Fi SSID
5
10 Homepage URL
Wi-Fi on or off
The number indicates
11 Data usage information
the number of devices
connected.
Double-press the Power button to cycle through the
following screens:
• Connect Info
(Wi-Fi SSID and Wi-Fi Passphrase)
• WPS Setup
• Messages/Alerts
• Data Usage/Billing Info
2 • Device Info/About
Step 1: Set up Device
1. Remove the back cover.
2. Insert a SIM card. (Slide the SIM cover away from the label
and lift up. Insert the card in the slot, then lower the SIM
cover and slide it toward the label to lock the card in place.)
3. Insert the battery as shown in the illustration. (The
battery installs easily. If it does not go in easily, check the
orientation. Do not force it.)
Gold contacts
Battery
SIM card
(To open, slide the
metal cover, then
lift up.)
4. Replace the back cover.
Your AirCard Mobile Hotspot comes with the battery partially
charged. When you need to recharge the battery, use the USB
cable to attach the hotspot to:
• A wall socket, using the AC adapter (fastest option)
• The USB port on your laptop
3
Step 2: Connect to
the Internet
1. Press and hold the Power button for a few seconds.
2. The LCD screen displays the message “Connect your
computer to Wi-Fi network” and shows you the Wi-Fi SSID
(Network name) and Wi-Fi Passphrase.
4G
Network
SSID: AC754S-1234
Wi-Fi Passphrase: 12345678
To conĮŐƵre yŽƵƌŚŽƚƐƉŽƚ
Note: The LCD screen goes into sleep mode to save power. To
wake up the LCD screen, press and release the Power button.
3. On your computer or mobile device, open your Wi-Fi/network
connection manager.
4. Select the Wi-Fi SSID displayed on the LCD screen.
5. When prompted, enter your Wi-Fi Passphrase, as it appears
on the LCD screen.
When the device connects to the Internet, a ‘1’ appears
beside the Wi-Fi icon on the LCD screen.
6. Launch your browser and, if desired, go to http://swi.hotspot
to personalize your settings. (Note: The mobile hotspot is
completely secured using its default security settings.)
Optional step: Depending on your service provider, you may
need to create a profile to connect to the mobile broadband.
Follow the instructions on page 11.
4
Security Credentials
Wi-Fi Passphrase
• Use to connect a wireless device to your Wi-Fi network
• The Wi-Fi Passphrase is shown on the LCD screen.
Admin Password
• Your default Admin Password is swiadmin.
• Use this password to log in to the AirCard Homepage and
make changes such as enabling GPS or changing your
security settings.
The default Wi-Fi Passphrase and Admin Password are printed
on the label under the battery.
Reset the Wi-Fi Passphrase and Admin
Password
To reset your device to the default settings:
1. Press and hold the Reset button (under the back cover) for
5 seconds.
A message appears on the LCD screen confirming the reset.
2. Press and release the Power button to confirm.
Power button
Reset button
Note: If you change your Wi-Fi Passphrase (password), you
may need to update the saved information in your laptop’s
Wi-Fi/network connection manager.
5
Mobile Hotspot Homepage
To access your mobile hotspot homepage, connect to your
device, and in your browser, enter http://swi.hotspot. Log in
with your Admin login (swiadmin) to modify settings.
Note: Alternatively, you can enter the device IP address
http://192.168.1.1
6
Check Your Data Usage
To view your data usage:
On the mobile hotspot LCD Dashboard:
1. Double-press the Power button to view the Dashboard
screens.
2. Double-press repeatedly to cycle through the screens. The
billing information screen (4 of 5) shows your data usage.
Billing Info
(4/5)
Data used from: 2011/06/18
Data transferred: 4.23 MB*
Cycle restarts: 2011/07/01
ĂLJƐůĞŌ͗ϭϮĚĂLJƐ
* approximate
On the Homepage:
1. Go to http://swi.hotspot.
2. Click the Session Data icon.
3. Optionally, set the billing cycle to match your data plan’s
billing date.
7
Connect Other Devices
Connect additional Wi-Fi capable devices:
1. Open the Wi-Fi network manager on your computer or other
Wi-Fi device (smartphones, tablets, media players, cameras,
etc.).
2. Select your mobile hotspot Wi-Fi network displayed on the
LCD screen (for example, AirCard-1234).
3. Enter the Wi-Fi Passphrase displayed on the LCD screen and
launch your browser.
Connect WPS Devices
Wi-Fi Protected Setup (WPS) allows WPS-enabled devices to
be connected to a Wi-Fi network without the use of a keyboard.
The WPS feature is available on certain cameras and printers as
well as some smartphones and laptops.
1. Double-press the Power button on your mobile hotspot to
reach the WPS Setup screen (2 of 5).
2. When the WPS Setup screen appears, press the Power
button to enable WPS.
3. Within 2 minutes, press the WPS button on the wireless
device you want to connect.
Your mobile hotspot and the wireless device will
communicate and establish the connection.
8
Use GPS
To view your GPS location:
1. Go to the AirCard Homepage (http://swi.hotspot).
2. Log in as Administrator.
3. Click the GPS icon.
4. Click Get GPS Location (one-time) or Start GPS Tracking
(continuous).
5. To view your location on a map and search for nearby amenities, click Map Me.
9
Create a profile
If you need to create a profile:
1. Go to the AirCard Homepage (http://swi.hotspot).
2. Log in as Administrator.
3. Go to Advanced Settings > WAN > Setup.
4. Click Add / Edit Profiles.
5. Enter the information supplied by your service provider, and
click Save.
Frequently Asked Questions
How do I enter the PIN code on my SIM card?
If your service provider gave you a PIN for your SIM card:
1. Connect your computer to the mobile Wi-Fi network using the
credentials printed on the label under the battery.
2. Go to the homepage. (The URL is displayed on the LCD
screen).
3. Enter your Admin Password in the Admin Login field and click
login. (Default Admin Password is swiadmin)
4. When prompted, enter the SIM PIN and click Submit.
10
Écran LCD
Alimentation
Commutateur silence
(Rouge = silence)
Connecteur
d’antenne RF
externe
Français
Découverte de votre appareil
Voyant
d’alimentation
Port microUSB
Connecteur d’antenne
RF externe
Également fournis :
• Batterie lithium-ion
• Chargeur mural
• Câble USB
11
L’écran LCD de votre appareil
1
2
9
4
5
6
4G
7
8
3
Network
SSID: AC754S-1234
Wi-Fi Passphrase: 12345678
To conĮŐƵre yŽƵƌŚŽƚƐƉŽƚ
10
11
1
Intensité du signal
6
Batterie
2
Réseau mobile
7
Icônes d’état
3
Messages
8
Nom de l’opérateur
(Visualisation sur http://swi.hotspot)
4
Recherche GPS fixe ou suivi
9
5
Wi-Fi - marche ou arrêt
10 URL de la page d’accueil
Le chiffre indique le
nombre d’appareils
connectés.
11
SSID Wi-Fi
Informations relatives à
l’utilisation des données
Appuyez deux fois sur le bouton d’alimentation pour naviguer
entre les fenêtres suivantes :
• Connect Info (Informations de connexion)
(SSID Wi-Fi et passphrase Wi-Fi)
• WPS Setup (Configuration du WPS)
• Messages/Alerts (Messages/Alertes)
• Billing Info (Utilisation des données/Informations de facturation)
12
• About (Informations sur l’appareil/En savoir plus)
Étape 1 : Installation de
l’appareil
1. Enlevez le couvercle arrière.
2. Insérez une carte SIM. (Faites glisser le couvercle de la carte SIM
dans la direction opposée à l’étiquette puis soulevez. Insérez la
carte dans la fente, baissez le couvercle de la carte SIM, puis
faites-le glisser vers l’étiquette pour positionner la carte et refermer.)
3. Insérez la batterie comme qu’illustré. (La batterie s’installe
facilement. Si elle s’insère difficilement, vérifiez l’orientation.
Ne forcez pas.)
Contacts dorés
Batterie
Carte SIM
(Pour ouvrir, faites glisser
le couvercle métallique,
puis soulevez.)
4. Replacez le couvercle arrière.
Votre hotspot mobile AirCard est fourni avec une batterie partiellement
chargée. Pour recharger la batterie, utilisez le câble USB pour fixer le
hotspot à :
• Une prise murale, à l’aide d’adaptateur AC (option la plus rapide)
• Le port USB de votre ordinateur portable
13
Étape 2 : Connexion à Internet
1. Appuyez sur le bouton d’alimentation et maintenez-le enfoncé
pendant quelques secondes.
2. L’écran LCD affiche le message « Connect your computer to Wi-Fi
network » (« Branchez votre ordinateur au réseau Wi-Fi ») et vous
montre le SSID Wi-Fi (Nom du réseau) et la passphrase Wi-Fi.
4G
Network
SSID: AC754S-1234
Wi-Fi Passphrase: 12345678
To conĮŐƵre yŽƵƌŚŽƚƐƉŽƚ
Remarque : l’écran LCD se met en mode veille afin d’économiser de
l’énergie. Pour activer l’écran LCD, appuyez sur le bouton d’alimentation
puis relâchez-le.
3. Sur votre ordinateur ou votre appareil mobile, ouvrez le gestionnaire
de connexion Wi-Fi/réseau.
4. Choisissez le SSID Wi-Fi affiché sur l’écran LCD.
5. Lorsque vous êtes invité(e) à le faire, entrez votre Passphrase Wi-Fi,
telle qu’elle apparaît sur l’écran LCD.
Lorsque l’appareil est connecté à Internet, un ’1’ apparaît à côté de
l’icône Wi-Fi sur l’écran LCD.
6. Lancez votre navigateur et, si vous le souhaitez, allez sur
http://swi.hotspot afin de personnaliser vos paramètres.
(Remarque : le hotspot mobile est entièrement sécurisé si vous
utilisez ses paramètres de sécurité par défaut.)
Étape facultative : en fonction de votre fournisseur de services, vous
devrez éventuellement créer un profil d’utilisateur pour vous connecter
au réseau mobile. Suivez les instructions de la page 11.
14
Informations relatives à la
sécurité
Passphrase Wi-Fi
• Utilisez-la pour connecter un appareil sans fil à votre réseau Wi-Fi.
• La passphrase Wi-Fi est indiquée sur l’écran LCD.
Mot de passe administrateur
• Votre mot de passe administrateur par défaut est swiadmin.
• Utilisez ce mot de passe pour vous connecter sur la page d’accueil
AirCard et effectuer des modifications telles que l’activation du GPS
ou les changements de vos paramètres de sécurité.
La passphrase Wi-Fi par défaut et le mot de passe administrateur sont
inscrits sur l’étiquette collée sous la batterie.
Réinitialisation de la passphrase Wi-Fi
et du mot de passe administrateur
Pour restaurer les paramètres par défaut de votre appareil :
1. Appuyez sur le bouton de réinitialisation et maintenez-le enfoncé
(sous le couvercle au dos de l’appareil) pendant 5 secondes.
Un message de confirmation apparaît sur l’écran LCD.
2. Appuyez sur le bouton d’alimentation puis relâchez-le pour
confirmer.
Bouton d’alimentation
Bouton de
réinitialisation
Remarque : si vous changez votre passphrase Wi-Fi (mot de passe),
vous devrez éventuellement actualiser l’information sauvegardée dans
votre gestionnaire de connexion au Wi-Fi/réseau de votre ordinateur 15
portable.
Page d’accueil du hotspot
mobile
Pour accéder à la page d’accueil de votre hotspot mobile, connectez
votre appareil puis, dans votre navigateur Web, saisissez l’adresse
suivante : http://swi.hotspot. Connectez-vous avec votre identifiant
d’administrateur (swiadmin) pour modifier les paramètres.
Remarque : vous pouvez également utilizer l’adresse IP de l’appareil
http://192.168.1.1
16
Vérification de votre
utilisation des données
Pour voir votre utilisation des données :
Sur le tableau de bord de l’écran LCD :
1. Appuyez deux fois sur le bouton d’alimentation pour afficher les
fenêtres du tableau de bord.
2. Appuyez deux fois de manière répétée pour naviguer d’une
fenêtre à l’autre. L’écran affichant les informations de facturation
(4 sur 5) indique votre utilisation des données.
Billing Info
(4/5)
Data used from: 2011/06/18
Data transferred: 4.23 MB*
Cycle restarts: 2011/07/01
ĂLJƐůĞŌ͗ϭϮĚĂLJƐ
* approximate
Sur la page d’accueil :
1. Allez sur http://swi.hotspot.
2. Cliquez sur l’icône Données de session.
3. Vous avez la possibilité de configurer la période de facturation pour
qu’elle coïncide avec la date de facturation de votre forfait de données.
17
Connexion d’appareils
supplémentaires
Pour connecter des appareils
supplémentaires compatibles avec
le Wi-Fi :
1. Ouvrez le gestionnaire de réseau Wi-Fi sur votre ordinateur ou autre
appareil Wi-Fi (smartphones, tablettes, lecteurs multimédias, appareils
photos, etc.).
2. Choisissez votre réseau hotspot Wi-Fi mobile affiché sur l’écran LCD
(par exemple, AirCard-1234).
3. Saisissez la passphrase Wi-Fi affichée sur l’écran LCD et lancez votre
navigateur.
Connexion des appareils WPS
Le protocole Wi-Fi Protected Setup (WPS) permet de connecter les
appareils compatibles WPS à un réseau Wi-Fi sans clavier. La fonction
WPS est disponible sur certains appareils photo, imprimantes,
smartphones et ordinateurs portables.
1. Appuyez deux fois sur le bouton d’alimentation de votre hotspot mobile pour afficher l’écran de configuration WPS (WPS Setup) (2 sur 5).
2. Lorsque l’écran de configuration WPS apparaît, appuyez sur le
bouton d’alimentation pour activer le WPS.
3. Vous avez 2 minutes pour appuyer sur le bouton WPS de l’appareil
sans fil que vous souhaitez connecter.
Votre hotspot mobile et l’appareil sans fil communiqueront et établiront
une connexion.
18
Utilisation du GPS
Pour voir votre localisation GPS :
1. Allez sur la Page d’accueil AirCard (http://swi.hotspot).
2. Connectez-vous en tant qu’administrateur.
3. Cliquez sur l’icône GPS.
4. Cliquez sur Get GPS Location (Obtenir la localisation GPS) (une fois)
ou Start GPS Tracking (Commencer le suivi GPS) (continu).
5. Pour visualiser votre localisation sur une carte et rechercher des commodités aux alentours, cliquez sur Map Me (Afficher sur la carte).
19
Création d’un profil
Si vous devez créer un profil :
1. Allez sur la Page d’accueil AirCard (http://swi.hotspot).
2. Connectez-vous en tant qu’administrateur.
3. Allez sur Advanced Settings > WAN > Setup. (Paramètres avancés >
WAN > Configuration)
4. Cliquez sur Add / Edit Profiles. (Ajouter / Éditer des profils)
5. Entrez les informations fournies par votre fournisseur de services,
puis cliquez sur Save (Enregistrer).
Foire aux questions
Comment dois-je entrer le code PIN sur ma carte SIM ?
Si votre fournisseur de services vous a donné un PIN pour votre carte SIM :
1. Connectez votre ordinateur au réseau Wi-Fi mobile en entrant les
informations figurant sur l’étiquette située sous la batterie.
2. Allez sur la Page d’accueil. (L’URL est affichée sur l’écran LCD).
3. Entrez votre mot de passe d’administrateur dans le champ réservé
à l’identifiant administrateur puis cliquez sur Login (Se connecter). (Le
mot de passe administrateur par défaut est swiadmin)
4. Lorsque vous y êtes invité(e), entrez le PIN de la SIM puis cliquez sur
Submit (Soumettre).
20
More Information
• Online Help — From the homepage, click the Help icon and
select Online Help.
• On the Internet — Additional support is available online at
http://www.sierrawireless.com/Support/Downloads.aspx
Pour plus d’informations
• Aide en ligne — À partir de la page d’accueil, cliquez sur
l’icône Aide et choisissez Aide en ligne.
• Sur Internet — Un support supplémentaire est disponible en
ligne sur http://www.sierrawireless.com/Support/Downloads.aspx
© 2011 Sierra Wireless. All rights reserved.
Sierra Wireless and the Sierra Wireless logo are
trademarks of Sierra Wireless. All other marks
contained herein are the property of their respective
owners.
© 2011 Sierra Wireless. Tous droits réservés.
Sierra Wireless et le logo Sierra Wireless sont
des marques de Sierra Wireless. Toutes les autres
marques mentionnées dans le présent document
appartiennent à leur titulaire respectif.
2400167 Rev. 1