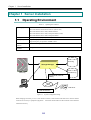
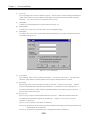
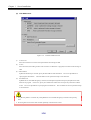
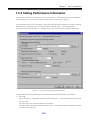
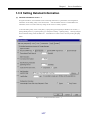
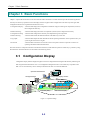
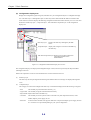
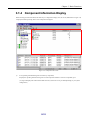
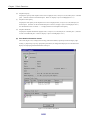
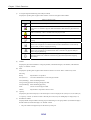
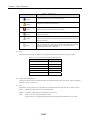
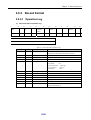
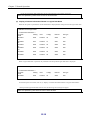
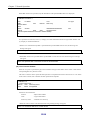
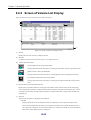
1
NEC Storage Manager
User’s Manual
IS004-13E
© NEC Corporation 2001-2004
No part of the contents of this book may be reproduced or
transmitted in any form without permission of NEC Corporation.
The contents of this book may be modified without notice in the future.
Preface
This manual describes the usage of NEC Storage Manager.
Storage disk array subsystems connected to server machines.
NEC Storage Manager centrally operates/manages NEC
To do so, it manages the configurations and statuses
of the NEC Storage disk array subsystems and issues alert messages according to performance and fault information.
Refer to the “NEC Storage Manager Manual Guide” (IS901) for the overview of NEC Storage and the related
manuals.
Remarks 1. This manual explains functions implemented by the following program products:
• NEC Storage Manager and NEC Storage BaseProduct
2. This manual is applicable to the program products of the following versions:
• NEC Storage Manager Ver3.3
• NEC Storage BaseProduct Ver3.3
3. The NEC Storage Manager is referred to as iSM or Storage Manager in the text of this manual. Also,
the NEC Storage series disk array subsystem is referred to as a disk array.
4. The following descriptions in the text of this manual refer to the corresponding products.
Description
Corresponding Product
Storage Manager
NEC Storage Manager
BaseProduct
NEC Storage BaseProduct
AccessControl
NEC Storage AccessControl
CachePartitioning
NEC Storage CachePartitioning
DynamicDataReplication
NEC Storage DynamicDataReplication
PerformanceMonitor
NEC Storage PerformanceMonitor
PerformanceOptimizer
NEC Storage PerformanceOptimizer
ReallocationControl
NEC Storage ReallocationControl
RemoteDataReplication
NEC Storage RemoteDataReplication
RemoteDataReplication/DisasterRecovery NEC Storage RemoteDataReplication/DisasterRecovery
ReplicationControl
NEC Storage ReplicationControl
5. The following descriptions in the text of this manual refer to the corresponding manuals.
Description
Corresponding Manual
Configuration Setting Tool User’s Manual
(GUI)
NEC Storage Manager Configuration Setting Tool
User’s Manual (GUI) (IS007)
Messages Handbook
NEC Storage Manager Messages Handbook (IS010)
Data Replication User's Manual (Function
Guide)
NEC Storage Manager Data Replication User's Manual
(Function Guide) (IS015)
Data Replication User's Manual (Installation
and Operation Guide for Windows)
NEC Storage Manager Data Replication User's Manual
(Installation and Operation Guide for Windows) (IS016)
PerformanceMonitor User's Manual
NEC Storage PerformanceMonitor User's Manual
(IS025)
Snapshot User’s Manual (Function Guide)
NEC Storage Manager Snapshot User’s Manual
(Function Guide) (IS030)
Manual Guide
NEC Storage Manager Manual Guide (IS901)
6. Trademarks and registered trademarks
• Microsoft® and Windows® are trademarks or registered trademarks of Microsoft Corporation in the
United States and other countries.
• HP-UX is a registered trademark of Hewlett-Packard Co. in the United States.
• Solaris is a trademark or a registered trademark of Sun Microsystems, Inc. in the United States and
other countries.
• Linux is a trademark or a registered trademark of Mr. Linus Torvalds in the United States and other
countries.
Other product names and company names, etc. are trademarks or registered trademarks of the
associated companies.
7. In this document, matters to which careful attention needs to be paid will be described as follows:
Be sure to observe the contents.
If the indications are ignored and the system is improperly operated, settings which have been already
made might be affected.
Type of Indication
Type
Description
Describes contents which require special attention during operation.
The First Edition in March 2001
The Thirteenth Edition in November 2004
Contents
Part I Installation and Setting ..........................................................................................................................I-1
Chapter 1
Server Installation ..........................................................................................................................................I-2
1.1
Operating Environment ............................................................................................................................................ I-2
1.2
Installation ................................................................................................................................................................ I-3
1.3
Environment Setting................................................................................................................................................. I-5
Chapter 2
Client Installation .........................................................................................................................................I-24
2.1
Operating Environment .......................................................................................................................................... I-24
2.2
Installation and Setting ........................................................................................................................................... I-25
2.3
Relationship between Server and Client Versions ................................................................................................. I-27
Part II Functions ..............................................................................................................................................II-1
Chapter 3
Basic Functions ............................................................................................................................................. II-2
3.1
Configuration Display .............................................................................................................................................II-2
3.2
State Monitoring....................................................................................................................................................II-44
3.3
Nickname Setting ..................................................................................................................................................II-49
3.4
Fault Monitoring....................................................................................................................................................II-55
3.5
Log Output ............................................................................................................................................................II-56
3.6
Event Link .............................................................................................................................................................II-62
3.7
ESMPRO Link.......................................................................................................................................................II-65
Chapter 4
Server Menu................................................................................................................................................ II-69
4.1
Operation Method..................................................................................................................................................II-69
4.2
Functions ...............................................................................................................................................................II-70
Part III Operations...........................................................................................................................................III-1
Chapter 5
Normal Operation........................................................................................................................................III-2
5.1
Server Start/Stop.................................................................................................................................................... III-2
5.2
Client Start/Stop .................................................................................................................................................... III-3
5.3
Volume List Command (iSMvollist)................................................................................................................... III-10
5.4
Volume List Display............................................................................................................................................ III-26
5.5
Configuration Display Command (iSMview) ..................................................................................................... III-37
5.6
Configuration Information File Output Command (iSMcsv).............................................................................. III-92
Chapter 6
Measures in Abnormalities .....................................................................................................................III-108
6.1
Measures for Server Fault ................................................................................................................................. III-108
6.2
Measures for Client Fault .................................................................................................................................. III-114
Appendix A
Specifications..................................................................................................................................................1
A.1
Number of Monitored Disk Arrays .............................................................................................................................1
A.2
Number of Connected Clients .....................................................................................................................................1
A.3
Maximum Number of iSM Clients That Can Be Started Simultaneously ..................................................................1
Appendix B Environment Definition Language ..................................................................................................................2
B.1
Mail Header File..........................................................................................................................................................2
Appendix C Notes...................................................................................................................................................................3
C.1
Items about Server.......................................................................................................................................................3
C.2
Items about Client .......................................................................................................................................................4
Index
.....................................................................................................................................................................................5
i
This page is intentionally left blank.
ii
Part I Installation and Setting
Chapter 1 Server Installation
Chapter 1 Server Installation
11..11
O
Op
peerraattiin
ng
gE
En
nvviirro
on
nm
meen
ntt
Table 1-1
Operating systems
Operating Environment
Microsoft Windows 2000 Server (SP2 or later)
Microsoft Windows 2000 Advanced Server (SP2 or later)
Microsoft Windows Server 2003, Standard Edition
Microsoft Windows Server 2003, Enterprise Edition (64-bit)
Microsoft Windows Server 2003, Enterprise Edition
Memory
OS required memory capacity + 50MB (+ 200MB for 64-bit) or more
Disk capacity
Program capacity: 20MB
Required capacity for operation: 100MB or more
Recommended
software
IIS FTP Publishing Service
Indispensable
hardware
Storage series
Event log
Storage Manager
Disk array
Operation log
Executable file, batch file
starting
Mail server
Client
Mail transmission
Figure 1-1
System Configuration Image
When managing a disk array via FC, a fibre channel controller, a fibre channel cable and a driver of fibre channel
controller are necessary as peripheral equipments.
installed if necessary.
I-2
And a fibre channel hub and a fibre channel switch should be
Chapter 1 Server Installation
11..22
IIn
nssttaallllaattiio
on
n
11..22..11 S
Sttoorraaggee M
Maannaaggeerr S
Seerrvveerr IInnssttaallllaattiioonn
To install the iSM server, follow the procedure below.
1.
To use the ESMPRO link function, install ESMPRO Agent ahead of the iSM server.
If Alert Manager
Main Service has been started before the iSM server is installed, terminate this service once to register the
link function securely and then execute the following operations for installation.
2.
When you install the iSM server to a server machine in which ESMPRO Manager is installed, a screen for
confirming link with ESMPRO Alert Manager appears.
Make setting as needed on the screen.
For
details, refer to 3.7.4 “Link between ESMPRO Manager and ESMPRO Alert Manager”.
3.
iSM server creates many files, while it is operating, in the folder where iSM itself is installed.
If the
program is uninstalled, all files and subfolders, not including the iSM server setting file, in the folder where
the program is installed are deleted.
the program.
Therefore, default folder setting is recommended to use for installing
If you want to install the program into a folder other than the default folder, you have to
create a new folder or be sure to install into an existing folder where other files are not installed.
In
addition, never save important files in the folder.
4.
The target folder where Win.ini file is stored cannot be selected for a folder where the program is to be
installed.
(1)
Log on as the Administrator.
(2)
Select the following installation program from [Add/Remove Programs] ([Add or Remove Programs] for
Windows Server 2003) in [Control Panel].
CD-ROM drive:\SERVER\WINDOWS\SETUP.EXE
(3)
Follow the directions of the installer.
Perform environment setting in the install process.
For the information of the environment setting, refer to 1.3
“Environment Setting”.
(4)
Reboot the operating system.
To prevent iSM server from being automatically started during restart of the operating system, refer to 5.1
“Server Start/Stop”.
I-3
Chapter 1 Server Installation
11..22..22 S
Sttoorraaggee M
Maannaaggeerr S
Seerrvveerr U
Unniinnssttaallllaattiioonn
To uninstall the iSM server, follow the procedure below.
(1)
Log on as the Administrator.
(2)
Close [Services] and [Event Viewer].
(3) Remove “Storage Manager Server” by using [Add/Remove Programs] ([Add or Remove Programs] for Windows
Server 2003) in [Control Panel].
When the Storage Manager service is running, it will be automatically stopped.
Even after iSM has been uninstalled, the environment definition files, operation log files, performance statistical
information history files, performance statistical information summary files, performance optimization log files,
and license-related files are not deleted.
All the other files and subfolders under the folder where the program is
installed are deleted when iSM is uninstalled.
11..22..33 S
Sttoorraaggee M
Maannaaggeerr S
Seerrvveerr U
Uppddaattee
To update iSM server, uninstall the existing iSM before installing the updated program.
Please refer to 1.2.1 “Storage Manager Server Installation” and 1.2.2 “Storage Manager Server Uninstallation” for the
procedures.
11..22..44 V
Voolluum
mee LLiisstt IInnssttaallllaattiioonn aanndd U
Unniinnssttaallllaattiioonn
The iSMvollist command is a tool for reporting disk information such as the disk array name or logical disk name of a
disk array connected via the fibre channel (FC).
This command can be operated independently even on a server
machine where iSM has not been installed.
To install iSMvollist, follow the procedure below.
When iSMvollist is already installed, uninstall it and then install it again.
(1)
Log on as the Administrator.
(2)
Select the following installation program from [Add/Remove Programs] ([Add or Remove Programs] for
Windows Server 2003) in [Control Panel].
CD-ROM drive:\VOLLIST\WINDOWS\SETUP.EXE
(3)
Follow the directions of the installer.
To uninstall iSMvollist, follow the procedure below.
(1)
Log on as the Administrator.
(2)
If the iSMvollist command and/or [Volume List Display] have been started, terminate all.
If [Event Viewer] is
open, close it.
(3)
Remove “Storage Manager Volume List” by using [Add/Remove Programs] ([Add or Remove Programs] for
Windows Server 2003) in [Control Panel].
I-4
Chapter 1 Server Installation
If you uninstall iSMvollist while iSMvollist and/or [Volume List Display] have been started, a message
prompting to restart the system may appear.
In this case, follow the instruction and be sure to restart the
system.
11..33
E
En
nvviirro
on
nm
meen
ntt S
Seettttiin
ng
g
Environment settings are required to start up the iSM server.
This document describes how to perform environment
settings.
Perform environment settings when installing the iSM server or changing the settings because of the addition of the
disk arrays to be monitored or users after the installation.
11..33..11 S
Seettttiinngg D
Diisskk A
Arrrraayy IInnffoorrm
maattiioonn
Disk array information is set in the following screen.
Disk array information includes identification of disk arrays
monitored by the iSM server and how to connect disk arrays.
To start the Setting Utility screen, select [Start] → [Programs] ([All Programs] for Windows Server 2003) → [Storage
Manager Server] → [Setting Utility], or select [Server Menu] → [Setting Utility].
environment setting, restart the iSM server.
If having changed the
Information set on each screen is saved by clicking the [OK] button.
When iSM server is installed before the connection of disk arrays or the IP address and/or disk number of a disk array
is unknown, first select [Automatic detection of Disk Array Subsystems connected by FC] and make other setting
(such as 1.3.2 “Setting User Information”).
In such a case, change the setting with the IP address and disk number
determined.
I-5
Chapter 1 Server Installation
(i)
(ii)
(iii)
Figure 1-2
(i)
(iv)
(v)
Disk Array Subsystem List Screen
[Automatic detection of Disk Array Subsystems connected by FC]
When you select [Automatic detection of Disk Array Subsystems connected by FC], disk arrays with the FC
connection are automatically detected and monitored.
(ii)
[Disk Array Subsystem List]
[Disk Array Subsystem List] displays the disk array information currently registered.
(When a disk array specified by the disk number is selected, the column heading [IP Address or Host Name] in
the figure above appears as [Disk].)
Up to 32 disk arrays can be registered in the [Disk Array Subsystem List].
(iii) [Add] button
To add a disk array, use the [Add] button to open the Add screen.
(iv) [Delete] button
To delete a disk array, select a disk array you want to delete, and click the [Delete] button.
I-6
Chapter 1 Server Installation
(v)
[Edit] button
To modify a disk array, select a disk array you want to edit and click the [Edit] button, or double-click the disk
array and edit it on the Edit screen (Figures 1-4 and 1-5).
(vi)
(vii)
Figure 1-3
Disk Array Subsystem - Add Screen - 1
(vi) [Specification by IP Address]
To monitor a disk array in TCP/IP connection, select [Specification by IP Address] to display the IP address
addition screen (Figure 1-4).
(vii) [Specification by Disk Number]
To monitor a disk array in FC connection, select [Specification by Disk Number] to display the disk addition
screen (Figure 1-5).
Disk number is a number assigned by Windows to manage logical disks.
The setting is
generally not required since the disk arrays connected by FC are automatically detected by checking [Automatic
detection of Disk Array Subsystems connected by FC].
(viii)
(ix)
Figure 1-4
Disk Array Subsystem - Add Screen - 2
(viii) [Main IP Address]
In [Main IP Address], specify an IP address or host name.
Up to 63 characters can be used for a host name.
Non-ASCII code characters, control characters, double quotation mark, and space cannot be used for a host
name.
iSM connects to the IP address or that specified for the host name (port number: 2730) to conduct monitoring.
I-7
Chapter 1 Server Installation
(ix) [Sub IP Address]
In [Sub IP Address], up to two IP addresses can be specified for the disk arrays with two SVPs.
iSM connects to the IP address or that specified for the host name (port number: 2730) to conduct monitoring.
(x)
Figure 1-5
(x)
Disk Array Subsystem - Add Screen - 3
Disk Number Entry field
In an entry field on the screen as shown in the figure above, specify a disk number.
can be specified for a disk number.
A value from 0 to 9999
Check the disk number of the disk array to be monitored, using the
Volume List (iSMvollist -dl) command in advance.
For details, refer to 5.3 “Volume List Command
(iSMvollist)”.
1.
Without any disk number being specified, disk arrays can be monitored via FC by specifying [Automatic
detection of Disk Array Subsystems connected by FC].
Specification of a disk number is not recommended because the disk number may change when the OS is
rebooted or an FC fault occurs.
2.
For Windows Server 2003, disks in disk arrays may not be accessed when, for example, the access control
setting is changed.
Therefore, it is strongly recommended that disk arrays be monitored through TCP/IP
connection when iSM server is installed and used under Windows Server 2003.
I-8
Chapter 1 Server Installation
11..33..22 S
Seettttiinngg U
Usseerr IInnffoorrm
maattiioonn
User information is set in the following screen.
iSM server uses user information as an account.
this information in order to identify the user who connects by iSM client.
iSM server uses
This information is composed of user
names, passwords, and user levels (refer to explanation of the “User-Add” screen given later for details).
As a
default, a user is registered having the user name of iSM, password of iSM and user level of L1 (only reference to the
information is allowed).
Add, as required, users of the user level L3 who can change configuration of disk arrays.
For the iSM client, refer to 5.2 “Client Start/Stop”.
Set user information on the Setting Utility screen shown below.
To start the Setting Utility screen, select [Start] → [Programs] ([All Programs] for Windows Server 2003) → [Storage
Manager Server] → [Setting Utility], or select [Server Menu] → [Setting Utility].
environment setting, restart the iSM server.
If having changed the
Information set on each screen is saved by clicking the [OK] button.
Setting of one or more pieces of user information is required.
Note that user information of iSM set on this screen
is independent of the OS user or password.
(i)
(ii)
Figure 1-6
I-9
User List Screen
(iii)
(iv)
Chapter 1 Server Installation
(i)
[User List]
[User List] displays the list of users currently registered.
This user name is used for obtaining authorization to
connect with an iSM server from an iSM client, and display and control the disk array information form the
iSM client.
(ii)
Up to 100 user names can be registered in the User List.
[Add] button
To add a user, use the [Add] button to open the Add screen (Figure 1-7).
(iii) [Delete] button
To delete a user, select a user you want to delete, and click the [Delete] button.
(iv) [Edit] button
To modify a user, select a user you want to edit and click the [Edit] button, or double-click the user and edit it
on the Edit screen (Figure 1-7).
(v)
(vi)
(vii)
Figure 1-7
(v)
User - Add Screen
[User Name]
In [User Name], specify a user name within 20 characters.
User Name is case-sensitive.
Non-ASCII code
characters, control characters, double quotation mark, and space cannot be used for a user name.
(vi) [Password]
In [Password], specify a password of the user within 14 characters.
same password in [Password Confirmation] for confirmation.
Password is case-sensitive.
Enter the
The character you enter is displayed as a “*”.
Non-ASCII code characters, control characters, and double quotation mark cannot be used for a password.
A
password cannot consist of all spaces.
(vii) [User Level]
In [User Level], specify the operation authorization level of the user.
levels that set/refer information of disk arrays by iSM client.
iSM defines the three kinds of user
An upper level (L3>L2>L1) allows all
operations of a lower level.
L1(Level 1): Only reference to state display is authorized.
L2(Level 2): Operations at the level of the replication, performance monitoring, performance optimization, and
snapshot functions are authorized.
L3(Level 3): All operations are authorized, such as changing the disk array configuration.
I-10
Chapter 1 Server Installation
11..33..33 S
Seettttiinngg LLiinnkk IInnffoorrm
maattiioonn
Set link information to use the event link function.
For details on the event link function, refer to 3.6 “Event Link”.
Set link information on the Setting Utility screen shown below.
To start the Setting Utility screen, select [Start] → [Programs] ([All Programs] for Windows Server 2003) → [Storage
Manager Server] → [Setting Utility], or select [Server Menu] → [Setting Utility].
(1) Setting Utility screen
Even while the iSM server is operating, event link operation can be dynamically changed by clicking the
[Update Event Link Operation] button on the Setting Utility screen.
is saved.
At this time, information set on this screen
Restart the iSM server if not clicking the [Update Event Link Operation] button.
Information set on each screen is saved by clicking the [OK] button.
(i)
(ii)
(iii)
(iv)
(v)
(vi)
(viii)
(vii)
(x)
(ix)
(xi)
(xii)
(xiii)
(xiv)
(xvi)
Figure 1-8
(i)
Screen for Setting Link Information
Authentication
NONE:
Does not perform user authentication.
POP before SMTP:
Performs user authentication using POP before SMTP.
SMTP-AUTH:
Performs user authentication using SMTP Authentication.
I-11
(xv)
Chapter 1 Server Installation
(ii)
SMTP Server
In [SMTP Server], specify the SMTP server to which mails are sent within 235 characters.
(iii) SMTP Port
In [SMTP Port], specify the port number of the SMTP server to which mails are sent.
A value from 1 to 65535 can be specified.
The default value is 25.
(iv) POP Server
In [POP Server], specify the POP server to access for authentication when sending mails within 235 characters.
This item is effective if you specify [POP before SMTP] for (i) [Authentication].
(v)
POP Port
In [POP Port], specify the port number of the POP server to access for authentication when sending mails.
A value from 1 to 65535 can be specified.
The default value is 110.
This item is effective if you specify [POP before SMTP] for (i) [Authentication].
(vi) User Name
In [User Name], specify the user name for authentication within 32 characters.
This item is effective if you specify either [POP before SMTP] or [SMTP-AUTH] for (i) [Authentication].
(vii) Password
In [Password], specify a password of the user name for authentication within 58 characters.
This item is effective if you specify either [POP before SMTP] or [SMTP-AUTH] for (i) [Authentication].
(viii) Password Confirmation
Enter the same password in [Password Confirmation] for confirmation.
This item is effective if you specify either [POP before SMTP] or [SMTP-AUTH] for (i) [Authentication].
(ix) Mail Header File
In [Mail Header File], specify the header file which is a template for sending a mail within 235 characters.
(x)
[Browse] button
Displays the file selection screen on which you can specify an existing mail header file.
(xi) [Edit] button
Enables the creation of a new mail header file or the editing of an existing mail header file.
the [Mail Header File] field and click the [Edit] button.
appears.
Enter the path in
The Mail Header File Setting screen (Figure 1-9)
Edit the contents and click the [Save] button or [Save as] button.
(xii) Link List
Displays the list of currently set link items.
(xiii) [Add] button
Displays the Link - Add screen (Figure 1-10) on which you can add link items.
(xiv) [Delete] button
To delete a link item, select the one you want to delete and click the [Delete] button.
(xv) [Edit] button
Select a link item and click the [Edit] button, or double-click the link item.
The Link - Add screen (Figure
1-10) appears for changing link items.
(xvi) [Update Event Link Operation] button
A message is displayed asking if you want to apply new settings.
button immediately applies the new settings.
If iSM is operating, selecting the [Yes]
If iSM is not operating, only event link information is updated,
and the new settings become valid when iSM is started next time.
I-12
Chapter 1 Server Installation
(2) Mail Header File Setting screen
(i)
(ii)
(iii)
Figure 1-9
(i)
Mail header file contents
Write the mail header file contents.
(ii)
Mail Header File Setting Screen
For details, refer to Appendix B “Environment Definition Language”.
[Save] button
Saves the mail header file with the displayed contents and returns to the Link Information Setting screen
(Figure 1-8).
(iii) [Save as] button
Newly saves the mail header file with the displayed contents, and returns to the Link Information Setting screen
(Figure 1-8).
The path name of a newly created file is entered in the [Mail Header File] field.
I-13
Chapter 1 Server Installation
(3) Link-Add screen
(i)
(ii)
(iii)
(iv)
Figure 1-10
(i)
Link Item Addition Screen
Action Level
Select the execution level of the action performed for the message of iSM.
(ii)
Action
Select the action (the sending of mail or the execution of a batch file or program) to be taken for the message of
iSM.
(iii) Mail Address
If [Mail Transmission] is selected, specify the mail address of the destination.
specifying the mail address.
Do not use parentheses in
The mail address can be specified with up to 235 characters.
(iv) Executable File
If [Batch File or Executable Program] is selected, click the [Browse] button and specify the path name of the
batch file or program.
screen.
In this case, specify an executable file which does not require any interaction with the
Do not use parentheses in specifying the executable file.
The executable file can be specified with up
to 235 characters.
1. The [Browse] button is available only when [Batch File or Executable Program] is selected in the [Action]
field.
2. Do not register actions of the same contents repeatedly in the same action level.
I-14
Chapter 1 Server Installation
11..33..44 S
Seettttiinngg P
Peerrffoorrm
maannccee IInnffoorrm
maattiioonn
Set performance information on the Setting Utility screen shown below.
Since the default values are recommended
for the information, it is not necessary to make any settings on this screen in ordinary operation.
To start the Setting Utility screen, select [Start] → [Programs] ([All Programs] for Windows Server 2003) → [Storage
Manager Server] → [Setting Utility], or select [Server Menu] → [Setting Utility].
environment setting, restart the iSM server.
If having changed the
Information set on each screen is saved by clicking the [OK] button.
(i)
(ii)
(iii)
(iv)
(v)
(vi)
(vii)
(viii)
(ix)
Figure 1-11
Screen for Setting Performance Information
• In [Performance Monitoring Information], set information about the monitoring of disk array performance.
(i)
PSL Folder
Specify the folder for containing the statistical information history file.
The folder name can be specified with
up to 210 bytes.
For details, refer to the “PerformanceMonitor User’s Manual”.
The default folder is [installation destination folder]\etc\mon.
and specify an existing folder.
I-15
If changing the folder, click the [Browse] button
Chapter 1 Server Installation
(ii)
PSL Output Interval
Specify the interval at which statistical information is collected and output to the statistical information history
file.
The default interval is 5 minutes.
If changing the interval, specify a value from 1 to 60.
(iii) Adjustment of Output Interval
Statistical information may not be output at the currently specified interval if there are too many disk array
components.
Specify this item to determine whether to automatically change to an interval at which statistical
information can be output.
Manual:
The currently specified interval is not changed automatically to an interval at which statistical
information can be output.
Automatic: The currently specified interval is changed automatically to an interval at which statistical
information can be output.
(iv) Output PSL when iSM Server Starts
Determine whether to automatically start the output of statistical information for all the disk arrays that can use
PerformanceMonitor when the iSM server starts.
Don’t Output: Statistical information output is not automatically started.
Output: Statistical information output is automatically started.
However, statistical information output is not
automatically started for disk arrays for which statistical information output was stopped in the previous
operation, and the previous operation state is retained instead.
(v)
Display Refresh Rate
Specify the number of times data updated per minute in the numeric value table and the time-series graph on the
performance monitoring screen.
For details, refer to the “PerformanceMonitor User’s Manual”.
number of times is 1 per minute.
If changing the number of times, specify a value from 1 to 6.
The default
(vi) Interval
Specify the monitoring interval as a threshold monitoring condition.
A value 1 to 60 (minutes) can be specified.
The default monitoring interval is identical to the display refresh
rate.
(vii) Minimum I/O Count
Specify the minimum number of I/O operations as a threshold monitoring condition.
A value 1 to 120 (the number of times/minute) can be specified.
The default minimum I/O count is 60 (times
per minute).
• In [Performance Optimization Information], specify information about the performance optimization of disk arrays.
(viii) Log File Folder
Specify the folder for containing the performance optimization log file.
The folder name can be specified with
up to 192 bytes.
The default folder is “[installation destination folder]\etc\optlog”.
If changing the folder, click the [Browse]
button and specify an existing folder.
(ix) LD Movement Status Check Interval
Specify the interval at which the logical disk moving status is to be checked.
seconds.
If changing the interval, specify a value from 5 to 30.
I-16
The default interval is 10
Chapter 1 Server Installation
11..33..55 S
Seettttiinngg D
Deettaaiilleedd IInnffoorrm
maattiioonn
(1) Detailed information screen - 1
Set agent information, client information, state monitoring information, log information, and configuration
information on the Setting Utility screen shown below.
Since the default values are recommended for the
information, there is no need to make any settings on this screen in ordinary operation.
To start the Setting Utility screen, select [Start] → [Programs] ([All Programs] for Windows Server 2003) →
[Storage Manager Server] → [Setting Utility], or select [Server Menu] → [Setting Utility].
the environment setting, restart the iSM server.
Information set on each screen is saved by clicking the [OK]
button.
(i)
(ii)
(iii)
(iv)
(v)
(vi)
(vii)
(viii)
Figure 1-12
Detailed Information Screen - 1
I-17
If having changed
Chapter 1 Server Installation
• In [Agent Information], set information regarding agent management
(i)
Receive SNMP Trap
Select the receiving method in [Receive SNMP Trap].
SNMP trap is information sent from the disk array to
notify the iSM server of state transition of hardware, etc.
It is enabled only for disk arrays monitored by
TCP/IP connection.
1.
Don’t Receive:
SNMP trap is not received.
Use the SNMP Trap Service:
SNMP trap is received via the SNMP trap service.
Receive Directly:
The iSM server receives it by using the port 162.
When you select [Use the SNMP Trap Service], SNMP Trap Service must be installed.
When you select
[Receive Directly], a conflict with application collecting SNMP trap as SNMP Trap Service occurs.
In
this case, don’t select [Receive Directly].
2.
Disk arrays can be monitored even without SNMP trap being received.
network security is compromised.
(ii)
Performance may be degraded if
Therefore, [Don’t Receive] should be selected.
Remonitoring Check Interval
When a trouble occurs in the connection between iSM server and the disk arrays, iSM server will stop the
monitoring of the disk arrays for a time, and later it will restart monitoring automatically.
In [Remonitoring Check Interval], specify an interval for checking whether the monitoring of disk arrays can be
restarted. The default value is 5 (minutes).
A value from 1 to 60 can be specified.
• In [Client Information], specify information regarding the iSM client.
(iii) Connection Port Number
In [Connection Port Number], specify the port number of the iSM server to which the iSM client connects.
For the iSM client, refer to 5.2 “Client Start/Stop” in Part III “Operations”.
The default value is 8020.
A
value from 1 to 65535 can be specified.
• In [State Monitoring Information], specify information regarding the monitoring of the disk array status.
(iv) Monitoring Interval
In [Monitoring Interval], specify an interval for requesting status monitoring of disk arrays.
is 15 (seconds).
The default value
A value from 1 to 3600 can be specified.
For status monitoring, refer to 3.2 “State Monitoring” in Part II “Functions”.
(v)
Duplicate Nickname Check
Determine whether to make a duplication check on identifiers that are assigned to components in the disk arrays
to be managed by iSM.
In [Duplicate Nickname Check], specify whether or not to execute the duplicated check for the identification
names of the components in the disk arrays that are targets of the iSM management.
Components to be checked in a duplicated manner are as follows:
y Disk Array Name
y Logical Disk Name
I-18
Chapter 1 Server Installation
y Port Name
Don’t Check: does not execute duplicated check.
Check:
executes duplicated check.
• In [Log Information] specify information regarding logs.
(vi) Log File Folder
In [Log File Folder], specify a folder that saves a file for outputting operation logs of iSM server.
the folder, use the [Browse] button to specify an existing folder.
To change
Specification uses up to 245 bytes.
For operation logs, refer to 3.5 “Log Output”.
(vii) Log File Size
In [Log File Size], specify the size (upper limit) of the file for outputting operation logs.
(MB).
The default value is 1
A value from 1 to 10 can be specified.
A serial number is assigned to each log file.
Up to 100 files with the specified size are created.
• In [Configuration Information], specify the information about configuration setting function
(viii) Automatically Correct Disk Array Subsystem’s Timer
In [Automatically Correct Disk Array Subsystem’s Timer], specify whether or not to correct the time in the disk
array by using the server automatically.
Correct:
corrects the time in the disk array automatically.
Don’t Correct:
does not correct the time in the disk array automatically.
(2) Detailed information screen - 2
File transfer information, replication information, and snapshot information settings are set in the following
setting screen.
To use the file transfer function, items in [File Transfer Information] must be specified.
In
normal operation, no settings are required in this screen since these items are set to the recommended default
values.
I-19
Chapter 1 Server Installation
(ix)
(x)
(xi)
(xii)
(xiii)
(xiv)
(xv)
(xvi)
(xvii)
(xviii)
(xix)
Figure 1-13
Detailed Information Screen - 2
• In [File Transfer Information], specify information regarding the file transfer function.
To transfer files between the iSM server and iSM client, the iSM internally uses the FTP through the following
operations of the iSM client.
Therefore, the FTP site environment (installation of IIS FTP Publishing Service and building of the FTP site) must
be built on the iSM server node before the iSM server is operated.
y Selecting [Get Configuration Setting Info.] on the configuration setting screen
y Selecting [Download Statistic Information files] on the performance screen
y Selecting [Busy Ratio Graph] and [Replacement Effect Prediction] on the performance optimization screen
y Selecting [Difficulty Information Gather] on the main screen (iSM client)
When these functions are not used, settings for file transfer are unnecessary.
(ix) FTP User Name
Specify the name of an FTP user who is to make FTP connection from the iSM client to the iSM server node.
You can specify only an FTP user who is permitted to use the FTP and authorized to read from and write to the
folder specified for [Temporary Folder].
The default user name is iSMuser.
The FTP user name can be specified with up to 32 bytes.
I-20
Chapter 1 Server Installation
(x)
FTP Password
Specify the password of the user specified for [FTP User Name].
If using “anonymous” or “ftp” as the FTP user, specify the mail address.
The FTP user password can be
specified with up to 58 bytes.
(xi) FTP Password Confirmation
For confirmation, enter the same value as for [FTP Password].
(xii) IP Address of FTP Site
Specify the IP address to be used as the FTP connection destination from the iSM client.
If the IP address of
the FTP site is not specified, the system automatically gets the IP address of the iSM server node and uses it as
the FTP connection destination.
Set a suitable IP address in the following cases:
y An IP address is explicitly written in the specification of the IP address of the FTP site.
(Select [Properties] of the FTP site used by iSM → [FTP Site] → [Identification] → [IP Address], in which an
IP address has been specified.)
y The iSM server is used in cluster environment.
In particular, to operate the FTP service in cluster environment, place the iSM server and the FTP service in
the same failover group, and specify a floating (virtual) IP address.
To operate the FTP service starting as a
service in cluster environment, specify the real IP address.
* Do not specify “127.0.0.1”, “0.0.0.0”, or “255.255.255.255” as an IP address.
(xiii) Port Number of FTP Site
Specify the port number of the FTP site to be used by iSM.
Select [Properties] of the FTP site used by iSM → [FTP Site] → [Identification] → [TCP Port], in which a port
number has been specified.
The port number must be specified here.
The default port number is 21.
(xiv) FTP Root Folder
Specify the root folder of the FTP site to be used by iSM.
Select [Properties] of the FTP site used by iSM → [Home Directory] → [FTP Site Directory] → [Local Path],
in which a path has been specified.
which the iSM server is installed.
The path must be specified here.
The default root folder is the drive in
The root folder can be specified with up to 192 bytes.
* If not specifying a virtual directory path:
Select [Properties] of the FTP site used by iSM → [Home Directory] → [FTP Site Directory], in which check
permission for both read and write.
(xv) Temporary Folder
Specify the folder (the local directory of the computer on which the iSM server operates) that is to be used as a
temporary folder when the iSM uses the FTP.
If a network resource or network directory is specified, the file
transfer function may not operate correctly.
This folder (drive) needs a free space of 300MB × the number of files concurrently transferred or more.
If the
drive containing the iSM server does not have a free space large enough, specify the folder of a drive having a
free space large enough.
If not using the default folder, give the group administrators “Full Control” access authority to the specified
folder and the high-level folders.
Also authorize the user specified for [FTP User Name] to read from and write to the folder specified here.
The default folder is “installation destination folder\etc\temp”.
bytes.
I-21
The folder can be specified with up to 192
Chapter 1 Server Installation
* In particular, to operate the FTP service under cluster control in cluster environment, you should place the
iSM server and the FTP service in the same fail over group on the local disk.
(xvi) Virtual Directory Path
If using a virtual directory, specify the path for the user, specified for [FTP User Name], to access [Temporary
Folder] through the FTP.
The path can be specified with up to 192 bytes.
If [FTP Root Folder] is at a higher level than [Temporary Folder] (or if the folders are identical), [Virtual
Directory Path] need not be specified.
The following shows examples:
Example 1: FTP Root Folder: C:\
Temporary Folder: C:\Program Files\NEC\iSMsvr\etc\temp
In this case, the temporary folder can be accessed through the path “/Program
Files/NEC/iSMsvr/etc/temp” in the FTP.
Thus, a virtual directory path need not be specified.
Example 2: FTP Root Folder: C:\Program Files\NEC\iSMsvr\etc\temp
Temporary Folder: C:\Program Files\NEC\iSMsvr\etc\temp
In this case, the temporary folder can be accessed through the path “/” that is to the temporary
folder.
Thus, a virtual directory path need not be specified.
In other cases, a virtual directory needs to be created and a virtual directory path needs to be specified.
The
following shows examples:
Example 3: FTP Root Folder: C:\InetPub\FTPRoot
Temporary Folder: C:\Program Files\NEC\iSMsvr\etc\temp
If a virtual directory is created under the conditions below, specify “/iSMftp” for [Virtual
Directory Path].
In this case, the temporary folder is accessed through the path “/iSMftp” in the
FTP.
Alias: “iSMftp”
Path:
“C:\Program Files\NEC\iSMsvr\etc\temp”
Example 4: FTP Root Folder: C:\InetPub\FTPRoot
Temporary Folder: D:\iSM\temp
If a virtual directory is created under the conditions below, specify “/iSMftp2” for [Virtual
Directory Path].
In this case, the temporary folder is accessed through the path “/iSMftp2” in the
FTP.
Alias: “iSMftp2”
Path:
Example 5:
“D:\iSM\temp”
FTP Root Folder: C:\InetPub\FTPRoot
Temporary Folder: D:\iSM\temp
If a virtual directory is created under the conditions below, specify “/iSMftp3/temp” for [Virtual
Directory Path].
In this case, the temporary folder is accessed through the path “/iSMftp3/temp”
in the FTP.
Alias: “iSMftp3”
Path:
“D:\iSM”
* For the path to be specified in creating a virtual directory, be sure to specify the local directory of the
computer on which the iSM server operates.
If a network resource or network drive (or a directory under the
drive) is specified, the file transfer function may not operate correctly.
* If specifying a virtual directory path (using a virtual directory), give access permission for both read and write
during creation of the virtual directory.
I-22
Chapter 1 Server Installation
The file transfer function of iSM is operated with FTP. An FTP command of Windows is used on the iSM client
side and an FTP server of each OS is used on the iSM server.
In this case, only active mode (PORT mode) is used
as FTP data transfer function. Therefore, if there is a firewall or NAT in the network between the iSM client and
the iSM server, the file transfer function may not be available.
Before attempting to operate iSM, be sure to connect the FTP (and perform get and put processing) through the
command prompt on the computer on which the iSM client operates, and confirm that the items in [File Transfer
Information] are set correctly.
• In [Replication Information], specify information regarding the replication function.
(xvii) Monitor of State Changes
Determine whether to monitor the transition of the replication states.
Monitor:
The replication state transition is monitored.
Don’t Monitor:
The replication state transition is not monitored.
(xviii) Port Number
Specify the number of the port to be used when the ReplicationControl command is issued via iSM.
from 1 to 65535 can be specified.
A value
The default value is 8030.
• In [Snapshot Information], specify information regarding the snapshot function.
(xix)
Port Number
Specify the port number to be used when the SnapControl command is issued via iSM.
65535 can be specified.
The default value is 8040.
I-23
A value from 1 to
Chapter 2 Client Installation
Chapter 2 Client Installation
22..11 O
Op
peerraattiin
ng
gE
En
nvviirro
on
nm
meen
ntt
(1) Network Environment Setting
Because TCP/IP socket communication is used between the iSM server and iSM client, which are operated on the
PC, TCP/IP connection environment with the concerned server should be bound for network environment
definitions of personal computer.
(2) Operating environment
The iSM client operates on the personal computer that has Windows 2000 (SP2 or later)/Windows XP/Windows
Server 2003 operating system.
Table 2-1
Main screen
Required Memory Capacity -1
21 (41) MB or more
Configuration setting screen
13 (22) MB or more
Replication screen
16 (29) MB or more
Performance monitoring screen
9 (17) MB or more
Performance optimization screen
7 (15) MB or more
Fault information gathering screen
10 (16) MB or more
Snapshot screen
7 (15) MB or more
* Memory capacity in addition to those for main memory is required for displaying a screen other than main
screen. The memory capacity is required when operating iSM client.
A value enclosed in parentheses indicates the memory capacity required when the iSM client operates under the
64-bit version of the operating system.
Table 2-2 Required Memory Capacity -2
Performance analysis supporting
9 (18) MB or more
tool
* In addition to the memory capacity for operating the iSM client, the above memory capacity is necessary for
operating the performance analysis supporting tool.
A value enclosed in parentheses indicates the memory capacity required when the iSM client operates under the
64-bit version of the operating system.
Table 2-3 Required disk capacity
For only basic functions
21 MB or more
For basic+extended functions
37 MB or more
* The values above do not include file size for CSV output, etc.
I-24
Chapter 2 Client Installation
22..22 IIn
nssttaallllaattiio
on
n aan
nd
dS
Seettttiin
ng
g
22..22..11 iiS
SM
MC
Clliieenntt IInnssttaallllaattiioonn
The iSM client should be pre-installed on the personal computer. To install the iSM client, follow the procedure
below.
(1)
Log on as the Administrator.
(2)
Select an installation program by using [Add/Remove Programs] ([Add or Remove Programs] for Windows XP
or Windows Server 2003) in [Control Panel].
Installation programs are stored in the following location.
<If the client is to be installed on Windows 2000>
CD-ROM drive:\CLIENT\2000\
<If the client is to be installed on either Windows XP or Windows Server 2003>
CD-ROM drive:\CLIENT\XP\
(3)
Follow the instruction of the installer.
The default destination of installation is “Program files\NEC\iSMClient” in the system drive.
(4)
During installation, the Setup Type selection screen is displayed.
You can select the basic function (including configuration setting) or the basic+extended function (including
performance monitoring, replication, access control, LD Administrator, performance optimization, cache
partitioning, and snapshot) on this screen.
Select either one that matches the server.
type easily by reinstalling the client.)
Figure 2-1
Setup Type Selection Screen
I-25
(You can change the setup
Chapter 2 Client Installation
(5)
If the iSM client is installed in the environment in which ESMPRO Manager has been installed, a screen for
confirming link with ESMPRO Alert Manager appears. Make setting on the screen as needed. For details,
refer to 3.7.4 “Link between ESMPRO Manager and ESMPRO Alert Manager”.
(6) After installation, various settings are needed on the Environment Settings screen. For details, refer to 5.2.1
“Client Start” and Help of the iSM client. To register menus in the operation window of ESMPRO Manager,
install ESMPRO Manager first. Since this operation is executed automatically, you do not need to execute
specific operation.
Figure 2-2
Registered iSM Client Start Menu
Only a single iSM client can be installed in a PC. Multiple clients, however, can be activated simultaneously by
defining an environment for each iSM server to be connected. For details, refer to 5.2.1 “Client Start” and iSM
client help.
I-26
Chapter 2 Client Installation
22..22..22 iiS
SM
MC
Clliieenntt U
Unniinnssttaallllaattiioonn
To uninstall the iSM client, follow the procedure below.
(1)
Log on as the Administrator.
(2)
Remove “Storage Manager Client” by using [Add/Remove Programs] ([Add or Remove Programs] for Windows
XP/Windows Server 2003) in [Control Panel].
Because setting information etc. is not deleted, reinstallation is
easy.
Uninstalling the iSM client deletes all of the icons on the desktop and the menu items.
If you are to re-install the
iSM client after uninstalling it, copy the icon on the desktop to an appropriate folder before uninstalling it.
After re-installing it, copy the saved icon to the following folder on the system drive.
<Desktop icon>
\Documents and Settings\All Users\Desktop
<[Start] menu icon> * When the default value is the program folder
\Documents and Settings\All Users\Start Menu\Program\iSM Client
To restore the icon to the state where uninstallation was not made, copy it to the folder above.
Re-install the iSM client in the folder from which the client was uninstalled. Otherwise, the icon reference will be
nullified.
22..22..33 iiS
SM
MC
Clliieenntt U
Uppddaattee
To update the iSM client, uninstall the software and then install it.
For details on the procedure, refer to 2.2.1 “iSM Client Installation” and 2.2.2 “iSM Client Uninstallation”.
22..33 R
Reellaattiio
on
nssh
hiip
pb
beettw
weeeen
nS
Seerrvveerr aan
nd
dC
Clliieen
ntt
V
Veerrssiio
on
nss
In general, connecting the iSM client to the other version of iSM server is not allowed.
a version is compared here.
(The value of x.y. of x.y.z. of
z should be disregarded.)
However, during operations while waiting for subsystem and in other temporarily unavoidable circumstances, use it
temporarily in an environment where the version of the iSM client is newer than the version (V1.5 or later) of iSM
server.
The functions which can be used are limited to the functional range of the version of the iSM server at this
time.
I-27
Chapter 2 Client Installation
This page is intentionally left blank.
I-28
Part II Functions
Chapter 3 Basic Functions
Chapter 3 Basic Functions
Chapter 3 explains the function that can be used when the iSM is introduced. The basic function provides the following function
necessary for disk array operations such as the display function of physical disk configuration in the disk array and logical disk
configuration that can be recognized from the business server.
• Configuration display: A function that displays the configuration information of physical and logical components (resources)
that configure the disk array.
• Status monitoring:
A function that displays the status of components (resources) that configure the disk array.
• Configuration setting:
A function that configures the disk array and implements logical components.
• Fault monitoring:
A function that informs the fault information in the disk array in real time.
• Log output:
A function that outputs the fault information and the operating information as the operation history for
system log file and exclusive log file.
• Event link:
A function that executes the action on the notice to the operator and server upon the occurrence of
operating information and fault information.
The basic function is composed of the above-mentioned 6 functions, and the efficient operation of disk array is possible by using
these functions. The detail functions are described in the following section.
33..11 C
Co
on
nffiig
gu
urraattiio
on
nD
Diissp
pllaayy
Configuration display function displays the physical resource configuration that configures the disk array and the logical
disk recognized from the business server. The configuration management of two or more disk arrays is possible in the
iSM. Two or more disk arrays can be centrally monitored on the same view from the iSM client.
Operation administrator
Configuration display screens
Storage Manager
Logical disks
Physical disks
Controller (DAC)
Disk enclosure (DE)
Disk array
Figure 3-1 Operation Image
II-2
Chapter 3 Basic Functions
33..11..11 S
Suum
mm
maarryy ooff FFuunnccttiioonn
(1) Display Function
The display function shows the information of the disk array, physical resource configuration that configures the
disk array and the information of logical disk recognized by a business server through an iSM client. (Table 3-1)
Table 3-1 Display Information List
Section
Display Information
Logical components
Disk array related
Disk Array Name
Monitoring state (by iSM/Server)
(Operating) Status
Operating status for each component
Product ID
Product FW REV
Serial Number
SAA (SubsystemAbsoluteAddress)
World Wide Name
Total capacity (data physical disk)
Control Path
Cross Call information
Cache partitioning function state
User system code
Revision of storage control software
Access Control information
Product status
Pool related (*1)
Pool Name
Type
Pool Number
(Operating) Status
Expansion State
Progress Ratio
RAID type
Capacity
Used capacity
Snapshot capacity
Snapshot control capacity
Snapshot used capacity
Snapshot threshold
Snapshot reserve area list
Configuration logical disk list
Configuration physical disk list
Logical disk related
Logical disk name (including OS type)
Number
(Operating) status
RAID type
Capacity
RANK number (*2)
Pool Number (*1)
Pool Name (*1)
Existence of cache resident
Progress ratio (At Formatting/Rebuilding/Copy back/
Expanding)
RPL type
Snapshot type
Link
Logical disk information during link
Group
Purpose
Cache segment name
Ownership
Physical disk list
Access Control information
II-3
Chapter 3 Basic Functions
Physical components
Section
Display Information
Physical disk related
Number (Group number - Position number)
(Operating) status
Capacity
Rotation speed
Product ID
Product Rev
Serial number
RANK number (*2)
Pool Number (*1)
Pool Name (*1)
Section
(Rebuilding) Progress ratio
Configuration logical disk list
Controller related
Component type (*3)
(Operating) status
Information of each component (*4)
Disk enclosure related
Component type (*5)
(Operating) status
Information of each component (*4)
*1 Displayed if the disk array to be monitored is a disk array with pool.
*2 Displayed if the disk array to be monitored is other than a disk array with pool.
*3 Director, Cache module, Service processor, Power supply, Battery, Fan, Temperature, Backboard, Junction
box, Panel, Maintenance PC, Power control card
*4 The displayed contents vary depending on the component.
*5 Adapter, Power Supply, FAN, Temperature, Back Board, and EC Junction Box
(2) Configuration information Output Function
Outputs the configuration information of the disk array to a CSV format file.
Select [File] → [CSV Output of Information List Display] from menu and specify the storage place and filename
from dialog.
33..11..22 S
Sccrreeeenn ccoom
mppoossiittiioonn ooff iiS
SM
Mm
maaiinn w
wiinnddoow
w
This subsection describes about the screen composition of the main window in iSM client.
Figure 3-2 is a main window of iSM client displayed right after logging in to iSM server.
The iSM main window consists of the “configuration display area”, “information list display area”, and “message
display area”.
Refer to 5.2.1 “Client Start” for how to start the main window.
II-4
Chapter 3 Basic Functions
Menu Bar
Title Bar
Toolbar
Information List
Display Area
Configuration
Display Area
Message Display Area
Status Bar
Figure 3-2 iSM Main Window
(1) Title Bar
Displays the element name currently selected in the configuration display area, in the following format:
State - (element name)
If more than one connection is defined, the Title Bar displays the nickname of a connection and the element name
currently selected in the configuration display area, in the following format:
nickname : State - (element name)
(2) Menu Bar
Performs various operations by selecting necessary item from menu.
Refer to Help about the details.
(3) Toolbar
Includes the buttons which are used frequently among menu function such as [Connection], [Disconnection],
[Replication], [Performance], [Configuration], [Optimizer], [Snapshot] and [Stop Alarm]. The [Replication],
[Performance], [Optimizer] and [Snapshot] buttons are displayed when the iSM client is installed with “basic +
extended function”.
Refer to Help about the details.
(4) Status Bar
The Status bar in the lowest line is the area that displays the current status of the iSM client. During the
establishment of session, [Con.]/IP address or DNS name of server/port number of server/client name/user
level/Types of display components and number of display items are displayed.
II-5
Chapter 3 Basic Functions
(5) Configuration display area
Displays the configuration (physical/logical) of the disk array as a management object in a configuration display
area. The disk array as a management object is a disk array that is defined inside the iSM server that the iSM
client connects to, and also displays the following configuration information of the disk array in a Tree View form
divided into “Disk array layer”, “Component layer“, and “Individual Component layer“ in the configuration
display area.
Disk array layer:
Displays the disk arrays managed by the iSM
server.
Component layer: Displays the categories of resources that make up
the disk array.
Individual Component layer: Displays lists of physical disks and
logical disks that have been
bound/installed.
Figure 3-3 Configuration Information Display in Tree View
The configuration display area displays the management target’s status, which is expressed by the shape and shade
(dark/light) of the icon.
Refer to the explanation of icons on each information list screen for details on the icons.
(a)
Disk array layer
The disk array list and operating status/monitoring state that the iSM server manages are displayed through the
icons.
(b)
Component layer
The category of resource that configures the disk array is classified and displayed into the following 5 categories.
- Pool:
The assembly of pool bound in the disk array (*1)
- Logical disk: The assembly of logical disk bound in the disk array
- Physical disk: Physical disk filed in the disk array
- Controller:
The assembly of control system resource in the disk array and composed of director, cache
module, adapter, power supply, fan, etc.
- Enclosure:
A disk enclosure unit that stores physical disk and is composed of adapter, power supply, fan and
etc. Enclosure is not provided depending on your system configuration
II-6
Chapter 3 Basic Functions
The component layer displays a list of components and each component’s operating/monitoring state with the
icon.
*1 Pool-related information is displayed if the disk array to be monitored is a disk array with pool.
(c)
Individual component layer
It displays the logical disk and physical disk list, and each operating status/monitoring state through icons.
Depending on the environmental setting, the logical disk number or logical disk name is indicated as the
identification information of logical disk. For details on the setting method, refer to 5.2 “Client Start/Stop”.
For the logical disk list, when the snapshot function is used, snapshot-volume (SV) and link-volume (LV) can be
set to non-display. For details on the setting method, refer to 5.2 “Client Start/Stop”.
To display the selected information of a component, right-click on the component and select [Properties].
(6) Information list display area
It displays information on components that is one class lower than the selected class (with left click) in the
configuration display area. If selecting the disk array in the configuration display area, it displays the resource
(“Pool” (*1), “Logical Disk”, “Physical Disk”, “Controller”, “Disk Enclosure”) information composed of the disk
array in the list, and if selecting the logical disk, it displays the information of logical disk in the list.
Displays the following screen according to selected component in the configuration display area.
- Disk Array Subsystem list screen:
displays disk array name and operating status
- Component list screen:
displays the operating status for each component
- Pool list screen:
displays pool name, operating status, and various attribute information.
(*1)
- Logical Disk list screen:
displays logical disk name, operating status, and various attribute
information
- Physical Disk list screen:
displays operation state of physical disk and various attribute information
- Controller list screen:
displays the operation state by component
- Disk Enclosure list screen:
displays the operation state for each component
*1 Pool-related information is displayed if the disk array to be monitored is a disk array with pool.
(7) Message display area
Messages that indicate the fault and operating status of the disk array and iSM itself are displayed in this area.
Double-clicking on a message displays the Help information of the message. Refer to the “Messages Handbook”
for the contents of the messages.
II-7
Chapter 3 Basic Functions
33..11..33 D
Diisskk A
Arrrraayy IInnffoorrm
maattiioonn D
Diissppllaayy
Disk array information is displayed in both “Disk Array Subsystem list screen” which is displayed in the configuration
display area and information list display areas, and “Disk Array Subsystem details information screen” which is
displayed as disk array property information.
In this section, each item displayed as disk array information is described.
(1) Disk Array Subsystem list screen
A screen (Figure 3-4) displayed in configuration display area when [iSM server] is selected and it displays the
disk array name and operating status.
Figure 3-4 Disk Array Subsystem List Screen
(i)
Icon (operating state/monitoring state of the disk array)
It displays the integrated operating state of disk array component and monitoring state from iSM server to the
disk array by using the icon next to disk array name.
II-8
Chapter 3 Basic Functions
Table 3-2 Display Icons
Icon
l,
Status
etc.
These icons are monitoring state where all disk array components are in normal
status. The icon’s shape differs by disk array type.
This icon is a monitoring state where an event or fault (except critical fault)
that needs “maintenance” occurred in any disk array components. (Note 1
and 2)
This icon is a monitoring state where a critical fault occurred in any disk
array components. (Note 2)
This icon is a monitoring state where “threshold excess” occurred in any pool
for snapshot. (Note 3)
,
etc.
These icons show that the disk array is in monitoring stop status or under
configuration setting. The icon’s shape differs by disk array type.
This shows monitoring stop status or under configuration setting.
If this icon is displayed, an event or fault (except critical fault) that needs
“maintenance” occurred in any disk array components just before stopping
monitoring.
This shows monitoring stop status or under configuration setting.
If displaying this icon, a critical fault has occurred in any disk array
components just before stopping monitoring.
This shows monitoring stop status or under configuration setting.
If displaying this icon, “threshold excess” has occurred in any pool for
snapshot just before stopping monitoring.
This icon indicates that disk array components are not being monitored.
If this icon is displayed, the SVP settings of the target disk array include an
incorrect IP address setting, or the target disk array could not be connected to
the iSM server.
Note 1 If an event or fault (except critical fault) that needs “maintenance” occurred, the disk array icon can be
switched between “
” and “
”. Switching is executed at [Display Maintenance State] in
environment setting dialog by selecting [File] → [Environment Settings] from the menu. Refer to 5.2
“Client Start/Stop” for details.
Note 2 Although a component fault is displayed by “
”, whether this icon deserves the critical fault or not is
decided at a higher layer, and the icon according to the status is displayed. Please refer to 3.2.2
“Description of screen and operation” about the component status icon and display in higher layer.
Note 3 If a threshold excess occurred in pool for snapshot, the icon “
” is displayed. If, however, the
integrated operating state of a disk array component is faulty or an event or fault (except critical fault)
that needs “maintenance” occurred, the icon displays the integrated operating state. For details on
actions to be taken when a threshold excess occurred, refer to the “Snapshot User's Manual (Function
Guide)” (IS030).
Note 4 The shade of icon indicates the monitoring state of target disk array. If icon is gray, the monitoring of
target disk array stops.
II-9
Chapter 3 Basic Functions
(ii)
Disk Array Subsystem Name
Names for identifying disk arrays uniquely.
An optional name can be set to the disk array. Refer to 3.3 “Nickname Setting” for setting method.
(iii) State
Displays integrated operating state in the whole disk array at “State” column.
Ready:
All disk array components are in normal operation.
Ready (Maintenance):
An event that needs “maintenance” occurs in any disk array.
Fault:
“Fault” occurs in any disk array component.
(iv) Monitoring State
Displays the monitoring state to the disk array at “Monitoring State” column.
Running:
Status that monitoring is executing to the target disk array
Starting demand:
Status that monitoring to the target disk array is starting
Configuration:
Status that Configuration setting of the target disk array is under way
Stopping demand:
Status that monitoring stop processing to the target disk array by user specification is
executing
Stop:
Status that monitoring to the target disk array by user specification is stopping
Stop(Maintenance):
Status that monitoring to the target disk array is stopping because of maintenance
operation such as configuration change
Stop(Fault):
Status that monitoring to the target disk array is stopping because of fault detection
Wait Recovery:
Status that monitoring on disk array was disabled due to disk array failure or control
path failure, and therefore recovery of the monitoring on the disk array is waited for
Unknown:
Status in which disk array components are not being monitored. This state includes
that the SVP settings of the target disk array include an incorrect IP address setting,
or the target disk array could not be connected to the iSM server.
(v)
SAA
Subsystem Absolute Address (56 hexadecimal digits) of the identification information of disk array is displayed
at the “SAA” column.
II-10
Chapter 3 Basic Functions
(2) Disk Array Subsystem details information screen
These screens (Figures 3-5, 3-6, and 3-7) are displayed if selecting (click the left button) optional disk array and
selecting by right clicking → [Properties] (or [View]→ [Properties] from menu) in configuration display area and
information list display, displaying detailed information of the disk array.
Figure 3-5 Disk Array Subsystem Details Information-1
(i)
Name
The identification information of disk array. The display contents are the same as (1) “Disk Array Subsystem list
screen”.
(ii)
Monitoring State
The monitoring state for the disk array. The display contents are the same as (1) “Disk Array Subsystem list
screen”.
When monitoring is waiting for recovery or stopping (failure), unknown causes of the failure on monitoring on
disk array are classified and displayed into the following three.
- Control path failure: Failure caused by control path (network failure, etc.)
- Disk array failure: Internal failure in disk array
- Others: Failure caused by management server
* For details of failures, refer to messages of operation log, etc. output upon a failure.
(iii) State
The integrated operating state for the entire disk array and disk array component. The display contents are the
same as (1) “Disk Array Subsystem list screen”.
II-11
Chapter 3 Basic Functions
(iv)
Product ID
Displays the product model name (maximum of 16 characters) in the disk array.
(v)
Product FW Rev
Displays the Product Revision (4 characters) in the disk array.
(vi)
Serial Number
Displays the product number (16 characters) in the disk array.
(vii) SAA
The identification information of disk array. The display contents are the same as (1) “Disk Array Subsystem list
screen”
(viii) World Wide Name
Displays the WWNN (World Wide Node Name) of the disk array.
This item is not displayed if the iSM of the server is Ver1.5 or earlier.
(ix) Total Capacity
Displays the total capacity of physical disk (total capacity of data disk) of the disk array in Gigabyte units (1 G
byte=1,073,741,824 byte) and Terabyte units. (1 T byte = 1,024 G byte).
(x)
Control Path
Displays the control path to the disk array in the iSM server by the IP Address (in the case of LAN connection) or
FC pathname (disk information). Displays the path currently controlled (upper layer) and the path for switching
on the fault (lower layer), and displays “
” which indicates a fault next to the control pathname when a fault
occurs in switching paths on the fault.
Example 1) LAN connection:
Control Path (1): 123.123.123.1
Control Path (2): 123.123.123.2
Example 2) FC-AL connection
Control Path (1): disk9 (Port6 Bus0 Target40 Lun4)
Control Path (2): disk10 (Port6 Bus0 Target40 Lun5)
If switching path on the fault does not exist, display “-” in Control Path (2).
(xi)
Cross Call
Displays any of the following as setting information for Cross Call function.
ON:
Cross Call is valid
OFF (Auto Assignment OFF):
Cross Call is invalid and Auto Assignment function is invalid
OFF (Auto Assignment ON):
Cross Call is invalid and Auto Assignment function is valid
-:
Cross Call function is not supported
(xii) CachePartitioning Function
As information about CachePartitioning function, either of the status below is displayed. This column does not
appear when CachePartitioning is not purchased.
ON
CachePartitioning function is applied
OFF
CachePartitioning function is not applied
(xiii) User System Code
If the user has made a contract for the maintenance service, the 10-digit user system code is displayed. If not,
“0000000000” is displayed.
II-12
Chapter 3 Basic Functions
Even if a user has made a contract for the maintenance service, “0000000000” may be displayed depending on the
combination of iSM and the disk array.
(xiv) Revision of Storage Control Software
Displays the revision of storage control software.
Figure 3-6 Disk Array Subsystem Details Information-2
(xv) Access Control information
Displays information on Access Control of the disk array. Displayed information includes Access Control
ON/OFF, information on port, and information on LD.
For details, refer to the “Configuration Setting Tool User’s Manual (GUI)”.
II-13
Chapter 3 Basic Functions
Figure 3-7 Disk Array Subsystem Details Information-3
(xvi) Product state
Displays the product information of the disk array.
II-14
Chapter 3 Basic Functions
33..11..44 C
Coom
mppoonneenntt IInnffoorrm
maattiioonn D
Diissppllaayy
When selecting (click the left button) the disk array in configuration display area, the screen (dashed line in Figure 3-8)
is displayed and the operating state in each component is displayed.
Figure 3-8 Component List Screen
(i)
Icon (operating state/monitoring state of disk array component)
Displays the operating state/monitoring state in each component with the icon next to component (pool
(*1)/logical disk/physical disk/controller/disk enclosure). (Enclosure is not provided depending on your system
configuration.)
II-15
Chapter 3 Basic Functions
Table 3-3 Display Icons
Status
Icon
Component (pool) is in normal operation (*1)
Component (logical disk) is in normal operation
Component (physical disk) is in normal operation
Component (controller) is in normal operation
Component (disk enclosure) is in normal operation
The event or fault (except critical fault) that needs “maintenance” in any component
occurs (Note 1 and Note 2)
“Critical fault” occurs in any component (Note 2)
This shows that “threshold excess” occurred in any pool for snapshot (Note 3).
etc.
These icons show that the disk array is in monitoring stop status or under configuration
setting.
This shows monitoring stop status or under configuration setting.
If this icon is displayed, an event or fault (except critical fault) that needs “maintenance”
occurred in any component just before stopping monitoring.
This shows monitoring stop status or under configuration setting.
If displaying this icon, a critical fault has occurred in any component just before stopping
monitoring.
This shows monitoring stop status or under configuration setting.
If this icon is displayed, “threshold excess” has occurred in any pool for snapshot just
before stopping monitoring.
Note 1. When the event or fault (except critical fault) that needs “maintenance” in any component occurs, whether
icon displays as “
” or not, is based on the environment setting of the client. Switch in “Display
Maintenance State” in the environment setting dialog by selecting [File] → [Environment Settings] from
menu. Refer to 5.2 “Client Start/Stop” for details.
Note 2. Although a fault is displayed in “
”, whether it deserves the critical fault is according to the
determination by the higher layer, and the specified icon is displayed. Refer to 3.2.2 “Description of Screen
and Operation” for status icon of component and display in the higher layer.
Note 3. If a threshold excess occurred in pool for snapshot, the icon “
” is displayed. If, however, the integrated
operating state of pool is faulty or an event or fault (except critical fault) that needs “maintenance”
occurred, the icon displays the integrated operating state. For details on actions to be taken when a
threshold excess occurred, refer to the “Snapshot User's Manual (Function Guide)”.
Note 4. The shades of gray of icon indicate the monitoring status of a target disk array. When an icon is dimmed,
the monitoring of the corresponding disk array stops.
II-16
Chapter 3 Basic Functions
(ii)
Type
Displays the disk array component such as “Pool (*1)”, “Logical Disk”, “Physical Disk”, “Controller” and
“Enclosure” at “Type” column.
(iii) State
Displays the integrated operating state by the disk array component in “State” column.
Ready:
Entire disk array component is in normal operation.
Ready (Maintenance): An event whereby “maintenance” is needed occurs in any disk array component.
Fault:
(iv)
“Fault” occurs in any disk array component.
Number of Elements
Displays the number of components included by type.
For the number of logical disk components, the number of all logical disks is always displayed regardless of
display setting of snapshot-volume (SV) and link-volume (LV) on the Environment Setting screen. For details
on the setting method, refer to 5.2 “Client Start/Stop”.
*1 Pool-related information is displayed if the disk array to be monitored is a disk array with pool.
33..11..55 P
Pooooll IInnffoorrm
maattiioonn D
Diissppllaayy
If the disk array to be monitored is a disk array with pool, pool information is displayed in “pool list screen” which is
displayed in the configuration display area and information list display area, and “pool details information screen”
which is displayed as pool property information.
In this section, each item indicated as pool information is described.
(1) Pool list screen
A screen (dashed line in Figure 3-9) displayed by selecting (click the left button) [Pool] in configuration display
area. It displays various attribute information such as pool name, operating state, and capacity.
II-17
Chapter 3 Basic Functions
Figure 3-9 Pool List Screen
(i)
Icon (Pool Operating state/Monitoring state)
Displays the operating state/monitoring state of pool with the icon next to pool number.
Table 3-4 Display Icons
Icon
Status
Pool is in normal operation
An event whereby “caution” is needed occurs in pool
“Fault” occurs in pool
This shows that “threshold excess” occurred in pool.
This icon shows that the disk array is in monitoring stop status or under configuration
setting.
This shows monitoring stop status or under configuration setting.
If this icon is displayed, an event that needs “caution” occurred in any pool just
before stopping monitoring.
This shows monitoring stop status or under configuration setting.
If displaying this icon, a fault has occurred in any pool just before stopping
monitoring.
This shows monitoring stop status or under configuration setting.
If this icon is displayed, “threshold excess” has occurred in pool just before stopping
monitoring.
II-18
Chapter 3 Basic Functions
If a threshold excess occurred in pool for snapshot, the icon “
” is displayed. If, however, the integrated operating
state of pool is faulty or an event or fault (except critical fault) that needs “maintenance” occurred, the icon displays
the integrated operating state. For details on actions to be taken when a threshold excess occurred, refer to the
“Snapshot User's Manual (Function Guide)” (IS030).
(ii)
Pool Number
Displays pool number (4 hexadecimal digits).
(iii) Pool Name
Displays pool name (maximum of 32 characters). The optional name for pool name can be set. Refer to the
“Configuration Setting Tool User’s Manual (GUI)” for setting method.
(iv)
State
Displays the operating state of pool and occurrence of event in any of the following at “State” column.
Ready:
Pool is in normal operation.
Attn.(reduce):
Reduction (RAID configuration redundancy disappears.)
Attn.(rebuilding):
While rebuilding (while rebuilding data within pool)
Attn.(preventive copy):
While copying data to spare disk (redundancy maintained by RAID configuration)
Attn.(copy back):
While writing back from the spare disk (redundancy maintained by RAID
configuration)
Fault:
(v)
“Fault” occurs in pool.
Expansion State
Displays the expansion state of pool in any of the following at “Expansion State” column.
(blank):
Pool expansion is not in progress or expansion terminated normally.
Expanding:
During pool expansion.
Expand-Fail:
Fails in pool expansion.
(vi) RAID
Displays RAID type of pool in any of the following at “RAID” column.
“0”:
RAID 0
“1”:
RAID 1
“5”:
RAID 5
“6”:
RAID 6
“10”:
RAID 10
“50”:
RAID 50
(vii) Capacity
Displays the capacity of pool in Gigabyte units (1 G byte=1,073,741,824 bytes) to 1 decimal place. (Truncate it
at the second decimal place. However, displays 1 byte to 100 Megabytes as 0.1.)
(viii) Used Capacity
Displays the used capacity of pool in Gigabyte units (1 G byte=1,073,741,824 bytes) to 1 decimal place.
(Truncate it at the second decimal place. However, displays 1 byte to 100 Megabytes as 0.1.)
II-19
Chapter 3 Basic Functions
(ix) Snapshot Capacity
Displays the capacity of the snapshot reserve area in Gigabyte units (1 G byte=1,073,741,824 bytes) to 1 decimal
place. (Truncate it at the second decimal place. However, displays 1 byte to 100 Megabytes as 0.1.)
(x)
Snapshot Used Capacity
Displays the used capacity of the snapshot reserve area in Gigabyte units (1 G byte=1,073,741,824 bytes) to 1
decimal place. (Truncate it at the second decimal place. However, displays 1 byte to 100 Megabytes as 0.1.)
If a threshold excess has occurred, “ * ” is displayed at the left of snapshot used capacity.
(xi)
Snapshot Threshold
Displays the snapshot threshold in Gigabyte units (1 G byte=1,073,741,824 bytes) to 1 decimal place. (Truncate
it at the second decimal place. However, displays 1 byte to 100 Megabytes as 0.1.)
(2) Pool details information screen
This screen (Figure 3-10) is displayed if selecting (click the left button) optional pool and selecting by right
clicking → [Properties] (or [View]→[Properties] from menu) in configuration display area or information list
display area, displaying detailed information of the pool.
Figure 3-10 Pool Details Information
II-20
Chapter 3 Basic Functions
(i)
Name
Displays the pool name.
The display contents are the same as (1) “Pool list screen”.
(ii)
Pool Number
Displays the pool number.
The display contents are the same as (1) “Pool list screen”.
(iii) Pool Type
Displays the pool type.
(iv)
Basic:
Basic pool
Dynamic:
Dynamic pool
State
Displays the operating state of pool.
The display contents are the same as (1) “Pool list screen”.
(v)
Expansion State
Displays the expansion state of pool.
The display contents are the same as (1) “Pool list screen”.
(vi)
Progress Ratio
Displays the progress ratio during pool capacity expansion.
(vii) RAID
Displays the RAID type of pool.
The display contents are the same as (1) “Pool list screen”.
For a dynamic pool, displays the configuration ratio of the data disk and the parity disk after the RAID type, like
“6(4+PQ)”.
(viii) Capacity
Displays the capacity of pool.
The display contents are the same as (1) “Pool list screen”.
(ix)
Used Capacity
Displays the used capacity of pool.
The display contents are the same as (1) “Pool list screen”.
(x)
Logical Disk List
Displays information on the logical disks contained in the target pool (logical disk number, form, logical disk
name, and status).
When the snapshot function is used, snapshot-volume (SV) and link-volume (LV) can be set to non-display.
For details on the setting method, refer to 5.2 “Client Start/Stop”.
Example:
Logic Disk Number
OS Type
Logical Disk Name
State
0000h
NX
LDNX00000
Ready
0001h
A4
LDA400000
Fault
II-21
Chapter 3 Basic Functions
(xi)
Physical Disk List
Displays information on the physical disks making up the target pool (physical disk number “PD group number
(2 digits in hexadecimal) - physical disk number (2 digits in hexadecimal)” and state).
If the expansion state of the pool is either Expanding or Expand-Fail, the physical disks subject to expansion are
not displayed on the list.
Example:
Physical Disk Number
State
00h - 01h
Ready
00h - 02h
Fault
Figure 3-11 Pool Details Information-2
This screen displays information related to snapshot.
* If you do not buy snapshot (DynamicSnapVolume), the [Snapshot] tab is not displayed.
II-22
Chapter 3 Basic Functions
(xii) Snapshot Capacity
Displays the total snapshot capacity.
The display contents are the same as (1) “Pool list screen”.
(xiii) Snapshot Used Capacity
Displays the used snapshot capacity.
The display contents are the same as (1) “Pool list screen”.
(xiv) Snapshot Threshold
Displays the snapshot threshold.
The display contents are the same as (1) “Pool list screen”.
(xv) Control Capacity of Snapshot
Displays the snapshot control capacity.
(xvi) Snapshot Reserve Area List
Lists the information (logical disk number, logical disk name, and capacity) on snapshot reserve area in the target
pool.
Example:
Logical Disk Number
Logical Disk Name
Capacity
0000h
POOL001_SDV_0001
10.0
0001h
POOL001_SDV_0002
20.0
II-23
Chapter 3 Basic Functions
33..11..66 LLooggiiccaall D
Diisskk IInnffoorrm
maattiioonn D
Diissppllaayy
The logical disk information is displayed in “logical disk list screen” which is displayed in the configuration display
area and information list display area, and “logical disk details information screen” which is displayed as logical disk
property information.
In this section, each item indicated as logical disk information is described.
(1) Logical Disk list screen
A screen (Figure 3-11) displayed by selecting (click the left button) [Logical Disk] in configuration display area
displaying various attribute information such as logical disk name, operating state and capacity.
If selecting (click the left button) optional logical disk in the configuration display area, it also displays RAID
configuration physical disk list (part of related information) composed of applicable logical disk.
Figure 3-12 Logical Disk list screen
II-24
Chapter 3 Basic Functions
(i)
Icon (Operating state/Monitoring state of logical disk)
Displays the operating state/monitoring state of logical disk with the icon next to logical disk number.
Table 3-5 Display Icons
Status
Icon
Logical disk is in normal operation
An event whereby “Caution” is needed occurs in logical disk
“Fault” occurs in logical disk
These icons show that the disk array is in monitoring stop status or under configuration
setting.
This shows monitoring stop status or under configuration setting.
If this icon is displayed, an event that needs “caution” occurred in any logical disk just
before stopping monitoring.
This shows monitoring stop status or under configuration setting.
If displaying this icon, a fault has occurred in any logical disk just before stopping
monitoring.
(ii)
Logical Disk Number
Displays logical disk number (4 hexadecimal digits).
(iii) OS Type/Logical Disk Name
Displays logical disk name (maximum of 24 characters) and OS type. The optional name for logical disk name
can be set. Refer to 3.3 “Nickname Setting” for setting method.
For (ii) Logical Disk Number and (iii) OS Type/Logical Disk Name, the order in which the columns are
displayed changes depending on the environment settings.
Number order display:
Order of [Number], [OS Type], [Logical Disk Name], [State] ...
Name order display:
Order of [OS Type], [Logical Disk Name], [Number, [State] ...
Refer to 5.2 “Client Start/Stop” for setting method.
(iv)
State
Displays the operating state of logical disk and occurrence of event in any of the following at “State” column.
Ready:
Logical disk is in normal operation.
Ready (formatting):
During logic formatting
* The logical disk is available, but there may occur I/O response delay until logic
formatting is completed.
Attn.(reduce):
Reduction (RAID configuration redundancy disappears)
Attn.(rebuilding):
While rebuilding (while rebuilding data within RANK)
Attn.(preventive copy): While copying data to spare disk (redundancy maintained by RAID configuration)
Attn.(copy back):
While writing back from the spare disk
(redundancy maintained by RAID configuration)
Attn.(unformatted):
Not logic formatting
Attn.(formatting):
During logic formatting
* The logical disk is not available until logic formatting is completed.
Attn.(format fail):
Fails in logic formatting
Attn.(expanding):
During RANK expansion
II-25
Chapter 3 Basic Functions
(v)
Attn.(expand-fail):
Fails in RANK expansion
Fault:
“Fault” occurs in logical disk
Fault (media error):
“Media fault” occurs in logical disk
RAID
Displays RAID type of logical disk in any of the following at “RAID” column.
“0”:
RAID 0
“1”:
RAID 1
“5”:
RAID 5
“6”:
RAID 6
“10”:
RAID 10
“50”:
RAID 50
(vi) Capacity
Displays the capacity of logical disk in Gigabyte units (1G byte=1,073,741,824 bytes) to 1 decimal place.
(Truncate less than 2 decimal places. However, displays 0 byte to 100 Megabyte in 0.1).
(vii) RPL Type
Displays the replication type of logical disk in any of the following at “RPL Type” column. This column does
not appear when none of DynamicDataReplication and RemoteDataReplication is purchased.
IV:
Not used as a replication volume
MV:
Used as a replication source volume
RV:
Used as a replication destination volume
RV/MV: Used as both RV and MV
(Blank): Cannot be used as a replication volume
(viii) Snapshot Type
Displays the snapshot type.
If you do not buy DynamicSnapVolume, this is not displayed.
Blank:
Volume not used by snapshot
BV:
Base volume (original volume from which copies are made)
SV:
Snapshot volume (volume as the snapshot generation)
LV:
Link volume (virtual volume establishing connection with BV or SV and implementing indirect access)
SDV:
Snapshot data volume (logical disk configuring snapshot reserve area (SRA))
SV*:
A type of snapshot volumes (volume that is not the snapshot generation)
*
SV* may exist due to an iSM abnormal end and the like, however it cannot be reused. Therefore, free it
immediately by “Freeing Logical Disk” of configuration setting.
(ix)
Link
Displays the connection state between BV-LV or SV-LV.
If you do not buy DynamicSnapVolume, this is not displayed.
(x)
Group
Displays the group to which a logical disk belongs in any of the following at “Group” column. This column does
not appear when AccessControl and ReallocationControl are not purchased.
Preserve: Preserve group
Reserve: Reserve group
(Blank): Already assigned to the LD Set
II-26
Chapter 3 Basic Functions
(xi)
Purpose
Displays the purpose of a logical disk in any of the following at “Purpose” column. This column does not appear
when ReallocationControl is not purchased.
RPL:
Logical disk to which only a pair for replication is set
Snapshot:
Logical disk to which only snapshot is set (BV)
Link Volume:
Logical disk that is a link-volume (LV)
RPL/Snapshot:
Logical disk to which a pair for replication and snapshot setting have already been set
Optimization:
Work disk for performance optimization
(Blank):
General logical disk to which no specific purpose is set
(xii) RANK/Pool Number
Displays RANK and pool numbers that contain the logical disk. RANK numbers are displayed in “PD group
number (2 digits in hexadecimal) - RANK number (2 digits in hexadecimal)”. A maximum of four RANK
numbers are displayed. Numbers exceeding four are indicated by “...” at the end of line.
* The pool number (4 digits in hexadecimal) is displayed only for the disk arrays with pool.
(xiii) Pool Name
Displays the name of the pool to which the logical disk belongs.
* The name is displayed only for the disk arrays with pool.
(xiv) Cache Resident
Displays cache resident status of logical disk in “resident” column.
Resident: Cache resident
(Blank):
Cache non-resident
(xv) Progress Ratio
Displays the progress ratio in logical disk where “formatting”, “rebuilding”, “copy back”, “expanding” and
“preventive copy” events occur.
For the disk arrays with pool, the progress ratio is displayed only if a “formatting” event occurs, and not
displayed if other events occur.
(xvi) LD Set Name
Displays up to four LD Set Names to which the logical disk belongs (in case four names are exceeded, displayed
“…” at the end of the names).
(xvii) Cache Segment Name
Displays the cache segment name to which a logical disk belongs. This column does not appear when
CachePartitioning is not purchased.
(xviii) Access Control
Displays port information (Port number, Port name) and LD Set information of host director owned by disk array
inside the “Access Control” list box.
By selecting an arbitrary LD Set name from the list box, only the information of logical disk included in the LD
Set is displayed in information list display area. When an arbitrary port is selected, only the information of
logical disk that can be accessed from the applicable port is displayed in information list display area. If “ALL”
is specified from list box, the information of all logical disk in selected disk array is displayed in the information
list display area.
II-27
Chapter 3 Basic Functions
(2) Logical Disk details information screen
These screens (Figures 3-13, 3-14, and 3-15) are displayed if selecting (click the left button) optional logical disk
and selecting by right clicking → [Properties] (or [View]→[Properties] from menu) in configuration display area
or information list display area, displaying detailed information of the logical disk.
Figure 3-13 Logical Disk Details Information-1
(i)
Name
Displays the logical disk name. The display contents are the same as (1) “Logical Disk list screen”.
(ii)
Number
Displays the logical disk number. The display contents are the same as (1) “Logical Disk list screen”.
(iii) OS Type
Displays the form of logical disk. The display contents are the same as (1) “Logical Disk list screen”.
(iv)
State
Displays the operating state of logical disk. The display contents are the same as (1) “Logical Disk list screen”.
II-28
Chapter 3 Basic Functions
(v)
RAID
Displays the RAID type of logical disk. The display contents are the same as (1) “Logical Disk list screen”.
If the pool to which the target logical disk belongs is a dynamic pool, displays the configuration ratio of the data
disk and the parity disk after the RAID type, like “6(4+PQ)”.
(vi)
Capacity
Displays the capacity of logical disk.
(vii) RANK/Pool Number
Displays the RANK and pool numbers
The display contents are the same as (1) “Logical Disk list screen”.
(viii) Pool Name
Displays the name of the pool to which the logical disk belongs.
The display contents are the same as (1) “Logical Disk list screen”.
(ix) Cache Resident
Displays the cache resident status of logical disk. The display contents are the same as (1) “Logical Disk list
screen”.
(x)
Progress Ratio
Displays the progress ratio in logical disk where the event of “formatting”, “rebuilding”, “copy back”,
“expanding” or “preventive copy” occurs. The display contents are the same as (1) “Logical Disk list screen”.
For the disk arrays with pool, the progress ratio is displayed only if a “formatting” event occurs, and not
displayed if other events occur.
(xi) RPL Type
Displays the replication type of logical disk. The display contents are the same as (1) “Logical Disk list screen”.
This column does not appear when none of DynamicDataReplication and RemoteDataReplication is purchased.
(xii) Group
Displays the group to which a logical disk belongs. The display contents are the same as (1) “Logical Disk list
screen”. This column does not appear when AccessControl and ReallocationControl are not purchased.
(xiii) Purpose
Displays the purpose of a logical disk. The display contents are the same as (1) “Logical Disk list screen”. This
column does not appear when CachePartitioning is not purchased.
(xiv) Cache Segment Name
Displays the cache segment name to which a logical disk belongs. This column does not appear when
CachePartitioning is not purchased.
(xv) Ownership
Displays the controller information (ownership: current, default) where authority to control logical disks is
assigned during an invalid Cross Call mode. Then, when the Cross Call function is not supported or Cross Call
mode is valid, displays “-”.
Example: Current Owner
controller 0
Default Owner
controller 1
II-29
Chapter 3 Basic Functions
(xvi)
Physical Disk List
The physical disk number “PD group number (2 hexadecimal digits) - physical disk number (2 hexadecimal
digits)”, which configures target logical disk, and the status are displayed.
For the disk arrays with pool, displays information on the physical disks contained in the pool to which the
target logical disk belongs.
Example:
Physical Disk Number
State
00h - 01h
Ready
00h - 02h
Fault
Figure 3-14 Logical Disk Details Information-2
(i)
Port
Displays the port information (port number, port name, status*1) where access authority is possessed to logical
disk.
This item is not displayed for disk array to which the AccessControl license has been applied.
Ports only for a host are displayed.
*1 Director state when the port is installed
Example:
Port Number
Port Name
State
00h - 01h
DB_server1
Ready
00h - 02h
DB_server2
Fault
II-30
Chapter 3 Basic Functions
(ii)
LD Set
Displays the LD Set where the specified logical disk is bound.
Figure 3-15 Logical Disk Details Information-3
The information related to snapshot is displayed.
*
The [Snapshot] tab is not displayed, if you do not buy snapshot (DynamicSnapVolume) or the selected logical disk
is not a volume related to snapshot (a snapshot related volume is a volume of which snapshot type is BV, SV, LV,
SDV, or SV*).
(i)
Snapshot Type
Displays the snapshot type.
The display contents are the same as (1) “Logical Disk list screen”.
(ii)
Link
Displays the connection state.
The display contents are the same as (1) “Logical Disk list screen”.
(iii)
Number
Displays the number of the connecting logical disk (4 digits in hexadecimal).
(iv)
OS Type
Displays the (OS) type of the connecting logical disk.
The display contents are the same as (1) “Logical Disk list screen”.
II-31
Chapter 3 Basic Functions
(v)
Logical Disk Name
Displays the logical disk name (up to 24 characters) of the connecting logical disk.
(vi)
Snapshot Type
Displays the snapshot type of the connecting logical disk.
The display contents are the same as (1) “Logical Disk list screen”.
II-32
Chapter 3 Basic Functions
33..11..77 P
Phhyyssiiccaall D
Diisskk IInnffoorrm
maattiioonn D
Diissppllaayy
Physical disk information is displayed in “Physical Disk list screen” displayed in the configuration display area and
information list display areas, and in “Physical Disk detailed information screen” displayed as physical disk property
information.
In this section, each item shown as physical disk information is described.
(1) Physical Disk list screen
The screen (dashed line in Figure 3-16) displayed when [Physical Disk] is selected (click the left button) in
configuration display area and displays various attribute information such as operating state of physical disk and
capacity.
When an optional physical disk is selected (click the left button) in the configuration display area, the information
of logical disk (a part of related information) configured by applicable physical disk in RAID is also displayed in
the list.
Figure 3-16 Physical Disk List Screen
II-33
Chapter 3 Basic Functions
(i)
Icon (Operating state/Monitoring state of Physical Disk)
Displays the operating state of physical disk with the icon next to the physical disk number.
Table 3-6 Display Icons
Status
Icon
Physical disk is in normal operation
The event whereby “Preventive maintenance” is needed occurred in physical disk.
This shows one alternative physical disk failed and the other alternative physical disk is
used.
The event whereby “Attn” is needed occurred in physical disk
“Fault” occurred in physical disk
These icons show that the disk array is in monitoring stop status or under configuration
setting.
This shows monitoring stop status or under configuration setting.
If this icon is displayed, an event that needs “Preventive maintenance” occurred in any
physical disk just before stopping monitoring.
This shows monitoring stop status or under configuration setting.
If this icon is displayed, an event that needs “Attn” occurred in any physical disk just
before stopping monitoring.
This shows monitoring stop status or under configuration setting.
If displaying this icon, a fault has occurred in any physical disk just before stopping
monitoring.
(ii)
Number
Displays the physical disk number in “PD group number (2 hexadecimal digits) - PD number (2 hexadecimal
digits)” at “Number” column.
(iii) State
Displays the operating state of physical disk and the occurrence of event at “State” column in any of the
following.
Ready:
Physical disk is in operation
Info (inactive):
“Preventive maintenance” occurred in physical disk
Attn.(rebuilding): While re-building the data
Attn.(powering up):While starting up the physical disk
Attn.(formatting): While formatting physically
Fault:
“Fault” occurred in physical disk
Offline:
Physical disk is separated or does not exist.
(iv) Capacity
Displays the physical disk capacity to one decimal place at most in Gigabyte unit (1G byte=1,073,741,824 byte)
at “Capacity” column. (Truncate less than 2 decimal places. But, 0 byte to 100Megabyte is displayed by 0.1).
(v)
RANK/Pool Number
Displays RANK and pool numbers whereby physical disk belongs in “PD group number (2 hexadecimal digits) RANK number (2 hexadecimal digits)” at “RANK” column.
* The pool number is displayed only for the disk arrays with pool.
II-34
Chapter 3 Basic Functions
(vi)
Pool Name
Displays the name of the pool to which the physical disk belongs.
* The name is displayed only for the disk arrays with pool.
(vii) Classification
Displays the classification of target physical disk in any of following at “Classification” column.
Data:
Physical disk that can be used as data area
Spare:
Replacement of physical disk at the fault occurrence
No Setting: Physical disk that is not specified as data/spare
* For the disk arrays with pool, the classification of the physical disk subject to pool expansion is displayed as
data.
(viii) Progress Ratio
If the disk array to be monitored is that with pool, displays the progress ratio in the physical disk in which a
rebuilding event occurred.
(2) Physical Disk detailed information screen
This screen (Figures 3-17) is displayed if selecting (click the left button) optional physical disk and selecting by
right clicking → [Properties] (or [View]→[Properties] from menu) in configuration display area or information
list display area, displaying detailed information of the physical disk.
Figure 3-17 Physical Disk Detailed Information
II-35
Chapter 3 Basic Functions
(i)
Number
Displays the physical disk number. The display contents are the same as (1) “Physical Disk list screen”.
(ii)
State
Displays the operating state of physical disk and the occurrence of event. The display contents are the same as
(1) “Physical Disk list screen”.
(iii) Capacity
Displays the capacity of physical disk.
(iv)
Rotation Speed
Displays the number of rotation (unit: rpm) of target physical disk.
(v)
Product ID
Displays the product model name (maximum of 16 characters) information of target physical disk.
(vi)
Product Rev
Displays the Product Revision (4 characters) information of target physical disk.
(vii) Serial Number
Displays the product serial number (20 characters) of target physical disk.
(viii) RANK Number/Pool Number
Displays the RANK and pool numbers of physical disk. The display contents are the same as (1) “Physical Disk
list screen”.
* The pool number is displayed only for the disk arrays with pool.
(ix)
Pool Name
Displays the name of the pool to which the physical disk belongs.
The display contents are the same as (1) “Physical Disk list screen”.
* The name is displayed only for the disk arrays with pool.
(x)
Classification
Displays the classification of physical disk. The display contents are the same as (1) “Physical Disk list screen”.
(xi)
Progress Ratio
If the disk array to be monitored is a disk array with pool, displays the progress ratio in the physical disk in which
a rebuilding event occurred.
The display contents are the same as (1) “Physical Disk list screen”.
(xii) Logical Disk List
Displays the logical disk number, form, logical disk name and status which are configured by target physical disk.
For the disk arrays with pool, displays the logical disk number, form, logical disk name, and status of each of the
logical disks contained in the pool to which the target physical disk belongs.
When the snapshot function is used, snapshot-volume (SV) and link-volume (LV) can be set to non-display.
For details on the setting method, refer to 5.2 “Client Start/Stop”.
Example:
Logical Disk Number
OS Type
Logical Disk Name
State
0000h
WN
KAIKEI
Ready
0001h
NX
KEIRI
Fault
II-36
Chapter 3 Basic Functions
33..11..88 C
Coonnttrroolllleerr IInnffoorrm
maattiioonn D
Diissppllaayy
The information of a controller is displayed on the following screens:
y Controller list screen that is displayed in the information list display area
y Controller detail information screen that is displayed as the information of controller’s properties
This section explains items displayed as controller information.
(1) Controller list screen
Controller list screen (Figure 3-18) displayed when [Controller] is selected (click the left button) in the
configuration display area, displaying the operating state in each component of controller relation.
Figure 3-18 Controller List Screen
(i)
Icon (operating state/monitoring state related to controller)
Displays the operating state/monitoring state of component related to controller with the icon next to “Type”
column.
II-37
Chapter 3 Basic Functions
Table 3-7 Display Icons
Icon
Status
etc. (Ready)
Component is in normal operation
(Offline)
An event whereby “Attn” is needed occurred in component.
(Fault)
“Fault” occurred in component (If component type is Temperature Alarm, it
indicates abnormal temperatures.)
These icons show that the disk array is in monitoring stop status or under
configuration setting.
etc. (Ready)
(ii)
(Offline)
This shows monitoring stop status or configuration setting.
If this icon is displayed, any component is disconnected or absent just before
stopping monitoring.
(Fault)
This shows monitoring stop status or configuration setting.
If this icon is displayed, a “fault” has occurred in any component just before
stopping monitoring. (If the component type is Temperature Alarm,
temperature abnormalities are indicated.)
Type
Displays the type information as component related to controller at “Type” column in the Table 3-8.
Table 3-8 Controller Component List
Type
Abbreviation
Host Director
HD
Replication Director
RD
Disk Director
DD
Cache Module
CHE
Service Processor
SVP
Power Supply
DAC_PS
Battery Backup Unit
DAC_BBU
Fan
DAC_FANU
DAC_FANL
Temperature Alarm
DAC_TEMP_ALM
Back Board
DAC_BB
BC Junction Box
BC_JB
Panel
PANEL
Maintenance PC
MAINTE_PC
Power Control Card
PCC
(iii) Abbreviated Name (number)
Displays the abbreviation and component number of component related to controller at “Abbreviation Name
(number)” column (Table 3-8).
II-38
Chapter 3 Basic Functions
(iv)
State
Displays the operating state in component related to controller in any of following at “State” column.
Ready:
Component of controller is in normal operation
Attn.(nolicense):
The program product “BaseProduct” has not been installed.
(Displayed only for the Host Director)
Attn.(rebuilding):
Component of controller is in the data rebuilding state
(Displayed only for Cache Module)
Attn.(charge):
Component of controller is being charged
(Displayed only for Battery Backup Unit)
Offline:
Component of controller is separated or does not exist
Fault:
“Fault” occurred in component of controller
(If component type is Temperature Alarm, indicates the abnormal temperature)
(v)
Others
Displays supplement information in each component at “Others” column optionally. Displays the cache module
capacity, port number and protocol information in controller information.
• Cache module capacity
If component type is “Cache Module”, the cache module capacity is displayed at “Others” column.
• Port number
If component type is “Host Director”, “Replication Director”, or “Disk Director”, port number (2 hexadecimal
digits) that applicable director possesses is displayed at “Others” column.
• Protocol information
If component type is “Host Director”, the protocol information of the target director is displayed following the
port number at “Others” column.
II-39
Chapter 3 Basic Functions
(2) Controller detail information screen
Select (left-click on) an arbitrary controller in the information list display area, right-click on it, and select
[Properties] (or [View] on the menu bar → [Properties]). The Controller properties screen (Figure 3-19) appears
displaying the detailed information of the selected controller.
Figure 3-19 Controller Detail Information Screen
The information to be displayed varies depending on the selected component.
(In the above screen sample, the host director is selected.)
II-40
Chapter 3 Basic Functions
33..11..99 D
Diisskk E
Enncclloossuurree IInnffoorrm
maattiioonn D
Diissppllaayy
The information of a disk enclosure is displayed on the following screens:
y Disk enclosure list screen that is displayed in the information list display area
y Disk Enclosure properties screen that is displayed as the information of disk enclosure’s properties
This section explains items displayed as disk enclosure information.
(1) Disk Enclosure list screen
Disk Enclosure list screen is a screen (dashed line in Figure 3-20) displayed by selecting (click the left button)
[Enclosure] in the configuration display area, and displays the operating state in each component relation to disk
enclosure. [Enclosure] is not provided depending on your system configuration.
Figure 3-20 Disk Enclosure List Screen
(i)
Icon (operating state/monitoring state related to disk enclosure)
Displays the operating state/monitoring state in component related to disk enclosure with the icon next to “Type”
column.
II-41
Chapter 3 Basic Functions
Table 3-9 Display Icons
Icon
(ii)
Status
(Ready)
Component (disk enclosure) is in normal operation.
(Offline)
Component is separated or does not exist
(Fault)
“Fault” occurred in component (If component type is Temperature Alarm, it
indicates temperature abnormalities or sensor fault.)
(Ready)
These icons show that the disk array is in monitoring stop status or under
configuration setting.
(Offline)
This shows monitoring stop status or configuration setting.
If this icon is displayed, any component is disconnected or absent just before
stopping monitoring.
(Fault)
This shows monitoring stop status or configuration setting.
If this icon is displayed, a “Fault” has occurred in any component just before
stopping monitoring. (If the component type is Temperature Alarm,
temperature abnormalities are indicated.)
Type
Displays the following type information as the component related to disk enclosure at “Type” column.
Table 3-10 List of Components Related to Disk Enclosure
Type
Abbreviation
Adapter Card
DE_ADP
Power Supply
DE_PS
Fan
DE_FAN
Temperature Alarm
DE_TEMP_ALM
Back Board
DE_BB
EC Junction Box
EC_JB
(iii) Abbreviated Name (number)
Displays the abbreviation and component number of component related to disk enclosure at “Abbreviated Name
(number)” column. (Table 3-10)
(iv)
State
Displays the operating state in any of the following in component related to disk enclosure at “Status” column.
Ready:
Component of disk enclosure is in normal operation.
Offline: Component of disk enclosure is separated or does not exist.
Fault:
“Fault” occurred in component of disk enclosure.
(If component type is Temperature Alarm, it indicates temperature abnormalities or sensor fault.)
II-42
Chapter 3 Basic Functions
(2) Disk Enclosure properties screen
Select (left-click on) an arbitrary disk enclosure in the information list display area, right-click on it, and select
[Properties] (or [View] on the menu bar → [Properties]). The Disk Enclosure properties screen (Figure 3-21)
appears displaying the detailed information of the selected disk enclosure.
Figure 3-21 Disk Enclosure Properties Screen
The information to be displayed varies depending on the selected component.
(In the above screen sample, the EC Junction Box is selected.)
II-43
Chapter 3 Basic Functions
33..22
S
Sttaattee M
Mo
on
niitto
orriin
ng
g
The state monitoring function monitors the generation of the following events in the disk array which is an object of
iSM.
<Event>
• Generation of status transition in the components
• Existence of change of a disk array name, a logical disk name and a port name
• Generation of configuration change
• Occurrence of a threshold excess of the quantity used of snapshot
iSM supports the polling mode to acquire the monitoring information in the fixed interval. When the above event is
detected, iSM not only reflects the detected event on the configuration control screen of an iSM client but also outputs
the message to various logs (event log, operation log). Besides, it can perform link processing such as maintenance, as
started by the event detection. For log output and link function, refer to sections 3.5 “Log Output” and 3.6 “Event
Link” in this manual.
Operation administrator
Displays the occurrence
of a failure.
Configuration
display screens
Storage Manager
Logical disks
Polling/Trap
Physical disk
Occurrence of failure
Controller (DAC)
Disk enclosure (DE)
Disk array
Figure 3-22 Operation Image
II-44
Chapter 3 Basic Functions
33..22..11 FFuunnccttiioonn O
Ouuttlliinnee
(1) Monitoring Events
Status monitoring function provides a function which monitors generation / transition of event indicated in Table
3-11 for the components of disk array which is an object of control.
Section
Component
Table 3-11 Monitoring Event List
Element
Physical Disk
Controller
(Disk)
Enclosure
ready
info
Info(inactive)
info
fault
error
attn.(rebuilding)
notice
attn.(powering up)
notice
attn.(formatting)
notice
error
HD/RD/DD
CHE/SVP
PS/BBU, etc
ready
info
fault
error
offline
error
ADP/PS
FAN/BB
TEMP_ALM, etc
ready
info
fault
error
offline
error
ready
info
ready(formatting)
info
fault
error
fault(media error)
error
attn.(reduce)
error
attn.(rebuilding)
notice
Logical Disk
Control Path
Pool
Configuration
Change
Level
offline
Status
Transition
Name Change
Event
attn.(preventive copy)
notice
attn.(copy back)
notice
attn.(unformatted)
notice
attn.(formatting)
notice
attn.(format-fail)
notice
attn.(expanding)
notice
attn.(expand-fail)
notice
stop(control path fail)
error
ready
info
fault
error
attn.(reduce)
error
attn.(rebuilding)
notice
attn.(preventive copy)
notice
attn.(copy back)
notice
Disk Array
Disk Array Name
renamed
info
Controller
Port Name
renamed
info
Logical Disk
Logical Disk Name
renamed
info
Logical Disk
config changed
notice
Logical Disk
Cache Disk
config changed
notice
Physical Disk
Physical Disk
config changed
notice
Controller
Access Control
config changed
notice
II-45
Chapter 3 Basic Functions
33..22..22 D
Deessccrriippttiioonn ooff S
Sccrreeeenn aanndd O
Oppeerraattiioonn
This section describes the instructions of status monitoring information display image and monitoring control operation
in the iSM client.
(1) Monitoring information display
Information monitored by the iSM server is displayed as “Message Output” and “Status Value Reflection” via
iSM client.
(a)
Message Output
When the status transition, name change, or configuration change is detected, messages corresponding to
such events are output in the message display area.
Example of message output at fault detection
Sat Jan 6 02:08:44 2001 0000017917 Info
iSMrmond
iSM07102:State of PD(28h) has become fault. (Storage4100/07 ProductID=S4100 Disk Array
SN=3000000000000002 No=00h-01h RankNo=00h-00h) ... (i)
(i) indicates that a fault occurred in the physical disk (with a resource type of 28h, product ID of S4100 Disk
Array, serial number of 3000000000000002, number of 00h-01h, and Rank number of 00h-00h) of the disk
array (whose disk array name is “Storage4100/07”).
Example of message output at name change
Sat Jan 6 02:08:44 2001 0000017917 Info
iSMrmond
iSM07201:Disk Array, named
Storage4100/07, has renamed to Storage4100/dwh1 (SN=3000000000000003 )
The message indicates that the disk array (whose name is “Storage4100/07” and serial number is
“3000000000000003”) has been renamed “Storage4100/dwh1”.
For details, refer to the “Messages Handbook”.
(b)
State Value Reflection
Due to the detection of status transition, name change, or configuration change, respective status of changed
elements is shown in the configuration display area on iSM client.
When events such as fault, caution, and offline occur in each component, status value of the object element
for individual element layer is changed and the corresponding icons are also changed. Status of element
layer or disk array layer change depends on the status change of individual element layer. For example, if
attention event occurs in PD, PD of the upper element layer and disk array layer change to normal status
(maintenance). (Table 3-12)
Furthermore, when two types of event at different fault level simultaneously occur in the individual element
layer, an event with higher fault level is always reflected on the upper layer.
For contents of display, refer to 3.1 “Configuration Display” in this manual.
II-46
Chapter 3 Basic Functions
Table 3-12 Fault Status Reflection
Disk Array Layer
Component Layer
Individual Component Layer
Pool
Serious Fault
Fault
LD
PD
or
Controller
or
Enclosure
or
Ready
(Maintenance)
or
or
Fault
Pool
Ready
(Maintenance)
LD
or
or
or
PD
Attention/Offline/I
nfo
Controller
or
Enclosure
or
Pool
LD
Ready
*
1.
PD
Ready
etc.
Controller
etc.
Enclosure
Ready
Pool-related information is displayed if the disk array to be monitored is a disk array with pool.
Displaying of the icon,
, in the ready (maintenance) status can be selected by environment setting for the
iSM client. Select [File] → [Environment Settings] from the Menu and check [Display Maintenance State]
from Environment Setting Dialog.
2.
If the states of the disk array layer and the component layer (pool) are Ready or Ready (Maintenance) at the
occurrence of threshold excess, the threshold excess icon
is displayed. If, however, [Display Maintenance
State] is checked, an icon indicating the resource state is given precedence and displayed.
3.
Shape or color tone of the disk array icon varies depending on the type of disk array and the monitoring state.
For further detailed information on the disk array icon, refer to 3.1.3 “Disk Array Information Display” in this
manual.
II-47
Chapter 3 Basic Functions
(2) Monitoring Start/Stop
In the iSM server, monitoring is automatically carried out for the disk array specified by the Environment
Definition File (iSMsvr.conf) when the server starts-up. When you wish to temporarily stop/resume monitoring
for the specific disk array due to maintenance or configuration changes, the following operation should be
executed. In order to utilize this function, user level should be L3.
(i)
Select [Operation]→[Start/Stop Monitoring] from the Menu to display monitoring control dialog.
(ii)
From [Disk Array Subsystem Name] on Monitoring Control Dialog, select (click) a disk array that you wish
to start or stop monitoring.
If you wish to monitor the disk array:
Click [Start] button.
If you wish to stop monitoring:
Click [Stop] button.
If you wish to stop monitoring start process during preparation of monitoring, or wish to stop recovery
process during waiting for monitoring recovery:
Click [Break] button.
Figure 3-23 Monitoring Control Dialog
II-48
Chapter 3 Basic Functions
33..33
N
Niicckkn
naam
mee S
Seettttiin
ng
g
Nickname setting function is used via iSM client to set disk array name, logical disk name (and disk OS Type), and
port name for the disk array which is the object of iSM monitoring. By setting these names so that they match to the
identification information of the individual daily work processing systems that use the disk arrays, efficient control of
the disk array can be achieved. Once information is set, it can be acquired regardless of iSM rebooting because the
preset name is recorded inside the disk array.
Accounting/ARRAY1/MS00
Operation administrator
Storage Manager
Accounting/ARRAY1/MS01
Configuration display screen
Accounting
operation
Logical disks
SAN
Accounting
MS00 MS01 MS02 MS03
Port
MS04 MS05 MS06 MS07
ARRAY2
ARRAY1
Disk array
Figure 3-24 Operation Image
33..33..11 FFuunnccttiioonn O
Ouuttlliinnee
Nickname Setting Function is a function which sets an optional identification name (disk array name) for the object
disk array of iSM monitoring, an arbitrary identification name (logical disk name + OS type) for the logical disk bound
inside the disk array, and an arbitrary identification name (port name) for the port. In order to set the identification
name, user level must be L3.
[Setting Items]
• Disk Array Name
• Logical Disk Name (+ OS type)
• Port Name
II-49
Chapter 3 Basic Functions
33..33..22 D
Deessccrriippttiioonn ooff S
Sccrreeeenn aanndd O
Oppeerraattiioonn
This section explains the image of set information in the iSM client and the operation for setting information.
(1) Disk Array Name Setting
Disk array name can be set with the following procedure.
(i)
Select (left-click on) the disk array (for which you want to set a name) in the configuration information display
area (or the information list display area), right-click on it, and select [Settings] (or [Operation] on the menu bar
→ [Disk Array Subsystem Name Settings]). The Disk Array Subsystem Name /Port Name Setting dialog box
(Figure 3-25) appears.
Figure 3-25 Disk Array Subsystem Name/Port Name Setting Dialog
(ii)
Input the disk array name in the [New Disk Array Subsystem Name] edit box, following the rule indicated in (2)
“Disk Array Setting Condition and Naming Rule”, and click [Apply] button.
(iii) As an execution result of the setting, the following information is displayed in the dialog.
Table 3-13 Execution Result Dialog
Message
State
“Setting has been completed”
Execution result is normal.
“Setting information is incorrect”
Parameter Error
“Same name exits”
Same name exits.
“Access error occurred to Disk Array Subsystem”
Access error occurred.
“Cannot execute the demand during the suspension of
the object Disk Array Subsystem monitoring”
Setting is unavailable due to monitoring stop.
“Cannot execute the demand during the configuration
setting”
Setting is unavailable due to under configuration
setting.
“Demanded process has already been executed”
Already executed
“Setting Failed (nn)”
Other errors (nn is a decimal detail code.)
II-50
Chapter 3 Basic Functions
* Other Errors *
When “Setting Failed (nn)” is displayed for setting process of disk array name, it is considered that the errors
are detected after completion of I/O for disk array. Check by the browser whether the disk array setting has
been executed, and set again if necessary.
(2) Disk Array Setting Condition and Naming Rule
(a)
Setting Condition
Disk array name should be set under the following conditions. (Settings other than the followings are treated as
parameter errors.)
• 1-byte alphanumeric characters including uppercase and lowercase characters. (When configuring a name with
plural information, “/”or “_” can be input)
• Maximum number of characters: 32.
(b)
Naming Rule
A disk array used from the ACOS-4 system must have its name identified by the ACOS host, especially when
DynamicDataReplication or RemoteDataReplication are used. Therefore, to determine the disk array where the
object logical disk exists, an identification name for the disk array should be set. Make a disk array name in
combination of alphanumeric characters including uppercase characters and “_” (under bar), within 32 bytes.
Definition Example: CABINET01,CABINET02
In addition, when operating a disk array through other systems, it is recommended to set a disk array name that
matches with identification information from the system, along with logical disk name and port name.
In addition, when disk array name is not set, “16 characters peculiar to a disk array” is set as default value at the
time of shipment.
(3) OS type/logical disk name setting
OS type/logical disk name is set using the following procedure.
(a)
Select (left-click on) the logical disk (for which you want to set an OS type and name) in the configuration
information display area (or the information list display area), right-click on it, and select [Settings] (or
[Operation] on the menu bar → [Logical Disk Name Settings]). The Setup of Logical Disk OS Type/Name
dialog box (Figure 3-26) appears.
Figure 3-26 Setup of Logical Disk OS Type/Name Dialog
II-51
Chapter 3 Basic Functions
(b)
In [New OS Type] or [New Name] Edit Box, input a logical disk name following the rules defined in (4) “OS
Type/Logical Disk Name Setting Conditions and Naming Rules” and click [OK] button.
(c)
As a result of the setting, the following information is displayed in the dialog.
Table 3-14 Execution Result Dialog
Message
State
“Setting has been completed”
Execution result is normal.
“Setting information (OS Type/Name) is incorrect”
Parameter Error
“Same name exits”
Same name exits.
“Error occurred in the access to the Disk Array
Subsystem”
Access error occurred.
“As for Logical Disk with replication setting, OS Type
cannot be changed”
OS Type of logical disk whose replication pair is set
is changed.
“Cannot execute the demand during the suspension of the
object Disk Array Subsystem monitoring”
Setting is unavailable due to monitoring stop.
“Cannot execute the demand during the configuration
setting”
Setting is unavailable due to under configuration
setting.
“Demanded process has already been executed”
Already executed
“Failed in setting (nn)”
Other errors (nn is a decimal detail code.)
* Other Errors *
When “Setting Failed (nnh)” is displayed for setting process of logical disk name, it is considered that the errors
are detected after completion of I/O for disk array. Check by the browser whether the disk array setting has been
executed, and set again if necessary.
(4) OS Type/Logical Disk Name Setting Conditions and Naming Rules
(a)
OS Type setting conditions
Select an OS Type from the Table 3-15 below according to a system to operate a logical disk.
Especially, you must set a correct OS type when using DynamicDataReplication or RemoteDataReplication in
the following systems:
• Logical volume used in ACOS-4 system
• Logical volume used in ACOS-2 system
• Logical volume used in Windows system
OS Type
Table 3-15 OS Type List
Description
A2
Logical disk operated by the ACOS-2 system
A4
Logical disk operated by the ACOS-4 system
(For instructions on setting this type, contact the maintenance
engineer.)
AX
Logical disk operated by the AIX system
CX
Logical disk operated by the Solaris system
LX
Logical disk operated by the Linux system
NX
Logical disk operated by the HP-UX system
WN
Logical disk operated by the Windows system
For instructions on setting the ACOS-4 type, also refer to Appendix in the “Configuration Setting Tool User’s
Manual (GUI)”.
II-52
Chapter 3 Basic Functions
If the logical disk to be set is a snapshot related volume (of which snapshot type is BV, SV, LV, SV*, or SDV), the
OS type cannot be changed.
The [New OS Type] edit box is grayed.
(b)
Setting Conditions
A logical disk name should be set according to the conditions below. (Settings other than those listed below are
processed as parameter errors.)
• 1-byte alphanumeric characters including upper- and lowercase characters. (When configuring a name with
plural information, “/”or “_” can be input)
• Maximum number of characters: 24
(c)
Naming Rules
A logical disk used by the ACOS-4 system must have its logical disk name that can be identified by the ACOS
host, especially when DynamicDataReplication or RemoteDataReplication are used. Therefore a logical name
should be set according to the rules below.
Logical disk name = [/system name/] + device identification name
System name:
Generic system name. An identifier is composed of the combination of
uppercase alphanumeric characters and “_” (under bar) within 18 bytes.
It may be omitted.
Device Identifier: Name of device defined in ACOS-4 system
Example of definition: MS01,/SYSTEM01/MS01
Moreover, when operating a logical disk by other systems, it is recommended to set a logical disk name that
matches with identification information of the system, along with disk array name and port name.
In addition, when OS type and logical disk name are not set, blank for the OS Type, “the 16 characters peculiar to
disk array + 4 characters of logical disk number” for the logical disk name are set as default value at the time of
shipment.
(5) Port name setting
Port name should be set according to the procedures below.
(i)
Select (left-click on) the disk array system having the port (for which you want to set a name) in the
configuration information display area (or the information list display area), right-click on it, and select [Settings]
(or [Operation] on the menu bar → [Disk Array Subsystem Name Settings]). The Disk Array Subsystem Name/
Port Name Setting dialog box (Figure 3-25) appears.
(ii)
Select a port number (port name) from the [Port Number] list and input port name in the [New Port Name] edit
box, following the rules defined in (6) “Port Name Setting Conditions and Naming Rules” and click [Apply]
button.
II-53
Chapter 3 Basic Functions
(iii) As a result of the setting, the following information is displayed in the dialog.
Table 3-16 Execution Result Dialog
Message
State
“Setting has been completed”
Execution result is in normal
“Setting information is incorrect”
Parameter Error
“Same name exists”
Same name exists
“Error occurred in the access to the Disk Array
Subsystem”
Access error occurred.
“Cannot execute the demand during the suspension
of the object Disk Array Subsystem monitoring”
Setting is unavailable due to monitoring stop
“Cannot execute the demand during configuration
setting”
Setting is unavailable due to under
configuration setting
“Demanded process has already been executed”
Already executed.
“Setting failed (nn)”
Other errors (nn is a decimal Detail Code.)
*Other Errors*
When “Setting Failed (nnh)” is displayed for setting process of logical disk name, it is considered that
the errors are detected after completion of I/O for disk array. Check by the browser whether the disk
array setting has been executed, and set again if necessary.
(6) Port Name Setting Conditions and Naming Rules
(a)
Setting conditions
Port name should be set with the following conditions. (Settings other than those listed below are processed as
parameter error.)
• 1-byte alphanumeric characters including upper- and lowercase characters. (When configure a name with plural
information, “/”or “_” can be input)
• Maximum number of characters: 32
(b)
Naming rules
As well as the disk array name and the logical disk name, it is recommended to set a port name that matches with
the identification information for the system being operated.
In addition, when port name is not set, “16 characters peculiar to disk array + 2 characters of director number + 2
characters of port number” for the port name is set as default value at the time of shipment.
You can set a name to a port only for a host. In the [Disk Array Subsystem Name/Port Name Setting] dialog box,
only the number of the port for a host is displayed.
II-54
Chapter 3 Basic Functions
33..44
F
Faau
ulltt M
Mo
on
niitto
orriin
ng
g
All messages of iSM are outputted on the message display area of client screen during the client connection. These are
the fault monitoring functions for each client disk array.
This fault monitoring function is described below.
33..44..11 D
Deessccrriippttiioonn ooff tthhee FFuunnccttiioonn
The fault monitoring functions of iSM are the following.
(1)
It outputs all messages which are connected in the message display area of the iSM client.
(2)
It saves display message in the text file of PC on which the iSM client is installed. (log collection)
(3)
The user notification function according to the message level.
33..44..22 O
Oppeerraattiioonn O
Ouuttlliinnee
The same contents with operation log are displayed in the message display area by the fault monitoring function. The
display shows clearly the importance of the messages by adding an icon of each message level at the start of the
message. The message which has already been displayed once also extracts to individual log file on the PC side.
Whatever display status iSM client may be on screen according to the message level, it has function for noticing the
fault occurrence to the user.
(1) Output to the message display area
The same operation log that is extracted on the iSM server side is displayed in the message display area.
However, it displays only what is outputted during iSM client connection.
The message which shows connection/disconnection between iSM client and server is also displayed as an
individual message. After determining the message level, add the proper icon (
(Err) /
(Warning) /
(Notice, Info)) at the start of line.
(2) Log collection
The message which is displayed in the message display area is outputted in the individual log file on the PC side.
Up to 1MB data can be stored in one log file. If it exceeds 1MB, it is renamed to an iSM old file and a new iSM
log file is created. Because two files, OLDiSM.log and iSM.log are used one after the other, a maximum of 2MB
file can be saved and more capacity is not needed.
(3) User notification function
Because the iSM client is not always displayed in the foreground, there is a function which notifies faults to the
user at each message level.
When the message level is
to
(Err) /
(Warning), the task tray blinks and the notification button changes from
.
The notification, the notification is stopped by pushing down the notification button
notification button returns from
to
.
II-55
or menu. Then the
Chapter 3 Basic Functions
33..55
L
Lo
og
gO
Ou
uttp
pu
utt
A message of iSM is output to operation log and event log. The details of a log output are explained below.
33..55..11 D
Deessccrriippttiioonn ooff FFuunnccttiioonn
Log output function of iSM is as follows.
(1)
Outputs messages to operation log.
(2)
Outputs important messages to event log.
(3)
Changes the output file when the size of an operation log exceeds the maximum.
33..55..22 O
Ouuttlliinnee ooff O
Oppeerraattiioonn
Operation log is composed of an outputting log file, its generation file (backup file) and a generation management file
saving the management information of generation file. An operation log is created on the log file saving directory
(installation directory\etc\log). A generation file has a structure that holds backup of a log file one by one and it is
created to a maximum of 99 files. However, if the number of generation files exceeds the maximum, the oldest file will
be overwritten.
These file changes and name changes are performed automatically, and the user does not need to pay attention.
Example: When 17 generation files have been created by the operation log.
Currently editing
(i) Name of the generation file being
updated
(ii) Name of the latest generation
iSM_Log.log
New
Generation files
17
iSM_Log17.log
16
Name of the oldest generation file
iSM_Log01.log
01
(iii) Name of the generation
management file
iSM_Log.cnt
Generation management file
17
Old
II-56
Chapter 3 Basic Functions
(1) Log file
One message output by iSM server is saved as one record into the outputting log file. When the log file exceeds
the specified size, it is initialized after copying to a generation file.
File size:
1 to 10 (MB)
Default is 1MB; can be specified by environment setting.
File name: “iSM_Log” + .log
(2) Generation file
A generation file is a backup file of the log file, and is created with maximum of 99 files. The generation file
shows the backed up order by the generation number in its file name, and the larger the number is, the newer the
file is. However, the file with the largest number is not necessarily the newest one because overwriting is made
from the file of the generation number 1 and subsequent files when the number of created files exceeds the
maximum. To identify the newest file correctly, refer to (3) “Generation management file”.
File name: “iSM_Log” + nn + .log
Generation number: 01 to 99
(3) Generation management file
A generation management file is a file that shows the latest information on the generation file numbers, and saves
the information with 2-digit generation number (2 bytes). When the generation number of generation
management file is 99, the next generation number will be assigned to 01. When a generation management file
does not exist right after the installation of iSM, or a number other than 01 to 99 is accidentally specified, the
following processing should be done.
(i)
Set the generation number to “01” for the next file to be processed.
(ii)
After backing up the information to a generation file, re-create the generation management file
File name:
“iSM_Log” + .cnt
Example 1: File change processing when generation files are not created up to 99
[Before file change processing]
Generation management file
03
03
[After file change processing]
Log file being output
May15152121
Thu
……
ThuMay
Generation management file
04
[ EOF ]
04
:
02
Log file being output
Log file is initialized
Thu May 15 45 …
03
02
01
01
Generation files
II-57
Newly
created
Generation files
Chapter 3 Basic Functions
Example 2: File change processing when generation files are created up to 99
[Before file change processing]
Generation management file
16
99
17
[After file change processing]
Log file being output
Generation management file
17
Thu May 15 21 …
Log file being output
[ EOF ]
99
Log file is initialized
Thu May 15 45 …
17
01
01
Updated
Generation files
Generation files
Example 3: File change processing when a generation management file does not exist (including default setting)
[Before file change processing]
Generation management file
[After file change processing]
Log file being output
Thu May 15 21 …
Generation management file
01
01
Log file being output
[ EOF ]
Log file is initialized
Thu May 15 45 …
Newly created
II-58
Chapter 3 Basic Functions
33..55..33 R
Reeccoorrdd FFoorrm
maatt
33..55..33..11 O
Oppeerraattiioonn LLoogg
(1) Record format of operation log
0
24
25
35
36
43
44
54
55
58
63
64
Generating
time
Blank
Process
ID
Blank
Message
Classification
Blank
Process
name
Blank
“iSM”
Message
number
“:”
ch(24)
ch(1)
ch(10)
ch(1)
ch(7)
ch(1)
ch(10)
ch(1)
ch(3)
ch(5)
ch(1)
Text
ch(n)
Size
24
n ≤ 501
Table 3-17 Record Format (Operation Log)
Contents
Contents Details
Data Type
char
Generation time
1
char
Blank (space)
10
char
Process ID
1
char
Blank (space)
7
char
Message Classification
1
char
Blank (space)
10
char
Process name
1
char
Blank (space)
3
char
“iSM”
5
char
Message number
1
char
“:”
char
Text
Date, time and year
Data format: Time format obtained from ctime( )
Process number of message output origin
Message Classification
LOG_ERR ........ “Err “
LOG_WARNING .... “Warning”
LOG_NOTICE ...... “Notice “
LOG_INFO . ....... “Info “
Process name of message output origin
Message serial number
Variable length: a maximum of 501 bytes of character
string (terminated by \n)
II-59
Chapter 3 Basic Functions
(2) Output image to operation log
(Log File)
Thu May 15 17:30:29 2000 0000003258 Info
Thu May 15 17:30:29 2000 0000016305 Info
iSMlogd
iSMlogd
iSM00000: This is example msg
iSM04030 : Last message repeated 2 times
When the same message is continuously outputted for 3 times or more, a summarized record that shows the first
message and number of times the message is outputted. When the same message is continuously outputted over
the fixed time range (for 2 minutes and 30 seconds), a message outputted within the fixed time range and a
message after the fixed time range are treated as different messages.
For the event link function, only the original message is sent as is not being processed by this procedure.
Example: When the same message is received every 15 seconds for 3 minutes 15 seconds (14 times in total).
[Received Message]
Thu May 15 17:00:00 ……This is example msg.
Thu May 15 17:00:15 ……This is example msg.
Thu May 15 17:00:30…… This is example msg.
Thu May 15 17:00:45 ……This is example msg.
Thu May 15 17:01:00 ……This is example msg.
Thu May 15 17:01:15 ……This is example msg.
Thu May 15 17:01:30 ……This is example msg.
Thu May 15 17:01:45 ……This is example msg.
Thu May 15 17:02:00 ……This is example msg.
Thu May 15 17:02:15 ……This is example msg.
Thu May 15 17:02:30 ……This is example msg.
Thu May 15 17:02:45 ……This is example msg.
Thu May 15 17:03:00 ……This is example msg.
Thu May 15 17:03:15 ……This is example msg.
*
2 ‘ 30” interval
[Operation Log]
Thu May 15 17:00:00 ……
This is example msg. ·····*
Thu May 15 17:00:40 ……
Thu May 15 17:00:45 ……
Last msg repeated 2 times
This is example msg.
Thu May 15 17:03:10 ……
Thu May 15 17:03:15 ……
Last msg repeated 9 times.
This is example msg
Received messages may be outputted repeatedly for 2 minutes and 30 seconds for the first time since the
timer is not based on the receiving time of the message.
II-60
Chapter 3 Basic Functions
33..55..33..22 E
Evveenntt LLoogg
(1) Record format of event log: Format 1
Event
Classification
Generating
time
Blank
“iSM : “
Process ID
Blank
Message
Classification
Blank
Process
name
ch(m)
ch(15)
ch(1)
ch(6)
ch(10)
ch(1)
ch(7)
ch(1)
ch(10)
Blank
“iSM”
Message
number
“:”
Text
ch(1)
ch(3)
ch(5)
ch(1)
ch(n)
Size
Table 3-18 Record Format (Event Log)
Content
Content Details
Data Model
m=11
or m=13
or m=17
char
Event Classification
Classification of Event
Error
...... “error: <11>“
Warning ...... “warning: <12>“
Information ...... “information: <14>“
15
char
Generating time
Date and time
(Example) Jun 20 11:30:17
1
char
Blank (space)
6
char
“iSM : “
“iSM∆:∆“
10
char
Process ID
Process number of message output origin
1
char
Blank (space)
7
char
Message Classification
1
char
Blank (space)
10
char
Process name
1
char
Blank (space)
(∆: blank)
Classification of Message
Error ....... “Err “
Warning ........ “Warning”
Information........ “Notice “
Information........ “Info “
Process name of message output origin
3
char
“iSM”
5
char
Message number
1
char
“:”
n ≤ 500
char
Text
Message serial number
Variable length :a maximum of 500 bytes of
character string
(2) Output image of event log
Important messages of iSM server are output to event log.
error: <11>Jan 03 11:29:52 iSM : 0000001048 Err iSMmaind iSM00000:This is example msg
warning: <12>Jan 03 11:29:46 iSM : 0000001048 Warning iSMmaind iSM00000:This is example msg
information: <14>Jan 03 11:29:47 iSM : 0000001048 Notice iSMmaind iSM00000:This is example msg
II-61
Chapter 3 Basic Functions
33..66 E
Evveen
ntt L
Liin
nkk
Event link function is one of the iSM functions. With this function, mails that report events, or execution files or batch
files are started up on the monitoring server, according to the specified definitions, based on messages informed by iSM.
33..66..11 D
Deessccrriippttiioonn ooff tthhee FFuunnccttiioonn
The event link function of iSM is as follows.
(1)
The mail address of a destination can be specified for each message level, so that mail notification can be made
to any mail address.
(2)
Execution or batch files can be specified for each message level, so that link processing is possible.
(3)
Definitions can be changed dynamically on the Setting Utility screen, without the need to restart the iSM server.
(For details, refer to 1.3 “Environment Setting”.)
Operation administrator
Operation administrator
on remote site
Storage Manager
Program start
Remote site
Local site
Trouble
occurred
Report can be
sent anywhere.
Original report
processing can be
set.
Disk
array
Figure 3-21 Event
Link
Figure 3-27 Event Link
33..66..22 O
Ouuttlliinnee ooff lliinnkk ddeeffiinniittiioonn aanndd pprroocceessssiinngg
When a message is generated, a certain action is started as a link operation. To define this, please refer to 1.3
“Environment Setting”.
II-62
Chapter 3 Basic Functions
33..66..33 O
Ouuttlliinnee ooff O
Oppeerraattiioonn
If the definition for the message level of a message that has arrived is registered with environment settings, the defined
actions are executed. As actions for message levels, starting a batch file or program take precedence over mail
transmission. If, during the execution of an action, the next message is received, the actions for the next message will
be executed after the actions to be executed for the message currently being handled are completed.
In batch file or program starting, full path of the temporary file that stored the message body (installation folder
\etc\msgdrv\nnnn.txt) is sent as the first parameter. For batch file, program, or programs that are started up by these
files, read the temporary file if necessary and receive the message.
For mails, mail header files are sent as mails to the defined SMTP server.
If the sending of mails to the SMTP server does not end within 30 seconds, the sending is interrupted due to a time-out
error. Timeout, SMTP error and starting failure of execution files or batch files are notified via message so that they
can be checked on the operation log.
Because multiple link operations cannot be performed at the same time, up to 30 messages generated during a link
operation will be stored in a buffer. If more messages are generated, the excess messages will be discarded.
A loop may be formed if an error event with the event link function arrives at the event link function again and,
therefore, the messages output by the event link function itself will not be subject to linking.
In addition, when starting a batch file through the event link function, “Administrator” must be set to the account of
“Storage Manager”.
33..66..44 S
Sppeecciiffiiccaattiioonn ooff D
Deeffiinniittiioonn FFiillee
(1) Header File
The header file is the form of the actual mail to transmit, and mainly describes the header part of the mail. Input
“FROM:” on the first line, and write the mail sender’s name. If mail transmission fails in SMTP server due to
wrong target mail address, etc., an error message from SMTP server may send to a sender’s mail address. The
contents of the mail text after the second line are sent as it is, the part above the blank line is the header, and
subsequent part is the body of the mail. A message including “$MSG” in body is converted into a message that is
output to an operation log triggered by “$MSG” for linkage.
FROM: [email protected]
Describe sender’s mail address.
SUBJECT: iSMserver error report.
Header
← blank line
This is the iSMserver at XXXX(domain name etc.)
Body
Error Reporting.
$MSG → A message output to operation log that triggered object linkage is described in this line.
II-63
Chapter 3 Basic Functions
1.
Mail address to input on the “FROM:” line must be a complete one that includes domain name.
2.
Various header lines in accordance with RFC822 can be written in the header part.
3.
Any contents can be described in the body part.
4.
The size of the whole header file must be less than 1KB. Also, one line must be less than 256 bytes (including
blank / tab / carriage return).
5.
When a part of “$MSG” of a certain line is replaced into the message content, the “$MSG” which appears first
can be replaced. So even if two or more “$MSG”s are described in one line, only the first “$MSG” is
replaced. However, if the “$MSG”s are described in each line, they are replaced by the same contents.
33..66..55 D
Deeffiinniittiioonn E
Exxaam
mppllee
Header file (Installation directory \conf\iSMsvr\mail.header )
FROM: [email protected]
← Temporary sender address (any address can be specified)
SUBJECT: iSMserver error report.
← Title (any)
← blank line
This is the iSMserver at iSMsystem.xxx.co.jp. ← Mail text (any)
Error Reporting.
← Mail text (Number of lines is not restricted, however, must be 1KB or less
on the whole)
$MSG
← The actual contents of the message are inserted in this line, and are
transmitted as mail.
If you get this mail, please be careful.
← Mail text.
II-64
Chapter 3 Basic Functions
33..77 E
ES
SM
MP
PR
RO
OL
Liin
nkk
iSM has a function for linking with ESMPRO as described below. ESMPRO Agent needs to be installed in advance to
a server where iSM operates.
33..77..11 O
Ovveerrvviieew
w ooff tthhee FFuunnccttiioonn
The ESMPRO link functions of iSM are as follows:
(1)
Alert report to ESMPRO Manager
(2)
Call of the iSM client function from ESMPRO Manager
(3)
Fault report to the maintenance engineer at a disk array fault (Note)
(4)
Report of an iSM message on ESMPRO Manager using ESMPRO Alert Manager
If a modem is connected and fault report is made through the modem, fault report by ESMPRO link cannot be made.
33..77..22 R
Reellaattiioonnsshhiipp w
wiitthh E
ES
SM
MP
PR
RO
OM
Maannaaggeerr
When an iSM server has been installed, reports to ESMPRO Manager are defined automatically if ESMPRO Agent is
installed in advance to the server to run. Likewise, when an iSM client is installed, the iSM client is registered
automatically to the operation window as an operation monitoring tool if ESMPRO Manager is installed in advance.
This enables ESMPRO to perform integrated monitoring including business servers and storage.
(1) Alert report to ESMPRO Manager
When an iSM server is installed on the server machine where ESMPRO Agent has been installed, the ESMPRO
report function is set to allow reporting a disk array fault or iSM fault to ESMPRO Manager.
II-65
Chapter 3 Basic Functions
Figure 3-28 Alert Report Screen
(2) Call of the client functions of iSM from ESMPRO Manager
When an iSM client is installed on the machine where ESMPRO Manager has been installed, an iSM client is
registered to the ESMPRO operation window as an operation monitoring tool. This enables ESMPRO to perform
integrated monitoring including business servers and storage.
Figure 3-29 Start Menu of the Registered iSM Client
II-66
Chapter 3 Basic Functions
33..77..33 D
Diisskk A
Arrrraayy FFaauulltt R
Reeppoorrtt
ESMPRO Agent must be installed in advance on the server where iSM server runs when maintenance contract for a
disk array is made.
If a fault occurs in the disk array monitored by iSM, the fault report function that is one of the ESMPRO Agent
functions can be used through event logs on a server machine.
The fault report function enables you to report a fault to maintenance engineer directly and get maintenance service.
33..77..44 LLiinnkk bbeettw
weeeenn E
ES
SM
MP
PR
RO
OM
Maannaaggeerr aanndd
E
ES
SM
MP
PR
RO
OA
Alleerrtt M
Maannaaggeerr
The Alert Type Link setting tool can operate in isolation in a personal computer in which iSM is not installed. Also,
this tool can be set to link ESMPRO Manager with ESMPRO Alert Manager to make various reports.
This tool can operate in the environment where ESMPRO Manager has been installed. You can set the tool when you
install an iSM server or iSM client, or you can start the tool in isolation and make settings.
(1) Setting at installation
When an iSM server or iSM client is installed to a server machine or a personal computer, the following screen
telling ESMPRO Manager has been installed appears. If ESMPRO Manager is not installed to the designated
environment, the following screen does not appear.
Figure 3-30 Confirmation Screen of Alert Type Link
To set the tool to report a message, reported from iSM to ESMPRO Manager, using ESMPRO Alert Manager,
click [Yes] and proceed installation.
(2) Setting by the Alert Type Link setting tool
If you start and set the Alert Type Link setting tool in isolation, follow the following procedure for setting.
(i)
Log on as the Administrator.
(ii)
Start Explorer and select the folder in which an iSM server or iSM client is installed or select the following
program in the CD-ROM.
<When started from the folder in which an iSM server is installed (default)>
[installed-folder]\sbin\iSMalset.exe
<When started from the folder in which an iSM client is installed (default)>
[installed-folder]\iSMalset.exe
<When started from the CD-ROM>
CD-ROM drive: \ALSET\WINDOWS\ISMALSET.EXE
II-67
Chapter 3 Basic Functions
(iii) When the following screen appears, click [Set].
Figure 3-31 Alert Type Link Setting Tool Screen-1
If the tool has already been set to make a report by ESMPRO Alert Manager, the following screen appears.
Click [Cancel] to close the screen.
Figure 3-32 Alert Type Link Setting Tool Screen-2
If the Alert Type Link setting tool is started in the environment where ESMPRO Manager is not installed,
the following screen appears. First of all install ESMPRO Manager, then start the tool, and make settings.
Figure 3-33 Execution Result of Alert Type Link Setting Tool
II-68
Chapter 4 Server Menu
Chapter 4 Server Menu
The Server Menu is a menu for calling environment setting and operation change of the iSM server.
44..11 O
Op
peerraattiio
on
nM
Meetth
ho
od
d
The Server Menu is activated via the authority of a user in the Administrators group, by selecting the [Server Menu] in
the [Storage Manager Server] in the [Programs] ([All Programs] for Windows Server 2003) folder from the [Start]
button in the task bar.
When the menu is activated, a window appears where icons are arranged.
Figure 4-1 iSM Server Menu Icons Screen
To start each function, double-click on the corresponding icon.
• Setting Utility
Specifies the operating environment of a disk array or the like that is to be monitored by the iSM server.
• Change Performance Display Refresh Rate
Changes the frequency of updating the numeric value table or the time-series graph on the performance monitoring
screen.
• Performance Analysis Supporting Tool
Supports the analysis of statistical information accumulated by the iSM server.
• Difficulty Information Gather
Gathers analysis information when the iSM server fails.
II-69
Chapter 4 Server Menu
44..22
F
Fu
un
nccttiio
on
nss
This section explains the functions that can be performed through the iSM server menu.
44..22..11 E
Ennvviirroonnm
meenntt S
Seettttiinngg
Environment setting is made by calling the Storage Manager Setting Utility to define the operating environment of the
iSM server.
The user must make the following definitions by using the Storage Manager Setting Utility before executing the iSM
server:
• Disk array monitoring method
• Definition of user name, password and user level to log in from the iSM client.
• Definition of cooperative function
• Other
For details of the Storage Manager Setting Utility, refer to 1.3 “Environment Setting”.
44..22..22 C
Chhaannggiinngg P
Peerrffoorrm
maannccee D
Diissppllaayy R
Reeffrreesshh
R
Raattee
The performance monitoring function as an optional function collects performance information on the disk array at a
predetermined interval, from one to six times per minute and reflects the resulting data on the Numeric Table or Graph.
The performance display refresh rate is defined in advance by the Storage Manager Setting Utility before the iSM
server is activated and can be changed dynamically via the performance display refresh rate change function while the
iSM server is operating.
For details on the changing of the performance display refresh rate, refer to 1.5.1 “Real-Time Display of Load Status”
of the “PerformanceMonitor User’s Manual”.
44..22..33 P
Peerrffoorrm
maannccee A
Annaallyyssiiss S
Suuppppoorrttiinngg TTooooll
To effectively utilize the disk array, it is important to regularly analyze the usage state and load balance of the disk
array and perform tuning including the optimum arrangement of files and expansion of devices. The iSM provides the
following performance analysis supporting tools aiming at support for performance analysis of the disk array:
(1) Archiver
The Archiver summarizes the statistic information of the disk array stored by the iSM on an hourly or daily basis.
Use of the Archiver reduces the statistic information volume thus saving the disk capacity necessary for
accumulating statistic information.
II-70
Chapter 4 Server Menu
(2) CSV Conversion Tool
The CSV Conversion Tool extracts statistic information from the statistic information history/summarized files of
iSM and turns it into character string data for output in the CSV format. Spreadsheet software, etc. is used to
display the contents of a CSV-format output file in a graph or to make various types of analysis later.
(3) Performance Report Editor
The Performance Report Editor edits and modifies the statistic information stored in statistic information
history/summarized files of iSM into a format that allows the user to readily make performance analysis, and
outputs the resulting information as a file. Editing the statistic information by using the Performance Report
Editor assures easy and proper performance analysis.
For how to use performance analysis support tools, refer to the following sections of the “PerformanceMonitor
User’s Manual”.
Archiver
- 3.3.3 “Summarizing Statistic Information”
CSV Conversion Tool
- 3.3.4 “Extracting Statistic Information”
Performance report Editor - 3.3.5 “Editing Statistic Information”
To perform efficient operation of the disk array, it is advantageous to grasp long-term load and analyze long-term
performance. The iSM cyclically reads the statistic information collected by the disk array and stores the
information obtained into a statistic information history file.
Performance analysis supporting tools support analysis of such statistic information via the following functions.
y Summarizing the statistic information history file into statistic information in a section that is longer than a
logging interval to create statistic information summarized file with compressed file capacity (Archiver).
y Outputting necessary statistic information from a statistic information history file or statistic information
summarized file in the CSV format to make available the resulting information to spreadsheet software, etc.
(CSV Conversion Tool)
For details of how to use Performance analysis support tools, refer to 3.3.3 “Summarizing Statistic Information”
and 3.3.4 “Extracting Statistic Information” in the “PerformanceMonitor User’s Manual”.
44..22..44 IInnffoorrm
maattiioonn G
Gaatthheerriinngg ffoorr S
Seerrvveerr FFaauulltt
If a possible cause of a fault is not known after the iSM server has abnormally terminated, it is necessary to analyze log
and trace information.
The function of information collection in the event of an iSM fault, collects log and trace information under the
iSMgather directory of the directory where the iSM server is installed (typically c:\Program
Files\NEC\iSMsvr\iSMgather).
For measures against a fault, refer to 6.1 “Measures for Server Fault”.
II-71
Chapter 4 Server Menu
This page is intentionally left blank.
II-72
Part III Operations
Chapter 5 Normal Operation
Chapter 5 Normal Operation
55..11 S
Seerrvveerr S
Sttaarrtt//S
Stto
op
p
Once the iSM server is installed, it starts/stops automatically when the system starts/stops.
To prevent the iSM server from automatically starting during reboot of the system, click [Start] → [Programs] ([All
Programs] for Windows Server 2003) → [Administrative Tools] → [Services], specify [NEC Storage Manager], and
switch the startup type from [Automatic] to [Manual].
55..11..11 S
Seerrvveerr S
Sttaarrtt
To start the iSM server, click [Start] → [Programs] ([All Programs] for Windows Server 2003) → [Administrative
Tools] → [Services], and specify [NEC Storage Manager].
If you make the start of the batch file etc., by event link function, pay attention to the execution account of the service
[NEC Storage Manager]. The execution account of executed batch file is regarded as the same account as the service
[NEC Storage Manager]. The installed setting account is set to operation system authority [Local System Account].
Because the account cannot be controlled by administrator or user of administrators group, you should modify it to
administrator from the service property. About the event link, refer to 3.6 “Event Link” in Part II “Functions”.
55..11..22 S
Seerrvveerr S
Sttoopp
If definition information is changed with environmental definition, you should reboot the iSM server.
To stop the iSM server in this case, click [Start] → [Programs] ([All Programs] for Windows Server 2003) →
[Administrative Tools] → [Services], and specify [NEC Storage Manager].
III-2
Chapter 5 Normal Operation
55..22
C
Clliieen
ntt S
Sttaarrtt//S
Stto
op
p
55..22..11 C
Clliieenntt S
Sttaarrtt
The iSM client is connected to the iSM server with TCP/IP communication and is the program which graphically
implements various functions on a PC.
(1) Starting the client
Select the [Start] menu → [Programs] ([All Programs] for Windows XP/Windows Server 2003) → [Storage
Manager Client] → [Storage Manager Client], and the iSM client starts and the main window appears. If multiple
connections are defined, a menu appears with nicknames added for the individual connections like [Storage
Manager Client <connection-name>]. Check the connections with their nickname, and start the iSM client.
Alternatively, the client can be started by double-clicking the shortcut icon on the desktop.
After starting the client, go on to (3) “Connection”. If starting the client for the first time since installation or if
adding a connection, go to (2) “Environment settings” and then (3) “Connection”.
(2) Environment settings
After installation according to the installer or if adding a connection, select [File] and [Environment Settings], and
the following setting screen is displayed.
Figure 5-1 Environment Setting (List, Selection) Screen
Select the connection for which to perform environment settings and click the [Edit] button, and the Environment
Setting screen, shown below, appears. To add a connection, click the [Add] button, to delete the settings of a
connection, select the connections whose settings are to be deleted and click the [Delete] button.
III-3
Chapter 5 Normal Operation
Figure 5-2 Environment Setting (Individual Setting) Screen
(i)
Connection Name
Enter the nickname for identifying a connection. (This item is mandatory if you specify multiple connections.)
The specified connection name is displayed in the title bar of each client screen. When you have started multiple
clients, you can determine which server the information on each screen is for from the connection name displayed
in its title bar.
Figure 5-3 Example of Display of Connection Name in Title Bar
III-4
Chapter 5 Normal Operation
For a connection name, you cannot use a blank and those characters that cannot be used for a file name (\/:,;*?”<>|).
If you enter a name containing an unusable character and click the [OK] button, an error dialog box is displayed;
enter a connection name again.
(ii)
IP Address or DNS Name of Server
Specify the IP address or DNS name of the iSM server (This item is mandatory).
(iii) Port Number of Server
In general, the port number does not need to be changed. Specify a port number only when the port is assigned
particularly in the iSM server setting.
(iv) Client Name
Specify the name for individually identifying the client (This item is mandatory).
An arbitrary name can be specified with alphanumeric characters as long as it is unique.
(v)
Port Number of Client
Display the port number that is used to transfer data between client screens.
Usually a default port number is used. If the number is used by another program already, it must be changed. If
multiple connections are defined, the client allocates default values from 8021 sequentially.
To change the port number, edit the iSMmain.ini file referenced by each client, as described below. iSMmain.ini
is stored in the folder displayed in [Folder Name] of [Connection Setting List]. If [Folder Name] displays the
“default” connection, the file is stored in the installation folder.
[CLIENT]
PORT=8021 ← Change this value into a port number that is not used currently.
1.
Numbers allowed for a port number are 1 to 65535. Specifying a disallowed number results in displaying an
error dialog and termination. You can click the [Browse] button only if [SHELL] is selected in Action Type.
2.
If the system has been activated, the specified value is used upon restarting.
3.
“iSMmain.ini” file contains various setting data. Do not edit other data than a client port number. Editing
other data may disable operations of the system.
(vi) Get Messages
Check to save the message, which is displayed on the client fault monitoring screen, as a text file on the PC.
(vii) Display Maintenance State
Check to switch the state of the upper structure to
the individual element layer. Normally, events (
(Notice) when an event other than normal events occurs in
(Warning) or
(Err)) in the individual element layer are
ignored in the upper structure because they do not affect operation. This option is selected when you want to
check them in detail. When an event (e.g. LD failure) which affects operation occurs in the individual element
layer, the upper structure fails (Err) regardless of this setting.
The setting information is saved when you click [OK] after the setting ends.
III-5
Chapter 5 Normal Operation
(viii) Display Snapshot-volume (SV)
[Display Snapshot-volume] sets whether to display snapshot-volume (SV) when Logical Disk List is displayed on
the main window, the Pool Property screen or the Physical Disk Property screen. The default value is Display.
This setting is enabled after the client is restarted. This setting is not available for the unit without the snapshot
(DynamicSnapVolume) function.
(ix)
Display Link-volume (LV)
[Display Link-volume] sets whether to display link-volume (LV) when Logical Disk List is displayed on the
main window, the Pool Property screen or the Physical Disk Property screen. The default value is Display. This
setting is enabled after the client is restarted. This setting is not available for the unit without the snapshot
(DynamicSnapVolume) function.
(x)
Logical Disk View Order
[Logical Disk View Order] sets the order in which logical disks are initially displayed on each screen. Select
[Number] or [Name (OS Type+Logical Disk Name)]. This setting changes the order in which columns are
displayed in the logical disk list. This setting is enabled after the client is restarted.
If you click [OK] after the setting is completed, the setting information is saved.
If a connection is added, a shortcut icon for the iSM client is created on the desktop and in the [Start] menu.
(3) Connection
If [File] and [Connection] is selected after environment setting, connection is actually performed for the iSM server.
Figure 5-4 Connection Screen
(i)
User name
Input the user name and password which are registered at the setting of the iSM server side.
(ii)
Password
User name/password can be saved individually. However, once a user name and a password are saved, any
person other than the registered users can log in the system by using a registered user name and password.
Therefore users must strictly manage the user names and passwords in terms of security.
If you click [OK] here, the current disk array configuration is displayed on the setting information display screen and
the message is displayed in order on the lower fault monitoring screen. If there are disk arrays for which the
BaseProduct license is not unlocked yet, the screen appears listing the disk arrays. (Figure 5-5)
III-6
Chapter 5 Normal Operation
Figure 5-5 List of Disk Array Subsystems with BaseProduct License Not Unlocked
(4) User Level
The iSM client user is given the definition at the iSM server side. The user has the user level and the following
operations are possible.
Level 1
Table 5-1 User Level List
Only reference of the status display/monitoring
For ordinary user
Level 2
Level 1 plus the functions needed for daily operations are permitted.
For operator
Level 3
All functions including various setting to the disk array are permitted.
For system
administrator
After connection, the user level is displayed on the iSM client status line and only those functions that can be
manipulated in that level become executable. Please refer to each function description for the differences of
permitted function at every level for each function.
(5) Icons on the Desktop and the [Start] Menu
If you delete a client-starting icon located on the desktop or in the [Start] menu or if you uninstall an iSM client
and then re-install it, you can re-create the icon with the procedure described below.
<<Re-creating an icon on the desktop>>
(i)
Click [Start] → [Programs] ([All Programs] for Windows XP/Windows Server 2003) → [Storage Manager
Client], and right-click the menu item for creating an icon on the desktop.
(ii) From the menu that appears, select [Copy].
(iii) On Explorer, display the “\Documents and Settings\All Users\Desktop” folder on the system drive.
(iv) Right-click on the displayed folder, and select [Paste].
<<Re-creating an icon on the desktop and in the [Start] menu>>
(i)
On Explorer, display iSMCL.EXE located in the client’s installation folder.
(ii) Right-click the iSMCL.EXE icon, and from the menu that appears, select [Create Shortcut].
(iii) Right-click the icon created in the installation folder, and from the menu that appears, select [Properties],
III-7
Chapter 5 Normal Operation
and the property screen is displayed.
(iv) Select the [Shortcut] tab from the properties screen.
(v)
After the double quotation of the iSMCL.EXE file name displayed as an item of [Target], add a blank and
the name of the desired folder containing connection information.
Example: “C:\Program Files\NEC\iSMClient\iSMCL.exe” SG1
Folder containing connection information is located below the installation folder. View the iSMmain.ini
(connection IP) or iSMstat.ini (connection name) found in each folder, and determine the name of the folder
you want to specify.
(vi) Select the [General] tab.
(vii) In the input field located to the right of the icon, enter the name of the shortcut.
Example: Storage Manager Client <connection name>
(viii) Click the [OK] button to close the properties screen.
(ix) To create an icon on the desktop, copy or move the icon created with the above steps to the “\Documents
and Settings\All Users\Desktop” folder on the system drive.
(x)
To create a menu item, copy or move the icon created with steps up to (viii) to “\Documents and
Settings\All Users\Start Menu\Programs\Storage Manager Client” (default value).
Note the following when re-creating an icon:
1.
Uninstalling an iSM client deletes the icon on the desktop and the menu item.
If you are to re-install a client after uninstalling it, copy the icon to an appropriate folder on the desktop
before uninstalling it. After re-installing it, you can restore the icon before uninstallation by copying the
saved icon to the “\Documents and Settings\All Users\Desktop” folder on the system drive (for the [Start]
menu, the “\Documents and Settings\All Users\Start Menu\Programs\Storage Manager Client” (default
value) folder on the system drive).
* Re-install the iSM client in the same folder as that before uninstallation, so that the icon reference will
not be nullified.
2.
If you delete both an icon on the desktop and a menu item, the procedure for re-creating the icon will be
cumbersome. For this reason, leave the menu item undeleted.
3.
The name of the icon to be created on the desktop must be in the format of “Storage Manager Client
<connection name>”. If you create the icon name in another format, the icon on the desktop will not be
deleted during uninstallation.
4.
If, in an environment in which the name of the desktop icon “iSM client” created by the installer (for
example, “Storage Manager Client <connection name>”) has changed, you install in overwrite mode with
Windows 2000, two icons are displayed on the desktop for a single connection. If this occurs, delete the
desktop icon created later.
5.
The term “icon”, as used throughout the above explanation refers to “shortcut icon”.
III-8
Chapter 5 Normal Operation
55..22..22 E
Eaacchh FFuunnccttiioonn S
Sttaarrtt
The iSM client has such functions as configuration monitoring, fault monitoring, performance monitoring, replication
operation, configuration setting, and snapshot management. In the screen that is activated first, the configuration
display area (upper left corner (i)) and the information list display area (upper right corner (ii)) correspond to
configuration monitoring. The message display area (lower area (iii)) corresponds to fault monitoring. The replication
and performance monitoring are displayed on a separate screen by clicking buttons (iv), (v), (vi), (vii), and (viii) on this
screen or selecting [File], then [Replication], [Performance], [Configuration], [Optimizer], or [Snapshot] from the menu.
(iv) (v) (vi) (vii) (viii)
Configuration Display and State Monitoring
Fault Monitoring
(i) Configuration
Area
Display
(ii) Information List Display Area
(iii) Message Display Area
Figure 5-6 iSM Client Main Window
If you define a connection for each iSM server to be connected based on environment settings, you can start multiple
iSM clients. In addition, multiple configuration setting screens can be displayed; however, only a single
configuration setting screen can be displayed in “set” mode, while other configuration setting screens can be
displayed in “browse” mode only. Other function screens do not differ in functions even if multiple clients are
started.
III-9
Chapter 5 Normal Operation
55..33 V
Vo
ollu
um
mee L
Liisstt C
Co
om
mm
maan
nd
d ((iiS
SM
Mvvo
olllliisstt))
The Volume List command can be executed independently on the server machines where iSM is not installed and
reports disk array names and logical disk names of subsystem connected via the fibre channel (FC). This command can
be used to obtain the relationship (hereafter referred to as the volume information) between Windows system
information such as drive letters, HBT (host adapter number/bus number/target ID), LUNs, and physical disk numbers
and disk array information such as logical disk name and disk array name. This command can also be used to create or
update the volume information.
HBT is described below.
<Host Adapter Number: HBA>
This is the number of an interface card to connect the SCSI bus and the host. There are two or more buses in the
host adapter.
<Bus Number: Bus>
This is the number of a path (bus) from the host adapter to a target (SCSI device). One path can handle two or more
targets.
<Target ID>
This is an ID to identify a device connected to the SCSI bus. One ID is assigned to one disk array.
HBA
Bus
Target ID
HBA
Bus
(switch)
Disk array
Figure 5-7 Relationship Between System Configuration and HBT
III-10
Chapter 5 Normal Operation
55..33..11 S
Sttaarrttuupp aanndd TTeerrm
miinnaattiioonn ooff V
Voolluum
mee LLiisstt
(1) Startup of Volume List
Input “iSMvollist” in the command line, and the Volume List will start.
If no option is specified or the -? option is specified, the version information and option list are displayed as
shown below.
> iSMvollist -?
iSMvollist Version n.n.nnn
Usage: iSMvollist -cr
Usage: iSMvollist –d
Usage: iSMvollist -dl disk_array [ld_number]
Usage: iSMvollist -de disk_array [ld_name]
Usage: iSMvollist -dd disk_array [drive | path]
Usage: iSMvollist -dp disk_array [disk_number]
Usage: iSMvollist -dh disk_array [HBT [LUN]]
Usage: iSMvollist -a
Usage: iSMvollist -al ld_number
Usage: iSMvollist -ae ld_name
Usage: iSMvollist -ad {drive | path}
Usage: iSMvollist -ap disk_number
Usage: iSMvollist -av volume_name
Usage: iSMvollist -ah HBT [LUN]
Usage: iSMvollist –ctl
Usage: iSMvollist –p
Usage: iSMvollist –ax
Usage: iSMvollist –ver
Usage: iSMvollist -?
* The above display is just for an example. Version is always according to the actual Volume List.
(2) Options Used for Volume List
The functions of the Volume List and the options that can be used for each function are as follows:
• -cr option:
Used to create or update the Volume List by scanning physical disks connected to a server.
• -d option:
Used to display information in the list form about the disk arrays existing in the volume
information.
• -dl option:
Used to display relationships of the disk array specified by disk_array. They are displayed after
sorting based on logical disk numbers. When an ld_number is specified, only relationships
concerning the specified logical disk are displayed.
• -de option:
Used to display relationships of the disk array specified by disk_array. They are displayed after
sorting based on logical disk names. When an ld_name is specified, only relationships of the
specified logical disk name are displayed.
• -dd option:
Used to sort relationships of the disk array specified by disk_array using a drive letter or the path
name of an NTFS folder as a key to display. When a drive or path is specified, only relationships
concerning the specified drive letter or path name of an NTFS folder are displayed.
III-11
Chapter 5 Normal Operation
• -dp option:
Used to display relationships of the disk array specified by disk_array. They are displayed after
sorting based on physical disk numbers. When a disk_number is specified, only relationships of
the specified physical disk are displayed.
• -dh option:
Used to display relationships of the disk array specified by disk_array. They are displayed after
sorting based on HBTs and LUNs. When an HBT is specified, only relationships of the specified
HBT are displayed. When a LUN is specified, relationships of the specified HBT and LUN are
displayed as well.
• -a option:
Used to display all the volume information in the Volume List.
• -al option:
Used to display only relationships concerning the logical disk specified to ld_number.
• -ae option:
Used to display only relationships concerning the logical disk name specified to ld_name.
• -ad option:
Used to display only relationships concerning a drive letter or path name of an NTFS folder
specified to drive or path.
• -ap option:
Used to display only relationships concerning the physical disk number specified to disk_number.
• -av option:
Used to display only relationships concerning the mount point volume name specified to
volume_name.
• -ah option:
Used to display only relationships concerning the Host number, Bus number and target ID
specified to HBT. When LUN is specified, only relationships concerning the specified HBT and
LUN are displayed.
• -ctl option:
Used to list the physical disk number and logical disk number of the control volume and the
corresponding disk array name.
The control volume is used to operate the data replication or snapshot function from a business
server. For details on the control volume, refer to manuals for data replication and snapshot.
• -p option:
Used to display the version of the Volume List and the created date as the property of the Volume
List.
• -ax option:
Used to list the disk array information and all volume information in the Volume List, and the
property information of the Volume List.
• -ver option: Used to display the version information of the volume list command.
• -? option:
Used to display the version information and option list of the volume list command.
Each parameter is described below.
disk_array:
Disk array name (nickname). Up to 32 ASCII characters can be specified. A part displayed as
“Disk Array” or “Disk Array Name” on the example screen indicates the disk array name.
ld_number:
Logical disk number built on the disk array. This can be specified in hexadecimal 0 to fff. If a
character other than “0” to “9”, “a” to “f” and “A” to “F” is input, the parameter format error
will occur. A part displayed as “LDN” on the example screen indicates the logical disk number.
ld_name:
Logical disk name (nickname). Up to 24 ASCII characters can be specified. When a disk array
is shipped, the SAA (unique number to identify the disk array) plus a logical disk number are
registered. A part displayed as “LD Name” on the example screen indicates the logical disk
name.
III-12
Chapter 5 Normal Operation
drive, path:
Drive letter the user gives to a volume, or path name of an NTFS folder. You can give a drive
letter and path names of multiple NTFS folders for a volume. This falls on [Path] on the screen
display.
disk_number:
Physical disk number that the Windows system allocates uniquely for managing disk devices.
This can be specified in decimal 0 to 255. If a character other than “0” to “9” is input, the
parameter format error will occur. A part displayed as “Disk No.” on the example screen
indicates the disk number.
volume_name:
Identifier that the Windows system allocates uniquely for managing volumes. This is referred
to as a MountPoint volume name. This falls on [Volume Name] on the screen display.
HBT:
Abbreviation of a host adapter number, bus number and target ID. This can be specified in the
format of hxxbxxtxx and a decimal number from 0 to 255 can be specified for xx. (Figure 5-7
Relationship Between System Configuration and HBT) You can identify a disk array by HBT.
<Host Adapter Number : HBA>
This is the number of an interface card to connect the SCSI bus and the host. There are two or
more buses in the host adapter.
<Bus Number : Bus>
This is the number of a path (bus) from the host adapter to a target (SCSI device). One path can
handle two or more targets.
<Target ID>
This is an ID to identify a device connected to the SCSI bus. One ID is assigned to one disk
array.
LUN:
Logical unit number to identify each of the two or more logical structures that can be accessed
with one target ID. This can be specified in decimal 0 to 255. A logical disk on a disk array is
recognized as a unique logical unit. You can identify a disk array and logical disk by HBT and
LUN.
(3) Termination of Volume List
When a Volume List is terminated normally, items corresponding to specified options are displayed.
The execution results are displayed only when the -cr option is specified.
1. The volume list command should be carried out by the authority of the Administrator group.
2. When the Volume List is installed for the first time, no volume information exists. Create it using the -cr option.
3. When the configuration of a device is changed, the volume information must be updated to reflect the latest
status. Update the volume information using the -cr option.
III-13
Chapter 5 Normal Operation
55..33..22 E
Exxaam
mpplleess ooff D
Diissppllaayy ffoorr E
Eaacchh O
Oppttiioonn
(1) Volume List Creation/Update
When -cr option id specified, the volume information is updated.
> iSMvollist –cr
iSMvollist: Info:
iSMvollist: Info:
iSM11700: Please wait a minute.
iSM11701: Volume list is created successfully.
If another process is updating or referring to the volume list, the following error message will appear.
iSM11751: Process_name has already started.
* process_name is expressed by the identifier of the process that is updating or referring to the volume list.
(2) List of Disk Array Information
When the -d option is specified, the disk array list in the volume information is displayed.
> iSMvollist -d
--- Disk Array List --Disk Array Name
Storage2100/13
Storage4100/07
Storage4100/10
Number of Drives
12
64
128
Each item is described below.
• Disk Array Name:
Nickname of a disk array
• Number of Drives:
Total number of volume information for each disk array
* If the Volume List is not created, the following error message will appear.
iSM11711: Volume list data does not exist.
III-14
Chapter 5 Normal Operation
(3) Display of Volume Information Based on Logical Disk Number
When -dl option is specified, the volume information is displayed after sorting based on the logical disk number.
> iSMvollist -dl Storage4100/07
--- Volume Data Information --LDN(h)
HBT
LUN(h)
Path
0000
h1b2t34
00
D:
0001
h1b2t34
01
E:
0002
h1b2t34
02
F:
0003
h1b2t34
03
G:
0004
h1b2t34
04
0005
h1b2t34
05
-
Disk No.
LD Name
OS Type
disk0
driveWN1
WN
disk1
driveWN2
WN
disk2
driveWN3
WN
disk3
driveWN4
WN
disk4
driveWN5
WN
disk5
driveWN6
WN
When a logical disk number is specified, only information on the specified logical disk number is displayed.
> iSMvollist -dl Storage4100/07 0
--- Volume Data Information --LDN(h)
HBT
LUN(h)
Path
0000
h1b2t34
00
D:
Disk No.
LD Name
OS Type
disk0
driveWN1
WN
Each item is described below.
• LDN:
Logical disk number
• Path:
Logical drive name or NTFS folder name
• HBT:
Host adapter number, bus number and target ID
• LUN:
LUN
• Disk No:
Disk number
• LD Name:
Logical disk name
• OS Type:
The OS type of a logical disk is displayed in one of the following.
A2:
Logical disk operated by the ACOS-2 system
A4:
Logical disk operated by the ACOS-4 system
AX:
Logical disk operated by the AIX system
CX:
Logical disk operated by the Solaris system
LX:
Logical disk operated by the Linux system
NX:
Logical disk operated by the HP-UX system
WN:
Logical disk operated by the Windows system
III-15
Chapter 5 Normal Operation
* If the specified logical disk number does not exist, the following error message will appear.
iSM11723: Specified ld_number does not exist in volume list data.
(4) Display of Volume Information Based on Logical Disk Name
When the -de option is specified, the volume information is displayed after sorting based on the logical disk name.
> iSMvollist -de Storage4100/07
--- Volume Data Information --LD Name
LDN(h)
Path
driveWN1
0000
D:
driveWN2
0001
E:
driveWN3
0002
F:
driveWN4
0003
G:
driveWN5
0004
driveWN6
0005
-
HBT
LUN(h)
Disk No.
OS Type
h1b2t34
00
disk0
WN
h1b2t34
01
disk1
WN
h1b2t34
02
disk2
WN
h1b2t34
03
disk3
WN
h1b2t34
04
disk4
WN
h1b2t34
05
disk5
WN
When a logical disk name is specified, only information on the specified logical disk name is displayed.
> iSMvollist -de Storage4100/07 driveWN6
--- Volume Data Information --LD Name
LDN(h)
Path
driveWN6
0005
-
HBT
LUN(h)
Disk No.
OS Type
h1b2t34
05
disk5
WN
For the description of each item, refer to (3) “Display of Volume Information Based on Logical Disk Number”.
* If the specified logical disk name does not exist, the following error message will appear.
iSM11724: Specified ld_name does not exist in volume list data.
III-16
Chapter 5 Normal Operation
(5) Display of Volume Information Based on Drive Letter or Path Name of NTFS Folder
When the -dd option is specified, the volume information is displayed after sorting data based on drive letters and
path names of NTFS folders.
> iSMvollist -dd Storage4100/07
--- Volume Data Information --Path
LDN(h)
HBT
LUN(h)
D:
0000
h1b2t34
00
E:
0001
h1b2t34
01
F:
0002
h1b2t34
02
G:
0003
h1b2t34
03
0004
h1b2t34
04
0005
h1b2t34
05
Disk No.
LD Name
OS Type
disk0
driveWN1
WN
disk1
driveWN2
WN
disk2
driveWN3
WN
disk3
driveWN4
WN
disk4
driveWN5
WN
disk5
driveWN6
WN
When a drive letter or the path name of an NTFS folder is specified, only information on the specified drive letter
or path name of the NTFS folder is displayed.
> iSMvollist -dd Storage4100/07 D
--- Volume Data Information --Path
LDN(h)
HBT
LUN(h)
D:
0000
h1b2t34
00
Disk No.
LD Name
OS Type
disk0
driveWN1
WN
For the description of each item, refer to (3) “Display of Volume Information Based on Logical Disk Number”.
* When the specified drive letter or path name of the NTFS folder does not exist, the following error message will
appear.
iSM11725: Specified drive does not exist in volume list data.
III-17
Chapter 5 Normal Operation
(6) Display of Volume Information based on Physical Disk Number
When the -dp option is specified, the volume information is displayed based on the physical disk number.
> iSMvollist -dp Storage4100/07
--- Volume Data Information --Disk No.
LDN(h)
HBT
Path
disk0
0000
h1b2t34
D:
disk1
0001
h1b2t34
E:
disk2
0002
h1b2t34
F:
disk3
0003
h1b2t34
G:
disk4
0004
h1b2t34
disk5
0005
h1b2t34
-
LUN(h)
LD Name
OS Type
00
driveWN1
WN
01
driveWN2
WN
02
driveWN3
WN
03
driveWN4
WN
04
driveWN5
WN
05
driveWN6
WN
When a physical disk number is specified, only information about the specified physical disk number is displayed.
> iSMvollist -dp Storage4100/07 0
--- Volume Data Information --Disk No.
LDN(h)
HBT
Path
disk0
0000
h1b2t34
D:
LUN(h)
LD Name
OS Type
00
driveWN1
WN
For the description of each item, refer to (3) “Display of Volume Information Based on Logical Disk Number”.
* If the specified physical disk number does not exist, the following error message will appear.
iSM11726: Specified disk_number does not exist in volume list data.
III-18
Chapter 5 Normal Operation
(7) Display of Volume Information based on HBT and LUN
When the -dh option is specified, the volume information is displayed based on the HBT and LUN.
> iSMvollist -dh Storage4100/07
--- Volume Data Information --HBT
LUN(h)
LDN(h)
Path
h1b2t34
00
0000
D:
h1b2t34
01
0001
E:
h1b2t34
02
0002
F:
h1b2t34
03
0003
G:
h1b2t34
04
0004
h1b2t34
05
0005
-
Disk No.
LD Name
OS Type
disk0
driveWN1
WN
disk1
driveWN2
WN
disk2
driveWN3
WN
disk3
driveWN4
WN
disk4
driveWN5
WN
disk5
driveWN6
WN
When an HBT is specified, only information on the specified HBT is displayed.
> iSMvollist -dh Storage4100/07 h1b2t34
--- Volume Data Information --HBT
LUN(h)
LDN(h)
Path
h1b2t34
00
0000
D:
h1b2t34
01
0001
E:
h1b2t34
02
0002
F:
h1b2t34
03
0003
G:
h1b2t34
04
0004
h1b2t34
05
0005
-
Disk No.
LD Name
OS Type
disk0
driveWN1
WN
disk1
driveWN2
WN
disk2
driveWN3
WN
disk3
driveWN4
WN
disk4
driveWN5
WN
disk5
driveWN6
WN
When an HBT and LUN are specified, only information on the specified HBT and LUN is displayed.
> iSMvollist -dh Storage4100/07 h1b2t34 0
--- Volume Data Information --HBT
LUN(h)
LDN(h)
Path
h1b2t34
00
0000
D:
Disk No.
LD Name
OS Type
disk0
driveWN1
WN
III-19
Chapter 5 Normal Operation
For the description of each item, refer to (3) “Display of Volume Information Based on Logical Disk Number”.
* When LUN is omitted and only HBT is specified but the specified HBT does not exist, the following error
message will appear.
iSM11727: Specified HBT does not exist in volume list data.
* When an HBT and LUN are specified but the specified HBT or LUN does not exist, the following error
message will appear.
iSM11728: Specified HBT or LUN does not exist in volume list data.
(8) Volume List Display
When -a option is specified, all the volume information in the volume list is displayed.
> iSMvollist -a
LDN
LD Name
VAA
HBT
LUN
Disk No. Disk Array
Volume Name
Path
0000h
dev000
30000000000000020000
h4b0t35
000h
disk1
Storage4100/07
\\?\Volume{4b94d348-58a7-11d5-abc1-806d6172696f}\
G:
0001h
dev001
30000000000000020001
h4b0t35
001h
disk2
Storage4100/07
0002h
dev002
30000000000000020002
h4b0t35
002h
disk3
Storage4100/07
\\?\Volume{4b94d349-58a7-11d5-abc1-806d6172696f}\
H:
0003h
dev003
30000000000000020003
h4b0t35
003h
disk4
Storage4100/07
0004h
dev004
30000000000000020004
h4b0t35
004h
disk5
Storage4100/07
\\?\Volume{9ba5c1c4-147f-11d5-958d-00004c7929e8}\
Y:
-
OS Type
WN
WN
WN
WN
WN
Each item is described below.
- VAA:
Volume Absolute Address
- Path:
Drive letter or path name of an NTFS folder
- Volume Name:
Mount point volume name
For explanation of the items other than the above, refer to (3) “Display of Volume Information Based on Logical
Disk Number”.
III-20
Chapter 5 Normal Operation
* If no volume list has been created, the following error message will appear.
iSM11711: Volume list data does not exist.
(9) Display of Volume Information on the Specified Logical Disk Number
When -al option is specified, the volume information on the specified logical disk number is displayed.
> iSMvollist –al 0
LDN
LD Name
VAA
HBT
LUN
Disk No. Disk Array
Volume Name
Path
0000h
dev000
30000000000000020000
h5b1t0
000h
disk1
Storage4100/07
\\?\Volume{d1a8d660-5748-11d5-a606-009027520bce}\
F:
OS Type
WN
For explanation of each item, refer to (3) “Display of Volume Information Based on Logical Disk Number” and
(8) “Volume List Display”.
* If the specified logical disk number does not exist, the following error message will appear.
iSM11723: Specified ld_number does not exist in volume list data.
(10) Display of Volume Information on the Specified Logical Disk Name
When -ae option is specified, the volume information on the specified logical disk name is displayed.
> iSMvollist –ae dev000
LDN
LD Name
VAA
HBT
LUN
Disk No.
Disk Array
Volume Name
Path
0000h
dev000
30000000000000020000
h5b1t0
000h
disk1
Storage4100/07
\\?\Volume{d1a8d660-5748-11d5-a606-009027520bce}\
F:
OS Type
WN
For explanation of each item, refer to (3) “Display of Volume Information Based on Logical Disk Number” and
(8) “Volume List Display”.
* If the specified logical disk name does not exist, the following error message will appear.
iSM11724: Specified ld_name does not exist in volume list data.
III-21
Chapter 5 Normal Operation
(11) Display of Volume Information on the Specified Drive Letter or NTFS Folder Path
Name
When the -ad option is specified, the volume information on the specified drive letter or path name of an NTFS
folder is displayed.
> iSMvollist –ad F:
LDN
LD Name
VAA
HBT
LUN
Disk No. Disk Array
Volume Name
Path
0000h
dev000
30000000000000020000
h5b1t0
000h
disk1
Storage4100/07
\\?\Volume{d1a8d660-5748-11d5-a606-009027520bce}\
F:
OS Type
WN
For explanation of each item, refer to (3) “Display of Volume Information Based on Logical Disk Number” and
(8) “Volume List Display”.
* When the specified drive letter or path name of an NTFS folder does not exist, the following error message will
appear.
iSM11725: Specified drive does not exist in volume list data.
(12) Display of Volume Information on the Specified Physical Disk Number
When -ap option is specified, the volume information on the specified physical disk number is displayed.
> iSMvollist –ap 1
LDN
LD Name
VAA
HBT
LUN
Disk No. Disk Array
Volume Name
Path
0000h
dev000
30000000000000020000
h5b1t0
000h
disk1
Storage4100/07
\\?\Volume{d1a8d660-5748-11d5-a606-009027520bce}\
F:
OS Type
WN
For explanation of each item, refer to (3) “Display of Volume Information Based on Logical Disk Number” and
(8) “Display of Volume Information”.
* If the specified physical disk number does not exist, the following error message will appear.
iSM11726: Specified disk_number does not exist in volume list data.
III-22
Chapter 5 Normal Operation
(13) Display of Volume Information on the Specified Mount Point Volume Name
When -av option is specified, the volume information on the specified mount point volume name is displayed.
> iSMvollist –av \\?\Volume{0e237a8f-5fb8-11d5-b1d7-009027520bce}\
LDN
LD Name
VAA
HBT
LUN
Disk No. Disk Array
Volume Name
Path
0000h
dev000
30000000000000020000
h5b1t0
000h
disk1
Storage4100/07
\\?\Volume{0e237a8f-5fb8-11d5-b1d7-009027520bce}\
F:
OS Type
WN
For explanation of each item, refer to (3) “Display of Volume Information Based on Logical Disk Number” and
(8) “Display of Volume Information”.
* If the specified mount point volume does not exist, the following error message will appear.
iSM11732: Specified Volume Name does not exist in volume list data.
(14) Display of Volume Information on the Specified HBT and LUN
When -ah option is specified, the volume information, the volume information on the specified HBT and LUN is
displayed.
When HBT is specified, only the information on the specified HBT is displayed.
> iSMvollist -ah h5b1t0
LDN
LD Name
VAA
HBT
LUN
Disk No. Disk Array
Volume Name
Path
0000h
dev000
30000000000000020000
h5b1t0
000h
disk1
Storage4100/07
\\?\Volume{4b94d348-58a7-11d5-abc1-806d6172696f}\
G:
0001h
dev001
30000000000000020001
h5b1t0
001h
disk2
Storage4100/07
0002h
dev002
30000000000000020002
h5b1t0
002h
disk3
Storage4100/07
\\?\Volume{4b94d349-58a7-11d5-abc1-806d6172696f}\
H:
0003h
dev003
30000000000000020003
h5b1t0
003h
disk4
Storage4100/07
-
III-23
OS Type
WN
WN
WN
WN
Chapter 5 Normal Operation
When HBT and LUN are specified, only the information on the specified HBT and LUN is displayed.
> iSMvollist -ah h5b1t0 1
LDN
LD Name
VAA
HBT
LUN
Disk No. Disk Array
Volume Name
Path
0000h
dev000
30000000000000020000
h5b1t0
000h
disk1
Storage4100/07
\\?\Volume{4b94d348-58a7-11d5-abc1-806d6172696f}\
G:
OS Type
WN
For explanation of each item, refer to (3) “Display of Volume Information Based on Logical Disk Number” and
(8) “Display of Volume Information”.
* When LUN is omitted and only HBT is specified but the specified HBT does not exist, the following error
message will appear.
iSM11727: Specified HBT does not exist in volume list data.
* When HBT and LUN are specified but the specified HBT or LUN does not exist, the following error message
will appear.
iSM11728: Specified HBT or LUN does not exist in volume list data.
(15) List of Control Volume
When the -ctl option is specified, the physical disk number and logical disk number of the control volume and the
corresponding disk array name are listed.
The control volume is used to operate the data replication or snapshot function from a business server. For details
on the control volume, refer to manuals for data replication and snapshot.
> iSMvollist -ctl
--- Control Volume List --Disk No. LDN Disk Array Name
Disk5
0004h Storage2800
Each item is described below.
Disk No.
: Physical disk number
LDN
: Logical disk number
Disk Array Name
: Nickname of a disk array
* When the control volume is not defined, the following warning message will appear.
iSM11714: Volume list data has no control volume.
III-24
Chapter 5 Normal Operation
(16) Display of Property of Volume List
When the -p option is specified, the property information of the volume list is displayed.
> iSMvollist -p
--- Property of Volume List File --Version
3.2.001
Created
2004/03/12 09:38:46
Owner Host Name
W2K3SERVER
Disk Array
1
Volume Information
12
Each item is described below. Items may be added when a function is enhanced.
Version
: Version information of the volume list command used when the Volume List was
created
Created
: Date when the Volume List was created
Owner Host Name
: Host name of the server owning the Volume List
Disk Array
: Total number of disk arrays in the Volume List
Volume Information
: Total number of the volume information items in the Volume List
(17) Display of Disk Array Information, Volume Information, and Property Information
When the -ax option is specified, disk array information, volume information, and property of the Volume List are
displayed.
> iSMvollist -ax
Volume List iSMvollist Version 3.2.003
--- Disk Array List --Disk Array Name
S2800/0001
Date: 2004/03/19 22:03:21
Number of LDN
2
--- Volume List --LDN LD Name
VAA
HBT
LUN Disk No.
Disk Array
Volume Name
Path
0004h MV_WN_DB1
00000004c517b7d0004
h4b0t35 000h disk5
S2800/0001
\\?\Volume{4b94d348-58a7-11d5-abc1-806d6172696f}\
D:
0005h MV_WN_DB2
200000004c517b7d0005
h4b0t35 001h disk6
S2800/0001
\\?\Volume{4b94d348-58a7-11d5-abc1-806d6172696f}\
H:
--- Property of Volume List File --Version
Created
Owner Host Name
Disk Array
Volume Information
3.2.001
2004/03/12 09:38:46
W2K3SERVER
1
2
III-25
OS Type
WN
WN
Chapter 5 Normal Operation
* The version of the executed volume list command and the execution date are displayed on the first line.
Each item is described below. Items may be added when a function is enhanced.
Information displayed as [Disk Array List]
: The same information as the -d option is displayed.
Information displayed as [Volume List]
: The same information as the -a option is displayed.
Information displayed as [Property of Volume List File]
: The same information as the -p option is displayed.
55..44 V
Vo
ollu
um
mee L
Liisstt D
Diissp
pllaayy
This function consists of functions, such as list of volume information, selection display on a disk array basis, creation
or update of the Volume List.
This function also provides a function for defining the control volume to be used to operate the data replication or
snapshot function from a business server. For details on the control volume and its definition method, refer to manuals
for data replication and snapshot.
Note the following when using the function of Volume List Display:
1.
A Volume List is also used in data replication control by the replication control command (ReplicationControl)
and snapshot control by the snapshot operation command (SnapControl). Creating/Updating a Volume List by
mistake may cause an error in data replication or snapshot control. Be careful in creating/updating a Volume
List.
2.
When a Volume List is created/updated, volumes in Not Ready state are not registered in the Volume List.
Therefore, separate all the paired RVs from each other that are connected before creating/updating a Volume List.
3.
When a Volume List is created or updated, specify all the drive letters and the path names of the NTFS folders
that are to be used in data replication control.
4.
Do not execute Create/Update of Volume List during execution of the iSMvollist command.
5.
Do not execute Create/Update of Volume List during execution of the replication control command
(ReplicationControl) or snapshot operation command (SnapControl).
III-26
Chapter 5 Normal Operation
55..44..11 S
Sttaarrttiinngg//TTeerrm
miinnaattiinngg V
Voolluum
mee LLiisstt D
Diissppllaayy
This section explains the procedures for starting and terminating the function of Volume List Display.
(1) Starting the function of Volume List Display
(i)
Click the [Start] button of Windows and select [Programs] ([All Programs] for Windows Server 2003) →
[Storage Manager Volume List] → [Volume List Display].
(ii)
The screen of Volume List Display appears.
Figure 5-8 Screen of Volume List Display
For details on the screen of Volume List Display, refer to 5.4.2 “Screen of Volume List Display” and 5.4.3 “Menu
Item List”.
(2) Terminating the function of Volume List Display
On the screen of Volume List Display, select [File] on the menu bar → [Exit]. Alternatively, click the close
button of the system menu.
When the function of Volume List Display is terminated, the window size, the row width of the list view, and the
window position of the Volume List Display screen currently displayed are stored automatically. The stored
screen information will take effect when the Volume List Display function is started next.
III-27
Chapter 5 Normal Operation
55..44..22 S
Sccrreeeenn ooff V
Voolluum
mee LLiisstt D
Diissppllaayy
Figure 5-9 shows the layout of the screen of Volume List Display.
(i)
(ii)
(iii)
(vi)
(vii)
(viii)
(ix)
(x)
(xi)
(xii)
(xiii)
(xiv)
(xv)
(iv)
(v)
Figure 5-9 Layout of Volume List Display Screen
(i)
Title bar
Displays the title of the Volume List Display function.
(ii) Menu bar
For details on each item of the menu bar, refer to 5.4.3 “Menu Item List”.
(iii) Toolbar and toolbar buttons
[Create/Update Volume List] Toolbar Button
Clicking this button has the same effect as selecting [Create/Update Volume List] from the menu.
[Define Control Volume] Toolbar Button
Clicking this button has the same effect as selecting [Define Control Volume] from the menu.
[CSV Output of Information List] Toolbar Button
Clicking this button has the same effect as selecting [CSV Output of Information List] from the
menu.
(iv) Paired/Linked Logical Disk Information List
Displays the logical disk information of a subject paired with the volume selected on the Volume List Display
screen using the data replication or snapshot function after acquiring the information from the disk array. When
connected to a link volume, the logical disk information of a subject linked with is acquired from the disk array
and displayed.
(v) Status bar
The following information is displayed on the status bar.
VOLUME
Displays the number of volume information items to be displayed on the Volume List Display screen.
When volume information for all disk arrays is displayed, the number of all volume information items in
the Volume List is displayed. For the selection display by a disk array, the number of volume information
items on the corresponding disk array is displayed.
III-28
Chapter 5 Normal Operation
(vi) Disk Array Subsystem selection combo box
Clicking the pull-down button displays the list of disk arrays currently registered in the Volume List file.
(vii) Drive Letter/Path Name
Displays path information in the Volume List file.
(viii) Volume Name
Displays volume names in the Volume List file.
(ix) Disk No.
Displays physical disk numbers in the Volume List file.
(x) Volume Definition
Displays the identification information of the control volume definition.
(xi) LUN
Displays logical unit numbers in the Volume List file.
(xii) LDN
Displays logical disk numbers in the Volume List file.
(xiii) LD Name
Displays logical disk names in the Volume List file.
(xiv) Disk Array
Displays disk array names in the Volume List file.
(xv) Classification
Displays the classification (volume attribute) of volumes related to data replication and snapshot after acquisition.
The information on (vi) to (xiv) above is acquired from the Volume List and then displayed, however, the information
on (iv) and (xv) is acquired from the disk array and then displayed.
III-29
Chapter 5 Normal Operation
55..44..33 M
Meennuu IItteem
m LLiisstt
This section explains the items on the menu bar of the screen of Volume List Display.
File
Create/Update Volume List
5.4.6 “Volume List Creation/Update”
CSV Output of Information List
5.4.7 “CSV Output of Information List”
Properties
5.4.8 “Display of Volume List Properties”
Exit
5.4.1 “Starting/Terminating Volume List Display”
View
Toolbar
5.4.9 “View/Hide of Toolbar”
Status bar
5.4.10 “View/Hide of Status Bar
Update Display Information
5.4.11 “Update Display Information”
Operation
Define Control Volume
5.4.12 “Definition of Control Volume”
Help
List Display Screen Help
Displays information about the screen of Volume List Display.
About
Displays information about versions.
III-30
Chapter 5 Normal Operation
55..44..44 D
Diissppllaayy LLiisstt ooff V
Voolluum
mee IInnffoorrm
maattiioonn
Starting the function of Volume List Display lists all the volume information of the Volume List.
Execution procedure
(i)
Click the [Start] button of Windows and select [Programs] ([All Programs] for Windows Server 2003) →
[Storage Manager Volume List] → [Volume List Display].
(ii)
The Volume List Display screen is started and volume information appears.
Figure 5-10 Display List of Volume Information
III-31
Chapter 5 Normal Operation
55..44..55 S
Seelleeccttiioonn D
Diissppllaayy bbyy D
Diisskk A
Arrrraayy
Click the pull-down button of Disk Array Subsystem selection combo box on the screen of Volume List Display, and
select the target disk array. The information of only the selected disk array is displayed.
Execution procedure
(i)
Select the target disk array from the Disk Array Subsystem selection combo box on the screen of Volume List
Display.
(ii)
The volume information of the selected disk array is displayed.
Figure 5-11 Selection Display by Disk Array
55..44..66 V
Voolluum
mee LLiisstt C
Crreeaattiioonn//U
Uppddaattee
To create/update a Volume List, select [File] → [Create/Update Volume List] on the screen of Volume List Display.
Execution procedure
(i)
Select [File] → [Create/Update Volume List] on the screen of Volume List Display. The following inquiry
message is displayed:
Figure 5-12 Execution Confirmation Screen for Create/Update Volume List
III-32
Chapter 5 Normal Operation
(ii)
Clicking the [OK] button executes Create/Update Volume List.
Clicking the [Cancel] button cancels Create/Update Volume List and returns to the screen of Volume List
Display.
(iii) The following message is displayed when the Volume List has been created/updated normally.
Figure 5-13 Confirmation Screen for Create/Update Volume List
(iv) Clicking the [OK] button returns to the screen of Volume List Display screen.
(v)
The screen of Volume List Display is automatically updated when the Volume List file has been created/updated.
55..44..77 C
CS
SV
VO
Ouuttppuutt ooff IInnffoorrm
maattiioonn LLiisstt
To output an information list as a CSV file, select [File] → [CSV Output of Information List] on the screen of Volume
List Display screen.
Execution procedure
(i)
Select [File] → [CSV Output of Information List] on the Volume List Display screen. The screen of CSV Output
of Information List appears.
Figure 5-14 CSV Output of Information List
(ii)
Specify the save destination.
The default save destination is the “etc” folder in the installation directory.
III-33
Chapter 5 Normal Operation
(iii) Specify the file name.
The default file name is “vollist.csv”.
(iv) Click the [Save] button to save the input information.
Clicking the [Cancel] button returns to the Volume List Display screen without saving data.
(v)
When the file is saved successfully, the following message is displayed:
Figure 5-15 Confirmation Screen for CSV Output of Information List
(vi) Clicking the [OK] button returns to the screen of Volume List Display.
File sample
The following is a sample of a CSV file output by executing CSV Output of Information List
Drive Letter/Path Name, Volume Name, Disk No.,Volume Definition,LUN, LDN, LD Name, Disk Array, Classification, Paired/Linked
Logical Disk Information
E:,\\?\Volume{6bd09e61-4d87-11d8-a1d8-0007e903d285}\,disk1,-,000h,0000h,DB_DATA_MV,Tokyo_Customer_DataBase,MV,
“RV(0005h,DB_DATA_RV,Tokyo_Customer_DataBase)/RV(0010h,DB_DATA_RV2,Tokyo_Customer_DataBase)/RV(0011h,DB_DAT
A_RV3,Tokyo_Customer_DataBase)”
F:,\\?\Volume{6bd09e62-4d87-11d8-a1d8-0007e903d285}\,disk2,-,001h,0001h,DB_REDO1_MV,Tokyo_Customer_DataBase,
MV,”RV(0006h,DB_REDO1_RV,Tokyo_Customer_DataBase)”
G:,\\?\Volume{6bd09e63-4d87-11d8-a1d8-0007e903d285}\,disk3,-,002h,0002h,DB_REDO2_MV,Tokyo_Customer_DataBase,
MV,”RV(0007h,DB_REDO2_RV,Tokyo_Customer_DataBase)”
H:,\\?\Volume{6bd09e64-4d87-11d8-a1d8-0007e903d285}\,disk4,-,003h,0003h,DB_CTL_MV,Tokyo_Customer_DataBase,MV,
“RV(0008h,DB_CTL_RV,Tokyo_Customer_DataBase)”
I:,\\?\Volume{6bd09e65-4d87-11d8-a1d8-0007e903d285}\,disk5,-,004h,0004h,DB_ARCHIVE_MV,Tokyo_Customer_DataBase,
MV,”RV(0009h,DB_ARCHIVE_RV,Tokyo_Customer_DataBase)”
-:,\\?\Volume{6bd09e66-4d87-11d8-a1d8-0007e903d285}\,disk6,-,000h,00a0h,TEMP,Storage4300/001,IV,-:,\\?\Volume{6bd09e67-4d87-11d8-a1d8-0007e903d285}\,disk7,Control,00h,0266h,WORK,Storage4300/002,IV,-
Figure 5-16 Output Example of CSV File
This file is output in format in which each item of the display information is separated by a comma.
One volume information item is output as information for a line.
The logical disk information displayed in the Paired/Linked Logical Disk Information List is output in the following
format. Multiple logical disk information items are delimited with slashes, concatenated, and output.
“Classification(LDN, LDName, DiskArray) [/Classification(LDN, LDName, DiskArray) […] ]”
Classification
: Classification
LDN
: Logical disk number
LDName
: Logical disk name
DiskArray
: Disk array name
III-34
Chapter 5 Normal Operation
55..44..88 D
Diissppllaayy ooff V
Voolluum
mee LLiisstt P
Prrooppeerrttiieess
To confirm properties of Volume List, select [File] → [Properties] on the screen of Volume List Display.
Execution procedure
(i) To display the following properties, select [File] → [Properties] on the screen of Volume List Display.
(ii) To return to the screen of Volume List Display, click the [Close] button.
Figure 5-17 Volume List Properties
• Version
Displays the version of the volume list command used to create the Volume List.
• Created
Displays the date when the Volume List was created.
• Owner Host Name
Displays the host name of the server owning the Volume List.
• Disk Array
Displays the total number of disk arrays in the Volume List.
• Volume
Displays the total number of volume information items in the Volume List.
III-35
Chapter 5 Normal Operation
55..44..99 V
Viieew
w//H
Hiiddee ooff TToooollbbaarr
To select view or hide of the toolbar, select [View] → [Toolbar] on the screen of Volume List Display.
View
Figure 5-18 View of Toolbar
Hide
Figure 5-19 Hide of Toolbar
55..44..1100 V
Viieew
w//H
Hiiddee ooff S
Sttaattuuss B
Baarr
To select display or hide of the status bar, select [View] → [Status bar] on the screen of Volume List Display.
View
Figure 5-20 View of Status Bar
Hide
Figure 5-21 Hide of StatusBar
55..44..1111 U
Uppddaattee D
Diissppllaayy IInnffoorrm
maattiioonn
To update the information of a Volume List file, select [View] → [Update Display Information] on the screen of
Volume List Display.
The Volume List file contents are updated and the screen of Volume List Display is automatically updated.
III-36
Chapter 5 Normal Operation
55..44..1122 D
Deeffiinniittiioonn ooff C
Coonnttrrooll V
Voolluum
mee
To start the screen for defining the control volume, select [Operation] → [Define Control Volume] on the screen of
Volume List Display.
The control volume is a volume used to operate the data replication or snapshot function from a business server. If you
do not use the data replication operation command or the snapshot operation command, you do not need to define the
control volume.
For details on how to define or use the control volume, refer to manuals for data replication and snapshot.
55..55 C
Co
on
nffiig
gu
urraattiio
on
nD
Diissp
pllaayy C
Co
om
mm
maan
nd
d
((iiS
SM
Mvviieew
w))
The configuration view command displays the settings of a specified disk array, the subsystem resource status, the LD
configuration, and the LD status. Table 5-2 shows the items that can be displayed.
Table 5-2 Items Displayed by the iSMview Command
Display Item
Description
Disk array Information
Displays information about disk array.
<Disk Array Information>
Disk Array Name, Resource State, Monitoring,
Vendor ID, Product ID, Product FW Revision, Storage Control
Software Revision, World Wide Name, Serial Number, SAA,
Total Capacity, User System Code
<Disk Array Control Mode>
Cross Call Mode, Auto Assignment Mode, Auto Repair Mode,
Auto Time Setup Mode
<Access Control Information>
Access Control Mode
<Control Path>
Path No., Control Path, Path State
<Expand LUN>
Port No., Exist, Expand LUN
<Cache Partitioning Information>
Cache Partitioning Mode
<Product Information>
Product, State
LD Information
Displays information about LD.
<LD Information>
LDN, OS Type, LD Name, LD State
<LD Detail Information>
LDN, OS Type, LD Name, LD Capacity, Progress Ratio, RANK, Pool
No., Pool Name, RaidType, LD State, Expansion State, Group,
Purpose, RPL Attribute, Snapshot Attribute, Current Owner, Default
Owner, Cache Resident, PD List, Segment Number, Segment Name
<LD/Port List>
Port No.,Port Name, Port State, Port Mode
<LD/WWN List>
Platform, LD Set Type, LD Set Name, Path Count
<LD Set List>
Platform, LD Set Name, Path Count, LD Count
III-37
Chapter 5 Normal Operation
Display Item
Description
LD-snapshot Information
Displays information about LD snapshot.
<Snapshot LD Information>
LDN, OS Type, LD Name, Snapshot Attribute
<Snapshot LD Detail Information>
LDN, OS Type, LD Name, LD Capacity, Snapshot Attribute
<Snapshot LD List>
LDN, OS Type, LD Name, Snapshot Attribute
< Link Control LD List>
LDN, OS Type, LD Name, Snapshot Attribute
RANK Information
Displays information about RANK.
<RANK Information>
RANK No., Raid Type, RANK State
<RANK Detail Information>
RANK No., RaidType, RANK State, RebuildTime,
RANK Capacity, Progress Ratio, PD List
<Partition List>
Start Address, End Address, Capacity, LDN
Pool Information
Displays information about pool.
<Pool Information>
Pool No., Pool Name, Pool Type, Pool State
<Pool Detail Information>
Pool No., Pool Name, Pool Type, RAID Type, Pool State, Expansion
State, Rebuild Time(hour), Expansion Time(hour), Pool Capacity,
Used Pool Capacity, Free Pool Capacity, Progress Ratio, PD List,
Expanding PD List
<Partition List>
Start Address, End Address, Capacity (GB), LDN
Pool-snapshot Information
Displays information about pool snapshot.
<Snapshot Pool Information>
Pool No., Pool Name, Threshold
<Snapshot Pool Detail Information>
Pool No., Pool Name, Pool Type, Threshold, Total Snapshot Capacity,
Used Snapshot Capacity, Snapshot Threshold, Snapshot Control
Capacity
<SDV List>
LDN, OS Type, LD Name, LD Capacity
PD Information
Displays information about PD.
<PD List>
PDN, PD State, Classification
<PD Detail Information>
PDN, Classification, State, PD Capacity, Vendor ID, Product ID,
Product Revision, Serial Number, LD List
III-38
Chapter 5 Normal Operation
Display Item
Controller Information
Description
Displays information about Controller.
<Controller Information>
Type, Abbr. Name, No., State, Info
Common display information
<BC Junction Box Information>
<Power Supply Information>
<Battery Information>
<Fan Information>
<Temperature Information>
<Host Director Information>
<Host Director/Port Information>
< Disk Director Information>
<Replication Director Information>
<Cache Module Information>
<Back Board Information>
<Service Processor Information>
<Disk Array TCP/IP Information>
<SCSI Socket Information>
<SNMP Information>
<Trap Information>
<Panel Information>
<Maintenance PC Information>
<Management Processor Information>
<Ethernet HUB Information>
<Power Control Card Information>
Type, Abbreviated Name, Number, State, Code
Additional display information of <Host Director Information>
Director Location, Revision, Protocol, Port No.
Additional display information of <Host Director/Port Information>
Port No., Port Name, Port Type, State, Mode, WWNN, WWPN, Data
Rate, Saved Data Rate, Topology, Saved Topology,
N_Port_ID/Switch, Saved N_Port_ID/Switch
Additional display information of <Disk Director Information>
Director Location, Revision, Port No.
Additional display information of <Replication Director Information>
Director Location, Revision, Port No.
Additional display information of <Cache Module Information>
Capacity
Additional display information of <Service Processor Information>
Revision
<Disk Array TCP/IP Information>
IP Address, Subnet Mask, Gateway Address
<SCSI Socket Information>
SCSI Socket Guard Invalid, SCSI Socket Valid IP Address
<SNMP Information>
Community Name, SNMP Trap Transmission IP Address, SNMP
Valid, SNMP Valid IP Address
<Trap Information>
Trap Sense Interval, Unit Contact, Unit Name, Unit Location, Unit Info
Disk Enclosure Information
Displays information about Disk Enclosure.
<Disk Enclosure Information>
III-39
Chapter 5 Normal Operation
Display Item
Description
Type, Abbr. Name, No., State
Common display information
<EC Junction Box Information>
<Power Supply Information>
<FAN Information>
<Temperature Information>
<Adapter Card Information>
<Back Board Information>
Type, Abbreviated Name, Number, State, Code
Port Information
Displays information about Port Information.
Port No., Port Name, Platform, Port Mode, Port State
Maintenance Information
Displays information about Maintenance Information
<Maintenance Information>
Storage Control Software Revision, Temp. Sense Interval, Write Cache
Mode (Single BBU), Write Cache Mode (Single HD), Hot Spare Mode,
Controller Host Type, Disk Array Series, Product Code, Subsystem
Category, Convert Flag
Access Control Information
Displays information about Access Control Information.
<Access Control Information>
Access Control Mode
<Port Information>
Port No., Port Name, Port State, Port Mode
<Port List>, <LD/Port List>
Port No., Port Name, Port State, Port Mode
<Port/LD List>
LDN, OS Type, LD Name
<WWN Information>
Platform, LD Set Name, WWPN List
<WWN List>, <LD/WWN List>
Platform, LD Set Name, Path Count
<WWN/LD List>
LUN, LDN, OS Type, LD Name
<LD Set List>
Platform, LD Set Name, Path Count, LD Count
<LD Set Information>
Platform, LD Set Name, Path List
<LUN/LD List>
LUN, LDN, OS Type, LD Name
LD Administrator Information
Displays information about LD Administrator.
<Reallocation Control Information>
Inaccessible LD Total Capacity
<LD Set Capacity Information>
Platform, LD Set Name, Capacity
<Preserve Group Information>
Group Total Capacity, Purpose, Purpose Total Capacity, LDN, OS
Type, LD Name, RANK, Pool No., RAID, Capacity
<Reserve Group Information>
Group Total Capacity, Purpose, Purpose Total Capacity, LDN, OS
Type, LD Name, RANK, Pool No., RAID, Capacity
Cache Partitioning Information
Displays information about cache partitioning.
<Cache Partitioning Detail Information>
Cache Partitioning Mode, Allocatable Cache Capacity, Total Allocated
Capacity, Total Unallocated Capacity, Total Minimum Capacity,
III-40
Chapter 5 Normal Operation
Display Item
Description
Current Segment Count, Allocatable Segment Count
<Cache Segment List>
Number, Segment Name, Max. Capacity, Min. Capacity, Allocated
Capacity
<Cache Segment Detail Information>
Segment Number, Segment Name, Maximum Capacity, Minimum
Capacity, Allocated Cache Capacity, LD Count, Total LD Capacity
<Cache Segment/LD List>
LDN, OS Type, LD Name
III-41
Chapter 5 Normal Operation
55..55..11 S
Sttaarrtt//TTeerrm
miinnaattiioonn ooff tthhee iiS
SM
Mvviieew
wC
Coom
mm
maanndd
(1) Start of the iSMview command
To start the command, enter iSMview in the command line.
If an option is omitted, the program version and the usage are displayed as shown below.
iSMview Version n.n.nnn
Usage : iSMview -d
iSMview -l
iSMview -ln
iSMview –sl
iSMview –sln
iSMview -r
iSMview -rn
iSMview -pl
iSMview -pln
iSMview -plm
iSMview -spl
iSMview -spln
iSMview -splm
iSMview -h
iSMview -hn
iSMview -c
iSMview -cn
iSMview -e
iSMview -en
iSMview -p
iSMview -a
iSMview -an
iSMview -ap
iSMview -aw
iSMview -ac
iSMview -ra
iSMview -cp
iSMview -cpn
iSMview -cpm
iSMview -all
[<Disk Array Name>]
<Disk Array Name>
<Disk Array Name> {<LDN> | <OS Type:LD Name>}
<Disk Array Name>
<Disk Array Name> {<LDN> | <OS Type:LD Name>}
<Disk Array Name>
<Disk Array Name> <PDG>-<RANK>
<Disk Array Name>
<Disk Array Name> <Pool Number>
<Disk Array Name> <Pool Name>
<Disk Array Name>
<Disk Array Name> <Pool Number>
<Disk Array Name> <Pool Name>
<Disk Array Name>
<Disk Array Name> <PDG>-<PDN>
<Disk Array Name>
<Disk Array Name> <Abbreviated Name> <Resource Number>
<Disk Array Name>
<Disk Array Name> <Abbreviated Name> <Resource Number>
<Disk Array Name>
<Disk Array Name>
<Disk Array Name> {<LDN> | <OS Type>:<LD Name>}
<Disk Array Name> {<Port Name> | <Port Number>}
<Disk Array Name> <LD Set Type>:<LD Set Name>
<Disk Array Name> <LD Set Type>:<LD Set Name>
<Disk Array Name>
<Disk Array Name>
<Disk Array Name> <Segment Number>
<Disk Array Name> <Segment Name>
<Disk Array Name>
* The above is a display sample. The actual program version is displayed.
(2) Termination of the iSMview command
When the iSMview command terminates normally, items for the specified options are displayed.
III-42
Chapter 5 Normal Operation
55..55..22 iiS
SM
Mvviieew
wC
Coom
mm
maanndd O
Oppttiioonnss
This section explains the functions of the iSMview command and the corresponding options.
y -d option:
Lists the information of the target disk array. To display the detailed information of the disk array,
specify Disk Array Name.
For details, refer to (1) “Display of a disk array list” and (2) “Display of detailed information about a
specified disk array”.
y -l option:
Displays information about the LDs of a specified disk array.
For details, refer to (3) “List of logical disk information”.
y -ln option:
Displays detailed information about a specified LD.
For details, refer to (4) “Display of detailed logical disk information”.
y -sl option:
Displays list information of snapshots about the specified LD.
For details, refer to (5) “Display of snapshot list information about a logical disk”.
y -sln option:
Displays snapshot detailed information about the specified LD.
For details, refer to (6) “Display of snapshot detailed information about a logical disk”.
y -r option:
Displays information about the RANKs of a specified logical disk.
For details, refer to (7) “List of RANK information”.
y -rn option:
Displays detailed information about a specified RANK.
For details, refer to (8) “Display of detailed RANK information”.
y -pl option:
Displays detailed pool information about a specified disk array.
For details, refer to (9) “List of pool information”.
y -pln option:
Displays detailed information about a specified pool.
For details, refer to (10) “Display of detailed pool information”.
y -plm option:
Displays detailed information about a specified pool.
For details, refer to (10) “Display of detailed pool information”.
y -spl option:
Displays information about snapshot pool of the specified disk array.
For details, refer to (11) “List of snapshot pool”.
y -spln option:
Displays snapshot detailed information about the specified pool.
For details, refer to (12) “Display of snapshot detailed information about pool”.
y -splm option: Displays snapshot detailed information about the specified pool.
For details, refer to (12) “Display of snapshot detailed information about pool”.
y -h option:
Displays information about the PDs of a specified disk array.
For details, refer to (13) “List of physical disk information”.
y -hn option:
Displays detailed information about a specified PD.
For details, refer to (14) “Display of detailed physical disk information”.
y -c option:
Displays information about the controllers of a specified physical disk.
For details, refer to (15) “Display of controller information about a specified disk array”.
y -cn option:
Displays detailed information about a specified controller in a specified disk array.
For details, refer to (16) “Display of detailed information about a specified controller in a specified
disk array”.
y -e option:
Displays information about the disk enclosures of a specified disk array.
For details, refer to (17) “Display of disk enclosure information”.
III-43
Chapter 5 Normal Operation
y -en option:
Displays detailed information about a specified disk enclosure in a specified disk array.
For details, refer to (18) “Display of detailed information about a specified disk enclosure”.
y -p option:
Displays information about the ports of a specified disk array.
For details, refer to (19) “Display of port information”.
y -a option:
Displays information about the access control of a specified disk array.
For details, refer to (20) “Display of access control information about a specified disk array”.
y -an option:
Displays information about the access control of a specified LD.
For details, refer to (21) “Display of LD access control information”.
y -ap option:
Displays information about access control (PORT mode) of a specified port.
For details, refer to (22) “Display of information about port access control (PORT mode)”.
y -aw option:
Displays information about the access control (WWN mode) of a specified LD Set.
For details, refer to (23) “Display of information about LD Set Access Control (WWN mode)”.
y -ac option:
Displays information about the access control of a specified LD Set.
For details, refer to (24) “Display of information about LD Set Access Control”.
y -ra option:
Displays information about LD Administrator of a specified disk array.
For details, refer to (25) “Display of information about LD Administrator of a disk array”.
y -cp option:
Displays information about cache partitioning of a specified disk array.
For details, refer to (26) “Display of information about cache partitioning of a disk array”.
y -cpn option:
Displays information about cache partitioning of a specified segment number.
For details, refer to (27) “Display of information about cache partitioning of a segment”.
y -cpm option:
Displays information about cache partitioning of a specified segment name.
For details, refer to (27) “Display of information about cache partitioning of a segment”.
y -all option:
Displays all information about a target disk array.
For details, refer to (28) “Display of all configuration information”.
(1) Display of a disk array list
If only the -d option is specified, the system displays a list of connected target disk array systems.
#iSMview -d
--- Disk Array List --Product ID
S2110 Disk Array
S4100 Disk Array
S4100 Disk Array
Disk Array Name
Storage001
Storage002
Storage003
Resource State
ready
attn.
fault
III-44
Monitoring
running
stop
stop
(fault)
Chapter 5 Normal Operation
The display items are as follows:
(1)
Disk Array List
Lists information about target disk arrays.
Product ID:
Displays the model names of the target disk arrays.
Disk Array Name: Displays the individual names of the target disk arrays.
Resource State:
Displays one of the following indicating the highest-level one of events that have occurred in
the disk array and the resources:
Monitoring:
ready:
Normal (The disk array and all the resources are in normal state.)
attn.:
Attention (An event which may affect operation has occurred.)
fault:
Abnormal (An event that affects operation has occurred.)
Displays one of the following as the monitoring state of the disk array:
running:
The disk array is to be monitored.
starting:
The disk array is in the monitoring start processing.
stopping:
The disk array is in the monitoring stop processing.
stop:
The disk array is not to be monitored.
stop(fault):
Information about the disk array cannot be obtained for some reason, and the
monitoring of the disk array has stopped.
stop(maint):
The monitoring of the disk array has stopped, and the disk array is to be
maintained by the maintenance tool. (“(Maintenance)” is shown in the
detailed information of the target disk array.)
stop(config.): The monitoring of the disk array has stopped, and the configuration setting is
in progress. (“(Configuration)” is shown in the detailed information of the
target disk array.)
wait recovery: The disk array is waiting for the recovery of the monitoring function.
* “attn.” or “fault” displayed in the column “Resource State” indicates that the disk array has encountered an
event.
“stop(fault)” displayed in the column “Monitoring” indicates that the information of the disk array could not be
obtained normally.
* If the iSM server recognizes a disk array which is not in any of the above monitoring states, “???” is displayed
in the column “Monitoring”.
* Refer to 3.3 “Nickname Setting” for details on the setting of Disk Array Name.
Refer to 3.2 “State Monitoring” for details on the setting for the monitoring function to start/stop monitoring the
disk array status.
III-45
Chapter 5 Normal Operation
(2) Display of detailed information about a specified disk array
If Disk Array Name is specified in the -d option, the system displays detailed information about the specified disk
array.
#iSMview -d Storage003
--- Disk Array Detail Information --Disk Array Name
Resource State
Monitoring
Vendor ID
Product ID
Product FW Revision
Serial Number
SAA
World Wide Name
Total Capacity
User System Code
Storage Control Software Revision
: Storage003
: fault
: stop(fault)
: XXX
: S4300 Disk Array
: 0730
: 00001234
: 02003000000000000002000000000000
000000000000000000000000
: 200000004C517D00
: 1.333TB
: 0123456789
: 0211
--- Disk Array Control Mode --Cross Call Mode
Auto Assignment Mode
Auto Repair Mode
Auto Time Setup Mode
: on
: off
: on
: on
--- Access Control Information --Access Control Mode
: on
--- Control Path --Path No.(h)
Control Path
Path State
: 00
: 127.0.0.1
: ready
Path No.(h)
Control Path
Path State
: 01
: --: ---
--- Expand LUN --Port No.(h) Exist Expand LUN
00-00
yes on
00-01
no --01-00
yes on
01-01
no ----- Cache Partitioning Information --Cache Partitioning Mode
: on
--- Product Information --Product
State
NEC Storage BaseProduct Ver3.1(Dir1,2)
NEC Storage BaseProduct Ver2.1(Dir3,4)
NEC Storage BaseProduct Ver2.1(Dir5,6)
NEC Storage BaseProduct Ver2.1(Dir7,8)
NEC Storage AccessControl(144Connection)
NEC Storage CachePartitioning(10TB)
NEC Storage DynamicDataReplication Ver2(10TB)
NEC Storage PerformanceOptimizer(10TB)
NEC Storage RemoteDataReplication Ver2(10TB)
NEC Storage RemoteDataReplication/DisasterRecovery(10TB)
NEC Storage PerformanceMonitor
NEC Storage ReallocationControl
III-46
: available
: available
: available
: available
: available
: available
: available
: available
: available
: available
: available
: available
Chapter 5 Normal Operation
The display items are as follows:
(1)
Disk Array Detail Information
Displays the detailed information of the specified disk array.
Disk Array Name:
Individual name of the disk array
Resource State:
Status of the disk array and resources
For details, refer to (1) “Display of a disk array list”.
Monitoring:
Monitoring state of the disk array
For details, refer to (1) “Display of a disk array list”.
Vendor ID:
ID of the disk array’s supplier
Product ID:
Model name of the disk array
Product FW Revision:
Information about the version of the disk array
Serial Number:
Product number of the disk array
SAA:
SAA of the disk array
World Wide Name:
Worldwide name of the disk array
Total Capacity:
Total capacity of the physical disks
User System Code:
User system code
* If the target disk array is not supported, “0000000000” is displayed.
Storage Control
Software Revision:
Revision of storage control software
* Refer to 3.3 “Nickname Setting” for details on the setting of Disk Array Name.
Refer to 3.2 “State Monitoring” for details on the setting for the monitoring function to start/stop monitoring the
disk array status.
(2)
Disk Array Control Mode
Displays the values set for the specified disk array.
(3)
Cross Call Mode:
Indicates that the Cross Call mode is on/off.
Auto Assignment Mode:
Indicates that the Auto Assignment mode is on/off.
Auto Repair Mode:
Indicates that the Auto Repair mode is on/off.
Auto Time Setup Mode:
Indicates that the Auto Time Setup mode is on/off.
Access Control Information
Displays access control information.
Access Control Mode:
(4)
Indicates that the Access Control mode is on/off.
Control Path
Displays information about the paths to which the disk array is connected.
Path No.(h):
Indicates the path number.
Control Path:
Indicates the control path.
The IP address (with LAN connection) or the FC path name is displayed.
“-” is displayed if there is no path to which the current path is switched when a failure occurs.
Path State:
Indicates either of the following as the path state:
ready:
Normal state
fault:
Abnormal state (blockade)
III-47
Chapter 5 Normal Operation
(5)
Expand LUN
Displays the installation status of each port and the status (on/off) of the Expand LUN function.
Port No.(h):
Indicates the HD number and port number.
Exist:
Indicates yes/no as the port installation status.
Expand LUN:
Indicates that the Expand LUN function is on/off.
* The status of the Expand LUN function is displayed for only the disk arrays of the
100/1100/1200/1300/2100/2200/2300 series.
* “---” is displayed in the column “Expand LUN” if the port is not installed.
(6)
Cache Partitioning Information
Cache Partitioning Mode:
Indicates the status (on/off) of cache partitioning mode.
(7)
Product Information
Displays the status of each function.
Product: Indicates the licenses granted for the disk array.
NEC Storage BaseProduct:
Indicates that the license to use BaseProduct has been granted.
NEC Storage AccessControl:
Indicates that the license to use AccessControl has been
granted.
NEC Storage AccessControl(WWN):
Indicates that the license to use AccessControl(WWN) has
been granted.
NEC Storage CachePartitioning:
Indicates that the license to use CachePartitioning has been
granted.
NEC Storage DynamicDataReplication: Indicates that the license to use DynamicDataReplication has
been granted.
NEC Storage DynamicSnapVolume:
Indicates that the license to use DynamicSnapVolume has
been granted.
NEC Storage PerformanceOptimizer:
Indicates that the license to use PerformanceOptimizer has
been granted.
NEC Storage RemoteDataReplication:
Indicates that the license to use RemoteDataReplication has
been granted.
NEC Storage RemoteDataReplication/DisasterRecovery:
Indicates that the license to use
RemoteDataReplication/DisasterRecovery has been granted.
NEC Storage PerformanceMonitor:
Indicates that the license to use PerformanceMonitor has been
granted.
NEC Storage ReallocationControl:
Indicates that the license to use ReallocationControl has been
granted.
State:
Indicates the availability of the individual products.
available:
The product can be used.
not available:
The product cannot be used.
* If a specified disk array is not supported, detailed information is not displayed.
III-48
Chapter 5 Normal Operation
* If no disk arrays exist, the error message as shown below is displayed.
iSM11162:Disk Array Subsystem which can be operated by this program is not found.
* If a specified disk array does not exist, the error message as shown below is displayed.
iSM11163:Specified Disk Array Subsystem is not found.
(3) List of logical disk information
If the -l option is specified, the system lists information about the LDs of a specified disk array.
#iSMview -l Storage001
--- LD Information --LDN(h) OS Type
0000 NX
0001 NX
0002 NX
LD Name
nxsvr/c10t0d0
nxsvr/c10t0d1
nxsvr/c10t0d2
LD State
ready
ready
ready
The display items are as follows:
(1)
LD Information
Lists the information of all logical disks bound in the specified disk array.
LDN(h):
LD number
OS Type: Displays one of the following indicating the type of OS used with each LD, which is obtained from
the disk array.
A4:
Logical disk operated by the ACOS4 system
A2:
Logical disk operated by the ACOS2 system
NX:
Logical disk operated by the HP-UX system
WN:
Logical disk operated by the Windows system
CX:
Logical disk operated by the Solaris system
LX:
Logical disk operated by the Linux system
AX:
Logical disk operated by the AIX system
LD Name: Arbitrary ID information (logical disk name) of each LD, which is obtained from the disk array
LD State: Displays one of the following as the operating state of each LD.
ready:
All the PDs making up the LD are in normal state.
ready(formatting):
The logical disk is being formatted. (The LD is available.)
attn.(reduce):
A failing PD has been disconnected (reduced).
attn.(rebuilding):
The rebuilding of data is in progress.
attn.(copy back):
A spare disk is being copied in redundant state.
attn.(preventive copy):
Preventive exchange assignment processing is in progress.
attn.(unformatted):
The logical disk has not been formatted.
attn.(formatting):
The logical disk is being formatted. (The LD is unavailable.)
attn.(format-fail):
A format error has occurred.
attn.(expanding):
Logical expansion processing is in progress.
attn.(expand-fail):
A logical expansion error has occurred.
fault:
A functional error has occurred.
fault(media error):
A medium error has occurred.
III-49
Chapter 5 Normal Operation
* If no LDs have been bound in a specified disk array, the error message as shown below is displayed.
iSM11173:LD doesn’t exist.
* Refer to 3.3 “Nickname Setting” for details on the settings of OS Type and LD Name (logical disk name).
(4) Display of detailed logical disk information
If the -ln option is specified, the system displays detailed information about a specified logical disk.
#iSMview -ln Storage002 00
--- LD Detail Information --LDN(h)
: 0000
OS Type
: NX
LD Name
: nxsvr/c10t0d0
LD Capacity
: 2.1GB(2,254,857,830Bytes)
Pool No.(h)
: 0000
Pool Name
: Pool0000
RaidType
: RAID1
LD State
: ready
Expansion State
: --Group
: Reserve
Purpose
: --RPL Attribute
: MV
Snapshot Attribute
: BV
Current Owner
: 00/01
Default Owner
: 00
Cache Resident
: no
PD List(h)
: 00-00,01,02,03
Segment Number(h)
: 00
Segment Name
: Default
--- LD/Port List --Port No.(h)
Port Name
00-00
10000000000000130100
--- LD/WWN List --Platform
LD Set Name
WN
WIN_SET
NX
NX_SET
Path Count
2
3
--- LD Set List --Platform
LD Set Name
WN
WIN_SET
LX
LIN_SET
Path Count
2
4
Port State
ready
Port Mode
Port
LD Count
2
16
The display items are as follows:
(1)
LD Detail Information
Displays the detailed information of a specified LD.
LDN(h):
Logical disk number
OS Type:
Type of OS used with each LD. For details, refer to (3) “List of LD information”.
LD Name:
Arbitrary ID information (logical disk name) of each LD, which is obtained from the disk array
LD Capacity:
Capacity of the LD
III-50
Chapter 5 Normal Operation
Progress Ratio:
Percentage of progress
The system displays this item only when “LD State” indicates attn. (rebuilding, copy back,
preventive copy, formatting, or expanding), and does not display the item in any other cases.
RANK(h):
Rank number. RANK(h), and Pool No.(h) and Pool Name are mutually exclusive.
Pool No.(h):
Pool number
Pool Name:
Pool name
RaidType:
RAID type of the LD
LD State:
Operating state of the LD
For details, refer to (3) “List of LD information”.
Expansion State: Pool expansion state. (LD expansion is displayed by LD State.)
Group:
Purpose:
---:
Pool expansion has not been performed or has terminated normally.
expanding:
Pool expansion is in progress.
expand-fail:
Pool expansion has failed.
Usage of LD. Displays one of the following.
Preserve:
LD for preserve groups
Reserve:
LD for reserve groups
---:
LD not set for a group
Attribute of LD. Displays one of the following.
RPL:
Logical disk for which only pair setting for replication is made
Snapshot:
Logical disk for which only snapshot setting is made (BV)
Link Volume:
Logical disk that is a link-volume (LV)
RPL/Snapshot:
Logical disk for which a pair setting for replication and snapshot setting
have already been made
RPL Attribute:
Optimization :
Work disk for optimizing performance
---:
General logical disk for which no specific usage is set
RPL type. Displays one of the following.
MV:
MV
RV:
RV
RV/MV:
Volume that can be both RV and MV
IV:
Volume for which a pair is not set
---:
Volume that is not targeted for replication
Snapshot Attribute: Snapshot type. Displays one of the following.
BV:
BV (Volume from which snapshot is copied)
SV:
SV (Volume storing information used to manage difference of BV at
some point in time)
LV:
LV (Virtual volume linking a BV or SV and accessing it indirectly)
SDV:
SDV (Special logical disk configuring snapshot reserve area (SRA))
SV*:
Volume that is a type of snapshot volumes and does not have
information used to manage difference of BV
---:
Current Owner:
Volume that is not a snapshot target
Indicates the number of the host director that has the current ownership for the target LD. If the
Cross Call mode of the disk array is on, two host director numbers are displayed.
Default Owner:
Indicates the number of the host director that has the initial ownership for the target LD.
III-51
Chapter 5 Normal Operation
Cache Resident:
If the LD is a cache resident disk, “yes” is displayed. If it is a general disk, “no” is displayed.
PD List(h):
Lists the PDs making up the target LD.
Segment Number(h): Indicates the number of the cache segment to which a target LD belongs.
Segment Name:
Indicates the name of the cache segment to which a target LD belongs.
* A 1-digit number (0) can be specified as a logical disk number.
* Current Owner and Default Owner are displayed for the disk arrays of the
100/1100/1200/1300/2100/2200/2300 series.
* Cache Resident is displayed for only the disk arrays of the 3000/4000 series and the disk arrays with pool.
* Refer to 3.3 “Nickname Setting” for details on the setting of OS Type and LD Name.
(2)
LD/Port List
Lists information about the access control (PORT mode) of the specified LD.
Port No.(h):
Director number and port number
Port Name:
Port name
Port State:
Port state
Port Mode:
Port mode
* If LD/Port List does not exist, the above information is not displayed.
* LD/Port List is displayed for only the disk arrays of the 1100/1200/2100/2200/3100/4100 series.
(3)
LD/WWN List
Lists information about the access control (WWN mode) of the specified LD.
Platform:
Platform
LD Set Name:
LD Set name
Path Count:
Number of paths
* LD/WWN List is displayed for only the disk arrays of the 1100/1200/2100/2200/3100/4100 series.
* If LD/WWN List does not exist, the above information is not displayed.
(4)
LD Set List
Lists information about the LD Set of the specified LD.
Platform:
Platform
LD Set Name:
LD Set name
Path Count:
Number of paths
LD Count :
Number of LDs
* LD Set List is displayed for only the disk arrays of the 100/1300/2300/2800/3300/4300 series.
* If LD Set List does not exist, the above information is not displayed.
* If a specified LD does not exist, the error message as shown below is displayed.
iSM11173:LD doesn’t exist.
* Refer to 3.3 “Nickname Setting” for details on the setting of Port Name.
III-52
Chapter 5 Normal Operation
(5) Display of snapshot list information about a logical disk
If the -sl option is specified, the system displays snapshot list information of logical disks about the specified disk
array.
# iSMview -sl Storage001
--- Snapshot LD Information --LDN(h) OS Type LD Name
0000 NX
LD0000
0001 NX
LD0001
0002 NX
LD0002
Snapshot Attribute
BV
SV
LV
#
The displayed items are as follows:
(1)
Snapshot LD Information
Lists information of all the LDs bound in the disk array.
LDN(h):
LD number
OS Type:
Displays the OS type for each LD.
LD Name:
Arbitrary identification information (logical disk name) for each LD acquired from the disk
array
Snapshot Attribute: Snapshot volume type
* If no snapshot LD is bound in the disk array, the error message as shown below is displayed.
11184 Snapshot LD doesn’t exist.
(6) Display of snapshot detailed information about a logical disk
If the -sln option is specified, the system displays snapshot detailed information about the specified LD.
# iSMview -sln Storage001 0001h
--- Snapshot LD Detail Information --LDN(h)
: 0001
OS Type
: NX
LD Name
: Snap_BV0001
LD Capacity
: 11.5GB
Snapshot Attribute
: BV
--- Snapshot LD List --LDN(h) OS Type LD Name
0002
NX
LD00002
0003
NX
LD00003
Snapshot Attribute
SV
LV
#
The displayed items are as follows:
III-53
Chapter 5 Normal Operation
(1)
Snapshot LD Detail Information
Displays detailed information about the specified LD.
LDN(h):
LD number
OS Type:
Displays the OS type for each LD.
LD Name:
Arbitrary identification information (logical disk name) for each LD acquired from the disk
array
LD Capacity:
LD capacity
Snapshot Attribute: Snapshot volume type
BV: Base-volume (Volume from which snapshot is replicated)
SV: Snapshot-volume (Volume storing information used to manage difference of BV at
some point in time)
LV: Link-volume (Virtual volume linking a BV or SV and having indirect access)
SV*: A type of snapshot-volume with no information to manage difference of BV
(2)
Snapshot LD List/Link Control LD List
Displays LD information linked with the specified LD.
LDN(h):
LD number
OS Type:
Displays the OS type for each LD.
LD Name:
Arbitrary identification information (logical disk name) for each LD acquired from the
disk array
Snapshot Attribute: Snapshot volume type
BV: Base-volume (Volume from which snapshot is replicated)
SV: Snapshot-volume (Volume storing information used to manage difference of BV at
some point in time)
LV: Link-volume (Virtual volume linking a BV or SV and having indirect access)
SV*: A type of snapshot-volume with no information to manage difference of BV
(7) List of RANK information
If the -r option is specified, the system lists information about the RANKs of a specified disk array.
#iSMview -r Storage001
--- RANK Information --RANK No.(h)
00-00
00-01
RaidType
RAID5(4+P)
RAID5(4+P)
RANK State
ready
attn.(reduce)
The display items are as follows:
(1)
RANK Information
Lists information of all the RANKs bound in the disk array.
RANK No.(h):
RANK number
Raid Type:
RAID type of each RANK
RANK State:
RANK state
ready:
The RANK is in normal state.
attn.(reduce):
A failing PD has been disconnected (reduced).
III-54
Chapter 5 Normal Operation
attn.(rebuilding):
The rebuilding of data is in progress.
attn.(copy back):
A spare disk is being copied in redundant state.
attn.(preventive copy):
Preventive exchange assignment processing is in progress.
attn.(expanding):
Logical expansion processing is in progress.
attn.(expand-fail):
A logical expansion error has occurred.
fault:
A functional error has occurred.
fault(media error):
A medium error has occurred.
* RANK Information is displayed only for other than the disk arrays with pool.
* If no RANKs exist in a specified disk array, the error message as shown below is displayed.
iSM11172:RANK doesn’t exist.
(8) Display of detailed RANK information
If the -rn option is specified, the system displays detailed information about a specified RANK.
#iSMview -rn Storage001 00-00
--- RANK Detail Information --RANK No.(h)
: 00-00
RaidType
: RAID5(4+P)
RebuildTime
: 10hour (s)
RANK State
: attn.(rebuilding)
RANK Capacity
: 66.5GB
Progress Ratio
: 12%
PD List(h)
: 00-00,01,02,03,04
--- Partition List --Start Address(h)
00000000
01000000
01010000
End Address(h)
00ffffff
0100ffff
01ffffff
Capacity
8192MB
32MB
8160MB
LDN(h)
0000
free
0002
The display items are as follows:
(1)
RANK Detail information
Displays the detailed information of the specified RANK.
RANK No.(h):
RANK number
RaidType:
RAID type of the RANK
For details, refer to (6) “List of RANK information”.
RebuildTime:
Time for rebuilding the RANK
RANK State:
RANK state
RANK Capacity:
Capacity of the RANK
Progress Ratio:
Percentage of progress
The system displays this item only when “RANK State” indicates attn. (rebuilding, copy back,
preventive copy, or expanding), and does not display the item in any other cases.
PD List(h):
List of the PDs making up the target RANK
III-55
Chapter 5 Normal Operation
(2)
Partition List
Lists information about the partitions of the specified RANK.
Start Address(h):
Start address of the LD or free area
End Address(h):
End address of the LD or free area
Capacity:
LD capacity in units of MBs
LDN(h):
The logical disk number is displayed in format of LD No.
“free” is displayed if the LD has not been bound.
* Partition List is displayed only for other than the disk arrays with pool.
* If a specified RANK does not exist, the error message as shown below is displayed.
iSM11172:RANK doesn’t exist.
(9) List of pool information
If the -pl option is specified, the system lists information about the pools of a specified disk array.
#iSMview –pl Storage001
--- Pool Information --Pool No.(h) Pool Name
0000
Pool01
0001
Pool02
Pool Type Pool State
basic
ready
dynamic
attn.(preventive copy)
The display items are as follows:
(1)
Pool Information
Lists the information of all pools bound in the specified disk array.
Pool No.(h):
Pool number
Pool Name:
Pool name
Pool Type:
Pool type
basic:
Basic pool
dynamic: Dynamic pool
Pool State:
Pool state
ready:
The pool is in normal state.
attn.(reduce):
The failing PD has been disconnected (reduced).
attn.(rebuilding):
The rebuilding of data is in progress.
attn.(copy back):
A spare copy is being copied in redundant state.
attn.(preventive copy): Preventive exchange assignment processing is in progress.
fault:
A functional error has occurred.
* Pool State is displayed only for the disk arrays with pool.
* If no pools exist, the error message as shown below is displayed.
iSM11182:Pool doesn’t exist.
III-56
Chapter 5 Normal Operation
(10) Display of detailed pool information
If the -pln or -plm option is specified, the system displays detailed information about a specified pool.
#iSMview -pln Storage001 00
--- Pool Detail Information --Pool No.(h)
: 0000
Pool Name
: Pool01
Pool Type
: dynamic
RAID Type
: RAID6(4+PQ)
Pool State
: ready
Expansion State
: expanding
Progress Ratio
: 75%
Rebuild Time(hour)
:1
Expansion Time(hour) : 2
Pool Capacity
: 66.5GB(71,403,831,296Bytes)
Used Pool Capacity
: 4.1GB(4,466,933,760Bytes)
Free Pool Capacity
: 62.3GB(66,936,897,536Bytes)
PD List(h)
: 00-00,01,02,03,04,05
Expanding PD List(h) : 00-07
--- Partition List --Start Address(h)
-------
End Address(h)
-------
Capacity(GB) LDN(h)
2.0
0000
2.0
0001
62.3
free
The display items are as follows:
(1)
Pool Detail Information
Displays the detailed information of the specified pool.
Pool No.(h):
Pool number
Pool Name:
Pool name
Pool Type:
Pool type
basic: Basic pool
dynamic: Dynamic pool
RAID Type:
RAID type of the pool
Pool State:
Pool state
For details, refer to (8) “List of pool information”.
Expansion State:
Pool expansion state
---: Pool expansion has not been performed or has terminated normally.
expanding: Pool expansion is in progress.
expand-fail: Pool expansion has failed.
Progress Ratio:
Percentage of progress of pool expansion
Rebuild Time(hour):
Target time for rebuilding the pool
Expansion Time(hour):
Target time for expanding the pool
Pool Capacity:
Capacity of the pool
Used Pool Capacity:
Space used by the pool
Free Pool Capacity:
Free space not used by the pool
PD List(h):
List of PDs making up the target pool
Expanding PD List(h):
List of expanding PDs
III-57
Chapter 5 Normal Operation
(2)
Partition List
Lists information about the partitions of the specified pool.
Start Address(h):
Start address of the LD or free area
End Address(h):
End address of the LD or free area
Capacity(GB):
LD capacity in units of GBs.
LDN(h):
The logical disk number is displayed in format of LD No. “free” is displayed if the LD has
not been bound.
* Partition List is displayed only for the disk arrays with pool.
* If a specified pool does not exist, the error message as shown below is displayed.
iSM11182:Pool doesn’t exist.
(11) List of snapshot pool
If the -spl option is specified, the system lists information about the snapshot pool of the specified disk array.
#iSMview –spl Storage001
--- Snapshot Pool Information --Pool No.(h) Pool Name
0000
Pool000
0001
Pool001
0002
Pool002
(1)
Threshold
----exceeded
Snapshot Pool Information
Lists the snapshot pool bound in the disk array.
Pool No.(h):
Pool number
Pool Name:
Pool name
Threshold:
Threshold state
exceeded: The snapshot used capacity exceeds the threshold.
---:
The snapshot used capacity does not exceed the threshold.
* If no snapshot pool exists, the error message as shown below is displayed.
11183 Snapshot Pool doesn’t exist.
III-58
Chapter 5 Normal Operation
(12) Display of snapshot detailed information about pool
If the -spln or -splm option is specified, the system displays snapshot detailed information about the specified
pool.
# iSMview -spln Storage001 0
--- Snapshot Pool Detail Information --Pool No.(h)
: 0001
Pool Name
: Pool0001
Pool Type
: dynamic
Threshold
: --Total Snapshot Capacity : 66.0GB
70,866,960,384Bytes
Used Snapshot Capacity : 0.0GB(0%)
0Bytes
Snapshot Threshold
: 52.7GB(80%)
56,693,568,000Bytes
Snapshot Control Capacity : 2.0GB
2,148,532,224Bytes
--- SDV List --LDN(h) OS Type
0380
(1)
LD Name
Pool0000_SDV0380
LD Capacity
22.0GB
Snapshot Pool Detail Information
Displays detailed information about snapshot of the pool.
(2)
Pool No.(h):
Pool number
Pool Name:
Pool name
Pool Type:
Pool type
Threshold:
Threshold state
Total Snapshot Capacity:
Capacity of the snapshot reserve area
Used Snapshot Capacity:
Space used for snapshot
Snapshot Threshold:
Snapshot threshold
Snapshot Control Capacity:
Space used for controlling snapshot
SDV List
Lists snapshot areas belonging to the specified pool.
LDN(h):
LD number
OS Type:
Displays the OS type for each LD.
LD Name :
Arbitrary identification information (logical disk name) for each LD acquired
from the disk array
LD Capacity:
Capacity of LD
* If the specified snapshot pool does not exist, the error message as shown below is displayed.
11183 Snapshot Pool doesn’t exist.
III-59
Chapter 5 Normal Operation
(13) List of physical disk information
If the -h option is specified, the system lists information about the PDs of a specified disk array.
#iSMview -h Storage001
--- PD List --PDN(h)
PD State
00-00
ready
00-01
info. (inactive)
00-02
ready
00-03
ready
00-04
ready
00-05
ready
00-06
ready
00-07
ready
Classification
data
data
data
data
not set
not set
not set
not set
The display items are as follows:
(1)
PD List
Lists the information of all PDs bound in the specified disk array.
PDN(h):
Physical disk number
PD State:
Operating state of each PD
ready:
The PD is in normal state.
attn.(powering up): The PD is being activated.
Classification:
attn.(rebuilding):
The PD is being rebuilt.
attn.(formatting):
The PD is being formatted.
info.(inactive):
The PD is under preventive maintenance.
fault:
The PD is in abnormal state.
Classification of the PD
data:
The target PD is available as a data area.
spare:
The target PD is a hot spare disk.
not set:
The target PD is not set as “data” or “spare”.
* If no PDs exist in a specified disk array, the error message as shown below is displayed.
iSM11174:PD doesn’t exist.
0
III-60
Chapter 5 Normal Operation
(14)
Display of detailed physical disk information
If the -hn option is specified, the system displays detailed information about a specified PD.
#iSMview -hn Storage001 00-00
--- PD Detail Information --PDN(h)
: 00-01
Classification
: data
State
: info. (inactive)
PD Capacity
: 17.8GB
Progress Ratio
: 75%
Vendor ID
: SEAGATE
Product ID
: ST373405FC
Product Revision
: 0002
Serial Number
: 3EK0KC5E000072119ZFK
LD List(h)
: 0002(LND0)
: 0003(LND2)
The display items are as follows:
(1)
PD Detail Information
Displays the detailed information of the specified PD.
PDN(h):
Physical disk number
Classification:
Classification of the PD
State:
data:
The target PD is available as a data area.
spare:
The target PD is a hot spare disk.
not set:
The target PD is not set as “data” or “spare”.
Operating state of the PD
For details, refer to (12) “List of physical disk information”.
PD Capacity:
Capacity of the PD
Progress Ratio:
Percentage of progress of pool rebuilding
Vendor ID:
ID of the product supplier
Product ID:
Model name of the product
Product Revision: Information about the product version
Serial Number:
Product number
LD List(h):
List of the LDs consisting of the target PD, which is displayed in format of LD No. (LD
Name).
* If a specified PD does not exist, the error message as shown below is displayed.
iSM11174:PD doesn’t exist.
III-61
Chapter 5 Normal Operation
(15) Display of controller information about a specified disk array
If the -c option is specified, the system displays information about the controllers of a specified disk array.
#iSMview -c Storage002
--- Controller Information --Type
Abbr. Name
BC Junction Box
BC_JB
BC Junction Box
BC_JB
Power Supply
DAC_PS
Power Supply
DAC_PS
Battery
DAC_BBU
Battery
DAC_BBU
FAN
DAC_FANU
FAN
DAC_FANU
FAN
DAC_FANL
FAN
DAC_FANL
Temperature
DAC_TEMP_ALM
Temperature
DAC_TEMP_ALM
Host Director
HD
Host Director
HD
Disk Director
DD
Disk Director
DD
Replication Director
RD
Replication Director
RD
Cache Module
CHE
Cache Module
CHE
Service Processor
SVP
Back Board
DAC_BB
Panel
PANEL
Power Control Card
PCC
Maintenance PC
MAINTE_PC
No.(h)
00
01
00
01
00
01
00
01
00
01
00
01
00
01
00
00
00
01
00
01
00
00
00
00
00
State
ready
ready
ready
ready
ready
ready
ready
ready
ready
ready
ready
ready
ready
ready
ready
ready
ready
ready
ready
ready
ready
ready
ready
ready
ready
The display items are as follows:
(1)
Controller Information
Type:
Displays one of the following as the resource type:
Back Board:
Backboard
Battery:
Battery
BC Junction Box:
Junction box of the basic cabinet
Cache Module:
Cache module
Disk Director:
Disk director
FAN:
Fan (upper/lower)
Host Director:
Host director
Panel:
Panel
Power Control Card:
Power control card
Power Supply:
Power supply
Replication Director:
Replication director
Service Processor:
Service processor
Maintenance PC:
Maintenance PC
Temperature:
Temperature sensor
Management Processor: Management Processor
Ethernet HUB:
Ethernet HUB
III-62
Info.
Port No.:00 FC
Port No.:00 FC
Port No.:00,01
Port No.:00,01
Port No.:00,01,02,03
Port No.:00,01,02,03
512.0MB
512.0MB
Chapter 5 Normal Operation
Abbr. Name:
Indicates the abbreviations of resources.
BC_JB:
BC Junction Box
CHE:
Cache module
DAC_BB:
Backboard
DAC_BBU:
Battery
DAC_FANL:
Fan (lower)
DAC_FANU:
Fan (upper)
DAC_PS:
Power supply
DAC_TEMP_ALM:
Temperature sensor
DD:
Disk director
HD:
Host director
MAINTE_PC:
Maintenance PC
PANEL:
Panel
PCC:
Power control card
RD:
Replication director
SVP:
Service processor
MP:
Management Processor
EHUB:
Ethernet HUB
No.(h):
Indicates the resource number.
State:
Displays one of the following as the resource state:
ready:
Normal state
fault:
Abnormal state
offline:
Not installed
attention(nolicense):
License not granted
rebuilding:
Rebuilding
charge:
Charging
* “attention(nolicense)” is displayed for host directors only.
* rebuilding is displayed for cache modules only.
* charge is displayed for batteries only.
Info.:
Additional information about the resource
With a host director:
The port number is displayed.
The physical protocol is displayed.
With a cache module: The cache capacity is displayed.
* If a cache module is faulty, information about the cache capacity may not be obtained correctly. In this case, “--” is displayed as the cache capacity.
* If no controllers exist in a specified disk array, the error message as shown below is displayed.
iSM11541:Controller resource doesn’t exist.
III-63
Chapter 5 Normal Operation
(16) Display of detailed information about a specified controller in a specified disk array
If the -cn option is specified, the system displays detailed information about a specified controller in a specified
disk array.
Specify a disk array and controller as shown below.
-cn <Disk Array Name> <Abbreviated Name> <Resource Number>
(a)
Basic Cabinet Junction Box (BC_JB)
# iSMview -cn Storage002 BC_JB 00h
--- BC Junction Box Information --Type
: BC Junction Box
Abbreviated Name
: BC_JB
Number(h)
: 00
State
: ready
Code(h)
: 41-00
The display items are as follows:
(1)
BC Junction Box Information
Displays the detailed information of the basic cabinet junction box.
Type:
Resource type
(“BC Junction Box” is displayed.)
Abbreviated Name: Abbreviation of the resource (“BC_JB” is displayed.)
Number(h):
Resource number
State:
Resource state
ready: Normal state
fault:
Code(h):
(b)
Abnormal state
Code for identifying the resource type
Cache Module (CHE)
# iSMview -cn Storage002 CHE 00h
--- Cache Module Information --Type
: Cache Module
Abbreviated Name : CHE
Number(h)
: 00
State
: ready
Code(h)
: a0-00
Capacity
: 1.2GB
The display items are as follows:
(1)
Cache Module Information
Displays the detailed information of the cache module.
Type:
Resource type
(“Cache Module” is displayed.)
Abbreviated Name: Abbreviation of the resource (“CHE” is displayed.)
III-64
Chapter 5 Normal Operation
(c)
Number(h):
Resource number
State:
Resource state
ready:
Normal state
rebuilding:
Rebuilding
fault:
Abnormal state
Code(h):
Code for identifying the resource type
Capacity:
Cache capacity
Back Board (DAC_BB)
# iSMview -cn Storage002 DAC_BB 00h
--- Back Board Information --Type
: Back Board
Abbreviated Name
: DAC_BB
Number(h)
: 00
State
: ready
Code(h)
: b1-00
The display items are as follows:
(1)
Back Board Information
Displays the detailed information of the back board.
Type:
Resource type
(“Back Board” is displayed.)
Abbreviated Name: Abbreviation of the resource (“DAC_BB” is displayed.)
Number(h):
Resource number
State:
Resource state
Code(h):
(d)
ready:
Normal state
fault:
Abnormal state
Code for identifying the resource type
Battery (DAC_BBU)
# iSMview -cn Storage002 DAC_BBU 00h
--- Battery Information --Type
: Battery
Abbreviated Name : DAC_BBU
Number(h)
: 00
State
: ready
Code(h)
: 65-00
III-65
Chapter 5 Normal Operation
The display items are as follows:
(1)
Battery Information
Displays the detailed information of the battery.
Type:
Resource type
(“Battery” is displayed.)
Abbreviated Name: Abbreviation of the resource (“DAC_BBU” is displayed.)
Number(h):
Resource number
State:
Resource state
ready:
Normal state
charge: Charging
fault:
Code(h):
(e)
Abnormal state
Code for identifying the resource type
Fan (lower) (DAC_FANL)
# iSMview -cn Storage002 DAC_FANL 00h
--- FAN Information --Type
: FAN
Abbreviated Name : DAC_FANL
Number(h)
: 00
State
: ready
Code(h)
: 69-00
The display items are as follows:
(1)
FAN Information
Displays the detailed information of the fan (lower).
Type:
Resource type
(“FAN” is displayed.)
Abbreviated Name: Abbreviation of the resource (“DAC_FANL” is displayed.)
Number(h):
Resource number
State:
Resource state
ready: Normal state
fault:
Code(h):
(f)
Abnormal state
Code for identifying the resource type
Fan (upper) (DAC_FANU)
# iSMview -cn Storage002 DAC_FANU 00h
--- FAN Information --Type
: FAN
Abbreviated Name : DAC_FANU
Number(h)
: 00
State
: ready
Code(h)
: 69-00
III-66
Chapter 5 Normal Operation
The display items are as follows:
(1)
FAN Information
Displays the detailed information of the fan (upper).
Type:
Resource type
(“FAN” is displayed.)
Abbreviated Name: Abbreviation of the resource (“DAC_FANU” is displayed.)
Number(h):
Resource number
State:
Resource state
ready: Normal state
fault:
Code(h):
(g)
Abnormal state
Code for identifying the resource type
Power Supply (DAC_PS)
# iSMview -cn Storage002 DAC_PS 00h
--- Power Supply Information --Type
: Power Supply
Abbreviated Name : DAC_PS
Number(h)
: 00
State
: ready
Code(h)
: 43-00
The display items are as follows:
(1)
Power Supply Information
Displays the detailed information of the power supply.
Type:
Resource type
(“Power Supply” is displayed.)
Abbreviated Name: Abbreviation of the resource (“DAC_PS” is displayed.)
Number(h):
Resource number
State:
Resource state
ready: Normal state
fault:
Code(h):
(h)
Abnormal state
Code for identifying the resource type
Temperature Sensor (DAC_TEMP_ALM)
# iSMview -cn Storage002 DAC_TEMP_ALM 00h
--- Temperature Information --Type
: Temperature
Abbreviated Name : DAC_TEMP_ALM
Number(h)
: 00
State
: ready
Code(h)
: 6c-00
III-67
Chapter 5 Normal Operation
The display items are as follows:
(1)
Temperature Information
Displays the detailed information of the temperature sensor.
Type:
Resource type
(“Temperature” is displayed.)
Abbreviated Name: Abbreviation of the resource (“DAC_TEMP_ALM” is displayed.)
Number(h):
Resource number
State:
Resource state
ready: Normal state
fault:
Code(h):
(i)
Abnormal state
Code for identifying the resource type
Disk Director (DD)
# iSMview -cn Storage002 DD 00h
--- Disk Director Information --Type
: Disk Director
Abbreviated Name
: DD
Number(h)
: 00
State
: ready
Code(h)
: 90
Director Location
: DA00
Port No.(h)
: 00,01
The display items are as follows:
(1)
Disk Director Information
Displays the detailed information of the disk director.
Type:
Resource type
(“Disk Director” is displayed.)
Abbreviated Name: Abbreviation of the resource (“DD” is displayed.)
Number(h):
Resource number
State:
Resource state
ready: Normal state
fault:
Abnormal state
offline: Not installed
Code(h):
Code for identifying the resource type
Director Location:
Location of the director.
Port No.(h):
Director’s port numbers
* “---” is displayed for “Director Location” if a specified disk array is of the 100/1000/2000 series.
III-68
Chapter 5 Normal Operation
(j)
Host Director (HD)
# iSMview -cn Storage002 HD 00h
--- Host Director Information --Type
: Host Director
Abbreviated Name : HD
Number(h)
: 00
State
: ready
Code(h)
: 80
Director Location
: HA00
Protocol
: FC
Port No.(h)
: 00,01,02,03
--- Host Director/Port Information --Port No.(h)
: 00-00
Port Name
: Storage4100/0000
Port Type
: host
State
: ready
Mode
: WWN
WWNN
: 200000004C517D00
WWPN
: 210000004C517D00
Data Rate
: 2Gbps
Topology
: Fabric
N_Port_ID/Switch : 0000EFh/01h
(Omitted)
The display items are as follows:
(1)
Host Director Information
Displays the detailed information of the host director.
Type:
Resource type
(“Host Director” is displayed.)
Abbreviated Name: Abbreviation of the resource (“HD” is displayed.)
Number(h):
Resource number
State:
Resource state
ready:
Normal state
fault:
Abnormal state
offline:
Not installed
attention(nolicense): License not granted
Code(h):
Code for identifying the resource type
Director Location:
Location of the director
Protocol:
Protocol
Port No.(h):
Director’s port numbers
III-69
Chapter 5 Normal Operation
(2)
Host Director/Port Information
Displays the detailed information of the port.
Port No.(h):
Port number
Port Name:
Port name
Port Type:
Port type
RPL: Port for replication
host: Port for a host
State:
Resource state
ready: Normal state
fault:
Abnormal state
Mode:
Access control mode (“WWN” or “PORT”)
WWNN:
Word Wide Node Name
WWPN:
World Wide Port Name
Data Rate:
Data transfer rate (“1 Gbps” or “2 Gbps”)
Topology:
Topology (“FC-AL” or “Fabric”)
N_Port_ID/Switch: N_Port_ID and Switch
* “---” is displayed for “Director Location” if the specified disk array is other than that with pool of the
100/1000/2000 series.
(k)
Maintenance PC (MAINTE_PC)
# iSMview -cn Storage002 MAINTE_PC 00h
--- Maintenance PC Information --Type
: Maintenance PC
Abbreviated Name : MAINTE_PC
Number(h)
: 00
State
: ready
Code(h)
: b8-00
The display items are as follows:
(1)
Maintenance PC Information
Displays the detailed information of the maintenance PC.
Type:
Resource type
(“Maintenance PC” is displayed.)
Abbreviated Name: Abbreviation of the resource (“MAINTE_PC” is displayed.)
Number(h):
Resource number
State:
Resource state
ready: Normal state
fault:
Code(h):
Abnormal state
Code for identifying the resource type
III-70
Chapter 5 Normal Operation
(l)
Panel (PANEL)
# iSMview -cn Storage002 PANEL 00h
--- Panel Information --Type
: Panel
Abbreviated Name : PANEL
Number(h)
: 00
State
: ready
Code(h)
: b5-00
The display items are as follows:
(1)
Panel Information
Displays the detailed information of the panel.
Type:
Resource type
(“Panel” is displayed.)
Abbreviated Name: Abbreviation of the resource (“PANEL” is displayed.)
Number(h):
Resource number
State:
Resource state
ready: Normal state
fault:
Code(h):
Abnormal state
Code for identifying the resource type
(m) Power Control Card (PCC)
# iSMview -cn Storage002 PCC 00h
--- Power Control Card Information --Type
: Power Control Card
Abbreviated Name : PCC
Number(h)
: 00
State
: ready
Code(h)
: b9
The display items are as follows:
(1)
Power Control Card Information
Displays the detailed information of the power control card.
Type:
Resource type (“Power Control Card” is displayed.)
Abbreviated Name: Abbreviation of the resource (“PCC” id displayed.)
Number(h):
Resource number
State:
Resource state
ready: Normal state
fault:
Code(h):
Abnormal state
Code for identifying the resource type
III-71
Chapter 5 Normal Operation
(n)
Replication Director (RD)
# iSMview -cn Storage002 RD 02h
--- Replication Director Information --Type
: Replication Director
Abbreviated Name : RD
Number(h)
: 02
State
: ready
Code(h)
: 80
Director Location
: HA01
Port No.(h)
: 00,01,02,03
The display items are as follows:
(1)
Replication Director Information
Displays the detailed information of the replication director.
Type:
Resource type
(“Replication Director” is displayed.)
Abbreviated Name: Abbreviation of the resource (“RD” is displayed.)
Number(h):
Resource number
State:
Resource state
ready: Normal state
fault:
Abnormal state
offline: Not installed
Code(h):
Code for identifying the resource type
Code(h):
Code for identifying the resource type
Director Location:
Location of the director
Port No.(h):
Director’s port numbers
* “---” is displayed for “Director Location” if a specified disk array is of the 100/1000/2000 series.
III-72
Chapter 5 Normal Operation
(o)
Service Processor (SVP)
# iSMview -cn Storage001 SVP 00h
--- Service Processor Information --Type
: Service Processor
Abbreviated Name
: SVP
Number(h)
: 00
State
: ready
Code(h)
: b3
--- Disk Array TCP/IP Information --IP Address
: 192.168.0.1
Subnet Mask
: 255.255.255.0
Gateway Address
: 192.168.0.254
--- SCSI Socket Information --SCSI Socket Guard Invalid
SCSI Socket Valid IP Address
: on
: 192.168.0.1
--- SNMP Information --Community Name
: public
SNMP Trap Transmission IP Address: : 192.168.0.1
: 192.168.0.2
SNMP Valid
: on
SNMP Valid IP Address
: 192.168.0.1
: 192.168.0.2
--- Trap Information --Trap Sense Interval : 20
Unit Contact
: XXX, Manager Name, 8-23-xxxx
Unit Name
: Storage2300
Unit Location
: Fuchu-shi Sumiyoshi-cho x-xx-xx
Unit Info
: Setting Date : 2002/01/01
The display items are as follows:
(1)
Service Processor Information
Displays the detailed information of the service processor.
Type:
Resource type
(“Service Processor” is displayed.)
Abbreviated Name: Abbreviation of the resource (“SVP” is displayed.)
Number(h):
Resource number
State:
Resource state
ready: Normal state
fault:
Code(h):
(2)
Abnormal state
Code for identifying the resource type
Disk Array TCP/IP Information
Displays information about the TCP/IP of the specified disk array.
IP Address:
IP address
Subnet Mask:
Subnet mask
Gateway Address:
Gateway address
III-73
Chapter 5 Normal Operation
(3)
SCSI Socket Information
Displays information about the monitoring server.
SCSI Socket Guard Invalid:
Indicates that monitoring by the monitoring server is permitted (on/off).
SCSI Socket Valid IP Address: IP address of the monitoring server that is permitted to perform monitoring
(4)
SNMP Information
Displays information about SNMP.
(5)
Community Name:
Community name
SNMP Trap Transmission IP Address:
IP address of the host that transmits SNMP traps
SNMP Valid:
Indicates that making SNMP requests is permitted (on/off).
SNMP Valid IP Address:
IP address of the host that is permitted to make SNMP requests
Trap Information
Displays information about traps.
Trap Sense Interval: Interval at which traps are monitored
Unit Contact:
Management information
Unit Name:
System name
Unit Location:
Installation location
Unit Info:
Other information
* The items (2) Disk Array TCP/IP Information, (3) SCSI Socket Information, (4) SNMP Information, (5) Trap
Information are displayed for only disk arrays that support Network Setting.
* If a specified resource type is wrong or the resource of a specified resource number does not exist, the error message
as shown below is displayed.
iSM11544: Specified Resource does not exist.
(p)
Management Processor (MP)
# iSMview -cn Storage002 MP 00h
--- Management Processor Information --Type
: Management Processor
Abbreviated Name : MP
Number(h)
: 00
State
: ready
Code
: b6-00
The display items are as follows:
(1)
Management Processor Information
Displays the detailed information of the management processor.
Type:
Resource type (“Management Processor” is displayed.)
Abbreviated Name: Abbreviation of the resource (“MP” is displayed.)
Number(h):
Resource number
State:
Resource state
III-74
Chapter 5 Normal Operation
ready: Normal state
fault:
Code:
(q)
Abnormal state
Code for identifying the resource type
Ethernet HUB (EHUB)
# iSMview -cn Storage002 EHUB 00h
--- Ethernet HUB Information --Type
: Ethernet HUB
Abbreviated Name : EHUB
Number(h)
: 00
State
: ready
Code
: b7-00
The display items are as follows:
(1)
Ethernet HUB Information
Displays the detailed information of the Ethernet HUB.
Type:
Resource type (“Ethernet HUB” is displayed.)
Abbreviated Name: Abbreviation of the resource (“EHUB” is displayed.)
Number(h):
Resource number
State:
Resource state
ready: Normal state
fault:
Code:
Abnormal state
Code for identifying the resource type
(17) Display of disk enclosure information
If the -e option is specified, the system displays disk enclosure information about a specified disk array.
#iSMview -e Storage002
--- Disk Enclosure Information --Resource Type
Abbr. Name
EC Junction Box
EC_JB
Power Supply
DE_PS
Power Supply
DE_PS
FAN
DE_FAN
FAN
DE_FAN
Temperature
DE_TEMP_ALM
Temperature
DE_TEMP_ALM
Adapter Card
DE_ADP
Adapter Card
DE_ADP
Back Board
DE_BB
III-75
No.(h)
00
00
01
00
01
00
01
00
01
00
State
ready
ready
ready
ready
ready
ready
ready
ready
ready
ready
Chapter 5 Normal Operation
The display items are as follows:
(1)
Disk Enclosure Information
Displays information about resources.
Resource Type: Displays one of the following as the resource type:
Adapter Card:
Adapter
Back Board:
Backboard
EC Junction Box: Junction box of the extended cabinet
Abbr. Name:
FAN:
Fan
Power Supply:
Power supply
Temperature:
Temperature sensor
Indicates the abbreviations of resources.
DE_ADP:
Adapter
DE_BB:
Backboard
DE_FAN:
Fan
DE_PS:
Power supply
DE_TEMP_ALM: Temperature sensor
EC_JB:
No.(h):
Resource number
State:
Resource state
Junction box of the basic cabinet
ready:
Normal state
fault:
Abnormal state
* If no disk enclosure exists in a specified disk array, the error message as shown below is displayed.
iSM11542:Enclosure resource doesn’t exist.
(18) Display of detailed information about a specified disk enclosure
If the -en option is specified, the system displays detailed information about a specified disk enclosure in a
specified disk array.
Specify a disk array and disk enclosure as shown below.
-en <Disk Array Name> <Abbreviated Name> <Resource Number>
(a)
Adapter (DE_ADP)
# iSMview -en Storage002 DE_ADP 00h
--- Adapter Card Information --Type
: Adapter Card
Abbreviated Name : DE_ADP
Number(h)
: 00
State
: ready
Code(h)
: c0-00
III-76
Chapter 5 Normal Operation
The display items are as follows:
(1)
Adapter Card Information
Displays the detailed information of the adapter card.
Type:
Resource type
(“Adapter Card” is displayed.)
Abbreviated Name: Abbreviation of the resource (“DE_ADP” is displayed.)
Number(h):
Resource number
State:
Resource state
ready: Normal state
fault:
Code(h):
(b)
Abnormal state
Code for identifying the resource type
Back Board (DE_BB)
# iSMview -en Storage002 DE_BB 00h
--- Back Board Information --Type
: Back Board
Abbreviated Name
: DE_BB
Number(h)
: 00
State
: ready
Code(h)
: c9-00
Maximum Number of PDs : 15
The display items are as follows:
(1)
Back Board Information
Displays the detailed information of the back board.
Type:
Resource type
(“Back Board” is displayed.)
Abbreviated Name:
Abbreviation of the resource (“DE_BB” is displayed.)
Number(h):
Resource number
State:
Resource state
ready: Normal state
fault:
Code(h):
Abnormal state
Code for identifying the resource type
Maximum Number of PDs: Maximum number of physical disks that can be installed (“10” or “15”)
(c)
Fan (DE_FAN)
# iSMview -en Storage002 DE_FAN 00h
--- FAN Information --Type
: FAN
Abbreviated Name : DE_FAN
Number(h)
: 00
State
: ready
Code(h)
: 78-00
III-77
Chapter 5 Normal Operation
The display items are as follows:
(1)
FAN Information
Displays the detailed information of fan.
Type:
Resource type
(“FAN” is displayed.)
Abbreviated Name: Abbreviation of the resource (“DE_FAN” is displayed.)
Number(h):
Resource number
State:
Resource state
ready: Normal state
fault:
Code(h):
(d)
Abnormal state
Code for identifying the resource type
Power Supply (DE_PS)
# iSMview -en Storage002 DE_PS 00h
--- Power Supply Information --Type
: Power Supply
Abbreviated Name : DE_PS
Number(h)
: 00
State
: ready
Code(h)
: 73-00
The display items are as follows:
(1)
Power Supply Information
Displays the detailed information of the power supply.
Type:
Resource type
(“Power Supply” is displayed.)
Abbreviated Name: Abbreviation of the resource (“DE_PS” is displayed.)
Number(h):
Resource number
State:
Resource state
ready: Normal state
fault:
Code(h):
(e)
Abnormal state
Code for identifying the resource type
Temperature (DE_TEMP_ALM)
# iSMview -en Storage002 DE_TEMP_ALM 00h
--- Temperature Information --Type
: Temperature
Abbreviated Name : DE_TEMP_ALM
Number(h)
: 00
State
: ready
Code(h)
: 7c-00
III-78
Chapter 5 Normal Operation
The display items are as follows:
(1)
Temperature Information
Displays the detailed information of the temperature sensor.
Type:
Resource type
(“Temperature” is displayed.)
Abbreviated Name: Abbreviation of the resource (“DE_TEMP_ALM” is displayed.)
Number(h):
Resource number
State:
Resource state
ready: Normal state
fault:
Code(h):
(f)
Abnormal state
Code for identifying the resource type
Extended Cabinet Junction Box (EC_JB)
# iSMview -en Storage002 EC_JB 00h
--- EC Junction Box Information --Type
: EC Junction Box
Abbreviated Name : EC_JB
Number(h)
: 00
State
: ready
Code(h)
: 71-00
The display items are as follows:
(1)
EC Junction Box Information
Displays the detailed information of the extended cabinet junction box
Type:
Resource type
(“EC Junction Box” is displayed.)
Abbreviated Name: Abbreviation of the resource (“EC_JB” is displayed.)
Number(h):
Resource number
State:
Resource state
ready: Normal state
fault:
Code(h):
Abnormal state
Code for identifying the resource type
* If a specified resource type is wrong or the resource of a specified resource number does not exist, the error message
as shown below is displayed.
iSM11544: Specified Resource does not exist.
III-79
Chapter 5 Normal Operation
(19) Display of port information
If the -p option is specified, the system displays information about the ports of a specified disk array.
#iSMview -p Storage002
--- Port Information --Port No.(h)
Port Name
00-00
10000000000000130100
00-01
10000000000000130200
Platform
WN
NX
Port Mode
port
port
Port State
ready
ready
The display items are as follows:
(1)
Port Information
Displays information about the ports.
Port No.(h):
Port number
Port Name:
Port name
Platform:
Platform
Port Mode:
Port mode
Port State:
Port state
* “---” is displayed for “Platform” if the platform information is not supported.
(20) Display of access control information about a specified disk array
If the -a option is specified, the system displays information about the access control of a specified disk array.
#iSMview -a Storage001
--- Access Control Information --Access Control Mode : ON
--- Port List --Port No.(h)
00-00
Port Name
10000000000000130100
--- WWN List --Platform
LD Set Name
WN
WIN_SET
Path Count
2
--- LD Set List --Platform
LD Set Name
WN
WIN_SET
LX
LIN_SET
Path Count
2
4
Port State
ready
LD Count
2
16
The display items are as follows:
(1)
Access Control Information
Access Control Mode:
Indicates that the Access Control mode is on/off.
III-80
Port Mode
Port
Chapter 5 Normal Operation
(2)
Port List
Lists information about the Access Control (PORT mode) of the specified disk array.
Port No.(h):
Port number
Port Name:
Port name
Port State:
Port state
Port Mode:
Port mode
* Port List is displayed for only the disk arrays of the 1100/1200/2100/2200/3100/4100 series.
(3)
WWN List
Lists information about the Access Control (WWN mode) of the specified disk array.
Platform:
OS type of the platform
LD Set Name:
LD Set name
Path Count:
Number of paths
* WWN List is displayed for only the disk arrays of the 1100/1200/2100/2200/3100/4100 series.
* If WWN List does not exist, the above information is not displayed.
(4)
LD Set List
Lists information about the LD Sets of the specified disk array.
Platform:
Platform
LD Set Name:
LD Set name
Path Count:
Number of paths
LD Count :
Number of logical disks
* LD Set List is displayed for only the disk arrays of the 100/1300/2300/2800/3300/4300 series.
* If LD Set List does not exist, the above information is not displayed.
(21) Display of LD Access Control information
If the -an option is specified, the system displays information about the Access Control of a specified logical disk.
#iSMview -an Storage001 0
--- LD/Port List --Port No.(h)
Port Name
00-00
10000000000000130100
--- LD/WWN List --Platform
LD Set Name
WN
WIN_SET
NX
NX_SET
Path Count
2
3
--- LD Set List --Platform
LD Set Name
WN
WIN_SET
LX
LIN_SET
Path Count
2
4
III-81
Port State
ready
LD Count
2
16
Port Mode
Port
Chapter 5 Normal Operation
The display items are as follows:
(1)
LD/Port List
Lists information about the Access Control (PORT mode) of the specified LD.
Port No.(h):
Port number
Port Name:
Port name
Port State:
Port state
Port Mode:
Port mode
* LD/Port List is displayed for only the disk arrays of the 1100/1200/2100/2200/3100/4100 series.
(2)
LD/WWN List
Lists information about the Access Control (WWN mode) of the specified LD.
Platform:
Platform
LD Set Name:
LD Set name
Path Count:
Number of paths
* LD/WWN List is displayed for only the disk arrays of the 1100/1200/2100/2200/3100/4100 series.
* If LD/WWN List does not exist, the above information is not displayed.
(3)
LD Set List
Lists information about the LD Sets of the specified LD.
Platform:
Platform
LD Set Name:
LD Set name
Path Count:
Number of paths
LD Count :
Number of logical disks
* LD Set List is displayed for only the disk arrays of the 100/400/1300/1400/2300/2400/2800/3300/4300 series.
* If LD Set List does not exist, the above information is not displayed.
* A 1-digit number (0) can be specified as a logical disk number.
* If a specified LD does not exist, the error message as shown below is displayed.
iSM11173:LD doesn’t exist.
* Refer to 3.3 “Nickname Setting” for details on the setting of Port Name.
III-82
Chapter 5 Normal Operation
(22) Display of information about port Access Control (PORT mode)
If the -ap option is specified, the system displays information about the Access Control (PORT mode) of a
specified port.
#iSMview -ap Storage001 00-00
--- Port Information --Port No.(h)
: 00-00
Port Name
: 10000000000000130100
Port State
: ready
Port Mode
: port
--- Port/LD List --LDN(h)
OS Type
0000
WN
0001
WN
LD Name
Win0000
Win0001
The display items are as follows:
(1)
Port Information
Displays information about the Access Control (PORT mode) of the specified port.
Port No.(h):
Port number
Port Name:
Port name
Port State:
Port state
Port Mode:
Port mode
* Refer to 3.3 “Nickname Setting” for details on the setting of Port Name.
(2)
Port/LD List
Lists LD information about the Access Control (PORT mode) of the specified port.
LDN(h):
Logical disk number
OS Type:
OS type of each LD
For details, refer to (3) “List of logical disk information”.
LD Name:
Arbitrary ID information (logical disk name) of each LD, which is obtained from the disk array
* This option is displayed for only the disk arrays of the 1100/1200/2100/2200/3100/4100 series.
* A port number or port name can be specified for a port.
* A 1-digit (0-0) can be specified as a port number.
* If a specified port does not exist, the error message as shown below is displayed.
iSM11175:Port doesn’t exist.
III-83
Chapter 5 Normal Operation
(23) Display of information about LD Set Access Control (WWN mode)
If the -aw option is specified, the system displays information about the Access Control (WWN mode) of a
specified LD Set.
#iSMview -aw Storage001 WN:WIN_SET
--- WWN Information --Platform
: WN
LD Set Name
: WIN_SET
WWPN List
: 1111-1111-1111-1111
2222-2222-2222-2222
3333-3333-3333-3333
--- WWN/LD List --LUN(h)
LDN(h)
0000
0000
0001
0001
OS Type
WN
NX
LD Name
WIN_SET
NX_SET
The display items are as follows:
(1)
WWN Information
Displays information about the Access Control (WWN mode) of the specified LD Set.
(2)
Platform:
Platform
LD Set Name:
LD Set name
WWPN List:
List of the WWPNs
WWN/LD List
Lists LD information about the Access Control (WWN mode) of the specified LD Set.
LUN(h):
LUN number
LDN(h):
Logical disk number
OS Type:
OS type of each LD
LD Name:
Arbitrary ID information of each LD
* This option is displayed for only the disk arrays of the 1100/1200/2100/2200/3100/4100 series.
* If a specified LD Set does not exist, the error message as shown below is displayed.
iSM11178:LD Set doesn’t exist.
* If the WWPN information of a specified LD Set does not match, the error message as shown below is displayed.
iSM11179:LD Set doesn’t match.
* If a specified WWPN does not exist, the error message as shown below is displayed.
iSM11181:WWPN doesn’t exist.
III-84
Chapter 5 Normal Operation
(24) Display of information about LD Set Access Control
If the -ac option is specified, the system displays information about the Access Control of a specified LD Set.
#iSMview -ac Storage001 WN:WIN_SET
--- LD Set Information --Platform
: WN
LD Set Name
: WIN_SET
Path List
: 00h-00h(PORT0000)
1111-1111-1111-1111
2222-2222-2222-2222
--- LUN/LD List --LUN(h)
LDN(h)
0000
0000
0001
0001
OS Type LD Name
WN
Win0000
WN
Win0001
The display items are as follows:
(1)
LD Set Information
Displays information about the Access Control of the specified LD Set.
(2)
Platform:
Platform
LD Set Name:
LD Set name
Path List:
List of the paths
LUN/LD List
Lists LD information about the Access Control of the specified LD Set.
LUN(h):
LUN number
LDN(h):
Logical disk number
OS Type:
OS type of each LD
LD Name:
Arbitrary ID information of each LD
* This option is displayed for only the disk arrays of the 100/1300/2300/2800/3300/4300 series.
* If a specified LD Set does not exist, the error message as shown below is displayed.
iSM11178:LD Set doesn’t exist.
III-85
Chapter 5 Normal Operation
(25) Display of Information about LD Administrator of a disk array
If the -ra option is specified, the system displays information about LD Administrator of a specified disk array.
#iSMview –ra Storage001
--- Reallocation Control Information --Inaccessible LD Total Capacity : 24.0GB(28.0GB)
--- LD Set Capacity Information --Platform LD Set Name
Capacity
DF
S2800
8.0GB
AX
test001
----- Preserve Group Information --Group Total Capacity : 16.0GB(20.0GB)
Purpose
: RPL/Snapshot
Purpose Total Capacity : 4.0GB
LDN OS Type LD NAME
0007 NX
LD0007
Pool No.(h)
0002
RAID Capacity
6
4.0GB
Pool No.(h)
0002
RAID Capacity
6
4.0GB
Pool No.(h)
0002
RAID Capacity
6
4.0GB
Pool No.(h)
0002
RAID Capacity
6
4.0GB
Pool No.(h)
0001
0001
RAID Capacity
6
2.0GB
6
2.0GB
Pool No.(h)
0002
RAID Capacity
6
4.0GB
Pool No.(h)
0002
RAID Capacity
6
4.0GB
Purpose
: RPL
Purpose Total Capacity : 4.0GB
LDN OS Type LD NAME
0008 NX
LD0008
Purpose
: Snapshot
Purpose Total Capacity : 4.0GB
LDN OS Type LD NAME
0009 NX
LD0009
Purpose
: Link Volume
Purpose Total Capacity : ---(4.0GB)
LDN OS Type LD NAME
0010 NX
LD0010
Purpose
: --Purpose Total Capacity : 4.0GB
LDN OS Type LD NAME
0005
LD0005
0006
LD0006
--- Reserve Group Information --Group Total Capacity : 8.0GB
Purpose
: Optimization
Purpose Total Capacity : 4.0GB
LDN OS Type LD NAME
0011 NX
LD0011
Purpose
: --Purpose Total Capacity : 4.0GB
LDN OS Type LD NAME
0011 NX
LD0011
III-86
Chapter 5 Normal Operation
The display items are as follows.
(1)
Reallocation Control Information
Displays the total capacity of LDs that do not belong to the disk array LD Set.
Inaccessible LD Total Capacity:
(2)
Total capacity of LDs
LD Set Capacity Information
Displays information on LD Set of a disk array.
(3)
Platform:
LD Set format
LD Set Name:
LD Set name
Capacity:
Total capacity of LDs belonging to the LD Set
Preserve Group Information
Displays detailed information on LDs of a disk array.
Group Total Capacity:
Total capacity of LDs belonging to the preserve group
Purpose:
Usage of the LD. Displays one of the following.
RPL/Snapshot: LD for which pair setting for replication and snapshot setting have
already been made
(4)
RPL:
LD for which pair setting for replication has already been made
Snapshot:
LD for snapshot
Link Volume:
LD for link volumes
---:
LD for which specific purpose has not been made
Purpose Total Capacity:
Total capacity of the above LDs
LDN(h):
LD number
OS Type:
OS type for each LD
LD NAME:
Optional identification information for each LD
Pool No.(h):
Pool number to which the LD belongs
RAID:
RAID type of the LD
Capacity:
Capacity of the LD
Reserve Group Information
Displays detailed information on LDs of a disk array.
Group Total Capacity:
Total capacity of LDs belonging to the reserve group
Purpose:
Usage of the LD. Displays one of the following.
Optimization: Work disk for performance optimization
---: LD for which specific usage is not set
Purpose Total Capacity:
Total capacity of the above LDs
LDN(h):
LD number
OS Type:
OS type for each LD
LD NAME:
Optional identification information for each LD
Pool No.(h):
Pool number to which the LD belongs
RAID:
RAID type of the LD
Capacity:
Capacity of the LD
III-87
Chapter 5 Normal Operation
(26) Display of information about cache partitioning of a disk array
If the -cp option is specified, the system displays information about cache partitioning of a specified disk array.
#iSMview -cp Storage002
--- Cache Partitioning Detail Information --Cache Partitioning Mode
:on
Allocatable Cache Capacity
:2.00GB
Total Allocated Capacity
:2.00GB
Total Unallocated Capacity
:0.00GB
Total Minimum Capacity
:2.00GB
Current Segment Count
:2
Allocatable Segment Count
:0
--- Cache Segment List --Number(h)
Segment Name Max. Capacity
00
DefaultSegment 1.00GB(50%)
01
Segment1
1.00GB(50%)
Min. Capacity
1.00GB(50%)
1.00GB(50%)
Allocated Capacity
1.00GB(50%)
1.00GB(50%)
The display items are as follows.
(1)
Cache Partitioning Detail Information
Displays detailed information on cache.
(2)
Cache Partitioning Mode:
Indicates the status (on/off) of cache partitioning mode.
Allocatable Cache Capacity:
Capacity of cache to be allocated
Total Allocated Capacity:
Total capacity of cache to be allocated
Total Unallocated Capacity:
Capacity of unallocated cache
Total Minimum Capacity:
Total minimum capacity
Current Segment Count:
Current number of cache segments
Allocatable Segment Count:
Number of allocatable cache segments
Cache Segment List
Lists cache segments.
Number(h):
Cache segment number
Segment Name:
Cache segment name
Max. Capacity:
Maximum capacity of allocated cache
Min. Capacity:
Minimum capacity of allocated cache
Allocated Capacity:
Capacity of currently allocated cache
III-88
Chapter 5 Normal Operation
(27) Display of information about cache partitioning of a segment
If the -cpn or -cpm option is specified, the system displays information about cache partitioning of a specified
segment.
#iSMview -cpn Storage002 01h
--- Cache Segment Detail Information --Segment Number(h)
:01
Segment Name
:Segment1
Maximum Capacity
:16.00GB(50%)
Minimum Capacity
:8.00GB(25%)
Allocated Cache Capacity :12.00GB(38%)
LD Count
:3
Total LD Capacity
:31.8GB
--- Cache Segment/LD List --LDN(h)
OS Type
LD Name
0000
LX
200000004C517B7D000C
0001
WN
200000004C517B7D006B
0001
CX
200000004C517B7D0189
The display items are as follows:
(1)
Cache Segment Detail Information
Displays detailed information on cache segments
(2)
Segment Number(h):
Cache segment number
Segment Name:
Cache segment name
Maximum Capacity:
Maximum capacity of allocated cache
Minimum Capacity:
Minimum capacity of allocated cache
Allocated Cache Capacity:
Capacity of currently allocated cache
LD Count:
Number of LDs allocated to the segment
Total LD Capacity:
Total capacity of LDs allocated to the segment
Cache Segment/LD List
Lists LD information about a specified cache segment.
LDN(h):
LD number
OS Type:
OS type for each LD
LD Name:
Optional identification information for each LD
III-89
Chapter 5 Normal Operation
(28) Display of all configuration information
If the -all option is specified, the system displays all information about a target disk array.
#iSMview –all Storage001
#iSM 2004/01/01 00:00:00
Configuration List iSMview Version n.n.nnn
[DiskArray]
•
•
[LD]
•
•
[PD]
•
•
[RANK]
•
•
[Pool]
•
•
[Snapshot-Pool]
•
•
[Controller]
•
•
...Title and date
...Header
...Section
...Data
...Section
...Data
...Section
...Data
...Section
...Data
...Section
...Data
...Section
...Data
...Section
...Data
The display items are as follows:
Title/Rev/date:
The title and the file creation time are displayed.
Header:
Information for recognizing the configuration setting file and the program revision are
displayed.
Section and data:
Each section is a portion allocated from the data area.
The contents of each section are displayed as data.
[DiskArray]:
Displays information about the target disk array.
The display contents are equivalent to those displayed by the -d option.
[LD]:
Displays information about the LDs.
The display contents are equivalent to those displayed by the -l/-ln option.
[Snapshot-LD]:
Displays information about LD snapshot.
The display contents are equivalent to those displayed by the -sl/-sln option.
[PD]:
Displays information about the PDs.
The display contents are equivalent to those displayed by the -h/-hn option.
[RANK]:
Displays information about the RANKs.
The display contents are equivalent to those displayed by the -r/-rn option.
This item is exclusive; either this or [Pool] information is displayed at a time.
[Pool]:
Displays information about the pools.
The display contents are equivalent to those displayed by the -pl/-pln option.
III-90
Chapter 5 Normal Operation
[Snapshot-Pool]:
Displays information about pool snapshot.
The display contents are equivalent to those displayed by the -spl/-spln option.
[Controller]:
Displays information about the controllers.
The display contents are equivalent to those displayed by the -c/-cn option.
[Enclosure]:
Displays information about the disk enclosures.
The display contents are equivalent to those displayed by the -e/-en option.
[Port]:
Displays information about the ports.
The display contents are equivalent to those displayed by the -p option.
[Maintenance]:
Displays maintenance information for maintenance persons.
[Access Control]:
Displays information about the Access Control.
The display contents are equivalent to those displayed by the -a/-an/-ap/-aw/-ac option.
[ReallocationControl]:
Displays information about LD Administrator.
The display contents are equivalent to those displayed by the -ra option.
[Cache Partitioning]:
Displays information about cache partitioning.
The display contents are equivalent to those displayed by the -cp/-cpn option.
Result:
1.
Displays the result of specifying the -all option.
Command Completed Successfully!!:
Successful
Command Completed Abnormally!!:
Unsuccessful
Users who have an administrative right and the administrators for iSM are permitted to execute the iSMview
command.
2.
Specify a RANK number in format of the RANK’s PDG number and the RANK number that are separated by
a “- (hyphen)”. Specifying only a RANK number results in a parameter error.
3.
Specify a PD number in format of the PD’s PDG number and the PD number that are separated by a “(hyphen)”. Specifying only a PD number results in a parameter error.
4.
Specify a port number in format of the port’s host director number and the port number that are separated by a
“- (hyphen)”.
Specifying only a port number results in a parameter error.
5.
Specify an LD Set name in format of the LD Set type and the LD Set name that are separated by a “: (colon)”.
Specifying only an LD Set name results in a parameter error.
6.
Specify optional identification information for each LD (logical disk name) in format of the OS type for each
LD and optional identification information for each LD (logical disk name) that are separated by “: (colon)”.
Specifying only optional identification information for each LD (logical disk name) results in a parameter
error.
7.
LD number, PD group number, PD number, Pool number, Resource number, Port number, and Cache segment
number are recognized as decimal numbers. When “h” is attached at the end, they are recognized as
hexadecimal numbers.
III-91
Chapter 5 Normal Operation
55..66 C
Co
on
nffiig
gu
urraattiio
on
n IIn
nffo
orrm
maattiio
on
nF
Fiillee O
Ou
uttp
pu
utt
C
Co
om
mm
maan
nd
d ((iiS
SM
Mccssvv))
The configuration information file output command (iSMcsv) outputs the configuration information of a disk array in
the CSV format. Table 5-4 shows a list of files. This command creates a new directory and outputs the files shown in
Table 5-4 in this directory. For details on the files, refer to 5.6.4 “Descriptions of Output Files”.
Table 5-4 File List
File Name
Description
DiskArray.csv
Information about a disk array
LDList.csv
Information about LDs
PDList.csv
Information about PDs
RANKList.csv
Information about RANKs
* This item is exclusive; either this or pool information can be output at a
time.
PoolList.csv
Information about pool
PortList.csv
Information about ports
LDSetList.csv
Information about the LD Set
LDSet-Path.csv
Information about correspondence between LD Sets and paths
PD-LD.csv
Information about correspondence between PDs and LDs
RANK-LD.csv
Information about correspondence between RANKs and LDs
* This item is exclusive; either this or pool information can be output at a
time.
Pool-LD.csv
Information about correspondence between pools and LDs
Port-LD.csv
Information about correspondence between ports and LDs
* This file is not output when a LD Set is used.
LDSet-LD.csv
Information about correspondence between LD Sets and LDs
* This file is not output when a port is used.
RANK-PD.csv
Information about correspondence between RANKs and PDs
* This item is exclusive; either this or pool information can be output at a
time.
Pool-PD.csv
Information about correspondence between pools and PDs
CachePartitioning.csv
Information about cache partitioning
* This file is not output when the CachePartitioning license is not applied.
CacheSegmentList.csv
Information about cache segments
* This file is not output when the CachePartitioning license is not applied.
CacheSegment-LD.csv
Information about correspondence between cache segments and LDs
* This file is not output when the CachePartitioning license is not applied.
PairInfo.csv
Information about pairs
* This file is not output when the DynamicDataReplication and
RemoteDataReplication licenses are not applied.
SnapshotLDList.csv
Information about snapshot LDs
* This file is not output when the DynamicSnapVolume license is not
applied.
III-92
Chapter 5 Normal Operation
File Name
Description
SnapshotPoolList.csv
Information about snapshot pool
* This file is not output when the DynamicSnapVolume license is not
applied.
SnapshotPool-SDV.csv
Information about correspondence between snapshot pool and SDV
* This file is not output when the DynamicSnapVolume license is not
applied.
ATGInfo.csv
Information about Atomic Group
* This file is not output when the
RemoteDataReplication/DisasterRecovery license is not applied.
Pool-ExpandingPD.csv
Information about correspondence between pool and pool-expanding PD
55..66..11 S
Sttaarrtt aanndd S
Sttoopp
(1) Start of the iSMcsv command
To start the configuration information file output command (iSMcsv) (referred to as this command below), enter
“iSMcsv” on the command line.
If an option is omitted, the program version and the usage are displayed as shown below.
iSMcsv Version n.n.nnn
Usage : iSMcsv -arrayname <Disk Array Name> -out <directory>
* The above is a display sample. The version of your program is displayed instead.
(2) Termination of the iSMcsv command
When the configuration information file output command terminates normally, configuration information files are
output in the specified directory.
55..66..22 D
Deessccrriippttiioonnss ooff O
Oppttiioonnss
The functions and corresponding options of the configuration information file output command are described below.
• -arrayname <disk array name> option
: Specifies a disk array whose CSV files are output.
To check the disk array name, use the configuration display command (iSMview).
For details on the configuration display command (iSMview), refer to 5.5 “Configuration Display Command
(iSMview)”.
• -out <directory> option
: Specifies a directory to which files are output. Directories named by the date and time are created in the
directory specified by <directory>.
III-93
Chapter 5 Normal Operation
55..66..33 E
Exxeeccuuttiioonn ooff tthhee C
Coom
mm
maanndd
An example of executing the configuration information file output command is shown below.
>iSMview -d
--- Disk Array List --Product ID
Disk Array Name
Resource State
S2300 Disk Array Storage001
ready
S4300 Disk Array Storage002
ready
>
>iSMcsv -arrayname Storage001 –out /home/user/tmp
iSM11605:Please wait a minute.
iSM11100:Command completed successfully.
Monitoring
running
running
This is an example when disk array name Storage001 is used.
• The disk array name is checked by the configuration display command (iSMview –d option).
• This command is executed with the disk array name and directory specified.
• A data and time directory is created in the specified directory (D:\tmp).
D:\tmp\YYYYMMDDhhmm
YYYY:
Year
MM:
Month
DD:
Day
hh:
Time
mm:
Minute
* When the same directory name already exists, a new directory is created with any number added to the
directory name.
D:\tmp\YYYYMMDDhhmm_n (n: Additional number)
• In a data and time directory, multiple files related to configuration information of the disk array (Storage001)
are output in CSV format.
III-94
Chapter 5 Normal Operation
55..66..44 D
Deessccrriippttiioonnss ooff O
Ouuttppuutt FFiilleess
This section explains CSV output files.
(1) Information about a disk array (DiskArray.csv)
Outputs information about a disk array.
Disk Array Name
Storage002
Resource State Vendor ID Product ID
ready
XXX
S4300 Disk Array
Serial Number
0000000921701126
Product FW Revision
020B
SAA
0200200000004C517B7D00000000000000000000000000000000000
World Wide Name
Total Capacity
200000004C517B7D 4.420TB
User System Code
The display items are as follows:
Disk Array Name:
Name of the disk array
Resource State:
Status of the disk array and configuration resources
Vendor ID:
ID information indicating the disk array supplier
Product ID:
Model name of the disk array
Product FW Revision:
Version information of the disk array
Serial Number:
Product number of the disk array
SAA:
Unique identifier of the disk array
World Wide Name:
World Wide Name of the disk array
Total Capacity:
Total capacity of the disk array
User System Code:
User system code
III-95
Chapter 5 Normal Operation
(2) Information about LDs (LDList.csv)
LDN(h)
OS Type
LD Name
LD Capacity
0000
CX
XXX000
3.9GB
LD Capacity(bytes)
4187593113
RAID Type
RAID1
LD State
attn.(rebuilding)
0001
NX
XXX000
3.9GB
4187593113
RAID1
ready
0002
WN
XXX0003
3.9GB
4187593113
RAID5
ready
0003
WN
XXX0004
3.9GB
4187593113
RAID1
ready
0004
WN
XXX0005
3.9GB
4187593113
RAID0
ready
Progress Ratio
Expansion State
Group
Purpose
RPL Attribute
Cache Resident Current Owner Default Owner
12%
---
Preserve
---
IV
no
---
Preserve
---
IV
no
Reserve
Optimization
---
--expanding
---
---
IV
no
---
Reserve
---
---
no
no
The display items are as follows:
LDN(h):
LD number
OS Type:
OS type for each LD
LD Name:
Optional identification information for each LD (logical disk name)
LD Capacity:
LD capacity
LD Capacity(bytes):
LD capacity (bytes)
RAID Type:
RAID type of the LD
LD State:
Operational status of the LD
Progress Ratio:
Progress ratio
Expansion State:
Expansion status of the LD
Group:
Usage of the LD
Purpose:
Attribute of the LD
RPL Attribute:
RPL type
Cache Resident:
Cache resident disk
Current Owner:
Number of the host director having the current owner right of the target LD
Default Owner:
Number of the host director having the initial owner right of the target LD
* The RPL Attribute item is output for the disk array to which the DynamicDataReplication or
RemoteDataReplication license is applied.
III-96
Chapter 5 Normal Operation
(3) Information about PDs (PDList.csv)
Outputs a list of PDs.
PDN(h)
Classification
State
00-00
data
ready
Progress Ratio
PD Capacity Vendor ID
Product ID
Product Revision
Serial Number
33.2GB
XXX
DK3000-0001
1234000A
XXX
00-01
data
ready
33.2GB
XXX
XXX
DK3000-0002
1234000B
00-02
spare
ready
33.2GB
XXX
XXX
DK3000-0003
1234000C
00-03
not set
ready
33.2GB
XXX
XXX
DK3000-39FC
12345920
00-04
data
ready
33.2GB
XXX
XXX
DK3000-40FC
12345921
The display items are as follows:
PDN(h):
PD number
Classification:
PD classification
State:
Operational status of the PD
Progress Ratio:
Progress ratio
PD Capacity:
Capacity of the PD
Vendor ID:
ID information indicating the supplier of the product
Product ID:
Model name if the product
Product Revision:
Version information of the product
Serial Number:
Product number
(4) Information about RANKs (RANKList.csv)
Outputs a list of RANKs.
RANK No.(h) RAID Type
00-00
RAID1(1+1)
00-01
RAID1(1+1)
00-02
RAID1(1+1)
00-03
RAID1(1+1)
00-04
RAID1(1+1)
00-05
RAID5(4+P)
00-06
RAID5(4+P)
00-07
RAID5(4+P)
00-08
RAID5(4+P)
RebuildTime(hours)
0
0
0
0
0
0
0
0
0
RANK State
attn.(rebuilding)
attn.(rebuilding)
attn.(rebuilding)
attn.(rebuilding)
fault
ready
ready
ready
ready
The display items are as follows:
RANK No.(h):
RANK number
RAID Type:
RAID type of the RANK
RebuildTime(hours):
Time required for rebuilding the RANK
RANK State:
Status of the RANK
Progress Ratio:
Progress ratio
RANK Capacity:
Capacity of the RANK
III-97
Progress Ratio
20%
30%
12%
34%
RANK Capacity
16.6GB
16.6GB
16.6GB
16.6GB
16.6GB
16.6GB
16.6GB
16.1GB
16.1GB
Chapter 5 Normal Operation
(5) Information about pools (PoolList.csv)
Outputs a list of pools.
Pool No(h) Pool Name Pool Type RAID Type
Pool State
0000
Pool00
virtual
RAID1
attn.(rebuilding) ---
Expansion State Progress Ratio Pool Capacity
14.5GB
0001
Pool01
virtual
RAID1
attn.(rebuilding)\ ---
14.5GB
0002
Pool02
virtual
RAID1
attn.(rebuilding) ---
14.5GB
0003
Pool03
virtual
RAID1
attn.(rebuilding) ---
14.5GB
0004
Pool04
virtual
RAID1
fault
---
14.5GB
0005
Pool05
virtual
RAID5
ready
---
52.0GB
0006
Pool06
virtual
RAID5
ready
---
52.0GB
0007
Pool07
virtual
RAID6(4+PQ) ready
---
0008
Pool08
virtual
RAID6(4+PQ) ready
expanding
66.5GB
20%
66.5GB
Pool Capacity(bytes) Used Pool Capacity Used Pool Capacity(bytes) Free Pool Capacity Free Pool Capacity(bytes)
13000000000
4.5GB
3000000000
10.0GB
10000000000
13000000000
4.5GB
3000000000
10.0GB
10000000000
13000000000
4.5GB
3000000000
10.0GB
10000000000
13000000000
4.5GB
3000000000
10.0GB
10000000000
13000000000
4.5GB
3000000000
10.0GB
10000000000
55000000000
17.5GB
18000000000
34.5GB
33000000000
55000000000
43.0GB
42000000000
9.0GB
9000000000
66000000000
21.0GB
21000000000
27.0GB
27000000000
66000000000
21.0GB
21000000000
45.5GB
43000000000
The display items are as follows:
Pool No(h):
Pool number
Pool Name:
Pool name
Pool Type:
Pool type
RAID Type:
RAID type of the pool
Pool State:
Pool state
Expansion State:
Pool expansion state
Progress Ratio:
Percentage of progress of pool expansion
Pool Capacity:
Capacity of the pool
Pool Capacity (bytes):
Capacity of the pool (bytes)
Used Pool Capacity:
Space used by the pool
Used Pool Capacity (bytes): Space used by the pool (bytes)
Free Pool Capacity:
Free space not used by the pool
Free Pool Capacity (bytes): Free space not used by the pool (bytes)
III-98
Chapter 5 Normal Operation
(6) Information about ports (PortList.csv)
Outputs a list of ports.
Port No.(h)
00-00
00-01
01-00
01-01
Port Name
Port1
Port2
Port3
Port4
Platform
WN
NX
NX
NX
Port Mode
WWN
WWN
port
port
Port State
ready
ready
ready
ready
The display items are as follows:
Port No.(h):
Port number
Port Name:
Port name
Platform:
Platform
Port Mode:
Mode of the port
Port State:
Status of the port
(7) Information about the LD Set (LDSetList.csv)
Outputs a list of the LD Set.
Platform
WN
NX
LD Set Name
exp54wd
Lserver1
The display items are as follows:
Platform:
Platform
LD Set Name:
LD Set name
(8) Information about correspondence between LD Sets and paths (LDSet-Path.csv)
Outputs information about correspondence between LD Sets and paths.
Platform
WN
WN
WN
WN
A2
NX
LD Set Name
exp54wd
exp54wd
exp54wd
exp54wd
Lserver1
FileServer
WWPN
1000-0000-C928-3A3F
1000-0000-C928-3A3C
1000-0000-C928-3A2C
0000-0001-C928-3A51
The display items are as follows:
Platform:
Platform
LD Set Name:
LD Set name
WWPN:
WWPN
Port No.(h):
Port number
Port Name:
Port name
III-99
Port No.(h)
Port Name
00-00
StoragePort001
Chapter 5 Normal Operation
(9) Information about correspondence between PDs and LDs (PD-LD.csv)
Outputs information about correspondence between PDs and LDs.
PDN(h)
00-00
00-00
00-00
00-01
LDN(h)
0016
001c
001e
001f
OS Type
WN
WN
NX
NX
LD Name
pm_nx_drsys1
pm_nx_drsys2
pm_nx_drsys3
oracle_data01
The display items are as follows:
PDN(h):
PD number
LDN(h):
LD number
OS Type:
OS type for each LD
LD Name:
Optional identification information for each LD (logical disk name)
(10) Information about correspondence between RANKs and LDs (RANK-LD.csv)
Outputs information about correspondence between RANKs and LDs.
RANK No.(h)
00-00
00-00
00-00
00-00
00-01
00-01
00-01
LDN(h)
0000
0001
0002
free
0004
0008
free
Start Address(h)
00000000
00428000
00850000
00c78000
00000000
0010a000
00214000
End Address(h)
00427fff
0084ffff
00c77fff
0109ffff
00109fff
00213fff
0031dfff
The display items are as follows:
RANK No.(h):
RANK number
LDN(h):
LD number (“free” when not constructed)
Start Address(h):
Start address of LD or free space
End Address(h):
End address of LD or free space
Capacity:
LD capacity (MB)
III-100
Capacity
2128MB
2128MB
2128MB
2128MB
532MB
532MB
532MB
Chapter 5 Normal Operation
(11) Information about correspondence between pools and LDs (Pool-LD.csv)
Outputs information about correspondence between LDs and pools.
Pool No(h)
0000
0000
0000
0000
0001
0001
0001
0001
0002
0002
0002
LDN(h)
0000
0001
0002
free
0004
0008
free
0010
0020
0021
free
Start Address(h)
00000000
00428000
00850000
00c78000
00000000
0010a000
00214000
0031a000
End Address(h)
00427fff
0084ffff
00c77fff
0109ffff
00109fff
00213fff
0031dfff
00427fff
Capacity
2128MB
2128MB
2128MB
2128MB
532MB
532MB
532MB
532MB
8192MB
8192MB
32MB
The display items are as follows:
Pool No(h):
Pool number
LDN(h):
LD number (“free” is displayed if the LD has not been bound.)
Start Address(h):
Start address of the LD or free area
End Address(h):
End address of the LD or free area
Capacity:
LD capacity (units of MBs)
(12) Information about correspondence between ports and LDs (Port-LD.csv)
Outputs information about correspondence between ports and LDs.
Port No(h)
00-00
00-00
00-00
00-00
Port Name
Port3
Port3
Port3
Port3
LDN(h)
0000
0001
0002
0003
OS Type
NX
NX
NX
NX
LD Name
100000000000100000
100000000000100000
100000000000100000
100000000000100000
The display items are as follows:
Port No(h):
Port number
Port Name:
Port name
LDN(h):
LD number
OS Type:
OS type for each LD
LD Name:
Optional identification information for each LD (logical disk name)
III-101
Chapter 5 Normal Operation
(13) Information about correspondence between LD Sets and LDs (LDSet-LD.csv)
Outputs information about correspondence between LD Sets and LDs.
Platform
WN
WN
WN
WN
WN
WN
WN
NX
NX
LDSet Name
Exp120rc
Exp120rc
Exp120rc
Exp120rc
Exp120rc
Exp120rc
Exp120rc
Lserver1
Lserver1
LDN(h)
0000
0001
0002
0003
0004
0005
0006
0010
0011
LUN(h)
0000
0001
0002
0003
0004
0005
0006
0011
0012
OS Type
WN
WN
WN
WN
WN
WN
WN
NX
NX
LD Name
200000004C0123450000
200000004C0123450001
200000004C0123450002
200000004C0123450003
200000004C0123450004
200000004C0123450005
200000004C0123450006
200000004C0123450020
200000004C0123450021
The display items are as follows:
Platform:
Platform
LD Set Name:
LD Set name
LDN(h):
LD number
LUN(h):
LUN number
OS Type:
OS type for each LD
LD Name:
Optional identification information for each LD
(14) Information about correspondence between RANKs and PDs (RANK-PD.csv)
Outputs information about correspondence between RANKs and PDs.
RANK No(h)
00-01
00-01
00-02
00-02
PDN(h)
00-01
00-02
00-03
00-04
The display items are as follows:
RANK No(h):
RANK number
PDN(h):
PDN number
(15) Information about correspondence between pools and PDs (Pool-PD.csv)
Outputs information about correspondence between pools and PDs.
Pool No(h)
0001
0001
0002
0002
PDN(h)
00-01
00-02
00-03
00-04
The display items are as follows:
Pool No(h):
Pool number
PDN(h):
PDN number
III-102
Chapter 5 Normal Operation
(16) Information about cache partitioning (CachePartitioning.csv)
Outputs information about cache partitioning.
Cache Partitioning Mode
off
Allocatable Cache Capacity
32.00GB
Total Allocated Capacity
25.00GB
Total Unallocated Capacity
7.00GB
Total Minimum Capacity
25.00GB
Current Segment Count
0
The display items are as follows:
Cache Partitioning Mode:
Cache partitioning mode
Allocatable Cache Capacity: Capacity of cache to be allocated
Total Allocated Capacity:
Total capacity of cache to be allocated
Total Unallocated Capacity: Capacity of unallocated cache
Total Minimum Capacity:
Total minimum capacity
Current Segment Count:
Number of current cache segments
(17) Information about cache segments (CacheSegmentList.csv)
Outputs a list of cache segments.
Segment Number(h) Segment Name Maximum Capacity
00
DefaultSegment 1.00GB
01
Server1
1.00GB
Minimum Ratio
50%
50%
Maximum Ratio
50%
50%
Allocated Cache Capacity Allocated Cache Ratio
1.00GB
50%
1.00GB
50%
The display items are as follows:
Segment Number(h):
Cache segment number
Segment Name:
Cache segment name
Maximum Capacity:
Maximum capacity of cache to be allocated (capacity)
Maximum Ratio:
Maximum capacity of cache to be allocated (ratio)
Minimum Capacity:
Minimum capacity of cache to be allocated (capacity)
Minimum Ratio:
Minimum capacity of cache to be allocated (ratio)
Allocated Cache Capacity:
Capacity of cache currently allocated (capacity)
Allocated Cache Ratio:
Capacity of cache currently allocated (ratio)
III-103
Minimum Capacity
1.00GB
1.00GB
Chapter 5 Normal Operation
(18) Information about correspondence between cache segments and LDs
(CacheSegment-LD.csv)
Outputs information about correspondence between cache segments and LDs.
Segment Number(h)
00
00
00
00
00
01
02
SegmentName
DefaultSegment
DefaultSegment
DefaultSegment
DefaultSegment
DefaultSegment
Segment1
Segment2
LDN(h)
0000
0000
0000
0000
0000
0001
0002
OS Type
WN
WN
WN
WN
WN
NX
NX
LD Name
LD-RPL001
LD-RPL002
LD-RPL003
LD-RPL004
LD-RPL005
LD-CONF0001
LD-CONF0002
The display items are as follows:
Segment Number(h):
Cache segment number
Segment Name:
Cache segment name
LDN(h):
LD number
OS Type:
OS type for each LD
LD Name:
Optional identification information for each LD
(19) Information about pairs (PairInfo.csv)
Outputs information about pairs of the replication function.
MV DiskArrayName
MV OS Type MV LD Name
RV DiskArrayName
Storage003
NX
pm_nx_ora9c
Storage003
RV OS Type RV LD Name
NX
pm_nx_rv01
Storage003
NX
pm_nx_ora9d
Storage003
NX
pm_nx_rv02
Storage003
NX
pm_nx_ora9l
Storage003
NX
pm_nx_rv03
Storage003
NX
pm_nx_ora9a
Storage003
NX
pm_nx_rv04
The display items are as follows:
MV DiskArrayName:
Name of the disk array to which MV belongs
MV OS Type:
OS type of MV
MV LD Name:
Logical disk name of MV
RV DiskArrayName:
Name of the disk array to which RV belongs
RV OS Type:
OS type of RV
RV LD Name:
Logical disk name of RV
III-104
Chapter 5 Normal Operation
(20) Information about snapshot LDs (SnapshotLDList.csv)
Outputs information about LDs of the snapshot function.
LDN(h) OS Type
LD Name
Snapshot Attribute
LDN(h)
OS Type
LD Name
Snapshot Attribute
0001
NX
LD0001
BV
0003
NX
LD0003
SV
0002
NX
LD0002
BV
0004
NX
LD0004
LV
0003
NX
LD0003
SV
0001
NX
LD0001
BV
0004
NX
LD0004
SV
0004
NX
LD0002
LV
The display items are as follows:
LDN(h):
LD number
OS Type:
OS type for each LD
LD Name:
Arbitrary identification information (logical disk name) for each LD acquired from the
disk array
LD Capacity:
Capacity of an LD
Snapshot Attribute:
Snapshot volume type
(21) Information about snapshot pool (SnapshotPoolList.csv)
Outputs information about pools of the snapshot function.
Pool No(h)
Pool Name
Threshold
Total Snapshot Capacity
Total Snapshot Capacity (bytes)
0001
Pool0001
---
55.0GB
59055800320
Used Snapshot Capacity Used Snapshot Capacity (bytes)
Used Snapshot Capacity (%)
Snapshot Threshold
16.5GB
30
44.0GB
17716740096
Snapshot Threshold (bytes)
Snapshot Threshold (%)
Snapshot Control Capacity
47244640256
80
2.0GB
Snapshot Control Capacity (bytes)
2148532224
The display items are as follows:
Pool No(h):
Pool number
Pool Name:
Pool name
Threshold:
Threshold state
Total Snapshot Capacity:
Capacity of the snapshot reserve area
Total Snapshot Capacity(bytes): Capacity of a snapshot reserve area (bytes)
Used Snapshot Capacity:
Space used for snapshot
Used Snapshot Capacity(bytes): Space used for snapshot (bytes)
Used Snapshot Capacity(%):
Space used for snapshot (%)
Snapshot Threshold:
Snapshot threshold
Snapshot Threshold(bytes):
Snapshot threshold (bytes)
Snapshot Threshold(%):
Snapshot threshold (%)
III-105
Chapter 5 Normal Operation
Snapshot Control Capacity:
Space used for controlling snapshot
Snapshot Control Capacity(%): Space used for controlling snapshot (%)
(22) Information about correspondence between snapshot pool and SDV (SnapshotPoolSDV.csv)
Outputs information about pool of the snapshot function.
Pool No(h)
Pool Name
LDN (h)
0001
Pool0001
0004
OS Type
LD Name
LD Capacity
Pool0001_SDV0004
57.0GB
Pool No(h):
Pool number
Pool Name:
Pool name
LDN(h):
LD number
OS Type:
OS type for each LD
LD Name:
Arbitrary identification information (logical disk name) for each LD acquired from the
disk array
LD Capacity:
Capacity of each LD
(23) Information about Atomic Group (ATGInfo.csv)
Outputs information about Atomic Group.
AtgroupName
DiskArrayName
LDN
OS Type
LD Name
ATG0001
Storage002
0001h
WN
LD0001
ATgroupName:
Name of Atomic Group
DiskArrayName:
Name of each disk array
LDN:
LD number
OS Type:
OS type for each LD
LD Name:
Arbitrary identification information (logical disk name) for each LD acquired from the
disk array
(24) Information about correspondence between pool and pool-expanding PD
Outputs information about correspondence between pool and pool-expanding PD.
Pool No(h)
PDN(h)
0001
00-11
0001
00-12
0002
00-13
0002
00-14
Pool No(h):
Pool number
PDN(h):
Pool-expanding PDN number
III-106
Chapter 5 Normal Operation
1.
This command can be executed by the user who has an administrative right or the administrator for iSM.
2.
When output CSV files are displayed by using Excel, correct data may be included depending on the
standard data format of Excel. Select [Data]-[Get External Data]-[Import Text File]-[Files of type]-[All
Files] and then include the desired CSV files.
3.
This command may take much time to obtain configuration information depending on the configuration.
III-107
Chapter 6 Measures in Abnormalities
Chapter 6 Measures in Abnormalities
66..11 M
Meeaassu
urreess ffo
orr S
Seerrvveerr F
Faau
ulltt
Detections and measures of software fault in the server program (iSM server) that may occur during the operation of
iSM are mainly described herein.
66..11..11 FFaauulltt D
Deetteeccttiioonn ffrroom
mC
Clliieenntt S
Sccrreeeenn
First, the server fault can be detected from the iSM client screen.
The iSM server software fault is notified in the message display area on the iSM client main screen as a warning or an
error message.
For details of the message, refer to the “Messages Handbook”.
When the hardware fault of disk array is notified on the main screen or replication screen, contact our maintenance
personnel or consult with the manual for each disk array.
66..11..22 S
Seerrvveerr S
Sttaattee C
Chheecckk
When iSM server does not work properly and you cannot check from the client, log in the host which iSM server
operates and checks the status.
(1) About the dialog box which comes out when iSM server is manually started from
service
When it fails in starting of iSM server, the following dialog boxes may be displayed.
Figure 6-1 Dialog Box Displayed at iSM Server Start Failure
III-108
Chapter 6 Measures in Abnormalities
About the reason of this dialog, consider the following several
• The environment setting mistake (information of the physical disk which not exists is set up. etc)
About all above reason, refer to the event log and operation log.
(2) Operating state check by Windows Task Manager
Open the Windows Task Manager and check whether the iSM server is operating. Check if iSMmaind.exe for
managing the processes of the iSM server is active.
Figure 6-2 shows a sample of a report on the iSM server’s processes. The number of processes may change or
processes not shown here may be used.
Figure 6-2 Operating State Sample of the Windows Task Manager
(3) Message check
The message that can be referred on the client screen is stored in the log file (installed directory\etc\log
subordinate) on the iSM server operating system.
Please refer to 3.5 “Log Output” in Part II “Functions” for log output.
Important messages are also written in the event log simultaneously.
The messages that cannot be written in the log file, or before completion of the iSM server starts need to refer to
this event log.
The user can change file size property and the overwriting mode based on the event viewer.
(4) Monitoring of iSM server
If the operation monitoring software monitors iSM server processes, iSMmaind.exe that manages all iSM server
processes are to be monitored.
III-109
Chapter 6 Measures in Abnormalities
66..11..33 FFaauulltt C
Caauusseedd bbyy FFaaiilluurree iinn C
Coonnnneeccttiioonn w
wiitthh
D
Diisskk A
Arrrraayy
A disk array to be monitored is registered, during configuration, via specification of an IP address or host name (for
TCP/IP connection) or specification of a disk and automatic detection (for FC-AL connection).
If this description for connection is incorrect or it cannot be connected by fault, the iSM server cannot monitor the disk
array.
The following causes can be considered.
(1) Fault in IP address specification by TCP/IP connection
y Error in specification of an IP address or host name
y By network definition error and circuit fault, network did not connect between host that the iSM server operates
and SVP of the disk array.
y Same disk array were doubly defined or also defined in FC definition.
y In two or more IP address descriptions, different disk array’s IP address was defined as the same disk array.
y In the SVP definition disk array, monitoring from the host that the iSM server operates was not permitted.
(2) Fault in FC-AL connection
y Error in specification of a disk or specification missing of disk and automatic detection
y Disk array cannot be access based on hardware fault. (fault of FC-AL card, disconnection of FC-AL, disk
array’s down etc.)
66..11..44 FFaauulltt iinn C
Clliieenntt M
Maannaaggeem
meenntt
If an attempt to start the iSM server fails due to a fault in client management, a possible cause is duplicated port
numbers.
The connection port number of the client information specified at environment definition should be changed to a port
number that is not being used. In addition, on the client side, the port number of the iSM server should be changed and
should be corrected to the above-mentioned setting value.
66..11..55 M
Moonniittoorriinngg oonn D
Diisskk A
Arrrraayy hhaass S
Sttooppppeedd D
Duuee
ttoo FFaaiilluurree
Control path failure or disk array failure in a monitored disk array may result in discontinuation of disk array
monitoring.
In this case, iSM switches the monitoring state on the concerned disk array into “Wait Recovery”, and waits for
recovery from the failure.
The fault-recovery waiting process checks the status of the faulty disk array at intervals specified in the environment
definition file (monitoring restarting allowance check interval), and restarts monitoring automatically upon recognizing
fault recovery.
III-110
Chapter 6 Measures in Abnormalities
The status waiting for faulty recovery continues until the fault recovers. To interrupt waiting for fault recovery,
perform interruption process on monitoring control screen on iSM client (after executing interruption, monitoring state
becomes “Stop (Fault)”).
For restarting the monitor function after recovery from failure, perform interruption process on monitor control screen
on iSM client and then start monitoring again.
If monitoring on a disk array discontinues due to problems with a management server (insufficient resources, etc.),
fault recovery is not waited for. In such a case, monitoring state becomes “Stop (Fault)”.
66..11..66 FFaaiilluurreess iinn P
Peerrffoorrm
maannccee R
Reellaattiioonn,,
R
Reepplliiccaattiioonn aanndd S
Snnaappsshhoott O
Oppeerraattiioonn
When Performance Monitoring, Performance Optimization, Replication or Snapshot operation fails, check the
following first.
•
Was the product to use Performance Monitoring, Performance Optimization, DynamicDataReplication,
RemoteDataReplication or Snapshot purchased for the target disk array?
•
You can check what has been purchased in Disk Array Properties in the Performance Monitoring screen on the
client.
•
Is the process of Performance Monitoring, Performance Optimization, Replication or Snapshot running on the
machine where the iSM server is operating?
•
Are there any forbidden operations done in Replication or Snapshot?
66..11..77 R
Reessttaarrtt aafftteerr S
Seerrvveerr A
Abbnnoorrm
maalliittiieess
If any process of an iSM server has halted after the iSM server went operable, the iSM server autonomously restarts to
continue monitoring of the disk array. If an iSM client is used, connection is terminated so that re-connection is
required after the iSM server is operable. The iSM server attempts to restart up to five times in an hour. If the iSM
server is unable to restart at the sixth attempt, it stops or shuts down the current function.
If asking for a check on the fault, gather the fault information according to 6.1.9 “Information Gathering Method when
Server Fault with Unknown Cause”.
* The iSM server becomes operable after the message “iSM01002 Storage Manager is ready” is output.
* If the iSM server shuts down a function, the message “iSM01101 The function is not available.function=functionname” is output.
The shutdown of an iSM server function means that the iSM server continues operation even if the target process (one
of the processes shown in the table below) is not operating. In this case, the function of the target process cannot be
used. If the process’s function is mandatory, stop the iSM server, check and eliminate the cause of the fault according
to the message, and then restart the iSM server.
III-111
Chapter 6 Measures in Abnormalities
Table 6-1 Processes Continued by the iSM server even if They are not Operating
Process Name
Function
iSMdrd.exe,
iSMrpl_report.exe
Replication (DDR/RDR) management function
ReplicationControl
If this function is unavailable, the clients are not permitted to use the pair
function, unpair function, or volume operation function through the GUI.
For the replication function, refer to the “Data Replication User’s Manual
(Function Guide)” and “Data Replication User’s Manual (Installation and
Operation Guide for Windows)”.
iSMmsgdd.exe
Event link function
msgdrv
If this function is unavailable, the mail link function and shell link function
cannot be used. For the event link function, refer to 3.6 “Event Link”.
iSMprfd.exe,
iSMprfrtd.exe
Performance monitoring function
PerformanceMonitor
If this function is unavailable, a performance monitoring command (e.g.,
iSMprflog) cannot be executed and the clients are not permitted to use the
function for monitoring disk array performance through the GUI. For the
performance monitoring function, refer to the “PerformanceMonitor User’s
Manual.
iSMconfig.exe
Configuration setting (GUI) function
config GUI
If this function is unavailable, the clients are not permitted to use the
functions for setting a disk array configuration and referring to the
configuration information through the GUI. For the configuration setting
(GUI) function, refer to the “Configuration Setting Tool User’s Manual
(GUI)”.
iSMoptd.exe,
iSMoptfad.exe
Performance optimization function
PerformanceOptimizer
If this function is unavailable, the clients are not permitted to use the
function for tuning disk array performance through the GUI. For the
performance optimization function, refer to the “PerformanceOptimizer
User’s Manual”.
iSMcmdd.exe
Configuration setting (GUI) function
ISMcmd
If this function is unavailable, the clients are not permitted to use the
function for saving disk array’s configuration setting information through the
GUI. For the configuration setting (GUI) function, refer to the
“Configuration Setting Tool User’s Manual (GUI)”.
iSMalived.exe
ALIVEmail function
ALIVEmail
If this function is unavailable, a fault cannot be reported to the NEC Fielding
by e-mail. (A maintenance contract is needed for a fault report.)
iSMftd.exe
File transfer function
FileTransfer
If this function is unavailable, the function to transfer files to/from the iSM
clients cannot be used.
iSMssd.exe
Snapshot function
Snapshot
If this function is unavailable, the clients are not permitted to use the
functions for snapshot operation through the GUI. For the snapshot function,
refer to the “Snapshot User’s Manual (Function Guide)”.
III-112
Chapter 6 Measures in Abnormalities
66..11..88 O
Otthheerrss
The following error can also occur.
• The area overflow under the directory of installation destination directory\etc.
Not only log files, but trace and internal socket paths at the time of the fault occurrence are stored here. So when the
capacity is filled up, the iSM server will not work.
66..11..99 IInnffoorrm
maattiioonn G
Gaatthheerriinngg M
Meetthhoodd w
whheenn S
Seerrvveerr
FFaauulltt w
wiitthh U
Unnkknnoow
wnn C
Caauussee
Because the cause of server fault is unknown, necessary information for fault analysis should be gathered when you ask
us for investigation.
You may gather the necessary information by executing the following command.
(1) Log on as the Administrator.
(2) Execute [Difficulty Information Gather] from the [Server Menu].
(3) Check that the directory iSMgather is created under the directory where the iSM server is installed when a
directory is not specified, and under the specified directory when one is specified.
Server fault information gathering can be performed from a client. For details, refer to 6.2.4 “Information Gathering
Method when Client Fault with Unknown Cause”.
To gather information at occurrence of an iSM fault, collect a subsystem log (default) as part of fault
analysis information. If the subsystem log is collected, it takes time to collect fault analysis information.
III-113
Chapter 6 Measures in Abnormalities
66..22
M
Meeaassu
urreess ffo
orr C
Clliieen
ntt F
Faau
ulltt
Description herein is the detection and measures of client program (iSM client) that operate on a personal computer
especially for software fault that may occur during the iSM operation.
66..22..11 M
Meessssaaggee D
Diiaalloogg
Basically a fault event is described to the user as a message dialog interactively. Individual dialog details are checked
with the iSM client HELP. If you follow these instructions, processing is executed normally.
<Example: A client fails to start when a port number is specified in duplicate.>
If the port number to be used in a client is already used, the iSM client fails to start displaying the [00007-00]
message dialog box. In this case, the iSMmain.ini file in the folder containing the iSM client needs to be edited as
shown below.
[CLIENT]
PORT=8021 ← Specify a port number other than 8021.
1.
A value 1 to 65535 can be specified as a port number. If a value outside the range is specified, the system
terminates displaying the error message dialog box.
2.
If the iSM client is active, the set value becomes valid after the client starts next time.
3.
The iSMmain.ini file contains various settings. If you edit any parameters other than the iSM
client’s port number in the iSMmain.ini file, the operation of the iSM client is not guaranteed. To
prevent this problem, do not change any other parameter settings.
66..22..22 C
Coom
mm
muunniiccaattiioonn ffaauulltt
If the connection with the iSM server fails, the server, not the client, may have the problem. Check the messages, etc.
on the server, and identify the problem. The problem may be also communication abnormalities that are not related to
iSM. The communication status between the iSM server and client should be checked.
66..22..33 R
Reeccoonnnneeccttiioonn
Because the iSM client specifies the information display as its main function, the iSM may rebuild when reconnection
is tried in software fault.
III-114
Chapter 6 Measures in Abnormalities
66..22..44 IInnffoorrm
maattiioonn G
Gaatthheerriinngg M
Meetthhoodd w
whheenn C
Clliieenntt
FFaauulltt w
wiitthh U
Unnkknnoow
wnn C
Caauussee
Because the cause of client fault is unknown, necessary information for fault analysis should be gathered when you ask
us to investigate. Select [Operation] → [Difficulty Information Gather] from the menu, and use the Difficulty
Information Gather screen that starts to gather fault information. If you execute this operation during connection to the
server, you can gather server fault information at the same time. Gathered information is stored with the following file
names in the saving folder [\iSMgather[\iSMsvr]] and [\iSMgather[\iSMclient]].
• hostname_iSMgather(n).cab
• hostname_iSMvolgather(n).cab
• iSMCL_gather(n).cab
where
hostname:
Host name of the connected server
(If the host name exceeds 16 bytes, the first 16 bytes are used.)
n:
Identification number used if multiple files exist
The default saving folder is “client installation folder[\SGn]\DATA”.
SGn: Folder displayed in [Folder Name] of Connection Settings
(If [Folder Name] displays the “default” connection, the default value is “client installation folder\DATA”.)
When gathering fault information, history information (GatherResult.log) of gathering fault information is also stored
in the saving folder. Send us the history information file together with server information and client information.
To gather server fault information at the same time, set [Detail2] → [File Transfer Information] correctly on Setting
Utility screen.
III-115
Chapter 6 Measures in Abnormalities
This page is intentionally left blank.
III-116
Appendix A
Appendix A
Specifications
Specifications
A
A..11 N
Nu
um
mb
beerr o
off M
Mo
on
niitto
orreed
dD
Diisskk A
Arrrraayyss
An iSM server can monitor a maximum of 32 disk arrays.
A
A..22 N
Nu
um
mb
beerr o
off C
Co
on
nn
neecctteed
dC
Clliieen
nttss
One iSM server can connect with a maximum of 32 iSM clients.
A
A..33 M
Maaxxiim
mu
um
mN
Nu
um
mb
beerr o
off iiS
SM
MC
Clliieen
nttss T
Th
haatt
C
Caan
nB
Bee S
Sttaarrtteed
dS
Siim
mu
ullttaan
neeo
ou
ussllyy
Up to ten iSM clients can be started on a single PC at the same time.
Depending on the execution-time environment
(including the free memory space), however, the maximum number of clients may not be started simultaneously.
1
Appendix B
Environment Definition Language
Appendix B
Environment Definition Language
B
B..11 M
Maaiill H
Heeaad
deerr F
Fiillee
This section describes about the mail header file specified with the Link information used in the environment setting.
For details of the environment setting, refer to Part I 1.3 “Environment Setting”.
(1) Header File
The header file is the form of the actual mail to transmit, and mainly describes the header part of the mail.
Input “FROM:” on the first line, and write the mail sender’s name.
If mail transmission fails in SMTP server
due to wrong target mail address, etc., an error message from SMTP server may send to a sender’s mail address.
The contents of the mail text after the second line are sent as it is, the part above the blank line is the header, and
subsequent part is the body of the mail.
A message including “$MSG” in body is converted into a message
that is output to an operation log triggered by “$MSG” for linkage.
FROM: [email protected]
Describe sender’s mail address.
Header
SUBJECT: iSMserver error report.
← blank line
This is the iSMserver at XXXX(domain name etc.)
Body
Error Reporting.
$MSG
→ A message output to operation log that triggered object linkage is described in this line.
1.
Mail address to input on the “FROM:” line must be a complete one that includes domain name.
2.
Various header lines in accordance with RFC822 can be written in the header part.
3.
Any contents can be described in the body part.
4.
The size of the whole header file must be less than 1KB. Also, one line must be less than 256 bytes (including
blank / tab / carriage return).
5.
When a part of “$MSG” of a certain line is replaced into the message content, a “$MSG” which appeared first
can be replaced. So even if two or more “$MSG”s are described in one line, only the first “$MSG” is
replaced. However, if the “$MSG”s are described in each line, they spread to each message.
2
Appendix C
Appendix C
Notes
Notes
C
C..11 IItteem
mss aab
bo
ou
utt S
Seerrvveerr
Note on the iSM server are described below.
1.
One iSM server can be installed/operated in one server.
2.
One disk array should be controlled by one iSM server.
3.
If installing multiple disk arrays or installing an additional one, you need not run or add multiple
iSM servers.
A single iSM server can monitor multiple disk arrays.
Note the following about iSM versions:
• If you have multiple iSM media, use an iSM server of the latest version.
The reason for this is that iSM servers of older versions do not support new disk arrays.
• If you install a disk array of a new type, you need to upgrade the currently running iSM server
to the latest version.
• iSM clients must use programs of the same versions as those on the servers.
4.
To conduct monitoring from multiple iSM servers at the same time, install a single iSM server for
monitoring a disk array and connect multiple iSM clients to it for monitoring.
The reason for this is that a disk array cannot be monitored by multiple iSM servers at the same
time.
If configuring iSM servers into a cluster, configure them into a unidirectional standby cluster so
that they are monitored by a single server at the same time.
5.
When there are many resources of a disk array, the amount of information to be collected is
increased. Therefore, it may take a few minutes until the iSM server starts and the monitoring
of the disk arrays resumes.
6.
The contents of mail header file are sent in sequence to SMTP server in the mail function at the event link.
However, in case that a part of Windows base SMTP server does not accept starting a new
paragraph without using <CR+LF>, should be modified to <LF> to <CR+LF> by altering it to
start a new paragraph in the mail header file.
7.
iSM server stops the mail transmission service after any problem occurs when communicating with the
SMTP server.
In resuming, please re-start iSM server.
The mail transmission service may be blocked by activation order, especially when the SMTP
server is operated simultaneously in the same machine.
8.
If iSM server cooperates with SNMP trap service, and SNMP trap service is re-started while
running, SNMP trap cannot be received after restarting.
needed.
3
In this case, re-starting of iSM server is
Appendix C
9.
Notes
When a system is high load, the following phenomena may occur.
• iSM server may terminate abnormally.
In this case, Please re-start iSM server.
• The display and operation by iSM client may be kept waiting. In this case, please re-perform
after carrying out for a while.
C
C..22 IItteem
mss aab
bo
ou
utt C
Clliieen
ntt
Note on iSM client are described below.
1.
One iSM client can be installed/operated in one PC.
2.
With respect to the CSV output function for the information view list, when a CSV format file is
opened by spreadsheet software, the name part, which is only configured by numbers, may
become exponent notation (like 30000000000000000000 → 3E+19).
3.
The configuration of the disk array cannot be displayed while changing configuration through
maintenance.
4.
The configuration of the target disk array cannot be displayed while the network path connecting
the disk array and the iSM server is failing.
5.
Do not set the same name (disk array, logical disk, port) in the same iSM server.
6.
The format cannot be changed for a logical disk for which the pair setting of replication is
specified.
7.
When the logical disk with the same number is built, note that the name and the form which were
set before are inherited.
8.
The disk array name is used as part of a name of a statistical information history/summarized file
in the performance monitoring function.
For some platforms (OS), file names are not
case-sensitive. Keep this in mind when specifying a disk array name.
4
Index
Disk Array Subsystem list screen........................ II-7, II-8
Disk Array Subsystem Name .......................... II-10, II-11
Disk Enclosure list screen ................................... II-7, II-41
Disk Enclosure properties screen .............................. II-43
display function ........................................................... II-3
display information list................................................ II-3
display list of all volumes.........................................III-31
DynamicSnapVolume ..............................................III-48
A
abbreviated name (number)............................. II-38, II-42
Access Control ................................................ II-13, II-27
Attn.(copy back).............................................. II-19, II-25
Attn.(expand fail) ...................................................... II-26
Attn.(expanding) ....................................................... II-25
Attn.(format fail) ....................................................... II-25
Attn.(formatting) ............................................. II-25, II-34
Attn.(nolicense) ......................................................... II-39
Attn.(powering up) .................................................... II-34
Attn.(preventive copy) .................................... II-19, II-25
Attn.(rebuilding).................................... II-19, II-25, II-34
Attn.(reduce) ................................................... II-19, II-25
Attn.(unformatted)..................................................... II-25
Auto Assignment............................................II-12, III-37
Auto Repair ..............................................................III-37
E
environment setting ............................................ I-5, II-70
Expand LUN.............................................................III-37
expand-fail................................................................. II-19
expanding .................................................................. II-19
Expansion State ............................................... II-19, II-21
F
C
Fault (media error) .................................................... II-26
fault monitoring......................................................... II-55
cache module capacity .............................................. II-39
cache partitioning function........................................ II-12
Cache Resident................................................ II-27, II-29
Cache Segment Name ..................................... II-27, II-29
capacity ................................................. II-19, II-20, II-21
Capacity................... II-19, II-21, II-26, II-29, II-34, II-36
Classification................................................... II-35, II-36
component layer .......................................................... II-6
Component list screen ....................................... II-7, II-15
component type ......................................................... II-39
configuration display area ..........................II-4, II-6, III-9
configuration display command ...............................III-37
configuration display function .................................... II-2
configuration information file output command ......III-92
configuration information output function.................. II-4
Control Path .............................................................. II-12
control volume.............................................. III-12, III-24
controller component list........................................... II-38
Controller detail information screen ......................... II-40
Controller list screen ......................................... II-7, II-37
Cross Call .................................................................. II-12
CSV output of information list.......... III-28, III-33, III-36
G
generation file.................................................. II-56, II-57
generation management file ............................ II-56, II-57
Group............................................................... II-26, II-29
I
individual component layer ................................. II-6, II-7
Info (inactive) ............................................................ II-34
information gathering for server fault ....................... II-71
information list display area ...............II-4, II-7, II-8, III-9
installation .................................................................... I-3
iSMcsv......................................................................III-92
iSMview ...................................................................III-37
iSMvollist .................................................................III-10
L
LD Set .........................................................................II-31
LD Set Name ............................................................. II-27
level 1 .........................................................................III-7
level 2 .........................................................................III-7
level 3 .........................................................................III-7
list of components related to Disk Enclosure............ II-42
log collection ............................................................. II-55
log file ....................................................................... II-57
log file saving directory............................................. II-56
Logical Disk details information screen.................... II-28
Logical Disk List ............................................. II-21, II-36
D
Data ........................................................................... II-35
definition of control volume.....................................III-37
disk array layer ............................................................ II-6
disk array name ......................................................... II-49
disk array name setting.............................................. II-50
disk array naming rule............................................... II-51
disk array setting condition ....................................... II-51
disk array setting condition and naming rule ............ II-51
Disk Array Subsystem details information screen .... II-11
5
Logical Disk list screen ..................................... II-7, II-24
logical disk name....................................................... II-49
logical disk naming rule ............................................ II-53
Logical Disk Number ................................................ II-25
logical disk setting conditions ................................... II-53
Product Rev ............................................................... II-36
Progress Ratio ....................................... II-21, II-27, II-29
property of volume list ................................. III-12, III-25
Purpose ............................................................ II-27, II-29
R
M
RAID ........................................... II-19, II-21, II-26, II-29
RANK.................................................... II-27, II-29, II-34
RANK Number.......................................................... II-36
Ready (formatting) .................................................... II-25
required memory capacity ....................................I-2, I-24
revision of storage control software .......................... II-13
Rotation Speed .......................................................... II-36
RPL Type ........................................................ II-26, II-29
menu bar...................................................................... II-5
message display area ..................................II-4, II-7, III-9
message level................................................... II-55, II-63
message output .......................................................... II-46
monitoring ....................................................... II-10, II-11
monitoring event ....................................................... II-45
monitoring event list ................................................. II-45
monitoring information display................................. II-46
monitoring start/stop ................................................. II-48
monitoring state......... II-8, II-15, II-18, II-25, II-37, II-41
S
SAA ................................................................. II-10, II-12
screen of volume list display ....................................III-28
selection of disk array name.....................................III-32
Serial Number ................................................. II-12, II-36
Server Menu .............................................................. II-69
Spare.......................................................................... II-35
State .....II-10, II-11, II-17, II-21, II-25, II-28, II-34, II-36,
II-39, II-42
state monitoring function .......................................... II-44
state value reflection.................................................. II-46
status bar...................................................................... II-5
N
Name ..................................................... II-21, II-23, II-28
nickname setting function ......................................... II-49
No Setting.................................................................. II-35
notification button ..................................................... II-55
Number............ II-21, II-23, II-28, II-31, II-32, II-34, II-36
number of elements ................................................... II-17
O
T
operating state ........... II-8, II-15, II-18, II-25, II-37, II-41
operation log.............................................................. II-56
OS Type..................................................................... II-28
OS type setting conditions ........................................ II-52
OS type/logical disk name......................................... II-25
OS type/logical disk name setting............................. II-51
output to the message display area............................ II-55
title bar......................................................................... II-5
toolbar.......................................................................... II-5
Total Capacity ........................................................... II-12
Type............................................. II-17, II-21, II-38, II-42
U
P
uninstallation ................................................................ I-4
Update display information ......................................III-36
user level ....................................................................III-7
user notification function .......................................... II-55
User System Code ..................................................... II-12
performance analysis supporting tool ....................... II-70
performance display refresh rate ............................... II-70
Physical Disk detailed information screen ................ II-35
Physical Disk List ..................................................... II-30
Physical Disk list screen.....................................II-7, II-33
Pool details information screen ................................. II-20
Pool list screen .................................................. II-7, II-18
Pool Name ................................................................. II-19
Pool Number ............................................................. II-19
Port ............................................................................ II-30
port information ........................................................ II-30
port name................................................................... II-49
port name naming rules ............................................. II-54
port name setting ....................................................... II-53
port name setting conditions ..................................... II-54
port number ............................................................... II-39
Port number of Server ................................................III-5
Product FW Rev ........................................................ II-12
Product ID ....................................................... II-12, II-36
V
View/Hide of Toolbar ..............................................III-36
volume list ................................................................III-12
volume list creation/update .......................... III-14, III-32
volume list display ....................................... III-20, III-26
volume list installation and uninstallation.................... I-4
volume list properties ...............................................III-35
W
World Wide Name..................................................... II-12
6