1
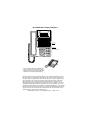
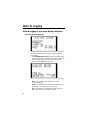
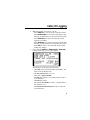
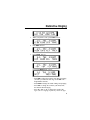
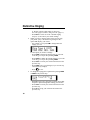
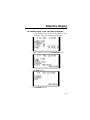
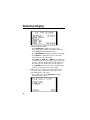
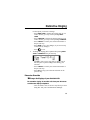
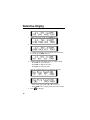
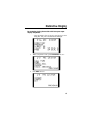
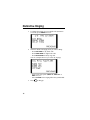
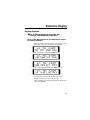
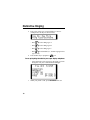
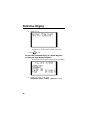
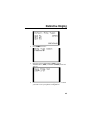
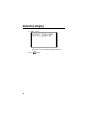
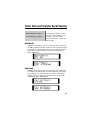
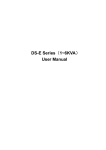
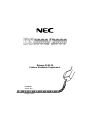
Release 02.03.00
Feature Handbook Supplement
80000MFS01
October 2001
Printed in U.S.A.
Your Multibutton Display Telephone
80000 -70
CLEAR
BIN 1
BIN 2
BIN 3
BIN 4
BIN 5
CHECK
BIN 6
BIN 7
BIN 8
BIN 9
BIN 10
LINE 1
LINE 2
LINE 3
LINE 4
LINE 5
LINE 6
LINE 7
LINE 8
LINE 9
LINE 10
LINE 11
LINE 12
ABC
DEF
1
2
3
GHI
JKL
MNO
4
5
6
PQRS
TUV
WXYZ
7
8
9
OPER
MW
ICM
FLASH
DND
DIAL
MIC
LND
SPK
In DS1000:
Keys 7-12 are
undefined.
For Attendants:
Key 11=Night Key
Key 12=Operator Call Key
0
VOL
●
●
CONF
HOLD
Your key assignments may be different than
shown. Ask your communications manager.
See the inside back cover of this guide for an
illustration of the Super Display telephone.
Nothing contained in this manual shall be deemed to be, and this manual does not constitute, a warranty of, or representation with respect to, any of the equipment covered. This
manual is subject to change without notice and NEC America, Inc. has no obligation to provide any updates or corrections to this manual. Further, NEC America also reserves the
right, without prior notice, to make changes in equipment design or components as it
deems appropriate. No representation is made that this manual is complete or accurate in
all respects and NEC America shall not be liable for any errors or omissions. In no event
shall NEC America be liable for any incidental or consequential damages in connection with
the use of this manual. This document contains proprietary information that is protected by
copyright. All rights are reserved. No part of this document may be photocopied or reproduced without prior written consent of NEC America.
©2001 by NEC America, Inc. All Rights Reserved.
Printed in U.S.A.
Table of Contents
Caller ID Logging .............................................................1
Caller ID Logging at your 22-Button or 34-Button
Display Telephone . . . . . . . . . . . . . . . . . . . . . . . . . . . .1
Caller ID Logging at your Super Display Telephone . .4
Distinctive Ringing...........................................................7
Distinctive Ring Configuration . . . . . . . . . . . . . . . . . .8
Extension Override . . . . . . . . . . . . . . . . . . . . . . . . . .13
Key Ring Override . . . . . . . . . . . . . . . . . . . . . . . . . . .17
Administration . . . . . . . . . . . . . . . . . . . . . . . . . . . . . .21
Hold Recall . . . . . . . . . . . . . . . . . . . . . . . . . . . . . . . .27
Park Recall . . . . . . . . . . . . . . . . . . . . . . . . . . . . . . . .27
Transfer Recall . . . . . . . . . . . . . . . . . . . . . . . . . . . . .28
Transfer, Handsfree.......................................................29
Volume and Contrast Control........................................30
Volume Control . . . . . . . . . . . . . . . . . . . . . . . . . . . . .30
Contrast Control . . . . . . . . . . . . . . . . . . . . . . . . . . . .32
i
ii
Caller ID Logging
Your phone can store
If your system has Caller ID
enabled, Caller ID logging stores in
a log your caller’s number and
phone number for easy
optional name for each outside call
review and redialing.
that rings the system. You can view
this log on your telephone display,
allowing you to easily review and redial your calls.
your caller’s name and
The system can log calls directly to your extension — or you
may be a member of a Caller ID Logging group that shares
records. Your Communications Manager can tell you more.
Use the feature and soft keys on your phone to:
Scroll through (review) your Caller ID records.
Delete records you no longer need.
Store a record (both the number and name) in one of your
Personal Speed Dial bins.
● Place a return call to the calling party.
●
●
●
Caller ID Logging at your 22-Button or 34-Button
Display Telephone
To review your Caller ID log:
1.
While your phone is idle, press CLnn (where nn is the number of Caller ID records currently logged at your phone).
– Your Ring/Message Lamp (the large green LED on the
upper right corner of you phone) winks on (green) when
you have Caller ID records you have not reviewed.
– After pressing CLnn, you see:
1
Caller ID Logging
2.
3.
– Total = the total number of Caller ID records in your log.
– New = the number of new calls since you last
reviewed your log.
While this display is on screen, you can:
– Press ALL to review all your Caller ID records.
– Press UNAN to review the records just for calls that
rang you phone but were unanswered in the system.
– Press DEL* to delete all Caller ID records logged at
your phone.
– Press EXIT or dial 9 to exit to the idle mode without
making any changes.
If you pressed ALL or UNAN in the previous step, you
see (for example):
This display is Page 1 of a Caller ID record. It shows:
– The name of the person that called (if available). The
most recent call displays first.
– The call record number (e.g., 03).
– The date they called (i.e., Yesterday, Today or day of
week and date).
4.
Press
. You see (for example):
This display is Page 2 of a Caller ID record. It shows:
– Your caller’s phone number.
– The call record number (e.g., 03).
2
Caller ID Logging
– The outside line number (or name – if programmed)
the call came in on.
– The extension that answered the call, or if the call
was unanswered.
5.
Use
and
to scroll through the Caller ID
records that are logged at your phone.
6.
Press
7.
When a Caller ID record is displayed, you can:
– Press
to call the person back.
– Dial
to Store the number in Personal Speed Dial.
– Dial
to Delete the displayed record.
– Dial
to eXit (go back to step 2).
– Press
8.
to toggle between Page 1 and Page 2.
to show the Caller ID Menu display below.
While the Caller ID Menu displays, you can:
– Press CALL to call the person back.
– Press STOR to store the number in Personal Speed
Dial.
– Press DEL to delete the displayed record.
– Press EXIT to go back to step 2.
– Press
to back up to step 7.
3
Caller ID Logging
Caller ID Logging at your Super Display Telephone
To review your Caller ID log:
1.
While your phone is idle, press CALLs nn (where nn is
the number of Caller ID records currently logged at
your phone).
– Your Ring/Message Lamp (the large green LED on the
upper right corner of you phone) winks on (green) when
you have Caller ID records you have not reviewed.
– After pressing CALLS nn, you see:
– Total = the total number of Caller ID records in your log.
– New = the number of new calls since you last
reviewed your log.
– Unans = the number of Caller ID calls that rang your
phone that were unanswered in the system.
– Ans = the number of Caller ID calls that rang your
phone that were answered in the system.
4
Caller ID Logging
2.
3.
While this display is on screen, you can:
– Press VIEW ALL to review all your Caller ID records.
– Press VIEW UNANS to review the records just for calls
that rang you phone but were unanswered in the system.
– Press DELETE ALL to delete all Caller ID records
logged at your phone.
– Press VIEW ANS to review the records just for the calls
that rang your phone that were answered in the system.
– Press EXIT or dial 9 to exit to the idle mode without
making any changes.
If you pressed VIEW ALL, VIEW UNANS,or VIEW ANS
in the previous step, you see (for example):
This display is a Caller ID record. It shows:
– The name of the person that called (if available). The
most recent call displays first.
– The call record number (e.g., 03).
– Your caller’s phone number.
– The date they called (i.e., Yesterday, Today or day of
week and date).
– The time they called.
– The outside line number (or name – if programmed)
the call came in on.
– The extension that answered the call, or if the call
was unanswered.
5
Caller ID Logging
6
4.
Use
and
to scroll through the Caller ID
records that are logged at your phone.
5.
When a Caller ID record is displayed, you can:
– Press CALLBACK to call the person back.
– Press DELETE to delete the displayed record.
– Press STORE BIN to store the number in a Personal
Speed Dial bin.
– Press DELETE ALL to delete all your Caller ID
records.
– Press EXIT to go back to step 1.
Distinctive Ringing
Customize your
Use Distinctive Ringing to customize the way your telephone
rings. If you are in a large work
you’ll know when calls
area with other co-workers, set up
are just for you.
Distinctive Ringing so you’ll
always know when calls are for
you. In addition, Distinctive Ringing helps you more easily differentiate the types of calls ringing your phone. Distinctive Ringing provides the following:
telephone’s ringing so
Distinctive Ring Configuration
Use Distinctive Ring Configuration to customize the ringing for your
telephone. There are 6 types of ringing at your phone (called a Ring
Set) that you can separately adjust:
– Intercom ringing
Includes ringing Intercom calls, as well as calls ringing Extension
Hunting Groups, Call Coverage keys and the operator’s Call key.
– Ring Group ringing
– Recall ringing
Includes Hold, Park and Transfer recall ringing.
– Type A ringing
Includes line key, loop key, Transfer and DIL ringing. (You
can reassign types A, B, and C ringing in Extension Override
and Key Ring Override below.)
– Type B ringing
Not used (unassigned) by default. (You can reassign types A, B,
and C in Extension Override and Key Ring Override below.)
– Type C ringing
Not used (unassigned) by default. (You can reassign types A, B,
and C in Extension Override and Key Ring Override below.)
Extension Override
If you want your outside calls to ring differently during the day, at
night, or after a delay, use Extension Override. You can use
7
Distinctive Ringing
Extension Override instead of Distinctive Ring Configuration if
you just want to change the way your outside calls ring. Or, you
can first set up Distinctive Ring Configuration and then use
Extension Override to further customize ringing. (Note that your
Extension Override selections always override your Distinctive
Ring Configuration settings.)
Key Ring Override
To have unique ringing just for your line, Call Coverage, and Group
Call Pickup keys, use Key Ring Override. You can use Key Ring
Override instead of either Extension Override or Distinctive Ring
Configuration, or in combination with both. (Note that your Key
Ring Override selections always override your Extension Override
or Distinctive Ring Configuration settings).
Distinctive Ring Administration (Admin)
Admin allows you to select a default Ring Set for your phone.
This is a quick way to change the way your phone rings. Here’s
how this works:
– The system has 3 Ring Sets (Set 1, Set 2 and Set 3).
– The 5 types of ringing within each of the 3 sets sound different.
– By default, your extension uses Set 1.
– Use Admin to select one of the other Ring Sets (2 or 3) for
your phone.
If you have a Super Display telephone, Admin lets you save your
Distinctive Ring Configuration settings as one of the system default
Ring Sets. Your settings then become a standard set that other users
can select.
Distinctive Ring Configuration
☎ Change the Ringing at your Extension
To customize ringing at your 22-button or 34-button display telephone:
– Your extension’s Class of Service may block you from
doing this. Ask your Communications Manager.
8
Distinctive Ringing
1.
While your phone is idle, press PGM. You see:
2.
Press RING. You see:
3.
Press CNFG. You see:
If you press MORE, you see:
If you press MORE again, you see:
From these choices:
– Press ICM to change the sound of your Intercom ringing.
(To make your Intercom calls ring, use the #VA UserProgrammable Feature.)
– Press RGRP to change the sound of Ring Group ringing.
– Press RCL to change the sound of your Hold, Park,
and Transfer Recall ringing.
– Press “A”, “B”, or “C” to change the sound of the
Type A, B or C ringing, respectively. You’ll use Type
9
Distinctive Ringing
4.
A, B and C ringing when setting up Extension
Override (page 13) and Key Ring Override (page 17).
– Press DFLT to select one of the 3 default ringing
setups (1-3) and cancel your custom settings.
When you select a ringing option in the previous step,
your phone “plays” the current ring setting for that
option and displays your choice.
– For example, if you press ICM to change Intercom
ringing, you see:
For the option you choose to change:
– Press TONE to change the ringing pitch. If you want
to do this, go to step 5 after pressing TONE.
– Press CDNC to change the ringing pattern. If you want
to do this, go to step 5 after pressing CDNC.
– Press CNCL to cancel your selection and return to the
previous step.
– Press SAVE to save your changes (if you went to step
5 and made any changes).
– Press
5.
to exit.
To change the ringing pitch or pattern after pressing TONE
or CDNC in the previous step:
– Dial 0-9 to select a new ring pitch or pattern. You’ll hear
the pitch or pattern change after making your selection.
– Press CNCL to cancel your selection and return to the
previous step.
– Press OK to accept your selection and return to the
previous step.
10
Distinctive Ringing
To customize ringing at your super display telephone:
– Your extension’s Class of Service may block you from
doing this. Ask your Communications Manager.
1.
While your phone is idle, press PROGRAM. You see:
2.
Press RING. You see:
3.
Press CONFIG. You see:
11
Distinctive Ringing
4.
12
From the displayed choices:
– Press INTERCOM to change the sound of your
Intercom ringing. (To make your Intercom calls ring,
use the #VA User-Programmable Feature.)
– Press RING GROUP to change your Ring Group ringing.
– Press RECALL to change the sound of your Hold,
Park, and Transfer Recall ringing.
– Press RING “A”, RING “B”, or RING “C” to change the
sound of the Type A, B or C ringing, respectively. You’ll
use Type A, B and C ringing when setting up Extension
Override (page 13) and Key Ring Override (page 17).
– Press DEFAULT to select one of the 3 default ringing
setups (1-3) and cancel your custom settings.
When you select a ringing option in the previous step,
your phone “plays” the current ring setting for that
option and displays your choice.
– For example, if you press INTERCOM to change
Intercom ringing, you see:
Distinctive Ringing
For the option you choose to change:
– Press RING TONE to change the ringing pitch. If you
want to do this, go to step 5 after pressing RING
TONE.
– Press CADENCE to change the ringing pattern. If you
want to do this, go to step 5 after pressing CADENCE.
– Press CANCEL to cancel your selection and return to
the previous step.
– Press SAVE to save your changes (if you went to step
5 and made any changes).
– Press
5.
to exit.
To change the ringing pitch or pattern after pressing RING
TONE or CADENCE in the previous step:
– Dial 0-9 to select a new ring pitch or pattern. You’ll
hear the pitch or pattern change after making your
selection.
– Press CANCEL to cancel your selection and return to
the previous step.
– Press OK to accept your selection and return to the
previous step.
Extension Override
☎ Change the Ringing of your Outside Calls
To customize ringing for outside calls from your 22-button
or 34-button display telephone:
– Your extension’s Class of Service may block you from
doing this. Ask your Communications Manager.
13
Distinctive Ringing
1.
While your phone is idle, press PGM. You see:
2.
Press RING. You see:
3.
To change the ringing for your outside calls (Extension
Override), press ASGN. You see:
4.
Select the outside call ringing mode you want to change.
– Press DAY for day mode calls.
– Press NGT for night mode calls.
– Press DLY for delay ring calls.
You see (example shown if you select day ringing):
If you press MORE, you see:
– Select a ring type option (“A”, “B” or “C”), or
– Select LINE to have ringing follow the system default.
5.
14
Press
to hang up.
Distinctive Ringing
To customize ringing for outside calls from your super
display telephone:
– Your extension’s Class of Service may block you from
doing this. Ask your Communications Manager.
1.
While your phone is idle, press PROGRAM. You see:
2.
Press RING. You see:
15
Distinctive Ringing
3.
To change the ringing for your outside calls (Extension
Override), press ASSIGN. You see:
4.
Select the outside call ringing mode you want to change.
– Press DAY RING for day mode calls.
– Press NIGHT RING for night mode calls.
– Press DELAY RING for delay ring calls.
You see (example shown if you select day ringing):
– Select a ring type option (RING “A”, RING “B” or
RING “C”), or
– Select CO LINE to have ringing follow the system default.
5.
16
Press
to hang up.
Distinctive Ringing
Key Ring Override
☎ Set up Unique Ringing for your Line, Call
Coverage, and Group Call Pickup Keys.
To set up Key Ring Override for your 22-button or 34-button display telephone:
– Your extension’s Class of Service may block you from
doing this. Ask your Communications Manager.
1.
While your phone is idle, press PGM. You see:
2.
Press RING. You see:
3.
To set up Key Ring Override, press KEY. You see:
4.
Select the type of key you want to program.
– The ring type you select in the next step will be
assigned to the key you press in this step.
– After you make your selection, the keys of the chosen
type will illuminate.
17
Distinctive Ringing
5.
6.
Press a key of the type you selected above. You see
(example for Line Key 01 shown below):
– Dial
to select Ring Type A.
– Dial
to select Ring Type B.
– Dial
to select Ring Type C.
– Dial
select Standard (i.e., normal ringing for this
type of call).
Press another key to program or
exit.
To set up Key Ring Override for your super display telephone:
– Your extension’s Class of Service may block you from
doing this. Ask your Communications Manager.
1.
18
While your phone is idle, press PROGRAM. You see:
Distinctive Ringing
2.
Press RING. You see:
3.
To set up Key Ring Override, press KEY. You see:
4.
Select the type of key you want to program.
– The ring type you select in the next step will be
assigned to the key you press in this step.
– After you make your selection, the keys of the chosen
type will illuminate.
19
Distinctive Ringing
5.
6.
20
Press a key of the type you selected above. You see
(example for Line Key 01 shown below):
– Dial
to select Ring Type A.
– Dial
to select Ring Type B.
– Dial
to select Ring Type C.
– Dial
select Standard (i.e., normal ringing for this
type of call).
Press another key to program or
exit.
Distinctive Ringing
Administration
☎ Selecting and Storing a Default Ring Tone Set
To select a new default Ring Tone Set for your 22-button
or 34-button display telephone:
1.
While your phone is idle, press PGM. You see:
2.
Press RING. You see:
3.
Press CNFG. You see:
4.
Press MORE twice, you see:
5.
Press DFLT. You see:
6.
Select the Ring Tone Set you want to use (1-3).
– By default, your extension initially uses Ring Set 1.
21
Distinctive Ringing
7.
When you see:
– Dial 9 (for yes) or confirm your selection, or
– Dial 6 (for no) to exit without making a selection.
8. Press
to exit.
To select a new default Ring Tone Set for your super display telephone:
1.
22
While your phone is idle, press PROGRAM. You see:
Distinctive Ringing
2.
Press RING. You see:
3.
Press CONFIG. You see:
3.
Press DEFAULT. You see:
4.
Select the Ring Tone Set you want to use (1-3).
– By default, your extension initially uses Ring Set 1.
23
Distinctive Ringing
5.
When you see:
– Dial 9 (for yes) or confirm your selection, or
– Dial 6 (for no) to exit without making a selection.
7. Press
to exit.
To store your customized ringing as a default Ring Tone
Set from your Super Display telephone:
– This option is only available at Super Display telephones.
1.
24
While your phone is idle, press:
PROGRAM + RING + CONFIG + DEFAULT. You see:
Distinctive Ringing
2.
Press ADMIN. You see:
3.
Enter the System Administrator (0000), System
Administrator 2 (9999), or Installer (372000) password.
You see:
4.
Enter the number of the default Ring Set (1-3) to which
you want to save your phone’s configuration.
25
Distinctive Ringing
5.
When you see:
– Dial 9 (for yes) to confirm your selection, or
– Dial 6 (for no) to exit without making a selection.
6. Press
26
to exit.
Hold, Park and Transfer Recall Display
Easily identify the type of
call recalling your phone.
Your telephone display can show
the type of call recalling, as well
as which co-worker initially
Parked, Transferred, or placed the
call on Hold.
Hold Recall
Following are the displays you see at your phone when a call placed
on Hold is recalling. In the first example, the call was placed on Hold
at extension 301 (which does not have a name). In the second example, the call was placed on Hold at extension 300 (which has the
name ATTENDANT).
Park Recall
Following are the displays you see at your phone when a parked call
is recalling. In the first example, the call was parked in system orbit
60 by extension 301 (which does not have a name). In the second
example, the call was parked in system orbit 60 by extension 300
(which has the name ATTENDANT).
27
Hold, Park and Transfer Recall Display
Transfer Recall
Following are the displays you see at your phone when a transferred
call is recalling. In the first example, the call was transferred by
extension 301 (which does not have a name). In the second example,
the call was transferred by extension 300 (which has the name
ATTENDANT).
28
Transfer, Handsfree
Transfer a call to a
Use Handsfree Transfer to send an
outside call to a co-worker’s
speakerphone. This allows your
co-worker to converse with the
transferred caller just by speaking toward their phone — without
lifting the handset.
co-worker’s speakerphone.
To Transfer a call to a co-worker’s speakerphone:
1.
While on an outside call, press
and dial your
co-worker’s extension number
OR
Press the Hotline key for your co-worker.
– Listen for 2 beeps. (This means that your Transfer
announcement has voice-announced at your
co-worker’s phone.)
– If your co-worker’s phone is set up to ring instead of
voice-announce, you cannot use Handsfree Transfer.
2.
Press
to send the call directly to your co-worker’s
speakerphone.
OR
Press
to get Intercom dial tone and select another
co-worker for the Transfer.
29
Volume and Contrast Control
Adjust the volume of your
You can easily adjust the volume
of your phone and the contrast of
the display. The volume and disphone’s display contrast.
play settings you make are
“remembered” by the system in
the event of a power down or system reset.
call, as well as your
Volume Control
Your telephone provides individual 7-step volume controls for the
following features while they are active:
– Intercom handset calls
– Intercom Handsfree calls
– Outside call handset calls
– Outside call Handsfree calls
– Paging (receive volume)
– Background Music
– Ringing
You can additionally use your telephone’s soft keys to adjust the volume of your on-hook ringing, off-hook ringing and Paging (receive).
Using the Volume Control Soft Keys
To adjust the ringing, off-hook ringing or incoming Page
volume at your 22- button or 34- button telephone:
30
1.
While your phone is idle, press PGM. You see:
2.
Press MORE. You see:
3.
Press VOL. You see:
Volume and Contrast Control
4.
Press the key for the type of volume you want to adjust:
– RING = Ringing
– OFHK = Off-hook ringing
– PAGE = Page announcements (incoming)
You see (ringing shown):
5.
Press
or
to adjust the selected volume.
– The number to the right of the display indicates the
current setting (1-7).
To adjust the ringing, off-hook ringing or incoming Page
volume at your Super Display telephone:
1.
While your phone is idle, press PROGRAM. You see:
2.
Press VOLUME. You see:
31
Volume and Contrast Control
3.
Press the key for the type of volume you want to adjust:
– RING = Ringing
– OFF-HK RING = Off-hook ringing
– PAGE = Page announcements (incoming)
You see (ringing shown):
4.
Press
or
to adjust the selected volume.
– The number to the right of the display indicates the
current setting (1-7).
Contrast Control
Press
or
while your 22-button or 34-button display telephone is idle to adjust the display contrast. There are 7
steps in this adjustment. Note that Contrast Control is not available if you have a Super Display telephone.
32
Your Super Display Telephone
80000 - 71
CHECK
CLEAR
LINE 1
LINE 2
LINE 3
LINE 4
LINE 5
LINE 6
LINE 7
LINE 8
LINE 9
LINE 10
LINE 11
LINE 12
For Attendants:
Key 11=Night Key
Key 24=Operator Call Key
Keys 13-24 are undefined
for non-attendants in DS2000.
ABC
DEF
1
2
3
GHI
JKL
MNO
4
5
6
PQRS
TUV
WXYZ
7
8
9
OPER
MW
ICM
FLASH
DND
DIAL
MIC
LND
SPKR
0
VOL
●
●
CONF
Your key assignments may be different than
shown. Ask your communications manager.
See the inside front cover of this guide for an
illustration of the 34-Button Display telephone.
HOLD
Keys 7-24 are undefined for
non-attendants in DS1000.
NEC America Inc., Corporate Networks Group
4 Forest Parkway, Shelton, CT 06484
TEL: 203-926-5400 FAX: 203-929-0535
cng.nec.com