1
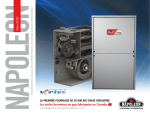
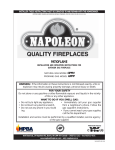
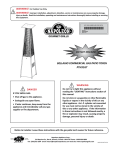
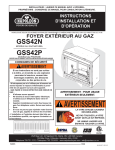
INSTALLER: LEAVE THIS MANUAL WITH THE APPLIANCE.
CONSUMER: RETAIN THIS MANUAL FOR FUTURE REFERENCE.
INSTALLATION AND
OPERATING INSTRUCTIONS
CERTIFIED UNDER CANADIAN AND AMERICAN NATIONAL STANDARDS: CR97-003, CAN1-2.21-M85, IAS U.S. 4-96.
PATIOFLAME
OUTDOOR GAS FIREPLACE
GPFGN
NATURAL GAS
GPFGP
PROPANE
CERTIFIED FOR CANADA AND UNITED STATES USING ANSI/CSA METHODS.
SAFETY INFORMATION
!
WARNING!
If the information in these instructions are
not followed exactly, a fire or explosion may
result causing property damage, personal
injury or loss of life.
Do not store or use gasoline or other
flammable vapors and liquids in the vicinity
of this or any other appliance.
WHAT TO DO IF YOU SMELL GAS:
• Do not try to light any appliance.
• Do not touch any electrical switch; do not
use any phone in your building.
• Immediately call your gas supplier from
a neighbour’s phone. Follow the gas
supplier’s instructions.
• If you cannot reach your gas supplier, call
the fire department.
Installation and service must be performed
by a qualified installer, service agency or
the supplier.
APPLY SERIAL NUMBER LABEL FROM CARTON
Serial No.
XXXXXX000000
MODEL NO.
Wolf Steel Ltd., 24 Napoleon Rd., Barrie, ON, L4M 4Y8 Canada /
103 Miller Drive, Crittenden, Kentucky, USA, 41030
Phone (705)721-1212 • Fax (705)722-6031 • www.napoleonfireplaces.com • [email protected]
N415-0232 AUG 18/10
2
NAPOLEON products are designed with superior components and materials, and are
assembled by trained craftsmen who take great pride in their work. Every component has
been thoroughly inspected by a qualified technician before packaging and shipping to
ensure that you, the customer, receive the quality product you expect from NAPOLEON.
NAPOLEON® GAS APPLIANCE 5 YEAR LIMITED WARRANTY
All stainless steel components of your new NAPOLEON® gas appliance are warranted
against defects for five years.
All parts such as gas valves, logs, glass embers, gasketing are covered and NAPOLEON®
will provide replacement parts free of charge during the first year of limited warranty.
Labour related to warranty repair is covered free of charge during the first year. Repair
work, however, requires the prior approval of an authorized company official. Labour costs
to the account of NAPOLEON® are based on a predetermined rate schedule and any repair
work must be done through an authorized NAPOLEON® dealer.
CONDITIONS AND LIMITATIONS
NAPOLEON® warrants its products against manufacturing defects to the original purchaser only. Registering your warranty is not necessary. Simply provide
your proof of purchase along with the model and serial number to make a warranty claim. NAPOLEON® reserves the right to have its representative inspect
any product or part thereof prior to honouring any warranty claim. Provided that the purchase was made through an authorized NAPOLEON® dealer your
heater is subject to the following conditions and limitations:
This limited warranty applies only while the unit remains at the site of original installation, and only if the unit is installed in Canada or the United States.
This factory warranty is non-transferable and may not be extended whatsoever by any of our representatives.
Installation must be done in accordance with the installation instructions included with the product and all local and national building and fire codes.
This limited warranty does not cover damages caused by misuse, lack of maintenance, accident, alterations, abuse or neglect and parts installed from other
manufacturers will nullify this warranty.
This limited warranty further does not cover any scratches, dents, corrosion or discoloring caused by excessive heat, abrasive and chemical cleaners, mechanical
breakage of logs and embers.
In the first year only, this warranty extends to the repair or replacement of warranted parts which are defective in material or workmanship provided that the
product has been operated in accordance with the operation instructions and under normal conditions.
After the first year, with respect to the President’s Limited Lifetime Warranty, NAPOLEON® may, at its discretion, fully discharge all obligations with respect to
this warranty by refunding to the original warranted purchaser the wholesale price of any warranted but defective parts).
After the first year, NAPOLEON® will not be responsible for installation, labour or any other costs or expenses related to the reinstallation of a warranted part,
and such expenses are not covered by this warranty.
Notwithstanding any provisions contained in the President’s Limited Lifetime Warranty, napoleon’s responsibility under this warranty is defined as above and it
shall not in any event extend to any incidental, consequential or indirect damages.
This warranty defines the obligations and liability of NAPOLEON® with respect to the NAPOLEON® gas appliance and any other warranties expressed or implied
with respect to this product, its components or accessories are excluded.
This limited warranty does not cover damages resulting from the use of components not supplied with the appliance, or the use of fuel other than those specified.
Any damages to appliance due to weather, long periods of dampness, condensation, damaging chemicals or cleaners will not be the responsibility of NAPOLEON®.
The bill of sale or copy will be required together with a serial number and a model number when making any warranty claims from your authorized dealer. The
warranty registration card must be returned within fourteen days to register the warranty.
NAPOLEON® reserves the right to have its representative inspect any product or part thereof prior to honouring any warranty claim.
ALL SPECIFICATIONS AND DESIGNS ARE SUBJECT TO CHANGE WITHOUT PRIOR NOTICE DUE TO ON-GOING PRODUCT IMPROVEMENTS. NAPOLEON® IS A REGISTERED
TRADEMARK OF WOLF STEEL LTD. PATENTS U.S. 5.303.693.801 - CAN. 2.073.411, 2.082.915. © WOLF STEEL LTD.
www.napoleonfireplaces.com
3
WARNING! For Outdoor Use Only.
WARNING! Improper installation, adjustment, alteration, service or maintenance can
cause injury or property damage. Read the installation, operating and maintenance
instructions thoroughly before installing or servicing this gas patio flame.
SAFE OPERATING PRACTICES
•
•
•
•
•
•
•
•
•
•
•
•
•
•
•
•
•
•
•
•
•
•
•
•
•
•
•
•
THIS APPLIANCE IS HOT WHEN OPERATED AND CAN CAUSE SEVERE BURNS IF CONTACTED.
Installation and repair should be done by a qualified service person. The appliance should be inspected
before use and at least annually by a qualified service person. More frequent cleaning may be required as
necessary. It is imperative the control compartment, burners and circulating air passageways of the appliance
be kept clean.
Do not operate appliance before reading and understanding operating instructions. Failure to operate
appliance according to operating instructions could cause fire or injury.
Risk of burns. The appliance should be turned off and cooled before servicing.
Do not install damaged, incomplete or substitute components.
Young children should be carefully supervised when they are in the vicinity of the appliance. Toddlers,
young children and others may be susceptible to accidental contact burns. A physical barrier is recommended
if there are at risk individuals in the house. To restrict access to an appliance or stove, install an adjustable
safety gate to keep toddlers, young children and other at risk individuals out of the vicinity and away from
hot surfaces.
Ensure you have incorporated adequate safety measure to protect infants/toddlers from touching hot
surfaces.
Under no circumstances should this appliance be modified.
Keep the packaging material out of reach of children and dispose of the material in a safe manner. As with
all plastic bags, these are not toys and should be kept away from children and infants.
Do not leave appliance unattended when in use.
For Outdoor use only.
This appliance must not be used for cooking.
This unit is not for use with solid fuel.
Improper installation, adjustment, alteration, service, or maintenance can cause injury or property damage.
Read the installation, operating and maintenance instructions thoroughly before installing or servicing this
equipment.
This appliance shall be used ONLY outdoors in a well-ventilated space and shall NOT be used inside a building,
garage, or any other enclosed area.
Cylinders must be stored outdoors in a well-ventilated area out of reach of children. Disconnected cylinders
must have threaded valve plugs tightly installed and must not be stored in a building, garage or any other
enclosed area.
Storage of this appliance indoors is permissible only if it has been disconnected from its fuel supply (natural
gas line or LP gas cylinder).
If it is evident there is excessive abrasion or wear, or the hose is cut, it must be replaced prior to the appliance
being put into operation.
Clothing or other flammable materials should not be hung from the appliance, or placed on or near the
appliance.
Any guard or other protective device removed for servicing the appliance must be replaced prior to operating
the appliance.
Inspect the fuel supply connection for signs of leakage (including the hose for LP models) before each use
of the appliance.
The pressure regulator and hose assembly supplied with LP models must be used. Replacement pressure
regulators and hose assemblies must be those specified in this manual.
The LP gas supply cylinder used with LP models must be constructed and marked in accordance with the
specifications for LP-gas cylinders as required by the U.S. Department of Transportation (DOT) or the Canadian
Transport Commission (CTC).
The LP gas cylinder supply system must be arranged for vapour withdrawal.
The LP-gas cylinder used must include a collar to protect the cylinder valve.
When an LP model is not in use, the LP-gas must be turned off at the supply cylinder.
To extend the life of your appliance, protect and cover it from the elements when not in use.
This product must be installed by a licensed plumber or gas fitter when installed within the commonwealth
of Massachusetts.
www.napoleonfireplaces.com
4
GENERAL INFORMATION
This appliance should be installed and serviced by a qualified installer to conform with local codes.
Installation practices vary from region to region and it is important to know the specifics that apply to your
area, for example: in Massachusetts State:
•
The appliance off valve must be a “T” handle gas cock.
•
The flexible connector must not be longer than 36 inches.
The installation must conform with local codes or in the absence of local codes, with the National Fuel Gas
Code ANSI Z223.1/INFPA 54 in the United States or CSA B149.1, Natural and Propane Installation code in
Canada.
The appliance and its individual shut off valve must be disconnected from the gas supply piping system during
any pressure testing of the system at test pressures in excess of 1/2 psig (3.5kPa).
This appliance must be isolated from the gas supply piping system by closing its individual manual shut off valve
during any pressure testing of the gas supply piping system at test pressures equal to or less than 1/2 psig (3.5kPa).
The following clearances to combustible materials must be maintained:
Sides (all around) - 24 inches (610mm)
Top - 72 inches (1.830m)
•
Always keep the appliance area clear and free from combustible materials, gasoline, and other flammable
vapours and liquids.
•
Do not locate appliance where it can get excessively
wet.
•
Do not use this appliance if any part has been
under water. Immediately call a qualified service
technician to inspect the unit and to replace any
part of the control system and any gas control
which has been underwater.
www.napoleonfireplaces.com
5
SPECIFICATIONS
DIMENSIONS
GAS INLET PRESSURES
INPUT
MODEL
FUEL
MAX. INPUT Btu/Hr
NATURAL
PROPANE
GPFN
Natural Gas
60, 000
Minimum Inlet Pressure
4.5" w.c.
11.0" w.c.
GPFP
Propane Gas
60, 000
Maximum Inlet Pressure
14.0" w.c.
14.0" w.c.
MINIMUM CLEARANCE TO COMBUSTIBLES
INCHES
MM
Side Walls
24
610
Top of unit to ceiling
72
1830
www.napoleonfireplaces.com
6
INSTALLATION
wARNING! When the appliance is being used with the optional tripod, it must not be situated on a
combustible surface, nor can it be located below a combustible overhang.
The glass embers and the burner assembly are shipped together.
• Remove the glass embers and burner assembly and check for damage. DO NOT install damaged components.
The glass embers may have sharp edges, wear safety glasses and gloves when handling.
• Place the appliance on a level/secure surface in desired location. This location must be adjacent to the
gas supply line or cylinder.
NOTE: Minimum clearances to combustible construction must be maintained, see "SPECIFICATIONS" section.
WARNING! You must have clear and easy access to the on/off valve AFTER the appliance is installed
and connected to the gas supply in order to safely turn off the burner.
THE ON/OFF GAS VALVE IS USED TO TURN THE BURNER ON AND OFF.
NATURAL GAS
Connect the incoming gas supply line to the on/off gas valve of the appliance. Make certain ALL gas connections are
tight, turn the on/off valve at the unit slowly to the on position and use soapy water to test for leaks as indicated in
the diagrams.
DO NOT USE AN OPEN FLAME.
Burner Assembly
Manual Gas
Valve (on/off)
LP (PROPANE) GAS
Attach cylinder retaining bracket supplied to the base of the cylinder. Then secure to the surface to which it
sits. Cylinder should be on a level surface.
This appliance has been designed for use with a 20lb. (9.1kg) or a 30lb (13.6kg) size propane cylinder only
(not supplied).
• Make sure cylinder valve is in its full off position. (Turn clockwise to stop).
• Check cylinder valve features to ensure it has proper external mating threads. (Cylinder Valve Marked:
USE WITH TYPE 1)
• Inspect hose shipped with the unit for damage. Never attempt to use damaged or plugged equipment. See
your local LP Gas Dealer for repairs.
• After inspecting the LP hose shipped with the unit, connect the end with the female fitting on the hose to
the male fitting on the on/off gas valve at the end of the flex tube. Tighten fittings using 2 wrenches.
• When connecting regulator assembly to the cylinder valve, hand tighten black QCC1 nut clockwise to a
positive stop. DO NOT use a wrench to tighten. Use of a wrench may damage the quick closing coupling
nut and result in a hazardous condition.
• Locate the hose out of pathways where people may trip over it or in areas where the hose may be subject
to accidental damage.
• Open cylinder valve fully (counter-clockwise). Turn the on/off valve at the unit slowly to the on position
and use a soapy water solution to check all connections for leaks as indicated in the diagrams before
attempting to light the appliance. If a leak is found, turn tank valve off and do not use the appliance until
repairs can be made.
DO NOT USE AN OPEN FLAME.
Burner Assembly
Manual Gas
Valve (on/off)
Cylinder Retaining
Bracket
www.napoleonfireplaces.com
7
ENCLOSURES FOR LP GAS SUPPLY SYSTEMS
WARNING! During the initial purging and subsequent lightings, NEVER allow gas valve to remain in
the “Open” position without first placing and igniting the firestarter.
If you build an enclosure for an LP gas cylinder, follow these recommended specifications. You must also
follow local codes.
•
Enclosures for LP gas supply cylinders shall be ventilated by openings at the level of the cylinder valve and
at floor level. The effectiveness of the opening(s) for purposes of ventilation shall be determined with the
LP gas supply cylinder(s) in place. This shall be accomplished by one of the following:
One side of the enclosure shall be completely open;
OR
For an enclosure having four sides, a top and bottom:
a) At least two ventilation openings at cylinder valve level shall be provided in the side wall, equally sized,
spaced at 180 degrees (3.14 rad), and unobstructed. Each opening shall have a total free area of not less than
½ square inch per pound (3.2 sq. cm/kg) of stored fuel capacity and not less than a total free area of 10 square
inches (64.5 sq. cm).
b) Ventilation opening(s) shall be provided at floor level and shall have a total free area of not less than ½ inch
per pound (3.2 sq. cm/kg) of stored fuel capacity and not less than a total free area of 10 square inches
(64.5 sq. cm). If ventilation openings at floor level are in a side wall, there shall be at least two openings. The
bottom of the openings shall be at floor level and the upper edge no more than 5 inches (127mm) above the
floor. The openings shall be equally sized, spaced at 180 degrees (3.14 rad) and unobstructed.
c) Every opening shall have minimum dimensions so as to permit the entrance of a 1/8 inch (3.2mm) diameter
rod.
•
Cylinder valves shall be readily accessible for hand operation. A door on the enclosure to gain access to
the cylinder valve is acceptable, provided it is
QCC1
non-locking and can be opened without the
use of tools.
•
There shall be a minimum clearance of 2 inches
(50.8mm) between the lower surface of the
floor of the LP gas supply cylinder enclosure
and the ground.
Propane Regulator
Hose
Manual Gas
Valve (on/off)
•
Natural Gas
The design of the enclosure shall be such
Cylinder Retaining Supply Line
Bracket
that (1) the LP gas supply cylinder(s) can be
(not supplied)
connected, disconnected and the connections
inspected and tested outside the cylinder enclosure; and (2) those connections which could be disturbed
when installing the cylinder(s) in the enclosure can be leak tested inside the enclosure.
•
Be certain to mount or set the LP gas cylinder on a flat surface and restrain it to prevent it from tipping.
•
Purge the gas supply line of any trapped air prior to the first firing of the unit.
CYLINDER RETAINING BRACKET
1. Fasten the bracket to the bottom of the propane bottle using bolt
and nut supplied.
2. Tighten the lag screw into the mounting surface leaving
approximately 1/4” of thread above the surface.
SE
E THRU
3. Slide propane bottle into position so that the bracket slides under
the head of the lag screw.
4. Tighten the lag screw onto the bracket.
5. For fastening to a concrete surface a concrete anchor will be required.
(Not supplied)
www.napoleonfireplaces.com
8
FINISHING
GLASS MEDIA INSTALLATION
WARNING! Glass embers may have sharp edges, wear safety glasses and gloves when handling.
Do not change or substitute the glass ember material provided with this fireplace. If replacing, use only
replacement glass embers available from your local authorized dealer / distributor.
WARNING! Glass embers may have a fine oil residue that needs to be cleaned prior to installation.
Clean the glass with mild dish soap, drain, rinse thoroughly and dry before installing
1. Carefully pour the appliance glass media onto the appliance log support as shown.
2. Spread the glass evenly over the pan burner. The distribution of clear glass over the burner pan will influence
flame height.
OPTIONAL MKR ROCK INSTALLATION
WARNING!
Real rocks must not be used in this appliance. Heat will cause them to explode.
1. Remove the glass media from your appliance.
2. Place the 4 notched rocks and 2 clusters on the edge of the burner pan as shown, making sure not to cover any ports.
3. Place the remaining refractory rocks on and around the burner as desired. (There are not set locations).
4. Spread the lava rock removed in Step 1 and evenly distribute it around the rocks.
Notched
Rock
www.napoleonfireplaces.com
9
OPERATION
WARNING! If you do not follow these instructions exactly a fire or explosion may result causing property
damage, personal injury or loss of life.
Upon completing the gas line connection, a small amount of air will be in the lines. When first lighting the
burner, it will take a few seconds for the lines to purge themselves of this air.
Once the purging is complete, the burner will light and operate as indicated in the instruction manual. Subsequent
lighting of the appliance will not require such pruging unless the gas supply has been disconnected.
FOR YOUR SAFETY READ BEFORE LIGHTING:
A. This appliance must be lit by hand while following these instructions exactly.
B. Before operating smell all around the appliance area for gas and next to the floor because some gas is
heavier than air and will settle on the floor.
C. Use only your hand to turn the manual gas control valve. Never use tools. If the valve will not turn by hand,
do not try to repair it. Call a qualified service technician. Force or attempted repair may result in a fire or
explosion.
D. Do not use this appliance if any part has been under water. Immediately call a qualified service technician to
inspect the appliance and replace any part of the control system and any gas control which has been underwater.
WHAT TO DO IF YOU SMELL GAS:
•
Do not try to light any appliance.
•
Do not touch any electric switch; Do not use any phone in your building.
•
Immediately call your gas supplier from a neighbour’s phone. Follow the gas supplier’s instructions.
•
If you cannot reach your gas supplier, call the fire department.
LIGHTING INSTRUCTIONS:
1. Locate the manual gas control valve.
2. Place the firestarter near the burner ports on top of the burner. Light the firestarter. For a Natural Gas unit,
turn on the ON/OFF valve slowly at the unit. For a LP unit, turn the valve in the LP tank counter clockwise all
the way and then turn on the ON/OFF valve slowly at the unit.
3. If the burner does not light before the fire starter goes out, immediately turn the gas off.
4. Wait at least five (5) minutes to clear out any gas. Then smell for gas including near the base of the unit. If you
smell gas, STOP! Refer to the safety information in the owner’s manual. If you don’t smell gas, repeat step 2.
TO TURN OFF GAS:
Turn the ON/OFF valve to the off position at the unit for Natural Gas unit.
For LP unit, turn the ON/Off valve to the off postion at the unit and then turn the valve on the LP tank to the
OFF position clockwise.
Note: The propane regulator in this appliance is equipped with a low flow protection device. Unless the
propane cylinder valve is opened before the appliance valve, the gas flow will be reduced resulting in a very
small flame. To reset this device, shut off the appliance valve, then the propane cylinder valve. Next, diconnect
the regulator adaptor from the tank and then reconnect. Follow the lighting procedure ensuring the propane
cylinder valve is opened before the unit is.
www.napoleonfireplaces.com
10
MAINTENANCE
•
The appliance should be inspected before initial use and
inspected and cleaned at least annually by a qualified field
service person.
•
Tampering is DANGEROUS and voids all warranties. Any
component that is found to be faulty, must be replaced with
an approved component.
•
To obtain proper operation, it is imperative that the burner
flame characteristics are steady, not lifting or floating. Check
the burner flame patterns with the image.
•
Periodically remove the glass embers and examine the burner.
If dirty, clean with a soft brush. Also examine the area
around the burner air shutter. Any dirt or foreign material,
such as spider webs or nests, in this area should be removed.
This will ensure long life and trouble free operation. When the appliance is put back in service, check the
burner flame patterns with the image. Reinstall the glass embers as shown in the glass media installation.
•
Periodically check the hose connecting the LP gas cylinder to ensure it is not damaged in any way.
During the winter months in cold weather climates, it is recommended to disconnect the Patioflame and
store it in a cool dry place. Do not store the propane tank inside. For the remainder of the year, protect and
cover your Patioflame from rain, freezing rain and snow.
HIGH ELEVATION INSTALLATION
This listed gas appliance is tested and approved for elevations from 0 to 4500 feet in Canada and the U.S.
When installing this appliance at an elevation above 4500 feet (in the U.S.), it may be necessary to decrease
the input rating by changing the existing burner orifice to a smaller size. Input should be reduced four percent
(4%) for each 1,000 feet beyond the 4,500 feet above sea level, unless the heating value of the gas has been
reduced, in which case this general rule will not apply. To identify the proper orifice size, check with the local
gas utility.
When installing this unit at an elevation above 4,500 feet (in Canada), check with local authorities.
Consult your local gas utility for assistance in determining the proper orifice for your location.
CLEANING STAINLESS STEEL
Stainless steel tends to oxidize or stain in the presence of chlorides and sulfides, particularly in coastal areas
and other harsh environments, such as the warm, highly humid atmosphere around pools and hot tubs. These
stains could be perceived as rust, but can be easily removed or prevented. To provide stain prevention and
removal, wash all stainless steel surfaces every 3-4 weeks or as often as required with fresh water and/or
stainless steel cleaner.
Cleaning The Stainless Steel Surface: Do not use abrasive cleaners or steel wool on the stainless steel parts.
Doing so will scratch the finish. Surfaces should be cleaned with warm soapy water while the metal is still
warm to the touch. To clean stainless surfaces, use a stainless steel or non-abrasive cleaner. Always wipe in
the direction of the grain. Over time, stainless steel parts discolour when heated, usually to a golden or brown
hue. This discolouration is normal and does not affect the performance of the appliance.
www.napoleonfireplaces.com
11
REPLACEMENTS
Contact your dealer or the factory for questions concerning prices and policies on replacement parts. Normally
all parts can be ordered through your Authorized dealer / distributor.
FOR WARRANTY REPLACEMENT PARTS, A PHOTOCOPY OF THE ORIGINAL INVOICE WILL BE REQUIRED TO
HONOUR THE CLAIM.
When ordering replacement parts always give the following information:
•
Model & Serial Number of appliance
•
Installation date of appliance
•
Part number
•
Description of part
•
Finish
* IDENTIFIES ITEMS WHICH ARE NOT ILLUSTRATED. FOR FURTHER INFORMATION, CONTACT YOUR AUTHORIZED
DEALER.
WARNING! Failure to position the parts in accordance with this manual or failure to use only parts
specifically approved with this appliance may result in property damage or personal injury.
COMPONENTS
REF
1
2
3
4
5
6
7
8
9
PART NO.
QA-047
W655-0176
W010-1030
W080-0618
W455-0076
W455-0077
W455-0079
W455-0080
N300-0002
W175-0210
W530-0023
W530-0024
DESCRIPTION
OUTER BASE
LOG SUPPORT
BURNER ASSEMBLY
ORIFICE BRACKET
PROPANE ORIFICE - #43
NATURAL GAS ORIFICE - #25
#60 ORIFICE, “blank” (NG)
#60 ORIFICE, “blank” (LP)
GLASS EMBERS - BRONZE
FLEX c/w SHUT OFF - STAINLESS STEEL
PROPANE REGULATOR / HOSE ASSEMBLY (LP UNITS ONLY)
NG REGULATOR (NG UNITS ONLY)
ACCESSORIES
REF
10
*
*
*
*
PART NO.
W320-0014
N345-0001
PFS
PFT
PFTT-GK
DESCRIPTION
WIRE GUARD
NATURAL GAS HOSE 10FT
SAFETY SCREEN
PATIO FLAME TABLE
GRANITE TABLE TOP
www.napoleonfireplaces.com
12
3
10
4
8
5
9
7
6
2
1
www.napoleonfireplaces.com
13
SERVICE HISTORY
43.1
www.napoleonfireplaces.com
14
Notes
44.1
www.napoleonfireplaces.com