1
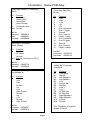
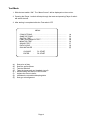
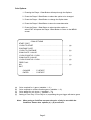
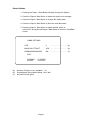
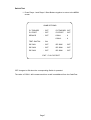
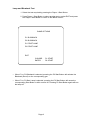
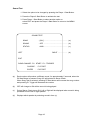
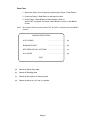
POINT BLANK 3 KIT CONNECTIONS AND TEST ROUTINE Part No 90500122 Issue 1 This kit comprises of the following items: Quantity 1 1 1 1 1 1 1 Description Point Blank 3 System 11 PCB Assembly Point Blank 3 Universal Header Decal Point Blank 3 Universal Instruction Decal Gun Assembly - Red Gun Assembly - Blue 20way JAE Connector - PS-D4C20 with wires Connection / Test Manual Page 2 Part No XPB3-GAMEPCB 40000645 40000646 XPB-GUNRED XPB-GUNBLUE 69200065 90500122 Connectors - Game PCB Assy 15way High Density D Connector (Video) 15way Amp Mini Plug (Guns) Pin 1 2 3 5 13 Shell Pin 1 2 3 4 5 6 7 8 9 10 11 12 13 14 15 Function Video Red Video Green Video Blue Video Ground Composite Sync Screen Part No Connector Case Terminals 66000013 66000001 66500008 3way Amp EI Connector (Game Control) Pin Function 1 1P Game 2 2P Game 3 Ground (Pin 1 Must be connected to Pin 3) Part No Connector Terminals Part No Connector Terminals 66000710 66500024 Pin A1 B1 A2 B2 B5 A6 B6 A7 B7 A8 B8 A9 B9 A10 B10 Function +5v +12v +24v Ground +5v +12v +24v Ground Ground +5v +12v Ground +24v Ground Part No Connector Terminals 66000668 66500014 20way JAE Connector (Switches) 12way Amp Mini Plug (Low Voltage In) Pin 1 2 3 4 5 6 7 8 9 10 11 12 Function +24v +24v +12v +5v +5v Gun 1 Solenoid Gun 1 Trigger Ground Gun 1 Sensor Player 1 Lamp Gun 2 Solenoid Gun 2 Trigger Ground Gun 2 Sensor Player 2 Lamp Function Coin Meter Ground Left Speaker + Left Speaker +12v Service Sw Test Sw Coin 1 Coin 2 1P Start Sw 2P Start Sw Right Speaker + Right Speaker Ground Ground This Connector is Supplied as part of the Kit 66000667 66500014 Page 3 Test Mode 1. Slide the test switch ON. The Menu Screen will be displayed on the monitor. 2. Pressing the Player 1 switch will step through the tests and pressing Player 2 switch will select the test. 3. After testing is completed slide the Test switch OFF. MENU COIN OPTIONS .......................................................................... GAME OPTIONS ........................................................................ SWITCH TEST ........................................................................... LAMP & BLOWBACK TEST ....................................................... MONITOR TEST ......................................................................... SOUND TEST ............................................................................. DATA CLEAR .............................................................................. GUN INITIALIZE ......................................................................... CHOOSE ENTER (a) (b) (c) (d) (e ) (f) (g) (h) : : P1 START P2 START Sets price of play. Sets the game options. Test the switches. Tests the lamps and gun blowback (recoil). Allows testing and set-up of the monitor. Adjusts the sound volume. Initializes the stored bookkeeping data. Sets gun aim alignment Page 4 (a) (b) (c) (d) (e) (f) (g) (h) Coin Options 1. Pressing the Player 1 Start Button will step through the Options. 2. Press the Player 2 Start Button to select the option to be changed. 3. Press the Player 1 Start Button to change the Option data. 4. Press the Player 2 Start Button to store the new data value. 5. Press the Player 1 Start Button to select another option or select EXIT and press the Player 2 Start Button to return to the MENU screen. COIN OPTIONS START COST: 1 COIN TO START ............................................................. (a) CONTINUE COST: 1 COIN TO CONTINUE ............................................................. (b) COIN CHUTE 1 VALUE: 1 COIN COUNT AS 1 COIN ............................................................ (c) COIN CHUTE 2 VALUE: 1 COIN COUNT AS 1 COIN ............................................................ (d) FREE PLAY: NO ............................................................. (e) EXIT CHOOSE ENTER (a) (b) (c) (d) (e) : : P1 START P2 START Coins required for 1 game. (settable 1 ~ 9.) Coins required to continue another game. (settable 1 ~ 9) Coins added for coin chute 1. (settable 1 ~ 9) Coins added for coin chute 2. (settable 1 ~ 9) Setting of Free Play. If Free Play is on, squeezing the gun trigger will start a game. Note: When using a CashFlow acceptor the price of play is set within the CashFlow. Ensure that options (a) ~ (d) are set at 1. Page 5 Game Options 1. Pressing the Player 1 Start Button will step through the Options. 2. Press the Player 2 Start Button to select the option to be changed. 3. Press the Player 1 Start Button to change the Option data. 4. Press the Player 2 Start Button to store the new data value. 5. Press the Player 1 Start Button to select another option or select EXIT and press the Player 2 Start Button to return to the MENU screen. GAME OPTIONS LIFE : 3 .................................... (a) MUSIC IN ATTRACT : YES .................................... (b) RANKINGPASSWORD : ON .................................... (c) EXIT CHOOSE : ENTER : (a) (b) (c) P1 START P2 START Number of Player Lives. (settable 1 ~ 5) Sound played during Attract Mode. (Yes / No) Not used on this game Page 6 Switch Test 1. Press Player 1 and Player 2 Start Buttons together to return to the MENU screen GAME OPTIONS P1 TRIGGER : OFF P2 TRIGGER: OFF P1 START : OFF P2 START : OFF SERVICE : OFF COIN 1 : 0 COIN 2 : 0 TEST SWITCH : ON DIP SW1 : OFF DIP SW5 : OFF DIP SW2 : OFF DIP SW6 : OFF DIP SW3 : OFF DIP SW6 : OFF EXIT : P1 & P2 START OFF changes to ON when the corresponding Switch is operated. The value of COIN 1 will increase each time credit is established from the CashFlow. Page 7 Lamp and Blowback Test 1. Select the test required by pressing the Player 1 Start Button. 2 . Press Player 1 Start Button to select another test or select EXIT and press the Player 2 Start Button to return to the MENU screen. GAME OPTIONS P1 BLOWBACK P2 BLOWBACK P1 START LAMP P2 START LAMP EXIT CHOOSE : ENTER : P1 START P2 START When P1 or P2 Blowback is selected, pressing the P2 Start Button will activate the Blowback (Recoil) on the corresponding gun. When P1 or P2 Start Lamp is selected, pressing the P2 Start Button will cause the corresponding Start Button to blink on and off. Pressing P2 Start Button again will turn the lamp off. Page 8 Monitor Test On entering Monitor Test from the Menu screen a Colour Bar is displayed on the monitor. Pressing P1 Start Button will toggle between the Colour Bar screen and a Convergence (crosshatch) screen. COLOUR BAR Four colour bars are displayed (white, red , green, and Blue) with gradations. Change the number of gradation steps (32,16,8,4,and 2) by pressing the P2 Start Button COLOUR BAR Colour bar - White Colour bar - Red Colour bar - Green Colour bar - Blue NEXT COLOUR TEST EXIT : P1 START : P1 &P2 START CONVERGENCE (Crosshatch pattern) A single colour crosshatch pattern is displayed. Change the colour of the crosshatch pattern (White, Red, Green and Blue) by pressing the P2 Start Button Press P1 and P2 Start Buttons together to return to the MENU screen. CONVERGENCE NEXT COLOUR TEST EXIT : P1 START : P1 &P2 START Page 9 Sound Test 1. Select the option to be changed by pressing the Player 1 Start Button. 2. Press the Player 2 Start Button to activate the test. 3 . Press Player 1 Start Button to select another option or select EXIT and press the Player 2 Start Button to return to the MENU screen. SOUND TEST SONG : [001] .................................................. (a) SOUND : OFF ................................................... (b) STATUS : 0000 ................................................... (c) LEFT RIGHT .................... (d) EXIT SONG CHANGE : P2 START / P1 - TRIGGER CHOOSE : P1 START ENTER P2 START : (a) Each number will produce a different sound, for approximately 5 seconds, when the P2 Start Button is pressed. Song 001 will produce a Stereo Check. When Song Test is selected, pressing P2 Start button will increase the song number and pressing P1 Trigger will decrease the number. (b) OFF will change to ON will the sound is being played. (c) During Stereo Check (song 001) Left or Right will be displayed when sound is being produced from the left or right speaker. (d) Displays which speaker is producing sound in item (c) Page 10 Data Clear 1. Select the option to be changed by pressing the Player 1 Start Button. 2. Press the Player 2 Start Button to activate the reset. 3 . Press Player 1 Start Button to select another option or select EXIT and press the Player 2 Start Button to return to the MENU screen. Note: No changes will be stored unless EXIT & SAVE is selected from the MENU Screen. BACKUP DATA CLEAR A.D.S.CLEAR ........................................ (a) RANKING CLEAR ........................................ (b) SET DEFAULTS ALL OPTIONS ........................................ (c) ALL CLEAR ........................................ (d) EXIT (a) Resets all Game Play data. (b) Resets all Ranking data. (c) Resets all test options to factory preset. (d) Resets all items (a), (b), and (c) together. Page 11 Gun Initialize This test MUST be carried out after replacing the Game PCB, ROMs, or Gun Assy. Failure to do so may cause incorrect game play. 1. Select GUN INITIALIZE from the test MENU screen. The following screen will be displayed. P1 GUN INITIALIZE ADJUST GUN SIGHT CHANGE GUN EXIT : P1 & P2 START : P1 START : P2 START 2. Aim and fire the gun. A will appear on the screen. If the appears where the gun was aimed, the gun sight is correct. If the does not appear where the gun was aimed press P1 Start Button. The following screen will be displayed. P1 GUN INITIALIZE EXIT : P1 & P2 START AIM AT CENTRE OF THE CROSS AND PULL GUN TRIGGER 3. Aim the gun at the centre of the cross and pull the trigger. The gun sight is set and the display will return to the previous test screen. Page 12 Note: Ensure that the gun is level and not slanted when aiming at the centre of the cross otherwise the initialization may not be correct. 4. Repeat step 3 to confirm gun alignment. 5. Press P2 Start Button to switch from P1 Gun to P2 Gun. 6. Repeat steps 3 and 4 to initialize Gun 2. 7. Press P1 and P2 Start Switches together to return to the MENU screen. Page 13 Copies of Namco Game Manuals can be downloaded from our website: www.namco.co.uk under Components Distribution For all Parts or Technical Support contact: Brent Spares, Namco House, Units 5-8, Acton Park Estate, The Vale, London. W3 7QE www.namco.co.uk For Technical Support, Warranty and Advance Replacement Parts:- +44 (0) 20 8324 6120 For Consumable Parts:- +44 (0) 20 8324 6102 Fax for both:- +44 (0) 20 8324 6126